child lock SUZUKI MARUTI 2005 1.G Owners Manual
[x] Cancel search | Manufacturer: SUZUKI, Model Year: 2005, Model line: MARUTI, Model: SUZUKI MARUTI 2005 1.GPages: 136, PDF Size: 2.93 MB
Page 12 of 136
Downloaded from www.Manualslib.com manuals search engine 1283K
BEFORE DRIVING
Keys ...................................................................................................................................... 4-1
Door Locks.......................................................................................................................... 4-2
Keyless Entry System Transmitter (if equipped)......................................................... 4-4
Mirrors................................................................................................................................ 4-13
Heated Rear Window Switch (if equipped).................................................................4-14
Front Seats........................................................................................................................ 4-14
Rear Seats......................................................................................................................... 4-16
Seat Belts and Child Restraint Systems.....................................................................4-18
Supplemental Restraint System (air bags) (if equipped).........................................4-24
Instrument Cluster (For Petrol & Diesel)....................................................................4-28
Warning and Indicator Lights........................................................................................4-29
Speedometer/Odometer/Trip meter/Meter Illumination Control................................4-34
Tachometer (if equipped)................................................................................................4-35
Fuel Gauge........................................................................................................................ 4-35
Lighting Control Lever....................................................................................................4-38
Front Fog Light Switch (if equipped)..........................................................................4-39
Rear Fog Light Switch (if equipped)............................................................................4-39
Headlight Leveling Switch.............................................................................................. 4-39
Turn Signal Control Lever.............................................................................................. 4-40
Hazard Warning Switch...................................................................................................4-40
Windshield Wiper and Washer Lever...........................................................................4-40
Rear Window Wiper/Washer Switch (if equipped).....................................................4-41
Tilt Steering Lock Lever (if equipped) ......................................................................... 4-42
Horn ..................................................................................................................................... 4-42
BEFORE DRIVING
Page 15 of 136
Downloaded from www.Manualslib.com manuals search engine 1583KNOTE:
Individual doors can also be UNLOCKED
anytime by using their respective "Door
Lock Knob" inside the vehicle.
If child proof locks are in locked position,
rear doors cannot be opened from inside.
w ww w
w WARNING
Be sure to place the child-proof lock
in the locked position whenever chil-
dren are seated in the rear.
BEFORE DRIVING
4-3
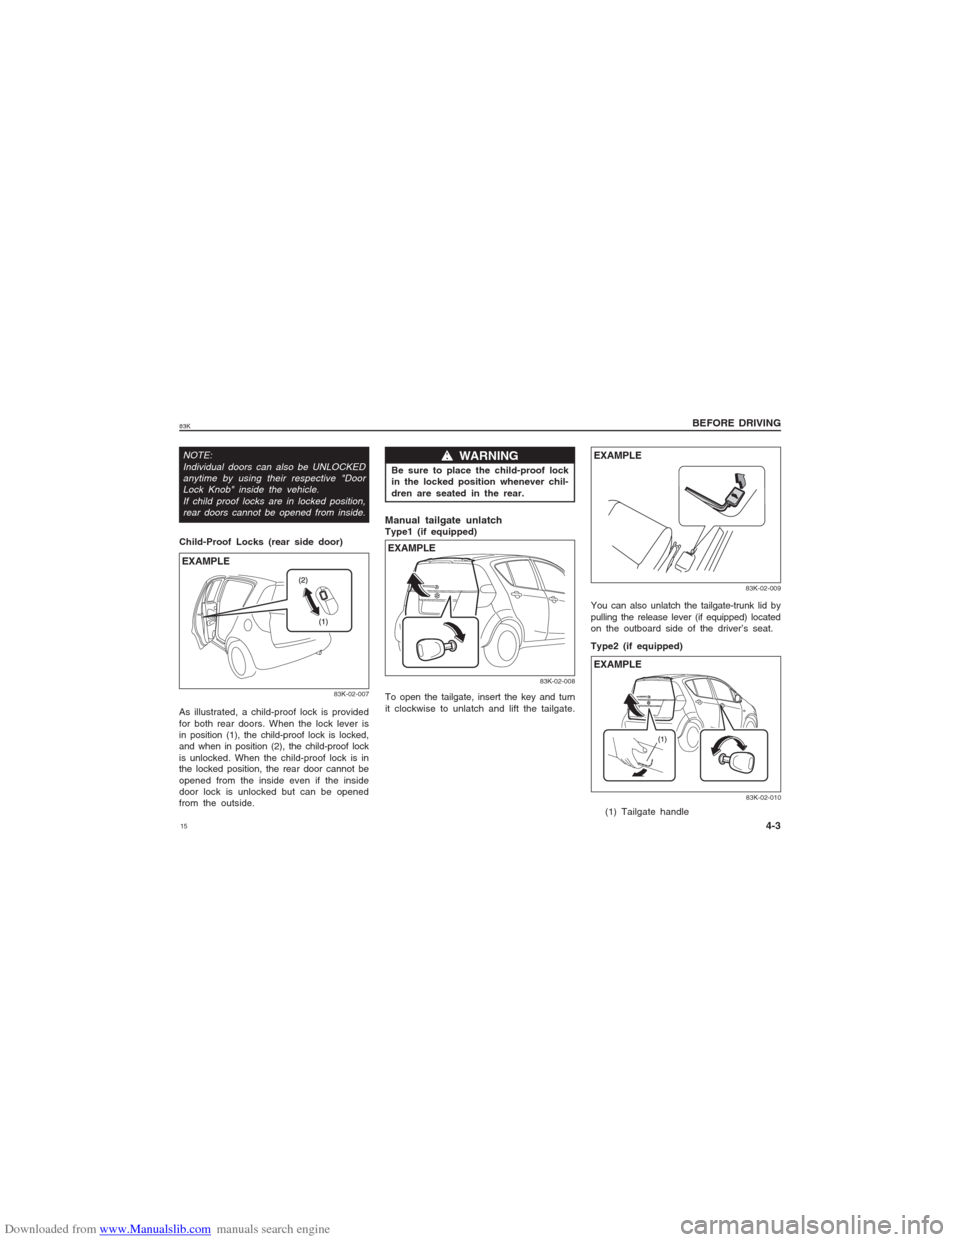
Child-Proof Locks (rear side door)
83K-02-007
EXAMPLEAs illustrated, a child-proof lock is provided
for both rear doors. When the lock lever is
in position (1), the child-proof lock is locked,
and when in position (2), the child-proof lock
is unlocked. When the child-proof lock is in
the locked position, the rear door cannot be
opened from the inside even if the inside
door lock is unlocked but can be opened
from the outside.
Manual tailgate unlatchType1 (if equipped)
83K-02-008
EXAMPLETo open the tailgate, insert the key and turn
it clockwise to unlatch and lift the tailgate.You can also unlatch the tailgate-trunk lid by
pulling the release lever (if equipped) located
on the outboard side of the driver’s seat.
Type2 (if equipped)
83K-02-00983K-02-010
EXAMPLE
EXAMPLE(1) Tailgate handle
Page 17 of 136
Downloaded from www.Manualslib.com manuals search engine 1783K
BEFORE DRIVING
4-5
Be sure the doors are locked after you
operate the “LOCK” button. If no door is
opened within about 30 seconds after the
“UNLOCK” button is operated, the doors will
automatically lock again.NOTE:
The maximum operating distance of the
keyless entry system transmitter is about
5 m (16 ft.), but this can vary depending
on the surroundings, especially near
other transmitting devices such as radio
towers or CB (citizen’s band).
The door locks can not be operated with
the transmitter if the ignition switch is in
a position other than “LOCK”, or the igni-
tion key is inserted in the ignition switch.
When any door is open, the door locks
can be operated only unlock with the
transmitter, and the turn signal light will
not flash.
If you lose one of the transmitters, con-
tact your MARUTI SUZUKI authorized
dealer as soon as possible for a replace-
ment. Be sure to have your dealer pro-
gram the new transmitter code in your
vehicle’s memory so that the old code
is erased.
CAUTION
The transmitter is a sensitive elec-
tronic instrument. To avoid damaging
the transmitter:
Do not expose it to impacts, mois-
ture or high temperature such as by
leaving it on the dashboard under
direct sunlight.
Keep the transmitter away from
magnetic objects such as a televi-
sion.
Replacement of the Battery
If the transmitter gets discharged, replace
the battery with a new one.
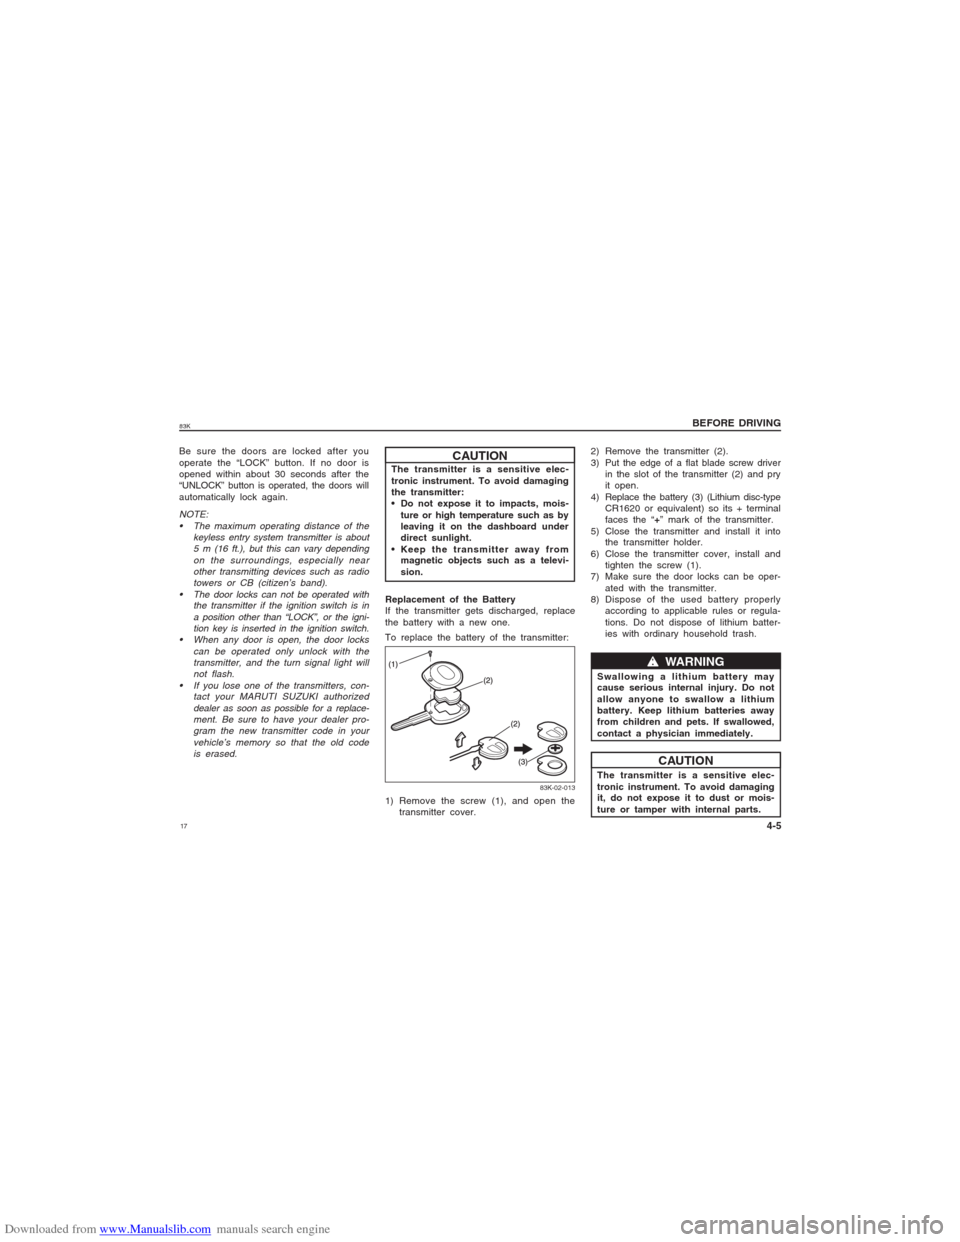
To replace the battery of the transmitter:
83K-02-013
1) Remove the screw (1), and open the
transmitter cover.2) Remove the transmitter (2).
3) Put the edge of a flat blade screw driver
in the slot of the transmitter (2) and pry
it open.
4) Replace the battery (3) (Lithium disc-type
CR1620 or equivalent) so its + terminal
faces the “+” mark of the transmitter.
5) Close the transmitter and install it into
the transmitter holder.
6) Close the transmitter cover, install and
tighten the screw (1).
7) Make sure the door locks can be oper-
ated with the transmitter.
8) Dispose of the used battery properly
according to applicable rules or regula-
tions. Do not dispose of lithium batter-
ies with ordinary household trash.
CAUTIONw ww w
w WARNING
Swallowing a lithium battery may
cause serious internal injury. Do not
allow anyone to swallow a lithium
battery. Keep lithium batteries away
from children and pets. If swallowed,
contact a physician immediately.
The transmitter is a sensitive elec-
tronic instrument. To avoid damaging
it, do not expose it to dust or mois-
ture or tamper with internal parts.
Page 25 of 136
Downloaded from www.Manualslib.com manuals search engine 2583K
BEFORE DRIVING
4-13
or (6). To restore normal operation, release
the lock switch by pushing again.
w ww w
w WARNING
You should always lock the passen-
ger’s window operation when there
are children in the vehicle. Children
can be seriously injured if they get
part of their body caught by the
window during operation.
To avoid injuring an occupant by
window entrapment, be sure no part
of the occupant’s body such as
hands or head is in the path of the
electric windows when closing them.
Always remove the ignition key
when leaving the vehicle even if a
short time. Also do not leave chil-
dren alone in a parked vehicle.
Unattended children could use the
electric window switches and get
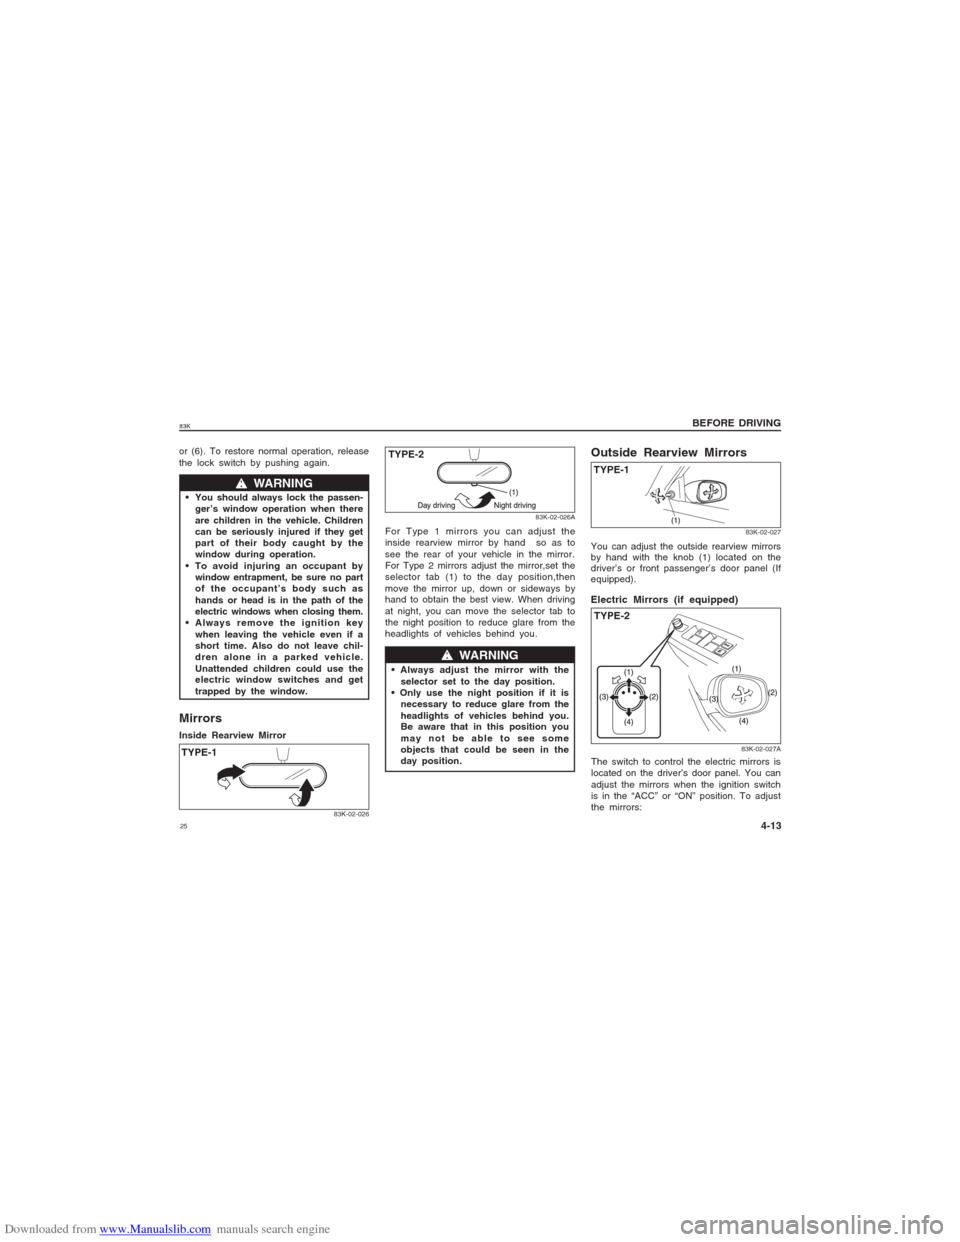
trapped by the window.MirrorsInside Rearview Mirror
83K-02-026
83K-02-026A
w ww w
w WARNING
selector set to the day position.
necessary to reduce glare from the
headlights of vehicles behind you.
Be aware that in this position you
may not be able to see some
objects that could be seen in the
day position.You can adjust the outside rearview mirrors
by hand with the knob (1) located on the
driver’s or front passenger’s door panel (If
equipped).
83K-02-027
Outside Rearview MirrorsTYPE-1
83K-02-027A
TYPE-2 Electric Mirrors (if equipped)The switch to control the electric mirrors is
located on the driver’s door panel. You can
adjust the mirrors when the ignition switch
is in the “ACC” or “ON” position. To adjust
the mirrors: For Type 1 mirrors you can adjust the
inside rearview mirror by hand so as to
see the rear of your vehicle in the mirror.
For Type 2 mirrors adjust the mirror,set the
selector tab (1) to the day position,then
move the mirror up, down or sideways by
hand to obtain the best view. When driving
at night, you can move the selector tab to
the night position to reduce glare from the
headlights of vehicles behind you.
TYPE-1TYPE-2
Page 28 of 136

Downloaded from www.Manualslib.com manuals search engine 2883K
BEFORE DRIVING
4-16
Rear SeatsAdjustable Head Restraints
(if equipped)
83K-02-034
To raise the rear head restraint, pull upward
on the restraint until it clicks. To lower the
restraint, push down on the restraint while
holding in the lock lever. If a head restraint
is required to be removed (for cleaning,
replacement, etc.), push in the lock lever
and pull the head restraint all the way out.
When installing a child restraint system,
raise the head restraint to the most upper
position.
Folding Rear Seats (if equipped)The rear seat(s) of your vehicle can be
folded forward to provide additional cargo
space.
To fold the rear seats forward:
1) Hook the webbing and the latch plate of
the outboard lap-shoulder belts in the
belt hangers.
83K-02-035
CAUTION
When you move a seatback, make
sure both the latch plate and the
belt webbing are hooked in the seat
belt hangers so the seat belts are
not caught by the seatback, seat
hinge, or seat latch. This helps pre-
vent damage to the belt system.
V
Front
To raise the front head restraint, pull
upward on the restraint until it clicks. To
lower the restraint, push down on the
restraint while holding in the lock lever. If
a head restraint must be removed (for
cleaning, replacement, etc.), push in the
lock lever and pull the head restraint all the
way out.
83K-02-033
EXAMPLE
Page 30 of 136
Downloaded from www.Manualslib.com manuals search engine 3083K
BEFORE DRIVING
4-18
w ww w
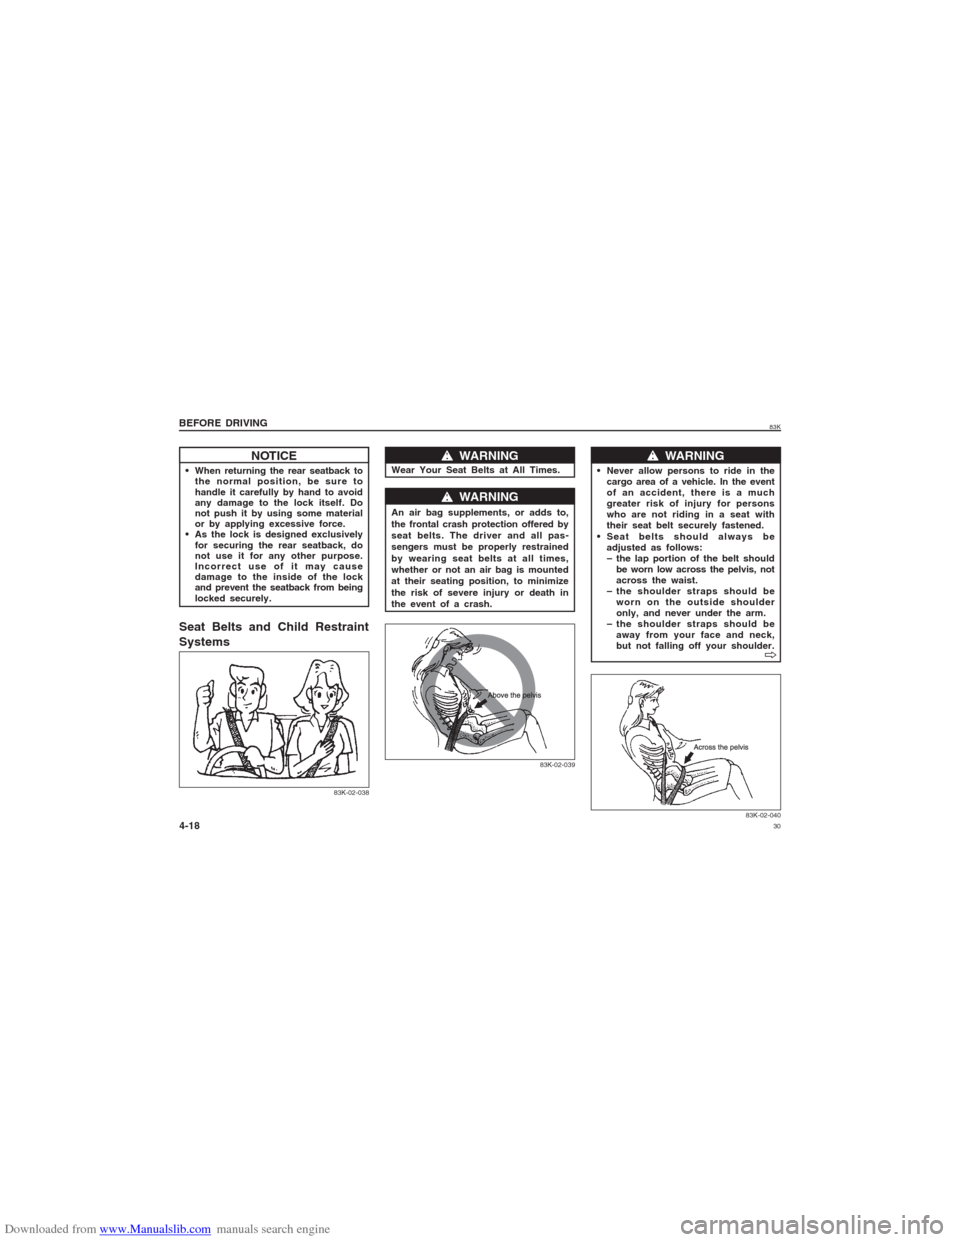
w WARNING
An air bag supplements, or adds to,
the frontal crash protection offered by
seat belts. The driver and all pas-
sengers must be properly restrained
by wearing seat belts at all times,
whether or not an air bag is mounted
at their seating position, to minimize
the risk of severe injury or death in
the event of a crash.
83K-02-039
w ww w
w WARNING
Never allow persons to ride in the
cargo area of a vehicle. In the event
of an accident, there is a much
greater risk of injury for persons
who are not riding in a seat with
their seat belt securely fastened.
Seat belts should always be
adjusted as follows:
– the lap portion of the belt should
be worn low across the pelvis, not
across the waist.
– the shoulder straps should be
worn on the outside shoulder
only, and never under the arm.
– the shoulder straps should be
away from your face and neck,
but not falling off your shoulder.
83K-02-040
NOTICE
When returning the rear seatback to
the normal position, be sure to
handle it carefully by hand to avoid
any damage to the lock itself. Do
not push it by using some material
or by applying excessive force.
As the lock is designed exclusively
for securing the rear seatback, do
not use it for any other purpose.
Incorrect use of it may cause
damage to the inside of the lock
and prevent the seatback from being
locked securely.Seat Belts and Child Restraint
Systems
w ww w
w WARNING
Wear Your Seat Belts at All Times.
83K-02-038
V VV V
V
Page 40 of 136
Downloaded from www.Manualslib.com manuals search engine 4083K
BEFORE DRIVING
4-28
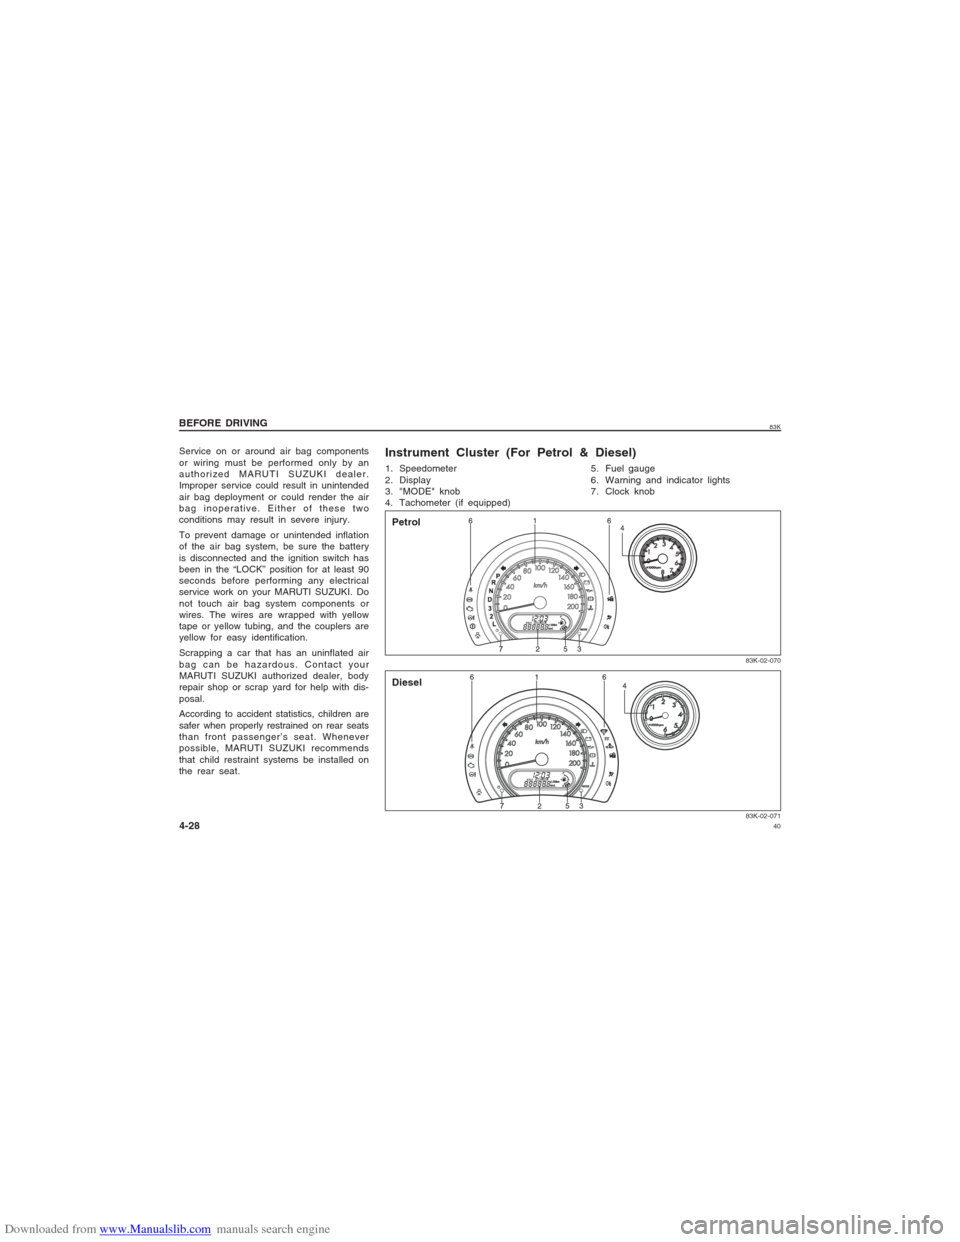
1. Speedometer
2. Display
3. "MODE" knob
4. Tachometer (if equipped)
83K-02-07183K-02-070
5. Fuel gauge
6. Warning and indicator lights
7. Clock knob
Instrument Cluster (For Petrol & Diesel)Petrol
Diesel
Service on or around air bag components
or wiring must be performed only by an
authorized MARUTI SUZUKI dealer.
Improper service could result in unintended
air bag deployment or could render the air
bag inoperative. Either of these two
conditions may result in severe injury.
To prevent damage or unintended inflation
of the air bag system, be sure the battery
is disconnected and the ignition switch has
been in the “LOCK” position for at least 90
seconds before performing any electrical
service work on your MARUTI SUZUKI. Do
not touch air bag system components or
wires. The wires are wrapped with yellow
tape or yellow tubing, and the couplers are
yellow for easy identification.
Scrapping a car that has an uninflated air
bag can be hazardous. Contact your
MARUTI SUZUKI authorized dealer, body
repair shop or scrap yard for help with dis-
posal.
According to accident statistics, children are
safer when properly restrained on rear seats
than front passenger’s seat. Whenever
possible, MARUTI SUZUKI recommends
that child restraint systems be installed on
the rear seat.
Page 58 of 136
Downloaded from www.Manualslib.com manuals search engine 5883K
w ww w
w WARNING
To avoid possible injury, do not oper-
ate controls by reaching through the
steering wheel.
83K-03-004
EXAMPLE OPERATING YOUR VEHICLE
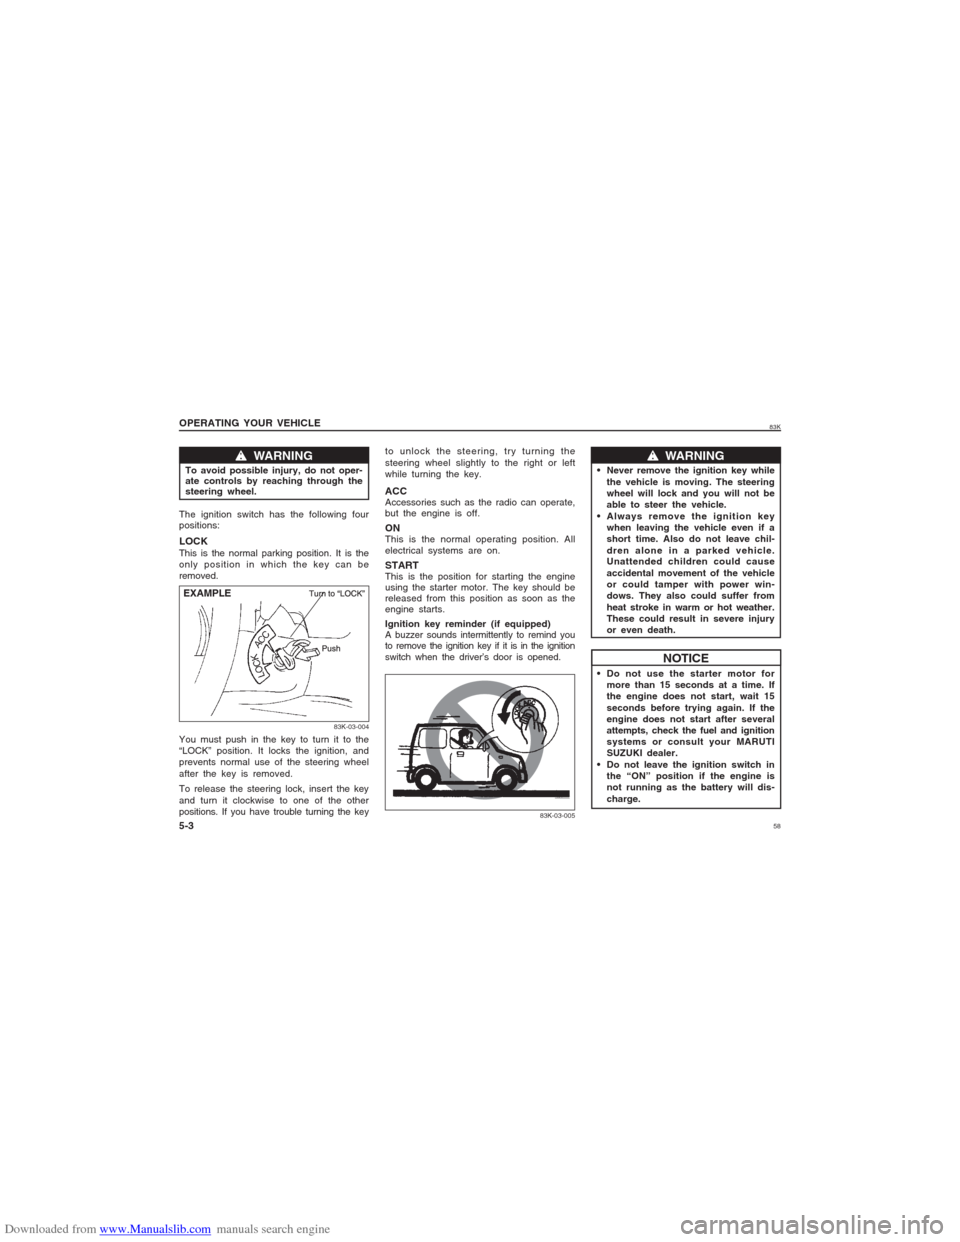
5-3The ignition switch has the following four
positions:LOCKThis is the normal parking position. It is the
only position in which the key can be
removed.
You must push in the key to turn it to the
“LOCK” position. It locks the ignition, and
prevents normal use of the steering wheel
after the key is removed.
To release the steering lock, insert the key
and turn it clockwise to one of the other
positions. If you have trouble turning the keyto unlock the steering, try turning the
steering wheel slightly to the right or left
while turning the key.
ACCAccessories such as the radio can operate,
but the engine is off.ONThis is the normal operating position. All
electrical systems are on.STARTThis is the position for starting the engine
using the starter motor. The key should be
released from this position as soon as the
engine starts.
Ignition key reminder (if equipped)
A buzzer sounds intermittently to remind you
to remove the ignition key if it is in the ignition
switch when the driver’s door is opened.
w ww w
w WARNING
Never remove the ignition key while
the vehicle is moving. The steering
wheel will lock and you will not be
able to steer the vehicle.
Always remove the ignition key
when leaving the vehicle even if a
short time. Also do not leave chil-
dren alone in a parked vehicle.
Unattended children could cause
accidental movement of the vehicle
or could tamper with power win-
dows. They also could suffer from
heat stroke in warm or hot weather.
These could result in severe injury
or even death.
NOTICE
Do not use the starter motor for
more than 15 seconds at a time. If
the engine does not start, wait 15
seconds before trying again. If the
engine does not start after several
attempts, check the fuel and ignition
systems or consult your MARUTI
SUZUKI dealer.
Do not leave the ignition switch in
the “ON” position if the engine is
not running as the battery will dis-
charge.
83K-03-005
Page 90 of 136
Downloaded from www.Manualslib.com manuals search engine 9083K
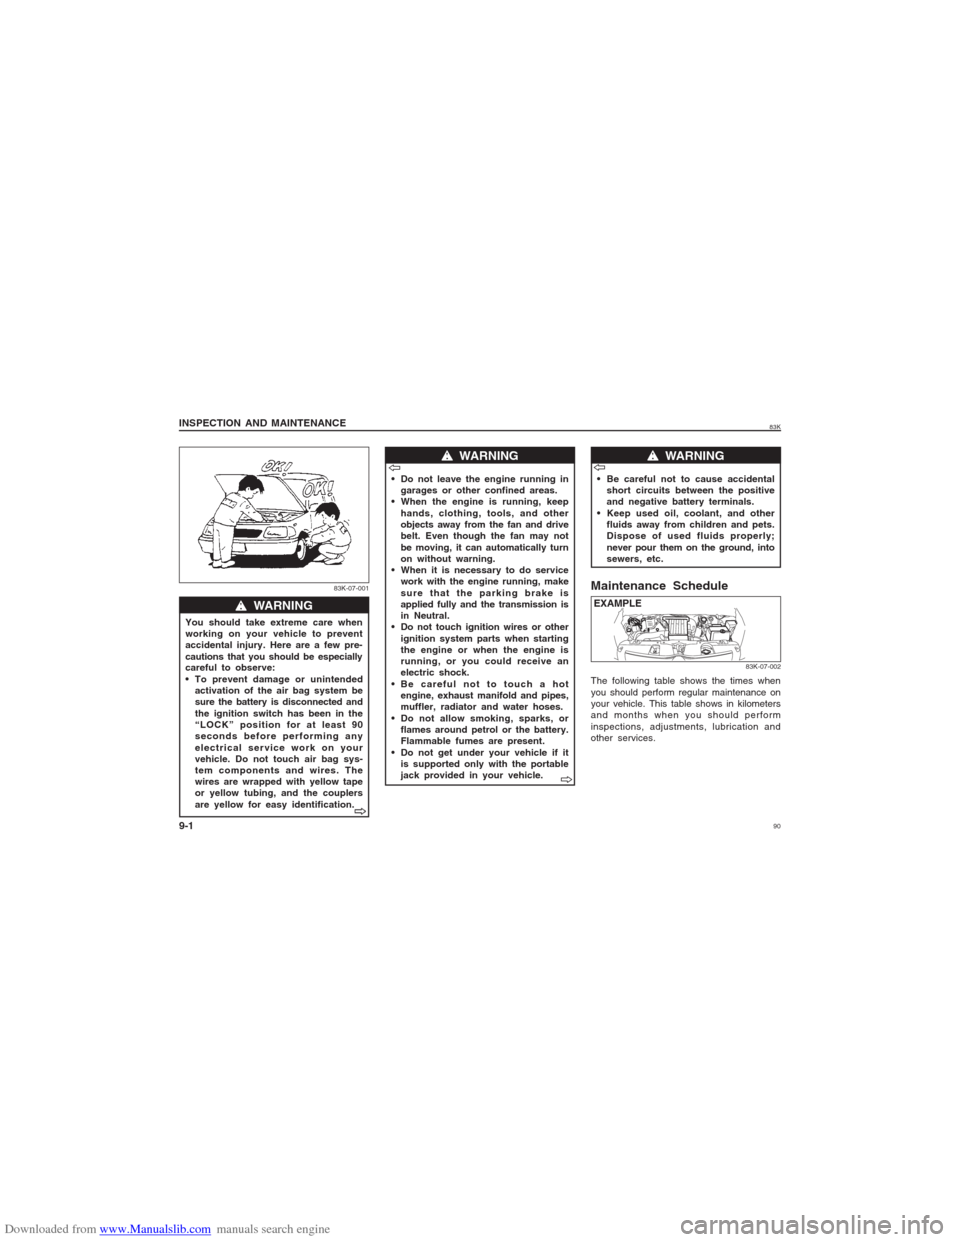
You should take extreme care when
working on your vehicle to prevent
accidental injury. Here are a few pre-
cautions that you should be especially
careful to observe:
To prevent damage or unintended
activation of the air bag system be
sure the battery is disconnected and
the ignition switch has been in the
“LOCK” position for at least 90
seconds before performing any
electrical service work on your
vehicle. Do not touch air bag sys-
tem components and wires. The
wires are wrapped with yellow tape
or yellow tubing, and the couplers
are yellow for easy identification.
w ww w
w WARNING
83K-07-001
w ww w
w WARNING
w ww w
w WARNING
INSPECTION AND MAINTENANCE
9-1
V VV V
V
Do not leave the engine running in
garages or other confined areas.
When the engine is running, keep
hands, clothing, tools, and other
objects away from the fan and drive
belt. Even though the fan may not
be moving, it can automatically turn
on without warning.
When it is necessary to do service
work with the engine running, make
sure that the parking brake is
applied fully and the transmission is
in Neutral.
Do not touch ignition wires or other
ignition system parts when starting
the engine or when the engine is
running, or you could receive an
electric shock.
Be careful not to touch a hot
engine, exhaust manifold and pipes,
muffler, radiator and water hoses.
Do not allow smoking, sparks, or
flames around petrol or the battery.
Flammable fumes are present.
Do not get under your vehicle if it
is supported only with the portable
jack provided in your vehicle.V VV V
V
V VV V
V
Be careful not to cause accidental
short circuits between the positive
and negative battery terminals.
Keep used oil, coolant, and other
fluids away from children and pets.
Dispose of used fluids properly;
never pour them on the ground, into
sewers, etc.V VV V
V
83K-07-002
Maintenance ScheduleThe following table shows the times when
you should perform regular maintenance on
your vehicle. This table shows in kilometers
and months when you should perform
inspections, adjustments, lubrication and
other services.EXAMPLE
Page 97 of 136
Downloaded from www.Manualslib.com manuals search engine 9783K
INSPECTION AND MAINTENANCE
9-8
83K-07-011
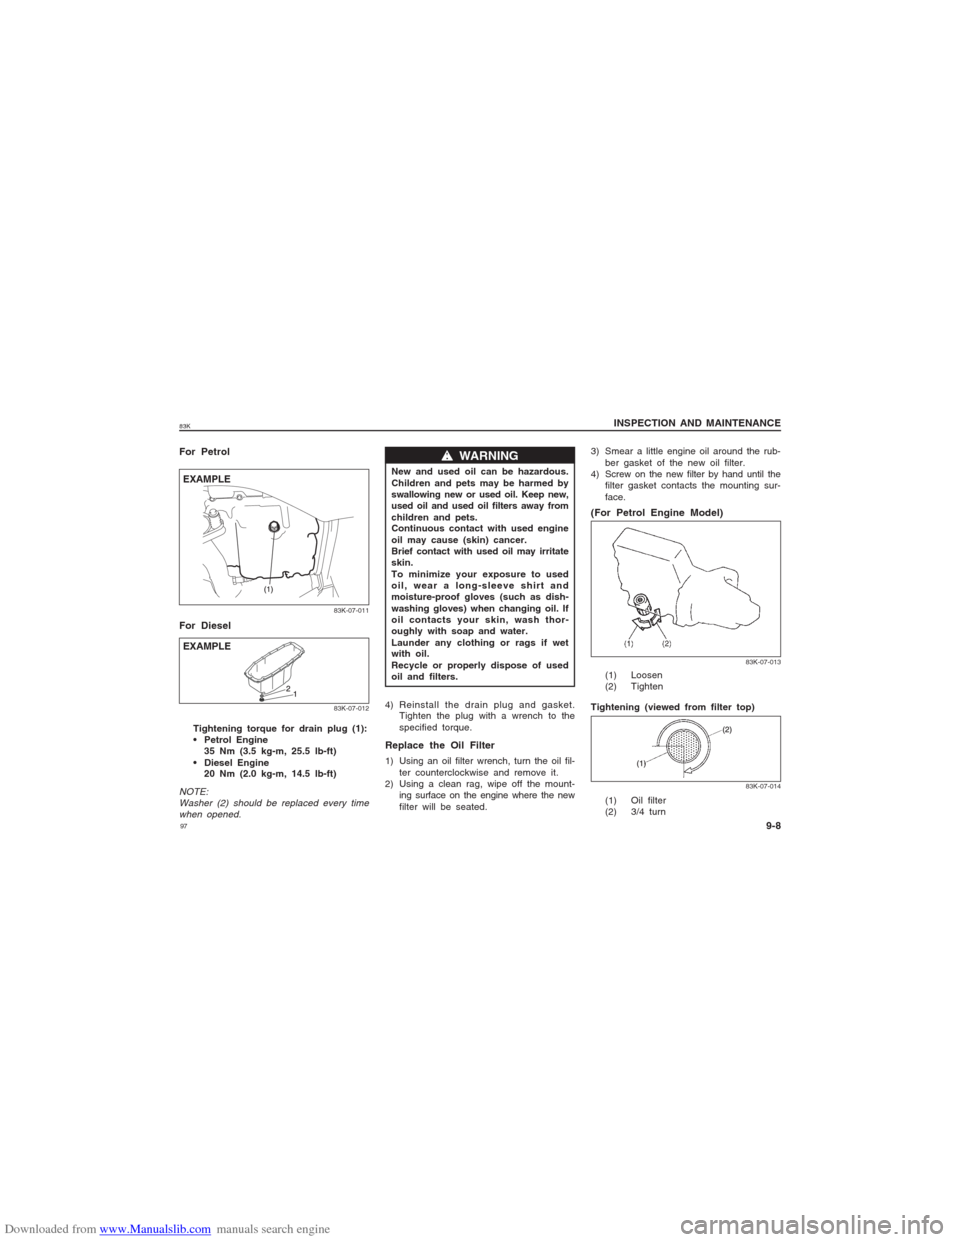
EXAMPLE For Petrol
For Diesel
EXAMPLETightening torque for drain plug (1):
Petrol Engine
35 Nm (3.5 kg-m, 25.5 lb-ft)
Diesel Engine
20 Nm (2.0 kg-m, 14.5 lb-ft)
NOTE:
Washer (2) should be replaced every time
when opened.
w ww w
w WARNING
New and used oil can be hazardous.
Children and pets may be harmed by
swallowing new or used oil. Keep new,
used oil and used oil filters away from
children and pets.
Continuous contact with used engine
oil may cause (skin) cancer.
Brief contact with used oil may irritate
skin.
To minimize your exposure to used
oil, wear a long-sleeve shirt and
moisture-proof gloves (such as dish-
washing gloves) when changing oil. If
oil contacts your skin, wash thor-
oughly with soap and water.
Launder any clothing or rags if wet
with oil.
Recycle or properly dispose of used
oil and filters.
4) Reinstall the drain plug and gasket.
Tighten the plug with a wrench to the
specified torque.Replace the Oil Filter1) Using an oil filter wrench, turn the oil fil-
ter counterclockwise and remove it.
2) Using a clean rag, wipe off the mount-
ing surface on the engine where the new
filter will be seated.3) Smear a little engine oil around the rub-
ber gasket of the new oil filter.
4) Screw on the new filter by hand until the
filter gasket contacts the mounting sur-
face.
(For Petrol Engine Model)
83K-07-012
83K-07-013
(1) Loosen
(2) Tighten
Tightening (viewed from filter top)
83K-07-014
(1) Oil filter
(2) 3/4 turn