wheel torque SUZUKI SWIFT 2000 1.G RG413 Service Owner's Manual
[x] Cancel search | Manufacturer: SUZUKI, Model Year: 2000, Model line: SWIFT, Model: SUZUKI SWIFT 2000 1.GPages: 698, PDF Size: 16.01 MB
Page 180 of 698
STEERING WHEEL AND COLUMN 3C-7
INSTALLATION
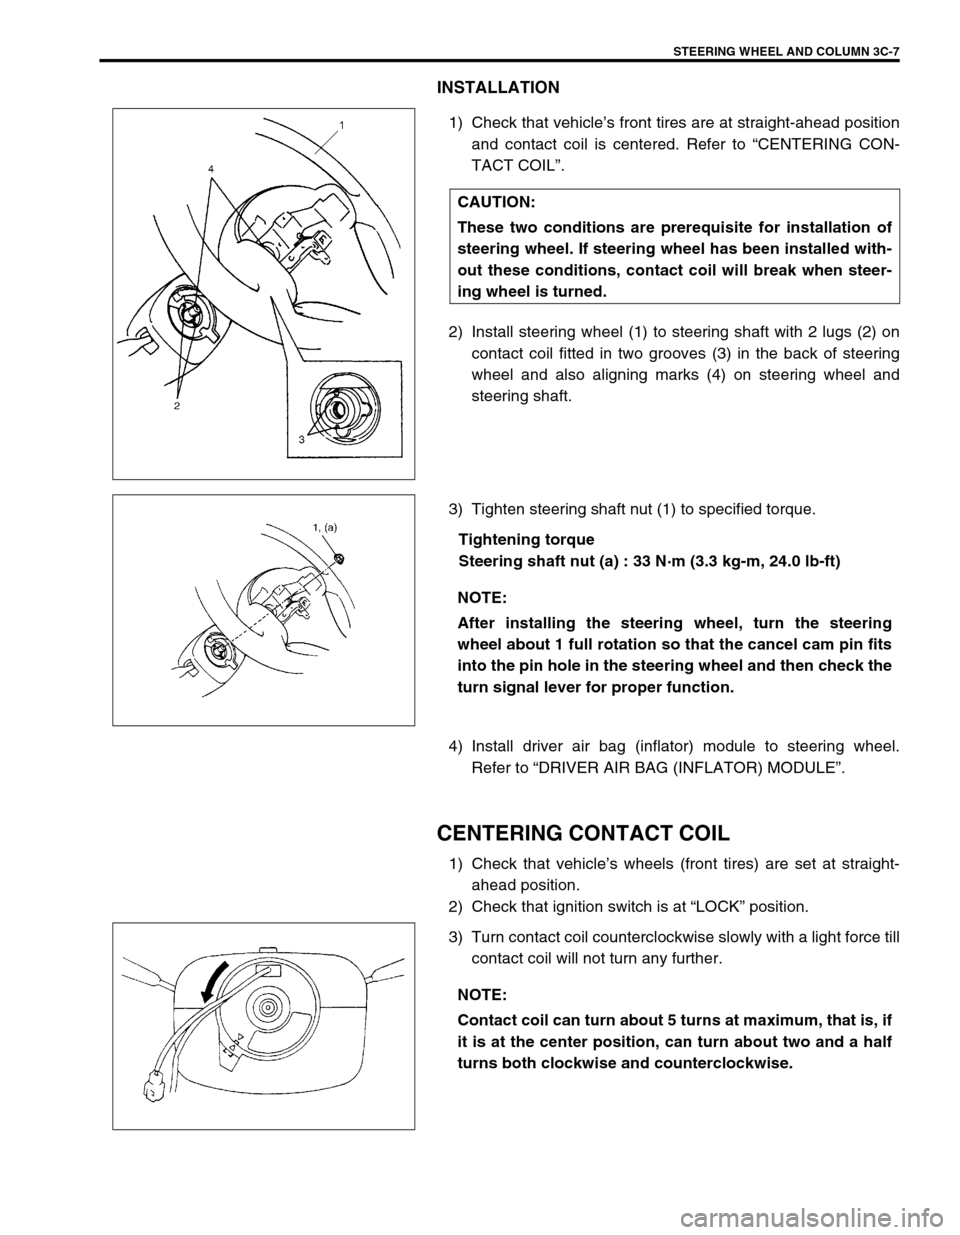
1) Check that vehicle’s front tires are at straight-ahead position
and contact coil is centered. Refer to “CENTERING CON-
TACT COIL”.
2) Install steering wheel (1) to steering shaft with 2 lugs (2) on
contact coil fitted in two grooves (3) in the back of steering
wheel and also aligning marks (4) on steering wheel and
steering shaft.
3) Tighten steering shaft nut (1) to specified torque.
Tightening torque
Steering shaft nut (a) : 33 N·m (3.3 kg-m, 24.0 lb-ft)
4) Install driver air bag (inflator) module to steering wheel.
Refer to “DRIVER AIR BAG (INFLATOR) MODULE”.
CENTERING CONTACT COIL
1) Check that vehicle’s wheels (front tires) are set at straight-
ahead position.
2) Check that ignition switch is at “LOCK” position.
3) Turn contact coil counterclockwise slowly with a light force till
contact coil will not turn any further. CAUTION:
These two conditions are prerequisite for installation of
steering wheel. If steering wheel has been installed with-
out these conditions, contact coil will break when steer-
ing wheel is turned.
NOTE:
After installing the steering wheel, turn the steering
wheel about 1 full rotation so that the cancel cam pin fits
into the pin hole in the steering wheel and then check the
turn signal lever for proper function.
NOTE:
Contact coil can turn about 5 turns at maximum, that is, if
it is at the center position, can turn about two and a half
turns both clockwise and counterclockwise.
Page 188 of 698
STEERING WHEEL AND COLUMN 3C-15
5) If contact coil and combination switch assembly is removed,
install it.
Refer to “CONTACT COIL AND COMBINATION SWITCH
ASSEMBLY”.
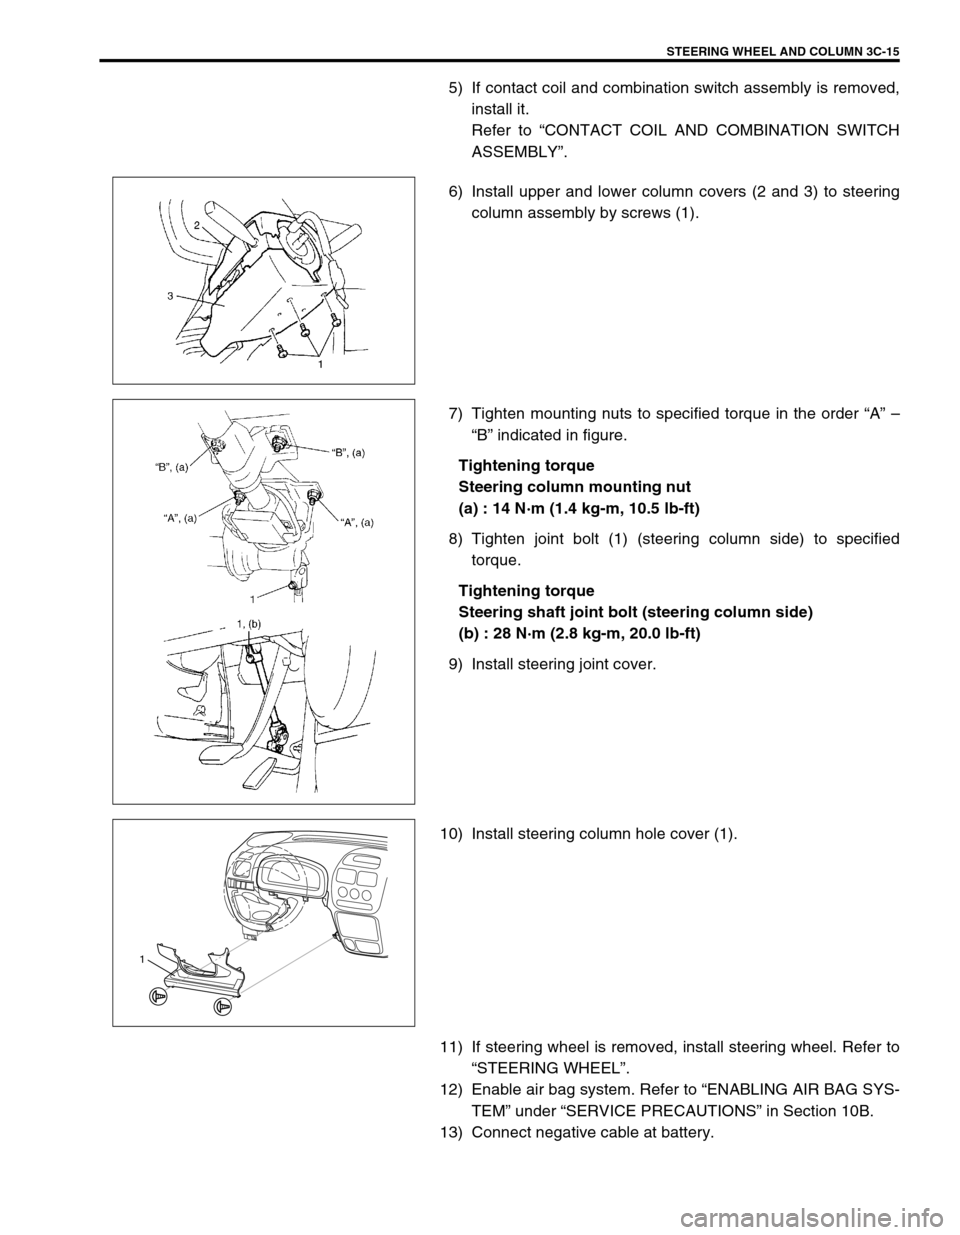
6) Install upper and lower column covers (2 and 3) to steering
column assembly by screws (1).
7) Tighten mounting nuts to specified torque in the order “A” –
“B” indicated in figure.
Tightening torque
Steering column mounting nut
(a) : 14 N·m (1.4 kg-m, 10.5 lb-ft)
8) Tighten joint bolt (1) (steering column side) to specified
torque.
Tightening torque
Steering shaft joint bolt (steering column side)
(b) : 28 N·m (2.8 kg-m, 20.0 lb-ft)
9) Install steering joint cover.
10) Install steering column hole cover (1).
11) If steering wheel is removed, install steering wheel. Refer to
“STEERING WHEEL”.
12) Enable air bag system. Refer to “ENABLING AIR BAG SYS-
TEM” under “SERVICE PRECAUTIONS” in Section 10B.
13) Connect negative cable at battery.
1
Page 191 of 698
3C-18 STEERING WHEEL AND COLUMN
INSTALLATION
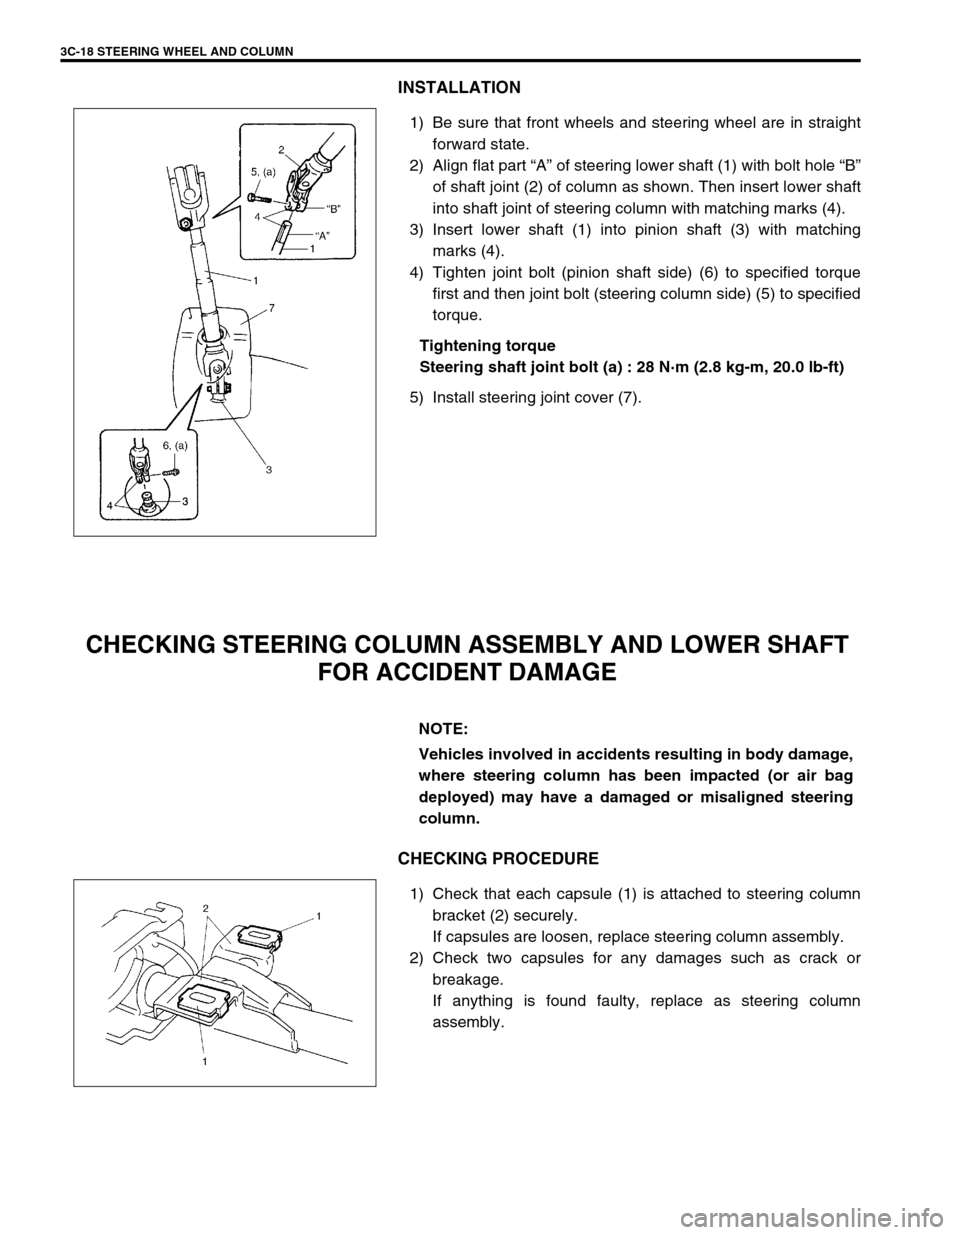
1) Be sure that front wheels and steering wheel are in straight
forward state.
2) Align flat part “A” of steering lower shaft (1) with bolt hole “B”
of shaft joint (2) of column as shown. Then insert lower shaft
into shaft joint of steering column with matching marks (4).
3) Insert lower shaft (1) into pinion shaft (3) with matching
marks (4).
4) Tighten joint bolt (pinion shaft side) (6) to specified torque
first and then joint bolt (steering column side) (5) to specified
torque.
Tightening torque
Steering shaft joint bolt (a) : 28 N·m (2.8 kg-m, 20.0 lb-ft)
5) Install steering joint cover (7).
CHECKING STEERING COLUMN ASSEMBLY AND LOWER SHAFT
FOR ACCIDENT DAMAGE
CHECKING PROCEDURE
1) Check that each capsule (1) is attached to steering column
bracket (2) securely.
If capsules are loosen, replace steering column assembly.
2) Check two capsules for any damages such as crack or
breakage.
If anything is found faulty, replace as steering column
assembly.
NOTE:
Vehicles involved in accidents resulting in body damage,
where steering column has been impacted (or air bag
deployed) may have a damaged or misaligned steering
column.
Page 194 of 698
FRONT SUSPENSION 3D-1
6F1
6F2
6G
1A
6K
7A
7A1
7B1
7C1
3D
7F
8A
8B
8C
8D
8E
9
10
10A
10B
SECTION 3D
FRONT SUSPENSION
CONTENTS
GENERAL DESCRIPTION .............................. 3D-1
DIAGNOSIS ..................................................... 3D-3
STABILIZER BAR AND/OR BUSHING
CHECK ......................................................... 3D-3
STRUT ASSEMBLY CHECK ....................... 3D-3
SUSPENSION CONTROL ARM / STEERING
KNUCKLE CHECK ....................................... 3D-4
SUSPENSION CONTROL ARM BUSHING
CHECK ......................................................... 3D-4
SUSPENSION CONTROL ARM JOINT
CHECK ......................................................... 3D-4
FRONT SUSPENSION FASTENERS
CHECK ......................................................... 3D-5WHEEL DISC, NUT AND BEARING
CHECK ........................................................ 3D-5
ON-VEHICLE SERVICE .................................. 3D-6
STRUT ASSEMBLY..................................... 3D-6
STABILIZER BAR AND/OR BUSHINGS ..... 3D-9
WHEEL HUB AND STEERING
KNUCKLE .................................................. 3D-11
SUSPENSION CONTROL ARM /
BUSHING................................................... 3D-16
REQUIRED SERVICE MATERIAL................ 3D-19
SPECIAL TOOL ............................................ 3D-19
GENERAL DESCRIPTION
The front suspension is the strut type independent suspension. The upper end of a strut is anchored to the vehi-
cle body by a strut support. The strut and strut support are isolated by a rubber mount. A strut bearing is also
installed a little lower to the rubber mount.
The lower end of the strut is connected to the upper end of a steering knuckle and lower end of knuckle is
attached to the stud of a ball joint which is incorporated in a unit with a suspension control arm. And connected
to this steering knuckle is the tie rod end.
Thus, movement of the steering wheel is transmitted to the tie rod end and then to the knuckle, eventually caus-
ing the wheel-and-tire to move. In this operation, with the movement of the knuckle, the strut also rotates by
means of the strut bearing and lower ball joint.NOTE:
All front suspension fasteners are an important attaching part in that it could affect the perfor-
mance of vital parts and systems, and/or could result in major repair expense. They must be
replaced with one of the same part number or with an equivalent part if replacement becomes nec-
essary. Do not use a replacement part of lesser quality or substitute design. Torque values must be
used as specified during reassembly to assure proper retention of this part.
Never attempt to heat, quench or straighten any front suspension part. Replace it with a new part or
damage to the part may result.
Page 195 of 698
![SUZUKI SWIFT 2000 1.G RG413 Service Owners Manual 3D-2 FRONT SUSPENSION
1. Strut assembly 4. Wheel 7. Drive shaft [A] : FORWARD
2. Stabilizer bar 5. Suspension control arm 8. Tie rod Tightening torque
3. Steering knuckle 6. Vehicle body 9. Brake disc SUZUKI SWIFT 2000 1.G RG413 Service Owners Manual 3D-2 FRONT SUSPENSION
1. Strut assembly 4. Wheel 7. Drive shaft [A] : FORWARD
2. Stabilizer bar 5. Suspension control arm 8. Tie rod Tightening torque
3. Steering knuckle 6. Vehicle body 9. Brake disc](/img/20/7606/w960_7606-194.png)
3D-2 FRONT SUSPENSION
1. Strut assembly 4. Wheel 7. Drive shaft [A] : FORWARD
2. Stabilizer bar 5. Suspension control arm 8. Tie rod Tightening torque
3. Steering knuckle 6. Vehicle body 9. Brake disc Do not reuse.
[A]
4
92
35
8
660 N·m(6.0 kg-m) 175 N·m(17.5 kg-m)
60 N·m(6.0 kg-m)
85 N·m(8.5 kg-m)
85 N·m(8.5 kg-m)
43 N·m(4.3 kg-m)
65 N·m(6.5 kg-m)
65 N·m(6.5 kg-m)
23 N·m(2.3 kg-m)
50 N·m(5.0 kg-m)
175 N·m(17.5 kg-m)
105 N·m(10.5 kg-m)
1
8
45 N·m (4.5kg-m) 7
5
4
9
Page 198 of 698
FRONT SUSPENSION 3D-5
FRONT SUSPENSION FASTENERS CHECK
Check each bolt and nut fastening suspension parts for tightness.
Tighten loose one, if any, to specified torque, referring to “GEN-
ERAL DESCRIPTION” in this section.
WHEEL DISC, NUT AND BEARING CHECK
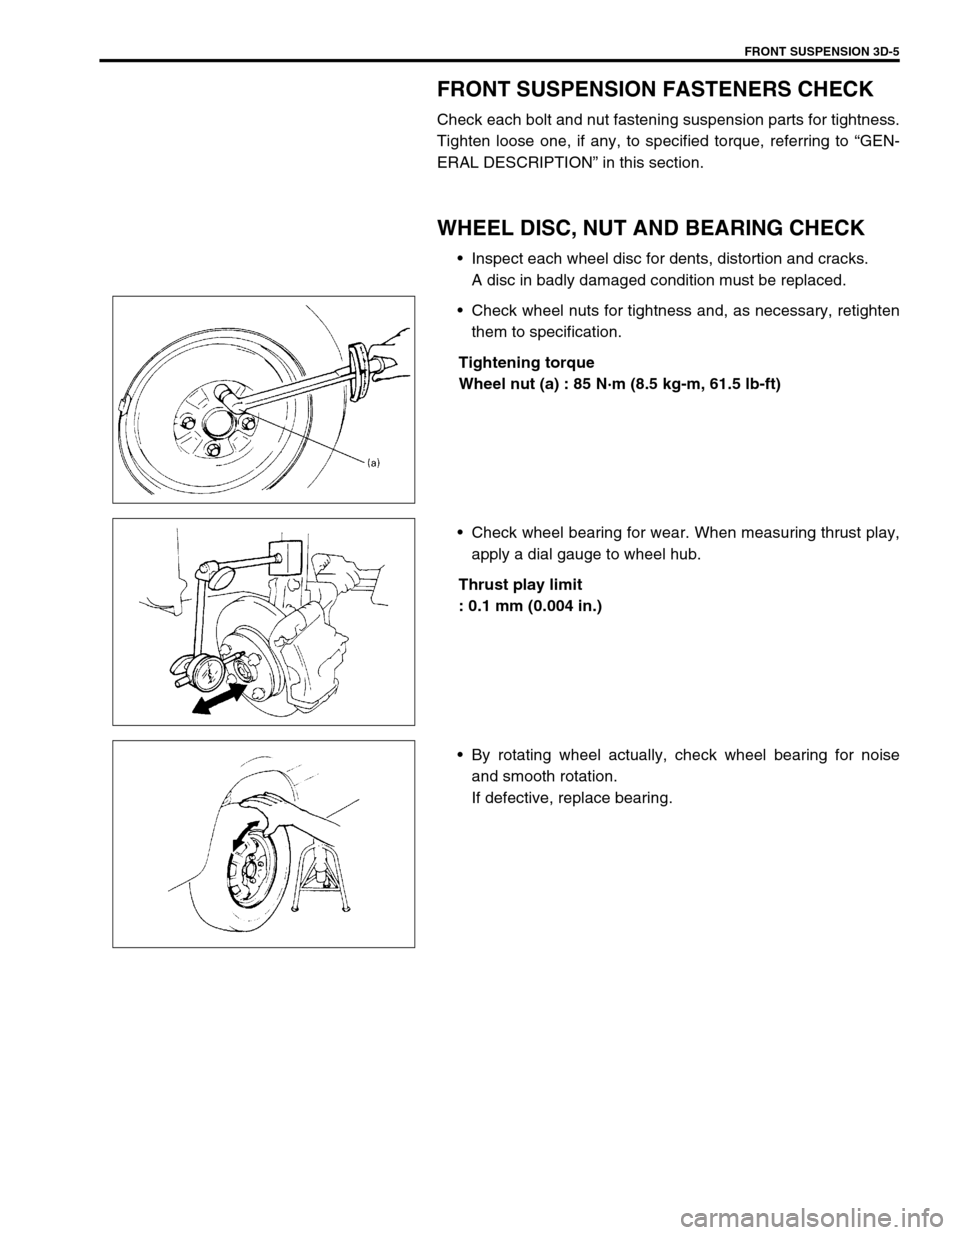
Inspect each wheel disc for dents, distortion and cracks.
A disc in badly damaged condition must be replaced.
Check wheel nuts for tightness and, as necessary, retighten
them to specification.
Tightening torque
Wheel nut (a) : 85 N·m (8.5 kg-m, 61.5 lb-ft)
Check wheel bearing for wear. When measuring thrust play,
apply a dial gauge to wheel hub.
Thrust play limit
: 0.1 mm (0.004 in.)
By rotating wheel actually, check wheel bearing for noise
and smooth rotation.
If defective, replace bearing.
Page 199 of 698
3D-6 FRONT SUSPENSION
ON-VEHICLE SERVICE
STRUT ASSEMBLY
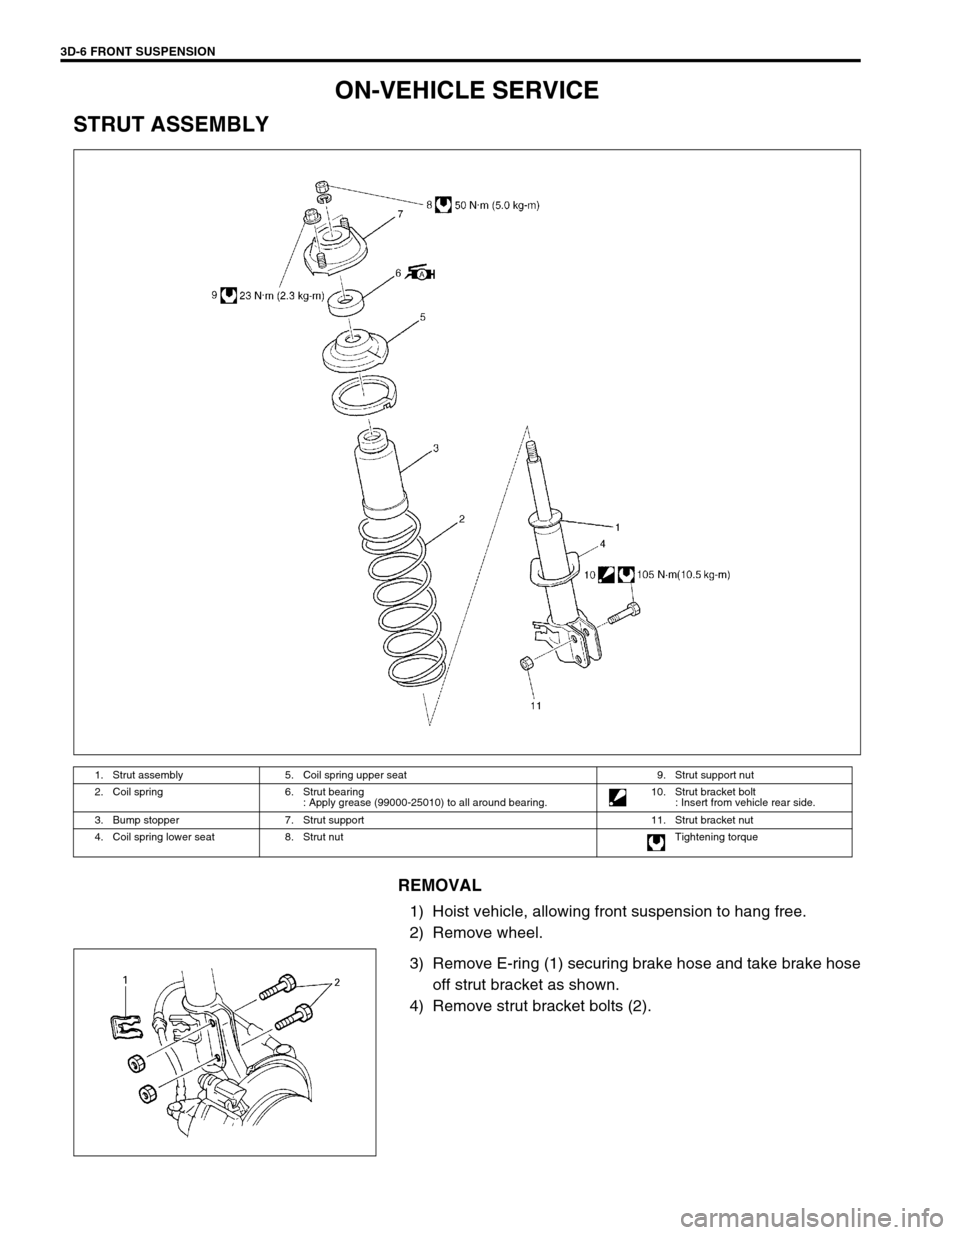
REMOVAL
1) Hoist vehicle, allowing front suspension to hang free.
2) Remove wheel.
3) Remove E-ring (1) securing brake hose and take brake hose
off strut bracket as shown.
4) Remove strut bracket bolts (2).
1. Strut assembly 5. Coil spring upper seat 9. Strut support nut
2. Coil spring 6. Strut bearing
: Apply grease (99000-25010) to all around bearing.10. Strut bracket bolt
: Insert from vehicle rear side.
3. Bump stopper 7. Strut support 11. Strut bracket nut
4. Coil spring lower seat 8. Strut nut Tightening torque
Page 201 of 698

3D-8 FRONT SUSPENSION
Tighten strut nut to specified torque by using special tools.
Tightening torque
Strut nut (a) : 50 N·m (5.0 kg-m, 36.5 lb-ft)
Special tool
(A) : 09900-00411
(B) : 09900-00414
(C) : 09945-26010
INSTALLATION
Install strut assembly by reversing removal procedure, noting the
following instructions.
Insert bolts in such direction as shown in figure.
Tighten all fasteners to specified torque.
Tightening torque
Strut bracket nut (a) : 105 N·m (10.5 kg-m, 76.0 lb-ft)
Strut support nut (b) : 23 N·m (2.3 kg-m, 17.0 lb-ft)
Tighten wheel nut to specified torque.
Tightening torque
Wheel nut : 85 N·m (8.5 kg-m, 61.5 lb-ft)
After installation, confirm front end (wheel) alignment refer-
ring to Section 3A.
NOTE:
Don’t twist brake hose when installing it.
Install E-ring (1) as far as it fits to bracket (2) as shown
in figure.
Page 202 of 698

FRONT SUSPENSION 3D-9
STABILIZER BAR AND/OR BUSHINGS
REMOVAL
1) Hoist vehicle and allow front suspension control arms to
hang free.
2) Remove front wheels.
3) Remove, stabilizer bar sprit pin (3) and nut (1) and washer
(2).
4) Remove stabilizer bar mounting bracket bolts (1).
5) Remove stabilizer bar (2).
1. Stabilizer bar 4. Bushing 7. Stabilizer bar mounting bracket bolt Tightening torque
2. Mount bracket 5. Washer 8. Sprit pin Do not reuse.
3. Mount bushing 6. Stabilizer bar nut
NOTE:
If it is hard to remove stabilizer bar, set tires in contact
with ground (with suspension compressed).
F. FORWARD
Page 203 of 698

3D-10 FRONT SUSPENSION
INSTALLATION
For installation, reverse removal procedure, noting the following
instructions.
Install stabilizer bar (2) so that paint mark (1) on it comes to
the right side of vehicle.
There is a paint mark (1) of stabilizer bar. Install stabilizer
bar mount bracket to inside of stabilizer bar at that mark.
Install mount bracket (1) so that its oblong hole side (2)
comes to the rear.
Tighten stabilizer bar mounting bracket bolts to specified
torque.
Tightening torque
Stabilizer bar mounting bracket bolt
: 45 N·m (4.5 kg-m, 32.5 lb-ft)
Tighten stabilizer bar nut (1) to specified torque.
Tightening torque
Stabilizer bar nut (a) : 65 N·m (6.5 kg-m, 47.0 lb-ft)
Install new sprit pin (2).
Tighten wheel nut to specified torque.
Tightening torque
Wheel nut : 85 N·m (8.5 kg-m, 61.5 lb-ft)
3. Mark
F: Forward