glove box SUZUKI SWIFT 2000 1.G Transmission Service Workshop Manual
[x] Cancel search | Manufacturer: SUZUKI, Model Year: 2000, Model line: SWIFT, Model: SUZUKI SWIFT 2000 1.GPages: 447, PDF Size: 10.54 MB
Page 49 of 447

AUTOMATIC TRANSMISSION (4 A/T) 7B-7
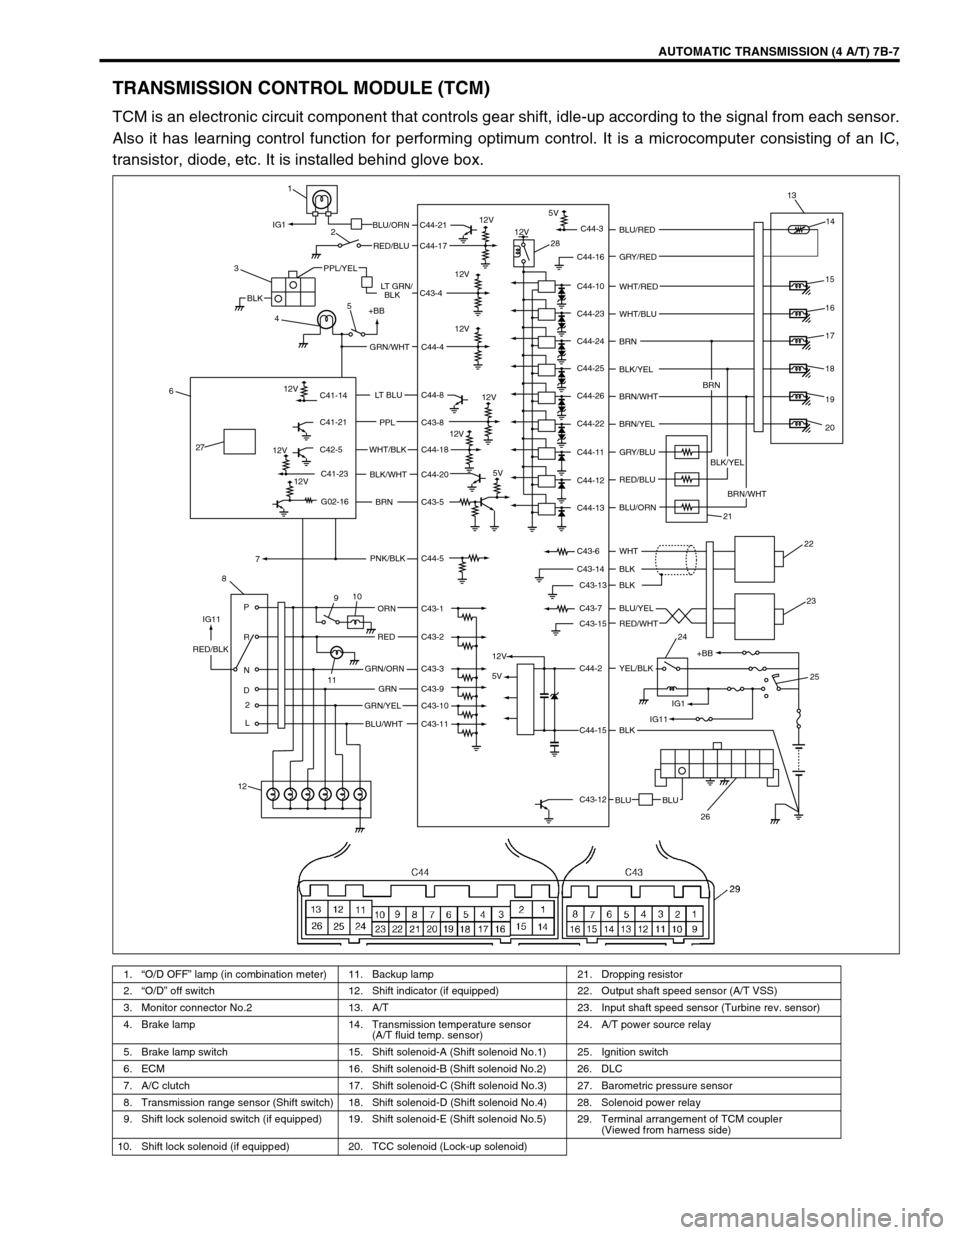
TRANSMISSION CONTROL MODULE (TCM)
TCM is an electronic circuit component that controls gear shift, idle-up according to the signal from each sensor.
Also it has learning control function for performing optimum control. It is a microcomputer consisting of an IC,
transistor, diode, etc. It is installed behind glove box.
1.“O/D OFF” lamp (in combination meter) 11. Backup lamp 21. Dropping resistor
2.“O/D” off switch 12. Shift indicator (if equipped) 22. Output shaft speed sensor (A/T VSS)
3. Monitor connector No.2 13. A/T 23. Input shaft speed sensor (Turbine rev. sensor)
4. Brake lamp 14. Transmission temperature sensor
(A/T fluid temp. sensor)24. A/T power source relay
5. Brake lamp switch 15. Shift solenoid-A (Shift solenoid No.1) 25. Ignition switch
6. ECM 16. Shift solenoid-B (Shift solenoid No.2) 26. DLC
7. A/C clutch 17. Shift solenoid-C (Shift solenoid No.3) 27. Barometric pressure sensor
8. Transmission range sensor (Shift switch) 18. Shift solenoid-D (Shift solenoid No.4) 28. Solenoid power relay
9. Shift lock solenoid switch (if equipped) 19. Shift solenoid-E (Shift solenoid No.5) 29. Terminal arrangement of TCM coupler
(Viewed from harness side)
10. Shift lock solenoid (if equipped) 20. TCC solenoid (Lock-up solenoid)
C41-14
C41-21
C42-5
C41-23
G02-16
BLKBLKLT GRN/ RED/BLU BLU/ORN
PPL/YEL
3
45
+BB
GRN/WHT
LT BLU
PPL
WHT/BLK
BLK/WHT
BRN
PNK/BLK 6
7
8
C44-8
C43-8
C44-18
C44-20
C43-5
C44-5
910
ORN
RED
GRN/ORN RED/BLK
GRNC43-1
C43-2
C43-3
C43-9
C43-10
C43-11 GRN/YEL
BLU/WHT P
R
N
D
2
L11
12C44-21
C44-17
C43-4
C44-4
12V 12V
12V
12V
12V IG1
IG115V
5VC44-3
C44-16
C44-10
C44-23
C44-24
C44-25
C44-26
C44-22
C44-11
C44-12
C44-13
C43-6
C43-14
C43-13
C43-7
C43-15
C44-2
C44-15
C43-12
BLU BLUBLK
BLK BLK
BLU/YEL
YEL/BLK RED/WHT WHT BLU/ORN RED/BLU GRY/BLU
BLK/YEL WHT/BLU
BRN/WHT BRN/WHT BRN WHT/RED
BLK/YEL
BRN/YEL BLU/RED
GRY/RED13
14
15
16
17
19
20 BRN
21
22
23
+BB 24
25
26
12V
12V
12V
12V
18
12V
IG1
IG11
5V
1
2
28
27
Page 67 of 447
![SUZUKI SWIFT 2000 1.G Transmission Service Workshop Manual AUTOMATIC TRANSMISSION (4 A/T) 7B-25
[INTERMITTENT TROUBLES] and [NOTES ON SYSTEM CIR-
CUIT INSPECTION]
Refer to Section 0A.
DTC CHECK
[Check DTC with SUZUKI scan tool]
1) Turn ignition switch OFF.
2) SUZUKI SWIFT 2000 1.G Transmission Service Workshop Manual AUTOMATIC TRANSMISSION (4 A/T) 7B-25
[INTERMITTENT TROUBLES] and [NOTES ON SYSTEM CIR-
CUIT INSPECTION]
Refer to Section 0A.
DTC CHECK
[Check DTC with SUZUKI scan tool]
1) Turn ignition switch OFF.
2)](/img/20/7605/w960_7605-66.png)
AUTOMATIC TRANSMISSION (4 A/T) 7B-25
[INTERMITTENT TROUBLES] and [NOTES ON SYSTEM CIR-
CUIT INSPECTION]
Refer to Section 0A.
DTC CHECK
[Check DTC with SUZUKI scan tool]
1) Turn ignition switch OFF.
2) After setting cartridge, connect SUZUKI scan tool to data link
connector (DLC) (1) located on underside of instrument
panel at driver’s seat side.
Special tool
(A) : 09931-76011 (SUZUKI scan tool)
(B) : Mass storage cartridge
(C) : 09931-76030 (16/14 pin DLC cable)
3) Turn ignition switch ON.
4) Read DTC according to instructions displayed on SUZUKI
scan tool and print it or write it down. Refer to SUZUKI scan
tool operator’s manual for further details.
5) After completing the check, turn ignition switch OFF and dis-
connect SUZUKI scan tool from data link connector (DLC)
(1).
[Check DTC without SUZUKI scan tool]
1) Turn ignition switch ON and make sure that O/D OFF lamp is
OFF in combination meter (O/D off switch OFF).
2) Turn ignition switch OFF.
3) Pull out clip (3) and remove glove box (2) from instrument
panel (1).
Page 342 of 447

9-38 BODY SERVICE
INSTRUMENTATION AND DRIVER INFORMATION
INSTRUMENT PANEL
REMOVAL
1) Disconnect negative cable at battery.
2) Disable air bag system, if equipped. Refer to “DISABLE AIR
BAG SYSTEM” in Section 10B.
3) Remove steering column hole cover (1).
4) Remove glove box (1) and food latch release lever (2).
5) Disconnect instrument panel harness connectors, antenna
and heater control cables which need to be disconnected for
removal for instrument panel.
6) Remove instrument panel ground wire.
7) Remove steering column assembly referring to “STEERING
COLUMN ASSEMBLY” in Section 3C.
8) Remove front pillar trims (1) and dash side trims (2).
9) Remove speaker covers (3).WARNING:
See WARNING at the beginning of this section.
“A”
“A”“A”
“A”
“A”
1
2“A” 1
3
“A”
Page 398 of 447

10B-24 AIR BAG SYSTEM
DIAGNOSTIC FLOW TABLE
DTC B1015 :
Fig. for STEP 1 and 2
Fig. for STEP 2
Special tool
(A) : 09932-76010
(B) : 09932-75010 Step Action Yes No
1 1) With ignition switch OFF, disconnect passenger air
bag (inflator) module connector behind the glove box.
2) Check proper connection to passenger air bag (infla-
tor) module at terminals in “Q03” connector.
3) If OK then connect Special Tool (B) to passenger air
bag (inflator) module connector disconnected at the
step 1).
With ignition switch ON, is DTC B1015 current?Go to step 2. Ignition switch OFF.
Replace passenger air
bag (inflator) module
(Refer to PASSENGER
AIR BAG (INFLATOR)
MODULE in this sec-
tion).
2 1) With ignition switch OFF, disconnect SDM.
2) Check proper connection to SDM at terminals “Q06-7”
and “Q06-8”.
3) If OK then measure resistance between “Q06-7” and
“Q06-8” terminals with connected Special Tool (B).
Is resistance 4.5 Ω or less?Substitute a
known-good SDM
and recheck.Repair high resistance
or open in “YEL/RED” or
“BLU/RED” wire circuit.
NOTE:
Upon completion of inspection and repair work, perform following items.
Reconnect all air bag system components, ensure all components are properly mounted.
Clear diagnostic trouble codes (Refer to DTC CLEARANCE), if any.
Repeat AIR BAG DIAGNOSTIC SYSTEM CHECK to confirm that the trouble has been corrected.
Page 399 of 447

AIR BAG SYSTEM 10B-25
DTC B1016:
Fig. for STEP 1 and 2
Fig. for STEP 2
Special tool
(A) : 09932-76010
(B) : 09932-75010 Step Action Yes No
1 1) With ignition switch OFF, disconnect passenger air
bag (inflator) module connector behind the glove box.
2) Check proper connection to passenger air bag (infla-
tor) module at terminals in “Q03” connector.
3) If OK then connect Special Tool (B) to passenger air
bag (inflator) module connector disconnected at the
step 1).
With ignition switch ON, is DTC B1016 current?Go to step 2. Ignition switch OFF.
Replace passenger air
bag (inflator) module
(Refer to PASSENGER
AIR BAG (INFLATOR)
MODULE in this section).
2 1) With ignition switch OFF, disconnect SDM.
2) Check proper connection to SDM at terminals “Q06-7”
and “Q06-8”.
3) If OK then measure resistance between “Q06-7” and
“Q06-8” terminals with connected Special Tool (B).
Is resistance 1.4 Ω or more?Substitute a
known-good
SDM and
recheck.Repair short from “YEL/
RED” wire circuit to “BLU/
RED” wire circuit or from
“YEL/RED” or “BLU/RED”
wire circuit to other wire
circuit.
NOTE:
Upon completion of inspection and repair work, perform following items.
1) Reconnect all air bag system components, ensure all components are properly mounted.
2) Clear diagnostic trouble codes (Refer to DTC CLEARANCE), if any.
3) Repeat AIR BAG DIAGNOSTIC SYSTEM CHECK to confirm that the trouble has been corrected.
Page 400 of 447

10B-26 AIR BAG SYSTEM
DTC B1018:
Fig. for STEP 1, 2 and 3
Fig. for STEP 2Step Action Yes No
1 1) With ignition switch OFF, disconnect passenger air
bag (inflator) module connector behind the glove box.
2) Check proper connection to passenger air bag (infla-
tor) module at terminals in “Q03” connector.
3) If OK then connect Special Tool (B) to passenger air
bag (inflator) module connector disconnected at the
step 1).
With ignition switch ON, is DTC B1018 current?Go to step 2. Ignition switch OFF.
Replace passenger air
bag (inflator) module
(Refer to PASSENGER
AIR BAG (INFLATOR)
MODULE in this section).
2 1) With ignition switch OFF, disconnect Special Tool (B)
and SDM.
2) Measure resistance between “Q06-7” terminals and
body ground.
Is resistance 10 W or more?Go to step 3. Repair short from “BLU/
RED” wire circuit to
ground.
3 1) Measure resistance between “Q06-8” terminal and
body ground.
Is resistance 10 Ω or more?Substitute a
known-good
SDM and
recheck.Repair short from “YEL/
RED” wire circuit to
ground.
Page 401 of 447

AIR BAG SYSTEM 10B-27
Fig. for STEP 3
Special tool
(A) : 09932-76010
(B) : 09932-75010
DTC B1019:
Fig. for STEP 1, 2 and 3
NOTE:
Upon completion of inspection and repair work, perform following items.
Reconnect all air bag system components, ensure all components are properly mounted.
Clear diagnostic trouble codes (Refer to DTC CLEARANCE), if any.
Repeat AIR BAG DIAGNOSTIC SYSTEM CHECK to confirm that the trouble has been corrected.
Step Action Yes No
1 1) With ignition switch OFF, disconnect passenger
air bag (inflator) module connector behind the
glove box.
2) Check proper connection to passenger air bag
(inflator) module at terminals in “Q03” connector.
3) If OK then connect Special Tool (B) to passenger
air bag (inflator) module connector disconnected
at the step 1).
With ignition switch ON, is DTC B1019 current?Go to step 2. Ignition switch OFF.
Replace passenger air
bag (inflator) module
(Refer to PASSENGER
AIR BAG (INFLATOR)
MODULE in this section).
2 1) With ignition switch OFF, disconnect Special Tool
(B) and SDM.
2) Measure voltage from “Q06-7” terminal to body
ground.
With ignition switch ON, is voltage 1 V or less?Go to step 3. Repair short from “BLU/
RED” wire circuit to power
circuit.
3 1) Measure voltage from “Q06-8” terminal to body
ground.
With ignition switch ON, is voltage 1 V or less?Substitute a known-
good SDM and
recheck.Repair short from “YEL/
RED” wire circuit to power
circuit.
Page 421 of 447

AIR BAG SYSTEM 10B-47
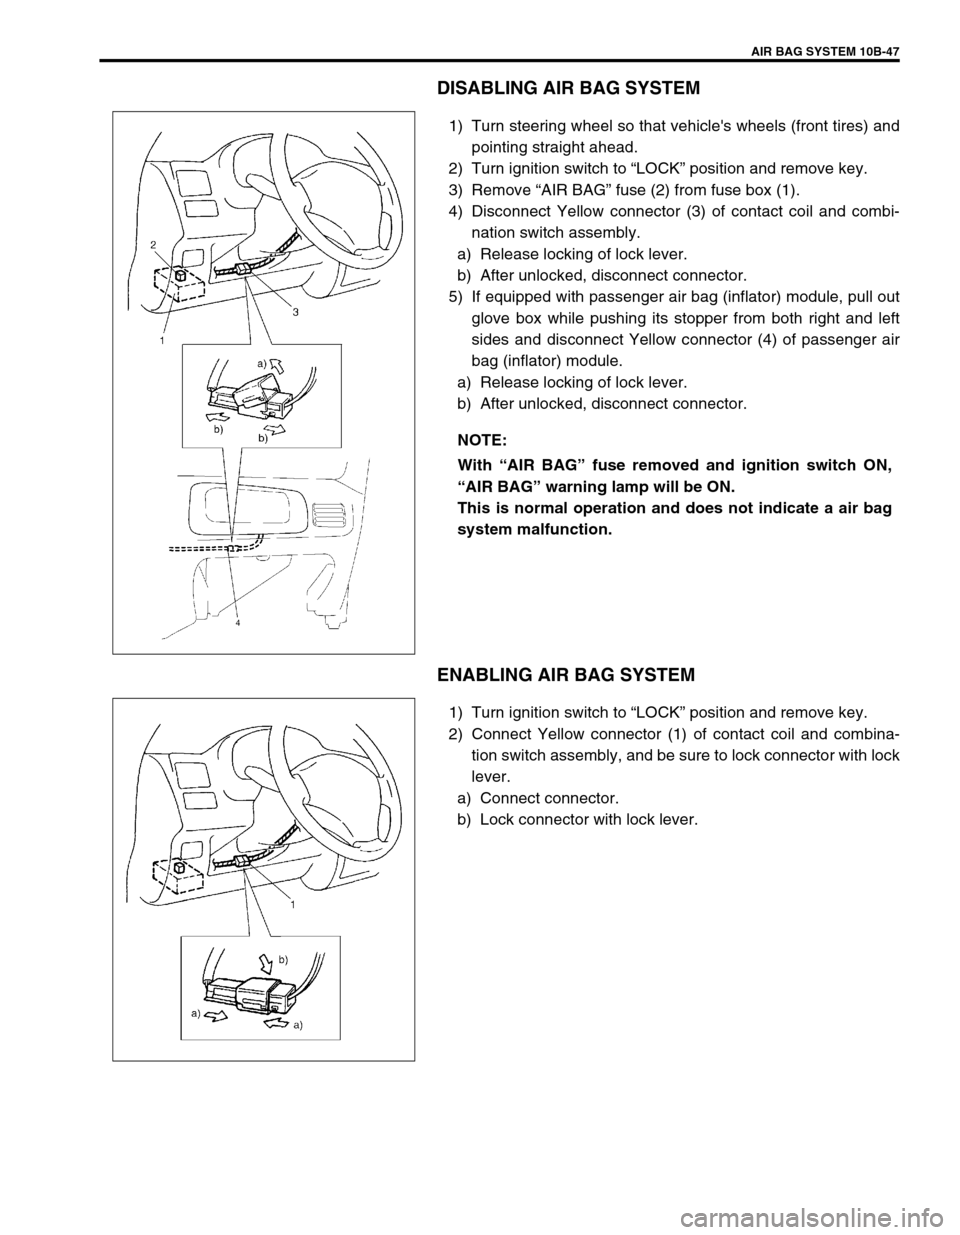
DISABLING AIR BAG SYSTEM
1) Turn steering wheel so that vehicle's wheels (front tires) and
pointing straight ahead.
2) Turn ignition switch to “LOCK” position and remove key.
3) Remove “AIR BAG” fuse (2) from fuse box (1).
4) Disconnect Yellow connector (3) of contact coil and combi-
nation switch assembly.
a) Release locking of lock lever.
b) After unlocked, disconnect connector.
5) If equipped with passenger air bag (inflator) module, pull out
glove box while pushing its stopper from both right and left
sides and disconnect Yellow connector (4) of passenger air
bag (inflator) module.
a) Release locking of lock lever.
b) After unlocked, disconnect connector.
ENABLING AIR BAG SYSTEM
1) Turn ignition switch to “LOCK” position and remove key.
2) Connect Yellow connector (1) of contact coil and combina-
tion switch assembly, and be sure to lock connector with lock
lever.
a) Connect connector.
b) Lock connector with lock lever.NOTE:
With “AIR BAG” fuse removed and ignition switch ON,
“AIR BAG” warning lamp will be ON.
This is normal operation and does not indicate a air bag
system malfunction.
Page 422 of 447

10B-48 AIR BAG SYSTEM
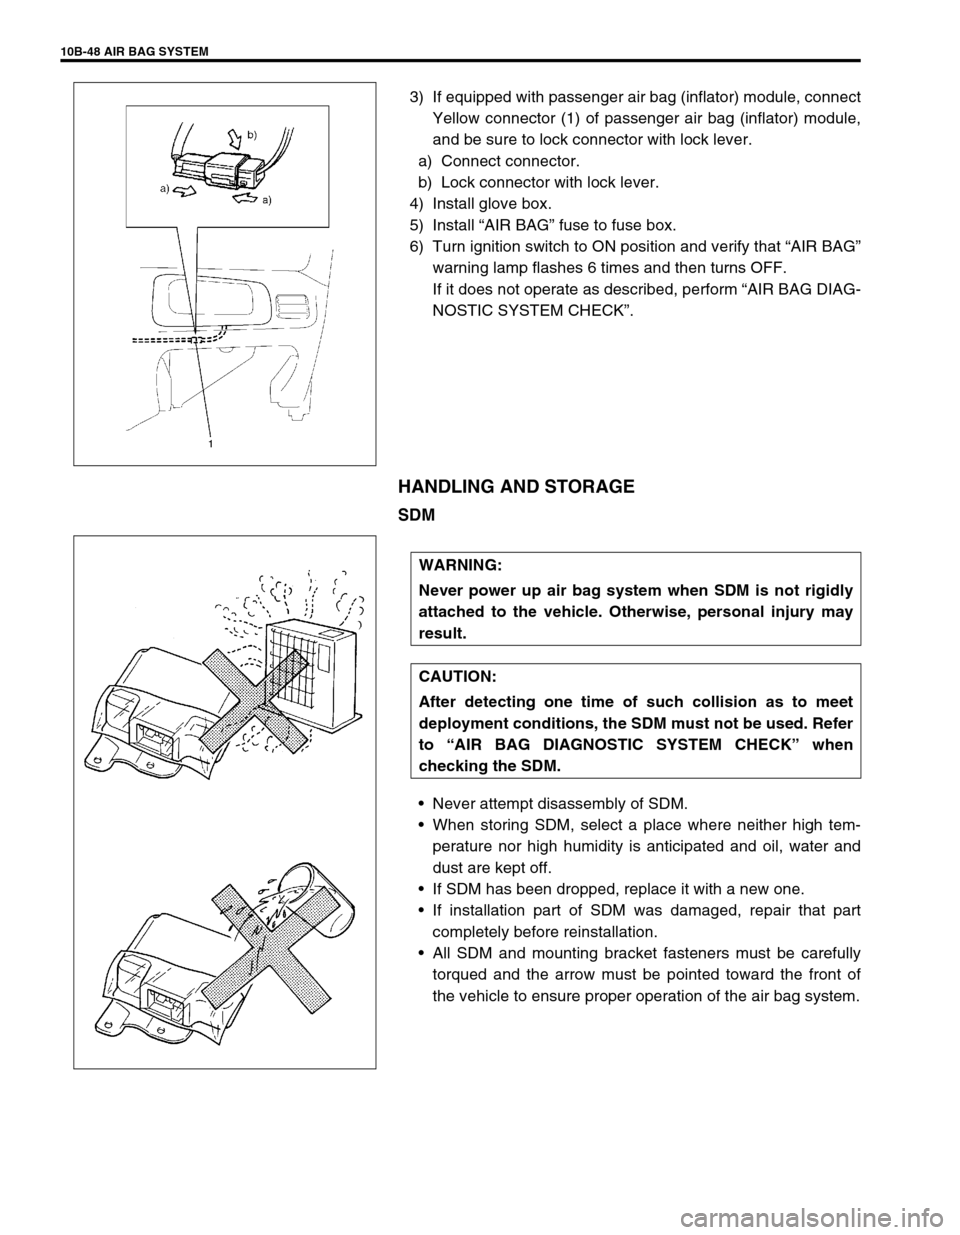
3) If equipped with passenger air bag (inflator) module, connect
Yellow connector (1) of passenger air bag (inflator) module,
and be sure to lock connector with lock lever.
a) Connect connector.
b) Lock connector with lock lever.
4) Install glove box.
5) Install “AIR BAG” fuse to fuse box.
6) Turn ignition switch to ON position and verify that “AIR BAG”
warning lamp flashes 6 times and then turns OFF.
If it does not operate as described, perform “AIR BAG DIAG-
NOSTIC SYSTEM CHECK”.
HANDLING AND STORAGE
SDM
Never attempt disassembly of SDM.
When storing SDM, select a place where neither high tem-
perature nor high humidity is anticipated and oil, water and
dust are kept off.
If SDM has been dropped, replace it with a new one.
If installation part of SDM was damaged, repair that part
completely before reinstallation.
All SDM and mounting bracket fasteners must be carefully
torqued and the arrow must be pointed toward the front of
the vehicle to ensure proper operation of the air bag system.
WARNING:
Never power up air bag system when SDM is not rigidly
attached to the vehicle. Otherwise, personal injury may
result.
CAUTION:
After detecting one time of such collision as to meet
deployment conditions, the SDM must not be used. Refer
to “AIR BAG DIAGNOSTIC SYSTEM CHECK” when
checking the SDM.
Page 432 of 447

10B-58 AIR BAG SYSTEM
PASSENGER AIR BAG (INFLATOR) MODULE (IF EQUIPPED)
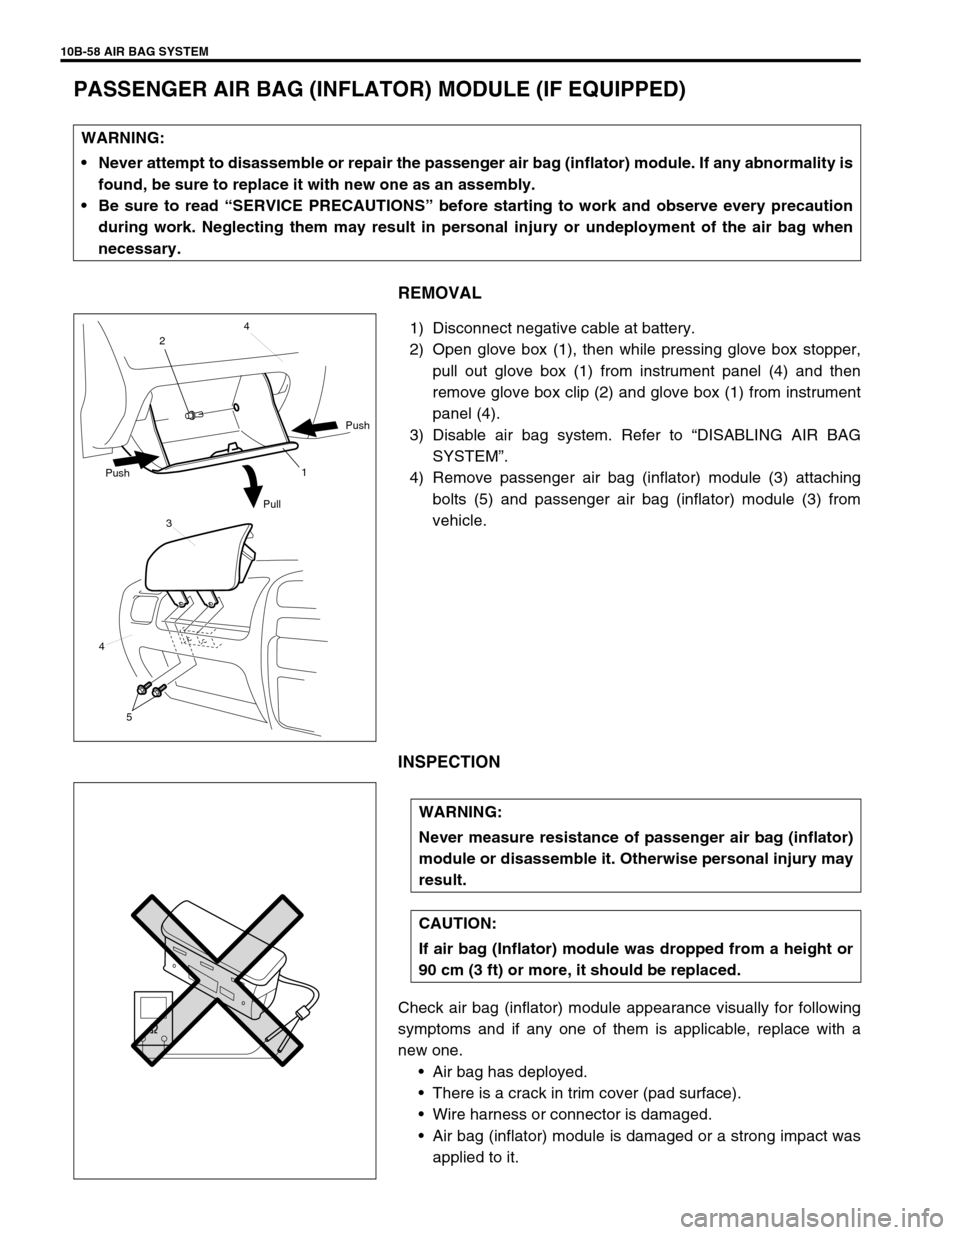
REMOVAL
1) Disconnect negative cable at battery.
2) Open glove box (1), then while pressing glove box stopper,
pull out glove box (1) from instrument panel (4) and then
remove glove box clip (2) and glove box (1) from instrument
panel (4).
3) Disable air bag system. Refer to “DISABLING AIR BAG
SYSTEM”.
4) Remove passenger air bag (inflator) module (3) attaching
bolts (5) and passenger air bag (inflator) module (3) from
vehicle.
INSPECTION
Check air bag (inflator) module appearance visually for following
symptoms and if any one of them is applicable, replace with a
new one.
Air bag has deployed.
There is a crack in trim cover (pad surface).
Wire harness or connector is damaged.
Air bag (inflator) module is damaged or a strong impact was
applied to it. WARNING:
Never attempt to disassemble or repair the passenger air bag (inflator) module. If any abnormality is
found, be sure to replace it with new one as an assembly.
Be sure to read “SERVICE PRECAUTIONS” before starting to work and observe every precaution
during work. Neglecting them may result in personal injury or undeployment of the air bag when
necessary.
1 24
Push
Pull Push
3
4
5
WARNING:
Never measure resistance of passenger air bag (inflator)
module or disassemble it. Otherwise personal injury may
result.
CAUTION:
If air bag (Inflator) module was dropped from a height or
90 cm (3 ft) or more, it should be replaced.