indicator light SUZUKI SWIFT 2017 5.G Owner's Manual
[x] Cancel search | Manufacturer: SUZUKI, Model Year: 2017, Model line: SWIFT, Model: SUZUKI SWIFT 2017 5.GPages: 336, PDF Size: 6.24 MB
Page 96 of 336
3-11OPERATING YOUR VEHICLE
74LH0-74E
Warm engine
Crank the engine by turning the ignition
key to “START”. Release the key when the
engine starts.
Caution when stopping the engine with
turbocharger
When stopping the engine after climbing or
high speed driving, let the engine idle for
about one minute or more (if it is not pro-
hibited) to cool down the turbocharger and
engine oil. This is to prevent the engine oil
from over-deteriorating. Deteriorated
engine oil will damage the bearings of the
turbocharger.
Restarting diesel engine after fuel-
empty stop
If the engine stops and the low fuel warn-
ing light and the malfunction indicator light
come on, use the following procedure:
1) Fill the fuel tank.
2) Hold the ignition key in “ON” position for
5-10 seconds to feed fuel.
3) Perform above engine starting proce-
dure to start the engine.
If the malfunction indicator light still comes
on after the engine started, there may be
some problem with the engine. Ask your
MARUTI SUZUKI dealer to have the
engine inspected.
Starting the Engine
(Vehicle with Keyless Push
Start System)Before Starting the Engine
74LHM0303
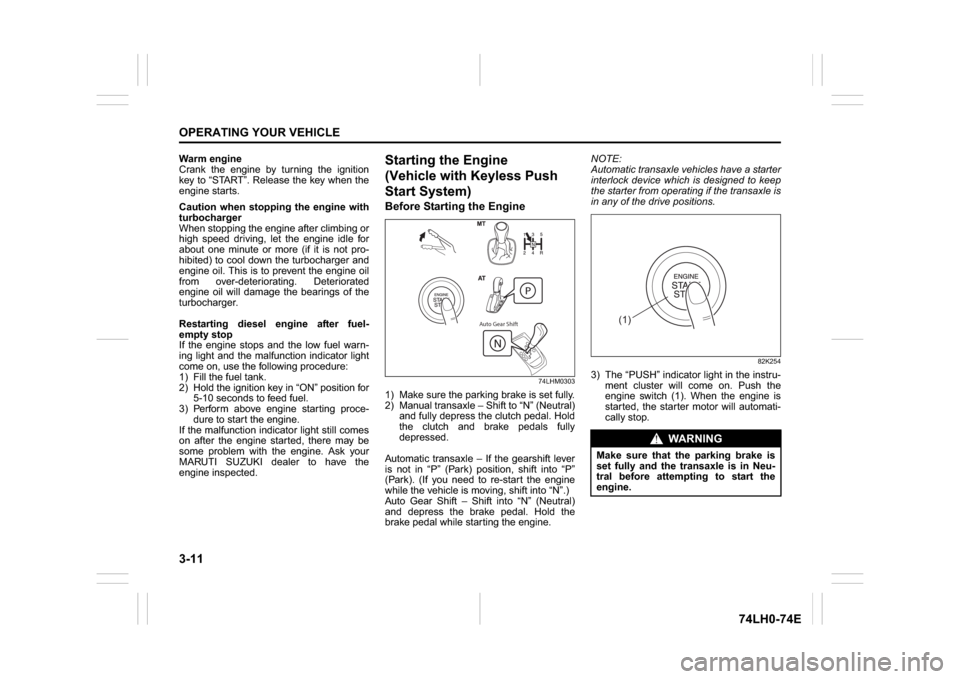
1) Make sure the parking brake is set fully.
2) Manual transaxle – Shift to “N” (Neutral)
and fully depress the clutch pedal. Hold
the clutch and brake pedals fully
depressed.
Automatic transaxle – If the gearshift lever
is not in “P” (Park) position, shift into “P”
(Park). (If you need to re-start the engine
while the vehicle is moving, shift into “N”.)
Auto Gear Shift – Shift into “N” (Neutral)
and depress the brake pedal. Hold the
brake pedal while starting the engine.NOTE:
Automatic transaxle vehicles have a starter
interlock device which is designed to keep
the starter from operating if the transaxle is
in any of the drive positions.
82K254
3) The “PUSH” indicator light in the instru-
ment cluster will come on. Push the
engine switch (1). When the engine is
started, the starter motor will automati-
cally stop.
Auto Gear Shift
WA R N I N G
Make sure that the parking brake is
set fully and the transaxle is in Neu-
tral before attempting to start the
engine.
(1)
Page 98 of 336
3-13OPERATING YOUR VEHICLE
74LH0-74E
(For Diesel Engine Model)
Cold engine
Depress the clutch and brake pedals fully
and press the engine switch to crank the
engine. If the glow plug indicator light
comes on, the engine will start automati-
cally after the glow plug indicator light goes
off or 10 seconds past.
Warm engine
Crank the engine by pressing the engine
switch to change the ignition mode to
“START”.
Caution when stopping the engine with
turbocharger
When stopping the engine after climbing or
high speed driving, let the engine idle for
about one minute or more (if it is not pro-
hibited) to cool down the turbocharger and
engine oil. This is to prevent the engine oil
from over-deteriorating. Deteriorated
engine oil will damage the bearings of the
turbocharger.Restarting diesel engine after fuel-
empty stop
If the engine stops and the low fuel warn-
ing light and the malfunction indicator light
come on, use the following procedure:
1) Fill the fuel tank.
2) Press the engine switch to change the
ignition mode to “ON” for 5-10 seconds
to feed fuel.
3) Perform above engine starting proce-
dure to start the engine.
If the malfunction indicator light still comes
on after the engine started, there may be
some problem with the engine. Ask your
MARUTI SUZUKI dealer to have the
engine inspected.
If the “PUSH” indicator light blinks and
the engine cannot be started
Your keyless push start system remote
controller may not be sensed as being
within the “interior workable area”. Try
again after making sure that you have the
remote controller with you. If the engine
still cannot be started, the battery of the
remote controller may be discharged. You
must then use the following method to be
able to start the engine.
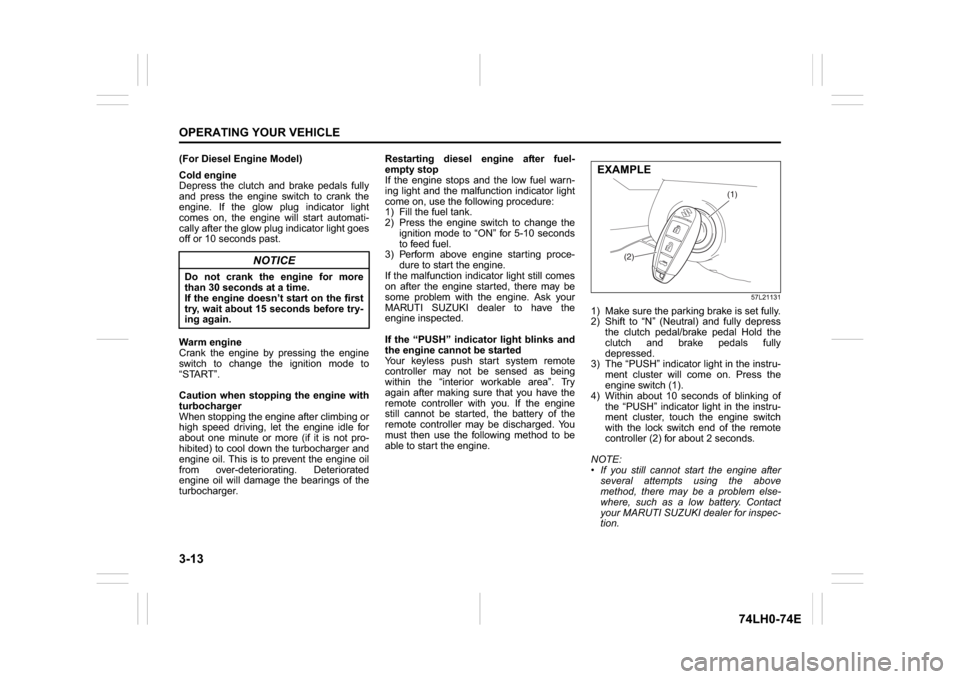
57L21131
1) Make sure the parking brake is set fully.
2) Shift to “N” (Neutral) and fully depress
the clutch pedal/brake pedal Hold the
clutch and brake pedals fully
depressed.
3) The “PUSH” indicator light in the instru-
ment cluster will come on. Press the
engine switch (1).
4) Within about 10 seconds of blinking of
the “PUSH” indicator light in the instru-
ment cluster, touch the engine switch
with the lock switch end of the remote
controller (2) for about 2 seconds.
NOTE:
If you still cannot start the engine after
several attempts using the above
method, there may be a problem else-
where, such as a low battery. Contact
your MARUTI SUZUKI dealer for inspec-
tion.
NOTICE
Do not crank the engine for more
than 30 seconds at a time.
If the engine doesn’t start on the first
try, wait about 15 seconds before try-
ing again.
(1)
(2)
EXAMPLE
Page 99 of 336
3-14
OPERATING YOUR VEHICLE
74LH0-74E
The immobilizer/keyless push start sys-
tem warning light come on for about 5
seconds while the “PUSH” indicator light
is blinking.
You may customize the system to cause
the interior buzzer to sound once for the
“remote controller out of sensing range”
warning. Please contact an authorized
MARUTI SUZUKI dealer for the customi-
zation.
If the battery of the remote controller is
about to be completely discharged, the
keyless push start system remote con-
troller battery consumption warning light
in the instrument cluster will come on for
a few seconds when the ignition mode is
changed to “ON” by pressing the engine
switch. For details on replacing the bat-
tery, refer to the “Keyless Push Start
System Remote Controller” in the
“BEFORE DRIVING” section.Returning the ignition mode to
“LOCK” (OFF)NOTE:
Certain problems like a fault in engine sys-
tem may prevent the engine switch from
going back to the “LOCK” (OFF) mode. If
this happens, have the vehicle inspected
by an authorized MARUTI SUZUKI dealer
after doing the following:
Lock the doors using the key to prevent
theft. (The request switches and the key-
less push start system remote controller
cannot be used to lock them.) Disconnect the negative cable from the
battery to prevent discharge.
“LOCK” (OFF) mode reminder buzzer
If the driver’s door is opened without
returning the ignition mode to “LOCK”
(OFF) by pressing the engine switch, a
buzzer sounds to warn you of this state.
If you open the driver’s door after press-
ing the engine switch to change the igni-
tion mode to “ACC”, the interior buzzer
beeps intermittently.
The buzzer will stop sounding if you then
push the engine switch twice, thus bring-
ing it back the ignition mode to “LOCK”
(OFF).
NOTE:
Whenever you leave the vehicle, make
sure you have returned the ignition mode
to “LOCK” (OFF) using the engine switch
and then lock the doors. Without returning
the ignition mode to “LOCK” (OFF), you
cannot use a request switch or keyless
push start system remote controller to lock
the doors.
Steering lock warning buzzer
If the steering lock fails to engage due to a
fault in the system when the ignition mode
is turned to “LOCK” (OFF) by pressing the
engine switch and then any door is opened
or closed, the interior buzzer will warn you
of this condition with repeated short beeps.
If this happens, have the vehicle inspected
by an authorized MARUTI SUZUKI dealer.
Using the Transmission
Manual Transmission
68LM324
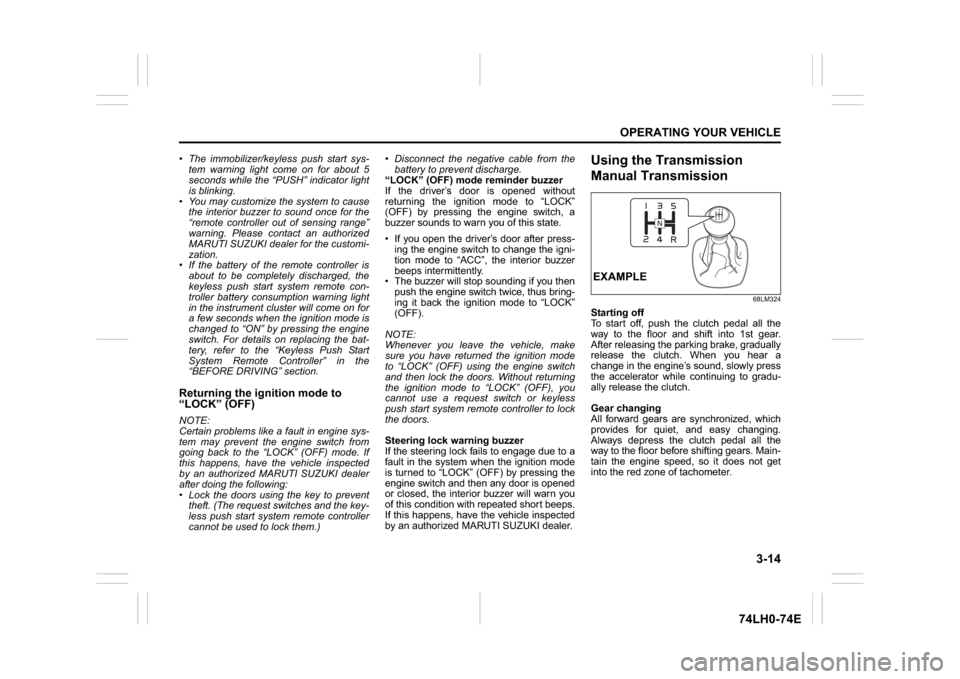
Starting off
To start off, push the clutch pedal all the
way to the floor and shift into 1st gear.
After releasing the parking brake, gradually
release the clutch. When you hear a
change in the engine’s sound, slowly press
the accelerator while continuing to gradu-
ally release the clutch.
Gear changing
All forward gears are synchronized, which
provides for quiet, and easy changing.
Always depress the clutch pedal all the
way to the floor before shifting gears. Main-
tain the engine speed, so it does not get
into the red zone of tachometer.EXAMPLE
Page 103 of 336
3-18
OPERATING YOUR VEHICLE
74LH0-74E
knob button (2) and shift the gearshift
lever to the desired position.
This procedure is for emergency use only.
If repeated use of this procedure is neces-
sary, or the procedure does not work as
described, take the vehicle to your dealer
for repair.
Auto Gear ShiftAuto Gear Shift is a 5-speed forward/
reverse transaxle.
Auto Gear Shift has the basic features of
conventional manual transaxle, but clutch
operation and transaxle gear shifting are
controlled electronically.
NOTE:
When you open the driver’s door, the Auto
Gear Shift systems run automatically and
you may hear an operating noise. This
sound does not indicate a malfunction.
The features are as follows:
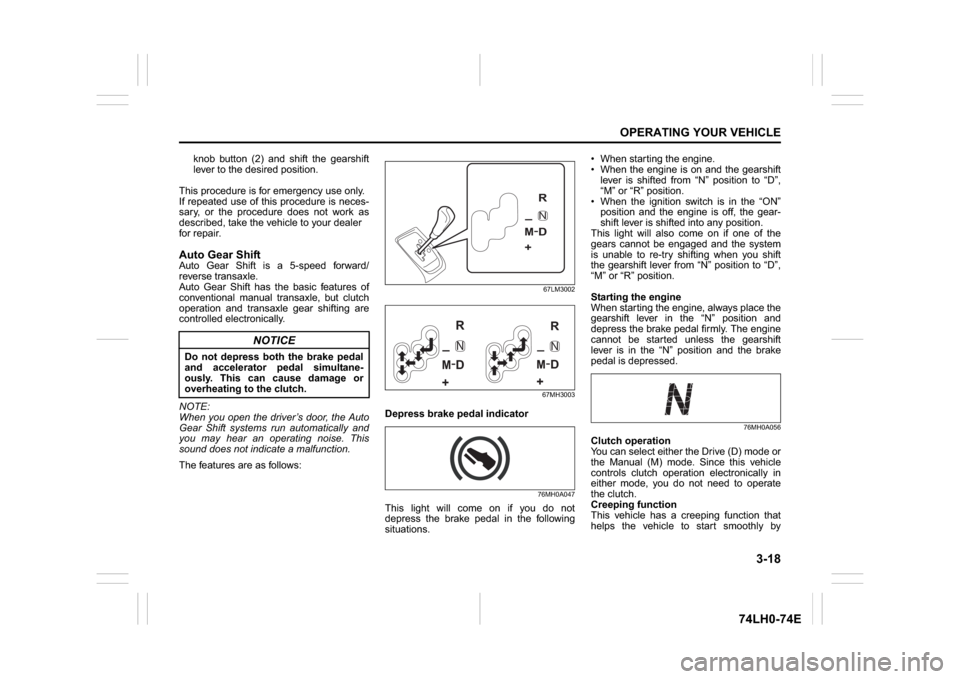
67LM3002
67MH3003
Depress brake pedal indicator
76MH0A047
This light will come on if you do not
depress the brake pedal in the following
situations. When starting the engine.
When the engine is on and the gearshift
lever is shifted from “N” position to “D”,
“M” or “R” position.
When the ignition switch is in the “ON”
position and the engine is off, the gear-
shift lever is shifted into any position.
This light will also come on if one of the
gears cannot be engaged and the system
is unable to re-try shifting when you shift
the gearshift lever from “N” position to “D”,
“M” or “R” position.
Starting the engine
When starting the engine, always place the
gearshift lever in the “N” position and
depress the brake pedal firmly. The engine
cannot be started unless the gearshift
lever is in the “N” position and the brake
pedal is depressed.
76MH0A056
Clutch operation
You can select either the Drive (D) mode or
the Manual (M) mode. Since this vehicle
controls clutch operation electronically in
either mode, you do not need to operate
the clutch.
Creeping function
This vehicle has a creeping function that
helps the vehicle to start smoothly by
NOTICE
Do not depress both the brake pedal
and accelerator pedal simultane-
ously. This can cause damage or
overheating to the clutch.
-M+R
N
D-
-M+R
N
D-
-M+R
N
D-
Page 109 of 336
3-24
OPERATING YOUR VEHICLE
74LH0-74E
Parking
Unlike an automatic transaxle, Auto Gear
Shift does not have a parking position. The
vehicle can be parked with the gearshift
lever at “D” or “R” position. Remember,
even though the transaxle is in gear, you
must set the parking brake firmly
1) Apply the parking brake and the brake
pedal firmly.
2) While depressing the brake pedal, shift
the gearshift lever to the “R” position on
a downhill slope, and to the 1st position
in the drive (D) mode or the “M(1)” posi-
tion in the manual (M) mode on an
uphill slope and confirm the gear posi-tion by checking the gear position indi-
cator.
3) Stop the engine completely.
4) In the case of uphill/downhill slope,
release the parking brake and brake
pedal slowly in order to check the gear
is engaged.
5) After check the vehicle stopped by the
gear engaged, Apply the parking brake
and the brake pedal firmly again.
6) Get out of the vehicle and put chocks
under the wheels.
When you return to your vehicle, you must
remember to remove the wheel chocks.
NOTE:
After the engine is stopped or ignition
switch is OFF, the gear in the transaxle
does not change even if you shift the
gearshift lever in any position. Always
shift the gearshift lever before turn igni-
tion switch OFF.
Check the transaxle gear position by
looking at the gear position indicator,
then turn the ignition switch off to stop
the engine.
WA R N I N G
When stopping, for example, at a
traffic light, be sure to depress the
brake pedal firmly. For your safety,
apply the parking brake, too, when
stopping on a hill.
When racing the engine, make sure
that the gear is in the “N” position
by checking the gear position indi-
cator. If the accelerator is operated
with the gear in any other position,
the vehicle may move resulting in
an unexpected accident.
Do not leave your vehicle unat-
tended while the engine is running.
When leaving the vehicle, stop the
engine and park the vehicle with a
gear engaged. Remember, even
though the transaxle is in gear, you
must set the parking brake firmly. If
you need to leave the vehicle with
the engine running, apply the park-
ing brakes firmly, and shift the
gearshift lever to the “N” position
and confirm the neutral position by
checking the gear position indica-
tor. However basically don’t leave
the vehicle with the engine running.
Otherwise, the vehicle may move
unexpectedly and may cause an
accident.
NOTICE
On a slope, never hold the vehicle
at a stop using only the accelerator
pedal or the creeping function. If
you perform this operation for a
certain period of time, a warning
buzzer will sound, and in some
cases the engine will stall. This can
also cause excessive damage to
the clutch.
If the gearshift lever is operated
more than necessary, the system
may not allow operation of the
gearshift lever for a certain period
of time, and the gear may not be
shifted appropriately. Therefore, do
not operate the gearshift lever if not
necessary.
Page 113 of 336
3-28
OPERATING YOUR VEHICLE
74LH0-74E
NOTE: Thin poles or obstacles lower than the sen-
sors may become undetectable as the
vehicle moves closer to them even if they
have been detected from longer distances.
The system may calculate the distance to
a road sign or similar obstacle to be shorter
than the actual dist
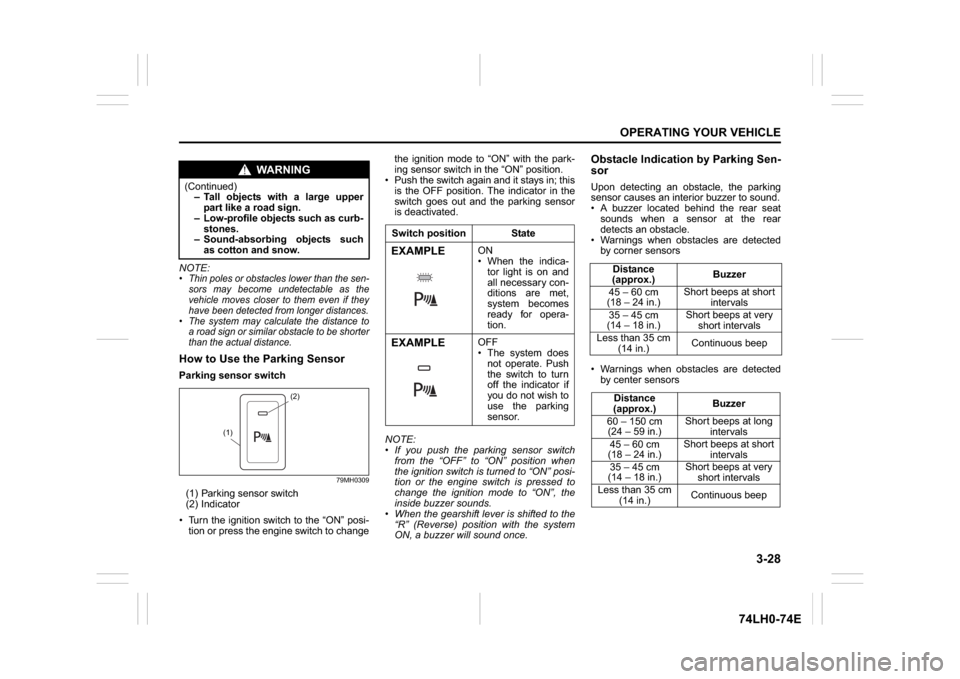
ance.How to Use the Parking SensorParking sensor switch
79MH0309
(1) Parking sensor switch
(2) Indicator
Turn the ignition switch to the “ON” posi-
tion or press the engine switch to changethe ignition mode to “ON” with the park-
ing sensor switch in the “ON” position.
Push the switch again and it stays in; this
is the OFF position. The indicator in the
switch goes out and the parking sensor
is deactivated.
NOTE:
If you push the parking sensor switch
from the “OFF” to “ON” position when
the ignition switch is turned to “ON” posi-
tion or the engine switch is pressed to
change the ignition mode to “ON”, the
inside buzzer sounds.
When the gearshift lever is shifted to the
“R” (Reverse) position with the system
ON, a buzzer will sound once.
Obstacle Indication by Parking Sen-
sorUpon detecting an obstacle, the parking
sensor causes an interior buzzer to sound.
A buzzer located behind the rear seat
sounds when a sensor at the rear
detects an obstacle.
Warnings when obstacles are detected
by corner sensors
Warnings when obstacles are detected
by center sensors
WA R N I N G
(Continued)
– Tall objects with a large upper
part like a road sign.
– Low-profile objects such as curb-
stones.
– Sound-absorbing objects such
as cotton and snow.
(2)
(1)
Switch position StateEXAMPLE
ON
When the indica-
tor light is on and
all necessary con-
ditions are met,
system becomes
ready for opera-
tion.
EXAMPLE
OFF
The system does
not operate. Push
the switch to turn
off the indicator if
you do not wish to
use the parking
sensor.
Distance
(approx.)Buzzer
45 – 60 cm
(18 – 24 in.)Short beeps at short
intervals
35 – 45 cm
(14 – 18 in.)Short beeps at very
short intervals
Less than 35 cm
(14 in.)Continuous beep
Distance
(approx.)Buzzer
60 – 150 cm
(24 – 59 in.)Short beeps at long
intervals
45 – 60 cm
(18 – 24 in.)Short beeps at short
intervals
35 – 45 cm
(14 – 18 in.)Short beeps at very
short intervals
Less than 35 cm
(14 in.)Continuous beep
Page 130 of 336
5-3OTHER CONTROLS AND EQUIPMENT
74LH0-74E
Temperature-controlled air comes out of
the floor outlets and cooler air comes out
of the center and side outlets. When the
temperature selector (1) is in the fully
COLD position or fully HOT position, how-
ever, the air from the floor outlets and the
air from the center and side outlets will be
the same temperature.
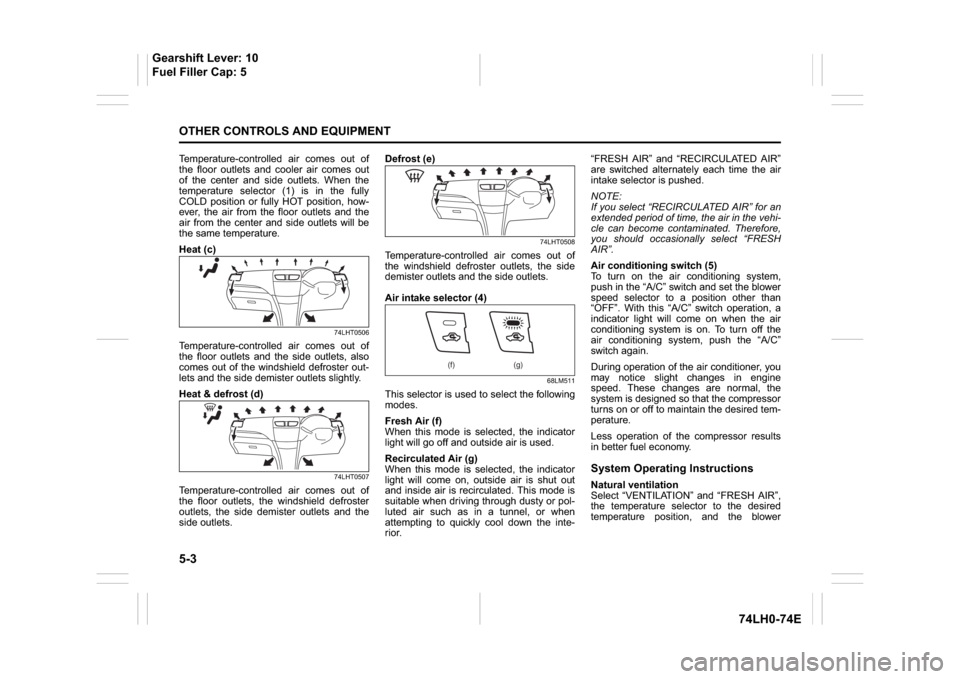
Heat (c)
74LHT0506
Temperature-controlled air comes out of
the floor outlets and the side outlets, also
comes out of the windshield defroster out-
lets and the side demister outlets slightly.
Heat & defrost (d)
74LHT0507
Temperature-controlled air comes out of
the floor outlets, the windshield defroster
outlets, the side demister outlets and the
side outlets.Defrost (e)
74LHT0508
Temperature-controlled air comes out of
the windshield defroster outlets, the side
demister outlets and the side outlets.
Air intake selector (4)
68LM511
This selector is used to select the following
modes.
Fresh Air (f)
When this mode is selected, the indicator
light will go off and outside air is used.
Recirculated Air (g)
When this mode is selected, the indicator
light will come on, outside air is shut out
and inside air is recirculated. This mode is
suitable when driving through dusty or pol-
luted air such as in a tunnel, or when
attempting to quickly cool down the inte-
rior.“FRESH AIR” and “RECIRCULATED AIR”
are switched alternately each time the air
intake selector is pushed.
NOTE:
If you select “RECIRCULATED AIR” for an
extended period of time, the air in the vehi-
cle can become contaminated. Therefore,
you should occasionally select “FRESH
AIR”.
Air conditioning switch (5)
To turn on the air conditioning system,
push in the “A/C” switch and set the blower
speed selector to a position other than
“OFF”. With this “A/C” switch operation, a
indicator light will come on when the air
conditioning system is on. To turn off the
air conditioning system, push the “A/C”
switch again.
During operation of the air conditioner, you
may notice slight changes in engine
speed. These changes are normal, the
system is designed so that the compressor
turns on or off to maintain the desired tem-
perature.
Less operation of the compressor results
in better fuel economy.
System Operating InstructionsNatural ventilation
Select “VENTILATION” and “FRESH AIR”,
the temperature selector to the desired
temperature position, and the blower
(f) (g)
Gearshift Lever: 10
Fuel Filler Cap: 5
Page 134 of 336
5-7OTHER CONTROLS AND EQUIPMENT
74LH0-74E
Temperature-controlled air comes out of
the floor outlets and the side outlets, a
small amount of air comes out of the wind-
shield defroster outlets and also comes
slightly out of the side demister outlets.
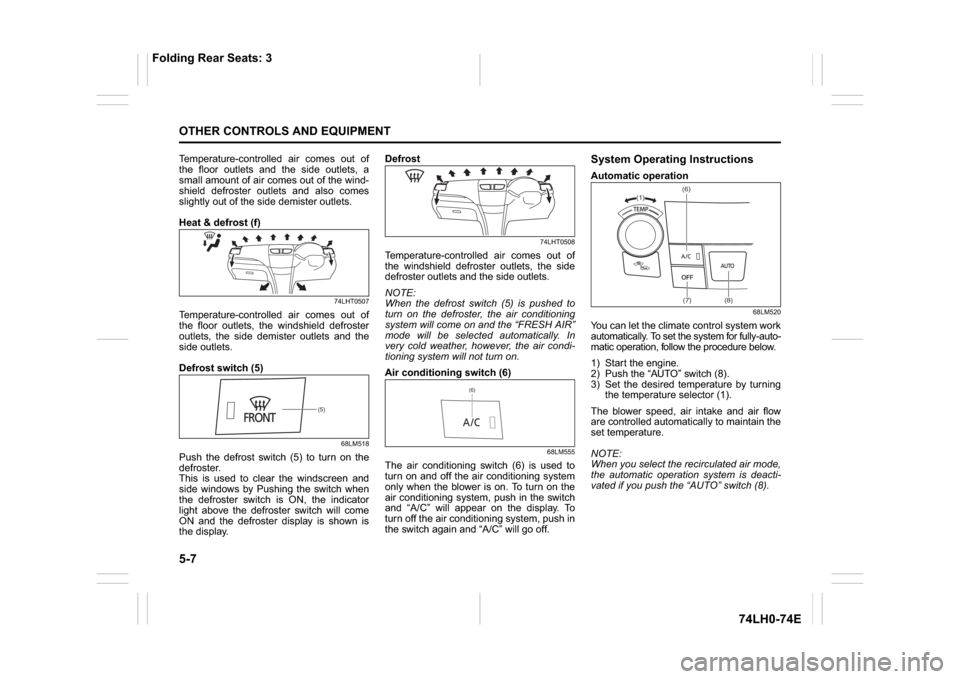
Heat & defrost (f)
74LHT0507
Temperature-controlled air comes out of
the floor outlets, the windshield defroster
outlets, the side demister outlets and the
side outlets.
Defrost switch (5)
68LM518
Push the defrost switch (5) to turn on the
defroster.
This is used to clear the windscreen and
side windows by Pushing the switch when
the defroster switch is ON, the indicator
light above the defroster switch will come
ON and the defroster display is shown is
the display.Defrost
74LHT0508
Temperature-controlled air comes out of
the windshield defroster outlets, the side
defroster outlets and the side outlets.
NOTE:
When the defrost switch (5) is pushed to
turn on the defroster, the air conditioning
system will come on and the “FRESH AIR”
mode will be selected automatically. In
very cold weather, however, the air condi-
tioning system will not turn on.
Air conditioning switch (6)
68LM555
The air conditioning switch (6) is used to
turn on and off the air conditioning system
only when the blower is on. To turn on the
air conditioning system, push in the switch
and “A/C” will appear on the display. To
turn off the air conditioning system, push in
the switch again and “A/C” will go off.
System Operating InstructionsAutomatic operation
68LM520
You can let the climate control system work
automatically. To set the system for fully-auto-
matic operation, follow the procedure below.
1) Start the engine.
2) Push the “AUTO” switch (8).
3) Set the desired temperature by turning
the temperature selector (1).
The blower speed, air intake and air flow
are controlled automatically to maintain the
set temperature.
NOTE:
When you select the recirculated air mode,
the automatic operation system is deacti-
vated if you push the “AUTO” switch (8).
(5)
(6)
(1)(6)
(7) (8)
Folding Rear Seats: 3
Page 143 of 336
5-16
OTHER CONTROLS AND EQUIPMENT
74LH0-74E
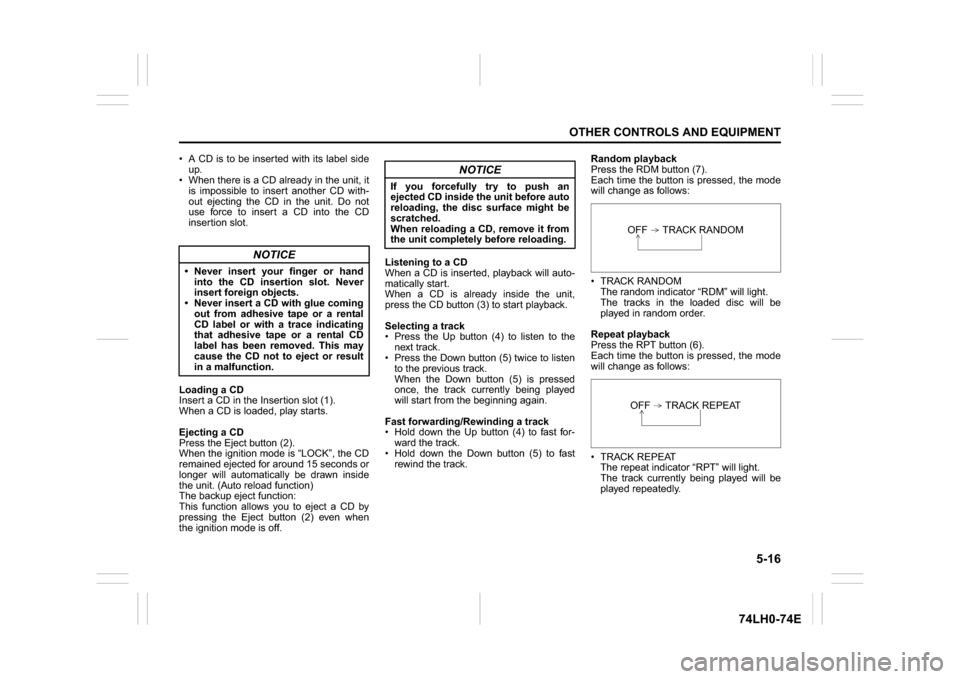
A CD is to be inserted with its label side
up.
When there is a CD already in the unit, it
is impossible to insert another CD with-
out ejecting the CD in the unit. Do not
use force to insert a CD into the CD
insertion slot.
Loading a CD
Insert a CD in the Insertion slot (1).
When a CD is loaded, play starts.
Ejecting a CD
Press the Eject button (2).
When the ignition mode is “LOCK”, the CD
remained ejected for around 15 seconds or
longer will automatically be drawn inside
the unit. (Auto reload function)
The backup eject function:
This function allows you to eject a CD by
pressing the Eject button (2) even when
the ignition mode is off.Listening to a CD
When a CD is inserted, playback will auto-
matically start.
When a CD is already inside the unit,
press the CD button (3) to start playback.
Selecting a track
Press the Up button (4) to listen to the
next track.
Press the Down button (5) twice to listen
to the previous track.
When the Down button (5) is pressed
once, the track currently being played
will start from the beginning again.
Fast forwarding/Rewinding a track
Hold down the Up button (4) to fast for-
ward the track.
Hold down the Down button (5) to fast
rewind the track.Random playback
Press the RDM button (7).
Each time the button is pressed, the mode
will change as follows:
TRACK RANDOM
The random indicator “RDM” will light.
The tracks in the loaded disc will be
played in random order.
Repeat playback
Press the RPT button (6).
Each time the button is pressed, the mode
will change as follows:
TRACK REPEAT
The repeat indicator “RPT” will light.
The track currently being played will be
played repeatedly.
NOTICE
Never insert your finger or hand
into the CD insertion slot. Never
insert foreign objects.
Never insert a CD with glue coming
out from adhesive tape or a rental
CD label or with a trace indicating
that adhesive tape or a rental CD
label has been removed. This may
cause the CD not to eject or result
in a malfunction.
NOTICE
If you forcefully try to push an
ejected CD inside the unit before auto
reloading, the disc surface might be
scratched.
When reloading a CD, remove it from
the unit completely before reloading.
OFF TRACK RANDOMOFF TRACK REPEAT
Page 144 of 336
5-17OTHER CONTROLS AND EQUIPMENT
74LH0-74E
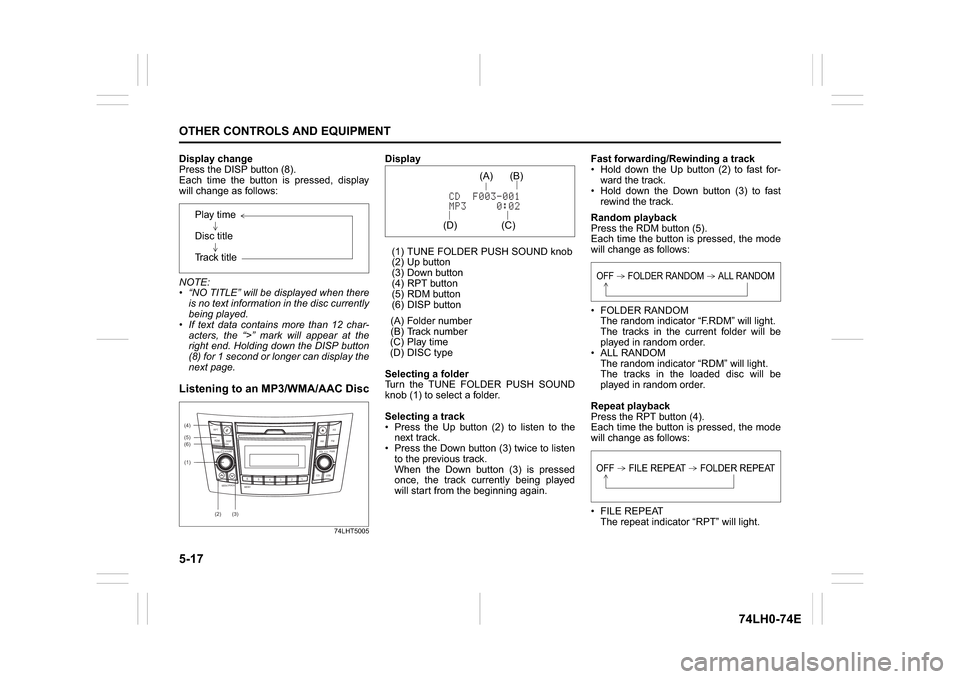
Display change
Press the DISP button (8).
Each time the button is pressed, display
will change as follows:
NOTE:
“NO TITLE” will be displayed when there
is no text information in the disc currently
being played.
If text data contains more than 12 char-
acters, the “>” mark will appear at the
right end. Holding down the DISP button
(8) for 1 second or longer can display the
next page.Listening to an MP3/WMA/AAC Disc
74LHT5005
Display
(1) TUNE FOLDER PUSH SOUND knob
(2) Up button
(3) Down button
(4) RPT button
(5) RDM button
(6) DISP button
(A) Folder number
(B) Track number
(C) Play time
(D) DISC type
Selecting a folder
Turn the TUNE FOLDER PUSH SOUND
knob (1) to select a folder.
Selecting a track
Press the Up button (2) to listen to the
next track.
Press the Down button (3) twice to listen
to the previous track.
When the Down button (3) is pressed
once, the track currently being played
will start from the beginning again.Fast forwarding/Rewinding a track
Hold down the Up button (2) to fast for-
ward the track.
Hold down the Down button (3) to fast
rewind the track.
Random playback
Press the RDM button (5).
Each time the button is pressed, the mode
will change as follows:
FOLDER RANDOM
The random indicator “F.RDM” will light.
The tracks in the current folder will be
played in random order.
ALL RANDOM
The random indicator “RDM” will light.
The tracks in the loaded disc will be
played in random order.
Repeat playback
Press the RPT button (4).
Each time the button is pressed, the mode
will change as follows:
FILE REPEAT
The repeat indicator “RPT” will light. Play time
Disc title
Track title
(5)
B S
U
CD
2
3 4 5 6
SEEK/TRACK
AS
AMFM RPT
RDM
DISP
PUSHSOUND
TUNE/FLD
VOLPWRPUSH
11
MENU
(2)
(4)
(3) (6)
(1)
(C)(B) (A)
(D)
OFF FOLDER RANDOM ALL RANDOMOFF FILE REPEAT FOLDER REPEAT