steering SUZUKI SWIFT 2017 5.G Owner's Manual
[x] Cancel search | Manufacturer: SUZUKI, Model Year: 2017, Model line: SWIFT, Model: SUZUKI SWIFT 2017 5.GPages: 336, PDF Size: 6.24 MB
Page 158 of 336
5-31OTHER CONTROLS AND EQUIPMENT
74LH0-74E
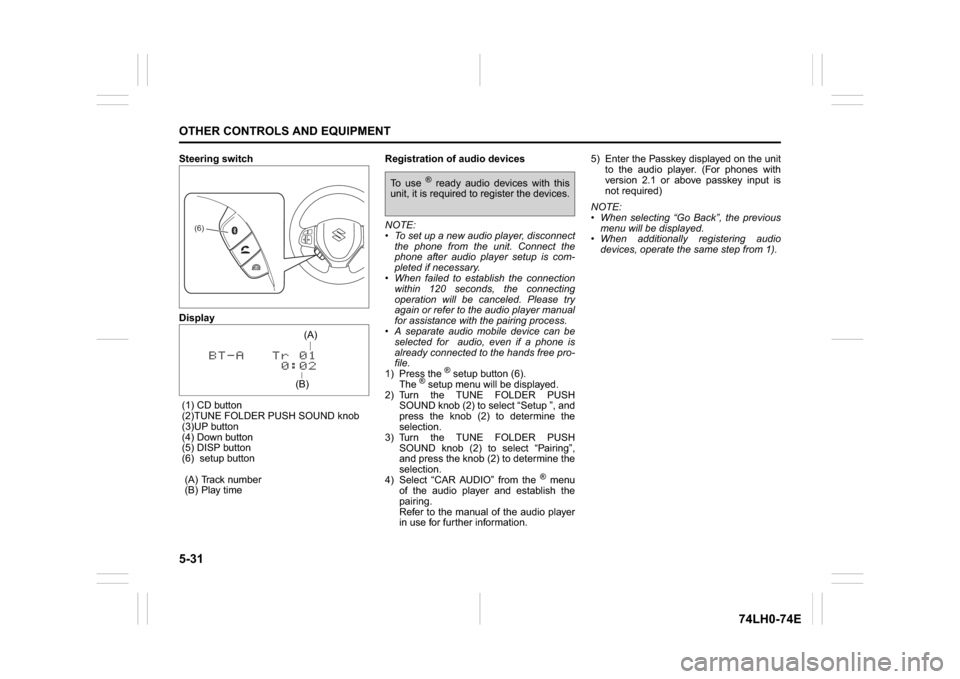
Steering switch
Display
(1) CD button
(2)TUNE FOLDER PUSH SOUND knob
(3)UP button
(4) Down button
(5) DISP button
(6) setup button
(A) Track number
(B) Play timeRegistration of audio devices
NOTE:
To set up a new audio player, disconnect
the phone from the unit. Connect the
phone after audio player setup is com-
pleted if necessary.
When failed to establish the connection
within 120 seconds, the connecting
operation will be canceled. Please try
again or refer to the audio player manual
for assistance with the pairing process.
A separate audio mobile device can be
selected for audio, even if a phone is
already connected to the hands free pro-
file.
1) Press the
® setup button (6).
The
® setup menu will be displayed.
2) Turn the TUNE FOLDER PUSH
SOUND knob (2) to select “Setup ”, and
press the knob (2) to determine the
selection.
3) Turn the TUNE FOLDER PUSH
SOUND knob (2) to select “Pairing”,
and press the knob (2) to determine the
selection.
4) Select “CAR AUDIO” from the
® menu
of the audio player and establish the
pairing.
Refer to the manual of the audio player
in use for further information.5) Enter the Passkey displayed on the unit
to the audio player. (For phones with
version 2.1 or above passkey input is
not required)
NOTE:
When selecting “Go Back”, the previous
menu will be displayed.
When additionally registering audio
devices, operate the same step from 1).
(6)
(B)(A)
To use
® ready audio devices with this
unit, it is required to register the devices.
Page 161 of 336
5-34
OTHER CONTROLS AND EQUIPMENT
74LH0-74E
Remote Audio Controls
(if equipped)Controlling of basic functions of the audio
system is available using the switches on
the steering wheel.
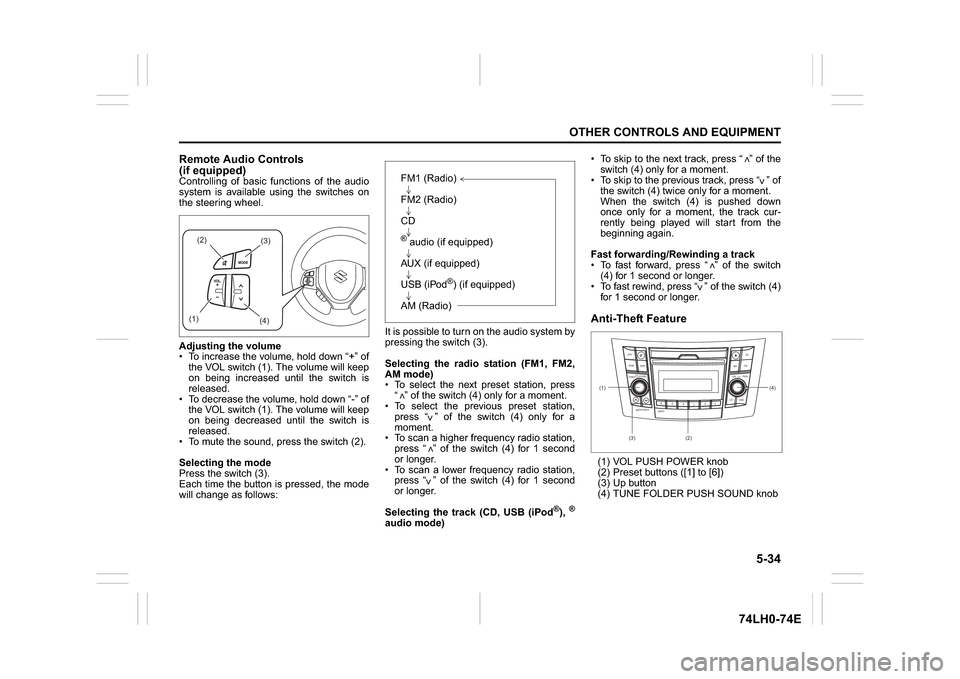
Adjusting the volume
To increase the volume, hold down “+” of
the VOL switch (1). The volume will keep
on being increased until the switch is
released.
To decrease the volume, hold down “-” of
the VOL switch (1). The volume will keep
on being decreased until the switch is
released.
To mute the sound, press the switch (2).
Selecting the mode
Press the switch (3).
Each time the button is pressed, the mode
will change as follows:It is possible to turn on the audio system by
pressing the switch (3).
Selecting the radio station (FM1, FM2,
AM mode)
To select the next preset station, press
“ ” of the switch (4) only for a moment.
To select the previous preset station,
press “ ” of the switch (4) only for a
moment.
To scan a higher frequency radio station,
press “ ” of the switch (4) for 1 second
or longer.
To scan a lower frequency radio station,
press “ ” of the switch (4) for 1 second
or longer.
Selecting the track (CD, USB (iPod
®),®
audio mode) To skip to the next track, press “ ” of the
switch (4) only for a moment.
To skip to the previous track, press “ ” of
the switch (4) twice only for a moment.
When the switch (4) is pushed down
once only for a moment, the track cur-
rently being played will start from the
beginning again.
Fast forwarding/Rewinding a track
To fast forward, press “ ” of the switch
(4) for 1 second or longer.
To fast rewind, press “ ” of the switch (4)
for 1 second or longer.
Anti-Theft Feature(1) VOL PUSH POWER knob
(2) Preset buttons ([1] to [6])
(3) Up button
(4) TUNE FOLDER PUSH SOUND knob
(2)
(3)
(1)
(4)
FM1 (Radio)
FM2 (Radio)
CD® audio (if equipped)
AUX (if equipped)
USB (iPod
®) (if equipped)
AM (Radio)
<
<<<
<
<
<<
(1)
B S U
CD
2
3 4 5 6
S
EEK/TRACK
AS
AMFM RPT
RDM
DISP
PUSHSOUND
TUNE/FLD
VOLPWRPUSH
11
MENU
(3)(4)
(2)
Page 163 of 336
5-36
OTHER CONTROLS AND EQUIPMENT
74LH0-74E
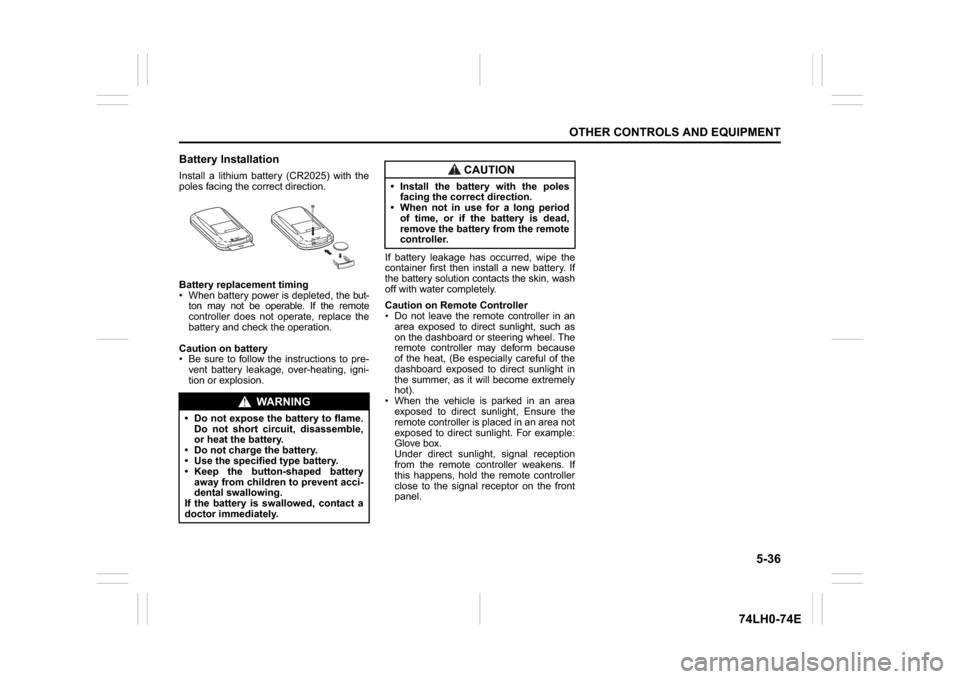
Battery InstallationInstall a lithium battery (CR2025) with the
poles facing the correct direction.
Battery replacement timing
When battery power is depleted, the but-
ton may not be operable. If the remote
controller does not operate, replace the
battery and check the operation.
Caution on battery
Be sure to follow the instructions to pre-
vent battery leakage, over-heating, igni-
tion or explosion.If battery leakage has occurred, wipe the
container first then install a new battery. If
the battery solution contacts the skin, wash
off with water completely.
Caution on Remote Controller
Do not leave the remote controller in an
area exposed to direct sunlight, such as
on the dashboard or steering wheel. The
remote controller may deform because
of the heat, (Be especially careful of the
dashboard exposed to direct sunlight in
the summer, as it will become extremely
hot).
When the vehicle is parked in an area
exposed to direct sunlight, Ensure the
remote controller is placed in an area not
exposed to direct sunlight. For example:
Glove box.
Under direct sunlight, signal reception
from the remote controller weakens. If
this happens, hold the remote controller
close to the signal receptor on the front
panel.
WA R N I N G
Do not expose the battery to flame.
Do not short circuit, disassemble,
or heat the battery.
Do not charge the battery.
Use the specified type battery.
Keep the button-shaped battery
away from children to prevent acci-
dental swallowing.
If the battery is swallowed, contact a
doctor immediately.
CAUTION
Install the battery with the poles
facing the correct direction.
When not in use for a long period
of time, or if the battery is dead,
remove the battery from the remote
controller.
Page 188 of 336

6-5VEHICLE LOADING AND TOWING
74LH0-74E
A: 2WD VEHICLES WITH MANUAL
TRANSAXLE OR AUTOMATIC
TRANSAXLE OR AUTO GEAR
SHIFT1) Secure the front wheels on a towing
dolly according to the instructions pro-
vided by the dolly manufacturer.
2) Release the parking brake.
NOTICE
The steering column is not strong
enough to withstand shocks trans-
mitted from the front wheels during
towing. Always unlock the steering
wheel before towing. TOWING METHOD AFROM THE FRONT:
FRONT WHEELS ON A DOLLY
AND REAR WHEELS ON THE GROUND
B: 2WD VEHICLES WITH MANUAL TRANSAXLE OR AUTO GEAR SHIFT1) Shift the manual transaxle lever into neutral.
2) Turn the ignition key to the “ACC” position or change the ignition mode to the “ACC” to
unlock the steering wheel.
3) Release the parking brake.
ACC
N
TOWING METHOD BFROM THE FRONT:
FRONT WHEELS ON THE GROUND
Page 191 of 336
INSPECTION AND MAINTENANCE
INSPECTION AND MAINTENANCE
Maintenance Schedule ....................................................... 7-2
Periodic Maintenance Schedule ........................................ 7-2
Drive Belt ............................................................................. 7-6
Engine Oil and Filter ........................................................... 7-6
Engine Coolant .................................................................... 7-10
Air Cleaner ........................................................................... 7-11
Spark Plugs (Petrol Engine)................................................ 7-11
Gear Oil ................................................................................ 7-13
Clutch Pedal ........................................................................ 7-14
Fuel Filter (Diesel Engine) .................................................. 7-15
Brakes .................................................................................. 7-16
7
Steering ................................................................................ 7-17
Tires ...................................................................................... 7-18
Battery .................................................................................. 7-20
Fuses .................................................................................... 7-22
Bulb Replacement ............................................................... 7-24
Wiper Blades ....................................................................... 7-28
Windshield Washer Fluid ................................................... 7-30
Air Conditioning System .................................................... 7-30
74LH0-74E
Page 195 of 336
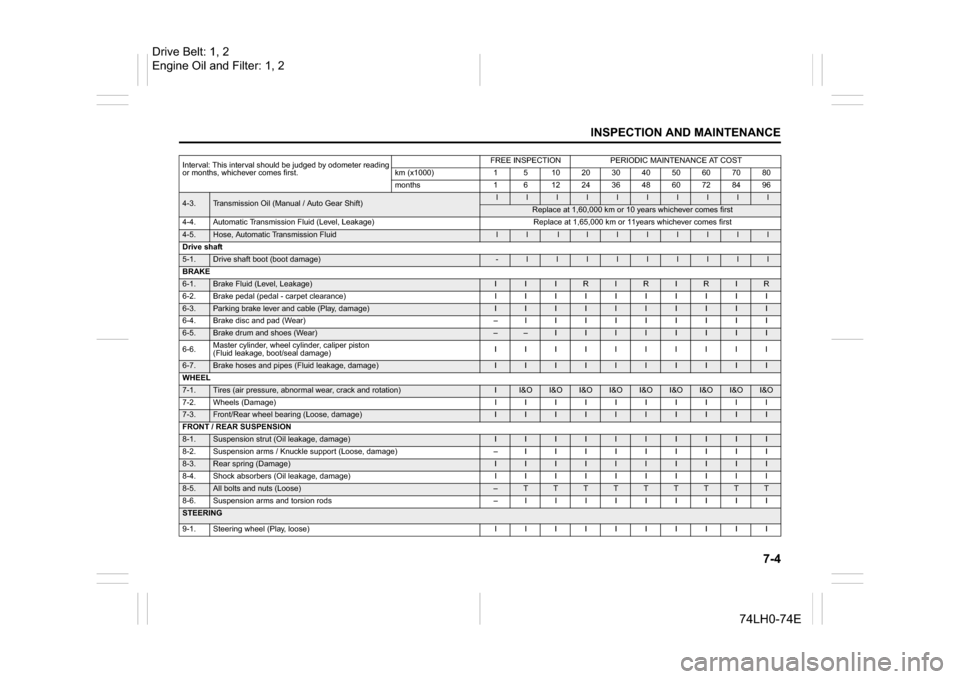
7-4
INSPECTION AND MAINTENANCE
74LH0-74E
4-3.
Transmission Oil (Manual / Auto Gear Shift)
l
l
l
l
l
l
l
l
l
l
Replace at 1,60,000 km or 10 years whichever comes first
4-4. Automatic Transmission Fluid (Level, Leakage) Replace at 1,65,000 km or 11years whichever comes first
4-5.
Hose, Automatic Transmission Fluid
l
l
l
l
l
l
l
l
l
l
Drive shaft
5-1.
Drive shaft boot (boot damage)
-
l
l
l
l
l
l
l
l
l
BRAKE
6-1.
Brake Fluid (Level, Leakage)
I
I
I
R
I
R
I
R
I
R
6-2. Brake pedal (pedal - carpet clearance) I I I I I I I I I I
6-3.
Parking brake lever and cable (Play, damage)
I
I
I
I
I
I
I
I
I
I
6-4. Brake disc and pad (Wear) – I I I I I I I I I
6-5.
Brake drum and shoes (Wear)
–
–
I
I
I
I
I
I
I
I
6-6.Master cylinder, wheel cylinder, caliper piston
(Fluid leakage, boot/seal damage)IIIIIIIIII
6-7.
Brake hoses and pipes (Fluid leakage, damage)
I
I
I
I
I
I
I
I
I
I
WHEEL
7-1.
Tires (air pressure, abnormal wear, crack and rotation)
I
I&O
I&O
I&O
I&O
I&O
I&O
I&O
I&O
I&O
7-2. Wheels (Damage) I I I I I I I I I I
7-3.
Front/Rear wheel bearing (Loose, damage)
I
I
I
I
I
I
I
I
I
I
FRONT / REAR SUSPENSION
8-1.
Suspension strut (Oil leakage, damage)
I
I
I
I
I
I
I
I
I
I
8-2. Suspension arms / Knuckle support (Loose, damage) – I I I I I I I I I
8-3.
Rear spring (Damage)
I
I
I
I
I
I
I
I
I
I
8-4. Shock absorbers (Oil leakage, damage) I I I I I I I I I I
8-5.
All bolts and nuts (Loose)
–
T
T
T
T
T
T
T
T
T
8-6. Suspension arms and torsion rods – I I I I I I I I I
STEERING
9-1. Steering wheel (Play, loose) I I I I I I I I I IInterval: This interval should be judged by odometer reading
or months, whichever comes first.
FREE INSPECTION
PERIODIC MAINTENANCE AT COST
km (x1000)
1
5
10
20
30
40
50
60
70
80
months
1
6
12
24
36
48
60
72
84
96
Drive Belt: 1, 2
Engine Oil and Filter: 1, 2
Page 197 of 336
7-6
INSPECTION AND MAINTENANCE
74LH0-74E
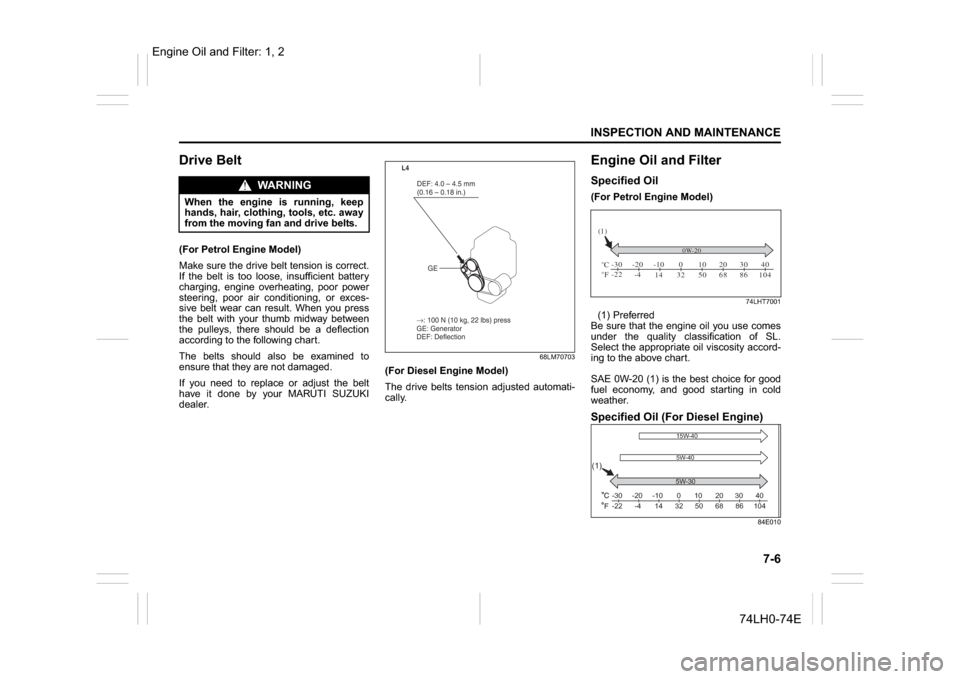
Drive Belt(For Petrol Engine Model)
Make sure the drive belt tension is correct.
If the belt is too loose, insufficient battery
charging, engine overheating, poor power
steering, poor air conditioning, or exces-
sive belt wear can result. When you press
the belt with your thumb midway between
the pulleys, there should be a deflection
according to the following chart.
The belts should also be examined to
ensure that they are not damaged.
If you need to replace or adjust the belt
have it done by your MARUTI SUZUKI
dealer.
68LM70703
(For Diesel Engine Model)
The drive belts tension adjusted automati-
cally.
Engine Oil and FilterSpecified Oil (For Petrol Engine Model)
74LHT7001
(1) Preferred
Be sure that the engine oil you use comes
under the quality classification of SL.
Select the appropriate oil viscosity accord-
ing to the above chart.
SAE 0W-20 (1) is the best choice for good
fuel economy, and good starting in cold
weather. Specified Oil (For Diesel Engine)
84E010
When the engine is running, keep
hands, hair, clothing, tools, etc. away
from the moving fan and drive belts.
→ : 100 N (10 kg, 22 lbs) press
GE: Generator
DEF: Deflection DEF: 4.0 – 4.5 mm
(0.16 – 0.18 in.)
GE
L4
CFo o-30
-22 -20
-4 -10
14 32 50 68 86 104 010203040
(1)
0W-205W-30
(1)
-30
-22 -4 14
32506886 104
-20 -10 10 20
3040
0
15W-40
5W-40
Engine Oil and Filter: 1, 2
WA R N I N G
Page 208 of 336
7-17INSPECTION AND MAINTENANCE
74LH0-74E
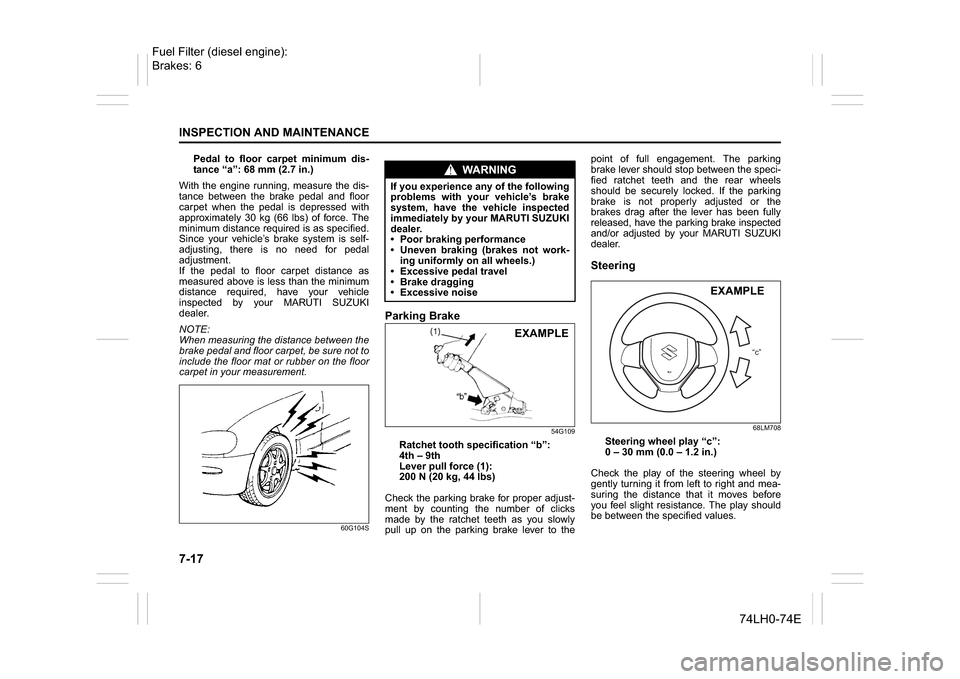
Pedal to floor carpet minimum dis-
tance “a”: 68 mm (2.7 in.)
With the engine running, measure the dis-
tance between the brake pedal and floor
carpet when the pedal is depressed with
approximately 30 kg (66 lbs) of force. The
minimum distance required is as specified.
Since your vehicle’s brake system is self-
adjusting, there is no need for pedal
adjustment.
If the pedal to floor carpet distance as
measured above is less than the minimum
distance required, have your vehicle
inspected by your MARUTI SUZUKI
dealer.
NOTE:
When measuring the distance between the
brake pedal and floor carpet, be sure not to
include the floor mat or rubber on the floor
carpet in your measurement.
60G104S
Parking Brake
54G109
Ratchet tooth specification “b”:
4th – 9th
Lever pull force (1):
200 N (20 kg, 44 lbs)
Check the parking brake for proper adjust-
ment by counting the number of clicks
made by the ratchet teeth as you slowly
pull up on the parking brake lever to thepoint of full engagement. The parking
brake lever should stop between the speci-
fied ratchet teeth and the rear wheels
should be securely locked. If the parking
brake is not properly adjusted or the
brakes drag after the lever has been fully
released, have the parking brake inspected
and/or adjusted by your MARUTI SUZUKI
dealer.
Steering
68LM708
Steering wheel play “c”:
0 – 30 mm (0.0 – 1.2 in.)
Check the play of the steering wheel by
gently turning it from left to right and mea-
suring the distance that it moves before
you feel slight resistance. The play should
be between the specified values.
WA R N I N G
If you experience any of the following
problems with your vehicle’s brake
system, have the vehicle inspected
immediately by your MARUTI SUZUKI
dealer.
Poor braking performance
Uneven braking (brakes not work-
ing uniformly on all wheels.)
Excessive pedal travel
Brake dragging
Excessive noise
EXAMPLE
“c”
EXAMPLE
Fuel Filter (diesel engine):
Brakes: 6
Page 209 of 336
7-18
INSPECTION AND MAINTENANCE
74LH0-74E
Check that the steering wheel turns easily
and smoothly without rattling by turning it
all the way to the right and to the left while
driving very slowly in an open area. If the
amount of free play is outside the specifi-
cation or you find anything else to be
wrong, an inspection must be performed
by your MARUTI SUZUKI dealer.Tires
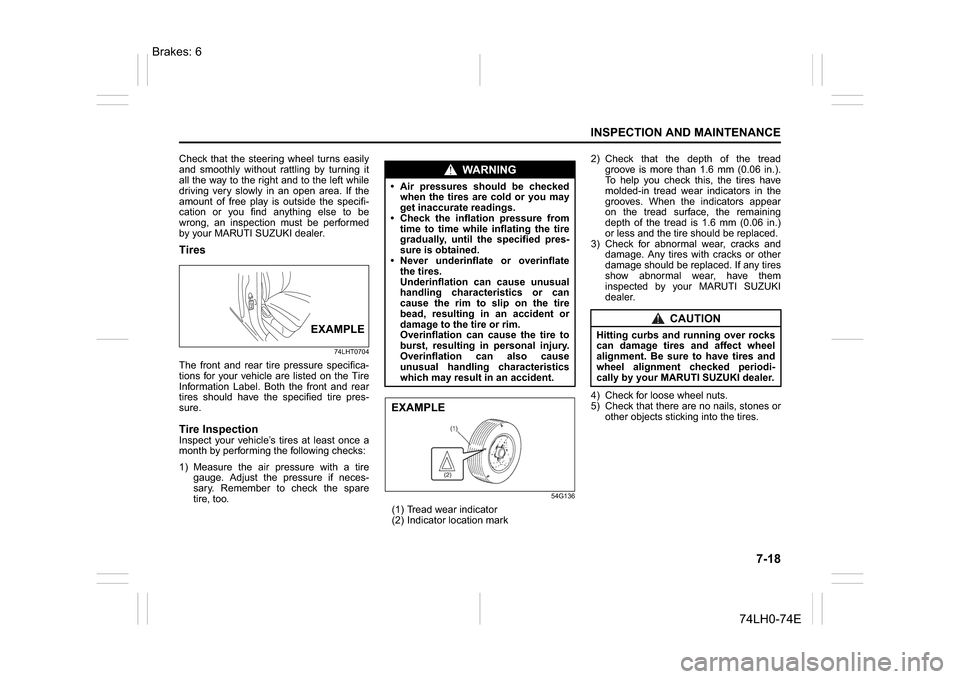
74LHT0704
The front and rear tire pressure specifica-
tions for your vehicle are listed on the Tire
Information Label. Both the front and rear
tires should have the specified tire pres-
sure.Tire InspectionInspect your vehicle’s tires at least once a
month by performing the following checks:
1) Measure the air pressure with a tire
gauge. Adjust the pressure if neces-
sary. Remember to check the spare
tire, too.
54G136
(1) Tread wear indicator
(2) Indicator location mark2) Check that the depth of the tread
groove is more than 1.6 mm (0.06 in.).
To help you check this, the tires have
molded-in tread wear indicators in the
grooves. When the indicators appear
on the tread surface, the remaining
depth of the tread is 1.6 mm (0.06 in.)
or less and the tire should be replaced.
3) Check for abnormal wear, cracks and
damage. Any tires with cracks or other
damage should be replaced. If any tires
show abnormal wear, have them
inspected by your MARUTI SUZUKI
dealer.
4) Check for loose wheel nuts.
5) Check that there are no nails, stones or
other objects sticking into the tires.
EXAMPLE
WA R N I N G
Air pressures should be checked
when the tires are cold or you may
get inaccurate readings.
Check the inflation pressure from
time to time while inflating the tire
gradually, until the specified pres-
sure is obtained.
Never underinflate or overinflate
the tires.
Underinflation can cause unusual
handling characteristics or can
cause the rim to slip on the tire
bead, resulting in an accident or
damage to the tire or rim.
Overinflation can cause the tire to
burst, resulting in personal injury.
Overinflation can also cause
unusual handling characteristics
which may result in an accident.EXAMPLE
CAUTION
Hitting curbs and running over rocks
can damage tires and affect wheel
alignment. Be sure to have tires and
wheel alignment checked periodi-
cally by your MARUTI SUZUKI dealer.
Brakes: 6
Page 210 of 336
7-19INSPECTION AND MAINTENANCE
74LH0-74E
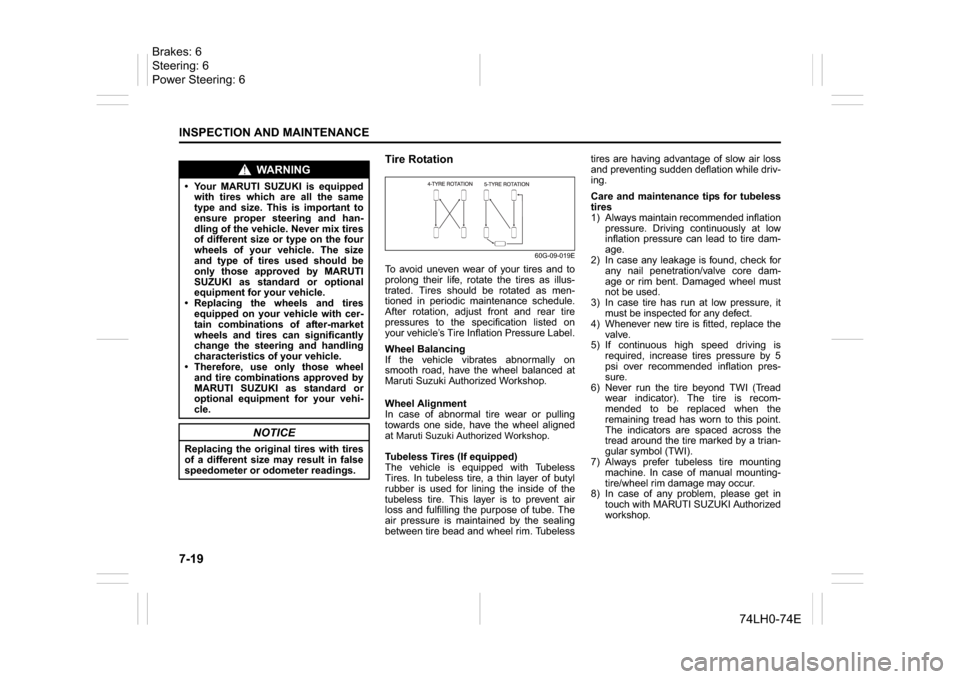
Tire Rotation
60G-09-019E
To avoid uneven wear of your tires and to
prolong their life, rotate the tires as illus-
trated. Tires should be rotated as men-
tioned in periodic maintenance schedule.
After rotation, adjust front and rear tire
pressures to the specification listed on
your vehicle’s Tire Inflation Pressure Label.
Wheel Balancing
If the vehicle vibrates abnormally on
smooth road, have the wheel balanced at
Maruti Suzuki Authorized Workshop.
Wheel Alignment
In case of abnormal tire wear or pulling
towards one side, have the wheel aligned
at Maruti Suzuki Authorized Workshop.Tubeless Tires (If equipped)
The vehicle is equipped with Tubeless
Tires. In tubeless tire, a thin layer of butyl
rubber is used for lining the inside of the
tubeless tire. This layer is to prevent air
loss and fulfilling the purpose of tube. The
air pressure is maintained by the sealing
between tire bead and wheel rim. Tubelesstires are having advantage of slow air loss
and preventing sudden deflation while driv-
ing.
Care and maintenance tips for tubeless
tires
1) Always maintain recommended inflation
pressure. Driving continuously at low
inflation pressure can lead to tire dam-
age.
2) In case any leakage is found, check for
any nail penetration/valve core dam-
age or rim bent. Damaged wheel must
not be used.
3) In case tire has run at low pressure, it
must be inspected for any defect.
4) Whenever new tire is fitted, replace the
valve.
5) If continuous high speed driving is
required, increase tires pressure by 5
psi over recommended inflation pres-
sure.
6) Never run the tire beyond TWI (Tread
wear indicator). The tire is recom-
mended to be replaced when the
remaining tread has worn to this point.
The indicators are spaced across the
tread around the tire marked by a trian-
gular symbol (TWI).
7) Always prefer tubeless tire mounting
machine. In case of manual mounting-
tire/wheel rim damage may occur.
8) In case of any problem, please get in
touch with MARUTI SUZUKI Authorized
workshop.
WA R N I N G
Your MARUTI SUZUKI is equipped
with tires which are all the same
type and size. This is important to
ensure proper steering and han-
dling of the vehicle. Never mix tires
of different size or type on the four
wheels of your vehicle. The size
and type of tires used should be
only those approved by MARUTI
SUZUKI as standard or optional
equipment for your vehicle.
Replacing the wheels and tires
equipped on your vehicle with cer-
tain combinations of after-market
wheels and tires can significantly
change the steering and handling
characteristics of your vehicle.
Therefore, use only those wheel
and tire combinations approved by
MARUTI SUZUKI as standard or
optional equipment for your vehi-
cle.
NOTICE
Replacing the original tires with tires
of a different size may result in false
speedometer or odometer readings.
Brakes: 6
Steering: 6
Power Steering: 6