key SUZUKI SWIFT 2017 5.G Service Manual
[x] Cancel search | Manufacturer: SUZUKI, Model Year: 2017, Model line: SWIFT, Model: SUZUKI SWIFT 2017 5.GPages: 336, PDF Size: 6.24 MB
Page 152 of 336
5-25OTHER CONTROLS AND EQUIPMENT
74LH0-74E
/Telephone setup mode can be entered
only during vehicle is stationary speed
less than ~ 8 kmph)
1) Press the
® setup button (4).
The
® setup menu will be displayed.
2) Turn the TUNE FOLDER PUSH
SOUND knob (1) to select “Setup ”, and
press the knob (1) to determine the
selection.
3) Turn the TUNE FOLDER PUSH
SOUND knob (1) to select “Pairing”,
and press the knob (1) to determine the
selection.
4) Select “CAR AUDIO” from the
® menu
of the phone and establish the pairing.
Refer to the manual of the phone in use
for further information.
5) Enter the Passkey displayed on the unit
to the phone.
6) Press the On Hook button (6).
NOTE:
When selecting “Go Back”, the previous
menu will be displayed.
When additionally registering a phone,
operate the same step from 1).
Receiving a call
Press the Off Hook button (5) to receive a
call.
Ending a call
Press the On Hook button (6) to end a call.
Rejecting a call (only for supported
models)Press the On Hook button (6) to reject a
incoming call.
Adjusting the listening volume
Turn the VOL PUSH POWER knob (2)
during a call.
Turning it clockwise increases the vol-
ume; turning it counterclockwise
decreases the volume.
Press the VOL switch (7) during a call.
Pressing “+” of the switch increases the
volume, pressing “-” of the switch
decreases the volume.
Adjusting the ring volume
Turn the VOL PUSH POWER knob (2)
while a call coming in.
Turning it clockwise increases the vol-
ume; turning it counterclockwise
decreases the volume.
Press the VOL switch (7) during a call.
Pressing “+” of the switch increases the
volume, pressing “-” of the switch
decreases the volume.
Adjusting the call or ringtone volume
Follow the instructions below to adjust the
call or ringtone volume.
1) Press the
® setup button (4).
The
® setup menu will be displayed.
2) Turn the TUNE FOLDER PUSH
SOUND knob (1) to select “Setup Tele-
phone”, and press the knob (1) to deter-
mine the selection.
3) Turn the TUNE FOLDER PUSH
SOUND knob (1) to select “Sound Set-ting”, and press the knob (1) to deter-
mine the selection.
4) Turn the TUNE FOLDER PUSH
SOUND knob (1) to select “Call Vol-
ume” or “Ringtone Volume”, and press
the knob (1) to determine the selection.
The current call or ringtone volume will
be displayed.
5) Turn the TUNE FOLDER PUSH
SOUND knob (1) to select desired call
or ringtone volume, and press the knob
(1) to determine the selection.
NOTE:
When selecting “Go Back”, the previous
menu will be displayed.
Selecting the Ringtone
Follow the instructions below to select a
ringtone.
1) Press the
® setup button (4).
The
® setup menu will be displayed.
2) Turn the TUNE FOLDER PUSH
SOUND knob (1) to select “Setup Tele-
phone”, and press the knob (1) to deter-
mine the selection.
3) Turn the TUNE FOLDER PUSH
SOUND knob (1) to select “Sound Set-
ting”, and press the knob (1) to deter-
mine the selection.
4) Turn the TUNE FOLDER PUSH SOUND
knob (1) to select “Ringtone”, and press
the knob (1) to determine the selection.
The current ringtone will be sounded.
5) Turn the TUNE FOLDER PUSH SOUND
knob (1) to select desired ringtone, and
Page 156 of 336
5-29OTHER CONTROLS AND EQUIPMENT
74LH0-74E
the knob (1) to display the device name
or the BD (
® Device) address.
NOTE:
When selecting “Go Back”, the previous
menu will be displayed.
Reset to the factory defaults
Follow the instructions below to reset all
the settings to the factory defaults.
1) Press the ® setup button (4).
The
® setup menu will be displayed.
2) Turn the TUNE FOLDER PUSH
SOUND knob (1) to select “Setup ”, and
press the knob (1) to determine the
selection.
3) Turn the TUNE FOLDER PUSH
SOUND knob (1) to select “Initialize”,
and press the knob (1) to determine the
selection.
4) Turn the TUNE FOLDER PUSH
SOUND knob (1) to select “All Initial-
ize”, and press the knob (1) to deter-
mine the selection.
5) Turn the TUNE FOLDER PUSH
SOUND knob (1) to select “Confirm”,
and press the knob (1) to start the
reset.
NOTE:
When selecting “Go Back”, the previous
menu will be displayed.Selection of phone (Select Phone)
Follow the instructions below to select a
phone to be paired with from the registered
phones.
1) Press the
® setup button (4).
The
® setup menu will be displayed.
2) Turn the TUNE FOLDER PUSH
SOUND knob (1) to select “Setup ”, and
press the knob (1) to determine the
selection.
3) Turn the TUNE FOLDER PUSH
SOUND knob (1) to select “List Phone”,
and press the knob (1) to determine the
selection.
4) Turn the TUNE FOLDER PUSH
SOUND knob (1) to select a phone to
be paired with, and press the knob (1)
to determine the selection.
5) Turn the TUNE FOLDER PUSH
SOUND knob (1) to select “Select”, and
press the knob (1) to determine the
selection.
NOTE:
When selecting “Go Back”, the previous
menu will be displayed.
The ® ready audio device will be discon-
nected when the phone is selected.List of phones (List Phones)
Follow the instructions below to display the
names of the registered phones in
sequence.
1) Press the
® setup button (4).
The
® setup menu will be displayed.
2) Turn the TUNE FOLDER PUSH
SOUND knob (1) to select “Setup ”, and
press the knob (1) to determine the
selection.
3) Turn the TUNE FOLDER PUSH
SOUND knob (1) to select “List Phone”,
and press the knob (1) to determine the
selection.
The names of the registered phones
are displayed in sequence.
NOTE:
When selecting “Go Back”, the previous
menu will be displayed.
Passkey setting (Set Passkey)
Follow the instructions below to set the
security number (Passkey).
1) Press the
® setup button (4).
The
® setup menu will be displayed.
2) Turn the TUNE FOLDER PUSH
SOUND knob (1) to select “Setup ”, and
press the knob (1) to determine the
selection.
3) Turn the TUNE FOLDER PUSH
SOUND knob (1) to select “Passkey”,
and press the knob (1) to determine the
selection.
4) Turn the TUNE FOLDER PUSH
SOUND knob (1) to select “New Pass-
Page 157 of 336
5-30
OTHER CONTROLS AND EQUIPMENT
74LH0-74E
key”, and press the knob (1) to deter-
mine the selection.
5) Press or turn the TUNE FOLDER
PUSH SOUND knob (1) to select “Con-
firm”.
6) Turn the TUNE FOLDER PUSH
SOUND knob (1) to select a number for
the first digit, and press the knob (1) to
determine the selection. Select and
determine numbers for the second,
third and fourth digits in order in the
same manner. When not entering up to
the eighth digit, enter blanks for the
successive digits.
7) Turn the TUNE FOLDER PUSH
SOUND knob (1) to determine the
passkey setting.
NOTE:
When selecting “Go Back”, the previous
menu will be displayed.
Deletion of phone information (Delete
Phone)
Follow the instructions below to delete the
registered information of the phone.
1) Press the
® setup button (4).
The
® setup menu will be displayed.
2) Turn the TUNE FOLDER PUSH
SOUND knob (1) to select “Setup ”, and
press the knob (1) to determine the
selection.
3) Turn the TUNE FOLDER PUSH
SOUND knob (1) to select “List Phone”,
and press the knob (1) to determine the
selection.4) Turn the TUNE FOLDER PUSH
SOUND knob (1) to select a phone to
be deleted, and press the knob (1) to
determine the selection.
5) Turn the TUNE FOLDER PUSH
SOUND knob (1) to select “Delete
Phone”, and press the knob (1) to
determine the selection.
6) Turn the TUNE FOLDER PUSH
SOUND knob (1) to select “Delete?”,
and press the knob (1) to determine the
selection.
7) Turn the TUNE FOLDER PUSH
SOUND knob (1) to select “Confirm”,
and press the knob (1) to determine the
selection.
NOTE:
When selecting “Go Back”, the previous
menu will be displayed.
BT function on/off (BT Power)
Follow the instructions below to turn on/off
the
® function.
1) Press the
® setup button (4).
The
® setup menu will be displayed.
2) Turn the TUNE FOLDER PUSH
SOUND knob (1) to select “Setup ”, and
press the knob (1) to determine the
selection.
3) Turn the TUNE FOLDER PUSH
SOUND knob (1) to select “BT Power”,
and press the knob (1) to determine the
selection.
4) Press the TUNE FOLDER PUSH
SOUND knob (1) to select “BT Power
On” or “BT Power Off ”.NOTE:
When the BT function is turned off, the
connection between this unit and the
registered phone in use will be discon-
nected.
When selecting “Go Back”, the previous
menu will be displayed.
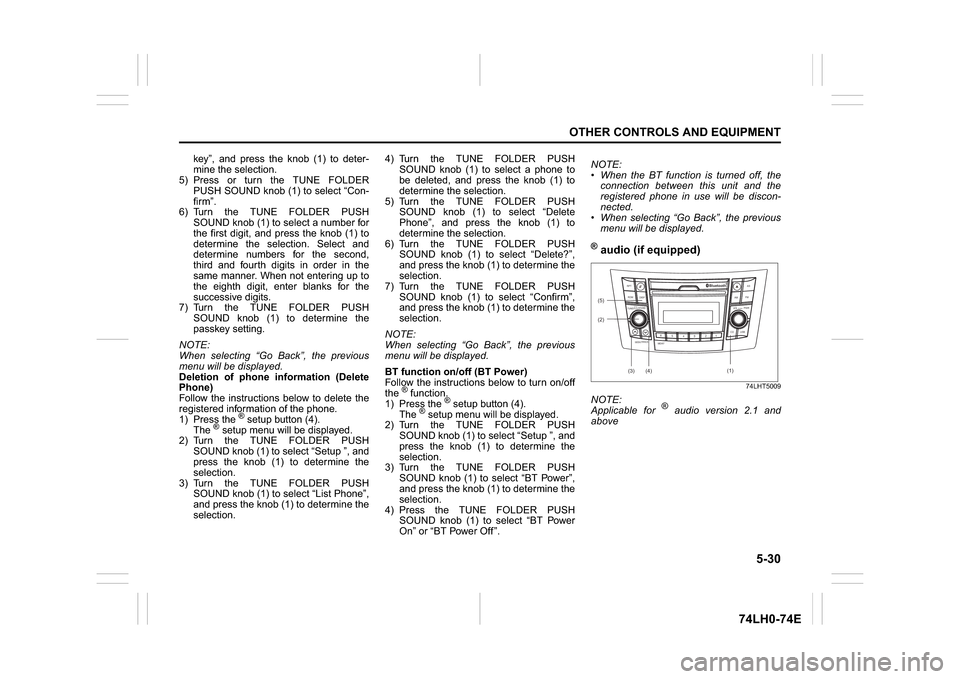
® audio (if equipped)
74LHT5009
NOTE:
Applicable for
® audio version 2.1 and
above
(2)
B
S U
CD
2
3 4 5 6
SEEK/TRACK
AS
AMFM RPT
RDM
DISP
PUSHSOUND
TUNE/FLD
VOLPWRPUSH
1
MENU
(3)
(4) (5)
Bluetooth
R(1)
Page 158 of 336
5-31OTHER CONTROLS AND EQUIPMENT
74LH0-74E
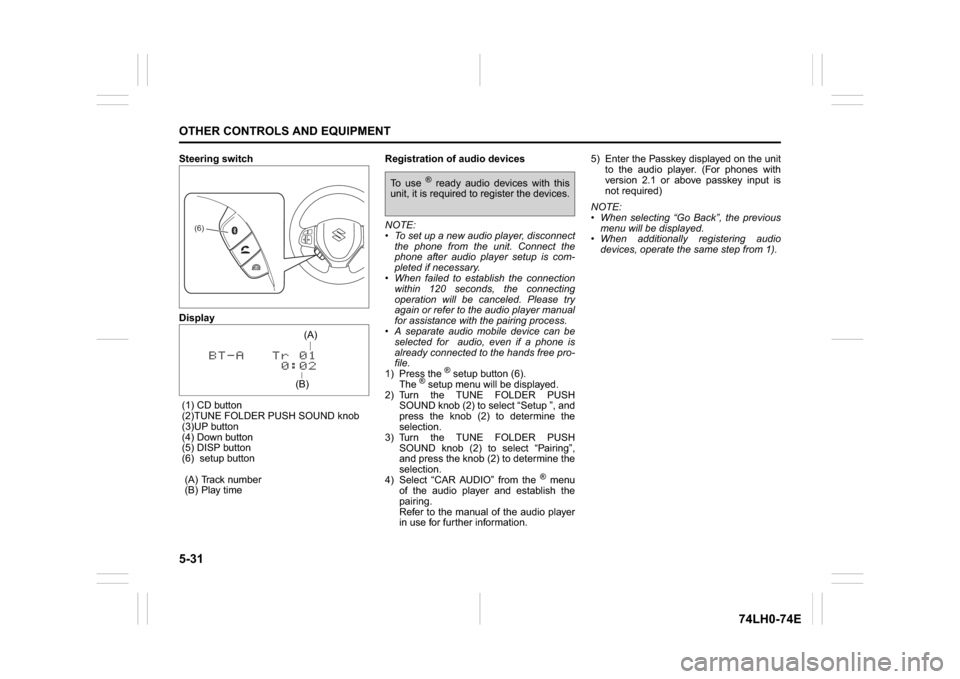
Steering switch
Display
(1) CD button
(2)TUNE FOLDER PUSH SOUND knob
(3)UP button
(4) Down button
(5) DISP button
(6) setup button
(A) Track number
(B) Play timeRegistration of audio devices
NOTE:
To set up a new audio player, disconnect
the phone from the unit. Connect the
phone after audio player setup is com-
pleted if necessary.
When failed to establish the connection
within 120 seconds, the connecting
operation will be canceled. Please try
again or refer to the audio player manual
for assistance with the pairing process.
A separate audio mobile device can be
selected for audio, even if a phone is
already connected to the hands free pro-
file.
1) Press the
® setup button (6).
The
® setup menu will be displayed.
2) Turn the TUNE FOLDER PUSH
SOUND knob (2) to select “Setup ”, and
press the knob (2) to determine the
selection.
3) Turn the TUNE FOLDER PUSH
SOUND knob (2) to select “Pairing”,
and press the knob (2) to determine the
selection.
4) Select “CAR AUDIO” from the
® menu
of the audio player and establish the
pairing.
Refer to the manual of the audio player
in use for further information.5) Enter the Passkey displayed on the unit
to the audio player. (For phones with
version 2.1 or above passkey input is
not required)
NOTE:
When selecting “Go Back”, the previous
menu will be displayed.
When additionally registering audio
devices, operate the same step from 1).
(6)
(B)(A)
To use
® ready audio devices with this
unit, it is required to register the devices.
Page 160 of 336
5-33OTHER CONTROLS AND EQUIPMENT
74LH0-74E
List of audio devices (List Audio)
Follow the instructions below to display the
names of the registered audio devices in
sequence.
1) Press the
® setup button (6).
The
® setup menu will be displayed.
2) Turn the TUNE FOLDER PUSH
SOUND knob (2) to select “Setup ”, and
press the knob (2) to determine the
selection.
3) Turn the TUNE FOLDER PUSH
SOUND knob (2) to select “List Audio”,
and press the knob (2) to determine the
selection. The names of registered
audio devices will be displayed in
sequence.
NOTE:
When selecting “Go Back”, the previous
menu will be displayed.
Passkey setting (Set Passkey)
Follow the instructions below to set the
security number (Passkey).
1) Press the
® setup button (6).
The
® setup menu will be displayed.
2) Turn the TUNE FOLDER PUSH
SOUND knob (2) to select “Setup ”, and
press the knob (2) to determine the
selection.
3) Turn the TUNE FOLDER PUSH
SOUND knob (2) to select “Passkey”,
and press the knob (2) to determine the
selection.
4) Turn the TUNE FOLDER PUSH
SOUND knob (2) to select “New Pass-key”, and press the knob (2) to deter-
mine the selection.
5) Press or turn the TUNE FOLDER
PUSH SOUND knob (2) to select “Con-
firm”.
6) Turn the TUNE FOLDER PUSH
SOUND knob (2) to select a number for
the first digit, and press the knob (2) to
determine the selection. Select and
determine numbers for the second,
third and fourth digits in order in the
same manner. When not entering up to
the eighth digit, enter blanks for the
successive digits.
7) Turn the TUNE FOLDER PUSH
SOUND knob (2) to determine the
passkey setting.
NOTE:
When selecting “Go Back”, the previous
menu will be displayed.
Deletion of audio device information
(Delete Audio)
Follow the instructions below to delete the
registered information of audio device.
1) Press the
® setup button (6).
The
® setup menu will be displayed.
2) Turn the TUNE FOLDER PUSH
SOUND knob (2) to select “Setup ”, and
press the knob (2) to determine the
selection.
3) Turn the TUNE FOLDER PUSH
SOUND knob (2) to select “List Audio”,
and press the knob (2) to determine the
selection.4) Turn the TUNE FOLDER PUSH
SOUND knob (2) to select an audio
device to be deleted, and press the
knob (2) to determine the selection.
5) Turn the TUNE FOLDER PUSH
SOUND knob (2) to select “Delete”, and
press the knob (2) to determine the
selection.
6) Turn the TUNE FOLDER PUSH
SOUND knob (2) to select “Delete?”,
and press the knob (2) to determine the
selection.
7) Turn the TUNE FOLDER PUSH
SOUND knob (2) to select “Confirm”,
and press the knob (2) to complete the
deletion.
NOTE:
When selecting “Go Back”, the previous
menu will be displayed.
Disclaimer for
® function
Depending on the mobile phone models,
some phones may not be compatible
fully or partially (some function may be
restricted).
Connectivity or voice quality may get
affected depending on circumstances.
After the ignition switch is turned to the
“ON” position, the audio system takes
few seconds to detect and connect to the® device (if already paired).
Make sure that you are aware of all
applicable local laws and accordingly
use device.
Page 176 of 336
5-49OTHER CONTROLS AND EQUIPMENT
74LH0-74E
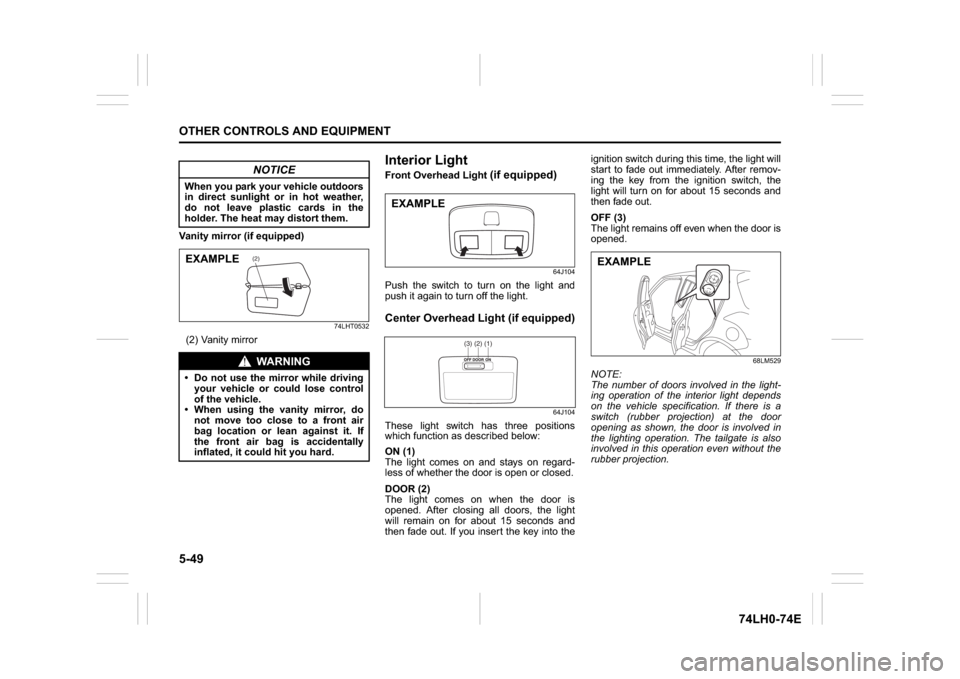
Vanity mirror (if equipped)
74LHT0532
(2) Vanity mirror
Interior Light Front Overhead Light
(if equipped)
64J104
Push the switch to turn on the light and
push it again to turn off the light.Center Overhead Light (if equipped)
64J104
These light switch has three positions
which function as described below:
ON (1)
The light comes on and stays on regard-
less of whether the door is open or closed.
DOOR (2)
The light comes on when the door is
opened. After closing all doors, the light
will remain on for about 15 seconds and
then fade out. If you insert the key into theignition switch during this time, the light will
start to fade out immediately. After remov-
ing the key from the ignition switch, the
light will turn on for about 15 seconds and
then fade out.
OFF (3)
The light remains off even when the door is
opened.
68LM529
NOTE:
The number of doors involved in the light-
ing operation of the interior light depends
on the vehicle specification. If there is a
switch (rubber projection) at the door
opening as shown, the door is involved in
the lighting operation. The tailgate is also
involved in this operation even without the
rubber projection.
NOTICE
When you park your vehicle outdoors
in direct sunlight or in hot weather,
do not leave plastic cards in the
holder. The heat may distort them.
WA R N I N G
Do not use the mirror while driving
your vehicle or could lose control
of the vehicle.
When using the vanity mirror, do
not move too close to a front air
bag location or lean against it. If
the front air bag is accidentally
inflated, it could hit you hard.
(2)
EXAMPLE
EXAMPLE
(1)(2)(3)
EXAMPLE
Page 188 of 336

6-5VEHICLE LOADING AND TOWING
74LH0-74E
A: 2WD VEHICLES WITH MANUAL
TRANSAXLE OR AUTOMATIC
TRANSAXLE OR AUTO GEAR
SHIFT1) Secure the front wheels on a towing
dolly according to the instructions pro-
vided by the dolly manufacturer.
2) Release the parking brake.
NOTICE
The steering column is not strong
enough to withstand shocks trans-
mitted from the front wheels during
towing. Always unlock the steering
wheel before towing. TOWING METHOD AFROM THE FRONT:
FRONT WHEELS ON A DOLLY
AND REAR WHEELS ON THE GROUND
B: 2WD VEHICLES WITH MANUAL TRANSAXLE OR AUTO GEAR SHIFT1) Shift the manual transaxle lever into neutral.
2) Turn the ignition key to the “ACC” position or change the ignition mode to the “ACC” to
unlock the steering wheel.
3) Release the parking brake.
ACC
N
TOWING METHOD BFROM THE FRONT:
FRONT WHEELS ON THE GROUND
Page 189 of 336
6-6
VEHICLE LOADING AND TOWING
74LH0-74E
NOTICE
After shifting the Auto Gear Shift
lever to the “N” position, always
check the gear position indicator in
the instrument cluster shows the “N”
position to make sure that the
transaxle is disengaged.
If the transaxle cannot be put in neu-
tral, turn the key from the “LOCK” to
the “ON” position, and move the
Auto Gear Shift lever from “N” to “D”,
“M” or “R”, then back to “N” again.
Then turn the key from the “ON” to
the “LOCK” position.
These procedures may help put the
transaxle in neutral. If the transaxle
still cannot be put in neutral, you can-
not tow the vehicle without using a
towing dolly.
Page 229 of 336
8-6
EMERGENCY SERVICE
74LH0-74E
71LST0802
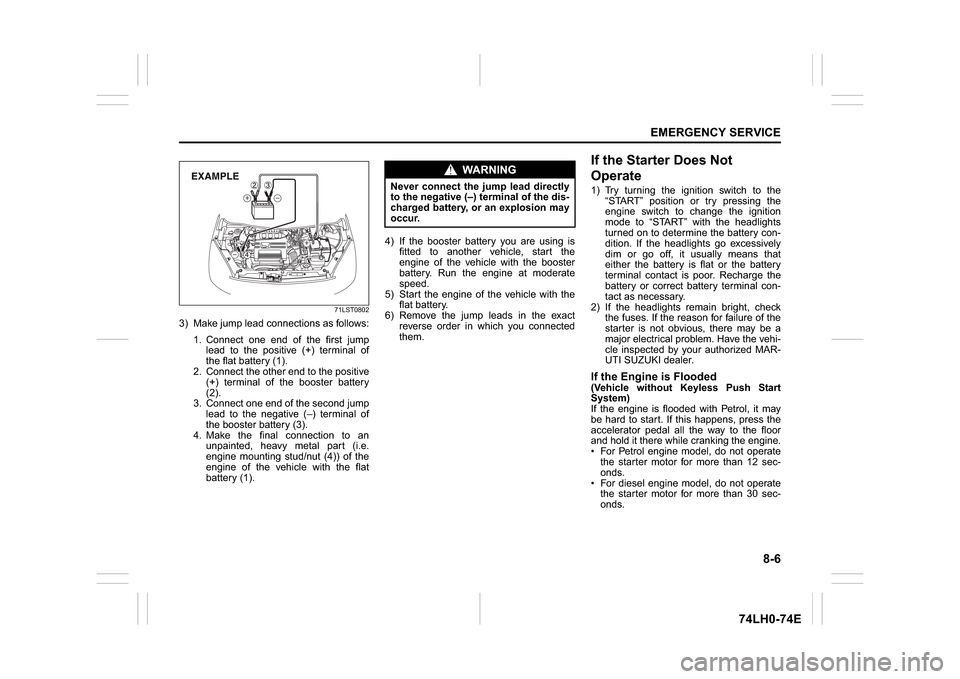
3) Make jump lead connections as follows:
1. Connect one end of the first jump
lead to the positive (+) terminal of
the flat battery (1).
2. Connect the other end to the positive
(+) terminal of the booster battery
(2).
3. Connect one end of the second jump
lead to the negative (–) terminal of
the booster battery (3).
4. Make the final connection to an
unpainted, heavy metal part (i.e.
engine mounting stud/nut (4)) of the
engine of the vehicle with the flat
battery (1).4) If the booster battery you are using is
fitted to another vehicle, start the
engine of the vehicle with the booster
battery. Run the engine at moderate
speed.
5) Start the engine of the vehicle with the
flat battery.
6) Remove the jump leads in the exact
reverse order in which you connected
them.
If the Starter Does Not
Operate1) Try turning the ignition switch to the
“START” position or try pressing the
engine switch to change the ignition
mode to “START” with the headlights
turned on to determine the battery con-
dition. If the headlights go excessively
dim or go off, it usually means that
either the battery is flat or the battery
terminal contact is poor. Recharge the
battery or correct battery terminal con-
tact as necessary.
2) If the headlights remain bright, check
the fuses. If the reason for failure of the
starter is not obvious, there may be a
major electrical problem. Have the vehi-
cle inspected by your authorized MAR-
UTI SUZUKI dealer.If the Engine is Flooded(Vehicle without Keyless Push Start
System)
If the engine is flooded with Petrol, it may
be hard to start. If this happens, press the
accelerator pedal all the way to the floor
and hold it there while cranking the engine.
For Petrol engine model, do not operate
the starter motor for more than 12 sec-
onds.
For diesel engine model, do not operate
the starter motor for more than 30 sec-
onds.
EXAMPLE
WA R N I N G
Never connect the jump lead directly
to the negative (–) terminal of the dis-
charged battery, or an explosion may
occur.
Page 230 of 336
8-7EMERGENCY SERVICE
74LH0-74E
(Vehicle with Keyless Push Start Sys-
tem)
If the engine is flooded with Petrol, it may
be hard to start. If this happens, press the
accelerator pedal all the way to the floor
and hold it there while cranking the engine.
For Petrol engine model, do not operate
the starter motor for more than 12 sec-
onds.
For diesel engine model, do not operate
the starter motor for more than 30 sec-
onds.
NOTE:
If the engine refuses to start, the starter
motor automatically stops after a certain
period of time. After the starter motor has
automatically stopped or there is anything
abnormal in the engine starting system,
the starter motor runs only while the
engine switch is held pressed.
If the Engine OverheatsThe engine could overheat temporarily
under severe driving conditions. If the
engine coolant temperature gauge indi-
cates overheating during driving:
1) Turn off the air conditioner, if equipped.
2) Take the vehicle to a safe place and
park.
3) Let the engine run at the normal idle
speed for a few minutes until the indica-
tor is within the normal, acceptable
temperature range between “H” and
“C”.
If the temperature indication does not
come down to within the normal, accept-
able range:
1) Turn off the engine and check that the
water pump belt and pulleys are not
damaged or slipping. If any abnormality
is found, correct it.
2) Check the coolant level in the reservoir.
If it is found to be lower than the “LOW”line, look for leaks at the radiator, water
pump, and radiator and heater hoses. If
you locate any leaks that may have
caused the overheating, do not run the
engine until these problems have been
corrected.
3) If you do not find a leak, carefully add
coolant to the reservoir and then the
radiator, if necessary. (Refer to “Engine
Coolant” in the “INSPECTION AND
MAINTENANCE” section.)
NOTE:
If your engine overheats and you are
unsure what to do, contact your MARUTI
SUZUKI dealer.
For Petrol
65D350
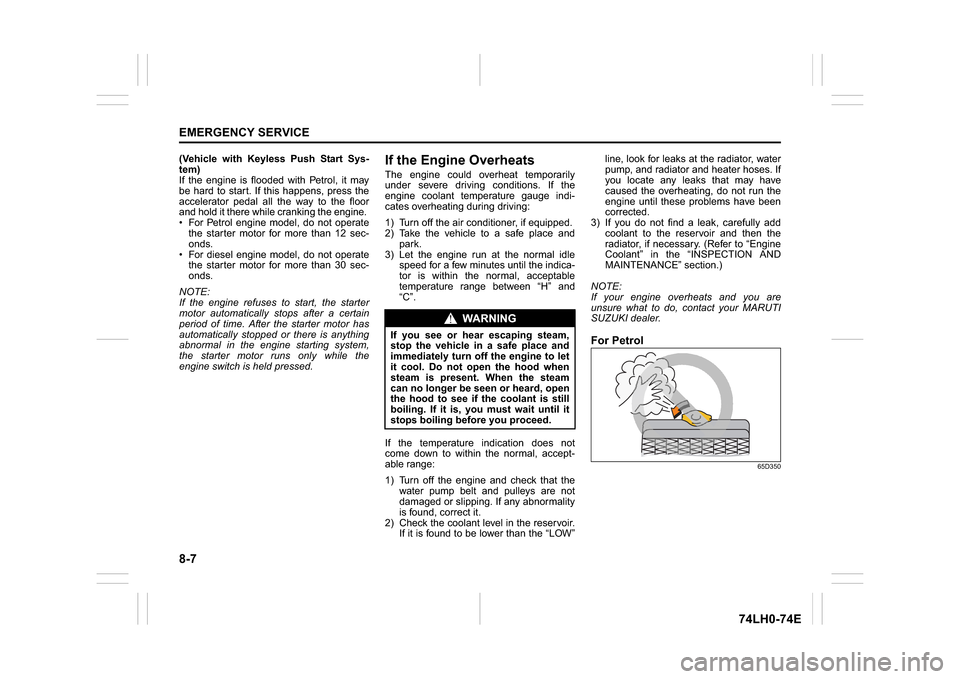
WA R N I N G
If you see or hear escaping steam,
stop the vehicle in a safe place and
immediately turn off the engine to let
it cool. Do not open the hood when
steam is present. When the steam
can no longer be seen or heard, open
the hood to see if the coolant is still
boiling. If it is, you must wait until it
stops boiling before you proceed.