MAN SUZUKI SWIFT 2017 5.G Repair Manual
[x] Cancel search | Manufacturer: SUZUKI, Model Year: 2017, Model line: SWIFT, Model: SUZUKI SWIFT 2017 5.GPages: 336, PDF Size: 6.24 MB
Page 188 of 336

6-5VEHICLE LOADING AND TOWING
74LH0-74E
A: 2WD VEHICLES WITH MANUAL
TRANSAXLE OR AUTOMATIC
TRANSAXLE OR AUTO GEAR
SHIFT1) Secure the front wheels on a towing
dolly according to the instructions pro-
vided by the dolly manufacturer.
2) Release the parking brake.
NOTICE
The steering column is not strong
enough to withstand shocks trans-
mitted from the front wheels during
towing. Always unlock the steering
wheel before towing. TOWING METHOD AFROM THE FRONT:
FRONT WHEELS ON A DOLLY
AND REAR WHEELS ON THE GROUND
B: 2WD VEHICLES WITH MANUAL TRANSAXLE OR AUTO GEAR SHIFT1) Shift the manual transaxle lever into neutral.
2) Turn the ignition key to the “ACC” position or change the ignition mode to the “ACC” to
unlock the steering wheel.
3) Release the parking brake.
ACC
N
TOWING METHOD BFROM THE FRONT:
FRONT WHEELS ON THE GROUND
Page 192 of 336
7-1INSPECTION AND MAINTENANCE
74LH0-74E
60B128S
WA R N I N G
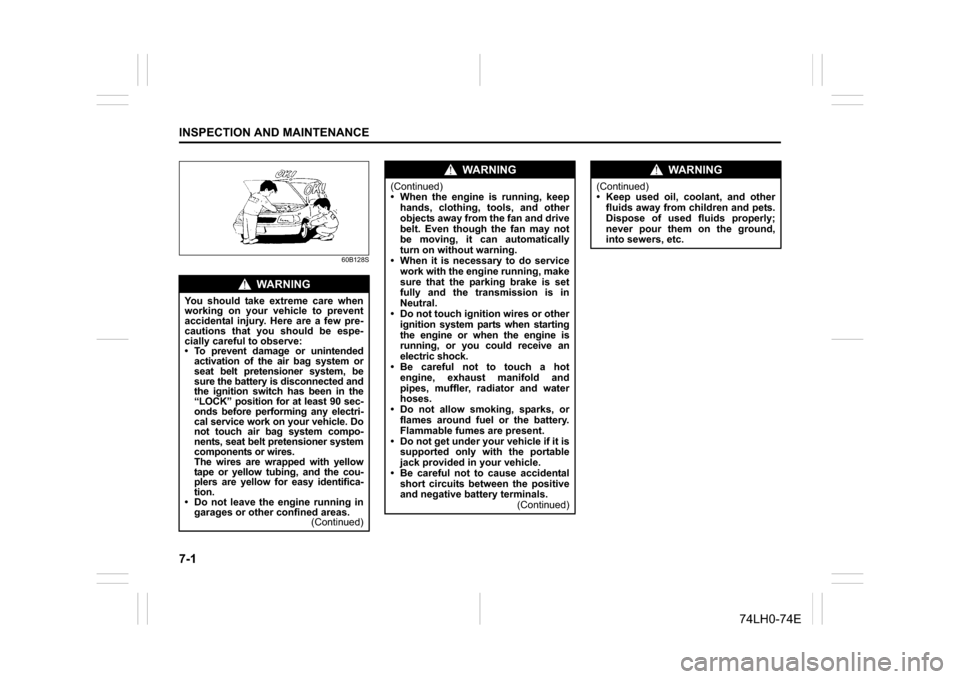
You should take extreme care when
working on your vehicle to prevent
accidental injury. Here are a few pre-
cautions that you should be espe-
cially careful to observe:
To prevent damage or unintended
activation of the air bag system or
seat belt pretensioner system, be
sure the battery is disconnected and
the ignition switch has been in the
“LOCK” position for at least 90 sec-
onds before performing any electri-
cal service work on your vehicle. Do
not touch air bag system compo-
nents, seat belt pretensioner system
components or wires.
The wires are wrapped with yellow
tape or yellow tubing, and the cou-
plers are yellow for easy identifica-
tion.
Do not leave the engine running in
garages or other confined areas.
(Continued)
WA R N I N G
(Continued)
When the engine is running, keep
hands, clothing, tools, and other
objects away from the fan and drive
belt. Even though the fan may not
be moving, it can automatically
turn on without warning.
When it is necessary to do service
work with the engine running, make
sure that the parking brake is set
fully and the transmission is in
Neutral.
Do not touch ignition wires or other
ignition system parts when starting
the engine or when the engine is
running, or you could receive an
electric shock.
Be careful not to touch a hot
engine, exhaust manifold and
pipes, muffler, radiator and water
hoses.
Do not allow smoking, sparks, or
flames around fuel or the battery.
Flammable fumes are present.
Do not get under your vehicle if it is
supported only with the portable
jack provided in your vehicle.
Be careful not to cause accidental
short circuits between the positive
and negative battery terminals.
(Continued)
WA R N I N G
(Continued)
Keep used oil, coolant, and other
fluids away from children and pets.
Dispose of used fluids properly;
never pour them on the ground,
into sewers, etc.
Page 194 of 336
7-3INSPECTION AND MAINTENANCE
74LH0-74E
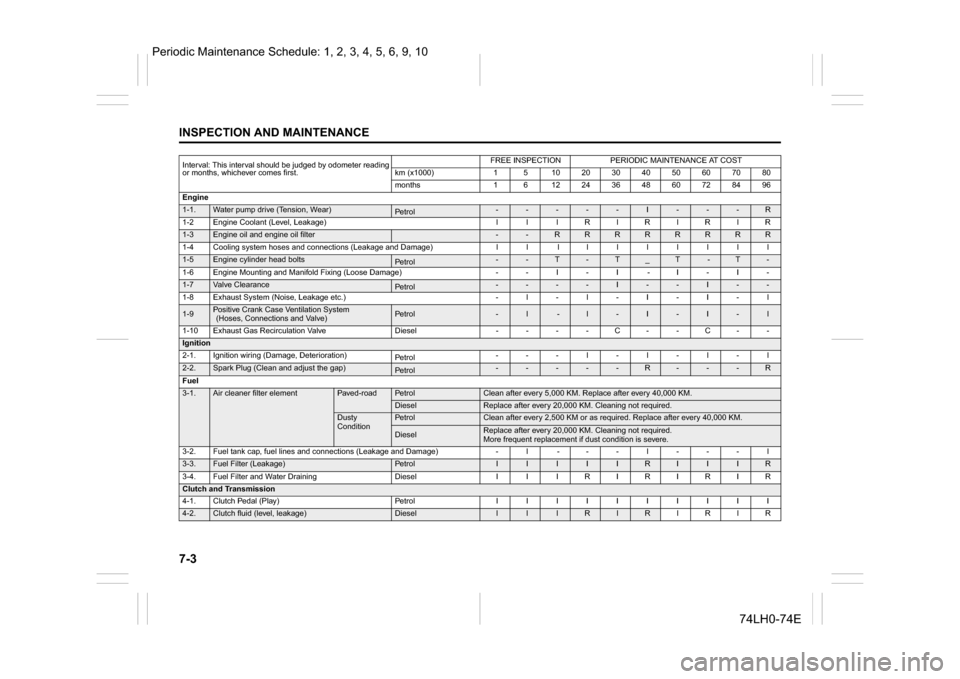
Interval: This interval should be judged by odometer reading
or months, whichever comes first.
FREE INSPECTION
PERIODIC MAINTENANCE AT COST
km (x1000)
1
5
10
20
30
40
50
60
70
80
months
1
6
12
24
36
48
60
72
84
96
Engine
1-1.
Water pump drive (Tension, Wear)
Pe tro l
-
-
-
-
-
I
-
-
-
R
1-2Engine Coolant (Level, Leakage) l l lRlRlRlR
1-3
Engine oil and engine oil filter
-
-
R
R
R
R
R
R
R
R
1-4 Cooling system hoses and connections (Leakage and Damage) l l l l l lllll
1-5
Engine cylinder head bolts
Pe tro l
-
-
T
-
T
_
T
-
T
-
1-6 Engine Mounting and Manifold Fixing (Loose Damage) - - I - I - I - I -
1-7
Valve Clearance
Pe tro l
-
-
-
-
I
-
-
I
-
-
1-8
Exhaust System (Noise, Leakage etc.)
-
l
-
l
-
I
-
I
-
l
1-9
Positive Crank Case Ventilation System (Hoses, Connections and Valve)
Pe tro l
-
l
-
l
-
I
-
I
-
l
1-10 Exhaust Gas Recirculation Valve Diesel - - - - C - - C - -
Ignition2-1.
Ignition wiring (Damage, Deterioration)
Pe tro l
-
-
-
l
-
l
-
l
-
l
2-2.
Spark Plug (Clean and adjust the gap)
Pe tro l
-
-
-
-
-
R
-
-
-
R
Fuel
3-1.
Air cleaner filter element
Paved-road
Pe tro l
Clean after every 5,000 KM. Replace after every 40,000 KM.
Diesel
Replace after every 20,000 KM. Cleaning not required.
Dusty
Condition
Pe tro l
Clean after every 2,500 KM or as required. Replace after every 40,000 KM.
Diesel
Replace after every 20,000 KM. Cleaning not required.
More frequent replacement if dust condition is severe.
3-2.
Fuel tank cap, fuel lines and connections (Leakage and Damage)
-
l
-
-
-
l
-
-
-
l
3-3.
Fuel Filter (Leakage)
Pe tro l
I
I
I
I
I
R
I
I
I
R
3-4.
Fuel Filter and Water Draining
Diesel
I
I
I
R
I
R
I
R
I
R
Clutch and Transmission4-1.
Clutch Pedal (Play)
Pe tro l
I
I
I
I
I
I
I
I
I
I
4-2.
Clutch fluid (level, leakage)
Diesel
l
l
l
R
l
R
l
R
l
R
Periodic Maintenance Schedule: 1, 2, 3, 4, 5, 6, 9, 10
Page 195 of 336
7-4
INSPECTION AND MAINTENANCE
74LH0-74E
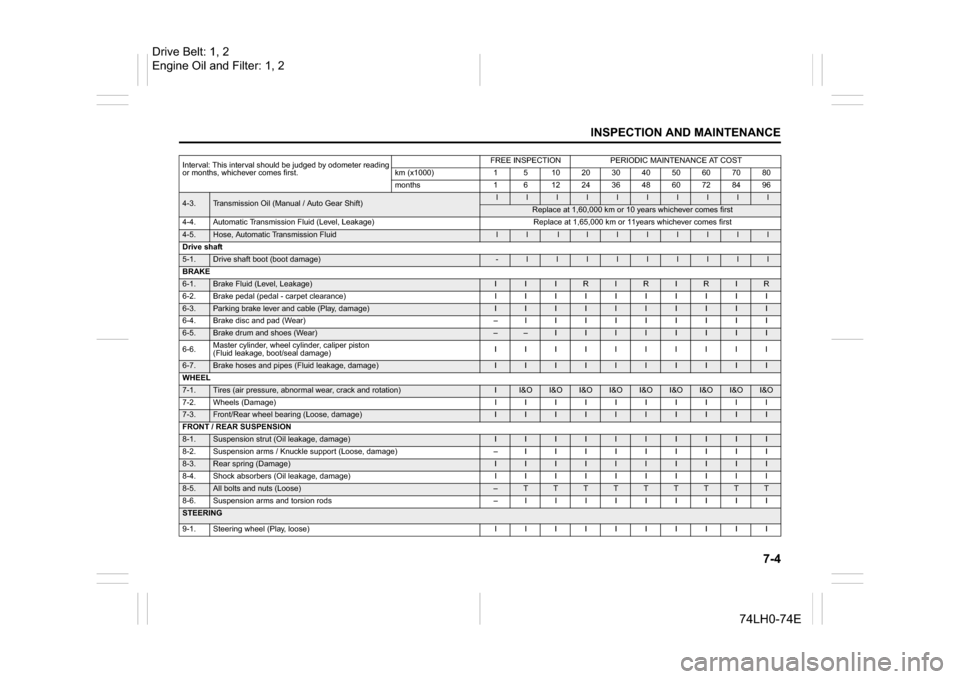
4-3.
Transmission Oil (Manual / Auto Gear Shift)
l
l
l
l
l
l
l
l
l
l
Replace at 1,60,000 km or 10 years whichever comes first
4-4. Automatic Transmission Fluid (Level, Leakage) Replace at 1,65,000 km or 11years whichever comes first
4-5.
Hose, Automatic Transmission Fluid
l
l
l
l
l
l
l
l
l
l
Drive shaft
5-1.
Drive shaft boot (boot damage)
-
l
l
l
l
l
l
l
l
l
BRAKE
6-1.
Brake Fluid (Level, Leakage)
I
I
I
R
I
R
I
R
I
R
6-2. Brake pedal (pedal - carpet clearance) I I I I I I I I I I
6-3.
Parking brake lever and cable (Play, damage)
I
I
I
I
I
I
I
I
I
I
6-4. Brake disc and pad (Wear) – I I I I I I I I I
6-5.
Brake drum and shoes (Wear)
–
–
I
I
I
I
I
I
I
I
6-6.Master cylinder, wheel cylinder, caliper piston
(Fluid leakage, boot/seal damage)IIIIIIIIII
6-7.
Brake hoses and pipes (Fluid leakage, damage)
I
I
I
I
I
I
I
I
I
I
WHEEL
7-1.
Tires (air pressure, abnormal wear, crack and rotation)
I
I&O
I&O
I&O
I&O
I&O
I&O
I&O
I&O
I&O
7-2. Wheels (Damage) I I I I I I I I I I
7-3.
Front/Rear wheel bearing (Loose, damage)
I
I
I
I
I
I
I
I
I
I
FRONT / REAR SUSPENSION
8-1.
Suspension strut (Oil leakage, damage)
I
I
I
I
I
I
I
I
I
I
8-2. Suspension arms / Knuckle support (Loose, damage) – I I I I I I I I I
8-3.
Rear spring (Damage)
I
I
I
I
I
I
I
I
I
I
8-4. Shock absorbers (Oil leakage, damage) I I I I I I I I I I
8-5.
All bolts and nuts (Loose)
–
T
T
T
T
T
T
T
T
T
8-6. Suspension arms and torsion rods – I I I I I I I I I
STEERING
9-1. Steering wheel (Play, loose) I I I I I I I I I IInterval: This interval should be judged by odometer reading
or months, whichever comes first.
FREE INSPECTION
PERIODIC MAINTENANCE AT COST
km (x1000)
1
5
10
20
30
40
50
60
70
80
months
1
6
12
24
36
48
60
72
84
96
Drive Belt: 1, 2
Engine Oil and Filter: 1, 2
Page 201 of 336
7-10
INSPECTION AND MAINTENANCE
74LH0-74E
Engine CoolantSelection of CoolantTo maintain optimum performance and
durability of your engine, use MARUTI
SUZUKI Genuine Coolant or equivalent.
This type of coolant is best for your cooling
system as it:
Helps maintain proper engine tempera-
ture.
Gives proper protection against freezing
and boiling.
Gives proper protection against corro-
sion and rust.
Failure to use the proper coolant can dam-
age your cooling system. Your authorized
MARUTI SUZUKI dealer can help you
select the proper coolant.
Coolant Level CheckCheck the coolant level at the reservoir
tank, not at the radiator. With the engine
cool, the coolant level should be between
the “FULL” and “LOW” marks.Adding Coolant
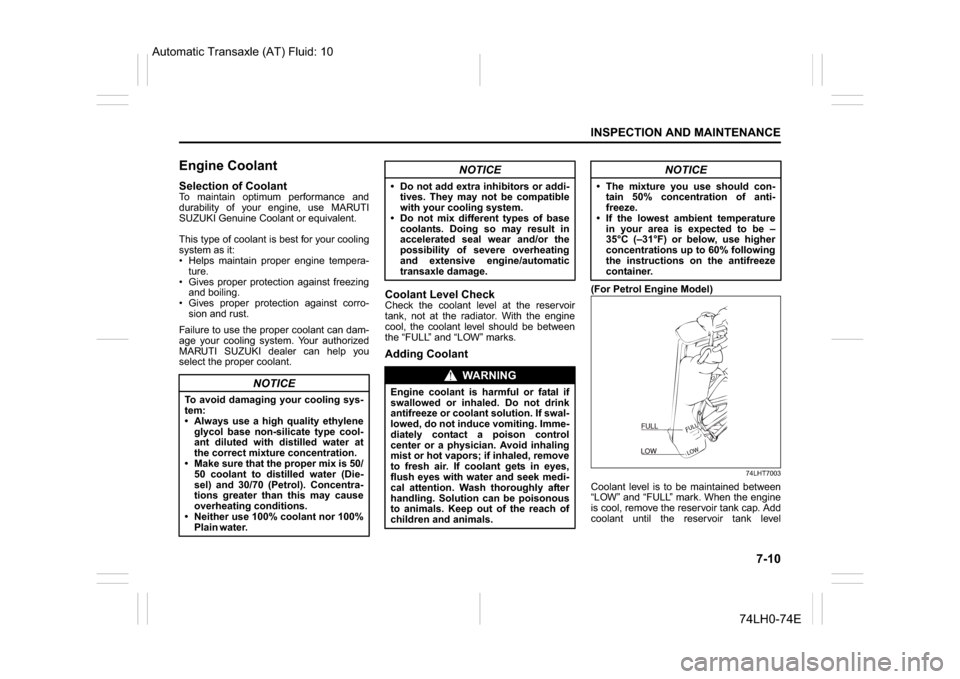
(For Petrol Engine Model)
74LHT7003
Coolant level is to be maintained between
“LOW” and “FULL” mark. When the engine
is cool, remove the reservoir tank cap. Add
coolant until the reservoir tank level
NOTICE
To avoid damaging your cooling sys-
tem:
Always use a high quality ethylene
glycol base non-silicate type cool-
ant diluted with distilled water at
the correct mixture concentration.
Make sure that the proper mix is 50/
50 coolant to distilled water (Die-
sel) and 30/70 (Petrol). Concentra-
tions greater than this may cause
overheating conditions.
Neither use 100% coolant nor 100%
Plain water.
NOTICE
Do not add extra inhibitors or addi-
tives. They may not be compatible
with your cooling system.
Do not mix different types of base
coolants. Doing so may result in
accelerated seal wear and/or the
possibility of severe overheating
and extensive engine/automatic
transaxle damage.
WA R N I N G
Engine coolant is harmful or fatal if
swallowed or inhaled. Do not drink
antifreeze or coolant solution. If swal-
lowed, do not induce vomiting. Imme-
diately contact a poison control
center or a physician. Avoid inhaling
mist or hot vapors; if inhaled, remove
to fresh air. If coolant gets in eyes,
flush eyes with water and seek medi-
cal attention. Wash thoroughly after
handling. Solution can be poisonous
to animals. Keep out of the reach of
children and animals.
NOTICE
The mixture you use should con-
tain 50% concentration of anti-
freeze.
If the lowest ambient temperature
in your area is expected to be –
35°C (–31°F) or below, use higher
concentrations up to 60% following
the instructions on the antifreeze
container.
FULLLOWFULLLOW
Automatic Transaxle (AT) Fluid: 10
Page 204 of 336
7-13INSPECTION AND MAINTENANCE
74LH0-74E
60D204
NOTE:
If your engine is equipped with the high
tension cord type ignition wiring and you
experience some firing problem of spark
plugs, such as, hard engine-starting, mis-
fire etc., the cause may be located not only
on spark plugs but also on deteriorated
ignition wirings (generally, used for more
than 80,000 km or five years). If spark plug
replacement does not solve the problem,
have the ignition wiring and other ignition
system inspected by your MARUTI
SUZUKI dealer.Gear OilManual Transaxle Oil / Auto Gear
Shift OilWhen adding gear oil, use gear oil with the
appropriate viscosity and grade.
We highly recommend you use:
"MARUTI SUZUKI GEAR OIL 75W-80" for
manual transaxle gear oil or Auto Gear
Shift Oil.
Gear Oil Level CheckManual transmission
74LHT0714
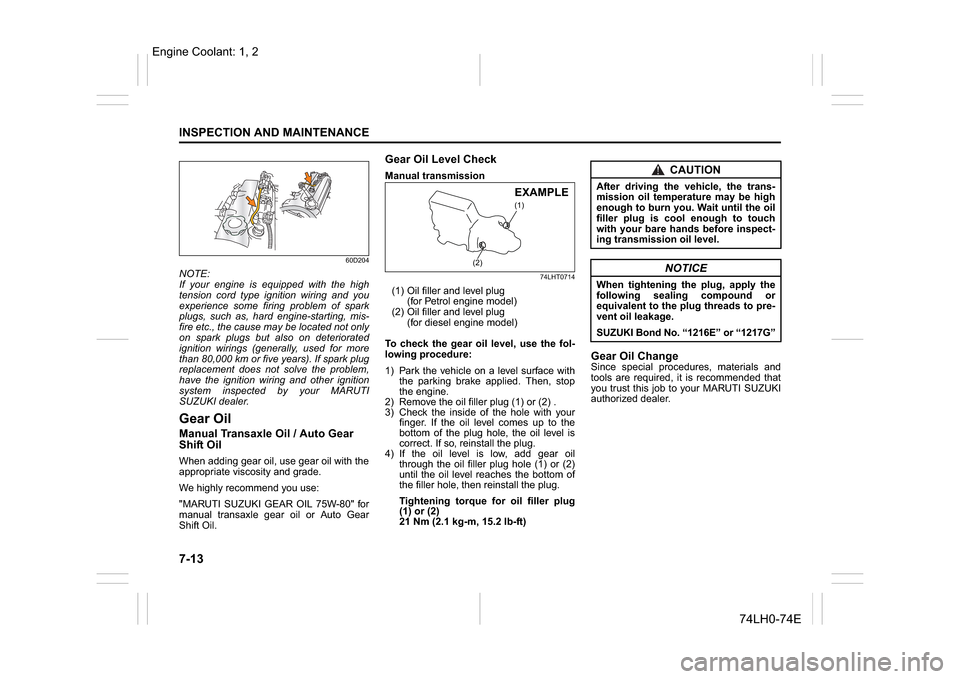
(1) Oil filler and level plug
(for Petrol engine model)
(2) Oil filler and level plug
(for diesel engine model)
To check the gear oil level, use the fol-
lowing procedure:
1) Park the vehicle on a level surface with
the parking brake applied. Then, stop
the engine.
2) Remove the oil filler plug (1) or (2) .
3) Check the inside of the hole with your
finger. If the oil level comes up to the
bottom of the plug hole, the oil level is
correct. If so, reinstall the plug.
4) If the oil level is low, add gear oil
through the oil filler plug hole (1) or (2)
until the oil level reaches the bottom of
the filler hole, then reinstall the plug.
Tightening torque for oil filler plug
(1) or (2)
21 Nm (2.1 kg-m, 15.2 lb-ft)
Gear Oil ChangeSince special procedures, materials and
tools are required, it is recommended that
you trust this job to your MARUTI SUZUKI
authorized dealer.
(1)
(2)
EXAMPLE
CAUTION
After driving the vehicle, the trans-
mission oil temperature may be high
enough to burn you. Wait until the oil
filler plug is cool enough to touch
with your bare hands before inspect-
ing transmission oil level.
NOTICE
When tightening the plug, apply the
following sealing compound or
equivalent to the plug threads to pre-
vent oil leakage.
SUZUKI Bond No. “1216E” or “1217G”
Engine Coolant: 1, 2
Page 208 of 336
7-17INSPECTION AND MAINTENANCE
74LH0-74E
Pedal to floor carpet minimum dis-
tance “a”: 68 mm (2.7 in.)
With the engine running, measure the dis-
tance between the brake pedal and floor
carpet when the pedal is depressed with
approximately 30 kg (66 lbs) of force. The
minimum distance required is as specified.
Since your vehicle’s brake system is self-
adjusting, there is no need for pedal
adjustment.
If the pedal to floor carpet distance as
measured above is less than the minimum
distance required, have your vehicle
inspected by your MARUTI SUZUKI
dealer.
NOTE:
When measuring the distance between the
brake pedal and floor carpet, be sure not to
include the floor mat or rubber on the floor
carpet in your measurement.
60G104S
Parking Brake
54G109
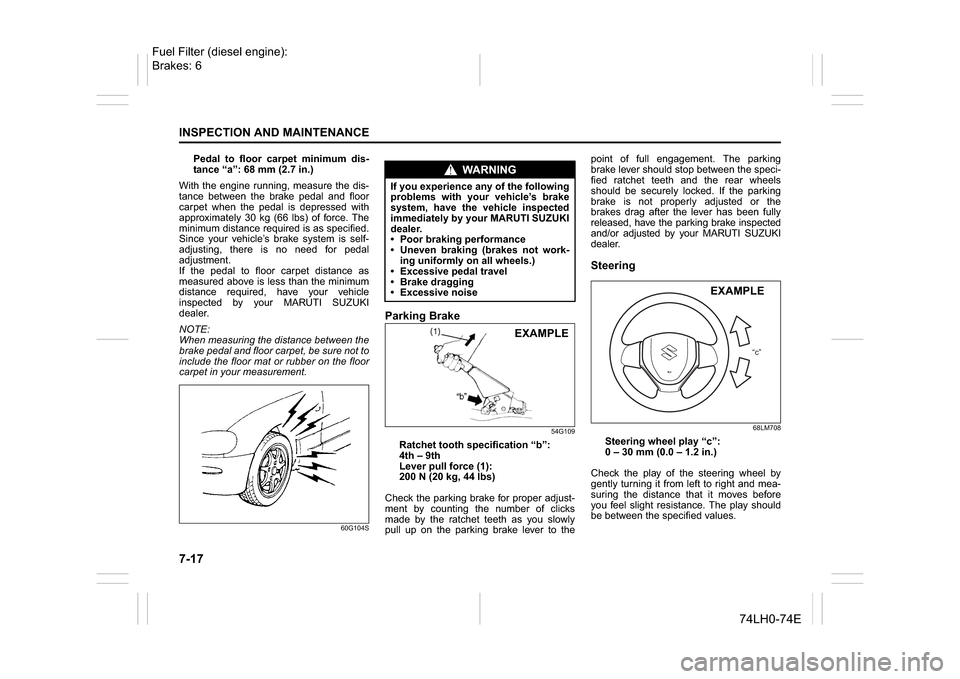
Ratchet tooth specification “b”:
4th – 9th
Lever pull force (1):
200 N (20 kg, 44 lbs)
Check the parking brake for proper adjust-
ment by counting the number of clicks
made by the ratchet teeth as you slowly
pull up on the parking brake lever to thepoint of full engagement. The parking
brake lever should stop between the speci-
fied ratchet teeth and the rear wheels
should be securely locked. If the parking
brake is not properly adjusted or the
brakes drag after the lever has been fully
released, have the parking brake inspected
and/or adjusted by your MARUTI SUZUKI
dealer.
Steering
68LM708
Steering wheel play “c”:
0 – 30 mm (0.0 – 1.2 in.)
Check the play of the steering wheel by
gently turning it from left to right and mea-
suring the distance that it moves before
you feel slight resistance. The play should
be between the specified values.
WA R N I N G
If you experience any of the following
problems with your vehicle’s brake
system, have the vehicle inspected
immediately by your MARUTI SUZUKI
dealer.
Poor braking performance
Uneven braking (brakes not work-
ing uniformly on all wheels.)
Excessive pedal travel
Brake dragging
Excessive noise
EXAMPLE
“c”
EXAMPLE
Fuel Filter (diesel engine):
Brakes: 6
Page 210 of 336
7-19INSPECTION AND MAINTENANCE
74LH0-74E
Tire Rotation
60G-09-019E
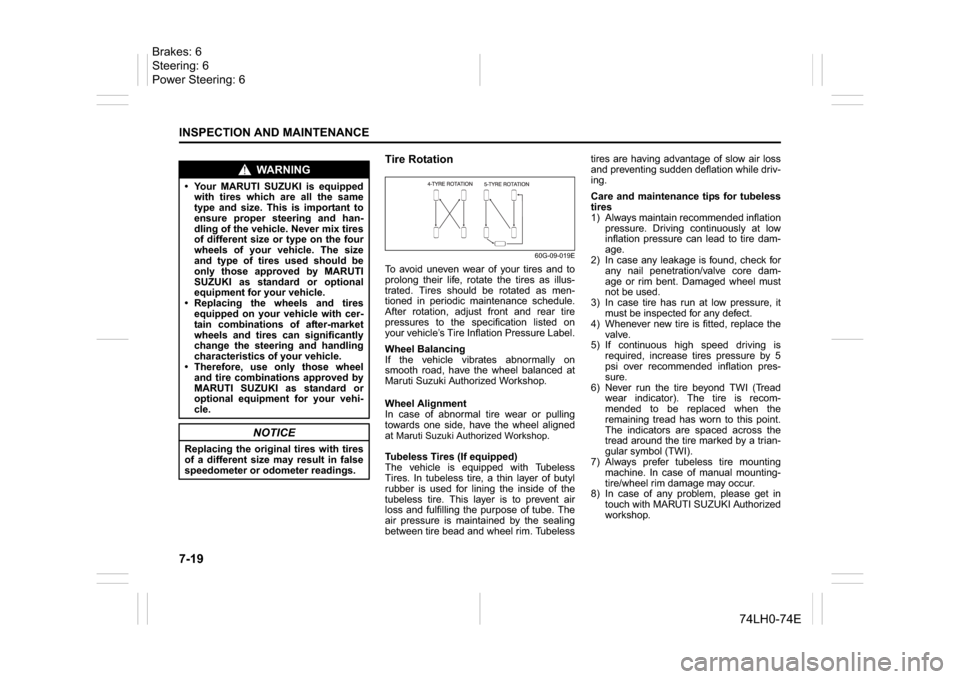
To avoid uneven wear of your tires and to
prolong their life, rotate the tires as illus-
trated. Tires should be rotated as men-
tioned in periodic maintenance schedule.
After rotation, adjust front and rear tire
pressures to the specification listed on
your vehicle’s Tire Inflation Pressure Label.
Wheel Balancing
If the vehicle vibrates abnormally on
smooth road, have the wheel balanced at
Maruti Suzuki Authorized Workshop.
Wheel Alignment
In case of abnormal tire wear or pulling
towards one side, have the wheel aligned
at Maruti Suzuki Authorized Workshop.Tubeless Tires (If equipped)
The vehicle is equipped with Tubeless
Tires. In tubeless tire, a thin layer of butyl
rubber is used for lining the inside of the
tubeless tire. This layer is to prevent air
loss and fulfilling the purpose of tube. The
air pressure is maintained by the sealing
between tire bead and wheel rim. Tubelesstires are having advantage of slow air loss
and preventing sudden deflation while driv-
ing.
Care and maintenance tips for tubeless
tires
1) Always maintain recommended inflation
pressure. Driving continuously at low
inflation pressure can lead to tire dam-
age.
2) In case any leakage is found, check for
any nail penetration/valve core dam-
age or rim bent. Damaged wheel must
not be used.
3) In case tire has run at low pressure, it
must be inspected for any defect.
4) Whenever new tire is fitted, replace the
valve.
5) If continuous high speed driving is
required, increase tires pressure by 5
psi over recommended inflation pres-
sure.
6) Never run the tire beyond TWI (Tread
wear indicator). The tire is recom-
mended to be replaced when the
remaining tread has worn to this point.
The indicators are spaced across the
tread around the tire marked by a trian-
gular symbol (TWI).
7) Always prefer tubeless tire mounting
machine. In case of manual mounting-
tire/wheel rim damage may occur.
8) In case of any problem, please get in
touch with MARUTI SUZUKI Authorized
workshop.
WA R N I N G
Your MARUTI SUZUKI is equipped
with tires which are all the same
type and size. This is important to
ensure proper steering and han-
dling of the vehicle. Never mix tires
of different size or type on the four
wheels of your vehicle. The size
and type of tires used should be
only those approved by MARUTI
SUZUKI as standard or optional
equipment for your vehicle.
Replacing the wheels and tires
equipped on your vehicle with cer-
tain combinations of after-market
wheels and tires can significantly
change the steering and handling
characteristics of your vehicle.
Therefore, use only those wheel
and tire combinations approved by
MARUTI SUZUKI as standard or
optional equipment for your vehi-
cle.
NOTICE
Replacing the original tires with tires
of a different size may result in false
speedometer or odometer readings.
Brakes: 6
Steering: 6
Power Steering: 6
Page 211 of 336
7-20
INSPECTION AND MAINTENANCE
74LH0-74E
Temporary Spare Tire (if equipped)Your vehicle comes equipped with the tem-
porary spare tire. It is only intended for
temporary emergency use, until the con-
ventional tire can be repaired or replaced.
The inflation pressure of the temporary
spare tire should be checked at least
monthly. At the same time, check that the
tire is stored securely. If it is not, tighten it.
Note that two or more temporary spare
tires should not be used on one vehicle
simultaneously.
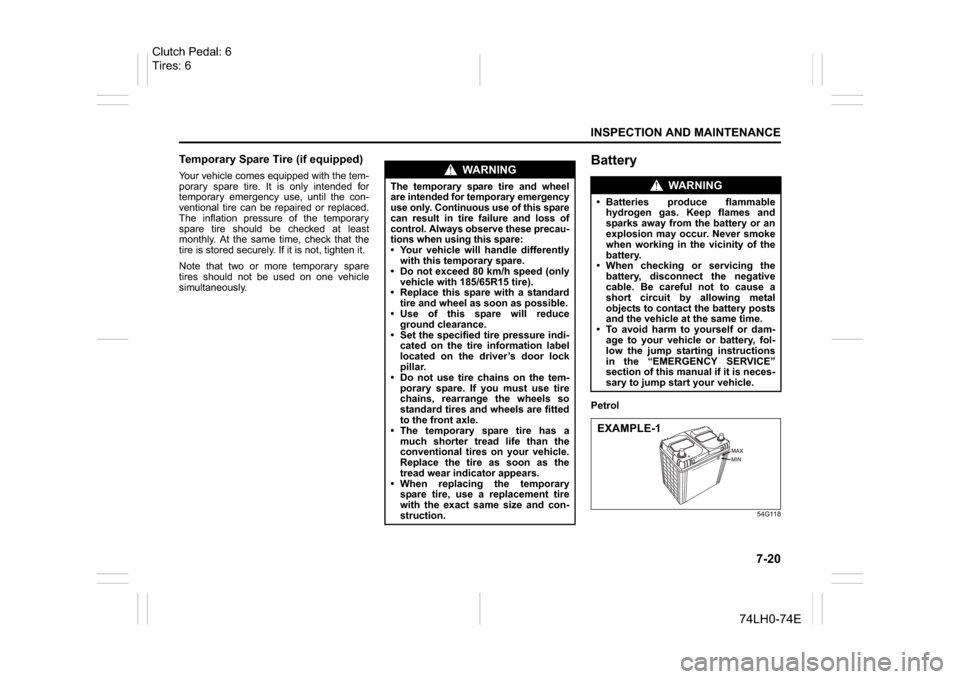
BatteryPetrol
54G118
WA R N I N G
The temporary spare tire and wheel
are intended for temporary emergency
use only. Continuous use of this spare
can result in tire failure and loss of
control. Always observe these precau-
tions when using this spare: Your vehicle will handle differently
with this temporary spare.
Do not exceed 80 km/h speed (only
vehicle with 185/65R15 tire).
Replace this spare with a standard
tire and wheel as soon as possible.
Use of this spare will reduce
ground clearance.
Set the specified tire pressure indi-
cated on the tire information label
located on the driver’s door lock
pillar.
Do not use tire chains on the tem-
porary spare. If you must use tire
chains, rearrange the wheels so
standard tires and wheels are fitted
to the front axle.
The temporary spare tire has a
much shorter tread life than the
conventional tires on your vehicle.
Replace the tire as soon as the
tread wear indicator appears.
When replacing the temporary
spare tire, use a replacement tire
with the exact same size and con-
struction.
WA R N I N G
Batteries produce flammable
hydrogen gas. Keep flames and
sparks away from the battery or an
explosion may occur. Never smoke
when working in the vicinity of the
battery.
When checking or servicing the
battery, disconnect the negative
cable. Be careful not to cause a
short circuit by allowing metal
objects to contact the battery posts
and the vehicle at the same time.
To avoid harm to yourself or dam-
age to your vehicle or battery, fol-
low the jump starting instructions
in the “EMERGENCY SERVICE”
section of this manual if it is neces-
sary to jump start your vehicle.EXAMPLE-1
Clutch Pedal: 6
Tires: 6
Page 221 of 336
7-30
INSPECTION AND MAINTENANCE
74LH0-74E
NOTE:
Do not flex the wiper blade frame end more
than necessary. If you do, it can break off.
54G135
(1) Retainer
4) If the new blade is provided without the
two metal retainers, move them from
the old blade to the new one.
5) Install the new blade in the reverse
order of removal.
Make sure the blade is properly
retained by all the hooks.
6) Reinstall wiper frame to arm in the
reverse order of removal.Windshield Washer Fluid
80JM078
Check that there is washer fluid in the tank.
Refill it if necessary. Use a good quality
windshield washer fluid, diluted with water
as necessary.Air Conditioning SystemIf you do not use the air conditioner for a
long period, such as during winter, it may
not give the best performance when you
start using it again. To help maintain opti-
mum performance and durability of your air
conditioner, it needs to be run periodically.
Operate the air conditioner at least once a
month for one minute with the engine
idling. This circulates the refrigerant and oil
and helps protect the internal components.
Replacement of the Air Conditioner
Filter (if equipped)Since special procedures are required, we
recommend you take your vehicle to your
MARUTI SUZUKI dealer for the air condi-
tioner filter replacement.
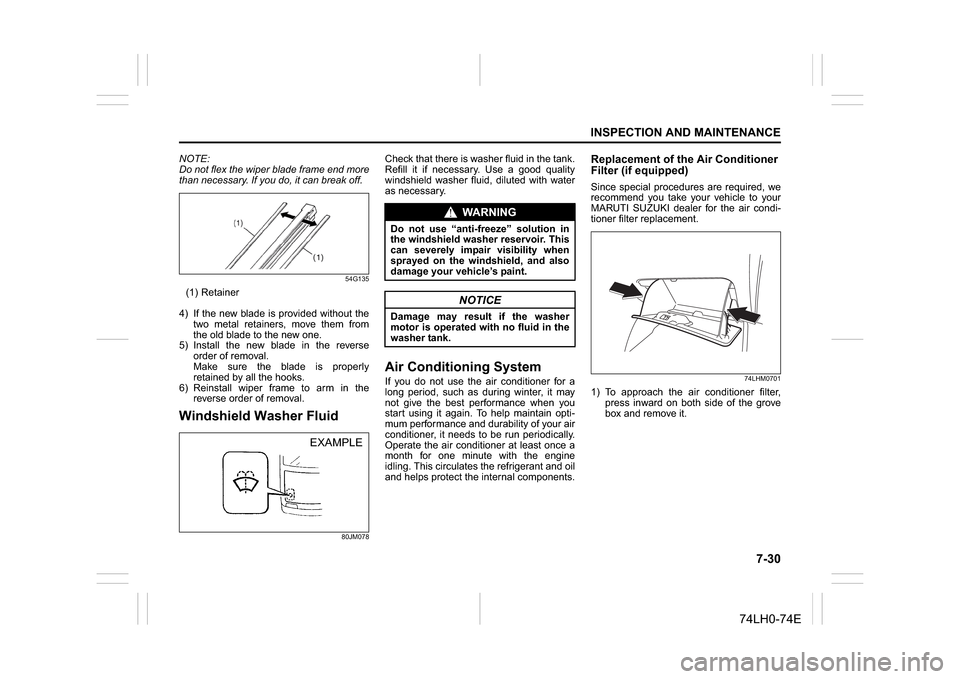
74LHM0701
1) To approach the air conditioner filter,
press inward on both side of the grove
box and remove it.
EXAMPLE
WA R N I N G
Do not use “anti-freeze” solution in
the windshield washer reservoir. This
can severely impair visibility when
sprayed on the windshield, and also
damage your vehicle’s paint.
NOTICE
Damage may result if the washer
motor is operated with no fluid in the
washer tank.