Power steering SUZUKI SWIFT 2017 5.G Owners Manual
[x] Cancel search | Manufacturer: SUZUKI, Model Year: 2017, Model line: SWIFT, Model: SUZUKI SWIFT 2017 5.GPages: 336, PDF Size: 6.24 MB
Page 68 of 336
2-49
BEFORE DRIVING
74LH0-74E
SUZUKI dealer to have the system
inspected.
Immobilizer/Keyless Push Start
System Warning Light
80JM122
When the ignition switch is turned to the
“ON” position or the engine switch is
pressed to change the ignition mode to
“ON”, the light comes on briefly so you can
check that the light is working. If this light
stays on, there is a problem with the sys-
tem. Ask your MARUTI SUZUKI dealer to
have the system inspected.
Open Door Warning Light
54G391
This light remains on until all doors (includ-
ing the tail gate for some model) are com-
pletely closed.
If any door is open when the vehicle is
moving, a ding sounds to remind you to
close all doors completely.
Low Fuel Warning Light
54G343
If this light comes on, fill the fuel tank
immediately.
When this light comes on, a ding sounds
once to remind you to fill the fuel.
If you do not fill the fuel, a ding sounds every
time when the ignition switch is turned to the
“ON” position or the engine switch is pressed
to change the ignition mode to “ON”.
NOTE:
The activation point of this light varies
depending on road conditions (for exam-
ple, slope or curve) and driving conditions
because of fuel moving in the tank.
Electric Power Steering Light
79J039
This light comes on when the ignition
switch is turned to the “ON” position or the
engine switch is pressed to change the
ignition mode to “ON”, and goes out when
the engine is started.If this light comes on while driving, the
power steering system may not work prop-
erly. Have the system inspected by your
MARUTI SUZUKI dealer.
NOTE:
Following operations of the steering wheel
while parking or driving at a very low-
speed may have steering effort bigger
gradually. This is not a malfunction of the
steering system, but the power steering
control system limits the power assist in
order to prevent them from overheating.
• The steering wheel is operated very
often.
• The steering wheel is kept in a fully
turned position for a long while.
When the power steering control system
cool down, the power steering system
back to the original condition.
However, repeating these operations could
cause the power steering system damaged.
NOTE:
If the power steering system does not work
properly, you will feel heavier to steer but
you still will be able to steer.
NOTE:
If the steering is operated, you may hear a
rubbing noise. This is normal and indicates
that the power steering system works
properly.
Page 89 of 336
3-4
OPERATING YOUR VEHICLE
74LH0-74E
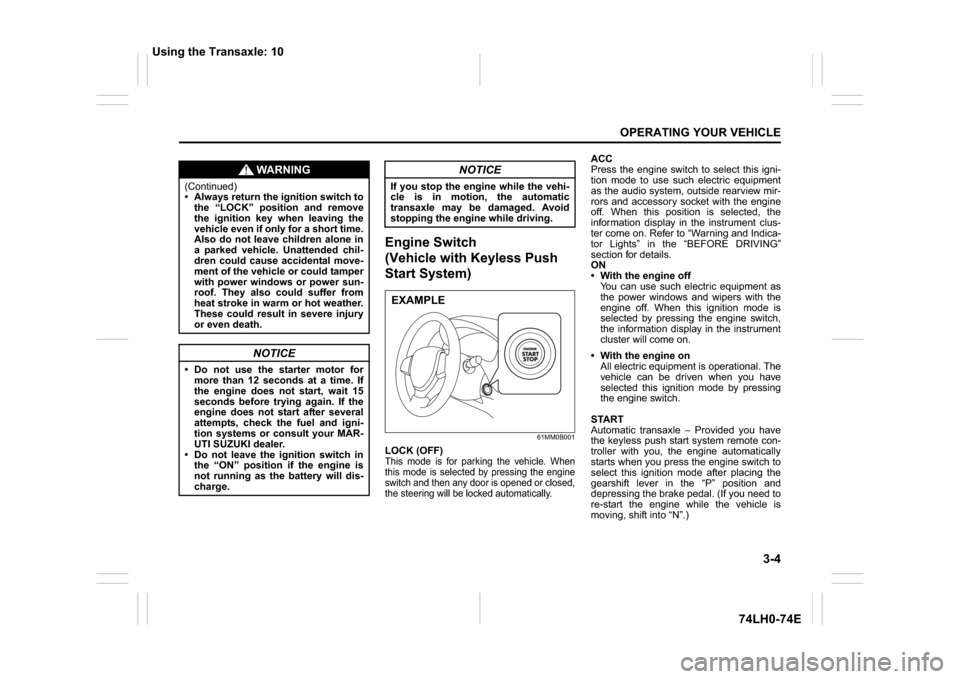
Engine Switch
(Vehicle with Keyless Push
Start System)
61MM0B001
LOCK (OFF)This mode is for parking the vehicle. When
this mode is selected by pressing the engine
switch and then any door is opened or closed,
the steering will be locked automatically.
ACC
Press the engine switch to select this igni-
tion mode to use such electric equipment
as the audio system, outside rearview mir-
rors and accessory socket with the engine
off. When this position is selected, the
information display in the instrument clus-
ter come on. Refer to “Warning and Indica-
tor Lights” in the “BEFORE DRIVING”
section for details.
ON
With the engine off
You can use such electric equipment as
the power windows and wipers with the
engine off. When this ignition mode is
selected by pressing the engine switch,
the information display in the instrument
cluster will come on.
With the engine on
All electric equipment is operational. The
vehicle can be driven when you have
selected this ignition mode by pressing
the engine switch.
START
Automatic transaxle – Provided you have
the keyless push start system remote con-
troller with you, the engine automatically
starts when you press the engine switch to
select this ignition mode after placing the
gearshift lever in the “P” position and
depressing the brake pedal. (If you need to
re-start the engine while the vehicle is
moving, shift into “N”.)
WA R N I N G
(Continued)
Always return the ignition switch to
the “LOCK” position and remove
the ignition key when leaving the
vehicle even if only for a short time.
Also do not leave children alone in
a parked vehicle. Unattended chil-
dren could cause accidental move-
ment of the vehicle or could tamper
with power windows or power sun-
roof. They also could suffer from
heat stroke in warm or hot weather.
These could result in severe injury
or even death.
NOTICE
Do not use the starter motor for
more than 12 seconds at a time. If
the engine does not start, wait 15
seconds before trying again. If the
engine does not start after several
attempts, check the fuel and igni-
tion systems or consult your MAR-
UTI SUZUKI dealer.
Do not leave the ignition switch in
the “ON” position if the engine is
not running as the battery will dis-
charge.
NOTICE
If you stop the engine while the vehi-
cle is in motion, the automatic
transaxle may be damaged. Avoid
stopping the engine while driving.EXAMPLE
Using the Transaxle: 10
Page 120 of 336

4-3DRIVING TIPS
67LH3-74E
Keep the air cleaner clean
74LHM0404
If the air cleaner is clogged with dust, there
will be greater intake resistance, resulting
in decreased power output and increased
fuel consumption.
Keep weight to a minimum
Heavier the load, more fuel the vehicle
consumes. Take out any luggage or cargo
when it is not necessary.
Keep tire pressures correct
Underinflation of the tires can waste fuel
due to increased running resistance of the
tires. Keep your tires inflated to the correct
pressure shown on the label on the driver’s
door lock pillar.
Highway DrivingWhen driving at high speeds, pay attention
to the following:
Stopping distance progressivelyincreases with vehicle speed. Apply the
brakes far enough ahead of the stopping
point to allow for the extra stopping dis-
tance.
On rainy days, hydroplaning can occur. Hydroplaning is the loss of direct contact
between the road surface and the vehi-
cle’s tires due to a water film forming
between them. Steering or braking the
vehicle while hydroplaning can be very
difficult, and loss of control can occur.
Keep speed down when the road sur-
face is wet.
At high speeds, the vehicle may be affected by side winds. Therefore,
reduce speed and be prepared for unex-
pected buffeting, which can occur at the
exits of tunnels, when passing by a cut
of a hill, or when being overtaken by
large vehicles, etc.
Driving on Hills
74LHM0405
When climbing steep hills, the vehicle
may begin to slow down and show a lack
of power. If this happens, you should
shift to a lower gear so that the engine
will again be operating in its normal
power range. Shift rapidly to prevent the
vehicle from losing momentum.
When driving down a hill, the engine should be used for braking by shifting to
next lower gear.
EXAMPLE
R
N
D
-
M+
EXAMPLE
Page 151 of 336
5-24
OTHER CONTROLS AND EQUIPMENT
74LH0-74E
NOTE:
Please consult your place of purchase
for details about whether a given auxil-
iary audio source can be connected and
the proper auxiliary cord to use.
The volume and tone controls of the
auxiliary audio source can be adjusted
on the unit.
In AUX mode, the volume setting is dif-
ferent from another mode.
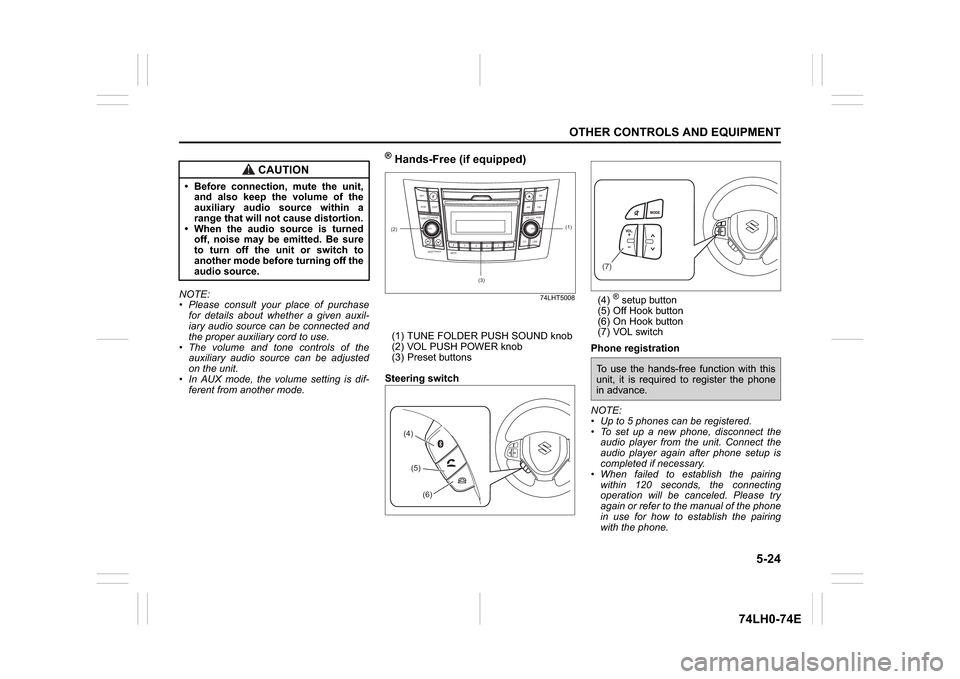
® Hands-Free (if equipped)
74LHT5008
(1) TUNE FOLDER PUSH SOUND knob
(2) VOL PUSH POWER knob
(3) Preset buttons
Steering switch(4)
® setup button
(5) Off Hook button
(6) On Hook button
(7) VOL switch
Phone registration
NOTE:
Up to 5 phones can be registered.
To set up a new phone, disconnect the
audio player from the unit. Connect the
audio player again after phone setup is
completed if necessary.
When failed to establish the pairing
within 120 seconds, the connecting
operation will be canceled. Please try
again or refer to the manual of the phone
in use for how to establish the pairing
with the phone.
CAUTION
Before connection, mute the unit,
and also keep the volume of the
auxiliary audio source within a
range that will not cause distortion.
When the audio source is turned
off, noise may be emitted. Be sure
to turn off the unit or switch to
another mode before turning off the
audio source.
(2)
B S U
CD
2
3 4 5 6
SEEK/TRACK
AS
AMFM RPT
RDM
DISP
PUSHSOUND
TUNE/FLD
VOLPWRPUSH
11
MENU
(3)
(1)
(4)(5)
(6)
(7)To use the hands-free function with this
unit, it is required to register the phone
in advance.
Page 161 of 336
5-34
OTHER CONTROLS AND EQUIPMENT
74LH0-74E
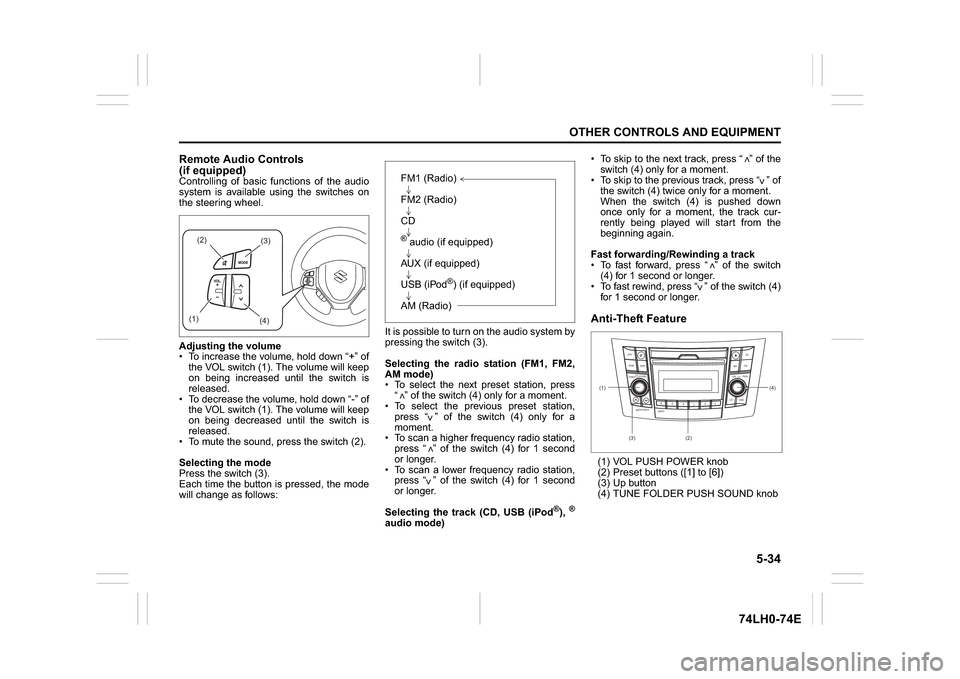
Remote Audio Controls
(if equipped)Controlling of basic functions of the audio
system is available using the switches on
the steering wheel.
Adjusting the volume
To increase the volume, hold down “+” of
the VOL switch (1). The volume will keep
on being increased until the switch is
released.
To decrease the volume, hold down “-” of
the VOL switch (1). The volume will keep
on being decreased until the switch is
released.
To mute the sound, press the switch (2).
Selecting the mode
Press the switch (3).
Each time the button is pressed, the mode
will change as follows:It is possible to turn on the audio system by
pressing the switch (3).
Selecting the radio station (FM1, FM2,
AM mode)
To select the next preset station, press
“ ” of the switch (4) only for a moment.
To select the previous preset station,
press “ ” of the switch (4) only for a
moment.
To scan a higher frequency radio station,
press “ ” of the switch (4) for 1 second
or longer.
To scan a lower frequency radio station,
press “ ” of the switch (4) for 1 second
or longer.
Selecting the track (CD, USB (iPod
®),®
audio mode) To skip to the next track, press “ ” of the
switch (4) only for a moment.
To skip to the previous track, press “ ” of
the switch (4) twice only for a moment.
When the switch (4) is pushed down
once only for a moment, the track cur-
rently being played will start from the
beginning again.
Fast forwarding/Rewinding a track
To fast forward, press “ ” of the switch
(4) for 1 second or longer.
To fast rewind, press “ ” of the switch (4)
for 1 second or longer.
Anti-Theft Feature(1) VOL PUSH POWER knob
(2) Preset buttons ([1] to [6])
(3) Up button
(4) TUNE FOLDER PUSH SOUND knob
(2)
(3)
(1)
(4)
FM1 (Radio)
FM2 (Radio)
CD® audio (if equipped)
AUX (if equipped)
USB (iPod
®) (if equipped)
AM (Radio)
<
<<<
<
<
<<
(1)
B S U
CD
2
3 4 5 6
S
EEK/TRACK
AS
AMFM RPT
RDM
DISP
PUSHSOUND
TUNE/FLD
VOLPWRPUSH
11
MENU
(3)(4)
(2)
Page 163 of 336
5-36
OTHER CONTROLS AND EQUIPMENT
74LH0-74E
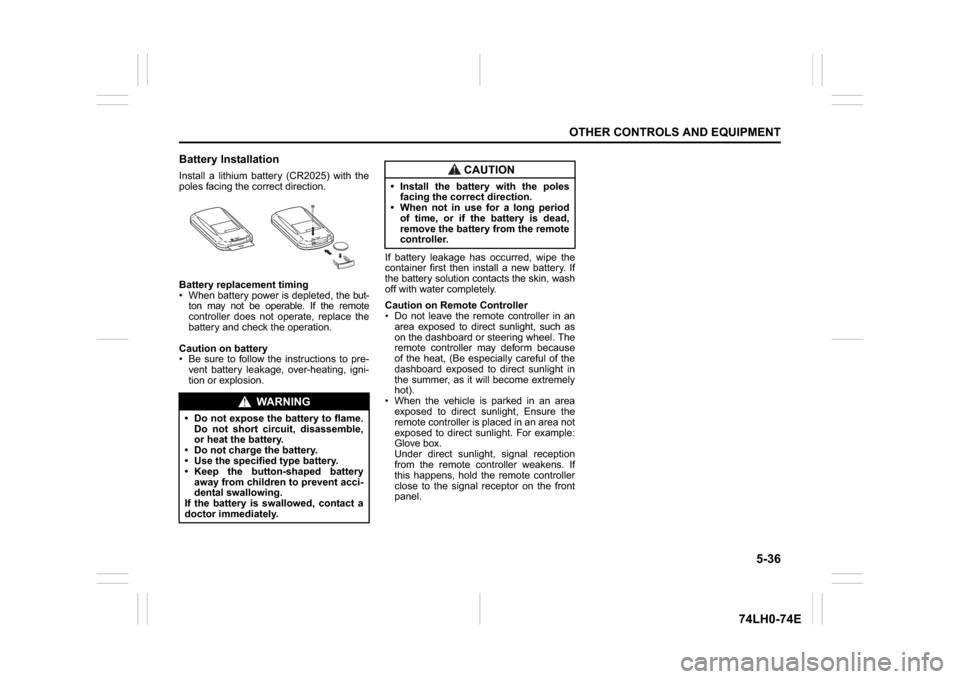
Battery InstallationInstall a lithium battery (CR2025) with the
poles facing the correct direction.
Battery replacement timing
When battery power is depleted, the but-
ton may not be operable. If the remote
controller does not operate, replace the
battery and check the operation.
Caution on battery
Be sure to follow the instructions to pre-
vent battery leakage, over-heating, igni-
tion or explosion.If battery leakage has occurred, wipe the
container first then install a new battery. If
the battery solution contacts the skin, wash
off with water completely.
Caution on Remote Controller
Do not leave the remote controller in an
area exposed to direct sunlight, such as
on the dashboard or steering wheel. The
remote controller may deform because
of the heat, (Be especially careful of the
dashboard exposed to direct sunlight in
the summer, as it will become extremely
hot).
When the vehicle is parked in an area
exposed to direct sunlight, Ensure the
remote controller is placed in an area not
exposed to direct sunlight. For example:
Glove box.
Under direct sunlight, signal reception
from the remote controller weakens. If
this happens, hold the remote controller
close to the signal receptor on the front
panel.
WA R N I N G
Do not expose the battery to flame.
Do not short circuit, disassemble,
or heat the battery.
Do not charge the battery.
Use the specified type battery.
Keep the button-shaped battery
away from children to prevent acci-
dental swallowing.
If the battery is swallowed, contact a
doctor immediately.
CAUTION
Install the battery with the poles
facing the correct direction.
When not in use for a long period
of time, or if the battery is dead,
remove the battery from the remote
controller.
Page 197 of 336
7-6
INSPECTION AND MAINTENANCE
74LH0-74E
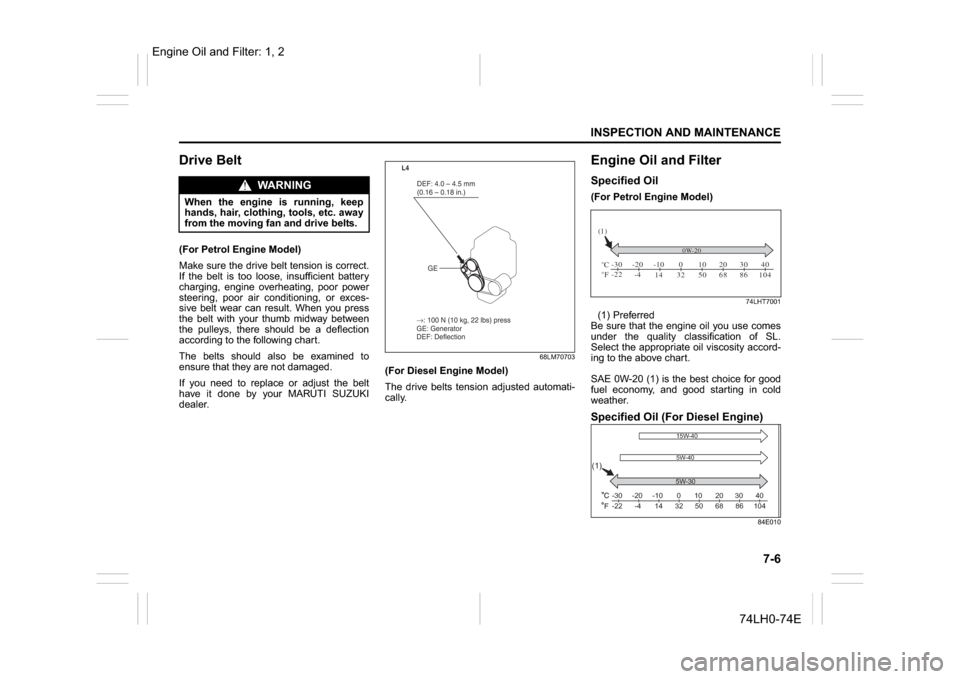
Drive Belt(For Petrol Engine Model)
Make sure the drive belt tension is correct.
If the belt is too loose, insufficient battery
charging, engine overheating, poor power
steering, poor air conditioning, or exces-
sive belt wear can result. When you press
the belt with your thumb midway between
the pulleys, there should be a deflection
according to the following chart.
The belts should also be examined to
ensure that they are not damaged.
If you need to replace or adjust the belt
have it done by your MARUTI SUZUKI
dealer.
68LM70703
(For Diesel Engine Model)
The drive belts tension adjusted automati-
cally.
Engine Oil and FilterSpecified Oil (For Petrol Engine Model)
74LHT7001
(1) Preferred
Be sure that the engine oil you use comes
under the quality classification of SL.
Select the appropriate oil viscosity accord-
ing to the above chart.
SAE 0W-20 (1) is the best choice for good
fuel economy, and good starting in cold
weather. Specified Oil (For Diesel Engine)
84E010
When the engine is running, keep
hands, hair, clothing, tools, etc. away
from the moving fan and drive belts.
→ : 100 N (10 kg, 22 lbs) press
GE: Generator
DEF: Deflection DEF: 4.0 – 4.5 mm
(0.16 – 0.18 in.)
GE
L4
CFo o-30
-22 -20
-4 -10
14 32 50 68 86 104 010203040
(1)
0W-205W-30
(1)
-30
-22 -4 14
32506886 104
-20 -10 10 20
3040
0
15W-40
5W-40
Engine Oil and Filter: 1, 2
WA R N I N G
Page 210 of 336
7-19INSPECTION AND MAINTENANCE
74LH0-74E
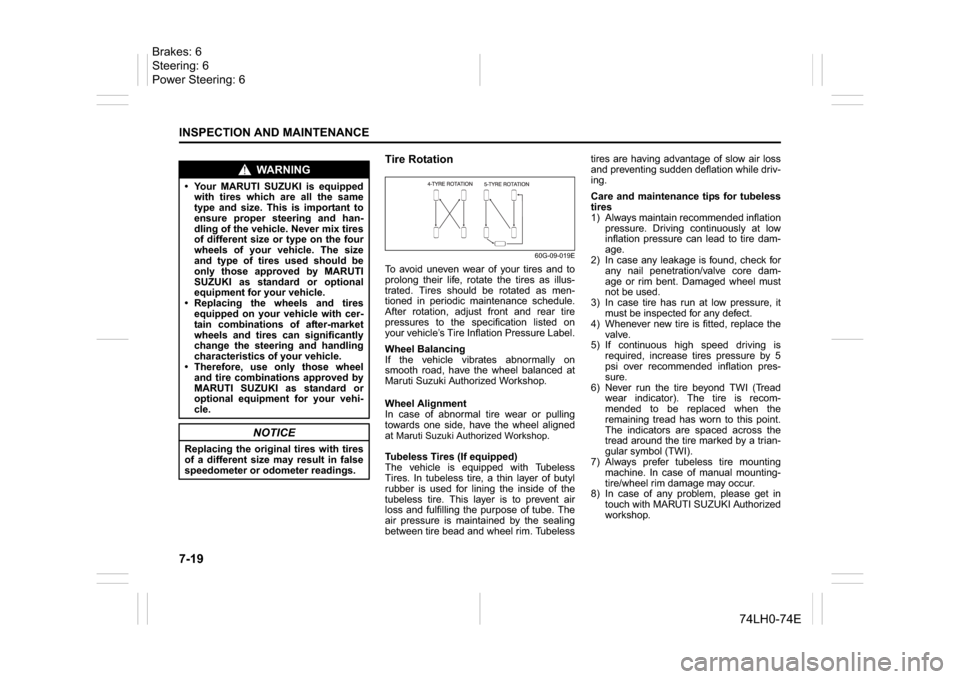
Tire Rotation
60G-09-019E
To avoid uneven wear of your tires and to
prolong their life, rotate the tires as illus-
trated. Tires should be rotated as men-
tioned in periodic maintenance schedule.
After rotation, adjust front and rear tire
pressures to the specification listed on
your vehicle’s Tire Inflation Pressure Label.
Wheel Balancing
If the vehicle vibrates abnormally on
smooth road, have the wheel balanced at
Maruti Suzuki Authorized Workshop.
Wheel Alignment
In case of abnormal tire wear or pulling
towards one side, have the wheel aligned
at Maruti Suzuki Authorized Workshop.Tubeless Tires (If equipped)
The vehicle is equipped with Tubeless
Tires. In tubeless tire, a thin layer of butyl
rubber is used for lining the inside of the
tubeless tire. This layer is to prevent air
loss and fulfilling the purpose of tube. The
air pressure is maintained by the sealing
between tire bead and wheel rim. Tubelesstires are having advantage of slow air loss
and preventing sudden deflation while driv-
ing.
Care and maintenance tips for tubeless
tires
1) Always maintain recommended inflation
pressure. Driving continuously at low
inflation pressure can lead to tire dam-
age.
2) In case any leakage is found, check for
any nail penetration/valve core dam-
age or rim bent. Damaged wheel must
not be used.
3) In case tire has run at low pressure, it
must be inspected for any defect.
4) Whenever new tire is fitted, replace the
valve.
5) If continuous high speed driving is
required, increase tires pressure by 5
psi over recommended inflation pres-
sure.
6) Never run the tire beyond TWI (Tread
wear indicator). The tire is recom-
mended to be replaced when the
remaining tread has worn to this point.
The indicators are spaced across the
tread around the tire marked by a trian-
gular symbol (TWI).
7) Always prefer tubeless tire mounting
machine. In case of manual mounting-
tire/wheel rim damage may occur.
8) In case of any problem, please get in
touch with MARUTI SUZUKI Authorized
workshop.
WA R N I N G
Your MARUTI SUZUKI is equipped
with tires which are all the same
type and size. This is important to
ensure proper steering and han-
dling of the vehicle. Never mix tires
of different size or type on the four
wheels of your vehicle. The size
and type of tires used should be
only those approved by MARUTI
SUZUKI as standard or optional
equipment for your vehicle.
Replacing the wheels and tires
equipped on your vehicle with cer-
tain combinations of after-market
wheels and tires can significantly
change the steering and handling
characteristics of your vehicle.
Therefore, use only those wheel
and tire combinations approved by
MARUTI SUZUKI as standard or
optional equipment for your vehi-
cle.
NOTICE
Replacing the original tires with tires
of a different size may result in false
speedometer or odometer readings.
Brakes: 6
Steering: 6
Power Steering: 6
Page 213 of 336
7-22
INSPECTION AND MAINTENANCE
74LH0-74E
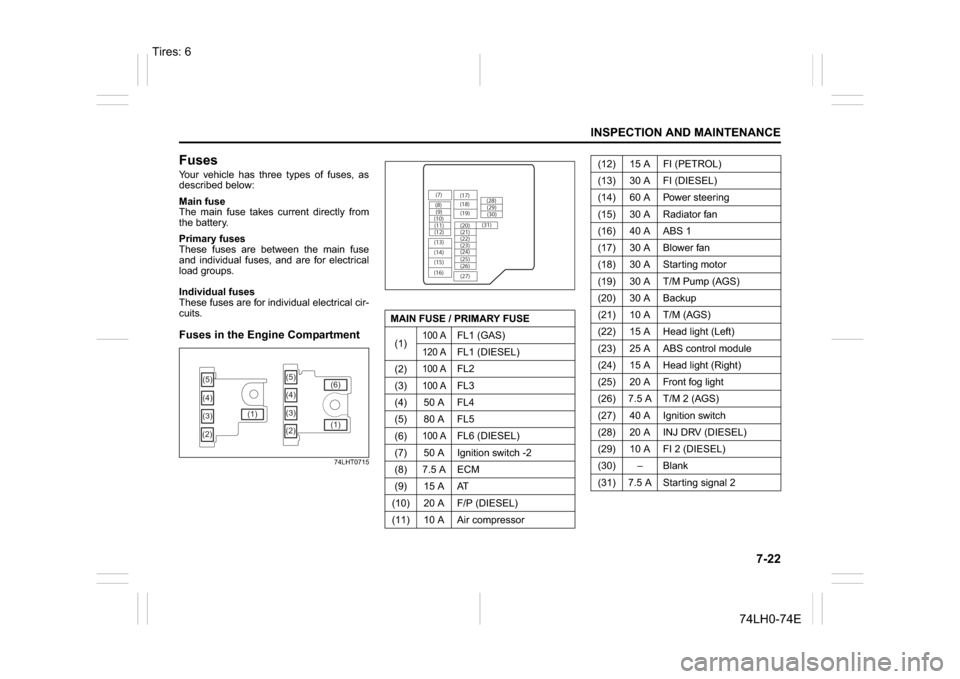
FusesYour vehicle has three types of fuses, as
described below:
Main fuse
The main fuse takes current directly from
the battery.
Primary fuses
These fuses are between the main fuse
and individual fuses, and are for electrical
load groups.
Individual fuses
These fuses are for individual electrical cir-
cuits.Fuses in the Engine Compartment
74LHT0715
(5)
(3) (4)
(2)(1)(5)
(4)
(3)
(2)(1) (6)
MAIN FUSE / PRIMARY FUSE
(1)
100 A
FL1 (GAS)
120 A
FL1 (DIESEL)
(2)
100 A
FL2
(3)
100 A
FL3
(4) 50 A FL4
(5) 80 A FL5
(6)
100 A
FL6 (DIESEL)
(7) 50 A Ignition switch -2
(8) 7.5 A ECM
(9) 15 A AT
(10) 20 A F/P (DIESEL)
(11) 10 A Air compressor
(7)
(8)(9)
(10)
(11)
(12)
(13)
(14)
(15)
(16)(17)
(18)
(20) (19)
(21)
(22)
(23)
(25) (24)
(26)
(27)(28)
(29)
(30)
(31)
(12) 15 A FI (PETROL)
(13) 30 A FI (DIESEL)
(14) 60 A Power steering
(15) 30 A Radiator fan
(16) 40 A ABS 1
(17) 30 A Blower fan
(18) 30 A Starting motor
(19) 30 A T/M Pump (AGS)
(20) 30 A Backup
(21) 10 A T/M (AGS)
(22) 15 A Head light (Left)
(23) 25 A ABS control module
(24) 15 A Head light (Right)
(25) 20 A Front fog light
(26) 7.5 A T/M 2 (AGS)
(27) 40 A Ignition switch
(28) 20 A INJ DRV (DIESEL)
(29) 10 A FI 2 (DIESEL)
(30)
Page 214 of 336
7-23INSPECTION AND MAINTENANCE
74LH0-74E
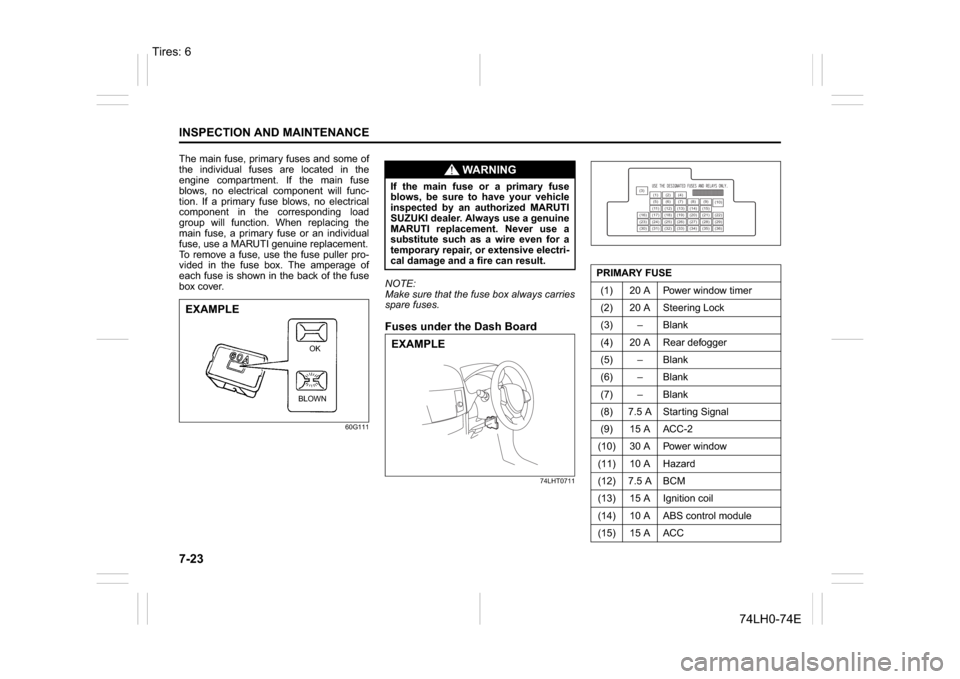
The main fuse, primary fuses and some of
the individual fuses are located in the
engine compartment. If the main fuse
blows, no electrical component will func-
tion. If a primary fuse blows, no electrical
component in the corresponding load
group will function. When replacing the
main fuse, a primary fuse or an individual
fuse, use a MARUTI genuine replacement.
To remove a fuse, use the fuse puller pro-
vided in the fuse box. The amperage of
each fuse is shown in the back of the fuse
box cover.
60G111
NOTE:
Make sure that the fuse box always carries
spare fuses.Fuses under the Dash Board
74LHT0711
EXAMPLE
BLOWNOK
WA R N I N G
If the main fuse or a primary fuse
blows, be sure to have your vehicle
inspected by an authorized MARUTI
SUZUKI dealer. Always use a genuine
MARUTI replacement. Never use a
substitute such as a wire even for a
temporary repair, or extensive electri-
cal damage and a fire can result.EXAMPLE
PRIMARY FUSE
(1) 20 A Power window timer
(2) 20 A Steering Lock
(3) – Blank
(4) 20 A Rear defogger
(5) – Blank
(6) – Blank
(7) – Blank
(8) 7.5 A Starting Signal
(9) 15 A ACC-2
(10) 30 A Power window
(11) 10 A Hazard
(12) 7.5 A BCM
(13) 15 A Ignition coil
(14) 10 A ABS control module
(15) 15 A ACC
(3)
(12)(10)
(13)
(36) (1) (2) (4)
(5)(6)
(7) (8)(9)
(11) (14) (15)
(16) (17) (18) (19) (20) (21) (22)
(23) (24) (25) (26) (27) (28) (29)
(30) (31) (32) (33) (34) (35)
Tires: 6