Spring SUZUKI SWIFT 2017 5.G Owners Manual
[x] Cancel search | Manufacturer: SUZUKI, Model Year: 2017, Model line: SWIFT, Model: SUZUKI SWIFT 2017 5.GPages: 336, PDF Size: 6.24 MB
Page 122 of 336

4-5DRIVING TIPS
67LH3-74E
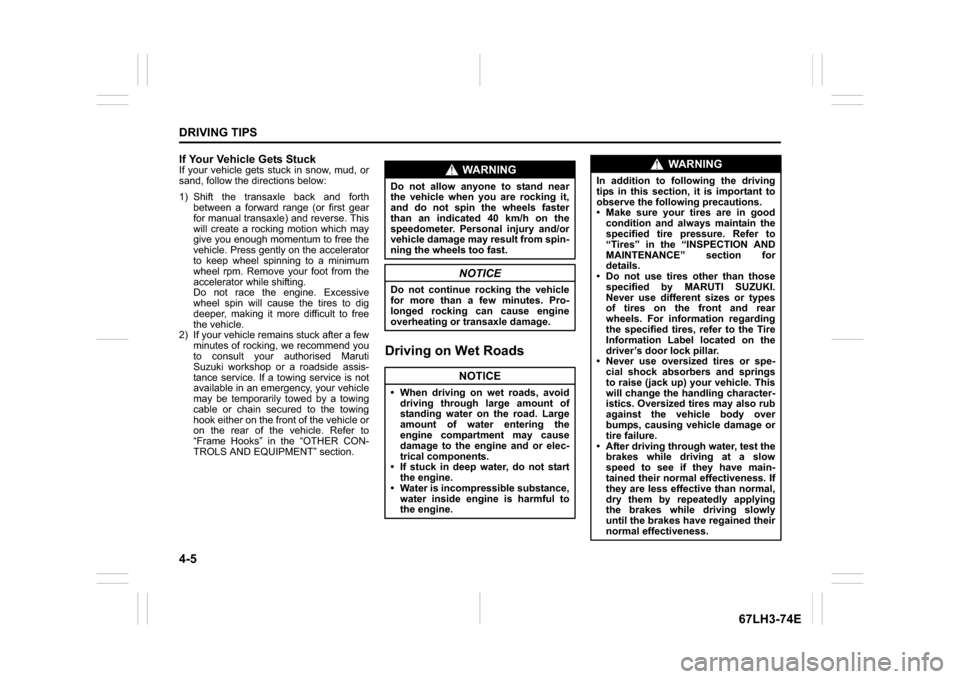
If Your Vehicle Gets StuckIf your vehicle gets stuck in snow, mud, or
sand, follow the directions below:
1) Shift the transaxle back and forthbetween a forward range (or first gear
for manual transaxle) and reverse. This
will create a rocking motion which may
give you enough momentum to free the
vehicle. Press gently on the accelerator
to keep wheel spinning to a minimum
wheel rpm. Remove your foot from the
accelerator while shifting.
Do not race the engine. Excessive
wheel spin will cause the tires to dig
deeper, making it more difficult to free
the vehicle.
2) If your vehicle remains stuck after a few
minutes of rocking, we recommend you
to consult your authorised Maruti
Suzuki workshop or a roadside assis-
tance service. If a towing service is not
available in an emergency, your vehicle
may be temporarily towed by a towing
cable or chain secured to the towing
hook either on the front of the vehicle or
on the rear of the vehicle. Refer to
“Frame Hooks” in the “OTHER CON-
TROLS AND EQUIPMENT” section.
Driving on Wet Roads
WA R N I N G
Do not allow anyone to stand near
the vehicle when you are rocking it,
and do not spin the wheels faster
than an indicated 40 km/h on the
speedometer. Perso nal injury and/or
vehicle damage may result from spin-
ning the wheels too fast.
NOTICE
Do not continue rocking the vehicle
for more than a few minutes. Pro-
longed rocking can cause engine
overheating or transaxle damage.
NOTICE
When driving on wet roads, avoid driving through large amount of
standing water on the road. Large
amount of water entering the
engine compartment may cause
damage to the engine and or elec-
trical components.
If stuck in deep water, do not start the engine.
Water is incompressible substance, water inside engine is harmful to
the engine.
WA R N I N G
In addition to following the driving
tips in this section, it is important to
observe the following precautions.
Make sure your tires are in good
condition and always maintain the
specified tire pressure. Refer to
“Tires” in the “INSPECTION AND
MAINTENANCE” section for
details.
Do not use tires other than those
specified by MARUTI SUZUKI.
Never use different sizes or types
of tires on the front and rear
wheels. For information regarding
the specified tires, refer to the Tire
Information Label located on the
driver’s door lock pillar.
Never use oversized tires or spe- cial shock absorbers and springs
to raise (jack up) your vehicle. This
will change the handling character-
istics. Oversized tires may also rub
against the vehicle body over
bumps, causing vehicle damage or
tire failure.
After driving through water, test the brakes while driving at a slow
speed to see if they have main-
tained their normal effectiveness. If
they are less effective than normal,
dry them by repeatedly applying
the brakes while driving slowly
until the brakes have regained their
normal effectiveness.
Page 195 of 336

7-4
INSPECTION AND MAINTENANCE
74LH0-74E
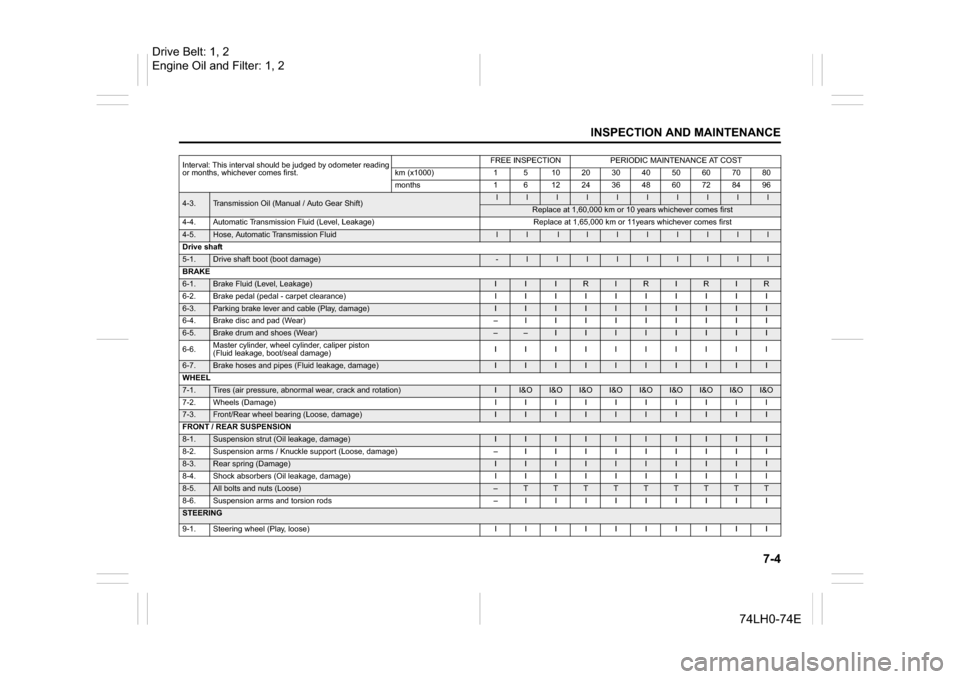
4-3.
Transmission Oil (Manual / Auto Gear Shift)
l
l
l
l
l
l
l
l
l
l
Replace at 1,60,000 km or 10 years whichever comes first
4-4. Automatic Transmission Fluid (Level, Leakage) Replace at 1,65,000 km or 11years whichever comes first
4-5.
Hose, Automatic Transmission Fluid
l
l
l
l
l
l
l
l
l
l
Drive shaft
5-1.
Drive shaft boot (boot damage)
-
l
l
l
l
l
l
l
l
l
BRAKE
6-1.
Brake Fluid (Level, Leakage)
I
I
I
R
I
R
I
R
I
R
6-2. Brake pedal (pedal - carpet clearance) I I I I I I I I I I
6-3.
Parking brake lever and cable (Play, damage)
I
I
I
I
I
I
I
I
I
I
6-4. Brake disc and pad (Wear) – I I I I I I I I I
6-5.
Brake drum and shoes (Wear)
–
–
I
I
I
I
I
I
I
I
6-6.Master cylinder, wheel cylinder, caliper piston
(Fluid leakage, boot/seal damage)IIIIIIIIII
6-7.
Brake hoses and pipes (Fluid leakage, damage)
I
I
I
I
I
I
I
I
I
I
WHEEL
7-1.
Tires (air pressure, abnormal wear, crack and rotation)
I
I&O
I&O
I&O
I&O
I&O
I&O
I&O
I&O
I&O
7-2. Wheels (Damage) I I I I I I I I I I
7-3.
Front/Rear wheel bearing (Loose, damage)
I
I
I
I
I
I
I
I
I
I
FRONT / REAR SUSPENSION
8-1.
Suspension strut (Oil leakage, damage)
I
I
I
I
I
I
I
I
I
I
8-2. Suspension arms / Knuckle support (Loose, damage) – I I I I I I I I I
8-3.
Rear spring (Damage)
I
I
I
I
I
I
I
I
I
I
8-4. Shock absorbers (Oil leakage, damage) I I I I I I I I I I
8-5.
All bolts and nuts (Loose)
–
T
T
T
T
T
T
T
T
T
8-6. Suspension arms and torsion rods – I I I I I I I I I
STEERING
9-1. Steering wheel (Play, loose) I I I I I I I I I IInterval: This interval should be judged by odometer reading
or months, whichever comes first.
FREE INSPECTION
PERIODIC MAINTENANCE AT COST
km (x1000)
1
5
10
20
30
40
50
60
70
80
months
1
6
12
24
36
48
60
72
84
96
Drive Belt: 1, 2
Engine Oil and Filter: 1, 2
Page 216 of 336

7-25INSPECTION AND MAINTENANCE
74LH0-74E
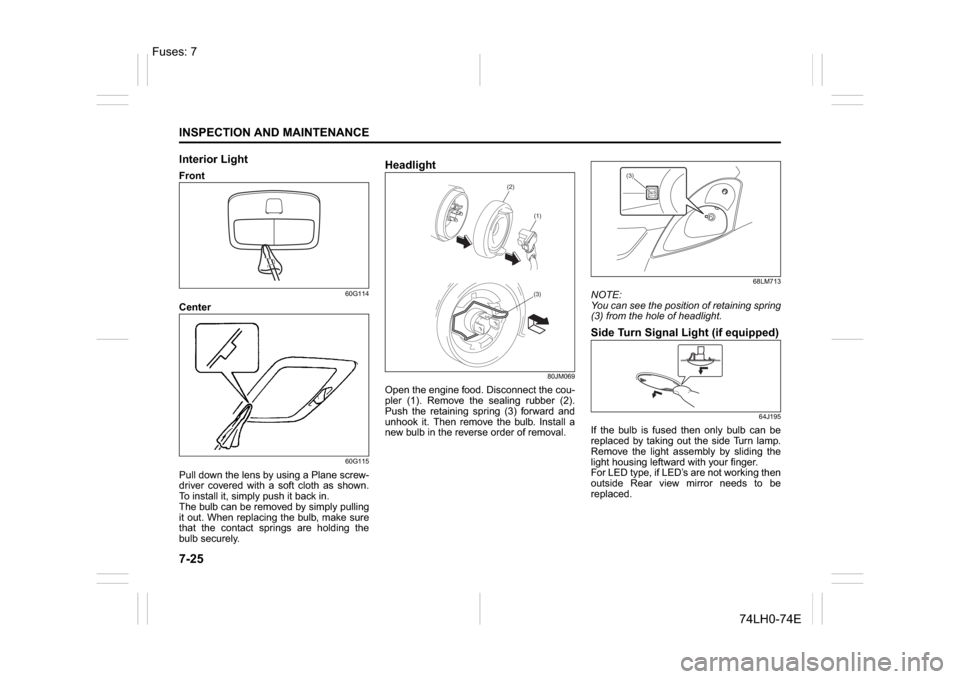
Interior LightFront
60G114
Center
60G115
Pull down the lens by using a Plane screw-
driver covered with a soft cloth as shown.
To install it, simply push it back in.
The bulb can be removed by simply pulling
it out. When replacing the bulb, make sure
that the contact springs are holding the
bulb securely.
Headlight
80JM069
Open the engine food. Disconnect the cou-
pler (1). Remove the sealing rubber (2).
Push the retaining spring (3) forward and
unhook it. Then remove the bulb. Install a
new bulb in the reverse order of removal.
68LM713
NOTE:
You can see the position of retaining spring
(3) from the hole of headlight.Side Turn Signal Light (if equipped)
64J195
If the bulb is fused then only bulb can be
replaced by taking out the side Turn lamp.
Remove the light assembly by sliding the
light housing leftward with your finger.
For LED type, if LED’s are not working then
outside Rear view mirror needs to be
replaced.
(2)
(1)(3)
(3)
Fuses: 7