run flat SUZUKI SWIFT 2017 5.G Owners Manual
[x] Cancel search | Manufacturer: SUZUKI, Model Year: 2017, Model line: SWIFT, Model: SUZUKI SWIFT 2017 5.GPages: 336, PDF Size: 6.24 MB
Page 24 of 336
2-5
BEFORE DRIVING
74LH0-74E
2) Push open the tailgate from inside by
pushing up on the emergency lever (2)
using a flat blade screwdriver or the
jack handle. The tailgate will be latched
again by closing the tailgate simply.
If the tailgate cannot be unlatched by push-
ing the unlatch switch (1), have the vehicle
inspected by your MARUTI SUZUKI
dealer.
Trunk Lid (if equipped)
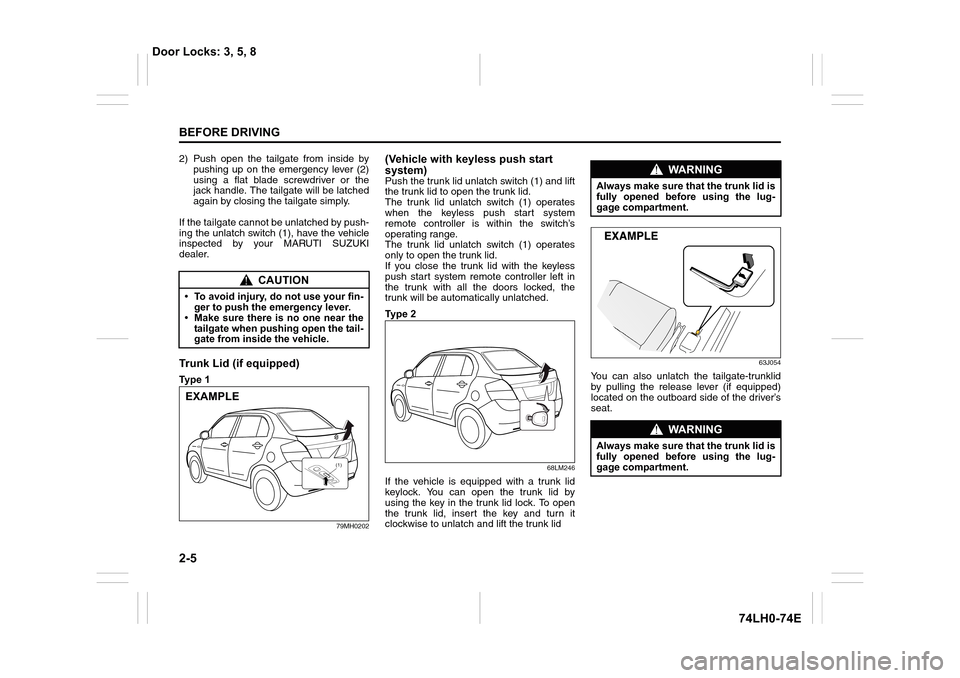
Ty p e 1
79MH0202
(Vehicle with keyless push start
system)
Push the trunk lid unlatch switch (1) and lift
the trunk lid to open the trunk lid.
The trunk lid unlatch switch (1) operates
when the keyless push start system
remote controller is within the switch’s
operating range.
The trunk lid unlatch switch (1) operates
only to open the trunk lid.
If you close the trunk lid with the keyless
push start system remote controller left in
the trunk with all the doors locked, the
trunk will be automatically unlatched.
Ty p e 2
68LM246
If the vehicle is equipped with a trunk lid
keylock. You can open the trunk lid by
using the key in the trunk lid lock. To open
the trunk lid, insert the key and turn it
clockwise to unlatch and lift the trunk lid
63J054
You can also unlatch the tailgate-trunklid
by pulling the release lever (if equipped)
located on the outboard side of the driver’s
seat.
CAUTION
• To avoid injury, do not use your fin-
ger to push the emergency lever.
• Make sure there is no one near the
tailgate when pushing open the tail-
gate from inside the vehicle.
EXAMPLE
(1)
WA R N I N G
Always make sure that the trunk lid is
fully opened before using the lug-
gage compartment.
WA R N I N G
Always make sure that the trunk lid is
fully opened before using the lug-
gage compartment.
Door Locks: 3, 5, 8
Page 102 of 336
3-17OPERATING YOUR VEHICLE
74LH0-74E
Overdrive off switchThe transmission is a 4-speed (3-speed
plus overdrive) automatic transmission. By
operating the overdrive off switch, the
transmission can be converted to a 3-
speed automatic transmission that will not
move to the overdrive position. To convert
the transmission to the 3-speed mode,
push in the overdrive off switch and
release it.
To return the transmission to the 4-speed
mode, push in the overdrive off switch
again.
When the ignition switch is turned to the
“ACC” position or the engine switch is
pressed to change the ignition mode to
“ACC”, the transmission in the 3-speed
mode is converted to the 4-speed mode
automatically.]
The 3-speed mode is suitable for the fol-
lowing driving conditions:
Driving on hilly, winding roads
– You can drive more smoothly with less
frequent gear changing
Going down a steep hill
– Some engine braking is provided
NOTE:
If you move the gearshift lever to a lower
gear while driving faster than the maximum
allowable speed for the lower gear, the
transaxle will not actually downshift until
your speed drops below the maximum
speed for the lower gear.
If You Cannot Shift Automatic trans-
mission Gearshift Lever Out of “P”
(PARK)Automatic transmission
Vehicles with an automatic transmission
have an electrically operated parklock fea-
ture. If the vehicle’s battery is discharged,
or there is some other electrical failure, the
automatic transmission cannot be shifted
out of Park in the normal way. Jump start-
ing may correct the condition. If not, follow
the procedure described below. This pro-
cedure will permit shifting the transmission
out of Park.
1) Be sure the parking brake is firmly
applied.
2) If the engine is running, stop the
engine.
3) Make sure the key is in the “ON” or
“ACC” position, or the ignition mode is
“ON” or “ACC”.
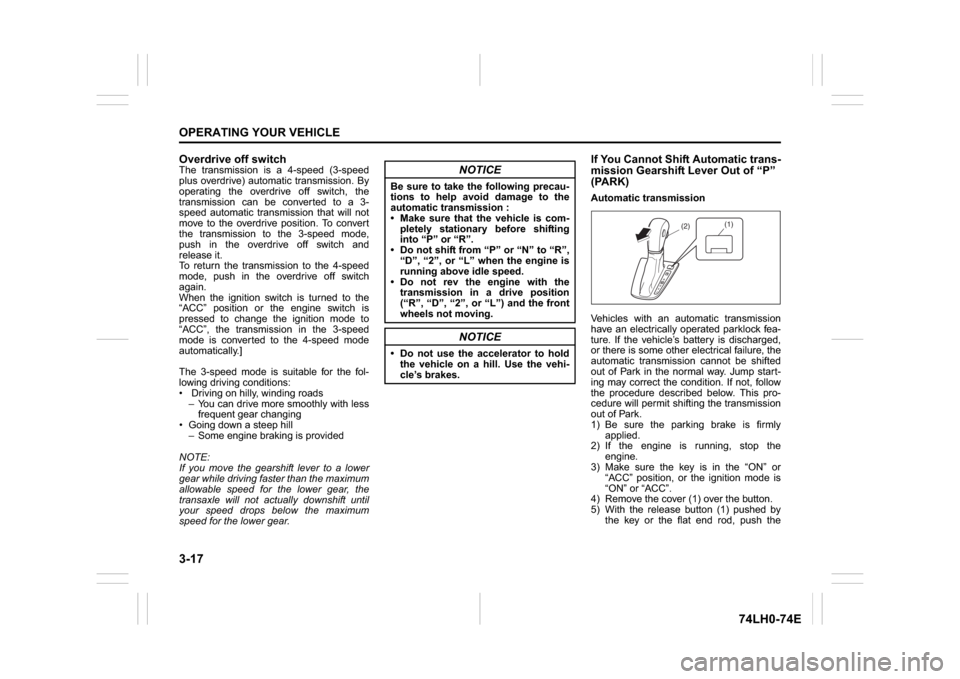
4) Remove the cover (1) over the button.
5) With the release button (1) pushed by
the key or the flat end rod, push the
NOTICE
Be sure to take the following precau-
tions to help avoid damage to the
automatic transmission :
Make sure that the vehicle is com-
pletely stationary before shifting
into “P” or “R”.
Do not shift from “P” or “N” to “R”,
“D”, “2”, or “L” when the engine is
running above idle speed.
Do not rev the engine with the
transmission in a drive position
(“R”, “D”, “2”, or “L”) and the front
wheels not moving.
NOTICE
Do not use the accelerator to hold
the vehicle on a hill. Use the vehi-
cle’s brakes.
(1)
(2)
Page 120 of 336

4-3DRIVING TIPS
67LH3-74E
Keep the air cleaner clean
74LHM0404
If the air cleaner is clogged with dust, there
will be greater intake resistance, resulting
in decreased power output and increased
fuel consumption.
Keep weight to a minimum
Heavier the load, more fuel the vehicle
consumes. Take out any luggage or cargo
when it is not necessary.
Keep tire pressures correct
Underinflation of the tires can waste fuel
due to increased running resistance of the
tires. Keep your tires inflated to the correct
pressure shown on the label on the driver’s
door lock pillar.
Highway DrivingWhen driving at high speeds, pay attention
to the following:
Stopping distance progressivelyincreases with vehicle speed. Apply the
brakes far enough ahead of the stopping
point to allow for the extra stopping dis-
tance.
On rainy days, hydroplaning can occur. Hydroplaning is the loss of direct contact
between the road surface and the vehi-
cle’s tires due to a water film forming
between them. Steering or braking the
vehicle while hydroplaning can be very
difficult, and loss of control can occur.
Keep speed down when the road sur-
face is wet.
At high speeds, the vehicle may be affected by side winds. Therefore,
reduce speed and be prepared for unex-
pected buffeting, which can occur at the
exits of tunnels, when passing by a cut
of a hill, or when being overtaken by
large vehicles, etc.
Driving on Hills
74LHM0405
When climbing steep hills, the vehicle
may begin to slow down and show a lack
of power. If this happens, you should
shift to a lower gear so that the engine
will again be operating in its normal
power range. Shift rapidly to prevent the
vehicle from losing momentum.
When driving down a hill, the engine should be used for braking by shifting to
next lower gear.
EXAMPLE
R
N
D
-
M+
EXAMPLE
Page 209 of 336
7-18
INSPECTION AND MAINTENANCE
74LH0-74E
Check that the steering wheel turns easily
and smoothly without rattling by turning it
all the way to the right and to the left while
driving very slowly in an open area. If the
amount of free play is outside the specifi-
cation or you find anything else to be
wrong, an inspection must be performed
by your MARUTI SUZUKI dealer.Tires
74LHT0704
The front and rear tire pressure specifica-
tions for your vehicle are listed on the Tire
Information Label. Both the front and rear
tires should have the specified tire pres-
sure.Tire InspectionInspect your vehicle’s tires at least once a
month by performing the following checks:
1) Measure the air pressure with a tire
gauge. Adjust the pressure if neces-
sary. Remember to check the spare
tire, too.
54G136
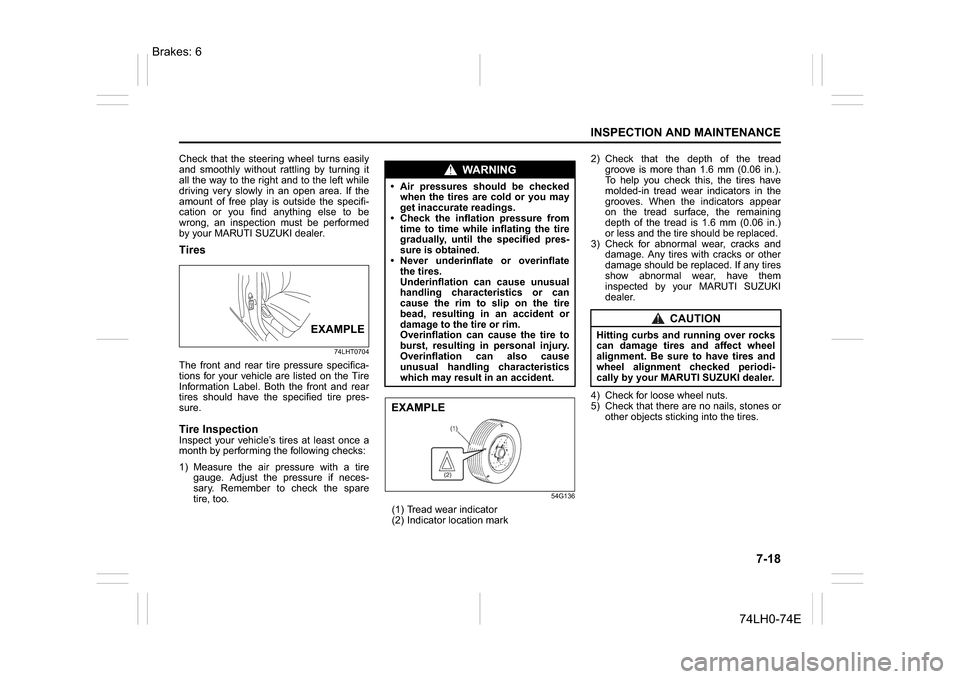
(1) Tread wear indicator
(2) Indicator location mark2) Check that the depth of the tread
groove is more than 1.6 mm (0.06 in.).
To help you check this, the tires have
molded-in tread wear indicators in the
grooves. When the indicators appear
on the tread surface, the remaining
depth of the tread is 1.6 mm (0.06 in.)
or less and the tire should be replaced.
3) Check for abnormal wear, cracks and
damage. Any tires with cracks or other
damage should be replaced. If any tires
show abnormal wear, have them
inspected by your MARUTI SUZUKI
dealer.
4) Check for loose wheel nuts.
5) Check that there are no nails, stones or
other objects sticking into the tires.
EXAMPLE
WA R N I N G
Air pressures should be checked
when the tires are cold or you may
get inaccurate readings.
Check the inflation pressure from
time to time while inflating the tire
gradually, until the specified pres-
sure is obtained.
Never underinflate or overinflate
the tires.
Underinflation can cause unusual
handling characteristics or can
cause the rim to slip on the tire
bead, resulting in an accident or
damage to the tire or rim.
Overinflation can cause the tire to
burst, resulting in personal injury.
Overinflation can also cause
unusual handling characteristics
which may result in an accident.EXAMPLE
CAUTION
Hitting curbs and running over rocks
can damage tires and affect wheel
alignment. Be sure to have tires and
wheel alignment checked periodi-
cally by your MARUTI SUZUKI dealer.
Brakes: 6
Page 210 of 336
7-19INSPECTION AND MAINTENANCE
74LH0-74E
Tire Rotation
60G-09-019E
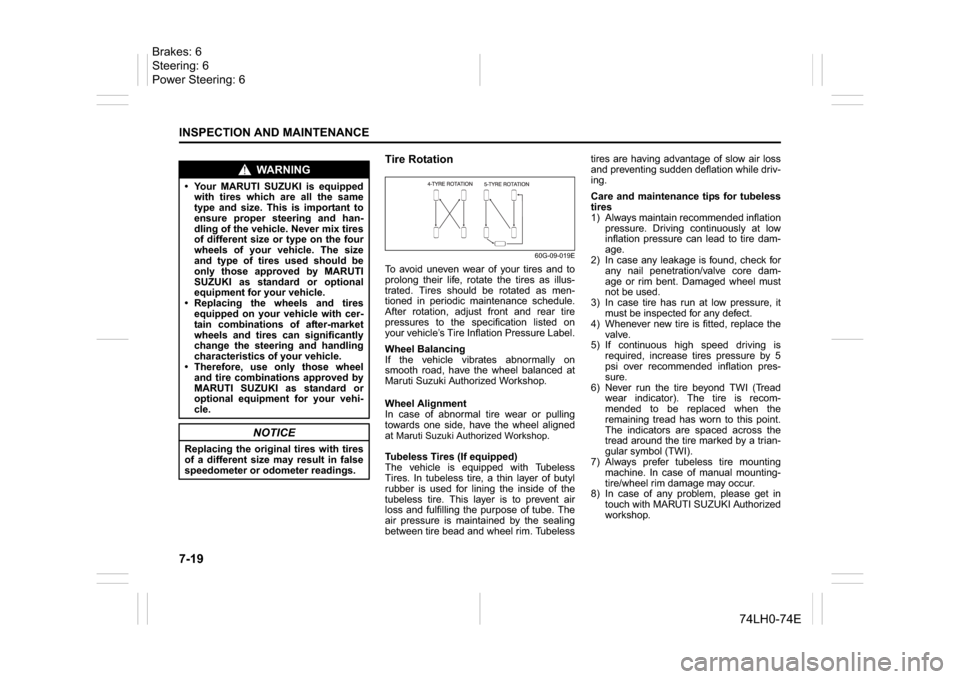
To avoid uneven wear of your tires and to
prolong their life, rotate the tires as illus-
trated. Tires should be rotated as men-
tioned in periodic maintenance schedule.
After rotation, adjust front and rear tire
pressures to the specification listed on
your vehicle’s Tire Inflation Pressure Label.
Wheel Balancing
If the vehicle vibrates abnormally on
smooth road, have the wheel balanced at
Maruti Suzuki Authorized Workshop.
Wheel Alignment
In case of abnormal tire wear or pulling
towards one side, have the wheel aligned
at Maruti Suzuki Authorized Workshop.Tubeless Tires (If equipped)
The vehicle is equipped with Tubeless
Tires. In tubeless tire, a thin layer of butyl
rubber is used for lining the inside of the
tubeless tire. This layer is to prevent air
loss and fulfilling the purpose of tube. The
air pressure is maintained by the sealing
between tire bead and wheel rim. Tubelesstires are having advantage of slow air loss
and preventing sudden deflation while driv-
ing.
Care and maintenance tips for tubeless
tires
1) Always maintain recommended inflation
pressure. Driving continuously at low
inflation pressure can lead to tire dam-
age.
2) In case any leakage is found, check for
any nail penetration/valve core dam-
age or rim bent. Damaged wheel must
not be used.
3) In case tire has run at low pressure, it
must be inspected for any defect.
4) Whenever new tire is fitted, replace the
valve.
5) If continuous high speed driving is
required, increase tires pressure by 5
psi over recommended inflation pres-
sure.
6) Never run the tire beyond TWI (Tread
wear indicator). The tire is recom-
mended to be replaced when the
remaining tread has worn to this point.
The indicators are spaced across the
tread around the tire marked by a trian-
gular symbol (TWI).
7) Always prefer tubeless tire mounting
machine. In case of manual mounting-
tire/wheel rim damage may occur.
8) In case of any problem, please get in
touch with MARUTI SUZUKI Authorized
workshop.
WA R N I N G
Your MARUTI SUZUKI is equipped
with tires which are all the same
type and size. This is important to
ensure proper steering and han-
dling of the vehicle. Never mix tires
of different size or type on the four
wheels of your vehicle. The size
and type of tires used should be
only those approved by MARUTI
SUZUKI as standard or optional
equipment for your vehicle.
Replacing the wheels and tires
equipped on your vehicle with cer-
tain combinations of after-market
wheels and tires can significantly
change the steering and handling
characteristics of your vehicle.
Therefore, use only those wheel
and tire combinations approved by
MARUTI SUZUKI as standard or
optional equipment for your vehi-
cle.
NOTICE
Replacing the original tires with tires
of a different size may result in false
speedometer or odometer readings.
Brakes: 6
Steering: 6
Power Steering: 6
Page 218 of 336
7-27INSPECTION AND MAINTENANCE
74LH0-74E
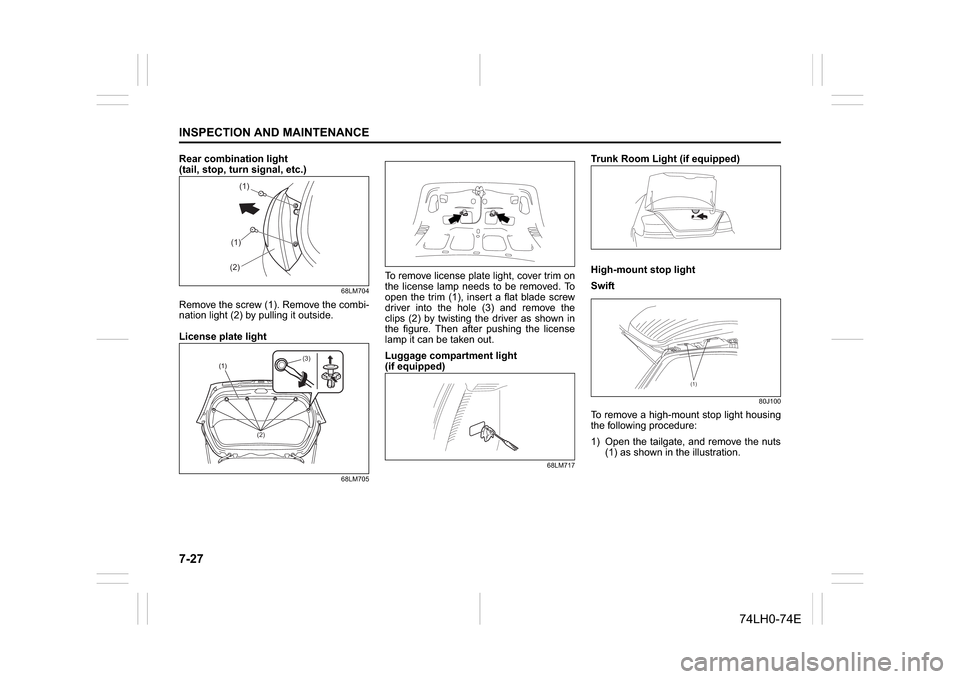
Rear combination light
(tail, stop, turn signal, etc.)
68LM704
Remove the screw (1). Remove the combi-
nation light (2) by pulling it outside.
License plate light
68LM705
To remove license plate light, cover trim on
the license lamp needs to be removed. To
open the trim (1), insert a flat blade screw
driver into the hole (3) and remove the
clips (2) by twisting the driver as shown in
the figure. Then after pushing the license
lamp it can be taken out.
Luggage compartment light
(if equipped)
68LM717
Trunk Room Light (if equipped)
High-mount stop light
Swift
80J100
To remove a high-mount stop light housing
the following procedure:
1) Open the tailgate, and remove the nuts
(1) as shown in the illustration.
(1)(1)
(2)
(2)(3)
(1)
Page 229 of 336
8-6
EMERGENCY SERVICE
74LH0-74E
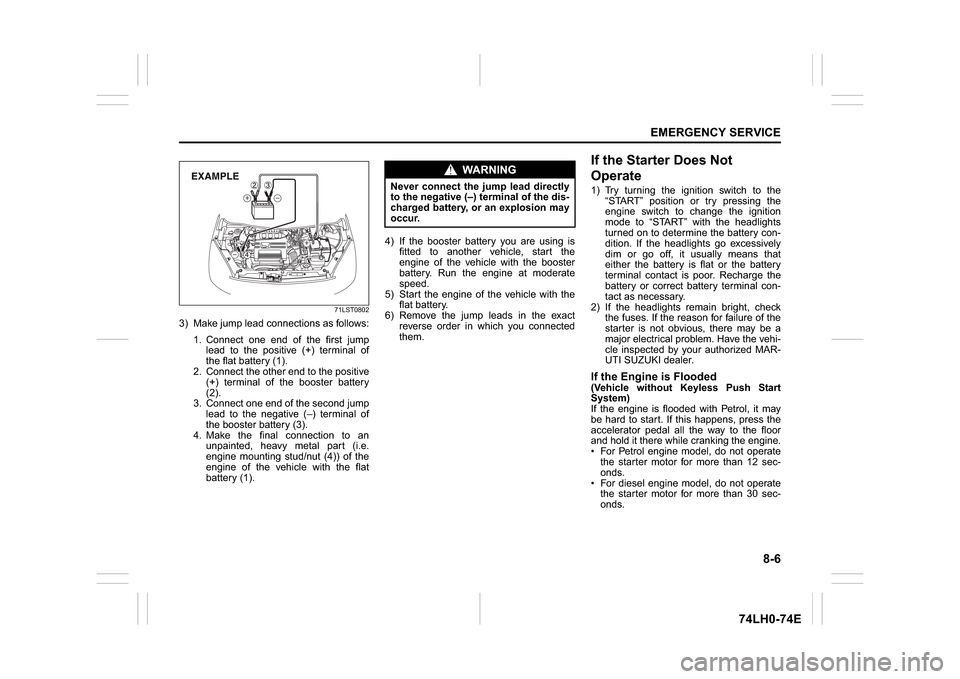
71LST0802
3) Make jump lead connections as follows:
1. Connect one end of the first jump
lead to the positive (+) terminal of
the flat battery (1).
2. Connect the other end to the positive
(+) terminal of the booster battery
(2).
3. Connect one end of the second jump
lead to the negative (–) terminal of
the booster battery (3).
4. Make the final connection to an
unpainted, heavy metal part (i.e.
engine mounting stud/nut (4)) of the
engine of the vehicle with the flat
battery (1).4) If the booster battery you are using is
fitted to another vehicle, start the
engine of the vehicle with the booster
battery. Run the engine at moderate
speed.
5) Start the engine of the vehicle with the
flat battery.
6) Remove the jump leads in the exact
reverse order in which you connected
them.
If the Starter Does Not
Operate1) Try turning the ignition switch to the
“START” position or try pressing the
engine switch to change the ignition
mode to “START” with the headlights
turned on to determine the battery con-
dition. If the headlights go excessively
dim or go off, it usually means that
either the battery is flat or the battery
terminal contact is poor. Recharge the
battery or correct battery terminal con-
tact as necessary.
2) If the headlights remain bright, check
the fuses. If the reason for failure of the
starter is not obvious, there may be a
major electrical problem. Have the vehi-
cle inspected by your authorized MAR-
UTI SUZUKI dealer.If the Engine is Flooded(Vehicle without Keyless Push Start
System)
If the engine is flooded with Petrol, it may
be hard to start. If this happens, press the
accelerator pedal all the way to the floor
and hold it there while cranking the engine.
For Petrol engine model, do not operate
the starter motor for more than 12 sec-
onds.
For diesel engine model, do not operate
the starter motor for more than 30 sec-
onds.
EXAMPLE
WA R N I N G
Never connect the jump lead directly
to the negative (–) terminal of the dis-
charged battery, or an explosion may
occur.