fuse diagram SUZUKI SX4 2006 1.G Service Owners Manual
[x] Cancel search | Manufacturer: SUZUKI, Model Year: 2006, Model line: SX4, Model: SUZUKI SX4 2006 1.GPages: 1556, PDF Size: 37.31 MB
Page 1387 of 1556
Downloaded from www.Manualslib.com manuals search engine Glass / Windows / Mirrors: 9E-2
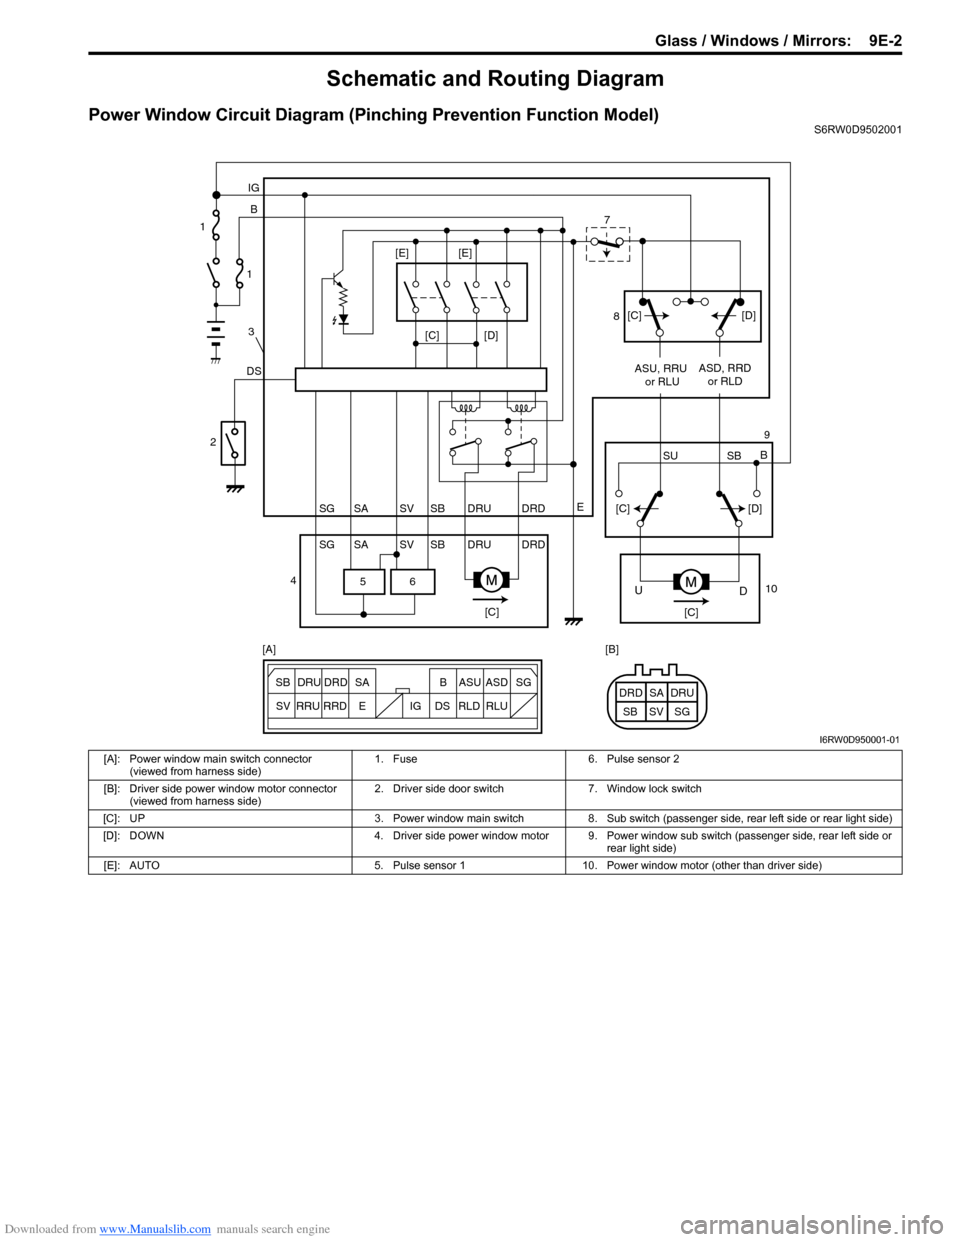
Schematic and Routing Diagram
Power Window Circuit Diagram (Pinching Prevention Function Model)S6RW0D9502001
6 5
[C][D]
DSB IG
E
SG SV SBSA DRU DRD
SG SV SBSA DRU DRDASU, RRU
or RLUASD, RRD
or RLD
[C][C]
D U
[C][D]
SU SBB [C][D] [E] [E]
ESG
SV SB SADRU DRD B ASU ASD
RRU
RRDDS IG RLD RLUSG SV SBSA DRU DRD [A] [B] 1
1
3
2
47
8
9
10
I6RW0D950001-01
[A]: Power window main switch connector
(viewed from harness side)1. Fuse 6. Pulse sensor 2
[B]: Driver side power window motor connector
(viewed from harness side)2. Driver side door switch 7. Window lock switch
[C]: UP 3. Power window main switch 8. Sub switch (passenger side, rear left side or rear light side)
[D]: DOWN 4. Driver side power window motor 9. Power window sub switch (passenger side, rear left side or
rear light side)
[E]: AUTO 5. Pulse sensor 1 10. Power window motor (other than driver side)
Page 1408 of 1556

Downloaded from www.Manualslib.com manuals search engine 9E-23 Glass / Windows / Mirrors:
Pulse Sensor and Its Circuit Inspection
(Pinching Prevention Function Model)
S6RW0D9506029
NOTE
After replacing or disconnecting the driver
side power window regulator (motor), power
window main switch, battery and/or fuse,
make sure to execute the initial setting, (to
have the door glass closed position learned)
refer to “Power Window Main Switch
Initialization (Pinching Prevention Function
Model)”.
Pulse Sensor Circuit Diagram1) Remove driver side door trim referring to Step 1) to
3) of “Front Door Glass Removal and Installation”.
2) Remove power window main switch from driver side
door trim, and them connect connector to power
window main switch.
3) Disconnect power window motor connector.
4) Turn ignition switch to ON position.
5) Check that “SV” wire terminal voltage of power
window motor connector is 10 – 14 V. If voltage is
not satisfied, check power window main switch
circuit for open, short and high resistance. If circuit is
OK, replace power window main switch.
6) Connect power window motor connector.
7) Connect oscilloscope to power window main switch
connector terminals.
8) Check pulse sensor signal by using oscilloscope. If
pulse sensor signal is not satisfied, check pulse
sensor 1 and 2 circuit. If circuit is OK, replace door
window regulator (motor).
Reference Waveform
[A]: Power window main switch connector
(viewed from harness side)
[B]: Driver side power window motor connector
(viewed from harness side)
1. Power window main switch
2. Driver side power window motor
3. Pulse sensor 1
4. Pulse sensor 2
SG
SV SB SA
SG SV SBSA
B IG
E
4 3
SG SV SBSA
SG SV SBSA
2 1
[A] [B]
I6RW0D950003-01
Measurement
terminalCH1: “SA” terminal to “SG” terminal
CH2: “SB” terminal to “SG” terminal
Oscilloscope
settingCH1: 5V/DIV, CH2: 5V/DIV
TIME: 10ms/DIV
Measurement
conditionIgnition switch is at ON position,
driver side power window operate
1. Normal operation
2. Something caught
I6RW0D950004-01
Page 1489 of 1556

Downloaded from www.Manualslib.com manuals search engine Body Electrical Control System: 10B-16
BCM Power Circuit and Ground Circuit CheckS6RW0DA204007
Wiring Diagram
Troubleshooting
+B
IG1
+BB
GRNG273-2BLKBLK/ORNG272-9
G271-3
BLK/ORNL314-4
BLU G273-5
WHTE324-22
3
1
E324 L314
1 2 4 53 6 7 8 9
10
11 12 13 14 15 16 17 181 21 2 4 53 61
2 4 53 6 7 8 9 10
7 8 9 10 11 12
11 12 13 14 15 16 17 18 19 20
G272 G271
1 2
4
65
G273[A] [A] [A]
3
[A]
I6RW0CA20006-02
[A]: Junction block connector viewed from harness side 2. Ignition switch
1. Junction block 3. Battery
Step Action Yes No
1Fuse check
1) Turn ignition switch to OFF position.
2) Check circuit fuses for condition.
Are circuit fuses in good condition?Go to Step 2. Replace fuse and check
for short circuit to
ground.
2Power supply circuit check
1) Disconnect connectors from junction block.
2) Check for proper connection to junction block connector
at terminal “E324-2”.
3) If OK, then measure voltage between “E324-2” terminal
of junction block connector and vehicle body ground.
Is voltage 10 – 14 V?Go to Step 3. Repair power supply
circuit.
3Power supply circuit check
1) Check for proper connection to junction block connector
at terminals “G273-2” and “G273-5”.
2) If OK, turn ignition switch to ON position.
3) Measure voltage between following terminals.
• Between “G273-2” terminal of junction block
connector and vehicle body ground
• Between “G273-5” terminal of junction block
connector and vehicle body ground
Is each voltage 10 – 14 V?Go to Step 4. Repair power supply
circuit.
Page 1511 of 1556
Downloaded from www.Manualslib.com manuals search engine Immobilizer Control System: 10C-9
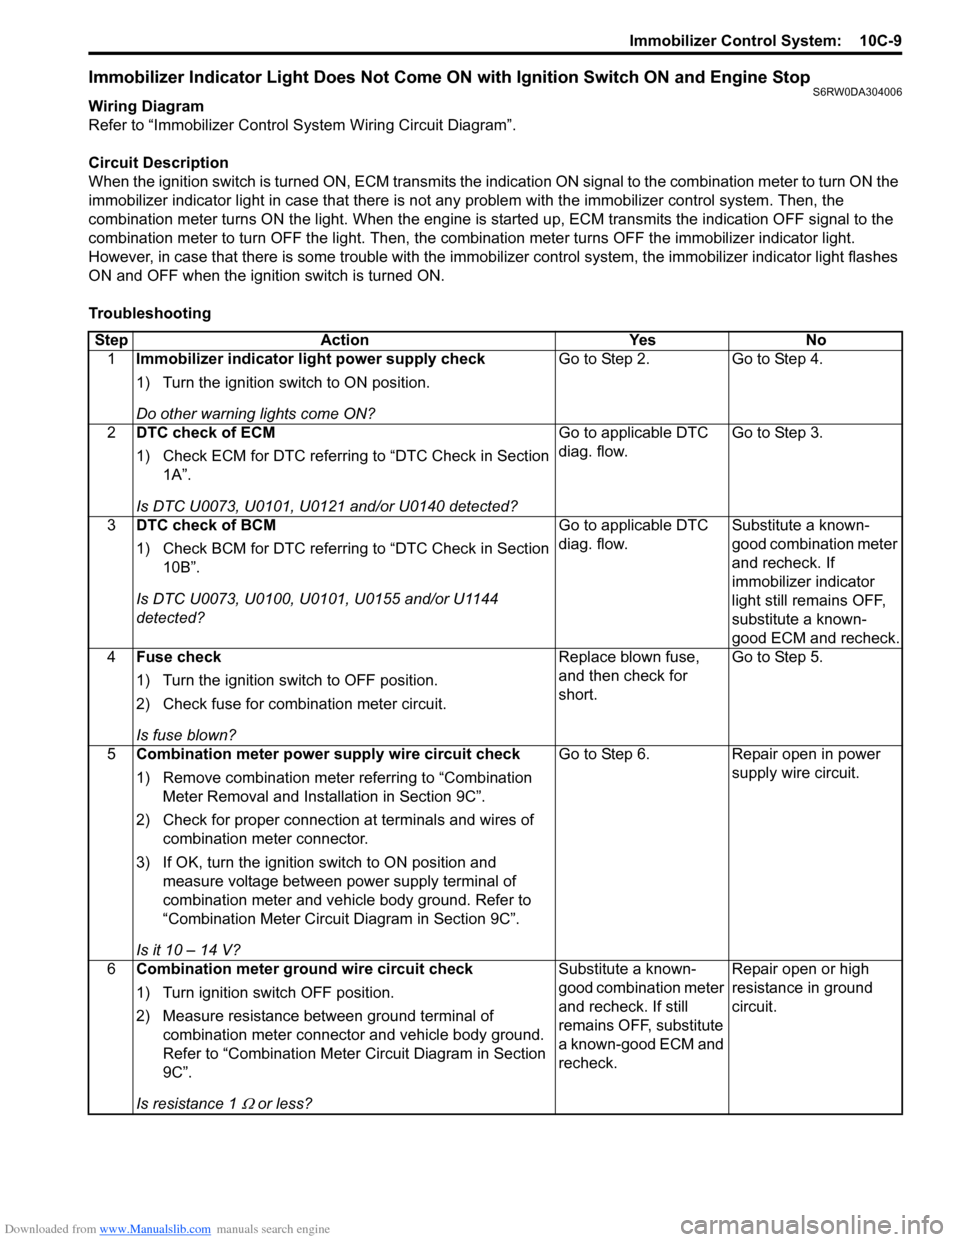
Immobilizer Indicator Light Does Not Come ON with Ignition Switch ON and Engine StopS6RW0DA304006
Wiring Diagram
Refer to “Immobilizer Control System Wiring Circuit Diagram”.
Circuit Description
When the ignition switch is turned ON, ECM transmits the indication ON signal to the combination meter to turn ON the
immobilizer indicator light in case that there is not any problem with the immobilizer control system. Then, the
combination meter turns ON the light. When the engine is started up, ECM transmits the indication OFF signal to the
combination meter to turn OFF the light. Then, the combination meter turns OFF the immobilizer indicator light.
However, in case that there is some trouble with the immobilizer control system, the immobilizer indicator light flashes
ON and OFF when the ignition switch is turned ON.
Troubleshooting
Step Action Yes No
1Immobilizer indicator light power supply check
1) Turn the ignition switch to ON position.
Do other warning lights come ON?Go to Step 2. Go to Step 4.
2DTC check of ECM
1) Check ECM for DTC referring to “DTC Check in Section
1A”.
Is DTC U0073, U0101, U0121 and/or U0140 detected?Go to applicable DTC
diag. flow.Go to Step 3.
3DTC check of BCM
1) Check BCM for DTC referring to “DTC Check in Section
10B”.
Is DTC U0073, U0100, U0101, U0155 and/or U1144
detected?Go to applicable DTC
diag. flow.Substitute a known-
good combination meter
and recheck. If
immobilizer indicator
light still remains OFF,
substitute a known-
good ECM and recheck.
4Fuse check
1) Turn the ignition switch to OFF position.
2) Check fuse for combination meter circuit.
Is fuse blown?Replace blown fuse,
and then check for
short.Go to Step 5.
5Combination meter power supply wire circuit check
1) Remove combination meter referring to “Combination
Meter Removal and Installation in Section 9C”.
2) Check for proper connection at terminals and wires of
combination meter connector.
3) If OK, turn the ignition switch to ON position and
measure voltage between power supply terminal of
combination meter and vehicle body ground. Refer to
“Combination Meter Circuit Diagram in Section 9C”.
Is it 10 – 14 V?Go to Step 6. Repair open in power
supply wire circuit.
6Combination meter ground wire circuit check
1) Turn ignition switch OFF position.
2) Measure resistance between ground terminal of
combination meter connector and vehicle body ground.
Refer to “Combination Meter Circuit Diagram in Section
9C”.
Is resistance 1
Ω or less?Substitute a known-
good combination meter
and recheck. If still
remains OFF, substitute
a known-good ECM and
recheck.Repair open or high
resistance in ground
circuit.
Page 1515 of 1556
Downloaded from www.Manualslib.com manuals search engine Immobilizer Control System: 10C-13
DTC P1618: Keyless Start Control Module CAN Communication ErrorS6RW0DA304011
Refer to “Troubleshooting for CAN-DTC in Section 1A”.
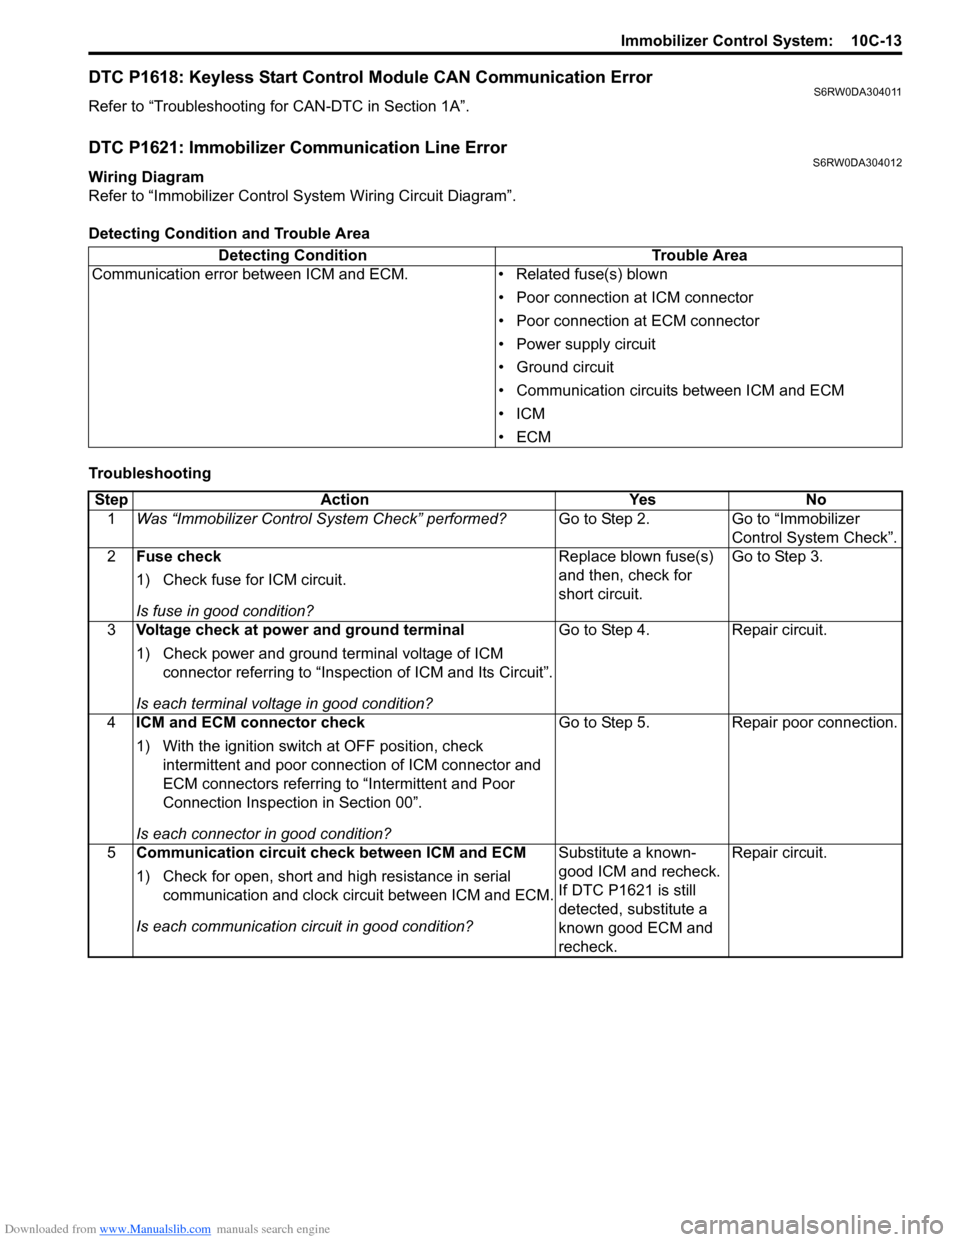
DTC P1621: Immobilizer Communication Line ErrorS6RW0DA304012
Wiring Diagram
Refer to “Immobilizer Control System Wiring Circuit Diagram”.
Detecting Condition and Trouble Area
TroubleshootingDetecting Condition Trouble Area
Communication error between ICM and ECM. • Related fuse(s) blown
• Poor connection at ICM connector
• Poor connection at ECM connector
• Power supply circuit
• Ground circuit
• Communication circuits between ICM and ECM
•ICM
•ECM
Step Action Yes No
1Was “Immobilizer Control System Check” performed?Go to Step 2. Go to “Immobilizer
Control System Check”.
2Fuse check
1) Check fuse for ICM circuit.
Is fuse in good condition?Replace blown fuse(s)
and then, check for
short circuit.Go to Step 3.
3Voltage check at power and ground terminal
1) Check power and ground terminal voltage of ICM
connector referring to “Inspection of ICM and Its Circuit”.
Is each terminal voltage in good condition?Go to Step 4. Repair circuit.
4ICM and ECM connector check
1) With the ignition switch at OFF position, check
intermittent and poor connection of ICM connector and
ECM connectors referring to “Intermittent and Poor
Connection Inspection in Section 00”.
Is each connector in good condition?Go to Step 5. Repair poor connection.
5Communication circuit check between ICM and ECM
1) Check for open, short and high resistance in serial
communication and clock circuit between ICM and ECM.
Is each communication circuit in good condition?Substitute a known-
good ICM and recheck.
If DTC P1621 is still
detected, substitute a
known good ECM and
recheck.Repair circuit.
Page 1542 of 1556
Downloaded from www.Manualslib.com manuals search engine 10E-20 Keyless Start System:
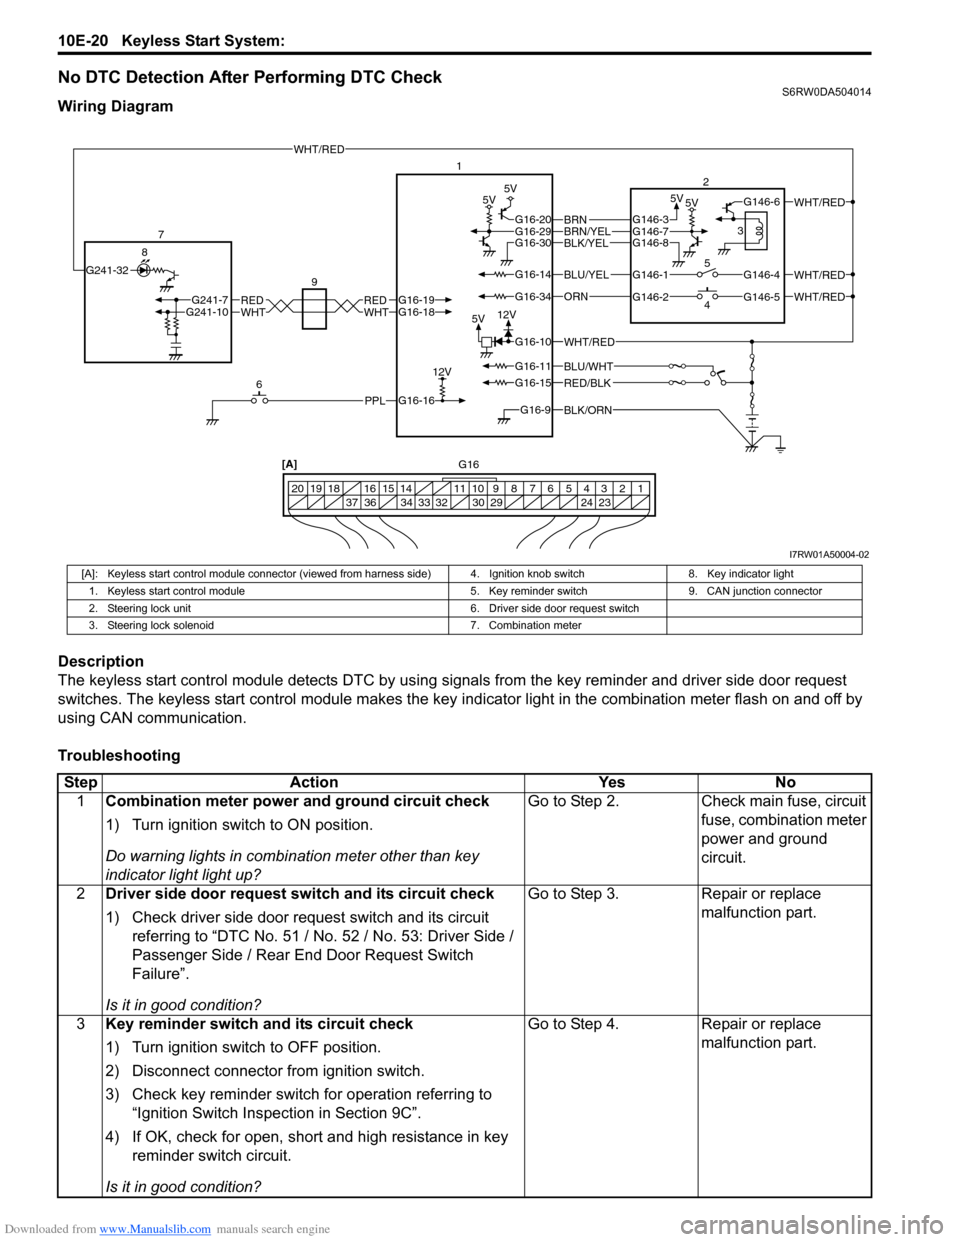
No DTC Detection After Performing DTC CheckS6RW0DA504014
Wiring Diagram
Description
The keyless start control module detects DTC by using signals from the key reminder and driver side door request
switches. The keyless start control module makes the key indicator light in the combination meter flash on and off by
using CAN communication.
Troubleshooting
BLK/ORNG16-9
G16-15
G16-14
G16-16
G16-20G16-29G16-30
G16-10
G16-34
G16-11BLU/WHT
WHT/RED
WHT/RED
WHT/RED
PPL
RED/BLK
5V5V 5V5V
5V12V
12VWHTREDWHTREDG16-18G16-19G241-10G241-7
BLU/YEL
ORN
BLK/YELBRN/YELBRNG146-3
G146-1
G146-2G146-5
G146-4
G146-6
G146-7G146-8
WHT/RED
WHT/RED
G241-32
6 7
81
2
4 53
20 12 3 4 5 6 7 8 9 10 11 14 15 16
36 34 33 32 30 29 24 23 37 18 19
[A]
9
G16
I7RW01A50004-02
[A]: Keyless start control module connector (viewed from harness side) 4. Ignition knob switch 8. Key indicator light
1. Keyless start control module 5. Key reminder switch 9. CAN junction connector
2. Steering lock unit 6. Driver side door request switch
3. Steering lock solenoid 7. Combination meter
Step Action Yes No
1Combination meter power and ground circuit check
1) Turn ignition switch to ON position.
Do warning lights in combination meter other than key
indicator light light up?Go to Step 2. Check main fuse, circuit
fuse, combination meter
power and ground
circuit.
2Driver side door request switch and its circuit check
1) Check driver side door request switch and its circuit
referring to “DTC No. 51 / No. 52 / No. 53: Driver Side /
Passenger Side / Rear End Door Request Switch
Failure”.
Is it in good condition?Go to Step 3. Repair or replace
malfunction part.
3Key reminder switch and its circuit check
1) Turn ignition switch to OFF position.
2) Disconnect connector from ignition switch.
3) Check key reminder switch for operation referring to
“Ignition Switch Inspection in Section 9C”.
4) If OK, check for open, short and high resistance in key
reminder switch circuit.
Is it in good condition?Go to Step 4. Repair or replace
malfunction part.
Page 1545 of 1556
Downloaded from www.Manualslib.com manuals search engine Keyless Start System: 10E-23
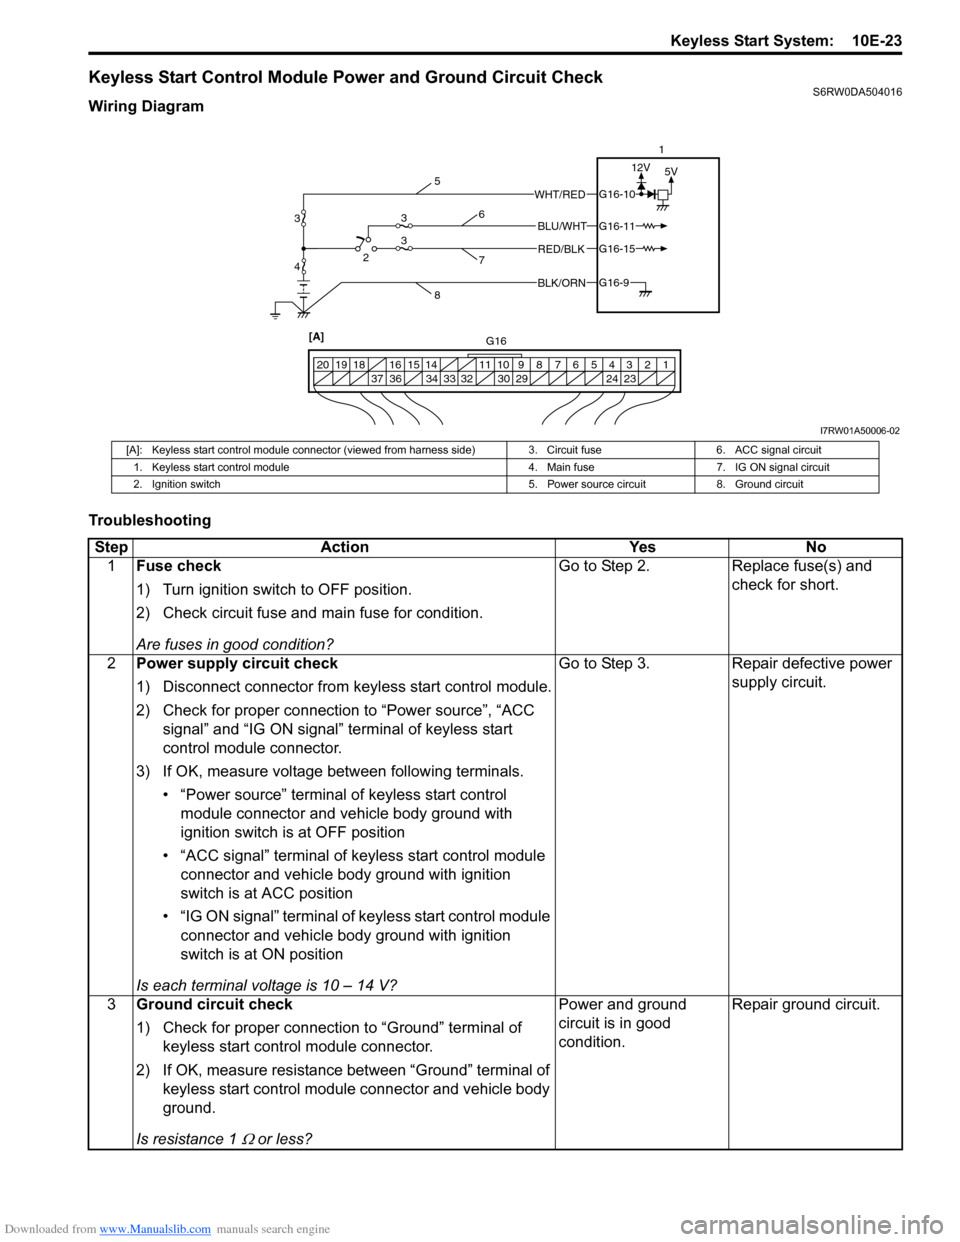
Keyless Start Control Module Power and Ground Circuit CheckS6RW0DA504016
Wiring Diagram
Troubleshooting
BLK/ORNG16-9
G16-15
G16-10
G16-11BLU/WHT
WHT/RED
RED/BLK
5V 12V
1 2 3 4 5 6 7 8 9 10 11 14 15 16
36 34 33 32 30 29 24 23 37 18 19 20
[A] 423
31
G16 5
86
7
3
I7RW01A50006-02
[A]: Keyless start control module connector (viewed from harness side) 3. Circuit fuse 6. ACC signal circuit
1. Keyless start control module 4. Main fuse 7. IG ON signal circuit
2. Ignition switch 5. Power source circuit 8. Ground circuit
Step Action Yes No
1Fuse check
1) Turn ignition switch to OFF position.
2) Check circuit fuse and main fuse for condition.
Are fuses in good condition?Go to Step 2. Replace fuse(s) and
check for short.
2Power supply circuit check
1) Disconnect connector from keyless start control module.
2) Check for proper connection to “Power source”, “ACC
signal” and “IG ON signal” terminal of keyless start
control module connector.
3) If OK, measure voltage between following terminals.
• “Power source” terminal of keyless start control
module connector and vehicle body ground with
ignition switch is at OFF position
• “ACC signal” terminal of keyless start control module
connector and vehicle body ground with ignition
switch is at ACC position
• “IG ON signal” terminal of keyless start control module
connector and vehicle body ground with ignition
switch is at ON position
Is each terminal voltage is 10 – 14 V?Go to Step 3. Repair defective power
supply circuit.
3Ground circuit check
1) Check for proper connection to “Ground” terminal of
keyless start control module connector.
2) If OK, measure resistance between “Ground” terminal of
keyless start control module connector and vehicle body
ground.
Is resistance 1
Ω or less?Power and ground
circuit is in good
condition.Repair ground circuit.