Sensors SUZUKI SX4 2006 1.G Service User Guide
[x] Cancel search | Manufacturer: SUZUKI, Model Year: 2006, Model line: SX4, Model: SUZUKI SX4 2006 1.GPages: 1556, PDF Size: 37.31 MB
Page 71 of 1556

Downloaded from www.Manualslib.com manuals search engine Engine General Information and Diagnosis: 1A-21
Component Location
Electronic Control System Components LocationS6RW0D1103001
NOTE
The figure shows left-hand steering vehicle. For right-hand steering vehicle, parts with (*) are installed
at the opposite side.
H*E*
10
D
G* C
6A
B*
e
3*
12*
a8 13
b
1
5-1
d
2
11
g
4
7
9
i
j
Fh k f
n
c J
5
K*
14
I6RW0D110016-03
Information sensors Control devices Others
1. MAF and IAT sensor a: Fuel injector A: ECM
2. Electric throttle body assembly
(built-in throttle position sensor and throttle
actuator)b: EVAP canister purge valve B: Combination meter
3. Brake light switch c: Fuel pump relay C: EVAP canister
4. ECT sensor d: EGR valve (if equipped) D: A/C evaporator outlet air temp. sensor
(if equipped with A/C)
5. Heated oxygen sensor-1 e: Malfunction indicator lamp E: Data link connector
5-1. Heated oxygen sensor-2 (if equipped) f: Radiator cooling fan relay F: A/C compressor relay (if equipped with A/C)
6. Battery g: Ignition coil assembly (with ignitor) G: BCM (included in junction block assembly)
7. CMP sensor (for engine with VVT system) h: Main relay H: Immobilizer coil antenna
8. MAP sensor (if equipped) i: Oil control valve (for engine with VVT system) J: A/C refrigerant pressure sensor
(if equipped with A/C)
9. CKP sensor j: A/C condenser cooling fan relay K: TCM (for A/T model)
10. Fuel level sensor k: Starting motor control relay
11. Knock sensor m: Immobilizer indicator lamp
12. APP sensor n: Throttle actuator control relay
13. Front wheel speed sensor (RH, LH) (VSS)
14. CMP sensor (for engine without VVT system)
Page 113 of 1556
Downloaded from www.Manualslib.com manuals search engine Engine General Information and Diagnosis: 1A-63
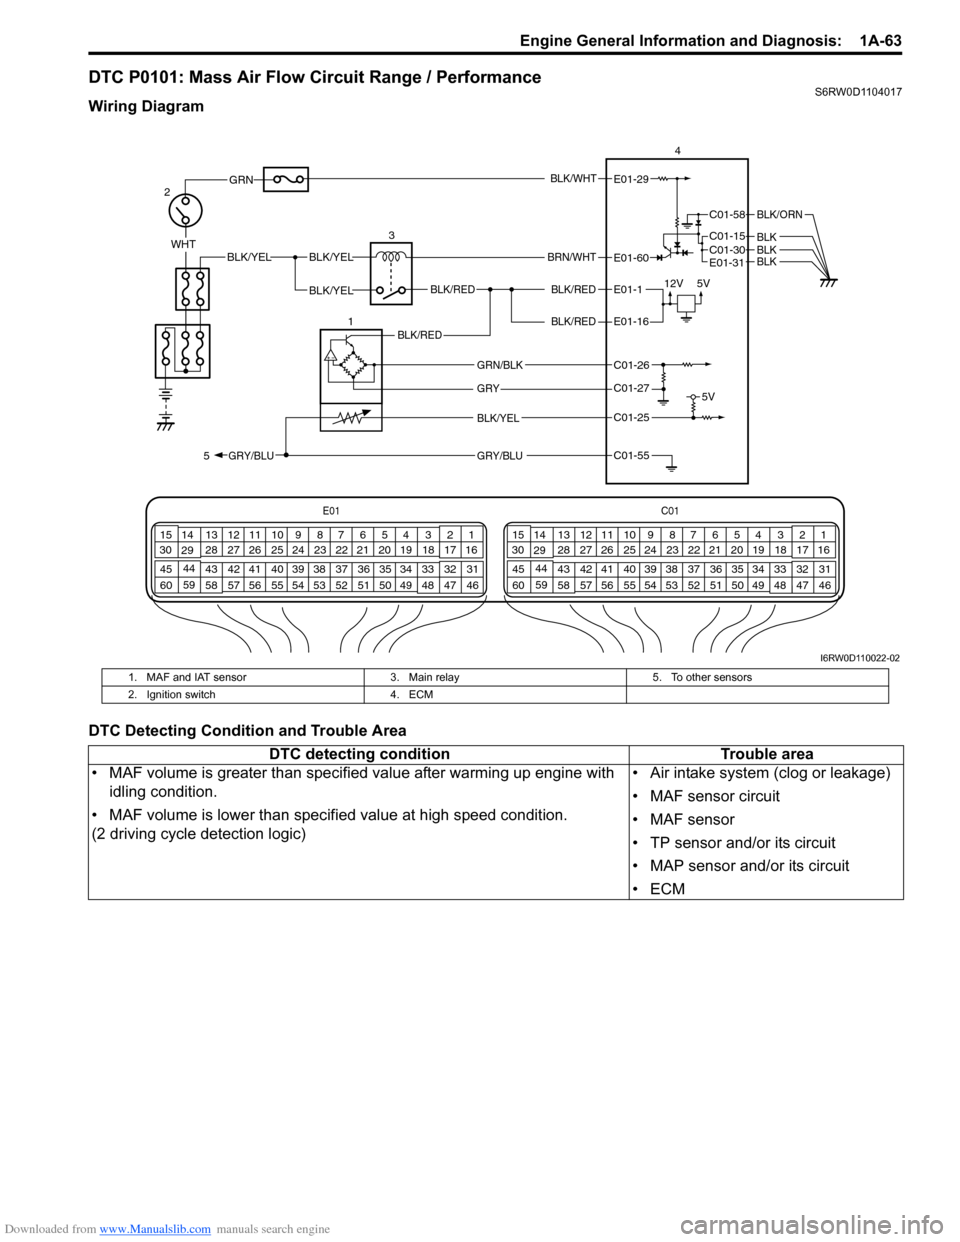
DTC P0101: Mass Air Flow Circuit Range / PerformanceS6RW0D1104017
Wiring Diagram
DTC Detecting Condition and Trouble Area
E01C01
3 4
18 19 5 6 7 10 11
17 20
47 46 49 50 51 21 22
5216 259
24 14
29
55 57 54 53 59
60 582
26 27 28 15
30
56 4832 31 34 35 36 37 40 42 39 38 44
45 43 41 331 12 13
238 3 4
18 19 5 6 7 10 11
17 20
47 46 49 50 51 21 22
5216 259
24 14
29
55 57 54 53 59
60 582
26 27 28 15
30
56 4832 31 34 35 36 37 40 42 39 38 44
45 43 41 331 12 13
238
BLK/WHT
BLK/RED
BLK/RED
WHTBLK/YELBLK/YEL
BLK/YEL
GRN
BRN/WHT
12V5V
5V
2
34E01-29
E01-1
E01-60
C01-58
C01-15 C01-30
BLK/ORN
BLKBLK
BLK/REDE01-16
BLK/YEL
GRY/BLU
1BLK/RED
C01-25
C01-55 5
E01-31 BLK
GRY/BLU
GRY
GRN/BLKC01-26
C01-27
I6RW0D110022-02
1. MAF and IAT sensor 3. Main relay 5. To other sensors
2. Ignition switch 4. ECM
DTC detecting condition Trouble area
• MAF volume is greater than specified value after warming up engine with
idling condition.
• MAF volume is lower than specified value at high speed condition.
(2 driving cycle detection logic)• Air intake system (clog or leakage)
• MAF sensor circuit
• MAF sensor
• TP sensor and/or its circuit
• MAP sensor and/or its circuit
•ECM
Page 119 of 1556

Downloaded from www.Manualslib.com manuals search engine Engine General Information and Diagnosis: 1A-69
DTC P0106: Manifold Absolute Pressure Range / PerformanceS6RW0D1104020
Wiring Diagram
DTC Detecting Condition and Trouble Area
DTC Confirmation Procedure
NOTE
Check to make sure that the following conditions are satisfied when using this “DTC Confirmation
Procedure”.
• Intake air temperature at engine start: –10 °C (14 °F) to 80 °C (176 °F)
• Intake air temperature: –10 °C (14 °F) to 70 °C (158 °F)
• Engine coolant temperature: 70 °C (158 °F) or more
• Altitude (barometric pressure): 2500 m, 8200 ft or less (560 mmHg, 74.4 kPa or more)
1) Connect scan tool to DLC with ignition switch OFF.
2) Turn ON ignition switch and clear DTC using scan tool and warm up engine completely.
3) Run engine at idle speed for 1 min.
4) Check DTC and pending DTC.
E01C01
3 4
18 19 5 6 7 10 11
17 20
47 46 49 50 51 21 22
5216 259
24 14
29
55 57 54 53 59
60 582
26 27 28 15
30
56 4832 31 34 35 36 37 40 42 39 38 44
45 43 41 331 12 13
238 3 4
18 19 5 6 7 10 11
17 20
47 46 49 50 51 21 22
5216 259
24 14
29
55 57 54 53 59
60 582
26 27 28 15
30
56 4832 31 34 35 36 37 40 42 39 38 44
45 43 41 331 12 13
238
4
C01-58
C01-15 C01-30
BLK/ORN
BLKBLK
12
3
GRY/REDGRY/RED
5V
5VC01-14
C01-53
C01-55
RED/BLK
GRY/BLUGRY/BLU
E01-31BLK
I6RW0D110023-01
1. Manifold absolute pressure sensor 3. To other sensors
2. To A/C refrigerant pressure sensor (if equipped with A/C) 4. ECM
DTC detecting condition Trouble area
• Difference between Max. manifold absolute pressure
value and Min. manifold pressure value is less than
specified value when engine running at idle speed.
• Difference between barometric pressure value and
manifold pressure value is less than specified value for 5
sec. at 2000 r/min. or more with acceleration pedal off
condition.
(2 driving cycle detection logic)• Manifold absolute pressure sensor
• Manifold absolute pressure sensor vacuum passage
• Air intake system
•ECM
Page 124 of 1556

Downloaded from www.Manualslib.com manuals search engine 1A-74 Engine General Information and Diagnosis:
DTC P0111: Intake Air Temperature Circuit Range / PerformanceS6RW0D1104023
Wiring Diagram
DTC Detecting Condition and Trouble Area
DTC Confirmation Procedure
NOTE
Check to make sure that following conditions are satisfied when using this “DTC Confirmation
Procedure”.
• Intake air temperature at engine start: –10 °C (14 °F) to 80 °C (176 °F)
• Intake air temperature: –10 °C (14 °F) to 70 °C (158 °F)
• Engine coolant temperature at engine start: less than 30 °C (86 °F)
• Engine coolant temperature: 70 °C (158 °F) or more
• Altitude (barometric pressure): 2500 m, 8200 ft or less (560 mmHg, 74.4 kPa or more)
1) With ignition switch turned OFF, connect scan tool.
2) Turn ON ignition switch, clear DTC using scan tool.
3) Start engine and warm up to normal operating temperature. (ECT approx. 90 – 95 °C, 194 – 203 °F)
4) Run engine at idle speed for 10 min. or more.9MAP sensor output signal check
1) Check MAP sensor according to “Manifold Absolute
Pressure (MAP) Sensor Inspection (If Equipped) in
Section 1C”.
Is it in good condition?Substitute a known-
good ECM and recheck.Faulty MAP sensor. Step Action Yes No
E01C01
3 4
18 19 5 6 7 10 11
17 20
47 46 49 50 51 21 22
5216 259
24 14
29
55 57 54 53 59
60 582
26 27 28 15
30
56 4832 31 34 35 36 37 40 42 39 38 44
45 43 41 331 12 13
238 3 4
18 19 5 6 7 10 11
17 20
47 46 49 50 51 21 22
5216 259
24 14
29
55 57 54 53 59
60 582
26 27 28 15
30
56 4832 31 34 35 36 37 40 42 39 38 44
45 43 41 331 12 13
238
5V
2
BLK/YEL
GRY/BLU
GRY
GRY/BLU
1
GRN/BLK
C01-25
C01-55 34
C01-26
C01-27
BLK/RED
GRY/BLU
I6RW0D110024-01
1. MAF and IAT sensor 3. To other sensors
2. ECM 4. From main relay
DTC detecting condition Trouble area
Difference of maximum IAT minus minimum IAT is less than specified value while
ECT is over 70 °C (158 °F) after 10 min from cold engine start (ECT is lower than
30°C (86 °F) at engine start).
(2 driving cycle detection logic)• High resistance circuit
• MAF and IAT sensor
•ECM
Page 130 of 1556

Downloaded from www.Manualslib.com manuals search engine 1A-80 Engine General Information and Diagnosis:
DTC P0116: Engine Coolant Temperature Circuit Range / PerformanceS6RW0D1104026
Wiring Diagram
DTC Detecting Condition and Trouble Area8Ground circuit check
1) Remove ECM from its bracket with ECM connectors
connected.
2) Measure resistance between “C01-55” terminal of ECM
connector and vehicle body ground.
Is resistance below 5
Ω?“GRY/BLU” wire is open
circuit or high resistance
circuit. Poor “C01-55”
connection.Faulty ECM ground
circuit. If circuit is OK,
substitute a known-
good ECM and recheck.
9IAT sensor for performance check
1) Check IAT sensor according to “Intake Air Temperature
(IAT) Sensor Inspection in Section 1C”.
Is it in good condition?Substitute a known-
good ECM and recheck.Replace MAF and IAT
sensor. Step Action Yes No
C01-55GRY/BLUGRY/BLU
3 1
2 5V
C01-24LT GRN
E01C01
3 4
18 19 5 6 7 10 11
17 20
47 46 49 50 51 21 22
5216 259
24 14
29
55 57 54 53 59
60 582
26 27 28 15
30
56 4832 31 34 35 36 37 40 42 39 38 44
45 43 41 331 12 13
238 3 4
18 19 5 6 7 10 11
17 20
47 46 49 50 51 21 22
5216 259
24 14
29
55 57 54 53 59
60 582
26 27 28 15
30
56 4832 31 34 35 36 37 40 42 39 38 44
45 43 41 331 12 13
238
I6RW0D110025-01
1. ECT sensor 2. ECM 3. To other sensors
DTC detecting condition Trouble area
ECT sensor values is less than temperature at A/F feedback start while engine is running
under more than specified engine load (more than 1000 rpm) for specified time
(depending on ECT at engine start (ex. 5 min at –10 °C, –4 °F)) continuously from engine
start.
(2 driving cycle detecting logic)•ECT sensor
• ECT sensor circuit
• Thermostat
•ECM
Page 161 of 1556
Downloaded from www.Manualslib.com manuals search engine Engine General Information and Diagnosis: 1A-111
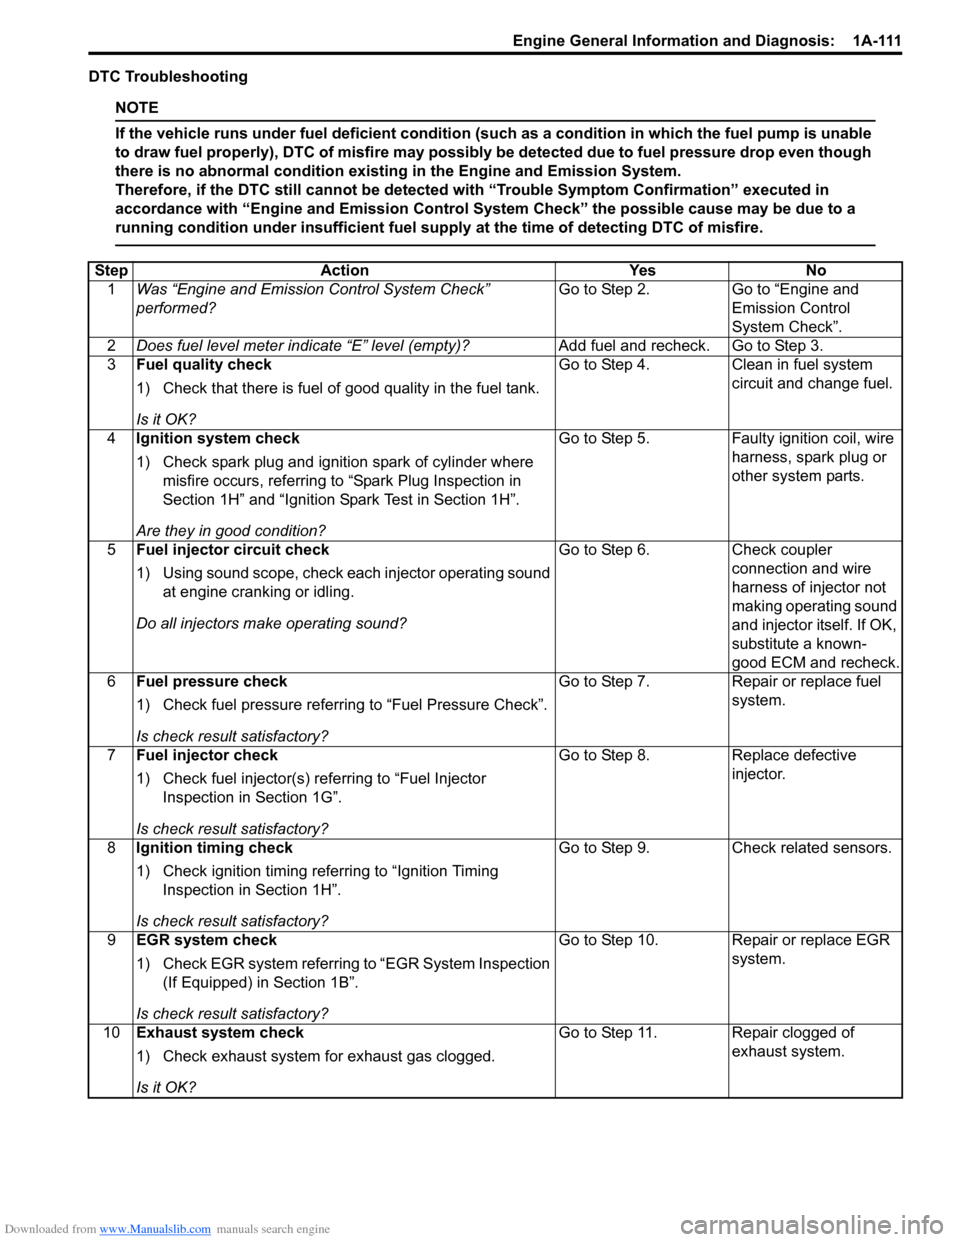
DTC Troubleshooting
NOTE
If the vehicle runs under fuel deficient condition (such as a condition in which the fuel pump is unable
to draw fuel properly), DTC of misfire may possibly be detected due to fuel pressure drop even though
there is no abnormal condition existing in the Engine and Emission System.
Therefore, if the DTC still cannot be detected with “Trouble Symptom Confirmation” executed in
accordance with “Engine and Emission Control System Check” the possible cause may be due to a
running condition under insufficient fuel supply at the time of detecting DTC of misfire.
Step Action Yes No
1Was “Engine and Emission Control System Check”
performed?Go to Step 2. Go to “Engine and
Emission Control
System Check”.
2Does fuel level meter indicate “E” level (empty)?Add fuel and recheck. Go to Step 3.
3Fuel quality check
1) Check that there is fuel of good quality in the fuel tank.
Is it OK?Go to Step 4. Clean in fuel system
circuit and change fuel.
4Ignition system check
1) Check spark plug and ignition spark of cylinder where
misfire occurs, referring to “Spark Plug Inspection in
Section 1H” and “Ignition Spark Test in Section 1H”.
Are they in good condition?Go to Step 5. Faulty ignition coil, wire
harness, spark plug or
other system parts.
5Fuel injector circuit check
1) Using sound scope, check each injector operating sound
at engine cranking or idling.
Do all injectors make operating sound?Go to Step 6. Check coupler
connection and wire
harness of injector not
making operating sound
and injector itself. If OK,
substitute a known-
good ECM and recheck.
6Fuel pressure check
1) Check fuel pressure referring to “Fuel Pressure Check”.
Is check result satisfactory?Go to Step 7. Repair or replace fuel
system.
7Fuel injector check
1) Check fuel injector(s) referring to “Fuel Injector
Inspection in Section 1G”.
Is check result satisfactory?Go to Step 8. Replace defective
injector.
8Ignition timing check
1) Check ignition timing referring to “Ignition Timing
Inspection in Section 1H”.
Is check result satisfactory?Go to Step 9. Check related sensors.
9EGR system check
1) Check EGR system referring to “EGR System Inspection
(If Equipped) in Section 1B”.
Is check result satisfactory?Go to Step 10. Repair or replace EGR
system.
10Exhaust system check
1) Check exhaust system for exhaust gas clogged.
Is it OK?Go to Step 11. Repair clogged of
exhaust system.
Page 186 of 1556
Downloaded from www.Manualslib.com manuals search engine 1A-136 Engine General Information and Diagnosis:
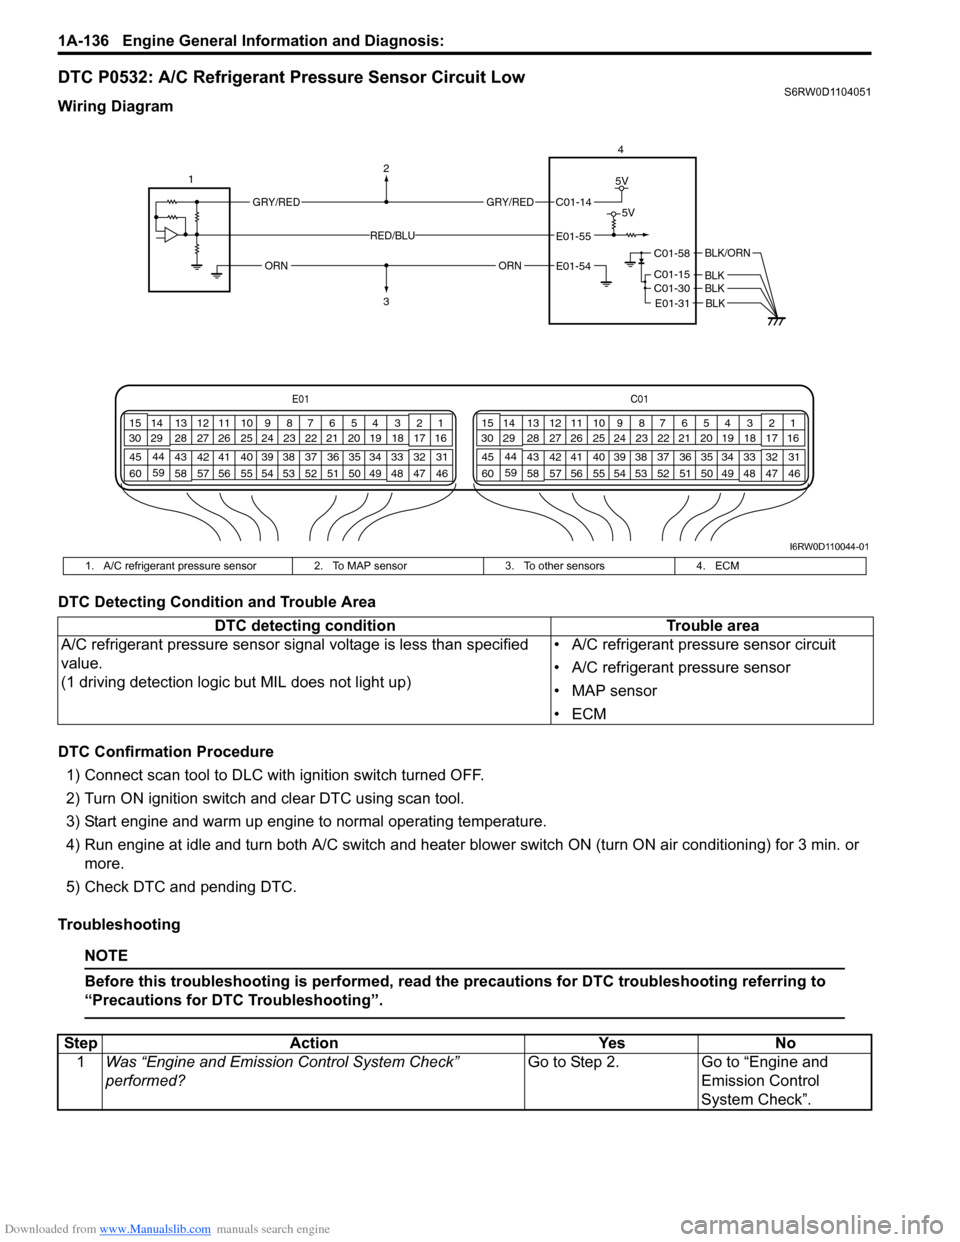
DTC P0532: A/C Refrigerant Pressure Sensor Circuit LowS6RW0D1104051
Wiring Diagram
DTC Detecting Condition and Trouble Area
DTC Confirmation Procedure
1) Connect scan tool to DLC with ignition switch turned OFF.
2) Turn ON ignition switch and clear DTC using scan tool.
3) Start engine and warm up engine to normal operating temperature.
4) Run engine at idle and turn both A/C switch and heater blower switch ON (turn ON air conditioning) for 3 min. or
more.
5) Check DTC and pending DTC.
Troubleshooting
NOTE
Before this troubleshooting is performed, read the precautions for DTC troubleshooting referring to
“Precautions for DTC Troubleshooting”.
E01C01
3 4
18 19 5 6 7 10 11
17 20
47 46 49 50 51 21 22
5216 259
24 14
29
55 57 54 53 59
60 582
26 27 28 15
30
56 4832 31 34 35 36 37 40 42 39 38 44
45 43 41 331 12 13
238 3 4
18 19 5 6 7 10 11
17 20
47 46 49 50 51 21 22
5216 259
24 14
29
55 57 54 53 59
60 582
26 27 28 15
30
56 4832 31 34 35 36 37 40 42 39 38 44
45 43 41 331 12 13
238
4
C01-58
C01-15 C01-30
BLK/ORN
BLKBLK
12
3
GRY/REDGRY/RED
ORNORN
5V
5VC01-14
E01-55
E01-54
RED/BLU
E01-31 BLK
I6RW0D110044-01
1. A/C refrigerant pressure sensor 2. To MAP sensor 3. To other sensors 4. ECM
DTC detecting condition Trouble area
A/C refrigerant pressure sensor signal voltage is less than specified
value.
(1 driving detection logic but MIL does not light up)• A/C refrigerant pressure sensor circuit
• A/C refrigerant pressure sensor
• MAP sensor
•ECM
Step Action Yes No
1Was “Engine and Emission Control System Check”
performed?Go to Step 2. Go to “Engine and
Emission Control
System Check”.
Page 217 of 1556
Downloaded from www.Manualslib.com manuals search engine Engine General Information and Diagnosis: 1A-167
Troubleshooting for CAN-DTCS6RW0D1104084
Perform this troubleshooting when CAN-DTC is detected.
NOTE
• When performing this troubleshooting, be sure to have full understanding of “Precaution on CAN
Troubleshooting” and observe it.
• It may be possible that CAN system has trouble because of fuse blown or low battery voltage.
Before troubleshooting, check to make sure that fuse, battery voltage and generator status are
normal.
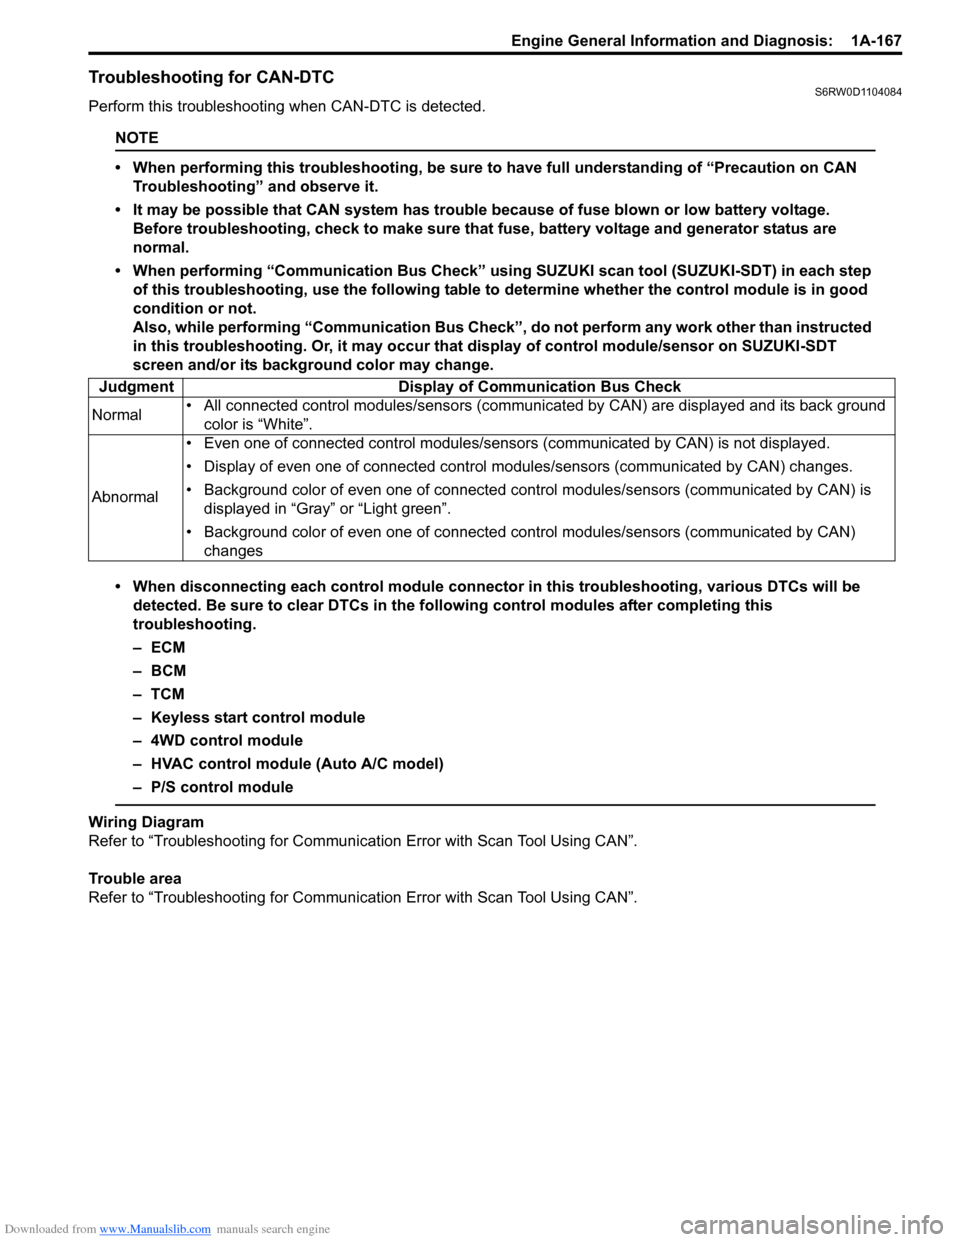
• When performing “Communication Bus Check” using SUZUKI scan tool (SUZUKI-SDT) in each step
of this troubleshooting, use the following table to determine whether the control module is in good
condition or not.
Also, while performing “Communication Bus Check”, do not perform any work other than instructed
in this troubleshooting. Or, it may occur that display of control module/sensor on SUZUKI-SDT
screen and/or its background color may change.
• When disconnecting each control module connector in this troubleshooting, various DTCs will be
detected. Be sure to clear DTCs in the following control modules after completing this
troubleshooting.
–ECM
– BCM
–TCM
– Keyless start control module
– 4WD control module
– HVAC control module (Auto A/C model)
– P/S control module
Wiring Diagram
Refer to “Troubleshooting for Communication Error with Scan Tool Using CAN”.
Trouble area
Refer to “Troubleshooting for Communication Error with Scan Tool Using CAN”. Judgment Display of Communication Bus Check
Normal• All connected control modules/sensors (communicated by CAN) are displayed and its back ground
color is “White”.
Abnormal• Even one of connected control modules/sensors (communicated by CAN) is not displayed.
• Display of even one of connected control modules/sensors (communicated by CAN) changes.
• Background color of even one of connected control modules/sensors (communicated by CAN) is
displayed in “Gray” or “Light green”.
• Background color of even one of connected control modules/sensors (communicated by CAN)
changes
Page 227 of 1556
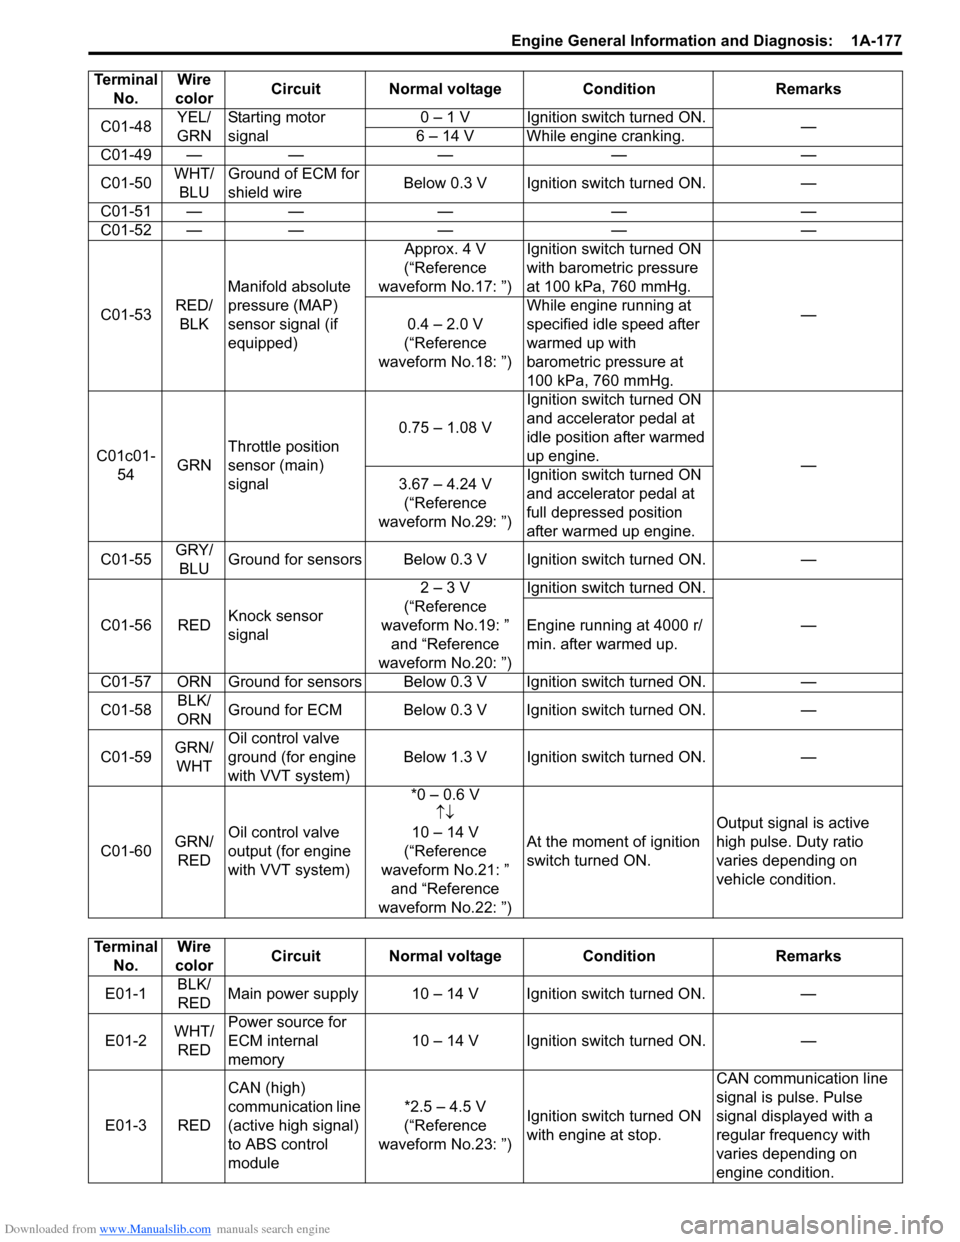
Downloaded from www.Manualslib.com manuals search engine Engine General Information and Diagnosis: 1A-177
C01-48YEL/
GRNStarting motor
signal0 – 1 V Ignition switch turned ON.
—
6 – 14 V While engine cranking.
C01-49 — — — — —
C01-50WHT/
BLUGround of ECM for
shield wireBelow 0.3 V Ignition switch turned ON. —
C01-51 — — — — —
C01-52 — — — — —
C01-53RED/
BLKManifold absolute
pressure (MAP)
sensor signal (if
equipped)Approx. 4 V
(“Reference
waveform No.17: ”)Ignition switch turned ON
with barometric pressure
at 100 kPa, 760 mmHg.
—
0.4 – 2.0 V
(“Reference
waveform No.18: ”)While engine running at
specified idle speed after
warmed up with
barometric pressure at
100 kPa, 760 mmHg.
C01c01-
54GRNThrottle position
sensor (main)
signal0.75 – 1.08 VIgnition switch turned ON
and accelerator pedal at
idle position after warmed
up engine.
—
3.67 – 4.24 V
(“Reference
waveform No.29: ”)Ignition switch turned ON
and accelerator pedal at
full depressed position
after warmed up engine.
C01-55GRY/
BLUGround for sensors Below 0.3 V Ignition switch turned ON. —
C01-56 REDKnock sensor
signal2 – 3 V
(“Reference
waveform No.19: ”
and “Reference
waveform No.20: ”)Ignition switch turned ON.
— Engine running at 4000 r/
min. after warmed up.
C01-57 ORN Ground for sensors Below 0.3 V Ignition switch turned ON. —
C01-58BLK/
ORNGround for ECM Below 0.3 V Ignition switch turned ON. —
C01-59GRN/
WHTOil control valve
ground (for engine
with VVT system)Below 1.3 V Ignition switch turned ON. —
C01-60GRN/
REDOil control valve
output (for engine
with VVT system)*0 – 0.6 V
↑↓
10 – 14 V
(“Reference
waveform No.21: ”
and “Reference
waveform No.22: ”)At the moment of ignition
switch turned ON.Output signal is active
high pulse. Duty ratio
varies depending on
vehicle condition. Terminal
No.Wire
colorCircuit Normal voltage Condition Remarks
Terminal
No.Wire
colorCircuit Normal voltage Condition Remarks
E01-1BLK/
REDMain power supply 10 – 14 V Ignition switch turned ON. —
E01-2WHT/
REDPower source for
ECM internal
memory10 – 14 V Ignition switch turned ON. —
E01-3 REDCAN (high)
communication line
(active high signal)
to ABS control
module*2.5 – 4.5 V
(“Reference
waveform No.23: ”)Ignition switch turned ON
with engine at stop.CAN communication line
signal is pulse. Pulse
signal displayed with a
regular frequency with
varies depending on
engine condition.
Page 230 of 1556
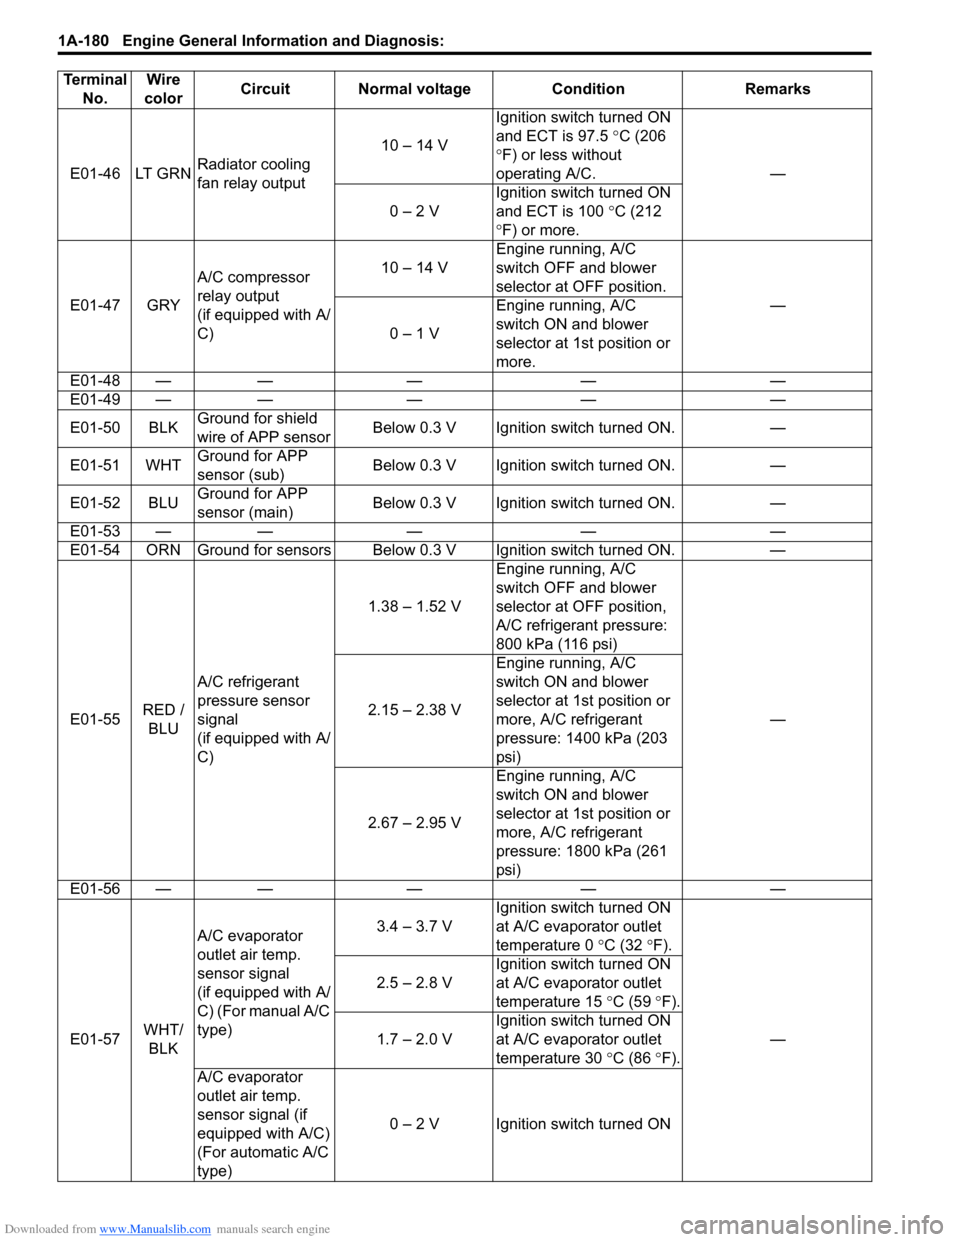
Downloaded from www.Manualslib.com manuals search engine 1A-180 Engine General Information and Diagnosis:
E01-46 LT GRNRadiator cooling
fan relay output10 – 14 VIgnition switch turned ON
and ECT is 97.5 °C (206
°F) or less without
operating A/C. —
0 – 2 VIgnition switch turned ON
and ECT is 100 °C (212
°F) or more.
E01-47 GRYA/C compressor
relay output
(if equipped with A/
C)10 – 14 VEngine running, A/C
switch OFF and blower
selector at OFF position.
—
0 – 1 VEngine running, A/C
switch ON and blower
selector at 1st position or
more.
E01-48 — — — — —
E01-49 — — — — —
E01-50 BLKGround for shield
wire of APP sensorBelow 0.3 V Ignition switch turned ON. —
E01-51 WHTGround for APP
sensor (sub)Below 0.3 V Ignition switch turned ON. —
E01-52 BLUGround for APP
sensor (main)Below 0.3 V Ignition switch turned ON. —
E01-53 — — — — —
E01-54 ORN Ground for sensors Below 0.3 V Ignition switch turned ON. —
E01-55RED /
BLUA/C refrigerant
pressure sensor
signal
(if equipped with A/
C)1.38 – 1.52 VEngine running, A/C
switch OFF and blower
selector at OFF position,
A/C refrigerant pressure:
800 kPa (116 psi)
— 2.15 – 2.38 VEngine running, A/C
switch ON and blower
selector at 1st position or
more, A/C refrigerant
pressure: 1400 kPa (203
psi)
2.67 – 2.95 VEngine running, A/C
switch ON and blower
selector at 1st position or
more, A/C refrigerant
pressure: 1800 kPa (261
psi)
E01-56 — — — — —
E01-57WHT/
BLKA/C evaporator
outlet air temp.
sensor signal
(if equipped with A/
C) (For manual A/C
type)3.4 – 3.7 VIgnition switch turned ON
at A/C evaporator outlet
temperature 0 °C (32 °F).
— 2.5 – 2.8 VIgnition switch turned ON
at A/C evaporator outlet
temperature 15 °C (59 °F).
1.7 – 2.0 VIgnition switch turned ON
at A/C evaporator outlet
temperature 30 °C (86 °F).
A/C evaporator
outlet air temp.
sensor signal (if
equipped with A/C)
(For automatic A/C
type)0 – 2 V Ignition switch turned ON Terminal
No.Wire
colorCircuit Normal voltage Condition Remarks