AIR SUZUKI SX4 2006 1.G Service Workshop Manual
[x] Cancel search | Manufacturer: SUZUKI, Model Year: 2006, Model line: SX4, Model: SUZUKI SX4 2006 1.GPages: 1556, PDF Size: 37.31 MB
Page 902 of 1556
Downloaded from www.Manualslib.com manuals search engine 6C-22 Power Assisted Steering System:
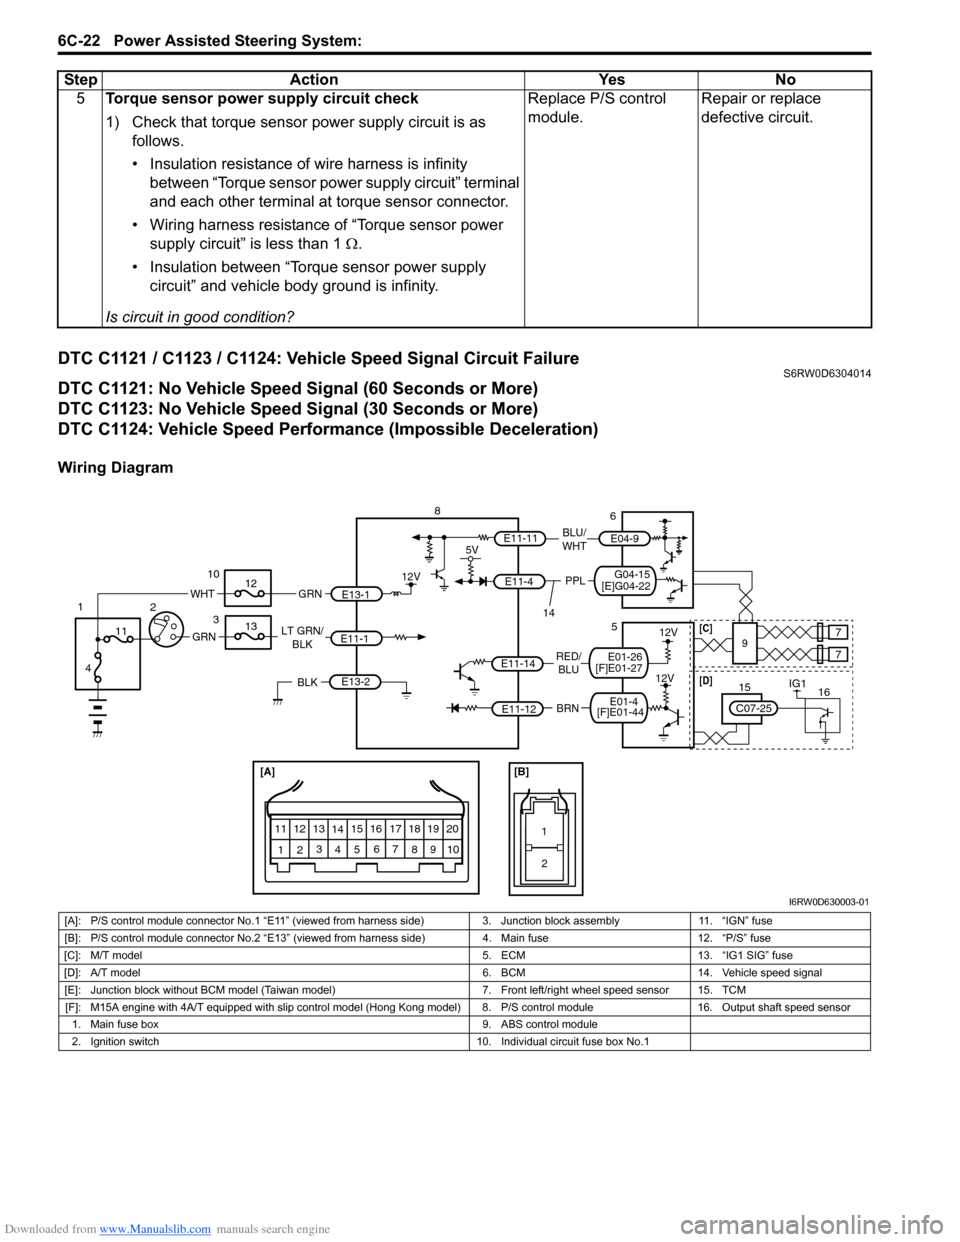
DTC C1121 / C1123 / C1124: Vehicle Speed Signal Circuit FailureS6RW0D6304014
DTC C1121: No Vehicle Speed Signal (60 Seconds or More)
DTC C1123: No Vehicle Speed Signal (30 Seconds or More)
DTC C1124: Vehicle Speed Performance (Impossible Deceleration)
Wiring Diagram5Torque sensor power supply circuit check
1) Check that torque sensor power supply circuit is as
follows.
• Insulation resistance of wire harness is infinity
between “Torque sensor power supply circuit” terminal
and each other terminal at torque sensor connector.
• Wiring harness resistance of “Torque sensor power
supply circuit” is less than 1 Ω.
• Insulation between “Torque sensor power supply
circuit” and vehicle body ground is infinity.
Is circuit in good condition?Replace P/S control
module.Repair or replace
defective circuit. Step Action Yes No
[A]
123
4567
8
9 11
10 12 13
141516
17 18 1920
1
2
[B]
BRN RED/
BLU LT GRN/
BLK
E11-1
E11-14
E11-12
E13-1 GRN
GRN
WHT
8
3 10
12
13
11
4 1
2
12V
E13-2BLK
12V
12V
9 5
77
E11-11
G04-15
[E]G04-22
5V
PPL
E11-4
BLU/
WHTE04-9
6
14
IG11615
C07-25
[D][C]
[F]E01-44E01-4
[F]E01-27E01-26
I6RW0D630003-01
[A]: P/S control module connector No.1 “E11” (viewed from harness side) 3. Junction block assembly 11. “IGN” fuse
[B]: P/S control module connector No.2 “E13” (viewed from harness side) 4. Main fuse 12. “P/S” fuse
[C]: M/T model 5. ECM 13. “IG1 SIG” fuse
[D]: A/T model 6. BCM 14. Vehicle speed signal
[E]: Junction block without BCM model (Taiwan model) 7. Front left/right wheel speed sensor 15. TCM
[F]: M15A engine with 4A/T equipped with slip control model (Hong Kong model) 8. P/S control module 16. Output shaft speed sensor
1. Main fuse box 9. ABS control module
2. Ignition switch 10. Individual circuit fuse box No.1
Page 904 of 1556
Downloaded from www.Manualslib.com manuals search engine 6C-24 Power Assisted Steering System:
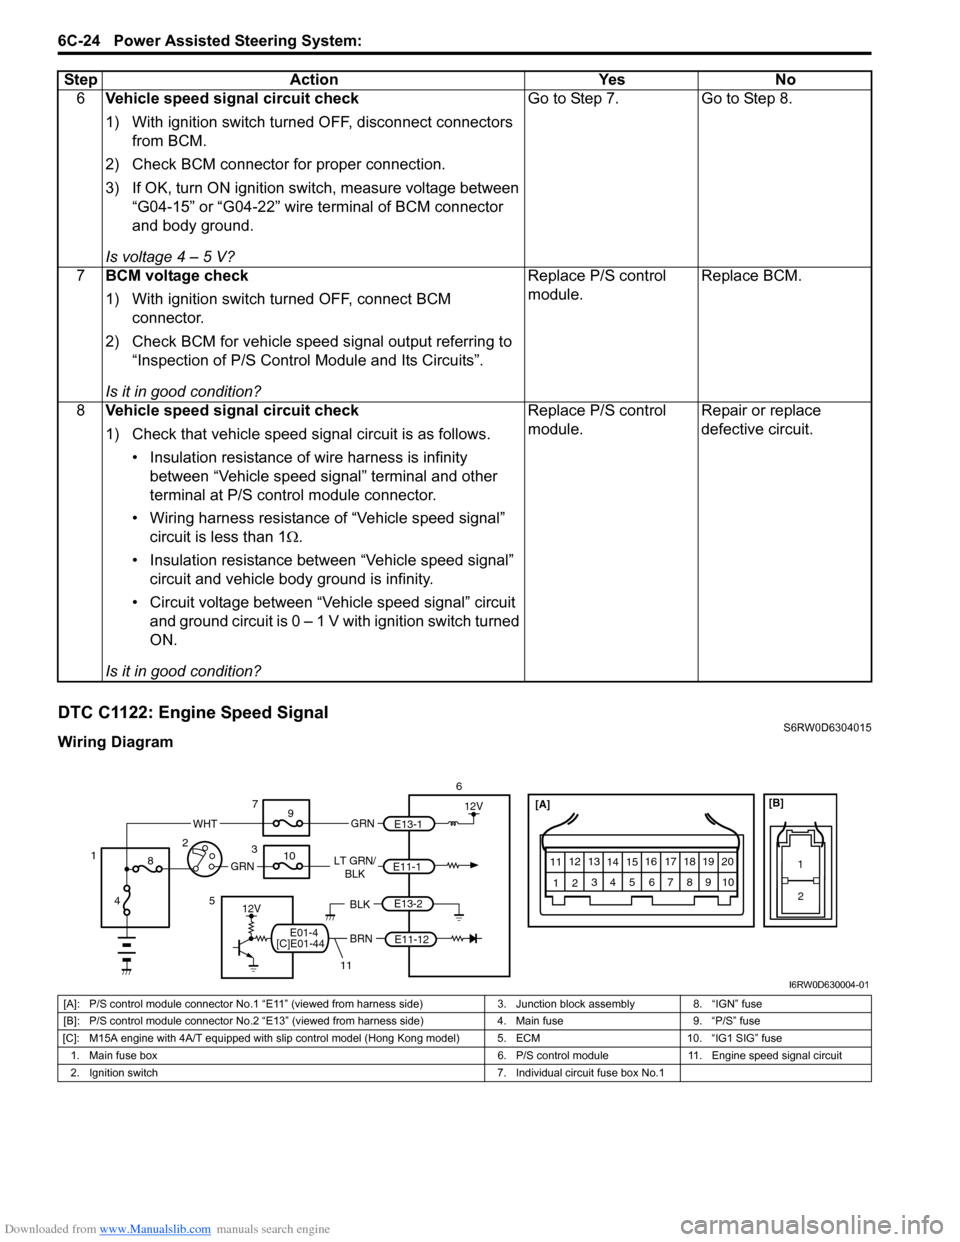
DTC C1122: Engine Speed SignalS6RW0D6304015
Wiring Diagram6Vehicle speed signal circuit check
1) With ignition switch turned OFF, disconnect connectors
from BCM.
2) Check BCM connector for proper connection.
3) If OK, turn ON ignition switch, measure voltage between
“G04-15” or “G04-22” wire terminal of BCM connector
and body ground.
Is voltage 4 – 5 V?Go to Step 7. Go to Step 8.
7BCM voltage check
1) With ignition switch turned OFF, connect BCM
connector.
2) Check BCM for vehicle speed signal output referring to
“Inspection of P/S Control Module and Its Circuits”.
Is it in good condition?Replace P/S control
module.Replace BCM.
8Vehicle speed signal circuit check
1) Check that vehicle speed signal circuit is as follows.
• Insulation resistance of wire harness is infinity
between “Vehicle speed signal” terminal and other
terminal at P/S control module connector.
• Wiring harness resistance of “Vehicle speed signal”
circuit is less than 1Ω.
• Insulation resistance between “Vehicle speed signal”
circuit and vehicle body ground is infinity.
• Circuit voltage between “Vehicle speed signal” circuit
and ground circuit is 0 – 1 V with ignition switch turned
ON.
Is it in good condition?Replace P/S control
module.Repair or replace
defective circuit. Step Action Yes No
[A]
123
4567
8
9 11
10 12 13
141516
17 18 1920
1
2
[B]
BRN LT GRN/
BLK
E11-1
E11-12
E13-1 GRN
GRN
WHT
6
37
9
10
8
4 12
12V
E13-2BLK12V5
11
[C]E01-44E01-4
I6RW0D630004-01
[A]: P/S control module connector No.1 “E11” (viewed from harness side) 3. Junction block assembly 8. “IGN” fuse
[B]: P/S control module connector No.2 “E13” (viewed from harness side) 4. Main fuse 9. “P/S” fuse
[C]: M15A engine with 4A/T equipped with slip control model (Hong Kong model) 5. ECM 10. “IG1 SIG” fuse
1. Main fuse box 6. P/S control module 11. Engine speed signal circuit
2. Ignition switch 7. Individual circuit fuse box No.1
Page 905 of 1556

Downloaded from www.Manualslib.com manuals search engine Power Assisted Steering System: 6C-25
DTC Detecting Condition and Trouble Area
DTC TroubleshootingDTC detecting condition Trouble area
Engine speed signal is less than 220 rpm for more than
0.8 seconds.
or
Engine speed signal is less than 220 rpm for more than 20
seconds continuously even though vehicle speed signal is
more than 50 km/h.
(1 driving cycle detection logic)• Engine speed signal circuit
•ECM
• P/S control module
Step Action Yes No
1Was “EPS System Check” performed?Go to Step 2. Go to “EPS System
Check”.
2DTC check
1) Check ECM for DTC referring to “DTC Check in Section
1A”.
Is there any DTC(s) detected?Go to applicable DTC
diag. flow.Go to Step 3.
3Engine speed signal circuit check
1) With ignition switch turned OFF, disconnect P/S control
module connector.
2) Check P/S control module connector for proper
connection.
3) If OK, turn ON ignition switch, measure voltage between
“E11-12” wire terminal of P/S control module connector
and vehicle body ground.
Is voltage 10 – 14 V?Go to Step 4. Go to Step 5.
4ECM voltage check
1) With ignition switch turned OFF, connect P/S control
module and ECM connectors.
2) Check engine speed signal output referring to
“Inspection of ECM and Its Circuits in Section 1A”.
Is it in good condition?Substitute a known-
good P/S control
module and recheck.Substitute a known
good ECM and recheck.
5Engine speed signal circuit check
1) Disconnect ECM connector.
2) Check that engine speed signal circuit is as follows.
• Insulation resistance of wire harness is infinity
between “Engine speed signal circuit” terminal and
other terminal at P/S control module connector.
• Wiring harness resistance of “Engine speed signal
circuit” is less than 1Ω.
• Insulation resistance between “Engine speed signal
circuit” and vehicle body ground is infinity
• Circuit voltage between “Engine speed signal circuit”
and ground circuit is 0 – 1 V with ignition switch turned
ON.
Is it in good condition?Substitute a known
good ECM and recheck.Repair or replace
defective circuit.
Page 907 of 1556
Downloaded from www.Manualslib.com manuals search engine Power Assisted Steering System: 6C-27
DTC Troubleshooting
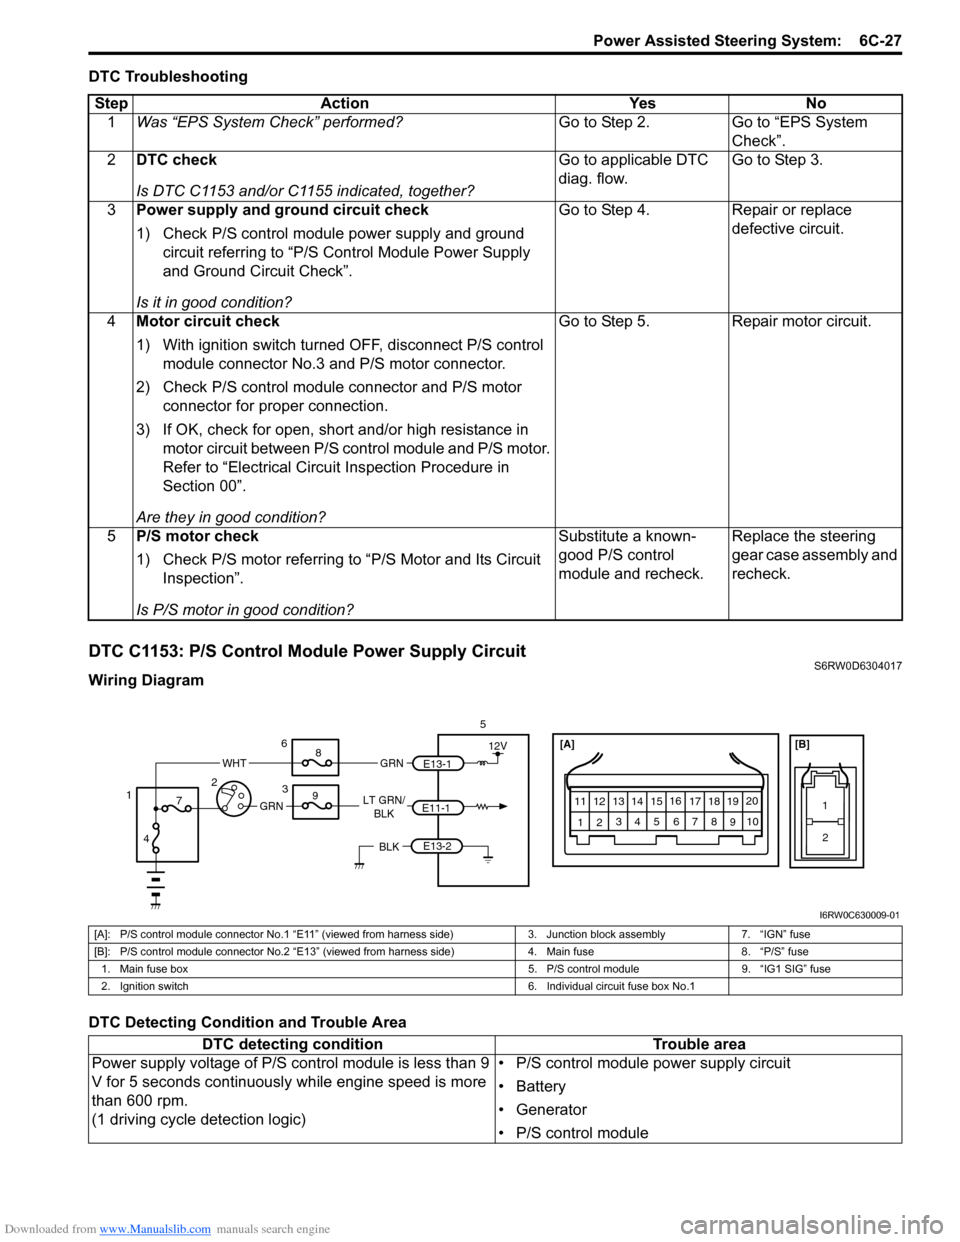
DTC C1153: P/S Control Module Power Supply CircuitS6RW0D6304017
Wiring Diagram
DTC Detecting Condition and Trouble AreaStep Action Yes No
1Was “EPS System Check” performed?Go to Step 2. Go to “EPS System
Check”.
2DTC check
Is DTC C1153 and/or C1155 indicated, together?Go to applicable DTC
diag. flow.Go to Step 3.
3Power supply and ground circuit check
1) Check P/S control module power supply and ground
circuit referring to “P/S Control Module Power Supply
and Ground Circuit Check”.
Is it in good condition?Go to Step 4. Repair or replace
defective circuit.
4Motor circuit check
1) With ignition switch turned OFF, disconnect P/S control
module connector No.3 and P/S motor connector.
2) Check P/S control module connector and P/S motor
connector for proper connection.
3) If OK, check for open, short and/or high resistance in
motor circuit between P/S control module and P/S motor.
Refer to “Electrical Circuit Inspection Procedure in
Section 00”.
Are they in good condition?Go to Step 5. Repair motor circuit.
5P/S motor check
1) Check P/S motor referring to “P/S Motor and Its Circuit
Inspection”.
Is P/S motor in good condition?Substitute a known-
good P/S control
module and recheck.Replace the steering
gear case assembly and
recheck.
[A]
123
4567
8
9 11
10 12 13
141516
17 18 1920
1
2
[B]
LT GRN/
BLKE11-1E13-1 GRNGRN
WHT
5
3 6
8
9
7
4 12
12V
E13-2BLK
I6RW0C630009-01
[A]: P/S control module connector No.1 “E11” (viewed from harness side) 3. Junction block assembly 7. “IGN” fuse
[B]: P/S control module connector No.2 “E13” (viewed from harness side) 4. Main fuse 8. “P/S” fuse
1. Main fuse box 5. P/S control module 9. “IG1 SIG” fuse
2. Ignition switch 6. Individual circuit fuse box No.1
DTC detecting condition Trouble area
Power supply voltage of P/S control module is less than 9
V for 5 seconds continuously while engine speed is more
than 600 rpm.
(1 driving cycle detection logic)• P/S control module power supply circuit
• Battery
• Generator
• P/S control module
Page 908 of 1556
Downloaded from www.Manualslib.com manuals search engine 6C-28 Power Assisted Steering System:
DTC Troubleshooting
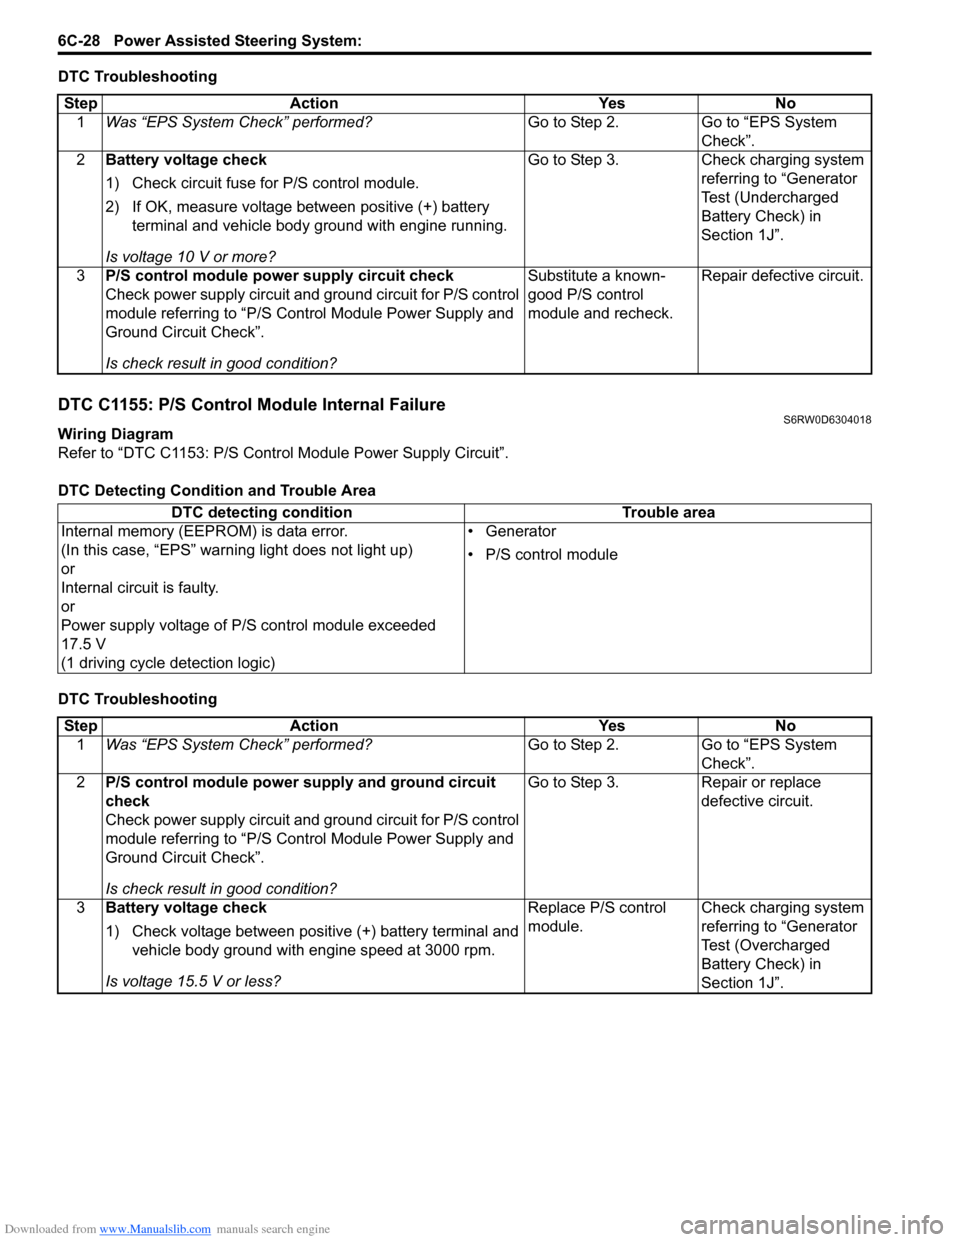
DTC C1155: P/S Control Module Internal FailureS6RW0D6304018
Wiring Diagram
Refer to “DTC C1153: P/S Control Module Power Supply Circuit”.
DTC Detecting Condition and Trouble Area
DTC TroubleshootingStep Action Yes No
1Was “EPS System Check” performed?Go to Step 2. Go to “EPS System
Check”.
2Battery voltage check
1) Check circuit fuse for P/S control module.
2) If OK, measure voltage between positive (+) battery
terminal and vehicle body ground with engine running.
Is voltage 10 V or more?Go to Step 3. Check charging system
referring to “Generator
Test (Undercharged
Battery Check) in
Section 1J”.
3P/S control module power supply circuit check
Check power supply circuit and ground circuit for P/S control
module referring to “P/S Control Module Power Supply and
Ground Circuit Check”.
Is check result in good condition?Substitute a known-
good P/S control
module and recheck.Repair defective circuit.
DTC detecting condition Trouble area
Internal memory (EEPROM) is data error.
(In this case, “EPS” warning light does not light up)
or
Internal circuit is faulty.
or
Power supply voltage of P/S control module exceeded
17.5 V
(1 driving cycle detection logic)• Generator
• P/S control module
Step Action Yes No
1Was “EPS System Check” performed?Go to Step 2. Go to “EPS System
Check”.
2P/S control module power supply and ground circuit
check
Check power supply circuit and ground circuit for P/S control
module referring to “P/S Control Module Power Supply and
Ground Circuit Check”.
Is check result in good condition?Go to Step 3. Repair or replace
defective circuit.
3Battery voltage check
1) Check voltage between positive (+) battery terminal and
vehicle body ground with engine speed at 3000 rpm.
Is voltage 15.5 V or less?Replace P/S control
module.Check charging system
referring to “Generator
Test (Overcharged
Battery Check) in
Section 1J”.
Page 914 of 1556
Downloaded from www.Manualslib.com manuals search engine 6C-34 Power Assisted Steering System:
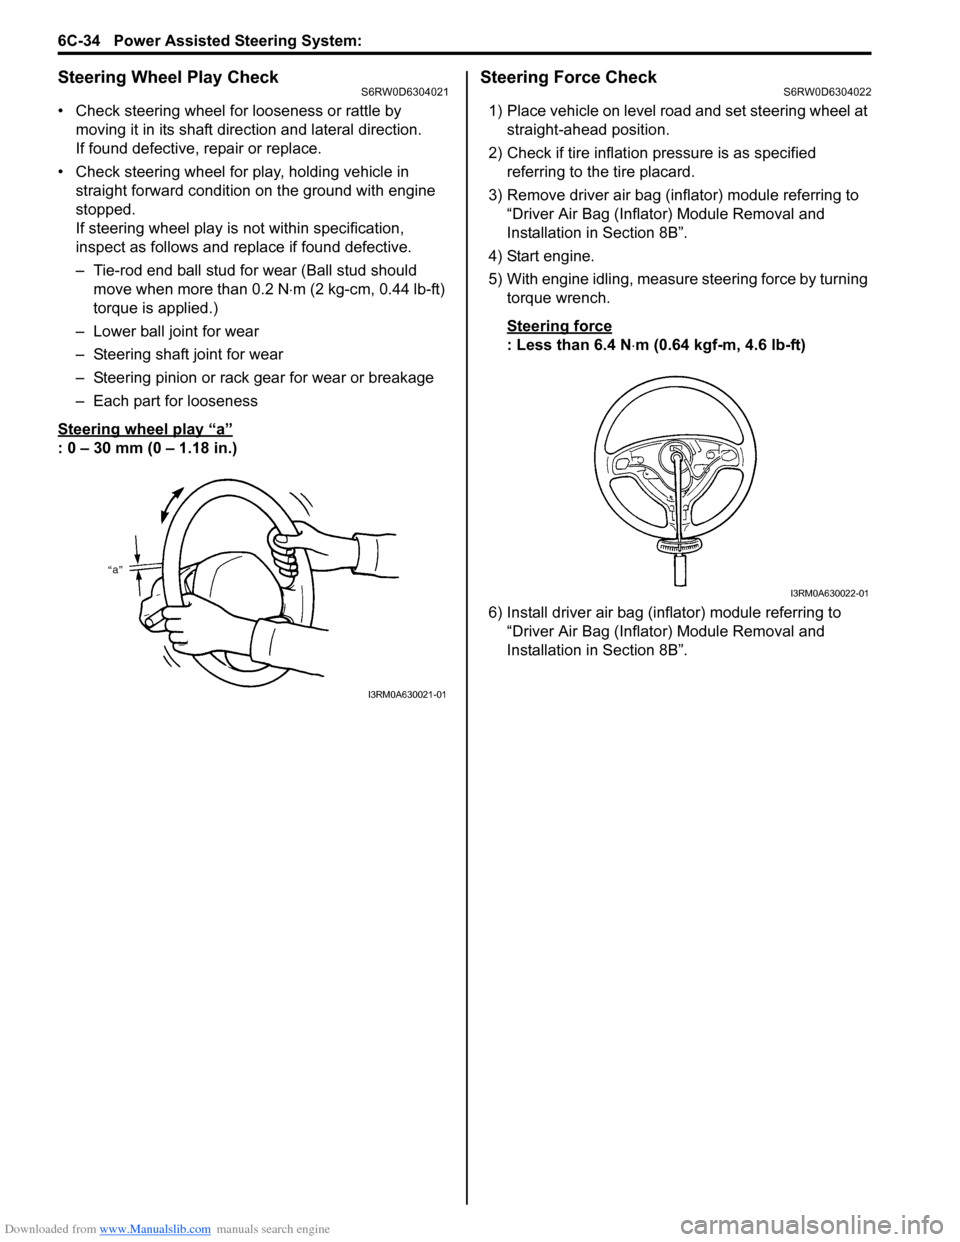
Steering Wheel Play CheckS6RW0D6304021
• Check steering wheel for looseness or rattle by
moving it in its shaft direction and lateral direction.
If found defective, repair or replace.
• Check steering wheel for play, holding vehicle in
straight forward condition on the ground with engine
stopped.
If steering wheel play is not within specification,
inspect as follows and replace if found defective.
– Tie-rod end ball stud for wear (Ball stud should
move when more than 0.2 N⋅m (2 kg-cm, 0.44 lb-ft)
torque is applied.)
– Lower ball joint for wear
– Steering shaft joint for wear
– Steering pinion or rack gear for wear or breakage
– Each part for looseness
Steering wheel play
“a”
: 0 – 30 mm (0 – 1.18 in.)
Steering Force CheckS6RW0D6304022
1) Place vehicle on level road and set steering wheel at
straight-ahead position.
2) Check if tire inflation pressure is as specified
referring to the tire placard.
3) Remove driver air bag (inflator) module referring to
“Driver Air Bag (Inflator) Module Removal and
Installation in Section 8B”.
4) Start engine.
5) With engine idling, measure steering force by turning
torque wrench.
Steering force
: Less than 6.4 N⋅m (0.64 kgf-m, 4.6 lb-ft)
6) Install driver air bag (inflator) module referring to
“Driver Air Bag (Inflator) Module Removal and
Installation in Section 8B”.
I3RM0A630021-01
I3RM0A630022-01
Page 915 of 1556
Downloaded from www.Manualslib.com manuals search engine Power Assisted Steering System: 6C-35
Repair Instructions
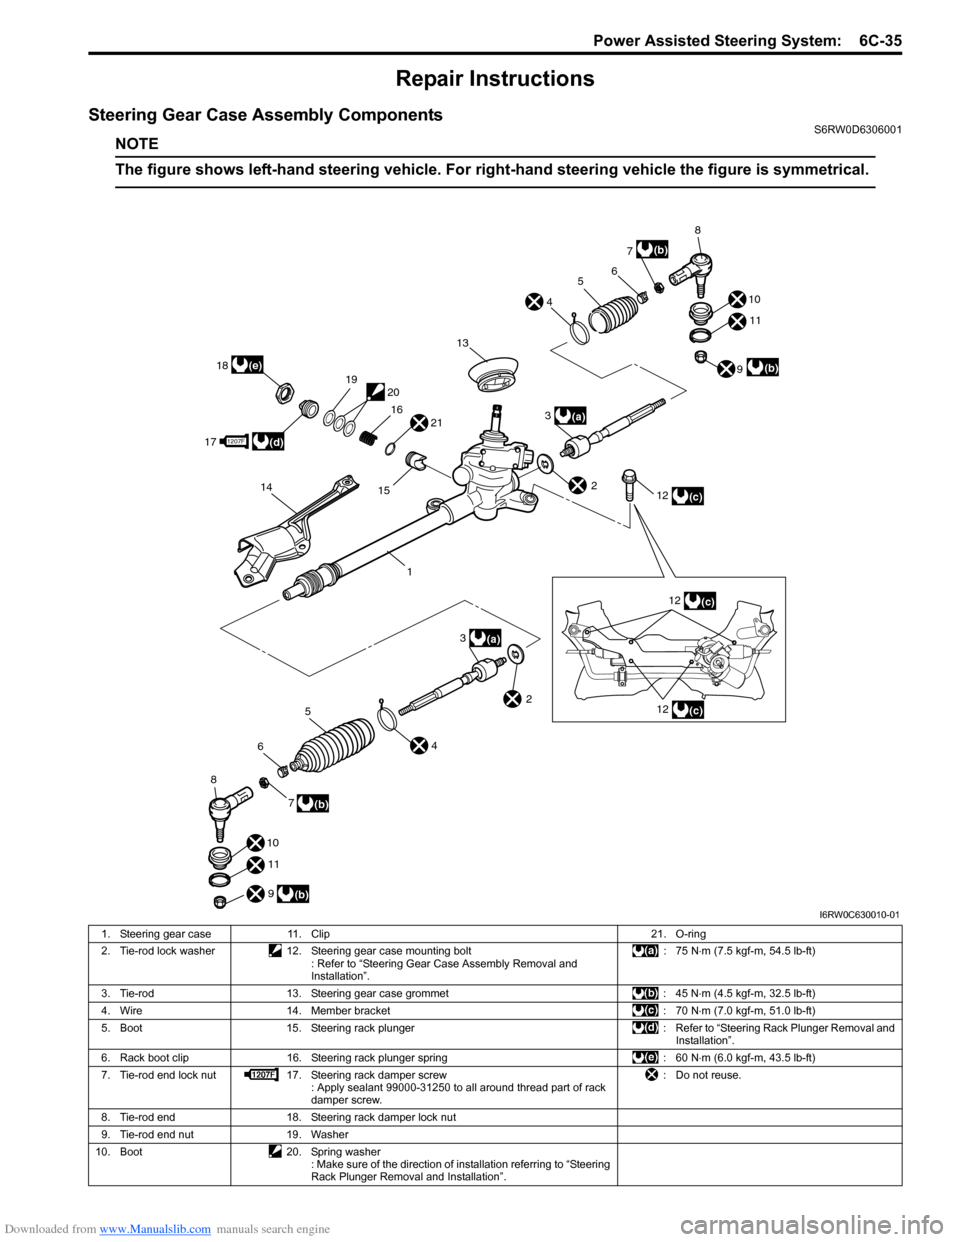
Steering Gear Case Assembly ComponentsS6RW0D6306001
NOTE
The figure shows left-hand steering vehicle. For right-hand steering vehicle the figure is symmetrical.
8
6
5
9
13
18
17
3
12
7(b)
(b)
(a)
(c)2
1
(e)
(d)
3
(a)
25
6
8
7
9
(b)
(b)
1621
1920
15
1207F
14
4
4
10
11
12(c)
12
(c)
10
11
I6RW0C630010-01
1. Steering gear case 11. Clip 21. O-ring
2. Tie-rod lock washer 12. Steering gear case mounting bolt
: Refer to “Steering Gear Case Assembly Removal and
Installation”. : 75 N⋅m (7.5 kgf-m, 54.5 lb-ft)
3. Tie-rod 13. Steering gear case grommet : 45 N⋅m (4.5 kgf-m, 32.5 lb-ft)
4. Wire 14. Member bracket : 70 N⋅m (7.0 kgf-m, 51.0 lb-ft)
5. Boot 15. Steering rack plunger : Refer to “Steering Rack Plunger Removal and
Installation”.
6. Rack boot clip 16. Steering rack plunger spring : 60 N⋅m (6.0 kgf-m, 43.5 lb-ft)
7. Tie-rod end lock nut 17. Steering rack damper screw
: Apply sealant 99000-31250 to all around thread part of rack
damper screw.: Do not reuse.
8. Tie-rod end 18. Steering rack damper lock nut
9. Tie-rod end nut 19. Washer
10. Boot 20. Spring washer
: Make sure of the direction of installation referring to “Steering
Rack Plunger Removal and Installation”.
Page 917 of 1556
Downloaded from www.Manualslib.com manuals search engine Power Assisted Steering System: 6C-37
3) Inspect for proper toe referring to “Front Wheel
Alignment Inspection and Adjustment in Section 2B”.
4) After confirming proper toe, tighten tie-rod end lock
nut to specified torque.
Tightening torque
Tie-rod end lock nut (a): 45 N·m (4.5 kgf-m, 32.5
lb-ft)
5) Tighten wheel bolts to specified torque and lower
hoist.
Tightening torque
Wheel bolt: 85 N·m (8.5 kgf-m, 61.5 lb-ft)
Tie-Rod End InspectionS6RW0D6306004
• Inspect for play in ball joint.
• Inspect for play in rack end ball joint.
In either case, if found defective, replace.
Steering Shaft Joint On-Vehicle InspectionS6RW0D6306005
Check shaft joint for wear, breakage and any other
damage and replace if any defect exists.
Steering Gear Case Assembly Removal and
Installation
S6RW0D6306006
Removal
CAUTION!
Be sure to set front wheels (tires) in straight
direction and remove ignition key from key
cylinder before performing the following
steps, otherwise, contact coil of air bag
system may get damaged.
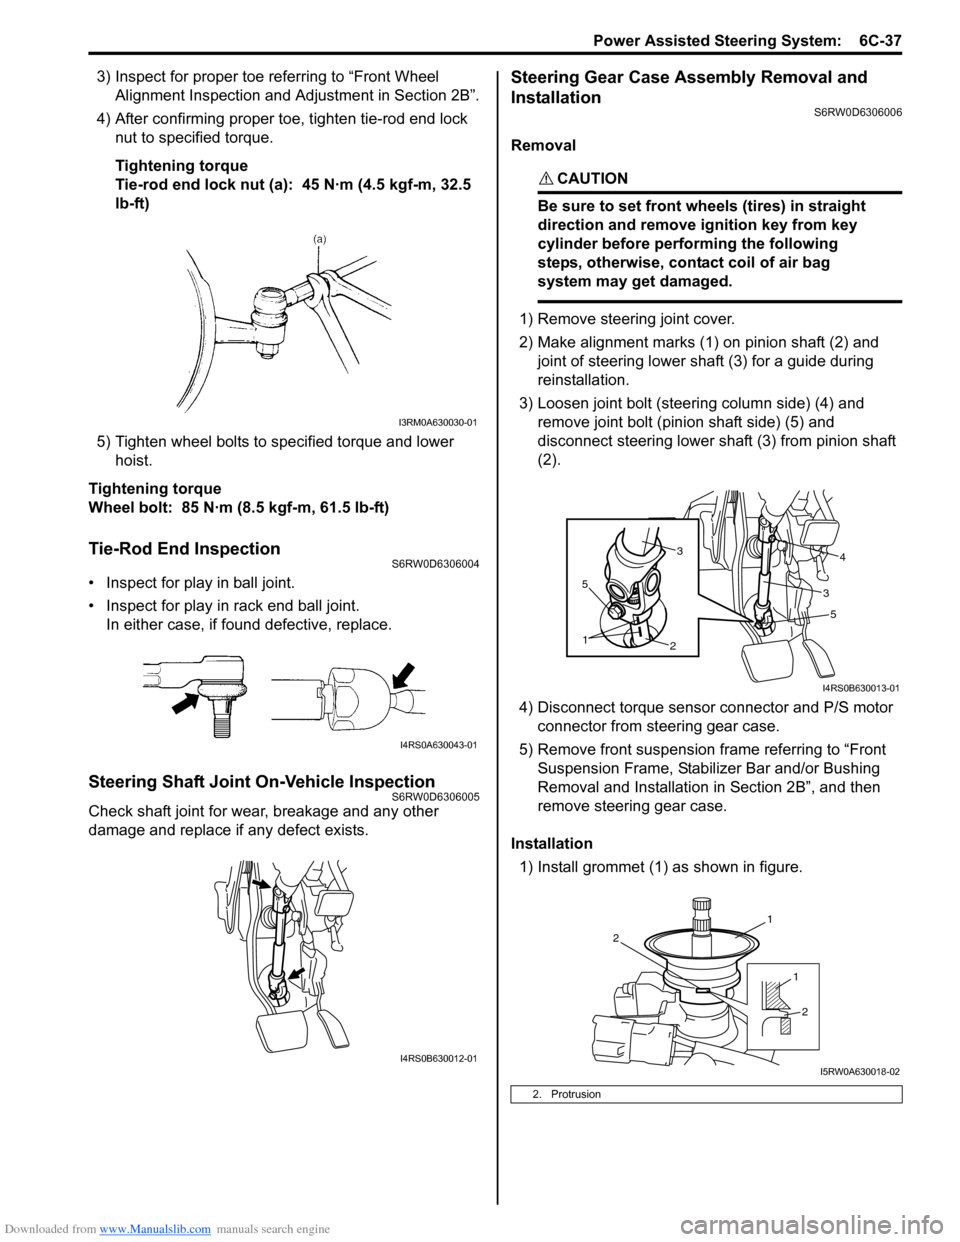
1) Remove steering joint cover.
2) Make alignment marks (1) on pinion shaft (2) and
joint of steering lower shaft (3) for a guide during
reinstallation.
3) Loosen joint bolt (steering column side) (4) and
remove joint bolt (pinion shaft side) (5) and
disconnect steering lower shaft (3) from pinion shaft
(2).
4) Disconnect torque sensor connector and P/S motor
connector from steering gear case.
5) Remove front suspension frame referring to “Front
Suspension Frame, Stabilizer Bar and/or Bushing
Removal and Installation in Section 2B”, and then
remove steering gear case.
Installation
1) Install grommet (1) as shown in figure.
I3RM0A630030-01
I4RS0A630043-01
I4RS0B630012-01
2. Protrusion
5
2
1
5
34
3
I4RS0B630013-01
1
2
1
2
I5RW0A630018-02
Page 921 of 1556
Downloaded from www.Manualslib.com manuals search engine Power Assisted Steering System: 6C-41
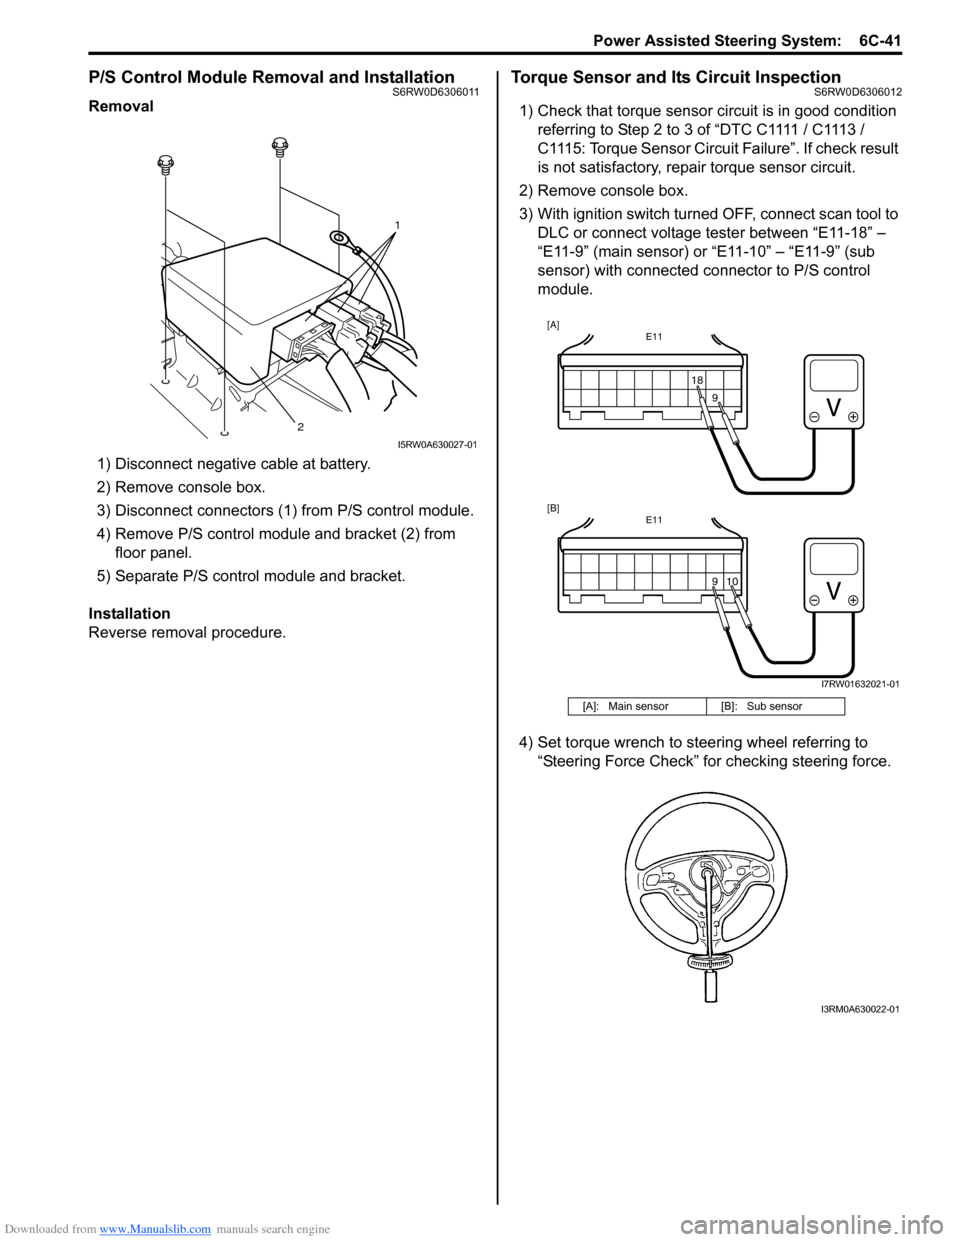
P/S Control Module Removal and InstallationS6RW0D6306011
Removal
1) Disconnect negative cable at battery.
2) Remove console box.
3) Disconnect connectors (1) from P/S control module.
4) Remove P/S control module and bracket (2) from
floor panel.
5) Separate P/S control module and bracket.
Installation
Reverse removal procedure.
Torque Sensor and Its Circuit InspectionS6RW0D6306012
1) Check that torque sensor circuit is in good condition
referring to Step 2 to 3 of “DTC C1111 / C1113 /
C1115: Torque Sensor Circuit Failure”. If check result
is not satisfactory, repair torque sensor circuit.
2) Remove console box.
3) With ignition switch turned OFF, connect scan tool to
DLC or connect voltage tester between “E11-18” –
“E11-9” (main sensor) or “E11-10” – “E11-9” (sub
sensor) with connected connector to P/S control
module.
4) Set torque wrench to steering wheel referring to
“Steering Force Check” for checking steering force.
1
2
I5RW0A630027-01
[A]: Main sensor [B]: Sub sensor
E11
1818
E11
10
[A]
[B]
9 9
I7RW01632021-01
I3RM0A630022-01
Page 922 of 1556

Downloaded from www.Manualslib.com manuals search engine 6C-42 Power Assisted Steering System:
5) Turn ON ignition switch without engine running and
select scan tool “Data List” mode due to checking
“Sensor (Main) Torque” and “Sensor (Sub) Torque”
displayed on scan tool when steering wheel turned
left and right (if used).
6) Check that characteristic of torque sensor (main and
sub) output voltage or scan tool data and steering
force is as following graph when steering wheel is
turned left and right. If sensor voltage or scan tool
data is out of specified value or does not vary linearly
as the following graph, check EPS control module
and its circuit referring to “Inspection of P/S Control
Module and Its Circuits”.
If they are OK, replace steering gear case assembly.P/S Motor and Its Circuit InspectionS6RW0D6306013
1) Check motor circuit referring to Step 2 to 3 of “DTC
C1141 / C1142 / C1143 / C1145: Motor Circuit
Failure”. If check result is not satisfactory, repair
motor circuit.
2) Disconnect motor connector from steering gear case
assembly with ignition switch turned OFF.
3) Check for resistance between terminals of motor
connector.
If check result is not as specified, check P/S motor
harness for continuity. If it is OK, replace steering
gear case assembly.
Motor circuit resistance
4) Check for insulation between each terminal of motor
connector and body ground.
If check result is not as specified, check P/S motor
harness for insulation. If it is OK, replace steering
gear case assembly.
Motor circuit resistance
5) Hoist vehicle
6) Check that steering wheel turns to left and right
smoothly. If steering wheel does not turn smoothly,
inspect and repair defective steering and suspension
parts.
7) Connect “E12” connector with ignition switch turned
OFF.
[A]: Main sensor
[B]: Sub sensor
[C]: Steering force at left turn
[D]: Steering force at right turn
[E]: Steering wheel at free
[F]: “Sensor (Main) Torque” in “Data List” displayed on scan tool
[G]: “Sensor (Sub) Torque” in “Data List” displayed on scan tool
0
[E][N.m]
MAX
MAX [D] [C]
[E][D] [C]
2.33 - 2.68[V] [F]
[G] [A]
[B]
66
1.65 - 1.9
(1.0 - 1.3)3.0 - 3.4 (3.7 - 4.0)
0 5
2.33 - 2.681.65 - 1.9
(1.0 - 1.3)3.0 - 3.4 (3.7 - 4.0)
0 5
0
[N.m]
MAX
MAX
[V]
6 11.76 11.7611.76 11.766
0 11.5
-12.00 -12.0
11.5
I7RW01632011-02
“E12-1” and “E12-2” (For motor) Approx. 1 Ω
Each terminal and body ground No continuity
[A]: Motor connector “E12” (viewed from harness side)
12
[A]
I6RW0C630012-02