lock SUZUKI SX4 2006 1.G Service Manual Online
[x] Cancel search | Manufacturer: SUZUKI, Model Year: 2006, Model line: SX4, Model: SUZUKI SX4 2006 1.GPages: 1556, PDF Size: 37.31 MB
Page 398 of 1556
Downloaded from www.Manualslib.com manuals search engine 1H-3 Ignition System:
Component Location
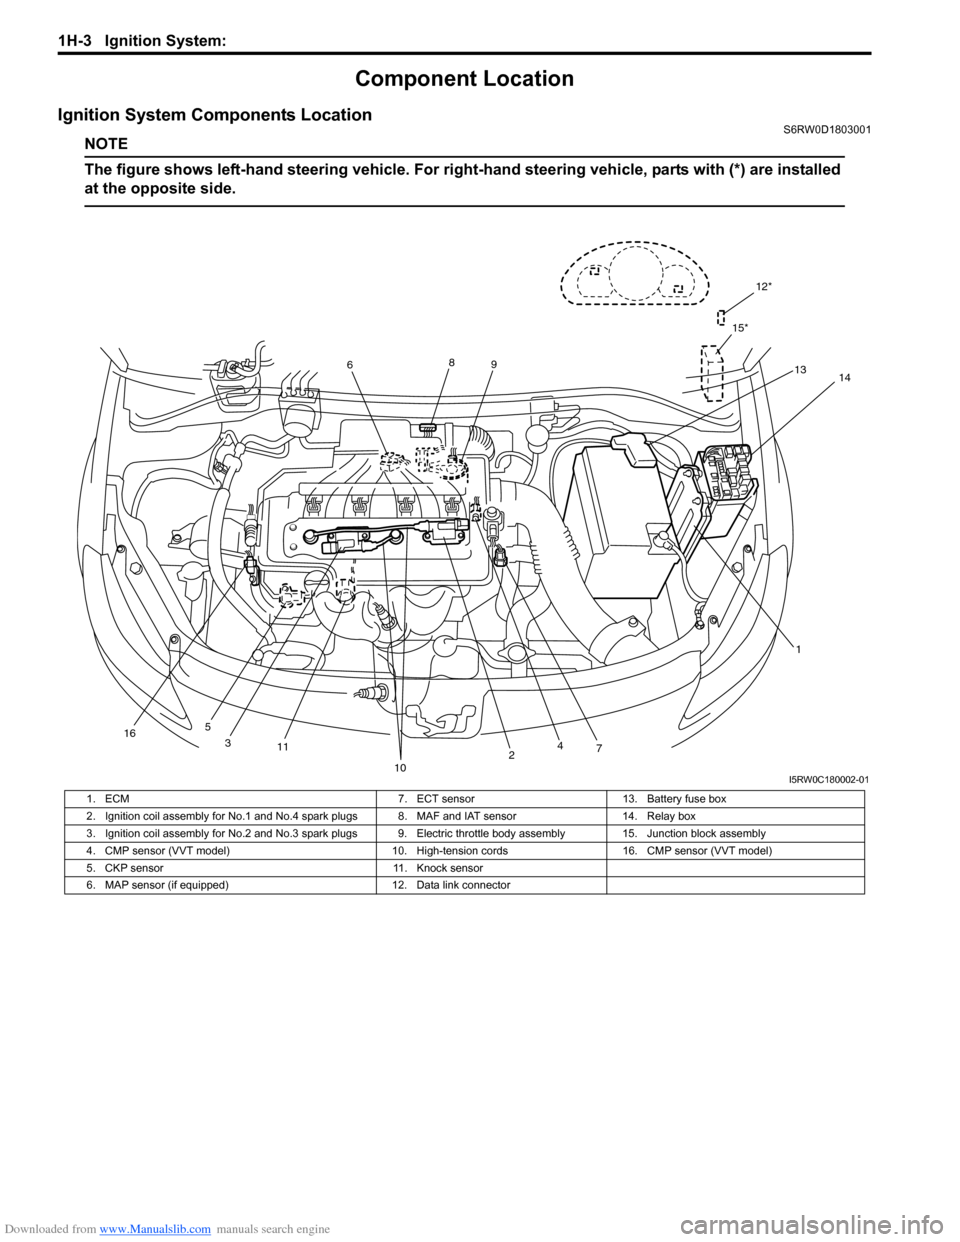
Ignition System Components LocationS6RW0D1803001
NOTE
The figure shows left-hand steering vehicle. For right-hand steering vehicle, parts with (*) are installed
at the opposite side.
12*
15*
13
1 689
11
10
74
5
14
2 3
16
I5RW0C180002-01
1. ECM 7. ECT sensor 13. Battery fuse box
2. Ignition coil assembly for No.1 and No.4 spark plugs 8. MAF and IAT sensor 14. Relay box
3. Ignition coil assembly for No.2 and No.3 spark plugs 9. Electric throttle body assembly 15. Junction block assembly
4. CMP sensor (VVT model) 10. High-tension cords 16. CMP sensor (VVT model)
5. CKP sensor 11. Knock sensor
6. MAP sensor (if equipped) 12. Data link connector
Page 412 of 1556
Downloaded from www.Manualslib.com manuals search engine 1I-7 Starting System:
Spring
Inspect brush springs for wear, damage or other
abnormal conditions. Replace if necessary.
Brush spring tension
Standard: 2.2 kg (4.85 lb)
Limit: 0.6 kg (1.33 lb)
Brush Holder
• Check movement of brush in brush holder. If brush
movement within brush holder is sluggish, check
brush holder for distortion and sliding faces for
contamination.
Clean or correct as necessary.
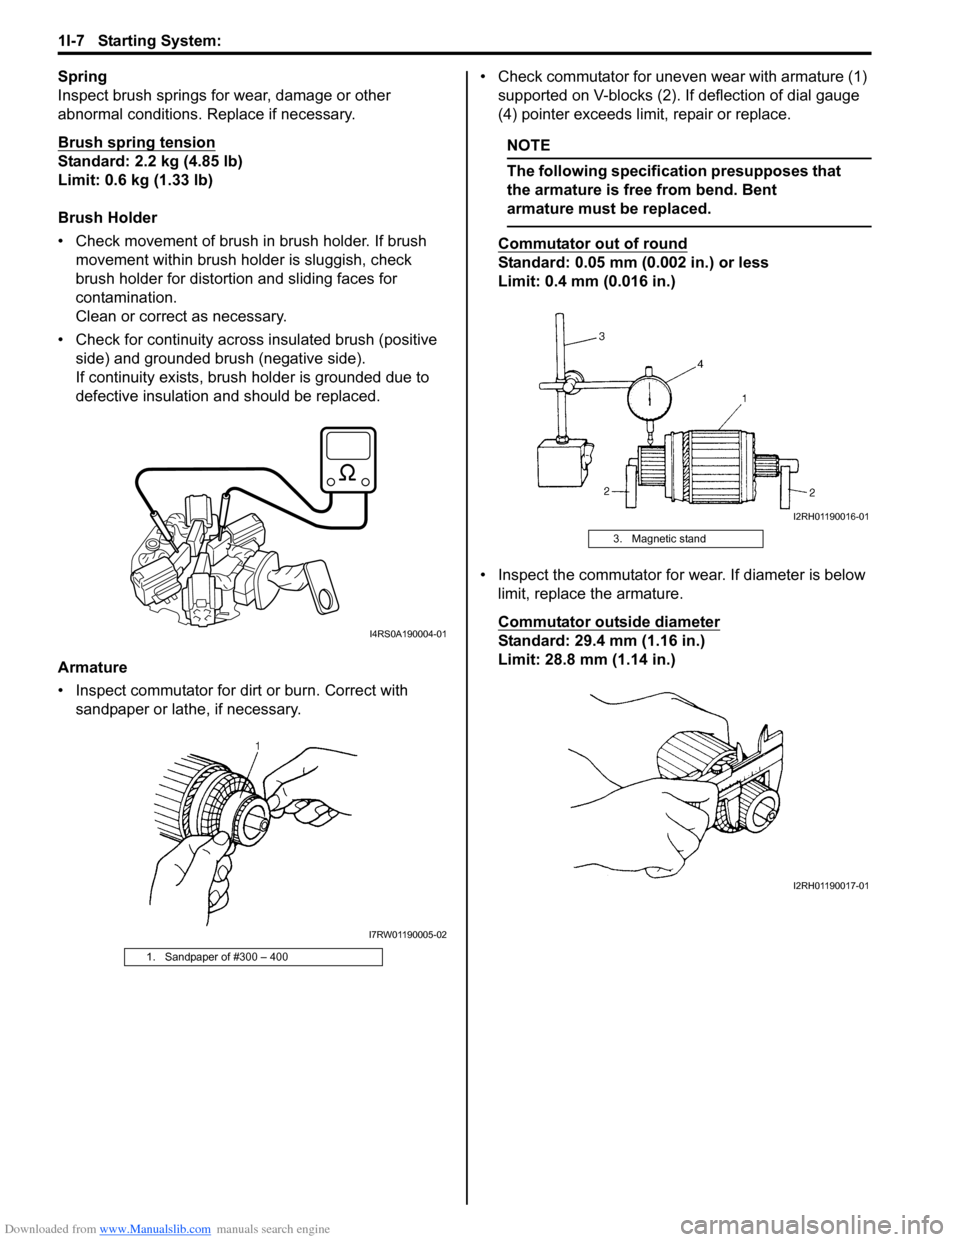
• Check for continuity across insulated brush (positive
side) and grounded brush (negative side).
If continuity exists, brush holder is grounded due to
defective insulation and should be replaced.
Armature
• Inspect commutator for dirt or burn. Correct with
sandpaper or lathe, if necessary.• Check commutator for uneven wear with armature (1)
supported on V-blocks (2). If deflection of dial gauge
(4) pointer exceeds limit, repair or replace.
NOTE
The following specification presupposes that
the armature is free from bend. Bent
armature must be replaced.
Commutator out of round
Standard: 0.05 mm (0.002 in.) or less
Limit: 0.4 mm (0.016 in.)
• Inspect the commutator for wear. If diameter is below
limit, replace the armature.
Commutator outside diameter
Standard: 29.4 mm (1.16 in.)
Limit: 28.8 mm (1.14 in.)
1. Sandpaper of #300 – 400
I4RS0A190004-01
I7RW01190005-02
3. Magnetic stand
I2RH01190016-01
I2RH01190017-01
Page 413 of 1556
Downloaded from www.Manualslib.com manuals search engine Starting System: 1I-8
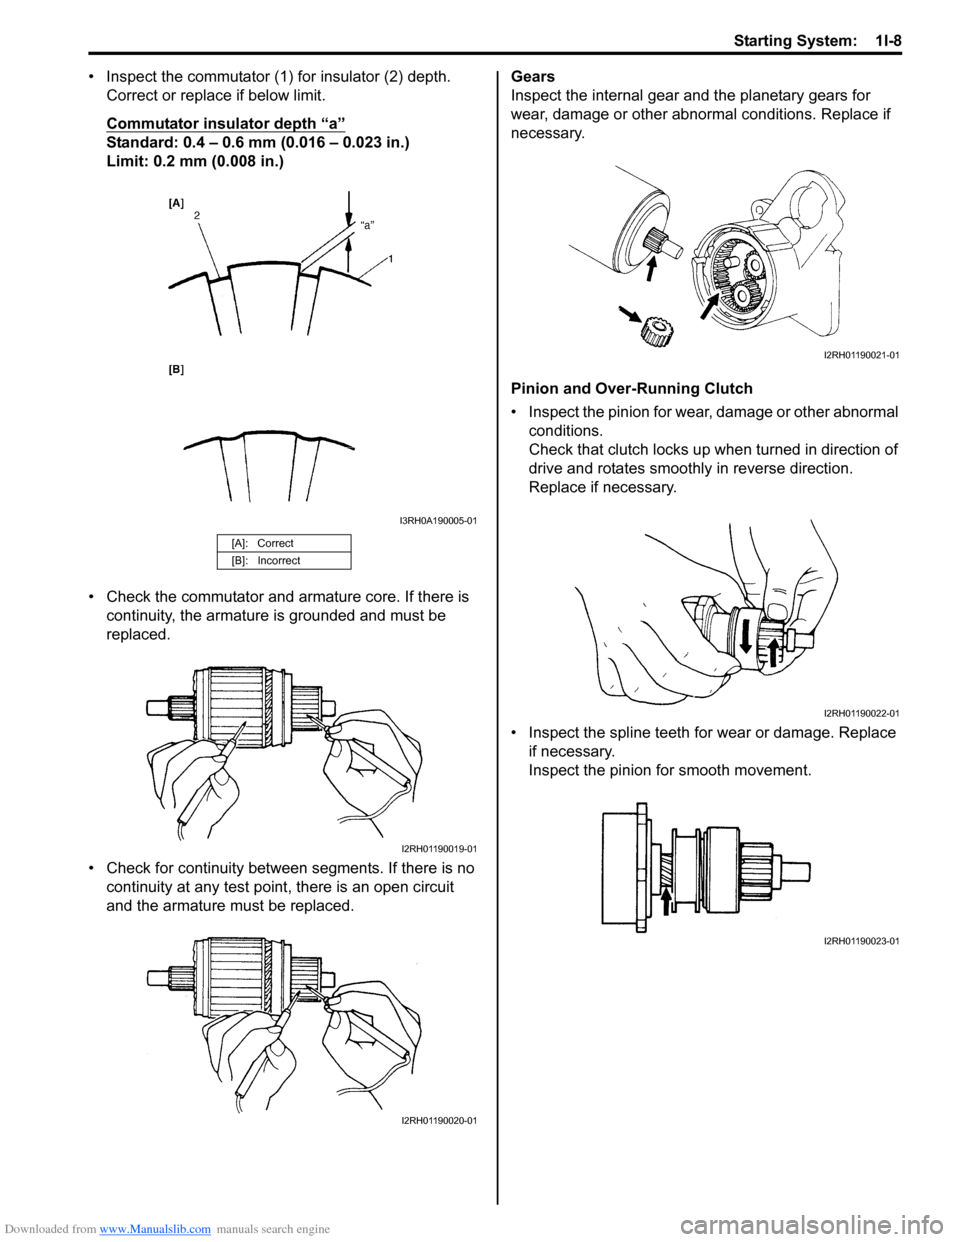
• Inspect the commutator (1) for insulator (2) depth.
Correct or replace if below limit.
Commutator insulator depth “a”
Standard: 0.4 – 0.6 mm (0.016 – 0.023 in.)
Limit: 0.2 mm (0.008 in.)
• Check the commutator and armature core. If there is
continuity, the armature is grounded and must be
replaced.
• Check for continuity between segments. If there is no
continuity at any test point, there is an open circuit
and the armature must be replaced.Gears
Inspect the internal gear and the planetary gears for
wear, damage or other abnormal conditions. Replace if
necessary.
Pinion and Over-Running Clutch
• Inspect the pinion for wear, damage or other abnormal
conditions.
Check that clutch locks up when turned in direction of
drive and rotates smoothly in reverse direction.
Replace if necessary.
• Inspect the spline teeth for wear or damage. Replace
if necessary.
Inspect the pinion for smooth movement.
[A]: Correct
[B]: Incorrect
I3RH0A190005-01
I2RH01190019-01
I2RH01190020-01
I2RH01190021-01
I2RH01190022-01
I2RH01190023-01
Page 414 of 1556
Downloaded from www.Manualslib.com manuals search engine 1I-9 Starting System:
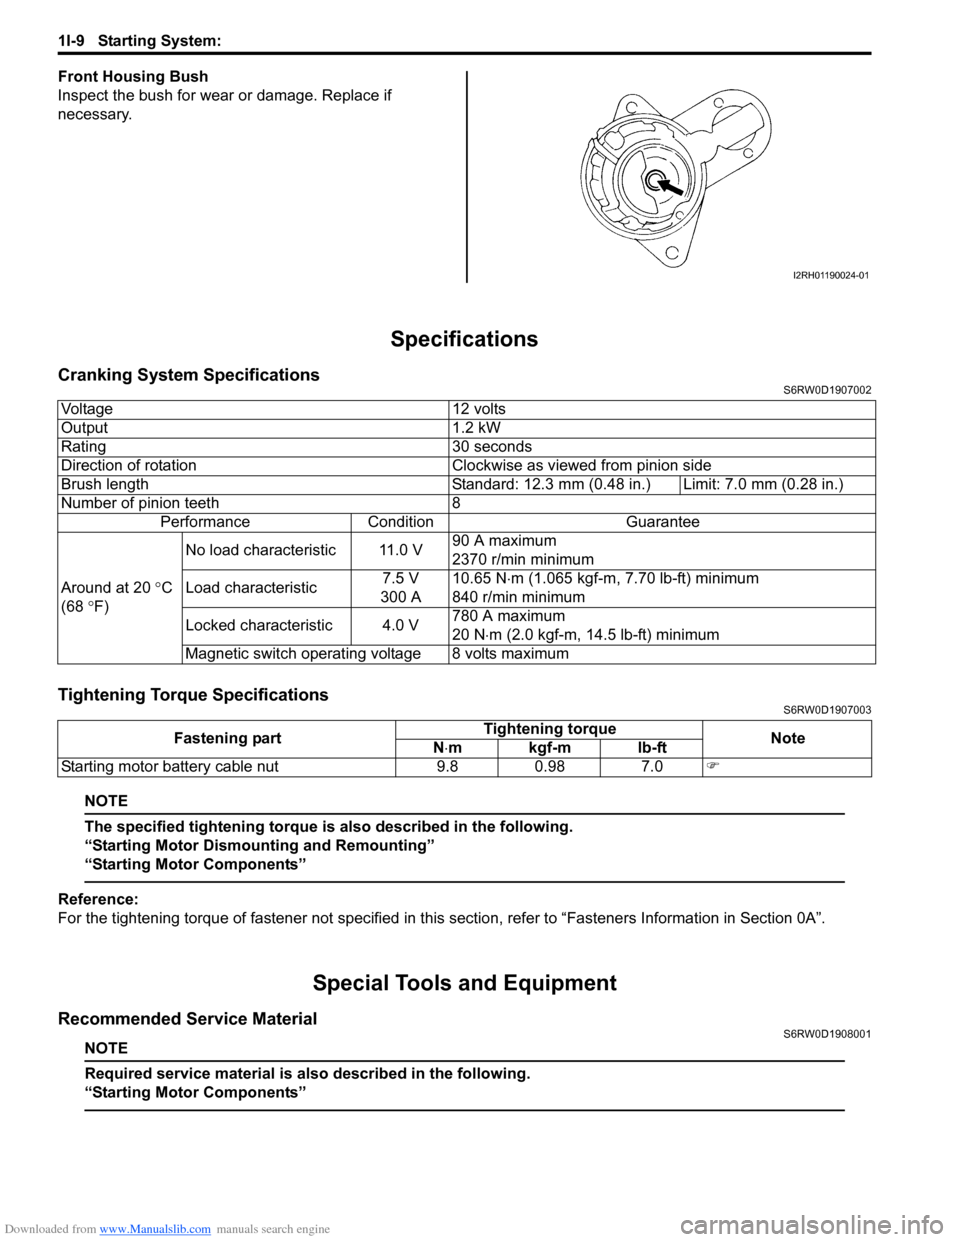
Front Housing Bush
Inspect the bush for wear or damage. Replace if
necessary.
Specifications
Cranking System SpecificationsS6RW0D1907002
Tightening Torque SpecificationsS6RW0D1907003
NOTE
The specified tightening torque is also described in the following.
“Starting Motor Dismounting and Remounting”
“Starting Motor Components”
Reference:
For the tightening torque of fastener not specified in this section, refer to “Fasteners Information in Section 0A”.
Special Tools and Equipment
Recommended Service MaterialS6RW0D1908001
NOTE
Required service material is also described in the following.
“Starting Motor Components”
I2RH01190024-01
Voltage 12 volts
Output 1.2 kW
Rating 30 seconds
Direction of rotation Clockwise as viewed from pinion side
Brush length Standard: 12.3 mm (0.48 in.) Limit: 7.0 mm (0.28 in.)
Number of pinion teeth 8
Performance Condition Guarantee
Around at 20 °C
(68 °F)No load characteristic 11.0 V90 A maximum
2370 r/min minimum
Load characteristic7.5 V
300 A10.65 N⋅m (1.065 kgf-m, 7.70 lb-ft) minimum
840 r/min minimum
Locked characteristic 4.0 V780 A maximum
20 N⋅m (2.0 kgf-m, 14.5 lb-ft) minimum
Magnetic switch operating voltage 8 volts maximum
Fastening partTightening torque
Note
N⋅mkgf-mlb-ft
Starting motor battery cable nut 9.8 0.98 7.0�)
Page 422 of 1556
Downloaded from www.Manualslib.com manuals search engine 1J-8 Charging System:
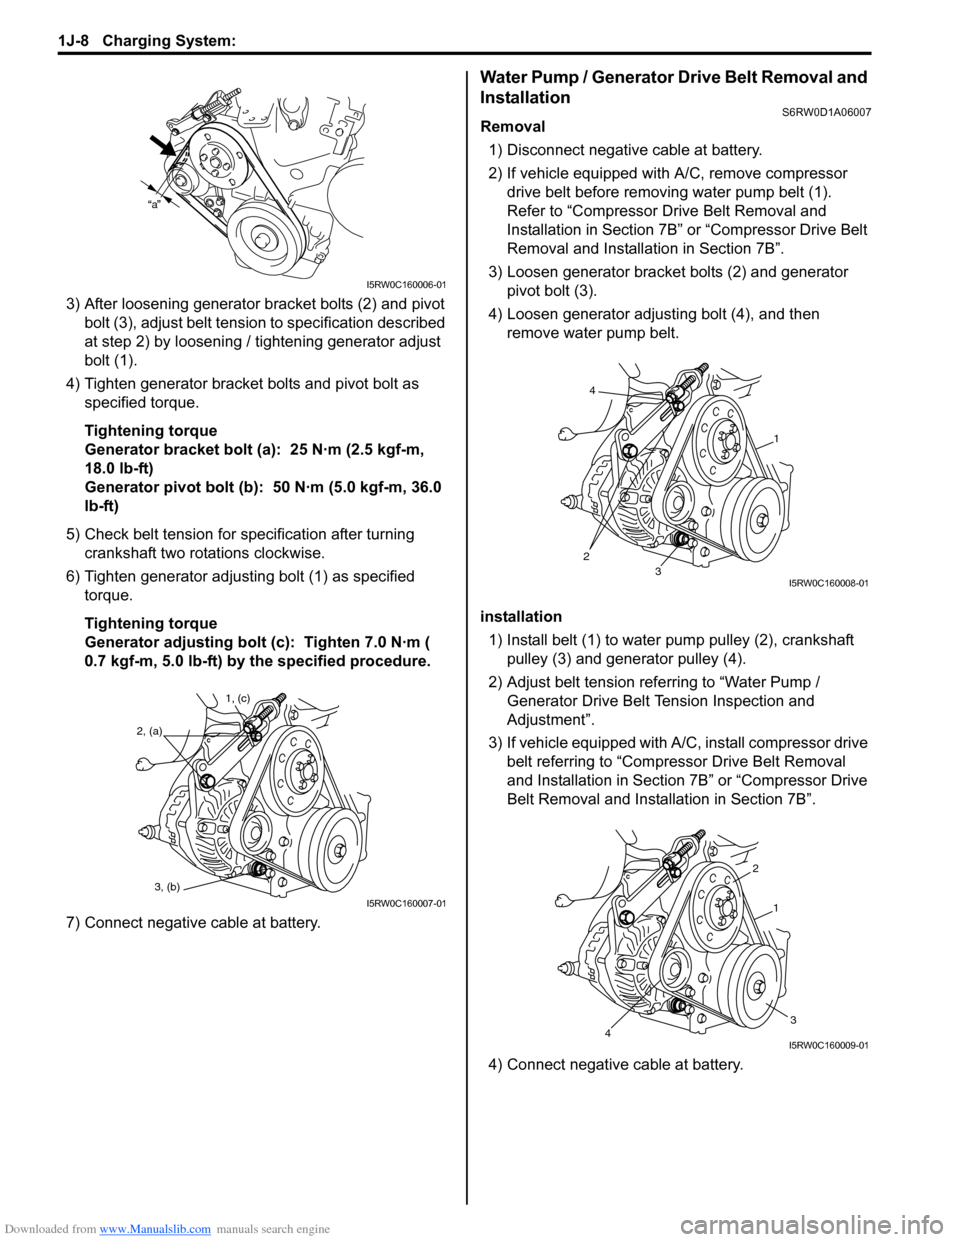
3) After loosening generator bracket bolts (2) and pivot
bolt (3), adjust belt tension to specification described
at step 2) by loosening / tightening generator adjust
bolt (1).
4) Tighten generator bracket bolts and pivot bolt as
specified torque.
Tightening torque
Generator bracket bolt (a): 25 N·m (2.5 kgf-m,
18.0 lb-ft)
Generator pivot bolt (b): 50 N·m (5.0 kgf-m, 36.0
lb-ft)
5) Check belt tension for specification after turning
crankshaft two rotations clockwise.
6) Tighten generator adjusting bolt (1) as specified
torque.
Tightening torque
Generator adjusting bolt (c): Tighten 7.0 N·m (
0.7 kgf-m, 5.0 lb-ft) by the specified procedure.
7) Connect negative cable at battery.
Water Pump / Generator Drive Belt Removal and
Installation
S6RW0D1A06007
Removal
1) Disconnect negative cable at battery.
2) If vehicle equipped with A/C, remove compressor
drive belt before removing water pump belt (1).
Refer to “Compressor Drive Belt Removal and
Installation in Section 7B” or “Compressor Drive Belt
Removal and Installation in Section 7B”.
3) Loosen generator bracket bolts (2) and generator
pivot bolt (3).
4) Loosen generator adjusting bolt (4), and then
remove water pump belt.
installation
1) Install belt (1) to water pump pulley (2), crankshaft
pulley (3) and generator pulley (4).
2) Adjust belt tension referring to “Water Pump /
Generator Drive Belt Tension Inspection and
Adjustment”.
3) If vehicle equipped with A/C, install compressor drive
belt referring to “Compressor Drive Belt Removal
and Installation in Section 7B” or “Compressor Drive
Belt Removal and Installation in Section 7B”.
4) Connect negative cable at battery.
a
I5RW0C160006-01
1, (c)
2, (a)
3, (b)
I5RW0C160007-01
4
23
1
I5RW0C160008-01
2
1
34I5RW0C160009-01
Page 427 of 1556
Downloaded from www.Manualslib.com manuals search engine Charging System: 1J-13
Specifications
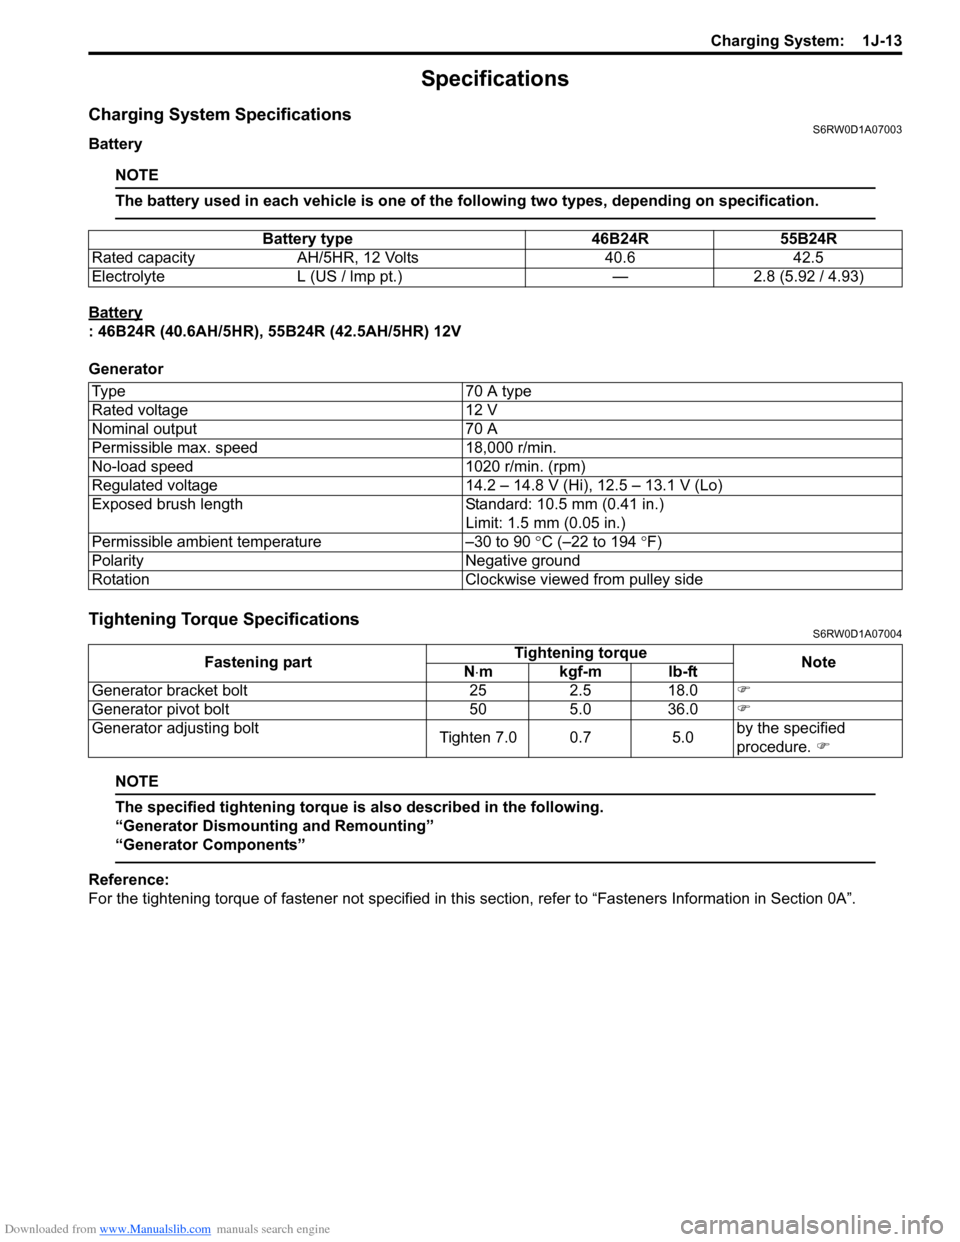
Charging System SpecificationsS6RW0D1A07003
Battery
NOTE
The battery used in each vehicle is one of the following two types, depending on specification.
Battery
: 46B24R (40.6AH/5HR), 55B24R (42.5AH/5HR) 12V
Generator
Tightening Torque SpecificationsS6RW0D1A07004
NOTE
The specified tightening torque is also described in the following.
“Generator Dismounting and Remounting”
“Generator Components”
Reference:
For the tightening torque of fastener not specified in this section, refer to “Fasteners Information in Section 0A”. Battery type 46B24R 55B24R
Rated capacity AH/5HR, 12 Volts 40.6 42.5
Electrolyte L (US / lmp pt.) — 2.8 (5.92 / 4.93)
Type 70 A type
Rated voltage 12 V
Nominal output 70 A
Permissible max. speed 18,000 r/min.
No-load speed 1020 r/min. (rpm)
Regulated voltage 14.2 – 14.8 V (Hi), 12.5 – 13.1 V (Lo)
Exposed brush length Standard: 10.5 mm (0.41 in.)
Limit: 1.5 mm (0.05 in.)
Permissible ambient temperature –30 to 90 °C (–22 to 194 °F)
Polarity Negative ground
Rotation Clockwise viewed from pulley side
Fastening partTightening torque
Note
N⋅mkgf-mlb-ft
Generator bracket bolt 25 2.5 18.0�)
Generator pivot bolt 50 5.0 36.0�)
Generator adjusting bolt
Tighten 7.0 0.7 5.0by the specified
procedure. �)
Page 440 of 1556
Downloaded from www.Manualslib.com manuals search engine 2B-3 Front Suspension:
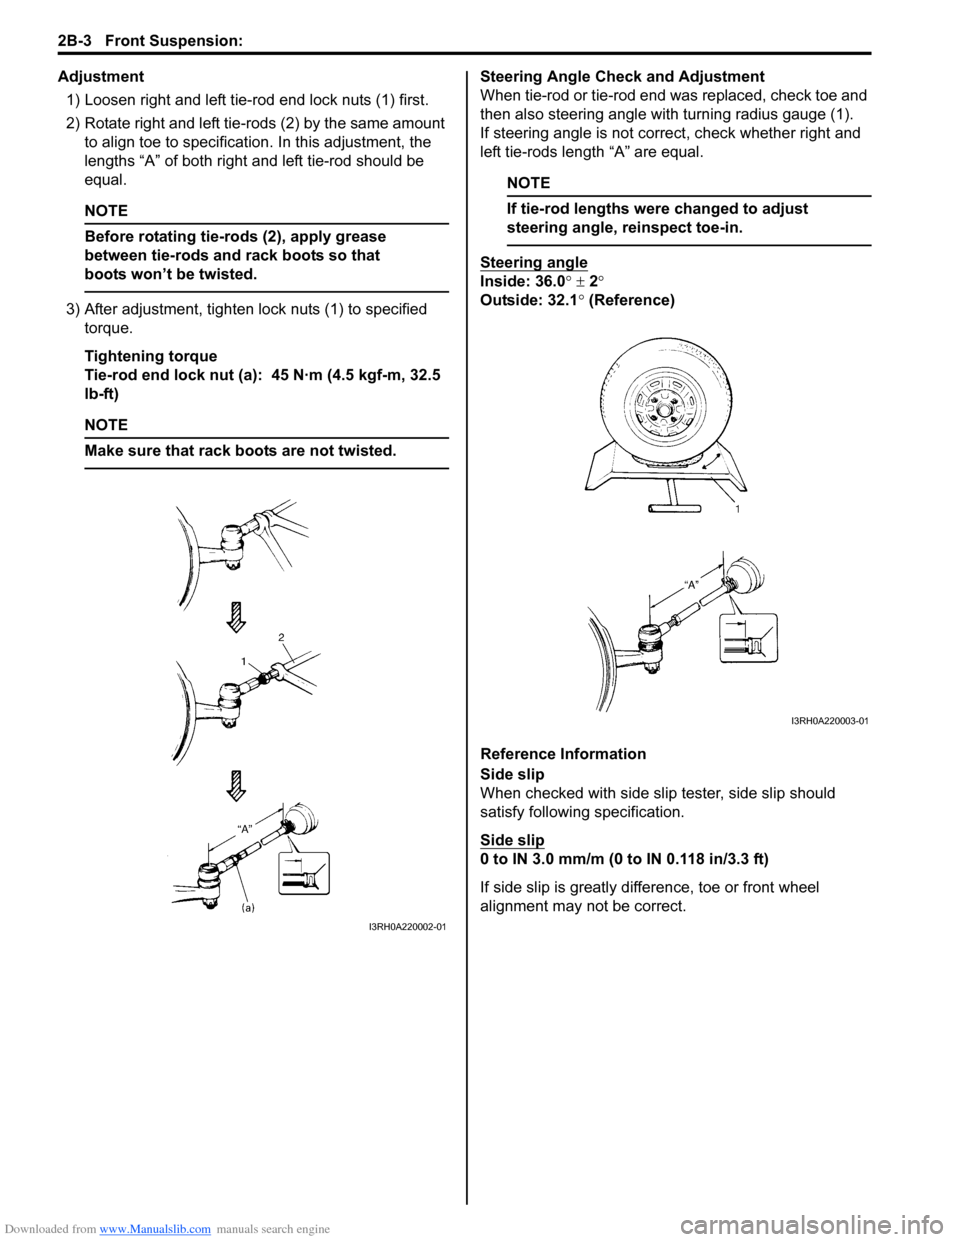
Adjustment
1) Loosen right and left tie-rod end lock nuts (1) first.
2) Rotate right and left tie-rods (2) by the same amount
to align toe to specification. In this adjustment, the
lengths “A” of both right and left tie-rod should be
equal.
NOTE
Before rotating tie-rods (2), apply grease
between tie-rods and rack boots so that
boots won’t be twisted.
3) After adjustment, tighten lock nuts (1) to specified
torque.
Tightening torque
Tie-rod end lock nut (a): 45 N·m (4.5 kgf-m, 32.5
lb-ft)
NOTE
Make sure that rack boots are not twisted.
Steering Angle Check and Adjustment
When tie-rod or tie-rod end was replaced, check toe and
then also steering angle with turning radius gauge (1).
If steering angle is not correct, check whether right and
left tie-rods length “A” are equal.
NOTE
If tie-rod lengths were changed to adjust
steering angle, reinspect toe-in.
Steering angle
Inside: 36.0° ± 2°
Outside: 32.1° (Reference)
Reference Information
Side slip
When checked with side slip tester, side slip should
satisfy following specification.
Side slip
0 to IN 3.0 mm/m (0 to IN 0.118 in/3.3 ft)
If side slip is greatly difference, toe or front wheel
alignment may not be correct.
I3RH0A220002-01
I3RH0A220003-01
Page 458 of 1556
Downloaded from www.Manualslib.com manuals search engine 2B-21 Front Suspension:
Specifications
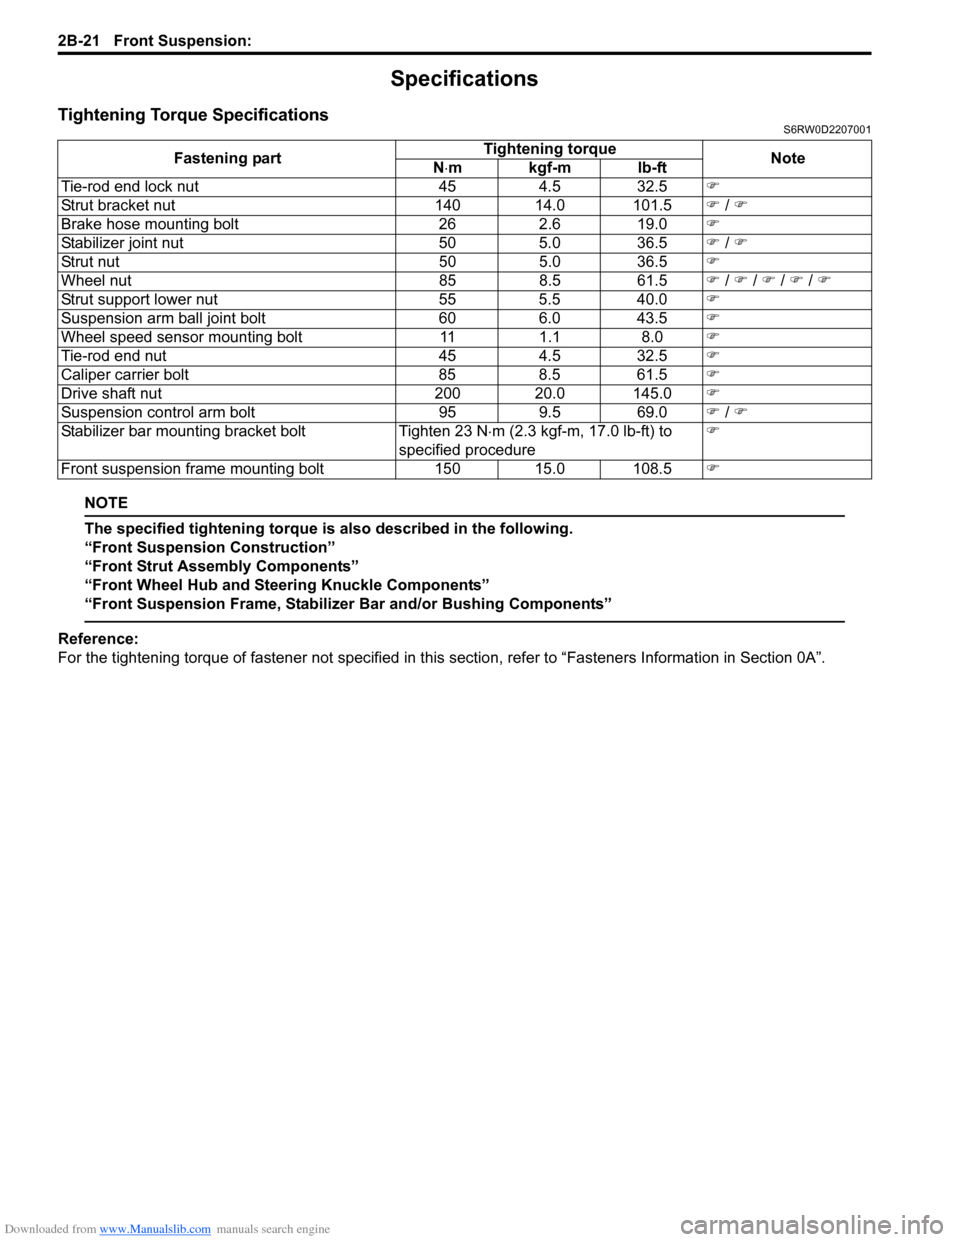
Tightening Torque SpecificationsS6RW0D2207001
NOTE
The specified tightening torque is also described in the following.
“Front Suspension Construction”
“Front Strut Assembly Components”
“Front Wheel Hub and Steering Knuckle Components”
“Front Suspension Frame, Stabilizer Bar and/or Bushing Components”
Reference:
For the tightening torque of fastener not specified in this section, refer to “Fasteners Information in Section 0A”. Fastening partTightening torque
Note
N⋅mkgf-mlb-ft
Tie-rod end lock nut 45 4.5 32.5�)
Strut bracket nut 140 14.0 101.5�) / �)
Brake hose mounting bolt 26 2.6 19.0�)
Stabilizer joint nut 50 5.0 36.5�) / �)
Strut nut 50 5.0 36.5�)
Wheel nut 85 8.5 61.5�) / �) / �) / �) / �)
Strut support lower nut 55 5.5 40.0�)
Suspension arm ball joint bolt 60 6.0 43.5�)
Wheel speed sensor mounting bolt 11 1.1 8.0�)
Tie-rod end nut 45 4.5 32.5�)
Caliper carrier bolt 85 8.5 61.5�)
Drive shaft nut 200 20.0 145.0�)
Suspension control arm bolt 95 9.5 69.0�) / �)
Stabilizer bar mounting bracket bolt Tighten 23 N⋅m (2.3 kgf-m, 17.0 lb-ft) to
specified procedure�)
Front suspension frame mounting bolt 150 15.0 108.5�)
Page 470 of 1556
Downloaded from www.Manualslib.com manuals search engine 2D-1 Wheels and Tires:
Suspension
Wheels and Tires
General Description
Tires DescriptionS6RW0D2401001
The tire is of tubeless type. The tire is designed to
operate satisfactorily with loads up to the full rated load
capacity when inflated to the recommended inflation
pressures.
Correct tire pressures and driving habits have an
important influence on tire life. Heavy cornering,
excessively rapid acceleration, and unnecessary sharp
braking increase tire wear.
Tire Placard
The “Tire Placard” is located on the left or right door lock
pillar and should be referred to tire information.
The placard lists the maximum load, tire size and cold
tire pressure where applicable.
NOTE
Whether rim size and/or maximum load are
listed or not depends on regulations of each
country.
Inflation of Tires
The pressure recommended for any model is carefully
calculated to give a satisfactory ride, stability, steering,
tread wear, tire life and resistance to bruises.
Tire pressure, with tires cold, (after vehicle has set for 3
hours or more, or driven less than one mile) should be
checked monthly or before any extended trip. Set to the
specifications on the “Tire Placard” located on the left or
right door lock pillar.
It is normal for tire pressure to increase when the tires
become hot during driving.
Do not bleed or reduce tire pressure after driving.
Bleeding reduces the “Cold Inflation Pressure”.
Higher than recommended pressure can cause:
• Hard ride
• Tire bruising or carcass damage
• Rapid tread wear at center of tire
Unequal pressure on same axle can cause:
• Uneven braking
• Steering lead
• Reduced handling
• Swerve on accelerationLower than recommended pressure can cause:
• Tire squeal on turns
• Hard Steering
• Rapid and uneven wear on the edges of the tread
• Tire rim bruises and rupture
• Tire cord breakage
• High tire temperature
• Reduced handling
• High fuel consumption
Matched Tires and Wheels (Steel Type)
Tires and wheels are match mounted at the assembly
plant.
This means that the radially stiffest part of the tire, or
“high spot”, is matched to the smallest radius or “low
spot” of the wheel.
This is done to provide the smoothest possible ride.
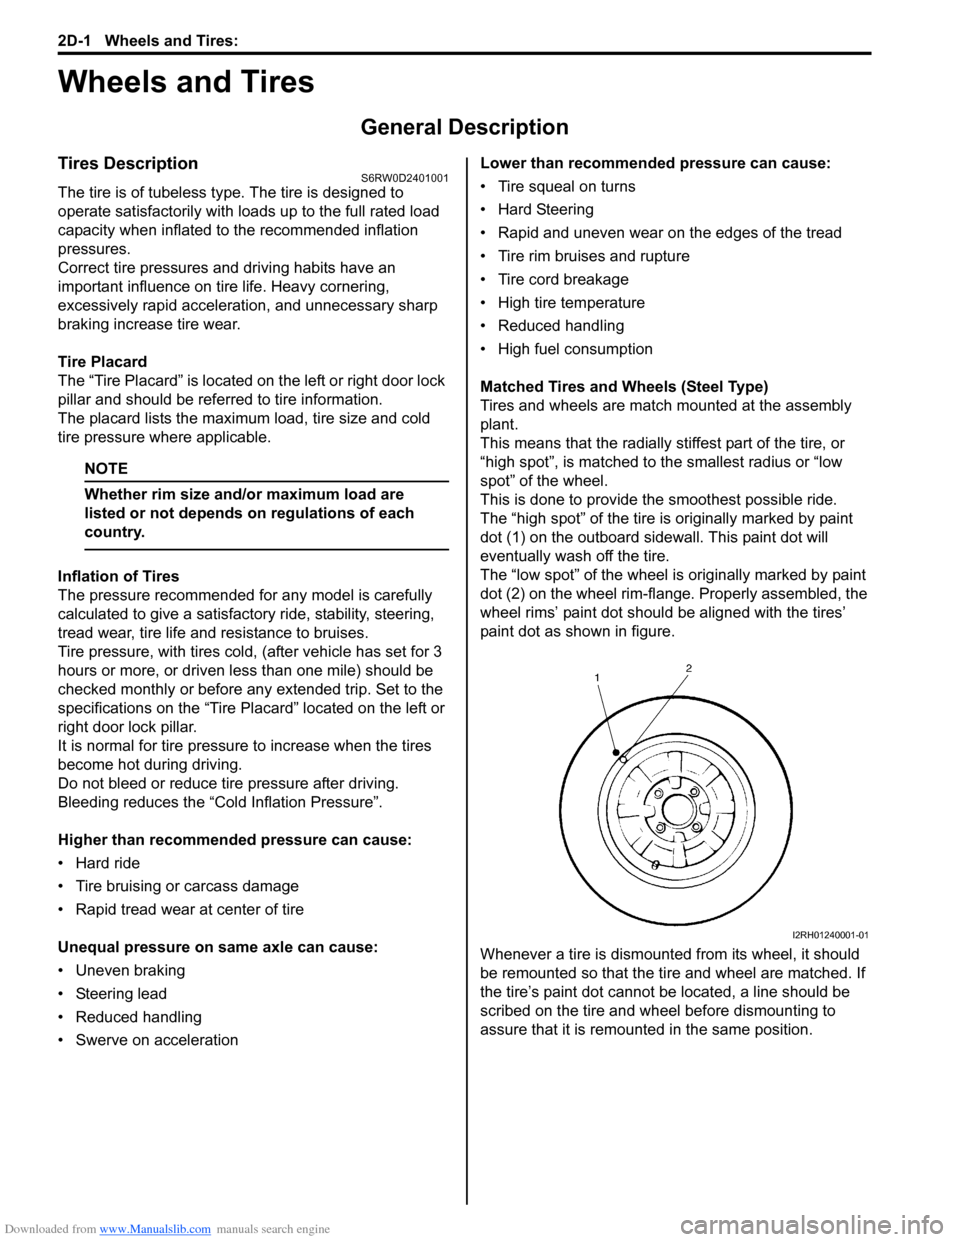
The “high spot” of the tire is originally marked by paint
dot (1) on the outboard sidewall. This paint dot will
eventually wash off the tire.
The “low spot” of the wheel is originally marked by paint
dot (2) on the wheel rim-flange. Properly assembled, the
wheel rims’ paint dot should be aligned with the tires’
paint dot as shown in figure.
Whenever a tire is dismounted from its wheel, it should
be remounted so that the tire and wheel are matched. If
the tire’s paint dot cannot be located, a line should be
scribed on the tire and wheel before dismounting to
assure that it is remounted in the same position.
I2RH01240001-01
Page 472 of 1556
Downloaded from www.Manualslib.com manuals search engine 2D-3 Wheels and Tires:
Irregular and/or Premature Wear DescriptionS6RW0D2401003
Irregular and premature wear has many causes. Some
of them are as follows: incorrect inflation pressures, lack
of tire rotation, driving habits, improper alignment.
If the following conditions are noted, tire rotation is
necessary:
• Front tire wear is different from rear’s.
• Uneven wear exists across tread of any tires.
• Both sides of front tire wears are not even.
• Both sides of rear tire wears are not even.
• There is cupping, flat spotting, etc.
A wheel alignment check is necessary if following
conditions are noted:
• Both sides of front tire wears are not even.
• Wear is uneven across the tread of any front tire.
• Front tire treads have scuffed appearance with
“feather” edges on one side of tread ribs or blocks.
Wear Indicators DescriptionS6RW0D2401004
Original equipment tires have built-in tread wear
indicators (1) to show when they need replacement.
These indicators (1) will appear as 12 mm (0.47 in.) wide
bands when the tire tread depth becomes 1.6 mm (0.063
in.).
When the indicators (1) appear in 3 or more grooves at 6
locations, tire replacement is recommended.
Radial Tire Waddle DescriptionS6RW0D2401005
Waddle is side to side movement at the front and/or rear
of the vehicle. It is caused by the steel belt not being
straight within the tire. It is most noticeable at a low
speed, 8 to 48 kph (5 to 30 mph).
It is possible to locate the faulty tire by road testing the
vehicle. If it is on the rear, the rear end of the vehicle
shakes from side to side or “waddles”. To the driver in
the seat, it feels as though someone is pushing on the
side of vehicle.
If the faulty tire is on the front, waddling is more visual.
The front sheet metal appears to be moving back and
forth and the driver feels as though he is at the pivot
point in vehicle.
Waddle can be quickly diagnosed by using Tire Problem
Detector (TPD) and following the equipment
manufacture’s recommendations.
If TPD is not available, an alternative method of
substituting known-good tire / wheel assemblies can be
used as follows, although it takes a longer time.
1) Ride vehicle to determine whether the front or rear
waddles.
2) Install tires and wheels that are known to be good
(on similar vehicle) in place of those on waddling end
of vehicle. If waddling end cannot be identified,
substitute rear ones.
3) Road test again. If improvement is noted, reinstall
originals one at a time till waddle causal tire is found.
If no improvement is noted, install known-good tires
in place of all four. Then reinstall originals in the
same manner.
[A]: Hard Cornering, under inflation or lack of tire rotation
[B]: Incorrect wheel alignment, tire construction not uniform or wheel
heavy acceleration
I3RH0A240002-01
I2RH01240005-01
I2RH01240006-01