lock SUZUKI SX4 2006 1.G Service Workshop Manual
[x] Cancel search | Manufacturer: SUZUKI, Model Year: 2006, Model line: SX4, Model: SUZUKI SX4 2006 1.GPages: 1556, PDF Size: 37.31 MB
Page 528 of 1556
Downloaded from www.Manualslib.com manuals search engine 3B-31 Differential:
2WD/4WD Switch Removal and InstallationS6RW0D3206003
Removal
1) Disconnect negative cable at battery.
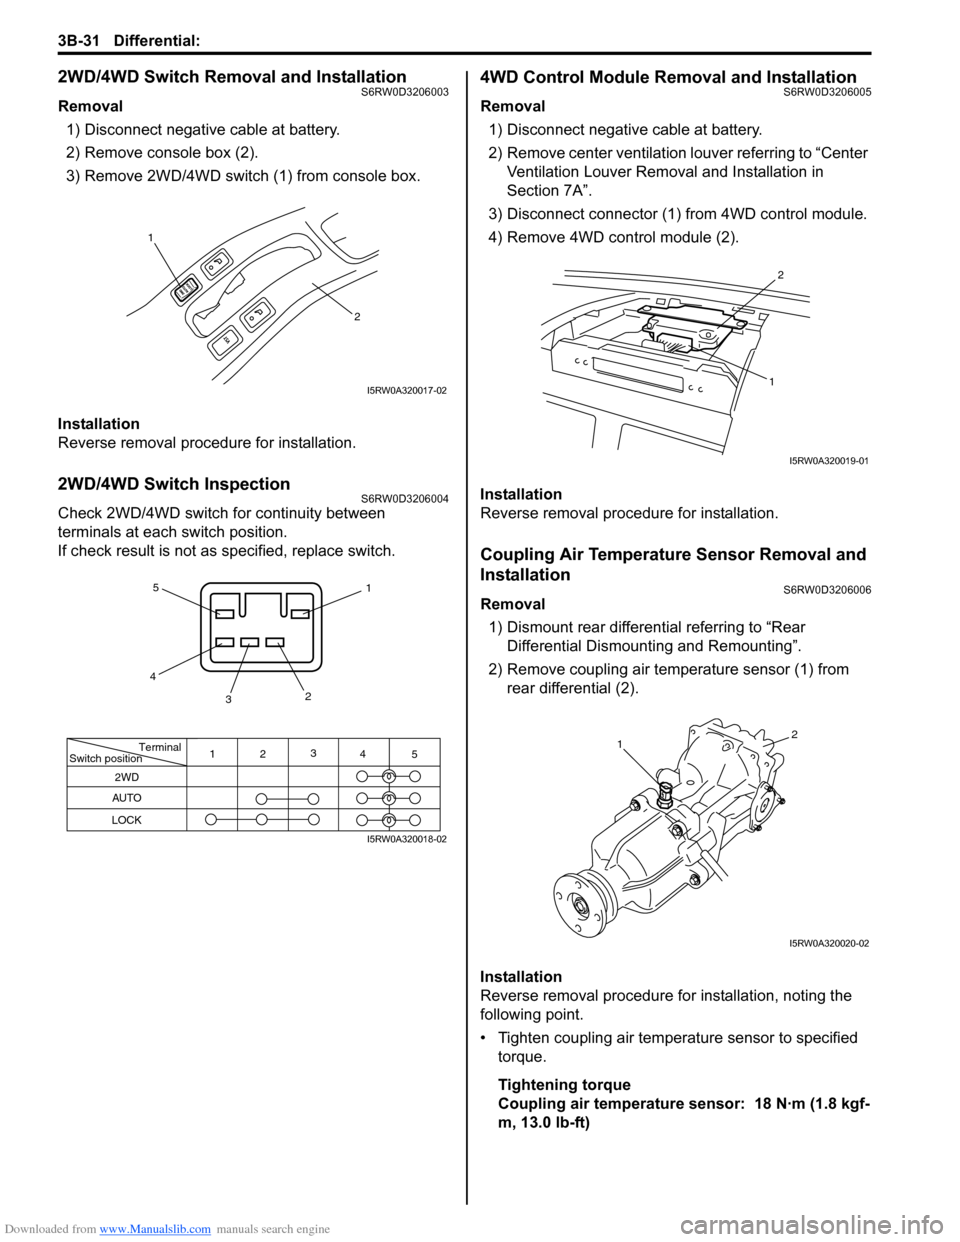
2) Remove console box (2).
3) Remove 2WD/4WD switch (1) from console box.
Installation
Reverse removal procedure for installation.
2WD/4WD Switch InspectionS6RW0D3206004
Check 2WD/4WD switch for continuity between
terminals at each switch position.
If check result is not as specified, replace switch.
4WD Control Module Removal and InstallationS6RW0D3206005
Removal
1) Disconnect negative cable at battery.
2) Remove center ventilation louver referring to “Center
Ventilation Louver Removal and Installation in
Section 7A”.
3) Disconnect connector (1) from 4WD control module.
4) Remove 4WD control module (2).
Installation
Reverse removal procedure for installation.
Coupling Air Temperature Sensor Removal and
Installation
S6RW0D3206006
Removal
1) Dismount rear differential referring to “Rear
Differential Dismounting and Remounting”.
2) Remove coupling air temperature sensor (1) from
rear differential (2).
Installation
Reverse removal procedure for installation, noting the
following point.
• Tighten coupling air temperature sensor to specified
torque.
Tightening torque
Coupling air temperature sensor: 18 N·m (1.8 kgf-
m, 13.0 lb-ft)
1
2
I5RW0A320017-02
Terminal
Switch position
2WD
AUTO
LOCK
11
22
3 3
4 4
5 5
I5RW0A320018-02
2
1
I5RW0A320019-01
12
I5RW0A320020-02
Page 539 of 1556
Downloaded from www.Manualslib.com manuals search engine Differential: 3B-42
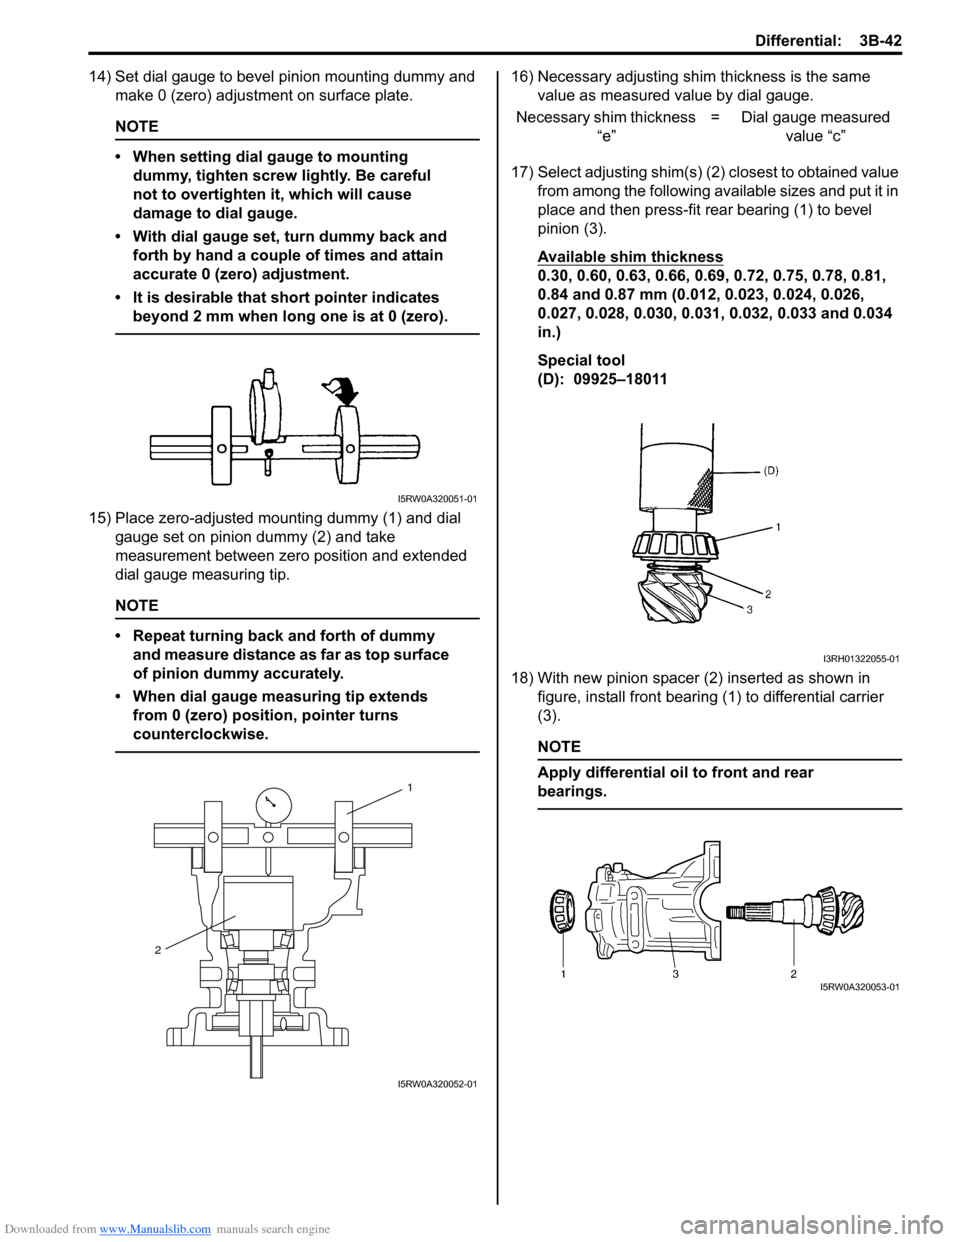
14) Set dial gauge to bevel pinion mounting dummy and
make 0 (zero) adjustment on surface plate.
NOTE
• When setting dial gauge to mounting
dummy, tighten screw lightly. Be careful
not to overtighten it, which will cause
damage to dial gauge.
• With dial gauge set, turn dummy back and
forth by hand a couple of times and attain
accurate 0 (zero) adjustment.
• It is desirable that short pointer indicates
beyond 2 mm when long one is at 0 (zero).
15) Place zero-adjusted mounting dummy (1) and dial
gauge set on pinion dummy (2) and take
measurement between zero position and extended
dial gauge measuring tip.
NOTE
• Repeat turning back and forth of dummy
and measure distance as far as top surface
of pinion dummy accurately.
• When dial gauge measuring tip extends
from 0 (zero) position, pointer turns
counterclockwise.
16) Necessary adjusting shim thickness is the same
value as measured value by dial gauge.
17) Select adjusting shim(s) (2) closest to obtained value
from among the following available sizes and put it in
place and then press-fit rear bearing (1) to bevel
pinion (3).
Available shim thickness
0.30, 0.60, 0.63, 0.66, 0.69, 0.72, 0.75, 0.78, 0.81,
0.84 and 0.87 mm (0.012, 0.023, 0.024, 0.026,
0.027, 0.028, 0.030, 0.031, 0.032, 0.033 and 0.034
in.)
Special tool
(D): 09925–18011
18) With new pinion spacer (2) inserted as shown in
figure, install front bearing (1) to differential carrier
(3).
NOTE
Apply differential oil to front and rear
bearings.
I5RW0A320051-01
1
2
I5RW0A320052-01
Necessary shim thickness
“e”= Dial gauge measured
value “c”
I3RH01322055-01
I5RW0A320053-01
Page 547 of 1556
Downloaded from www.Manualslib.com manuals search engine Differential: 3B-50
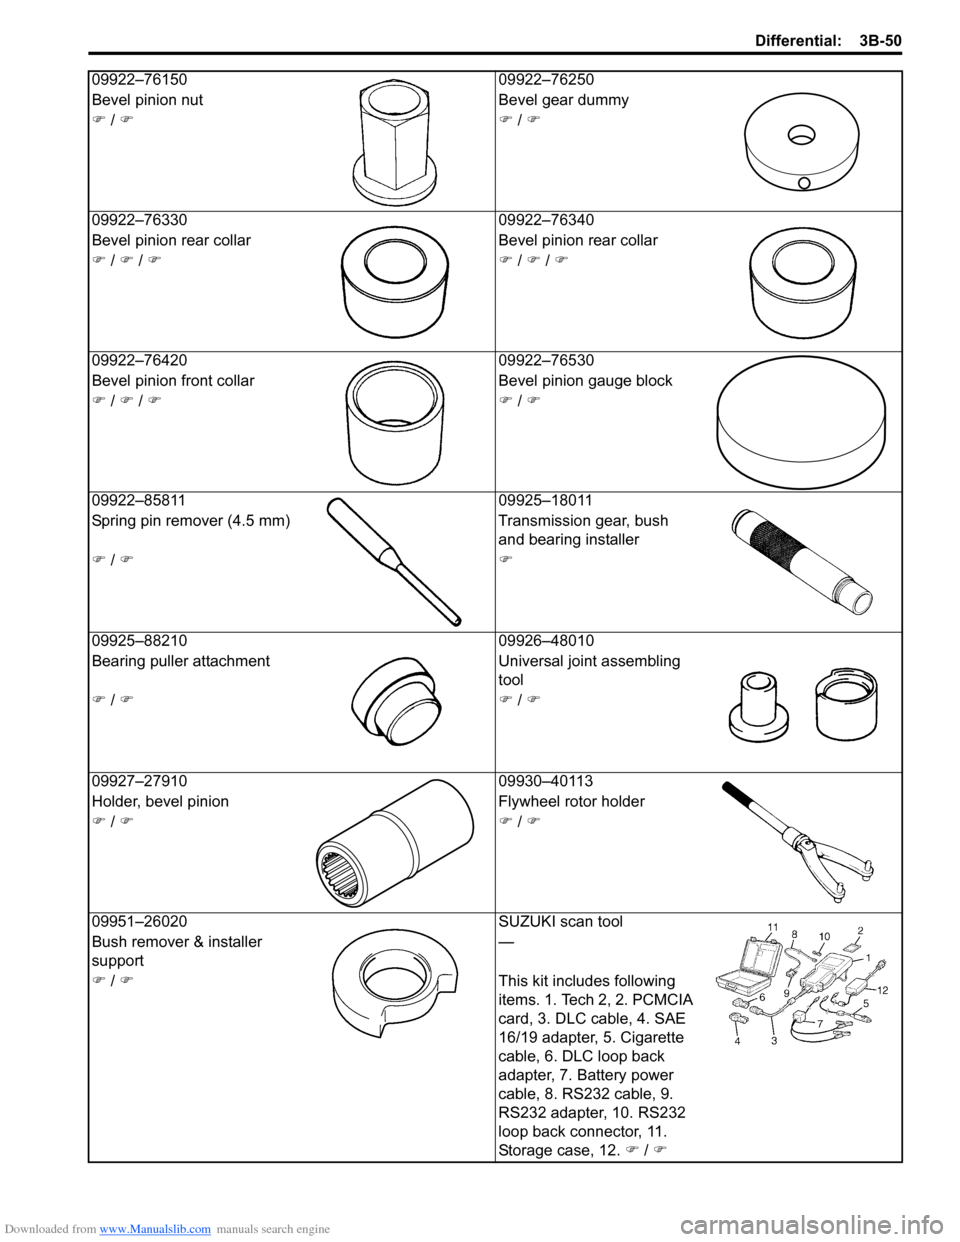
09922–76150 09922–76250
Bevel pinion nut Bevel gear dummy
�) / �)�) / �)
09922–76330 09922–76340
Bevel pinion rear collar Bevel pinion rear collar
�) / �) / �)�) / �) / �)
09922–76420 09922–76530
Bevel pinion front collar Bevel pinion gauge block
�) / �) / �)�) / �)
09922–85811 09925–18011
Spring pin remover (4.5 mm) Transmission gear, bush
and bearing installer
�) / �)�)
09925–88210 09926–48010
Bearing puller attachment Universal joint assembling
tool
�) / �)�) / �)
09927–27910 09930–40113
Holder, bevel pinion Flywheel rotor holder
�) / �)�) / �)
09951–26020 SUZUKI scan tool
Bush remover & installer
support—
�) / �)This kit includes following
items. 1. Tech 2, 2. PCMCIA
card, 3. DLC cable, 4. SAE
16/19 adapter, 5. Cigarette
cable, 6. DLC loop back
adapter, 7. Battery power
cable, 8. RS232 cable, 9.
RS232 adapter, 10. RS232
loop back connector, 11.
Storage case, 12. �) / �)
Page 552 of 1556
Downloaded from www.Manualslib.com manuals search engine 3C-5 Transfer:
Transfer Assembly Disassembly and
Reassembly
S6RW0D3306005
Disassembly
NOTE
It is possible to disassemble transfer
assembly without removing intermediate
shaft with Step 1) to 4) performed if not
necessary.
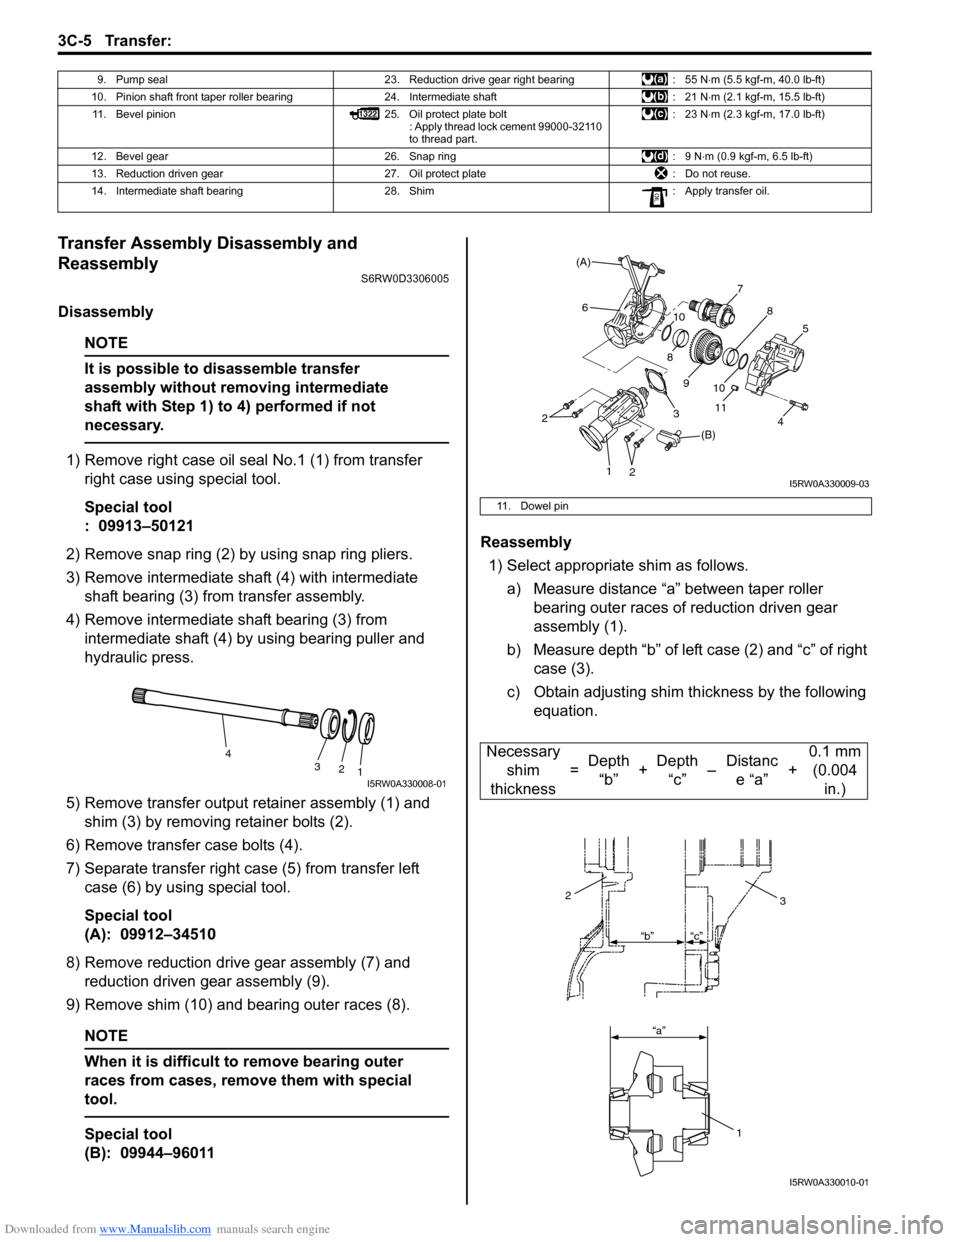
1) Remove right case oil seal No.1 (1) from transfer
right case using special tool.
Special tool
: 09913–50121
2) Remove snap ring (2) by using snap ring pliers.
3) Remove intermediate shaft (4) with intermediate
shaft bearing (3) from transfer assembly.
4) Remove intermediate shaft bearing (3) from
intermediate shaft (4) by using bearing puller and
hydraulic press.
5) Remove transfer output retainer assembly (1) and
shim (3) by removing retainer bolts (2).
6) Remove transfer case bolts (4).
7) Separate transfer right case (5) from transfer left
case (6) by using special tool.
Special tool
(A): 09912–34510
8) Remove reduction drive gear assembly (7) and
reduction driven gear assembly (9).
9) Remove shim (10) and bearing outer races (8).
NOTE
When it is difficult to remove bearing outer
races from cases, remove them with special
tool.
Special tool
(B): 09944–96011Reassembly
1) Select appropriate shim as follows.
a) Measure distance “a” between taper roller
bearing outer races of reduction driven gear
assembly (1).
b) Measure depth “b” of left case (2) and “c” of right
case (3).
c) Obtain adjusting shim thickness by the following
equation.
9. Pump seal 23. Reduction drive gear right bearing : 55 N⋅m (5.5 kgf-m, 40.0 lb-ft)
10. Pinion shaft front taper roller bearing 24. Intermediate shaft : 21 N⋅m (2.1 kgf-m, 15.5 lb-ft)
11. Bevel pinion 25. Oil protect plate bolt
: Apply thread lock cement 99000-32110
to thread part.: 23 N⋅m (2.3 kgf-m, 17.0 lb-ft)
12. Bevel gear 26. Snap ring : 9 N⋅m (0.9 kgf-m, 6.5 lb-ft)
13. Reduction driven gear 27. Oil protect plate : Do not reuse.
14. Intermediate shaft bearing 28. Shim : Apply transfer oil.
4
3
2
1
I5RW0A330008-01
11. Dowel pin
Necessary
shim
thickness=Depth
“b”+Depth
“c”–Distanc
e “a”+0.1 mm
(0.004
in.)
7
(B)
5
11
310 9 10
8 64
8
(A)
12
2
I5RW0A330009-03
23
1
“b”
“a”“c”
I5RW0A330010-01
Page 561 of 1556

Downloaded from www.Manualslib.com manuals search engine Transfer: 3C-14
8) Install transfer output flange (1) by tapping with
plastic hammer and tighten transfer output flange nut
gradually so as rotational torque of bevel pinion to be
in specified value.
NOTE
• If rotational torque of bevel pinion exceeds
specification given in the following,
replace pinion shaft spacers and tighten
flange nut.
• Before taking measurement of rotational
torque, rotate pinion over ten rounds in
advance.
Bevel pinion bearing preload
: 0.5 – 1.3 N⋅m (0.05 – 0.13 kgf-m, 0.35 – 0.95 lb-ft)
Special tool
(A): 09930–40113
9) Caulk transfer output flange nut (1).
Transfer Assembly InspectionS6RW0D3306010
• Check each bearing for smooth rotation, wear or
discoloration
If found abnormal, replace.
• Check oil seal for leakage and its lip for excessive
hardness
If either is found, replace.
• Check transfer case for cracks.
• Check bevel pinion and bevel gears for wear or
cracks.
Bevel Gear Tooth Contact InspectionS6RW0D3306011
1) After cleaning tooth surface of bevel gear (1), paint
them with gear marking compound evenly by using
brush or sponge etc.
NOTE
When applying red lead paste to teeth, be
sure to paint tooth surfaces uniformly. The
paste must not be too dry or too fluid.
2) Install transfer output retainer assembly referring to
“Transfer Assembly Disassembly and Reassembly”.
3) Turn transfer output flange clockwise and
counterclockwise repeatedly, and remove transfer
output retainer assembly and bevel gear shims from
transfer assembly.
2. Torque wrench
(A)1
2
I5RW0A330043-01
1
I5RW0A330044-01
I3RH01332043-01
Page 576 of 1556
Downloaded from www.Manualslib.com manuals search engine 4A-5 Brake Control System and Diagnosis:
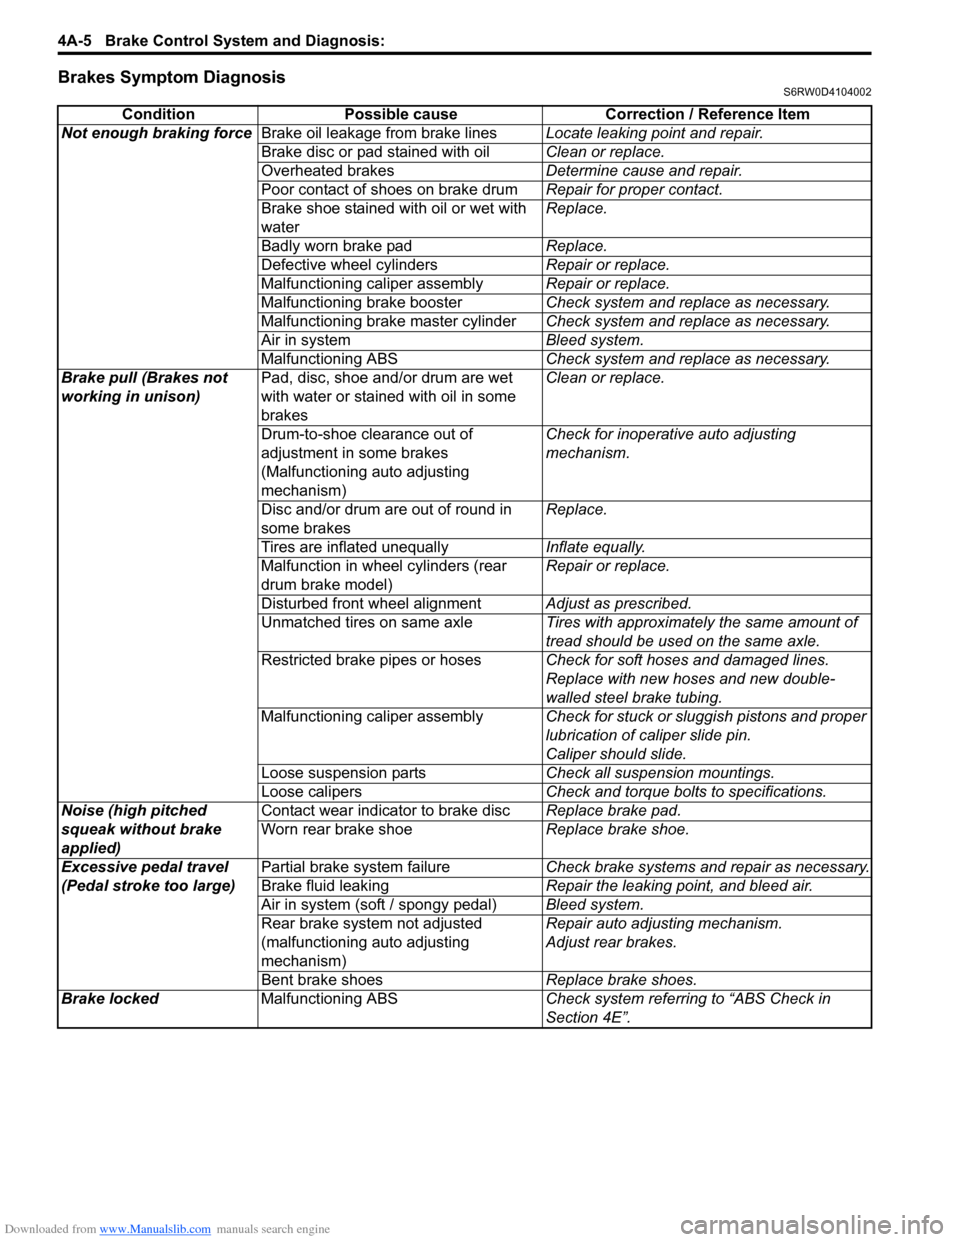
Brakes Symptom DiagnosisS6RW0D4104002
Condition Possible cause Correction / Reference Item
Not enough braking forceBrake oil leakage from brake linesLocate leaking point and repair.
Brake disc or pad stained with oilClean or replace.
Overheated brakesDetermine cause and repair.
Poor contact of shoes on brake drumRepair for proper contact.
Brake shoe stained with oil or wet with
waterReplace.
Badly worn brake padReplace.
Defective wheel cylindersRepair or replace.
Malfunctioning caliper assemblyRepair or replace.
Malfunctioning brake boosterCheck system and replace as necessary.
Malfunctioning brake master cylinderCheck system and replace as necessary.
Air in systemBleed system.
Malfunctioning ABSCheck system and replace as necessary.
Brake pull (Brakes not
working in unison)Pad, disc, shoe and/or drum are wet
with water or stained with oil in some
brakesClean or replace.
Drum-to-shoe clearance out of
adjustment in some brakes
(Malfunctioning auto adjusting
mechanism) Check for inoperative auto adjusting
mechanism.
Disc and/or drum are out of round in
some brakesReplace.
Tires are inflated unequallyInflate equally.
Malfunction in wheel cylinders (rear
drum brake model)Repair or replace.
Disturbed front wheel alignmentAdjust as prescribed.
Unmatched tires on same axleTires with approximately the same amount of
tread should be used on the same axle.
Restricted brake pipes or hosesCheck for soft hoses and damaged lines.
Replace with new hoses and new double-
walled steel brake tubing.
Malfunctioning caliper assemblyCheck for stuck or sluggish pistons and proper
lubrication of caliper slide pin.
Caliper should slide.
Loose suspension partsCheck all suspension mountings.
Loose calipersCheck and torque bolts to specifications.
Noise (high pitched
squeak without brake
applied)Contact wear indicator to brake discReplace brake pad.
Worn rear brake shoeReplace brake shoe.
Excessive pedal travel
(Pedal stroke too large)Partial brake system failureCheck brake systems and repair as necessary.
Brake fluid leakingRepair the leaking point, and bleed air.
Air in system (soft / spongy pedal)Bleed system.
Rear brake system not adjusted
(malfunctioning auto adjusting
mechanism)Repair auto adjusting mechanism.
Adjust rear brakes.
Bent brake shoesReplace brake shoes.
Brake locked Malfunctioning ABSCheck system referring to “ABS Check in
Section 4E”.
Page 579 of 1556
Downloaded from www.Manualslib.com manuals search engine Brake Control System and Diagnosis: 4A-8
Brake Fluid Level InspectionS6RW0D4106004
CAUTION!
Do not use shock absorber fluid or any other
fluid which contains mineral oil. Do not use a
container which has been used for mineral oil
or a container which is wet from water.
Mineral oil will cause swelling and distortion
of rubber parts in hydraulic brake system and
water mixed into brake fluid will lower fluid
boiling point. Keep all fluid containers
capped to prevent contamination.
NOTE
Be sure to use particular brake fluid either as
indicated on reservoir cap of that vehicle or
recommended in owner’s manual which
comes along with that vehicle. Use of any
other fluid is strictly prohibited.
Fluid level should be between MIN and MAX
lines marked on reservoir.
When brake warning light lights sometimes
during driving, replenish fluid to MAX level.
When fluid decreases quickly, inspect brake
system for leakage. Correct leaky points and
then refill to specified level.
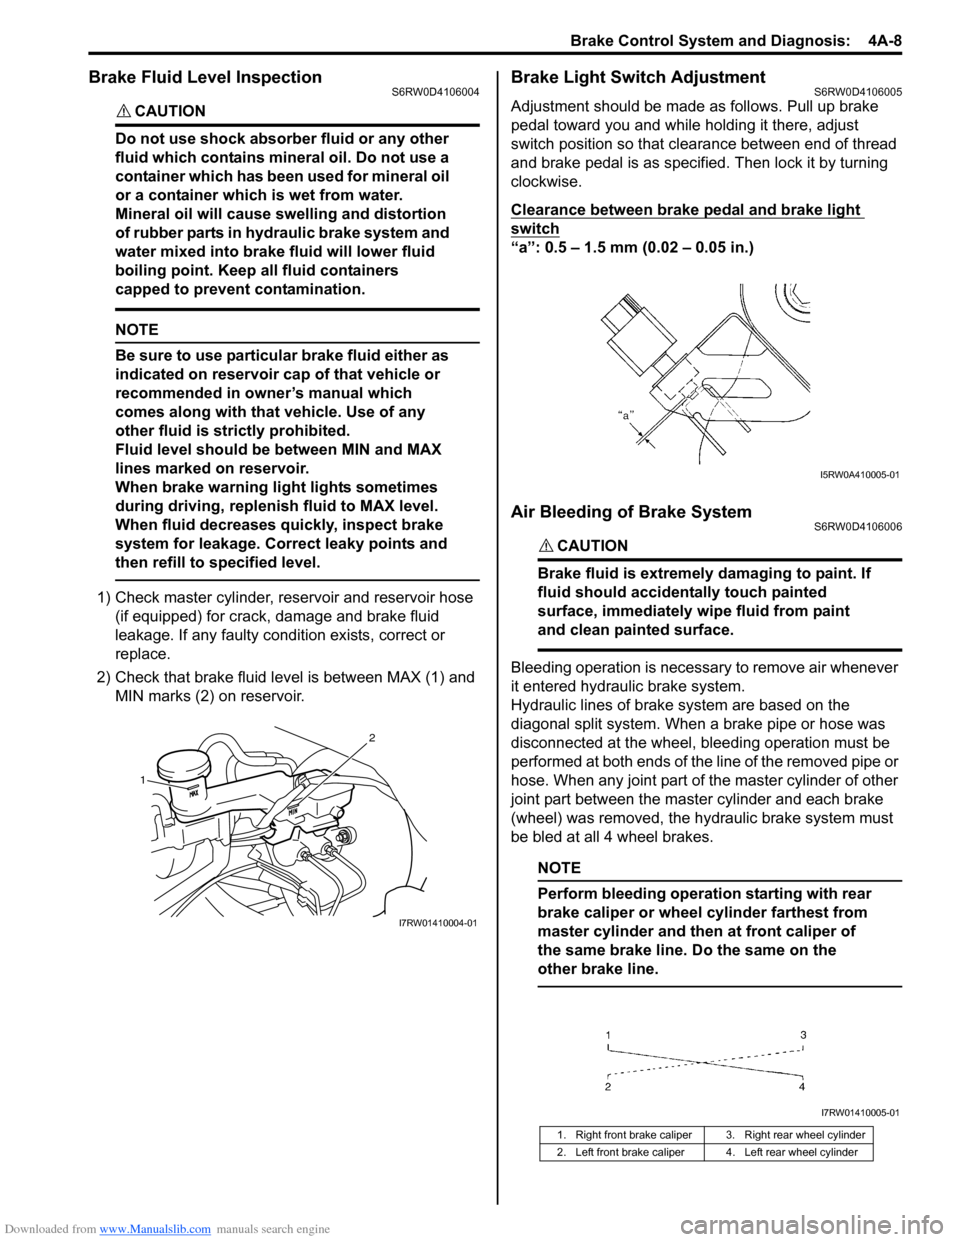
1) Check master cylinder, reservoir and reservoir hose
(if equipped) for crack, damage and brake fluid
leakage. If any faulty condition exists, correct or
replace.
2) Check that brake fluid level is between MAX (1) and
MIN marks (2) on reservoir.
Brake Light Switch AdjustmentS6RW0D4106005
Adjustment should be made as follows. Pull up brake
pedal toward you and while holding it there, adjust
switch position so that clearance between end of thread
and brake pedal is as specified. Then lock it by turning
clockwise.
Clearance between brake pedal and brake light
switch
“a”: 0.5 – 1.5 mm (0.02 – 0.05 in.)
Air Bleeding of Brake SystemS6RW0D4106006
CAUTION!
Brake fluid is extremely damaging to paint. If
fluid should accidentally touch painted
surface, immediately wipe fluid from paint
and clean painted surface.
Bleeding operation is necessary to remove air whenever
it entered hydraulic brake system.
Hydraulic lines of brake system are based on the
diagonal split system. When a brake pipe or hose was
disconnected at the wheel, bleeding operation must be
performed at both ends of the line of the removed pipe or
hose. When any joint part of the master cylinder of other
joint part between the master cylinder and each brake
(wheel) was removed, the hydraulic brake system must
be bled at all 4 wheel brakes.
NOTE
Perform bleeding operation starting with rear
brake caliper or wheel cylinder farthest from
master cylinder and then at front caliper of
the same brake line. Do the same on the
other brake line.
1
2
I7RW01410004-01
1. Right front brake caliper 3. Right rear wheel cylinder
2. Left front brake caliper 4. Left rear wheel cylinder
I5RW0A410005-01
I7RW01410005-01
Page 587 of 1556
Downloaded from www.Manualslib.com manuals search engine Brake Control System and Diagnosis: 4A-16
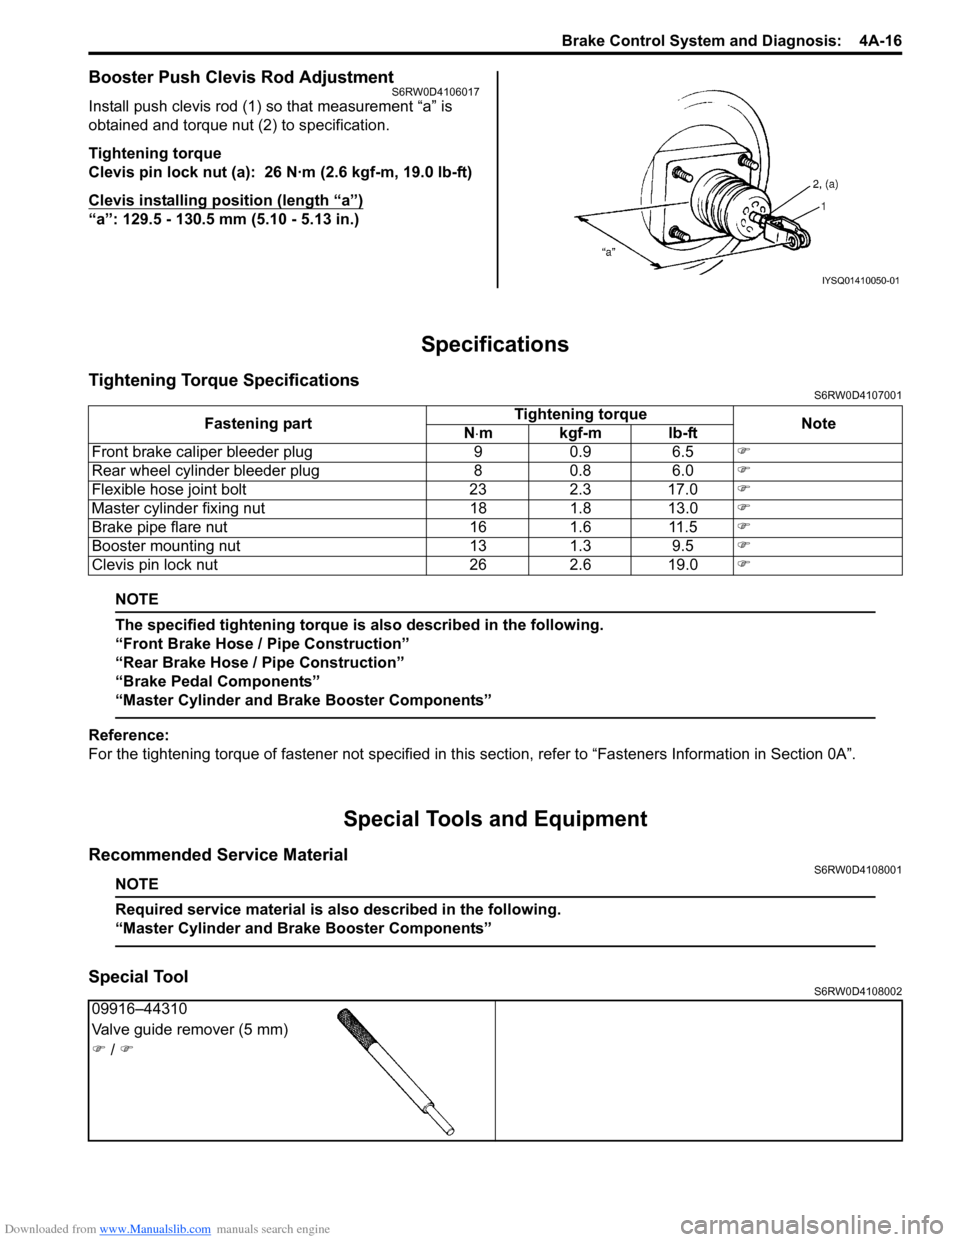
Booster Push Clevis Rod AdjustmentS6RW0D4106017
Install push clevis rod (1) so that measurement “a” is
obtained and torque nut (2) to specification.
Tightening torque
Clevis pin lock nut (a): 26 N·m (2.6 kgf-m, 19.0 lb-ft)
Clevis installing position (length “a”)
“a”: 129.5 - 130.5 mm (5.10 - 5.13 in.)
Specifications
Tightening Torque SpecificationsS6RW0D4107001
NOTE
The specified tightening torque is also described in the following.
“Front Brake Hose / Pipe Construction”
“Rear Brake Hose / Pipe Construction”
“Brake Pedal Components”
“Master Cylinder and Brake Booster Components”
Reference:
For the tightening torque of fastener not specified in this section, refer to “Fasteners Information in Section 0A”.
Special Tools and Equipment
Recommended Service MaterialS6RW0D4108001
NOTE
Required service material is also described in the following.
“Master Cylinder and Brake Booster Components”
Special ToolS6RW0D4108002
IYSQ01410050-01
Fastening partTightening torque
Note
N⋅mkgf-mlb-ft
Front brake caliper bleeder plug 9 0.9 6.5�)
Rear wheel cylinder bleeder plug 8 0.8 6.0�)
Flexible hose joint bolt 23 2.3 17.0�)
Master cylinder fixing nut 18 1.8 13.0�)
Brake pipe flare nut 16 1.6 11.5�)
Booster mounting nut 13 1.3 9.5�)
Clevis pin lock nut 26 2.6 19.0�)
09916–44310
Valve guide remover (5 mm)
�) / �)
Page 603 of 1556
Downloaded from www.Manualslib.com manuals search engine Parking Brake: 4D-2
Repair Instructions
Parking Brake Inspection and AdjustmentS6RW0D4406001
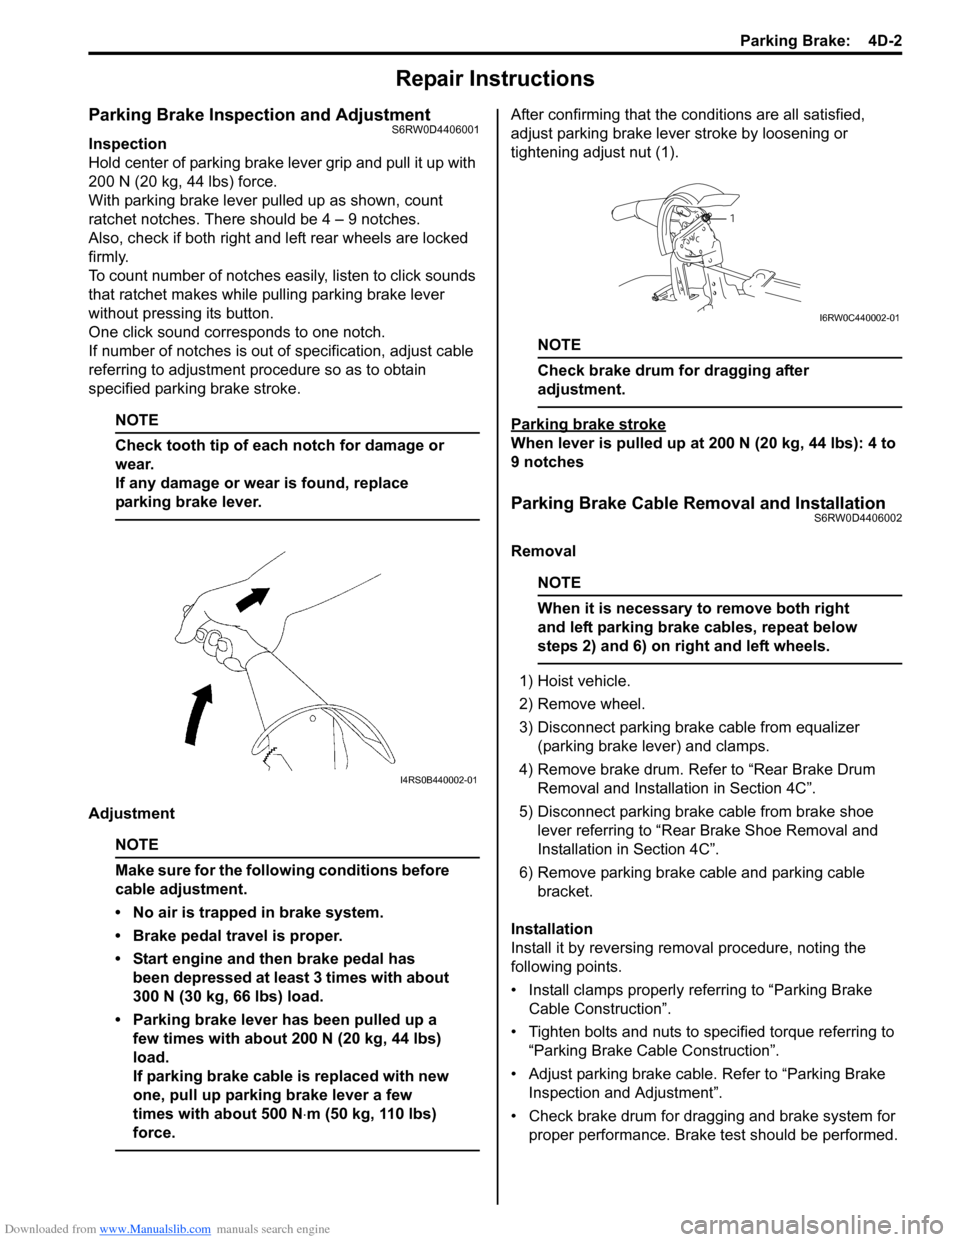
Inspection
Hold center of parking brake lever grip and pull it up with
200 N (20 kg, 44 lbs) force.
With parking brake lever pulled up as shown, count
ratchet notches. There should be 4 – 9 notches.
Also, check if both right and left rear wheels are locked
firmly.
To count number of notches easily, listen to click sounds
that ratchet makes while pulling parking brake lever
without pressing its button.
One click sound corresponds to one notch.
If number of notches is out of specification, adjust cable
referring to adjustment procedure so as to obtain
specified parking brake stroke.
NOTE
Check tooth tip of each notch for damage or
wear.
If any damage or wear is found, replace
parking brake lever.
Adjustment
NOTE
Make sure for the following conditions before
cable adjustment.
• No air is trapped in brake system.
• Brake pedal travel is proper.
• Start engine and then brake pedal has
been depressed at least 3 times with about
300 N (30 kg, 66 lbs) load.
• Parking brake lever has been pulled up a
few times with about 200 N (20 kg, 44 lbs)
load.
If parking brake cable is replaced with new
one, pull up parking brake lever a few
times with about 500 N⋅m (50 kg, 110 lbs)
force.
After confirming that the conditions are all satisfied,
adjust parking brake lever stroke by loosening or
tightening adjust nut (1).
NOTE
Check brake drum for dragging after
adjustment.
Parking brake stroke
When lever is pulled up at 200 N (20 kg, 44 lbs): 4 to
9 notches
Parking Brake Cable Removal and InstallationS6RW0D4406002
Removal
NOTE
When it is necessary to remove both right
and left parking brake cables, repeat below
steps 2) and 6) on right and left wheels.
1) Hoist vehicle.
2) Remove wheel.
3) Disconnect parking brake cable from equalizer
(parking brake lever) and clamps.
4) Remove brake drum. Refer to “Rear Brake Drum
Removal and Installation in Section 4C”.
5) Disconnect parking brake cable from brake shoe
lever referring to “Rear Brake Shoe Removal and
Installation in Section 4C”.
6) Remove parking brake cable and parking cable
bracket.
Installation
Install it by reversing removal procedure, noting the
following points.
• Install clamps properly referring to “Parking Brake
Cable Construction”.
• Tighten bolts and nuts to specified torque referring to
“Parking Brake Cable Construction”.
• Adjust parking brake cable. Refer to “Parking Brake
Inspection and Adjustment”.
• Check brake drum for dragging and brake system for
proper performance. Brake test should be performed.
I4RS0B440002-01
1
I6RW0C440002-01
Page 604 of 1556
Downloaded from www.Manualslib.com manuals search engine 4D-3 Parking Brake:
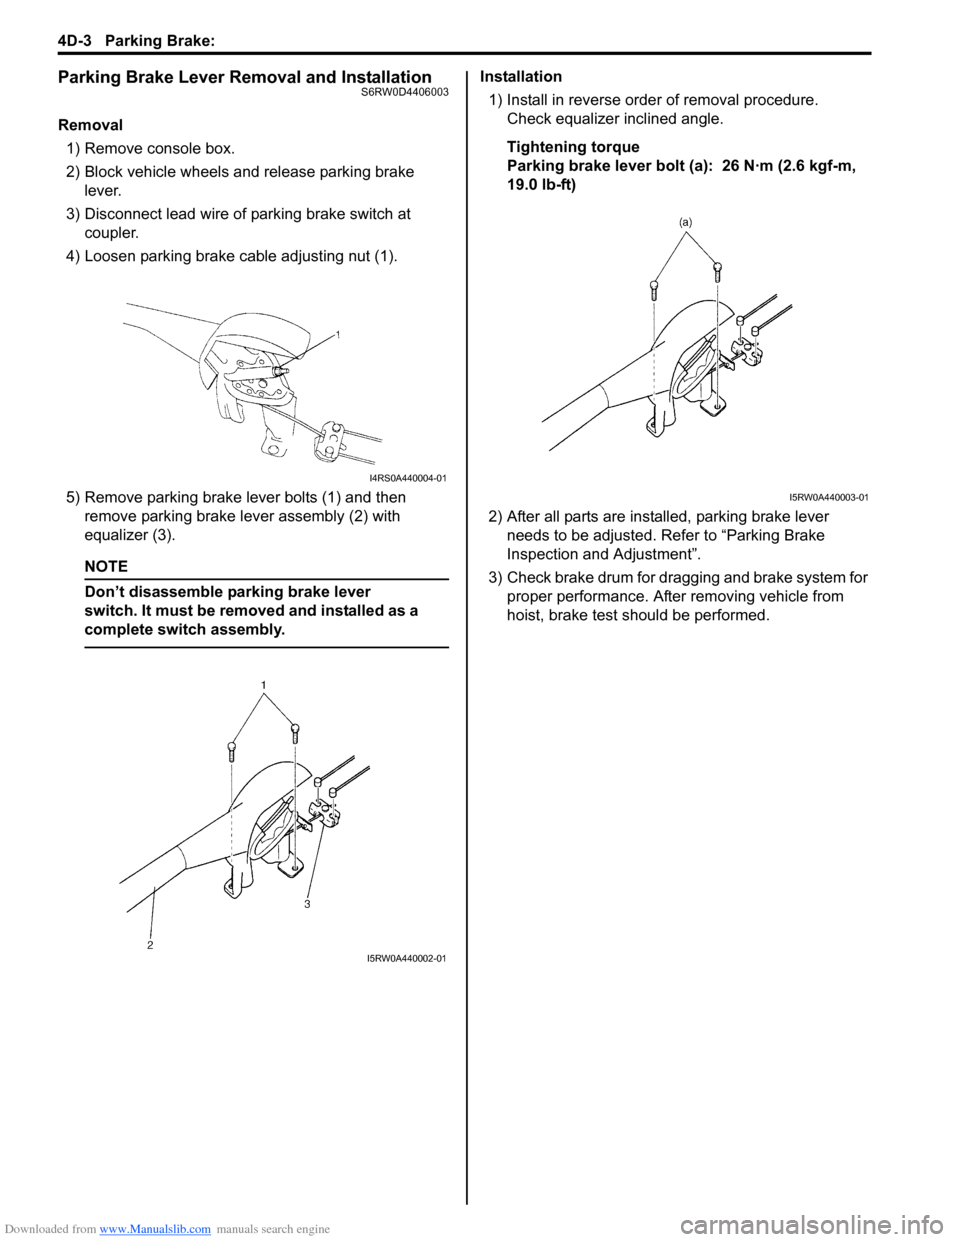
Parking Brake Lever Removal and InstallationS6RW0D4406003
Removal
1) Remove console box.
2) Block vehicle wheels and release parking brake
lever.
3) Disconnect lead wire of parking brake switch at
coupler.
4) Loosen parking brake cable adjusting nut (1).
5) Remove parking brake lever bolts (1) and then
remove parking brake lever assembly (2) with
equalizer (3).
NOTE
Don’t disassemble parking brake lever
switch. It must be removed and installed as a
complete switch assembly.
Installation
1) Install in reverse order of removal procedure.
Check equalizer inclined angle.
Tightening torque
Parking brake lever bolt (a): 26 N·m (2.6 kgf-m,
19.0 lb-ft)
2) After all parts are installed, parking brake lever
needs to be adjusted. Refer to “Parking Brake
Inspection and Adjustment”.
3) Check brake drum for dragging and brake system for
proper performance. After removing vehicle from
hoist, brake test should be performed.
I4RS0A440004-01
I5RW0A440002-01
I5RW0A440003-01