Coolant Level Check SUZUKI SX4 2006 1.G Service Workshop Manual
[x] Cancel search | Manufacturer: SUZUKI, Model Year: 2006, Model line: SX4, Model: SUZUKI SX4 2006 1.GPages: 1556, PDF Size: 37.31 MB
Page 36 of 1556
Downloaded from www.Manualslib.com manuals search engine 0B-5 Maintenance and Lubrication:
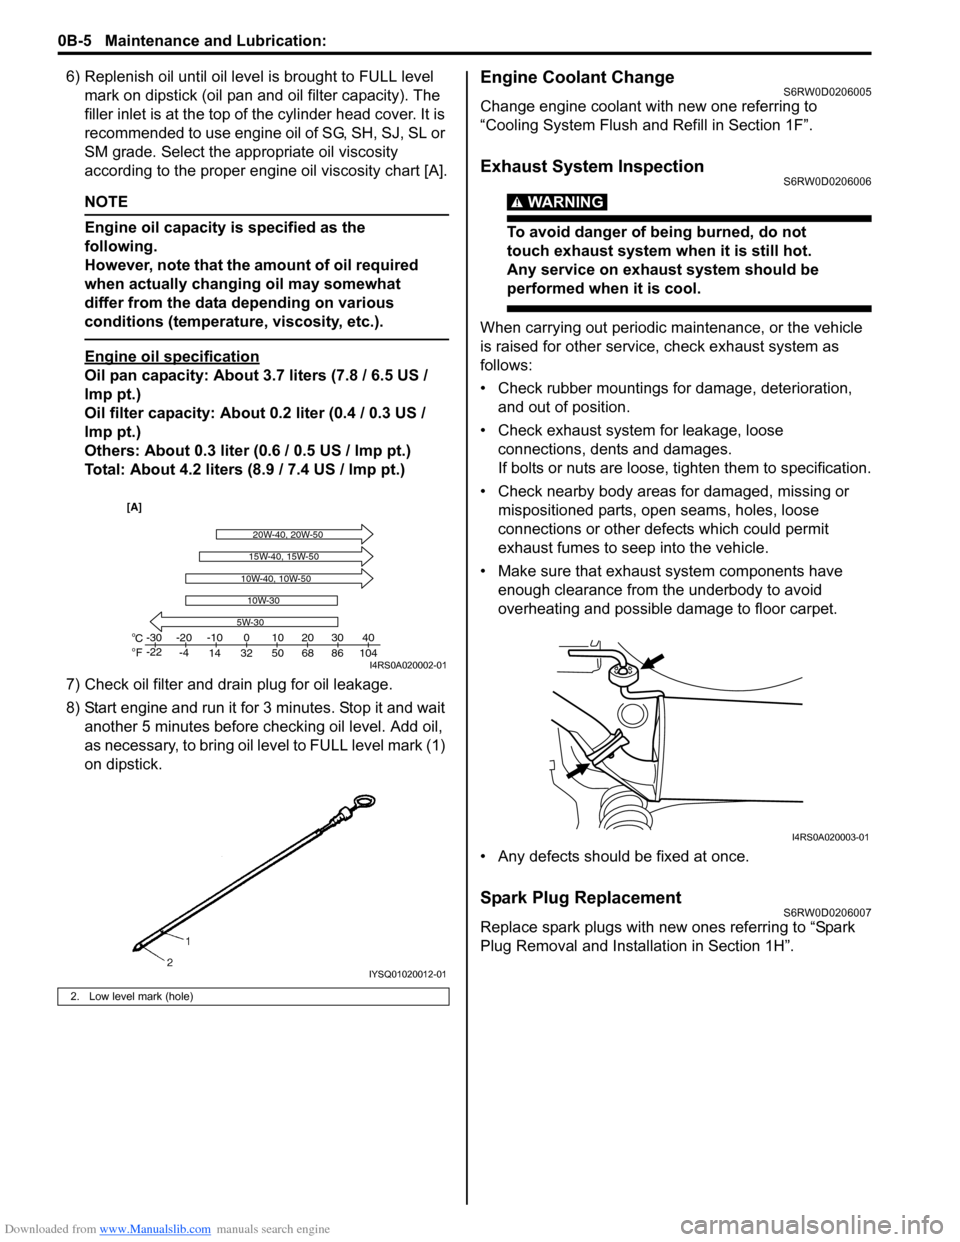
6) Replenish oil until oil level is brought to FULL level
mark on dipstick (oil pan and oil filter capacity). The
filler inlet is at the top of the cylinder head cover. It is
recommended to use engine oil of SG, SH, SJ, SL or
SM grade. Select the appropriate oil viscosity
according to the proper engine oil viscosity chart [A].
NOTE
Engine oil capacity is specified as the
following.
However, note that the amount of oil required
when actually changing oil may somewhat
differ from the data depending on various
conditions (temperature, viscosity, etc.).
Engine oil specification
Oil pan capacity: About 3.7 liters (7.8 / 6.5 US /
lmp pt.)
Oil filter capacity: About 0.2 liter (0.4 / 0.3 US /
lmp pt.)
Others: About 0.3 liter (0.6 / 0.5 US / lmp pt.)
Total: About 4.2 liters (8.9 / 7.4 US / lmp pt.)
7) Check oil filter and drain plug for oil leakage.
8) Start engine and run it for 3 minutes. Stop it and wait
another 5 minutes before checking oil level. Add oil,
as necessary, to bring oil level to FULL level mark (1)
on dipstick.
Engine Coolant ChangeS6RW0D0206005
Change engine coolant with new one referring to
“Cooling System Flush and Refill in Section 1F”.
Exhaust System InspectionS6RW0D0206006
WARNING!
To avoid danger of being burned, do not
touch exhaust system when it is still hot.
Any service on exhaust system should be
performed when it is cool.
When carrying out periodic maintenance, or the vehicle
is raised for other service, check exhaust system as
follows:
• Check rubber mountings for damage, deterioration,
and out of position.
• Check exhaust system for leakage, loose
connections, dents and damages.
If bolts or nuts are loose, tighten them to specification.
• Check nearby body areas for damaged, missing or
mispositioned parts, open seams, holes, loose
connections or other defects which could permit
exhaust fumes to seep into the vehicle.
• Make sure that exhaust system components have
enough clearance from the underbody to avoid
overheating and possible damage to floor carpet.
• Any defects should be fixed at once.
Spark Plug ReplacementS6RW0D0206007
Replace spark plugs with new ones referring to “Spark
Plug Removal and Installation in Section 1H”.
2. Low level mark (hole)
C
Fo o-30
-22-20
-4-10
14 32 50 68 86 104010203040
5W-30
20W-40, 20W-50
10W-30
15W-40, 15W-50
10W-40, 10W-50
[A]
I4RS0A020002-01
IYSQ01020012-01
I4RS0A020003-01
Page 48 of 1556
Downloaded from www.Manualslib.com manuals search engine 1-iv Table of Contents
Crankshaft Inspection .......................................1D-63
Main Bearings Inspection ..................................1D-65
Sensor Plate Inspection ....................................1D-70
Rear Oil Seal Inspection ...................................1D-70
Flywheel Inspection...........................................1D-70
Cylinder Block Inspection ..................................1D-70
Specifications .....................................................1D-71
Tightening Torque Specifications ......................1D-71
Special Tools and Equipment ...........................1D-73
Recommended Service Material .......................1D-73
Special Tool ......................................................1D-73
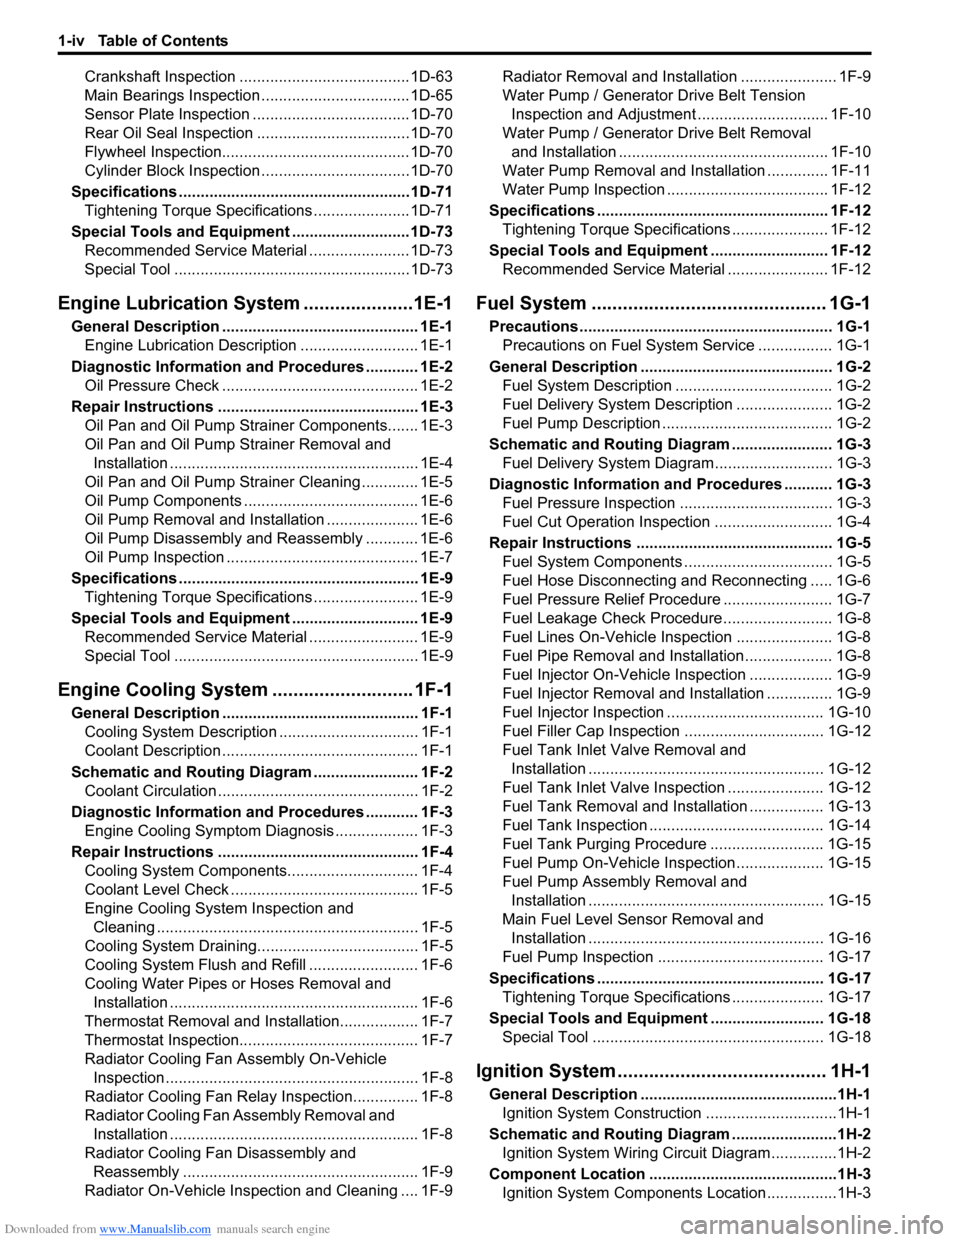
Engine Lubrication System.....................1E-1
General Description ............................................. 1E-1
Engine Lubrication Description ........................... 1E-1
Diagnostic Information and Procedures ............ 1E-2
Oil Pressure Check ............................................. 1E-2
Repair Instructions .............................................. 1E-3
Oil Pan and Oil Pump Strainer Components....... 1E-3
Oil Pan and Oil Pump Strainer Removal and
Installation ......................................................... 1E-4
Oil Pan and Oil Pump Strainer Cleaning ............. 1E-5
Oil Pump Components ........................................ 1E-6
Oil Pump Removal and Installation ..................... 1E-6
Oil Pump Disassembly and Reassembly ............ 1E-6
Oil Pump Inspection ............................................ 1E-7
Specifications ....................................................... 1E-9
Tightening Torque Specifications ........................ 1E-9
Special Tools and Equipment ............................. 1E-9
Recommended Service Material ......................... 1E-9
Special Tool ........................................................ 1E-9
Engine Cooling System ........................... 1F-1
General Description ............................................. 1F-1
Cooling System Description ................................ 1F-1
Coolant Description ............................................. 1F-1
Schematic and Routing Diagram ........................ 1F-2
Coolant Circulation .............................................. 1F-2
Diagnostic Information and Procedures ............ 1F-3
Engine Cooling Symptom Diagnosis ................... 1F-3
Repair Instructions .............................................. 1F-4
Cooling System Components.............................. 1F-4
Coolant Level Check ........................................... 1F-5
Engine Cooling System Inspection and
Cleaning ............................................................ 1F-5
Cooling System Draining..................................... 1F-5
Cooling System Flush and Refill ......................... 1F-6
Cooling Water Pipes or Hoses Removal and
Installation ......................................................... 1F-6
Thermostat Removal and Installation.................. 1F-7
Thermostat Inspection......................................... 1F-7
Radiator Cooling Fan Assembly On-Vehicle
Inspection .......................................................... 1F-8
Radiator Cooling Fan Relay Inspection............... 1F-8
Radiator Cooling Fan Assembly Removal and
Installation ......................................................... 1F-8
Radiator Cooling Fan Disassembly and
Reassembly ...................................................... 1F-9
Radiator On-Vehicle Inspection and Cleaning .... 1F-9Radiator Removal and Installation ...................... 1F-9
Water Pump / Generator Drive Belt Tension
Inspection and Adjustment.............................. 1F-10
Water Pump / Generator Drive Belt Removal
and Installation ................................................ 1F-10
Water Pump Removal and Installation .............. 1F-11
Water Pump Inspection ..................................... 1F-12
Specifications ..................................................... 1F-12
Tightening Torque Specifications ...................... 1F-12
Special Tools and Equipment ........................... 1F-12
Recommended Service Material ....................... 1F-12
Fuel System ............................................. 1G-1
Precautions .......................................................... 1G-1
Precautions on Fuel System Service ................. 1G-1
General Description ............................................ 1G-2
Fuel System Description .................................... 1G-2
Fuel Delivery System Description ...................... 1G-2
Fuel Pump Description ....................................... 1G-2
Schematic and Routing Diagram ....................... 1G-3
Fuel Delivery System Diagram........................... 1G-3
Diagnostic Information and Procedures ........... 1G-3
Fuel Pressure Inspection ................................... 1G-3
Fuel Cut Operation Inspection ........................... 1G-4
Repair Instructions ............................................. 1G-5
Fuel System Components .................................. 1G-5
Fuel Hose Disconnecting and Reconnecting ..... 1G-6
Fuel Pressure Relief Procedure ......................... 1G-7
Fuel Leakage Check Procedure......................... 1G-8
Fuel Lines On-Vehicle Inspection ...................... 1G-8
Fuel Pipe Removal and Installation.................... 1G-8
Fuel Injector On-Vehicle Inspection ................... 1G-9
Fuel Injector Removal and Installation ............... 1G-9
Fuel Injector Inspection .................................... 1G-10
Fuel Filler Cap Inspection ................................ 1G-12
Fuel Tank Inlet Valve Removal and
Installation ...................................................... 1G-12
Fuel Tank Inlet Valve Inspection ...................... 1G-12
Fuel Tank Removal and Installation ................. 1G-13
Fuel Tank Inspection ........................................ 1G-14
Fuel Tank Purging Procedure .......................... 1G-15
Fuel Pump On-Vehicle Inspection.................... 1G-15
Fuel Pump Assembly Removal and
Installation ...................................................... 1G-15
Main Fuel Level Sensor Removal and
Installation ...................................................... 1G-16
Fuel Pump Inspection ...................................... 1G-17
Specifications .................................................... 1G-17
Tightening Torque Specifications ..................... 1G-17
Special Tools and Equipment .......................... 1G-18
Special Tool ..................................................... 1G-18
Ignition System ........................................ 1H-1
General Description .............................................1H-1
Ignition System Construction ..............................1H-1
Schematic and Routing Diagram ........................1H-2
Ignition System Wiring Circuit Diagram...............1H-2
Component Location ...........................................1H-3
Ignition System Components Location................1H-3
Page 63 of 1556
Downloaded from www.Manualslib.com manuals search engine Engine General Information and Diagnosis: 1A-13
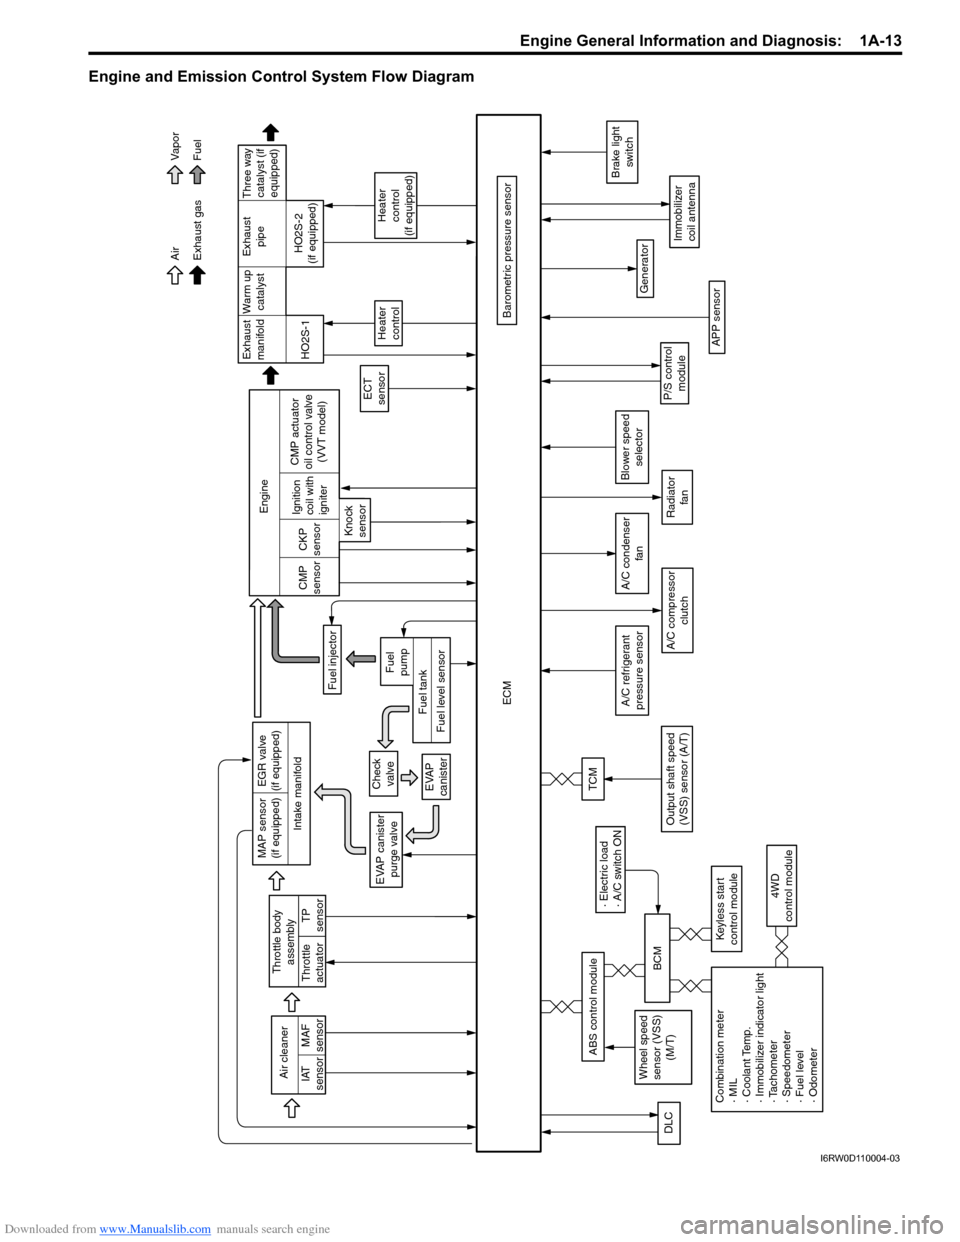
Engine and Emission Control System Flow Diagram
Intake manifoldExhaust
manifold
Exhaust gas Air
Fuel Vapor
War m up
catalystExhaust
pipe
EVAP canister
purge valve
Fuel injector
ECT
sensor
ECM
Heater
control
Heater
control
(if equipped)
Barometric pressure sensor HO2S-1HO2S-2
(if equipped) Engine
CMP
sensorCKP
sensor
Knock
sensorIgnition
coil with
igniter
APP sensor
A/C compressor
clutch
Generator
Immobilizer
coil antenna
P/S control
module
Brake light
switch
Air cleaner
IAT
sensorMAF
sensor
A/C refrigerant
pressure sensor
TP
sensor Throttle body
assembly
Throttle
actuator
A/C condenser
fan
DLC
Radiator
fan
Combination meter
· MIL
· Coolant Temp.
· Immobilizer indicator light
· Tachometer
· Speedometer
· Fuel level
· Odometer4WD
control module
Wheel speed
sensor (VSS)
(M/T)
· Electric load
· A/C switch ON
BCM
Keyless start
control module
ABS control module
Blower speed
selector
MAP sensor
(if equipped)EGR valve
(if equipped)
Check
valve
EVAP
canister
Fuel level sensorFuel tankFuel
pump
CMP actuator
oil control valve
(VVT model)
TCM
Output shaft speed
(VSS) sensor (A/T)
Three way
catalyst (if
equipped)
I6RW0D110004-03
Page 88 of 1556
Downloaded from www.Manualslib.com manuals search engine 1A-38 Engine General Information and Diagnosis:
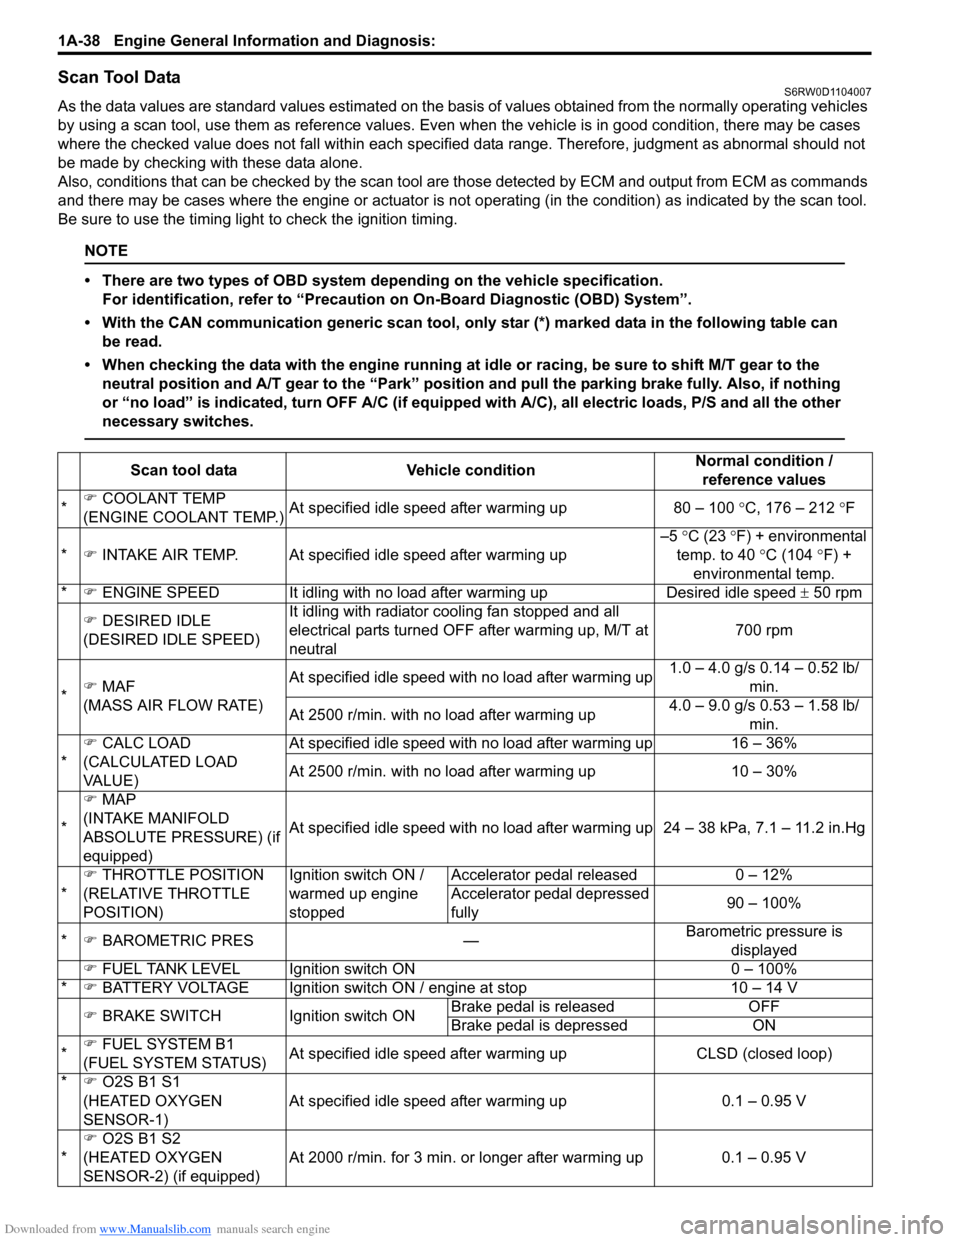
Scan Tool DataS6RW0D1104007
As the data values are standard values estimated on the basis of values obtained from the normally operating vehicles
by using a scan tool, use them as reference values. Even when the vehicle is in good condition, there may be cases
where the checked value does not fall within each specified data range. Therefore, judgment as abnormal should not
be made by checking with these data alone.
Also, conditions that can be checked by the scan tool are those detected by ECM and output from ECM as commands
and there may be cases where the engine or actuator is not operating (in the condition) as indicated by the scan tool.
Be sure to use the timing light to check the ignition timing.
NOTE
• There are two types of OBD system depending on the vehicle specification.
For identification, refer to “Precaution on On-Board Diagnostic (OBD) System”.
• With the CAN communication generic scan tool, only star (*) marked data in the following table can
be read.
• When checking the data with the engine running at idle or racing, be sure to shift M/T gear to the
neutral position and A/T gear to the “Park” position and pull the parking brake fully. Also, if nothing
or “no load” is indicated, turn OFF A/C (if equipped with A/C), all electric loads, P/S and all the other
necessary switches.
Scan tool data Vehicle conditionNormal condition /
reference values
*�) COOLANT TEMP
(ENGINE COOLANT TEMP.)At specified idle speed after warming up 80 – 100 °C, 176 – 212 °F
*�) INTAKE AIR TEMP. At specified idle speed after warming up–5 °C (23 °F) + environmental
temp. to 40 °C (104 °F) +
environmental temp.
*�) ENGINE SPEED It idling with no load after warming up Desired idle speed ± 50 rpm
�) DESIRED IDLE
(DESIRED IDLE SPEED)It idling with radiator cooling fan stopped and all
electrical parts turned OFF after warming up, M/T at
neutral700 rpm
*�) MAF
(MASS AIR FLOW RATE)At specified idle speed with no load after warming up1.0 – 4.0 g/s 0.14 – 0.52 lb/
min.
At 2500 r/min. with no load after warming up4.0 – 9.0 g/s 0.53 – 1.58 lb/
min.
*�) CALC LOAD
(CALCULATED LOAD
VA L U E )At specified idle speed with no load after warming up 16 – 36%
At 2500 r/min. with no load after warming up 10 – 30%
*�) MAP
(INTAKE MANIFOLD
ABSOLUTE PRESSURE) (if
equipped)At specified idle speed with no load after warming up 24 – 38 kPa, 7.1 – 11.2 in.Hg
*�) THROTTLE POSITION
(RELATIVE THROTTLE
POSITION)Ignition switch ON /
warmed up engine
stoppedAccelerator pedal released 0 – 12%
Accelerator pedal depressed
fully90 – 100%
*�) BAROMETRIC PRES —Barometric pressure is
displayed
�) FUEL TANK LEVEL Ignition switch ON 0 – 100%
*�) BATTERY VOLTAGE Ignition switch ON / engine at stop 10 – 14 V
�) BRAKE SWITCH Ignition switch ONBrake pedal is released OFF
Brake pedal is depressed ON
*�) FUEL SYSTEM B1
(FUEL SYSTEM STATUS)At specified idle speed after warming up CLSD (closed loop)
*�) O2S B1 S1
(HEATED OXYGEN
SENSOR-1)At specified idle speed after warming up 0.1 – 0.95 V
*�)
O2S B1 S2
(HEATED OXYGEN
SENSOR-2) (if equipped)At 2000 r/min. for 3 min. or longer after warming up 0.1 – 0.95 V
Page 93 of 1556
Downloaded from www.Manualslib.com manuals search engine Engine General Information and Diagnosis: 1A-43
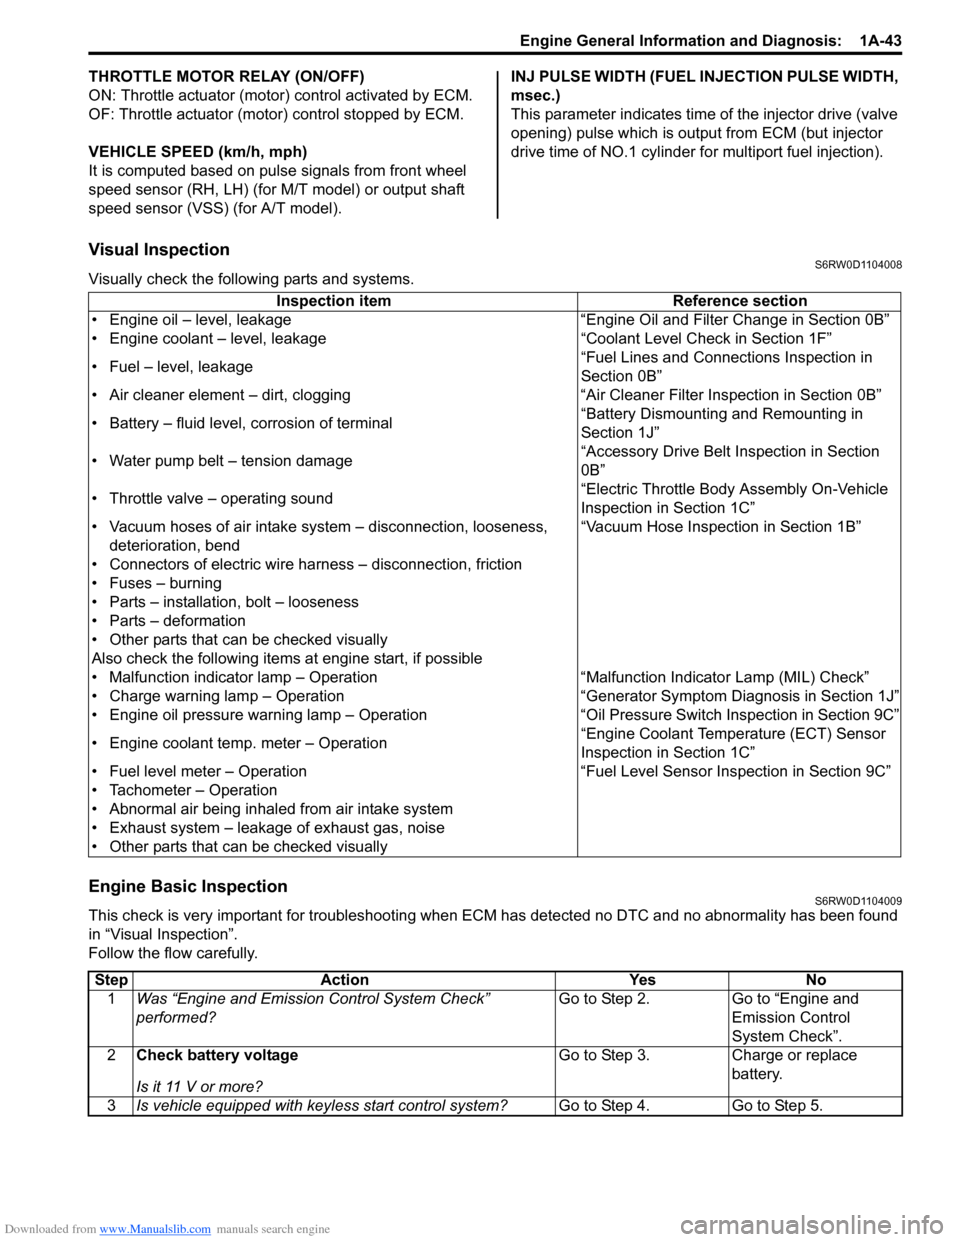
THROTTLE MOTOR RELAY (ON/OFF)
ON: Throttle actuator (motor) control activated by ECM.
OF: Throttle actuator (motor) control stopped by ECM.
VEHICLE SPEED (km/h, mph)
It is computed based on pulse signals from front wheel
speed sensor (RH, LH) (for M/T model) or output shaft
speed sensor (VSS) (for A/T model).INJ PULSE WIDTH (FUEL INJECTION PULSE WIDTH,
msec.)
This parameter indicates time of the injector drive (valve
opening) pulse which is output from ECM (but injector
drive time of NO.1 cylinder for multiport fuel injection).
Visual InspectionS6RW0D1104008
Visually check the following parts and systems.
Engine Basic InspectionS6RW0D1104009
This check is very important for troubleshooting when ECM has detected no DTC and no abnormality has been found
in “Visual Inspection”.
Follow the flow carefully.Inspection item Reference section
• Engine oil – level, leakage “Engine Oil and Filter Change in Section 0B”
• Engine coolant – level, leakage “Coolant Level Check in Section 1F”
• Fuel – level, leakage“Fuel Lines and Connections Inspection in
Section 0B”
• Air cleaner element – dirt, clogging “Air Cleaner Filter Inspection in Section 0B”
• Battery – fluid level, corrosion of terminal“Battery Dismounting and Remounting in
Section 1J”
• Water pump belt – tension damage“Accessory Drive Belt Inspection in Section
0B”
• Throttle valve – operating sound“Electric Throttle Body Assembly On-Vehicle
Inspection in Section 1C”
• Vacuum hoses of air intake system – disconnection, looseness,
deterioration, bend“Vacuum Hose Inspection in Section 1B”
• Connectors of electric wire harness – disconnection, friction
• Fuses – burning
• Parts – installation, bolt – looseness
• Parts – deformation
• Other parts that can be checked visually
Also check the following items at engine start, if possible
• Malfunction indicator lamp – Operation “Malfunction Indicator Lamp (MIL) Check”
• Charge warning lamp – Operation “Generator Symptom Diagnosis in Section 1J”
• Engine oil pressure warning lamp – Operation “Oil Pressure Switch Inspection in Section 9C”
• Engine coolant temp. meter – Operation“Engine Coolant Temperature (ECT) Sensor
Inspection in Section 1C”
• Fuel level meter – Operation “Fuel Level Sensor Inspection in Section 9C”
• Tachometer – Operation
• Abnormal air being inhaled from air intake system
• Exhaust system – leakage of exhaust gas, noise
• Other parts that can be checked visually
Step Action Yes No
1Was “Engine and Emission Control System Check”
performed?Go to Step 2. Go to “Engine and
Emission Control
System Check”.
2Check battery voltage
Is it 11 V or more?Go to Step 3. Charge or replace
battery.
3Is vehicle equipped with keyless start control system?Go to Step 4. Go to Step 5.
Page 114 of 1556

Downloaded from www.Manualslib.com manuals search engine 1A-64 Engine General Information and Diagnosis:
DTC Confirmation Procedure
WARNING!
• When performing a road test, select a place where there is no traffic or possibility of a traffic
accident and be very careful during testing to avoid occurrence of an accident.
• Road test should be carried out by 2 persons, a driver and a tester, on a level road.
NOTE
Check to make sure that the following conditions are satisfied when using this “DTC Confirmation
Procedure”.
• Intake air temperature at engine start: –10 °C (14°F) to 80 °C (176 °F)
• Intake air temperature: –10 °C (14 °F) to 70 °C (158 °F)
• Engine coolant temperature: 70 °C (158 °F) or more
• Altitude (barometric pressure): 2500 m, 8200 ft or less (560 mmHg, 74.4 kPa or more)
1) With ignition switch turned OFF, connect scan tool.
2) Turn ON ignition switch and clear DTC using scan tool.
3) Start engine and warm up to normal operating temperature. (ECT approx. 90 – 95 °C, 194 – 203 °F)
4) Drive vehicle with engine speed: more than 2500 rpm for 1 min.
5) Increase vehicle speed to 100 km/h (62 mile/h) at 5th gear or D range.
6) Release accelerator pedal to decrease vehicle speed to 40 km/h (25 mile/h).
7) Stop vehicle and run it idle for 1 min.
8) Check DTC and pending DTC.
DTC Troubleshooting
NOTE
Before this troubleshooting is performed, read the precautions for DTC troubleshooting referring to
“Precautions for DTC Troubleshooting”.
Step Action Yes No
1Was “Engine and Emission Control System Check”
performed?Go to Step 2. Go to “Engine and
Emission Control
System Check”.
2Visual inspection
Check MAF sensor and air intake system for:
• Objects which block measuring duct and resistor of MAF
sensor.
• Other air flow which does not pass the MAF sensor.
Are they in good condition?Go to Step 3. Repair or replace.
3MAF sensor and its circuit check
1) With ignition switch turned OFF, install scan tool.
2) Start engine and warm up to normal operation
temperature.
3) Check MAF value using scan tool. (Refer to “Scan Tool
Data” for normal value.)
Is each value within specified range?Go to Step 11. Go to Step 4.
Page 131 of 1556

Downloaded from www.Manualslib.com manuals search engine Engine General Information and Diagnosis: 1A-81
DTC Confirmation Procedure
WARNING!
• When performing a road test, select a place where there is no traffic or possibility of a traffic
accident and be very careful during testing to avoid occurrence of an accident.
• Road test should be carried out by 2 persons, a driver and tester, on a level road.
NOTE
Check to make sure that following conditions are satisfied when using this “DTC Confirmation
Procedure”.
• Intake air temperature at engine start: –10 °C (14 °F) to 80 °C (176 °F)
• Intake air temperature: –10 °C (14 °F) to 70 °C (158 °F)
• Altitude (barometric pressure): 2500 m, 8200 ft or less (560 mmHg, 74.4 kPa or more)
1) With ignition switch turned OFF, connect scan tool.
2) Turn ON ignition switch, clear DTC.
3) Start engine.
4) Drive vehicle at 40 mph (60 km/h) or higher for 20 min. or more.
5) Stop vehicle.
6) Check DTC and pending DTC.
DTC Troubleshooting
NOTE
Before this troubleshooting is performed, read the precautions for DTC troubleshooting referring to
“Precautions for DTC Troubleshooting”.
Step Action Yes No
1Was “Engine and Emission Control System Check”
performed?Go to Step 2. Go to “Engine and
Emission Control
System Check”.
2DTC check
1) With ignition switch turned OFF, install scan tool to DLC.
2) Turn ON ignition switch and check DTC with scan tool.
Is DTC P0118 displayed?Go to “DTC P0118:
Engine Coolant
Temperature Circuit
High”.Go to Step 3.
3Engine coolant temp. check
1) Turn ON ignition switch and check engine coolant temp.
displayed on scan tool.
2) Warm up engine to normal operating temp. and check
engine coolant temp. displayed on scan tool.
Does engine coolant temp. vary more than 1
°C (1 °F) and
rise higher than 70
°C (158 °F)?Intermittent trouble.
Check for intermittent
referring to “Intermittent
and Poor Connection
Inspection in Section
00”.Go to Step 4.
4Thermostat check
Is there a symptom due to thermostat remaining open (it
takes a long time before vehicle heater becomes effective or
before engine is warmed to normal operating temp., etc.)?Check thermostat
referring to “Thermostat
Inspection in Section
1F”.Go to Step 5.
Page 143 of 1556
Downloaded from www.Manualslib.com manuals search engine Engine General Information and Diagnosis: 1A-93
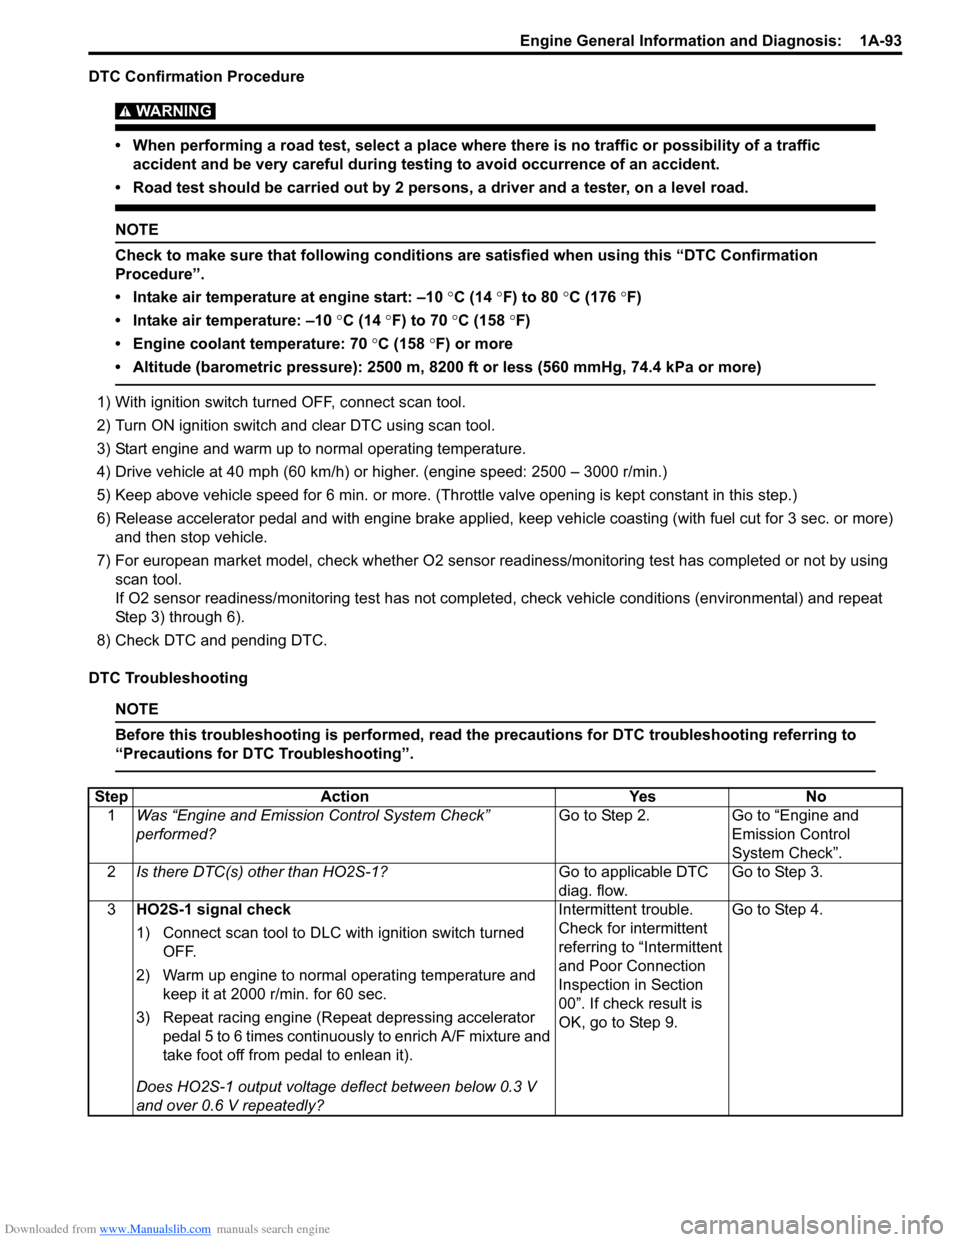
DTC Confirmation Procedure
WARNING!
• When performing a road test, select a place where there is no traffic or possibility of a traffic
accident and be very careful during testing to avoid occurrence of an accident.
• Road test should be carried out by 2 persons, a driver and a tester, on a level road.
NOTE
Check to make sure that following conditions are satisfied when using this “DTC Confirmation
Procedure”.
• Intake air temperature at engine start: –10 °C (14 °F) to 80 °C (176 °F)
• Intake air temperature: –10 °C (14 °F) to 70 °C (158 °F)
• Engine coolant temperature: 70 °C (158 °F) or more
• Altitude (barometric pressure): 2500 m, 8200 ft or less (560 mmHg, 74.4 kPa or more)
1) With ignition switch turned OFF, connect scan tool.
2) Turn ON ignition switch and clear DTC using scan tool.
3) Start engine and warm up to normal operating temperature.
4) Drive vehicle at 40 mph (60 km/h) or higher. (engine speed: 2500 – 3000 r/min.)
5) Keep above vehicle speed for 6 min. or more. (Throttle valve opening is kept constant in this step.)
6) Release accelerator pedal and with engine brake applied, keep vehicle coasting (with fuel cut for 3 sec. or more)
and then stop vehicle.
7) For european market model, check whether O2 sensor readiness/monitoring test has completed or not by using
scan tool.
If O2 sensor readiness/monitoring test has not completed, check vehicle conditions (environmental) and repeat
Step 3) through 6).
8) Check DTC and pending DTC.
DTC Troubleshooting
NOTE
Before this troubleshooting is performed, read the precautions for DTC troubleshooting referring to
“Precautions for DTC Troubleshooting”.
Step Action Yes No
1Was “Engine and Emission Control System Check”
performed?Go to Step 2. Go to “Engine and
Emission Control
System Check”.
2Is there DTC(s) other than HO2S-1?Go to applicable DTC
diag. flow.Go to Step 3.
3HO2S-1 signal check
1) Connect scan tool to DLC with ignition switch turned
OFF.
2) Warm up engine to normal operating temperature and
keep it at 2000 r/min. for 60 sec.
3) Repeat racing engine (Repeat depressing accelerator
pedal 5 to 6 times continuously to enrich A/F mixture and
take foot off from pedal to enlean it).
Does HO2S-1 output voltage deflect between below 0.3 V
and over 0.6 V repeatedly?Intermittent trouble.
Check for intermittent
referring to “Intermittent
and Poor Connection
Inspection in Section
00”. If check result is
OK, go to Step 9.Go to Step 4.
Page 145 of 1556
Downloaded from www.Manualslib.com manuals search engine Engine General Information and Diagnosis: 1A-95
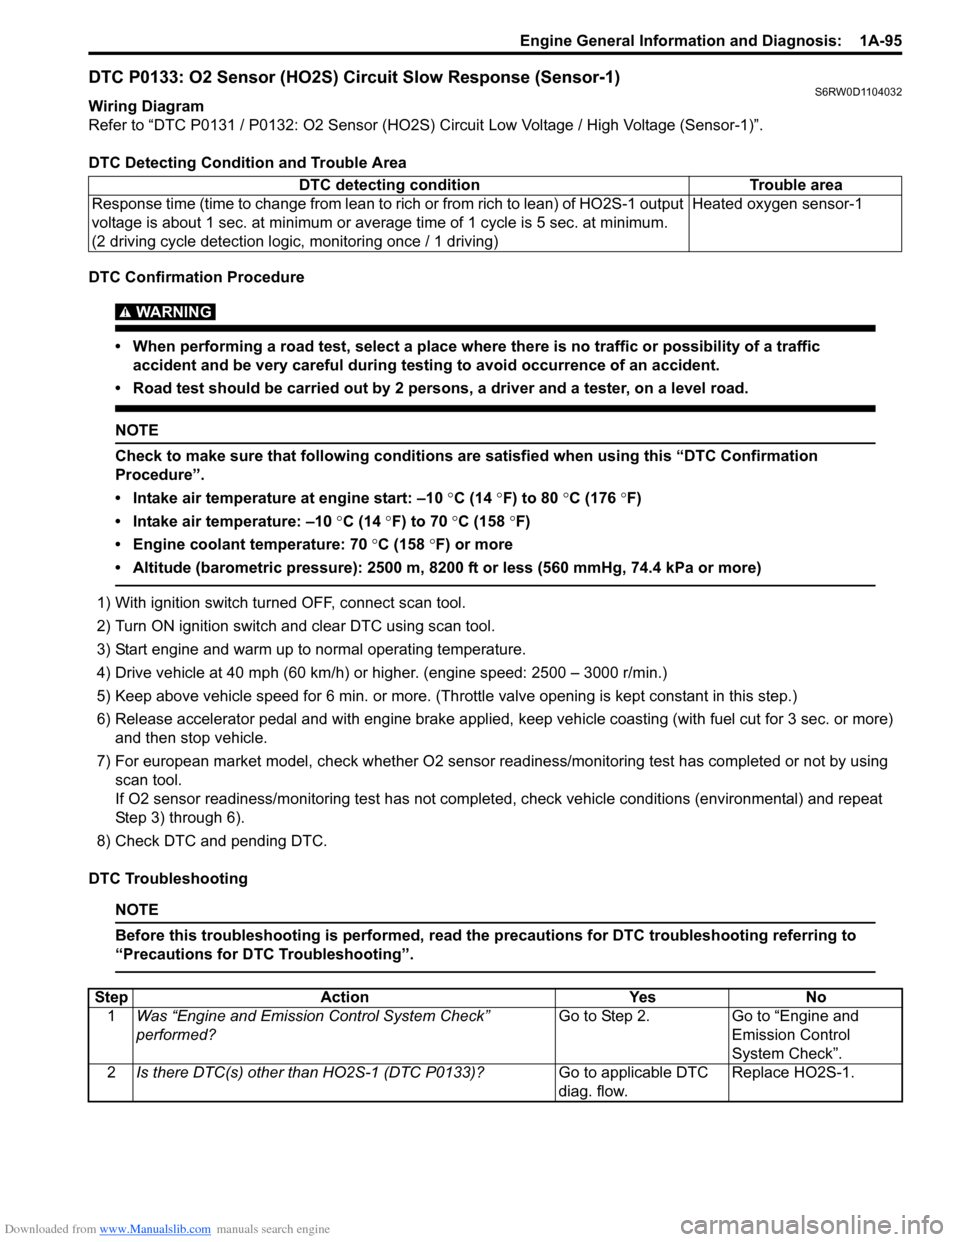
DTC P0133: O2 Sensor (HO2S) Circuit Slow Response (Sensor-1)S6RW0D1104032
Wiring Diagram
Refer to “DTC P0131 / P0132: O2 Sensor (HO2S) Circuit Low Voltage / High Voltage (Sensor-1)”.
DTC Detecting Condition and Trouble Area
DTC Confirmation Procedure
WARNING!
• When performing a road test, select a place where there is no traffic or possibility of a traffic
accident and be very careful during testing to avoid occurrence of an accident.
• Road test should be carried out by 2 persons, a driver and a tester, on a level road.
NOTE
Check to make sure that following conditions are satisfied when using this “DTC Confirmation
Procedure”.
• Intake air temperature at engine start: –10 °C (14 °F) to 80 °C (176 °F)
• Intake air temperature: –10 °C (14 °F) to 70 °C (158 °F)
• Engine coolant temperature: 70 °C (158 °F) or more
• Altitude (barometric pressure): 2500 m, 8200 ft or less (560 mmHg, 74.4 kPa or more)
1) With ignition switch turned OFF, connect scan tool.
2) Turn ON ignition switch and clear DTC using scan tool.
3) Start engine and warm up to normal operating temperature.
4) Drive vehicle at 40 mph (60 km/h) or higher. (engine speed: 2500 – 3000 r/min.)
5) Keep above vehicle speed for 6 min. or more. (Throttle valve opening is kept constant in this step.)
6) Release accelerator pedal and with engine brake applied, keep vehicle coasting (with fuel cut for 3 sec. or more)
and then stop vehicle.
7) For european market model, check whether O2 sensor readiness/monitoring test has completed or not by using
scan tool.
If O2 sensor readiness/monitoring test has not completed, check vehicle conditions (environmental) and repeat
Step 3) through 6).
8) Check DTC and pending DTC.
DTC Troubleshooting
NOTE
Before this troubleshooting is performed, read the precautions for DTC troubleshooting referring to
“Precautions for DTC Troubleshooting”.
DTC detecting condition Trouble area
Response time (time to change from lean to rich or from rich to lean) of HO2S-1 output
voltage is about 1 sec. at minimum or average time of 1 cycle is 5 sec. at minimum.
(2 driving cycle detection logic, monitoring once / 1 driving)Heated oxygen sensor-1
Step Action Yes No
1Was “Engine and Emission Control System Check”
performed?Go to Step 2. Go to “Engine and
Emission Control
System Check”.
2Is there DTC(s) other than HO2S-1 (DTC P0133)?Go to applicable DTC
diag. flow.Replace HO2S-1.
Page 146 of 1556
Downloaded from www.Manualslib.com manuals search engine 1A-96 Engine General Information and Diagnosis:
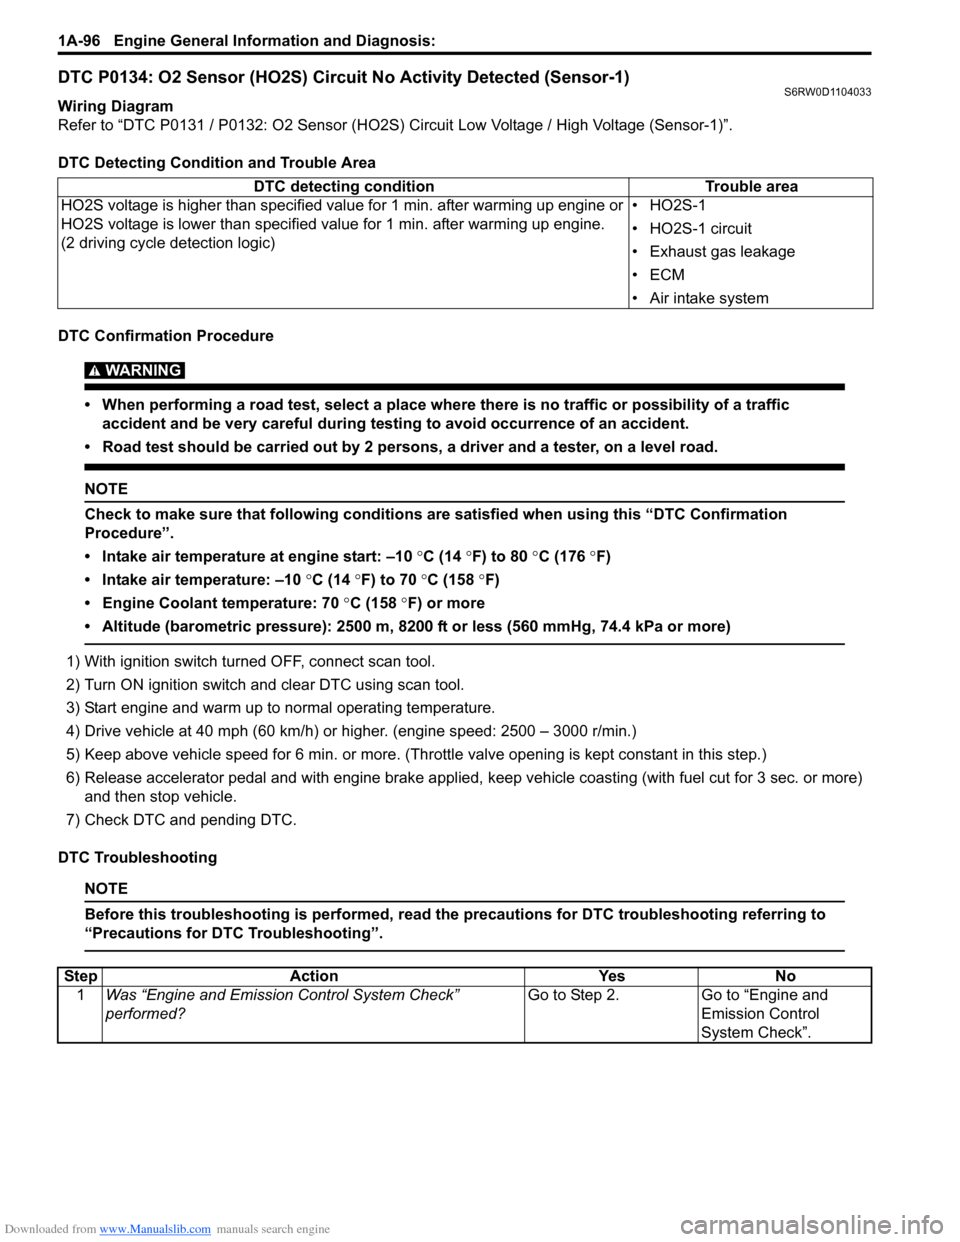
DTC P0134: O2 Sensor (HO2S) Circuit No Activity Detected (Sensor-1)S6RW0D1104033
Wiring Diagram
Refer to “DTC P0131 / P0132: O2 Sensor (HO2S) Circuit Low Voltage / High Voltage (Sensor-1)”.
DTC Detecting Condition and Trouble Area
DTC Confirmation Procedure
WARNING!
• When performing a road test, select a place where there is no traffic or possibility of a traffic
accident and be very careful during testing to avoid occurrence of an accident.
• Road test should be carried out by 2 persons, a driver and a tester, on a level road.
NOTE
Check to make sure that following conditions are satisfied when using this “DTC Confirmation
Procedure”.
• Intake air temperature at engine start: –10 °C (14 °F) to 80 °C (176 °F)
• Intake air temperature: –10 °C (14 °F) to 70 °C (158 °F)
• Engine Coolant temperature: 70 °C (158 °F) or more
• Altitude (barometric pressure): 2500 m, 8200 ft or less (560 mmHg, 74.4 kPa or more)
1) With ignition switch turned OFF, connect scan tool.
2) Turn ON ignition switch and clear DTC using scan tool.
3) Start engine and warm up to normal operating temperature.
4) Drive vehicle at 40 mph (60 km/h) or higher. (engine speed: 2500 – 3000 r/min.)
5) Keep above vehicle speed for 6 min. or more. (Throttle valve opening is kept constant in this step.)
6) Release accelerator pedal and with engine brake applied, keep vehicle coasting (with fuel cut for 3 sec. or more)
and then stop vehicle.
7) Check DTC and pending DTC.
DTC Troubleshooting
NOTE
Before this troubleshooting is performed, read the precautions for DTC troubleshooting referring to
“Precautions for DTC Troubleshooting”.
DTC detecting condition Trouble area
HO2S voltage is higher than specified value for 1 min. after warming up engine or
HO2S voltage is lower than specified value for 1 min. after warming up engine.
(2 driving cycle detection logic)•HO2S-1
• HO2S-1 circuit
• Exhaust gas leakage
•ECM
• Air intake system
Step Action Yes No
1Was “Engine and Emission Control System Check”
performed?Go to Step 2. Go to “Engine and
Emission Control
System Check”.