Parking light SUZUKI SX4 2006 1.G Service Workshop Manual
[x] Cancel search | Manufacturer: SUZUKI, Model Year: 2006, Model line: SX4, Model: SUZUKI SX4 2006 1.GPages: 1556, PDF Size: 37.31 MB
Page 5 of 1556
Downloaded from www.Manualslib.com manuals search engine 00
0
1
2
3
4
5
6
7
8
9
10
11
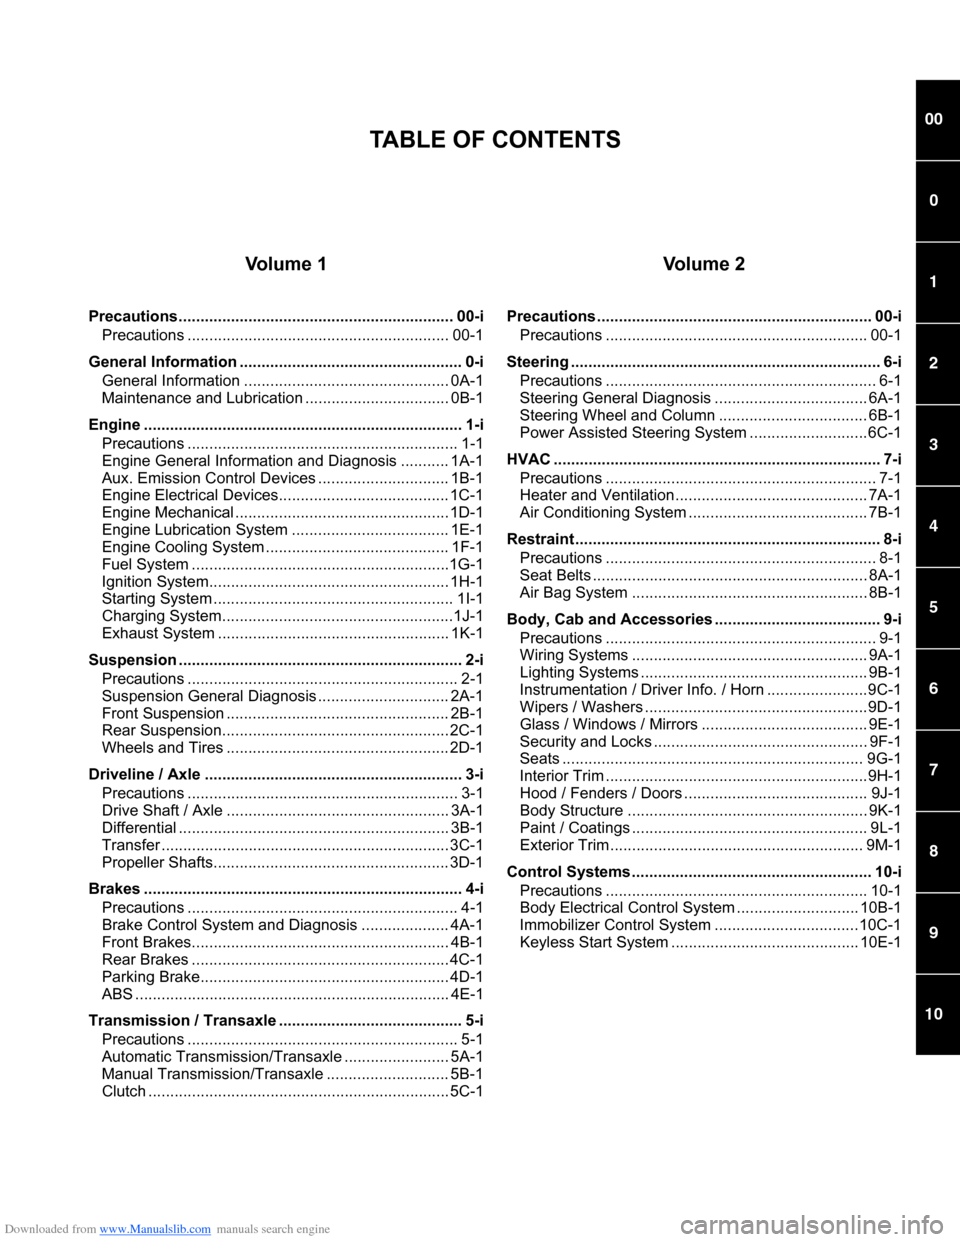
Vo l u m e 1
Precautions............................................................... 00-i
Precautions ............................................................ 00-1
General Information ................................................... 0-i
General Information ............................................... 0A-1
Maintenance and Lubrication ................................. 0B-1
Engine ......................................................................... 1-i
Precautions .............................................................. 1-1
Engine General Information and Diagnosis ........... 1A-1
Aux. Emission Control Devices .............................. 1B-1
Engine Electrical Devices....................................... 1C-1
Engine Mechanical ................................................. 1D-1
Engine Lubrication System .................................... 1E-1
Engine Cooling System .......................................... 1F-1
Fuel System ...........................................................1G-1
Ignition System....................................................... 1H-1
Starting System ....................................................... 1I-1
Charging System.....................................................1J-1
Exhaust System ..................................................... 1K-1
Suspension ................................................................. 2-i
Precautions .............................................................. 2-1
Suspension General Diagnosis .............................. 2A-1
Front Suspension ................................................... 2B-1
Rear Suspension.................................................... 2C-1
Wheels and Tires ................................................... 2D-1
Driveline / Axle ........................................................... 3-i
Precautions .............................................................. 3-1
Drive Shaft / Axle ................................................... 3A-1
Differential .............................................................. 3B-1
Transfer .................................................................. 3C-1
Propeller Shafts...................................................... 3D-1
Brakes ......................................................................... 4-i
Precautions .............................................................. 4-1
Brake Control System and Diagnosis .................... 4A-1
Front Brakes........................................................... 4B-1
Rear Brakes ........................................................... 4C-1
Parking Brake......................................................... 4D-1
ABS ........................................................................ 4E-1
Transmission / Transaxle .......................................... 5-i
Precautions .............................................................. 5-1
Automatic Transmission/Transaxle ........................ 5A-1
Manual Transmission/Transaxle ............................ 5B-1
Clutch ..................................................................... 5C-1
Vo l u m e 2
Precautions ............................................................... 00-i
Precautions ............................................................ 00-1
Steering ....................................................................... 6-i
Precautions .............................................................. 6-1
Steering General Diagnosis ................................... 6A-1
Steering Wheel and Column .................................. 6B-1
Power Assisted Steering System ...........................6C-1
HVAC ........................................................................... 7-i
Precautions .............................................................. 7-1
Heater and Ventilation............................................ 7A-1
Air Conditioning System ......................................... 7B-1
Restraint ...................................................................... 8-i
Precautions .............................................................. 8-1
Seat Belts ............................................................... 8A-1
Air Bag System ...................................................... 8B-1
Body, Cab and Accessories ...................................... 9-i
Precautions .............................................................. 9-1
Wiring Systems ...................................................... 9A-1
Lighting Systems .................................................... 9B-1
Instrumentation / Driver Info. / Horn .......................9C-1
Wipers / Washers ...................................................9D-1
Glass / Windows / Mirrors ...................................... 9E-1
Security and Locks ................................................. 9F-1
Seats ..................................................................... 9G-1
Interior Trim ............................................................9H-1
Hood / Fenders / Doors .......................................... 9J-1
Body Structure ....................................................... 9K-1
Paint / Coatings ...................................................... 9L-1
Exterior Trim .......................................................... 9M-1
Control Systems ....................................................... 10-i
Precautions ............................................................ 10-1
Body Electrical Control System ............................ 10B-1
Immobilizer Control System .................................10C-1
Keyless Start System ........................................... 10E-1
TABLE OF CONTENTS
Page 88 of 1556
Downloaded from www.Manualslib.com manuals search engine 1A-38 Engine General Information and Diagnosis:
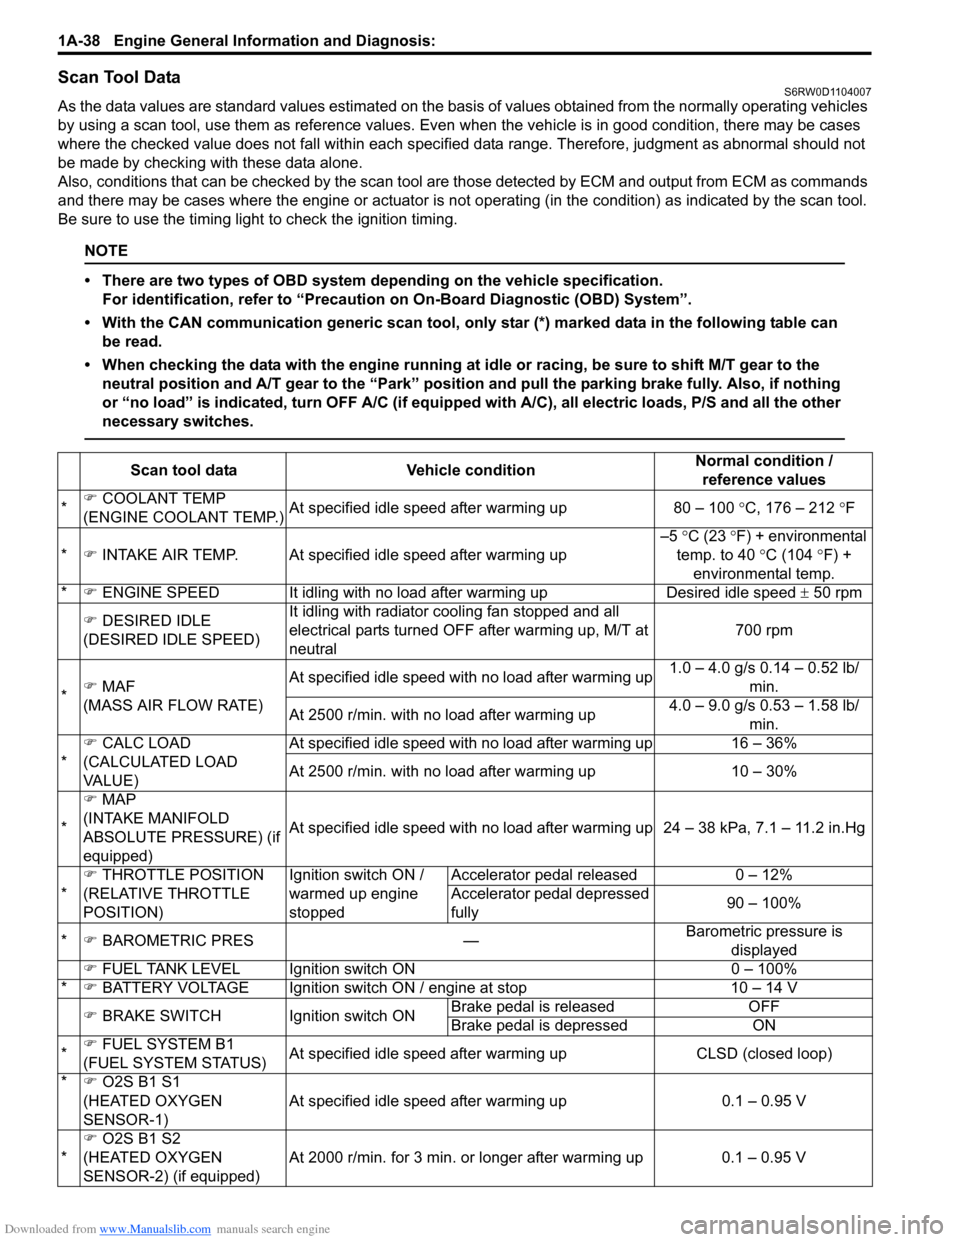
Scan Tool DataS6RW0D1104007
As the data values are standard values estimated on the basis of values obtained from the normally operating vehicles
by using a scan tool, use them as reference values. Even when the vehicle is in good condition, there may be cases
where the checked value does not fall within each specified data range. Therefore, judgment as abnormal should not
be made by checking with these data alone.
Also, conditions that can be checked by the scan tool are those detected by ECM and output from ECM as commands
and there may be cases where the engine or actuator is not operating (in the condition) as indicated by the scan tool.
Be sure to use the timing light to check the ignition timing.
NOTE
• There are two types of OBD system depending on the vehicle specification.
For identification, refer to “Precaution on On-Board Diagnostic (OBD) System”.
• With the CAN communication generic scan tool, only star (*) marked data in the following table can
be read.
• When checking the data with the engine running at idle or racing, be sure to shift M/T gear to the
neutral position and A/T gear to the “Park” position and pull the parking brake fully. Also, if nothing
or “no load” is indicated, turn OFF A/C (if equipped with A/C), all electric loads, P/S and all the other
necessary switches.
Scan tool data Vehicle conditionNormal condition /
reference values
*�) COOLANT TEMP
(ENGINE COOLANT TEMP.)At specified idle speed after warming up 80 – 100 °C, 176 – 212 °F
*�) INTAKE AIR TEMP. At specified idle speed after warming up–5 °C (23 °F) + environmental
temp. to 40 °C (104 °F) +
environmental temp.
*�) ENGINE SPEED It idling with no load after warming up Desired idle speed ± 50 rpm
�) DESIRED IDLE
(DESIRED IDLE SPEED)It idling with radiator cooling fan stopped and all
electrical parts turned OFF after warming up, M/T at
neutral700 rpm
*�) MAF
(MASS AIR FLOW RATE)At specified idle speed with no load after warming up1.0 – 4.0 g/s 0.14 – 0.52 lb/
min.
At 2500 r/min. with no load after warming up4.0 – 9.0 g/s 0.53 – 1.58 lb/
min.
*�) CALC LOAD
(CALCULATED LOAD
VA L U E )At specified idle speed with no load after warming up 16 – 36%
At 2500 r/min. with no load after warming up 10 – 30%
*�) MAP
(INTAKE MANIFOLD
ABSOLUTE PRESSURE) (if
equipped)At specified idle speed with no load after warming up 24 – 38 kPa, 7.1 – 11.2 in.Hg
*�) THROTTLE POSITION
(RELATIVE THROTTLE
POSITION)Ignition switch ON /
warmed up engine
stoppedAccelerator pedal released 0 – 12%
Accelerator pedal depressed
fully90 – 100%
*�) BAROMETRIC PRES —Barometric pressure is
displayed
�) FUEL TANK LEVEL Ignition switch ON 0 – 100%
*�) BATTERY VOLTAGE Ignition switch ON / engine at stop 10 – 14 V
�) BRAKE SWITCH Ignition switch ONBrake pedal is released OFF
Brake pedal is depressed ON
*�) FUEL SYSTEM B1
(FUEL SYSTEM STATUS)At specified idle speed after warming up CLSD (closed loop)
*�) O2S B1 S1
(HEATED OXYGEN
SENSOR-1)At specified idle speed after warming up 0.1 – 0.95 V
*�)
O2S B1 S2
(HEATED OXYGEN
SENSOR-2) (if equipped)At 2000 r/min. for 3 min. or longer after warming up 0.1 – 0.95 V
Page 262 of 1556
Downloaded from www.Manualslib.com manuals search engine 1A-212 Engine General Information and Diagnosis:
Repair Instructions
Idle Speed and IAC Throttle Valve Opening
Inspection
S6RW0D1106001
Before idle speed check, make sure of the following.
• Lead wires and hoses of electronic fuel injection and
engine and emission control systems are connected
securely.
• Valve lash is checked according to maintenance
schedule.
• Ignition timing is within specification.
• All accessories (wipers, heater, lights, A/C, etc.) are
out of service.
• Air cleaner has been properly installed and is in good
condition.
• No abnormal air drawn in from air intake system.After all items are confirmed, check idle speed and IAC
throttle opening as follows.NOTE
Before starting engine, place transmission
gear shift lever in “Neutral”, and set parking
brake and block drive wheels.
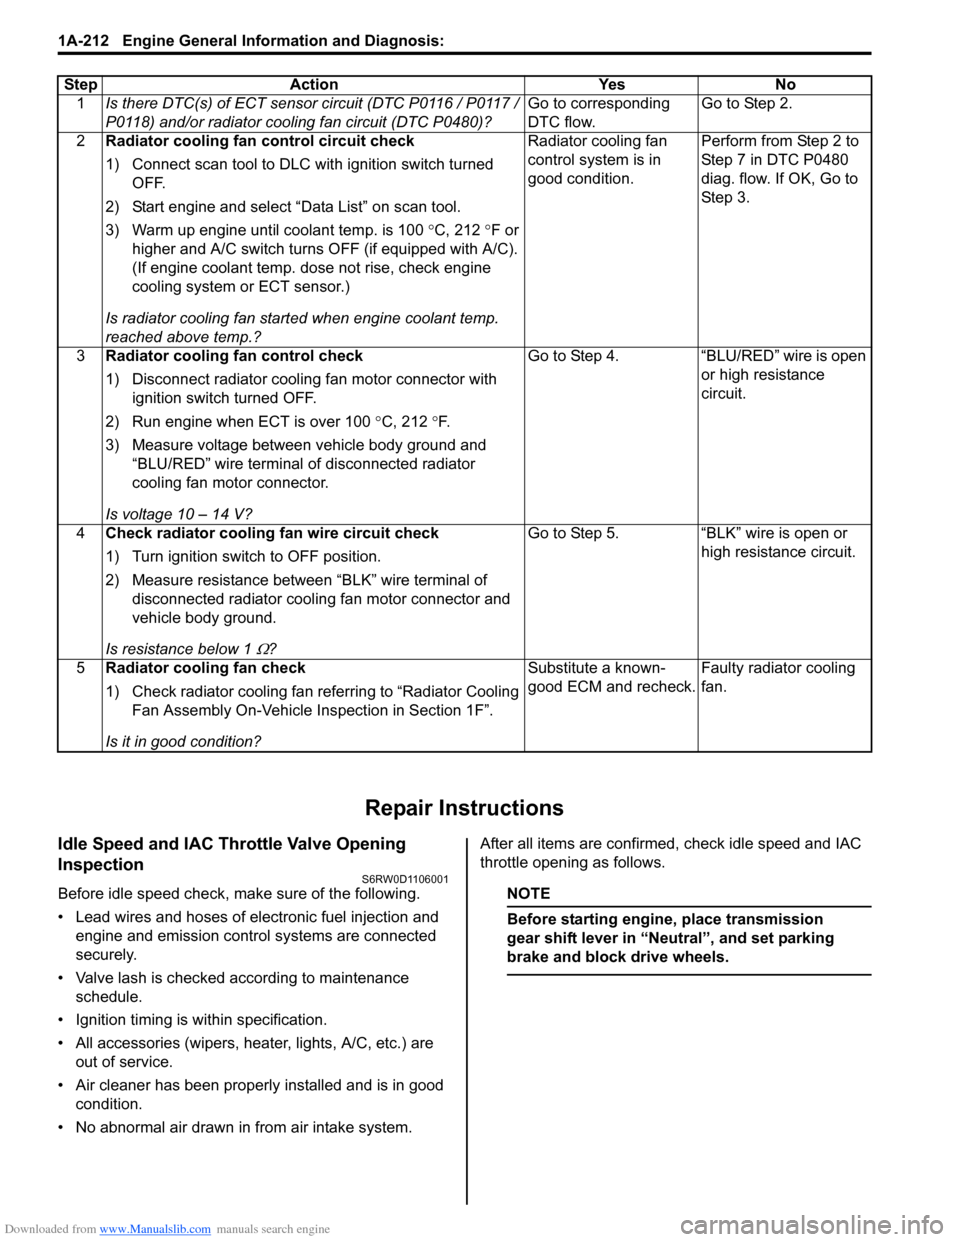
Step Action Yes No
1Is there DTC(s) of ECT sensor circuit (DTC P0116 / P0117 /
P0118) and/or radiator cooling fan circuit (DTC P0480)?Go to corresponding
DTC flow.Go to Step 2.
2Radiator cooling fan control circuit check
1) Connect scan tool to DLC with ignition switch turned
OFF.
2) Start engine and select “Data List” on scan tool.
3) Warm up engine until coolant temp. is 100 °C, 212 °F or
higher and A/C switch turns OFF (if equipped with A/C).
(If engine coolant temp. dose not rise, check engine
cooling system or ECT sensor.)
Is radiator cooling fan started when engine coolant temp.
reached above temp.?Radiator cooling fan
control system is in
good condition.Perform from Step 2 to
Step 7 in DTC P0480
diag. flow. If OK, Go to
Ste p 3.
3Radiator cooling fan control check
1) Disconnect radiator cooling fan motor connector with
ignition switch turned OFF.
2) Run engine when ECT is over 100 °C, 212 °F.
3) Measure voltage between vehicle body ground and
“BLU/RED” wire terminal of disconnected radiator
cooling fan motor connector.
Is voltage 10 – 14 V?Go to Step 4. “BLU/RED” wire is open
or high resistance
circuit.
4Check radiator cooling fan wire circuit check
1) Turn ignition switch to OFF position.
2) Measure resistance between “BLK” wire terminal of
disconnected radiator cooling fan motor connector and
vehicle body ground.
Is resistance below 1
Ω?Go to Step 5. “BLK” wire is open or
high resistance circuit.
5Radiator cooling fan check
1) Check radiator cooling fan referring to “Radiator Cooling
Fan Assembly On-Vehicle Inspection in Section 1F”.
Is it in good condition?Substitute a known-
good ECM and recheck.Faulty radiator cooling
fan.
Page 287 of 1556
Downloaded from www.Manualslib.com manuals search engine Engine Mechanical: 1D-5
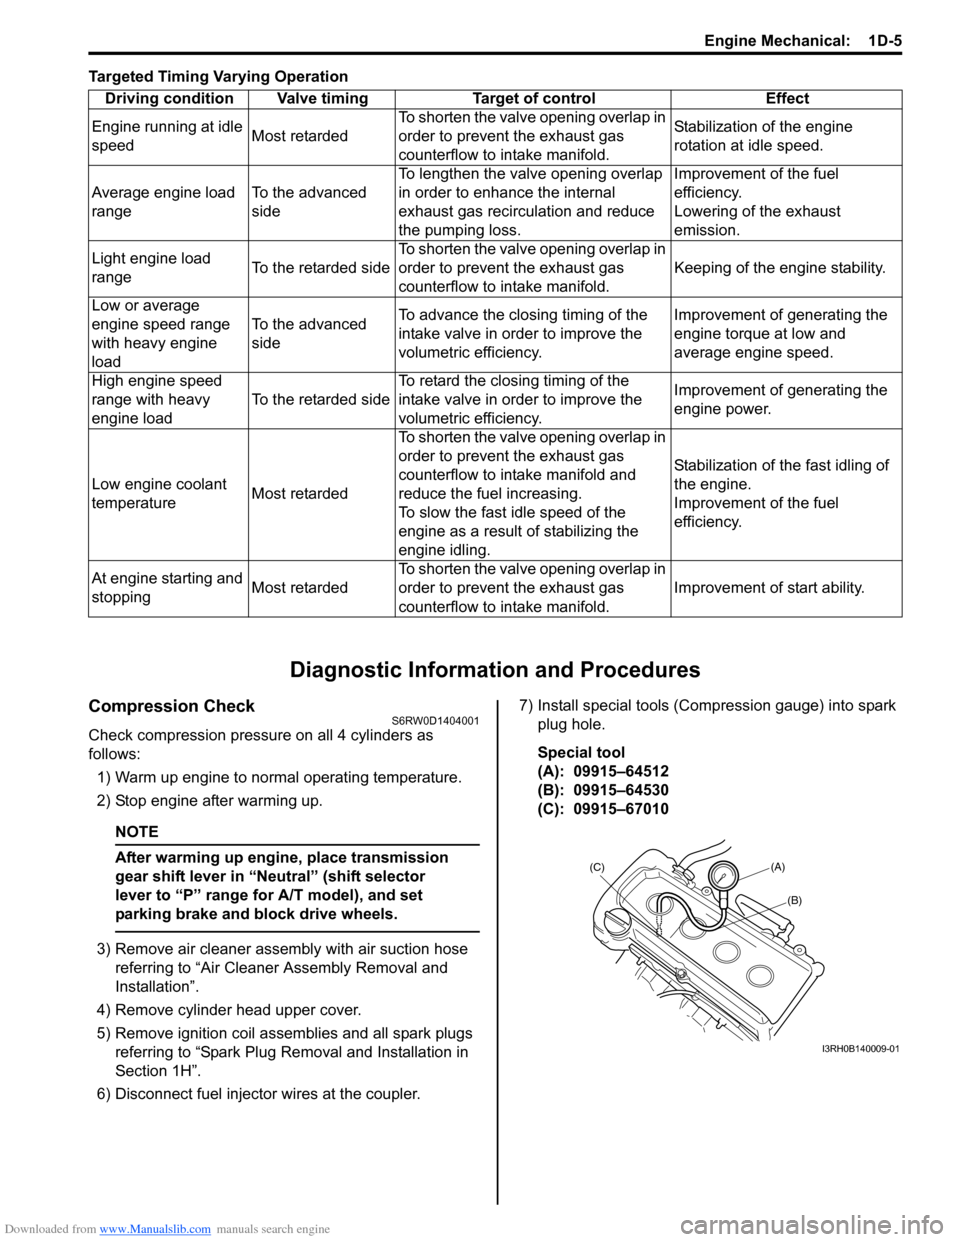
Targeted Timing Varying Operation
Diagnostic Information and Procedures
Compression CheckS6RW0D1404001
Check compression pressure on all 4 cylinders as
follows:
1) Warm up engine to normal operating temperature.
2) Stop engine after warming up.
NOTE
After warming up engine, place transmission
gear shift lever in “Neutral” (shift selector
lever to “P” range for A/T model), and set
parking brake and block drive wheels.
3) Remove air cleaner assembly with air suction hose
referring to “Air Cleaner Assembly Removal and
Installation”.
4) Remove cylinder head upper cover.
5) Remove ignition coil assemblies and all spark plugs
referring to “Spark Plug Removal and Installation in
Section 1H”.
6) Disconnect fuel injector wires at the coupler.7) Install special tools (Compression gauge) into spark
plug hole.
Special tool
(A): 09915–64512
(B): 09915–64530
(C): 09915–67010 Driving condition Valve timing Target of control Effect
Engine running at idle
speedMost retardedTo shorten the valve opening overlap in
order to prevent the exhaust gas
counterflow to intake manifold.Stabilization of the engine
rotation at idle speed.
Average engine load
rangeTo the advanced
sideTo lengthen the valve opening overlap
in order to enhance the internal
exhaust gas recirculation and reduce
the pumping loss.Improvement of the fuel
efficiency.
Lowering of the exhaust
emission.
Light engine load
rangeTo the retarded sideTo shorten the valve opening overlap in
order to prevent the exhaust gas
counterflow to intake manifold.Keeping of the engine stability.
Low or average
engine speed range
with heavy engine
loadTo the advanced
sideTo advance the closing timing of the
intake valve in order to improve the
volumetric efficiency.Improvement of generating the
engine torque at low and
average engine speed.
High engine speed
range with heavy
engine loadTo the retarded sideTo retard the closing timing of the
intake valve in order to improve the
volumetric efficiency.Improvement of generating the
engine power.
Low engine coolant
temperatureMost retardedTo shorten the valve opening overlap in
order to prevent the exhaust gas
counterflow to intake manifold and
reduce the fuel increasing.
To slow the fast idle speed of the
engine as a result of stabilizing the
engine idling.Stabilization of the fast idling of
the engine.
Improvement of the fuel
efficiency.
At engine starting and
stoppingMost retardedTo shorten the valve opening overlap in
order to prevent the exhaust gas
counterflow to intake manifold.Improvement of start ability.
(A)
(C)
(B)
I3RH0B140009-01
Page 288 of 1556
Downloaded from www.Manualslib.com manuals search engine 1D-6 Engine Mechanical:
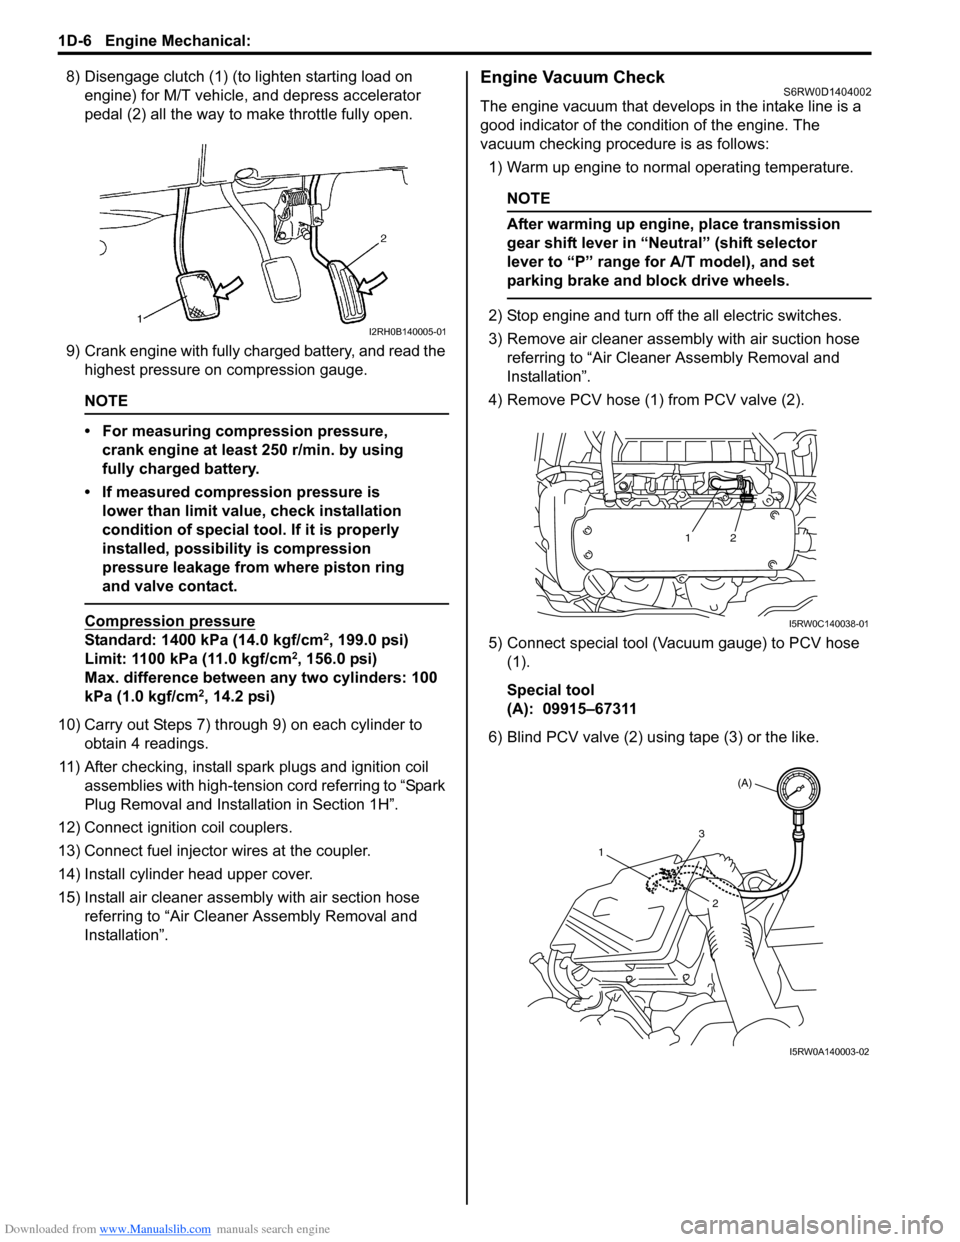
8) Disengage clutch (1) (to lighten starting load on
engine) for M/T vehicle, and depress accelerator
pedal (2) all the way to make throttle fully open.
9) Crank engine with fully charged battery, and read the
highest pressure on compression gauge.
NOTE
• For measuring compression pressure,
crank engine at least 250 r/min. by using
fully charged battery.
• If measured compression pressure is
lower than limit value, check installation
condition of special tool. If it is properly
installed, possibility is compression
pressure leakage from where piston ring
and valve contact.
Compression pressure
Standard: 1400 kPa (14.0 kgf/cm2, 199.0 psi)
Limit: 1100 kPa (11.0 kgf/cm2, 156.0 psi)
Max. difference between any two cylinders: 100
kPa (1.0 kgf/cm
2, 14.2 psi)
10) Carry out Steps 7) through 9) on each cylinder to
obtain 4 readings.
11) After checking, install spark plugs and ignition coil
assemblies with high-tension cord referring to “Spark
Plug Removal and Installation in Section 1H”.
12) Connect ignition coil couplers.
13) Connect fuel injector wires at the coupler.
14) Install cylinder head upper cover.
15) Install air cleaner assembly with air section hose
referring to “Air Cleaner Assembly Removal and
Installation”.
Engine Vacuum CheckS6RW0D1404002
The engine vacuum that develops in the intake line is a
good indicator of the condition of the engine. The
vacuum checking procedure is as follows:
1) Warm up engine to normal operating temperature.
NOTE
After warming up engine, place transmission
gear shift lever in “Neutral” (shift selector
lever to “P” range for A/T model), and set
parking brake and block drive wheels.
2) Stop engine and turn off the all electric switches.
3) Remove air cleaner assembly with air suction hose
referring to “Air Cleaner Assembly Removal and
Installation”.
4) Remove PCV hose (1) from PCV valve (2).
5) Connect special tool (Vacuum gauge) to PCV hose
(1).
Special tool
(A): 09915–67311
6) Blind PCV valve (2) using tape (3) or the like.I2RH0B140005-01
12
I5RW0C140038-01
(A)
1
2
3
I5RW0A140003-02
Page 421 of 1556
Downloaded from www.Manualslib.com manuals search engine Charging System: 1J-7
1) Set parking brake and place automatic transaxle in
PARK (NEUTRAL on manual transaxle). Turn off
ignition, turn off lights and all other electrical loads.
2) Check electrolyte level. If it is below low level line,
add distilled water.
3) Attach end of one jumper cable to positive terminal
of booster battery and the other end of the same
cable to positive terminal of discharged battery. (Use
12-volt battery only to jump start engine).
4) Attach one end of the remaining negative cable to
negative terminal of booster battery, and the other
end to a solid engine ground (such as exhaust
manifold) at least 45 cm (18 in.) away from battery of
vehicle being started.
5) Start engine of vehicle with booster battery and turn
off electrical accessories. Then start engine of the
vehicle with discharged battery.
6) Disconnect jumper cables in the exact reverse order.
With Charging Equipment
CAUTION!
When jump starting engine with charging
equipment, be sure equipment used is 12-
volt and negative ground. Do not use 24-volt
charging equipment. Using such equipment
can cause serious damage to electrical
system or electronic parts.
Battery Dismounting and RemountingS6RW0D1A06002
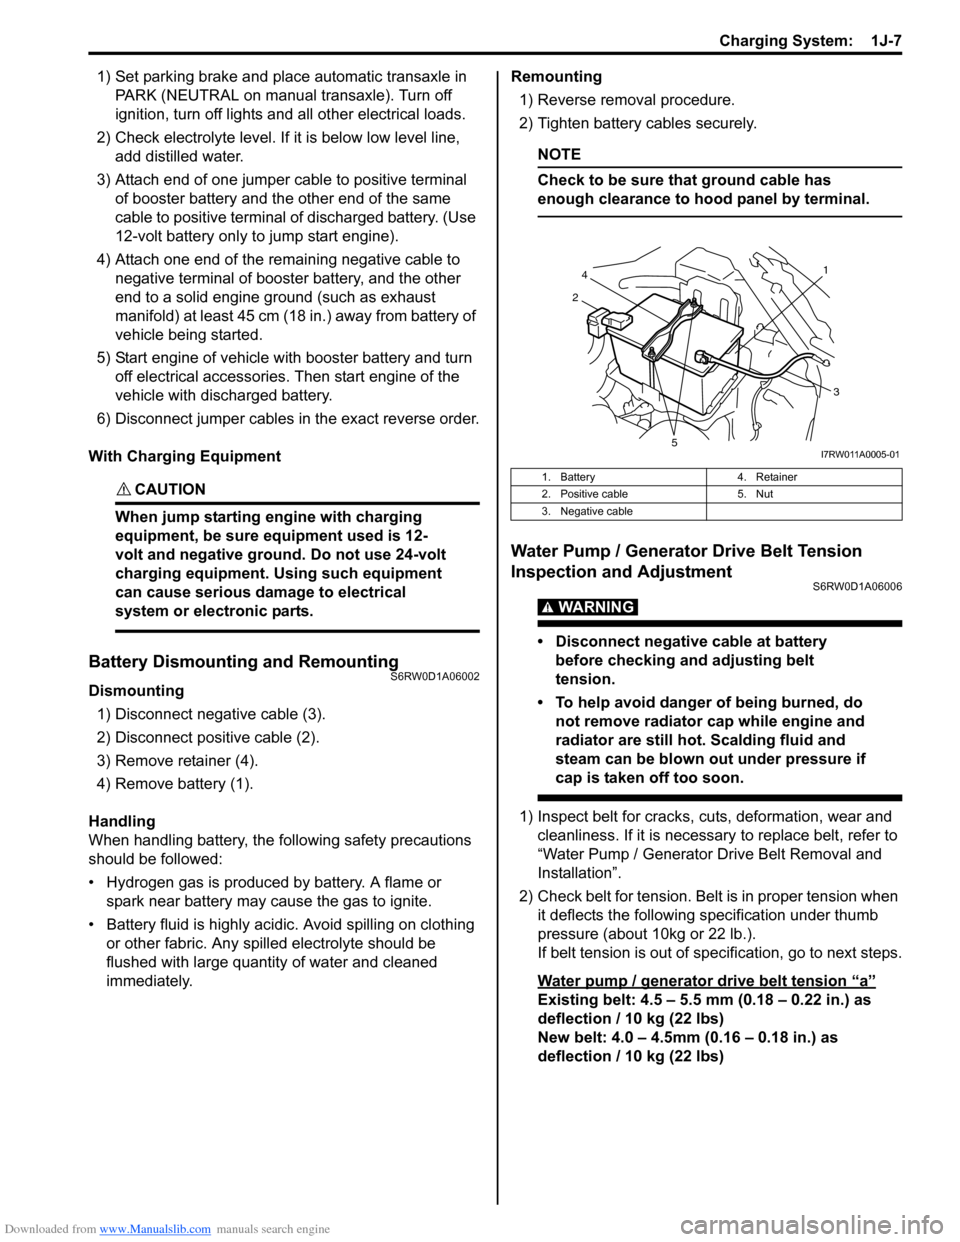
Dismounting
1) Disconnect negative cable (3).
2) Disconnect positive cable (2).
3) Remove retainer (4).
4) Remove battery (1).
Handling
When handling battery, the following safety precautions
should be followed:
• Hydrogen gas is produced by battery. A flame or
spark near battery may cause the gas to ignite.
• Battery fluid is highly acidic. Avoid spilling on clothing
or other fabric. Any spilled electrolyte should be
flushed with large quantity of water and cleaned
immediately.Remounting
1) Reverse removal procedure.
2) Tighten battery cables securely.
NOTE
Check to be sure that ground cable has
enough clearance to hood panel by terminal.
Water Pump / Generator Drive Belt Tension
Inspection and Adjustment
S6RW0D1A06006
WARNING!
• Disconnect negative cable at battery
before checking and adjusting belt
tension.
• To help avoid danger of being burned, do
not remove radiator cap while engine and
radiator are still hot. Scalding fluid and
steam can be blown out under pressure if
cap is taken off too soon.
1) Inspect belt for cracks, cuts, deformation, wear and
cleanliness. If it is necessary to replace belt, refer to
“Water Pump / Generator Drive Belt Removal and
Installation”.
2) Check belt for tension. Belt is in proper tension when
it deflects the following specification under thumb
pressure (about 10kg or 22 lb.).
If belt tension is out of specification, go to next steps.
Water pump / generator drive belt tension
“a”
Existing belt: 4.5 – 5.5 mm (0.18 – 0.22 in.) as
deflection / 10 kg (22 lbs)
New belt: 4.0 – 4.5mm (0.16 – 0.18 in.) as
deflection / 10 kg (22 lbs)
1. Battery 4. Retainer
2. Positive cable 5. Nut
3. Negative cable
21
4
3
5I7RW011A0005-01
Page 569 of 1556
Downloaded from www.Manualslib.com manuals search engine Table of Contents 4- i
4
Section 4
CONTENTS
Brakes
Precautions ................................................. 4-1
Precautions............................................................. 4-1
Precautions for Brakes .......................................... 4-1
Brake Control System and Diagnosis ... 4A-1
Precautions........................................................... 4A-1
Precautions on Brake .......................................... 4A-1
General Description ............................................. 4A-1
Brakes Construction ............................................ 4A-1
Brake Pedal Foot Protection System
Construction (If Equipped) ................................ 4A-2
Front Brake Hose / Pipe Construction................. 4A-3
Rear Brake Hose / Pipe Construction ................. 4A-4
Diagnostic Information and Procedures ............ 4A-4
Brakes Diagnosis Note ....................................... 4A-4
Brakes Symptom Diagnosis ................................ 4A-5
Repair Instructions .............................................. 4A-7
Brake Pedal Components ................................... 4A-7
Brake Pedal Free Height Inspection ................... 4A-7
Brake Pedal Play Inspection ............................... 4A-7
Excessive Pedal Travel Inspection ..................... 4A-7
Brake Fluid Level Inspection ............................... 4A-8
Brake Light Switch Adjustment ........................... 4A-8
Air Bleeding of Brake System ............................. 4A-8
Front Brake Hose / Pipe Removal and
Installation ......................................................... 4A-9
Rear Brake Hose / Pipe Removal and
Installation ....................................................... 4A-10
Brake Hose and Pipe Inspection ....................... 4A-10
Master Cylinder and Brake Booster
Components.................................................... 4A-11
Master Cylinder Reservoir Removal and
Installation ....................................................... 4A-11
Master Cylinder Removal and Installation......... 4A-12
Master Cylinder Inspection ............................... 4A-13
Booster Operation Inspection ........................... 4A-14
Brake Booster Removal and Installation ........... 4A-15
Brake Booster Inspection .................................. 4A-15
Booster Push Clevis Rod Adjustment ............... 4A-16
Specifications..................................................... 4A-16
Tightening Torque Specifications ...................... 4A-16
Special Tools and Equipment ........................... 4A-16
Recommended Service Material ....................... 4A-16
Special Tool ...................................................... 4A-16
Front Brakes ............................................ 4B-1
Repair Instructions ..............................................4B-1
Front Disc Brake Components ............................ 4B-1
Front Disc Brake Pad On-Vehicle Inspection ...... 4B-2
Front Disc Brake Pad Removal and
Installation ......................................................... 4B-2
Front Disc Brake Pad Inspection......................... 4B-3
Front Disc Brake Caliper Removal and
Installation ......................................................... 4B-3
Front Disc Brake Caliper Disassembly and
Assembly........................................................... 4B-4
Front Disc Brake Caliper Inspection.................... 4B-6
Front Brake Disc Removal and Installation ......... 4B-6
Front Brake Disc Inspection ................................ 4B-7
Specifications .......................................................4B-8
Tightening Torque Specifications ........................ 4B-8
Special Tools and Equipment .............................4B-8
Recommended Service Material ......................... 4B-8
Special Tool ........................................................ 4B-8
Rear Brakes.............................................. 4C-1
Repair Instructions ..............................................4C-1
Rear Drum Brake Components ...........................4C-1
Rear Brake Drum Removal and Installation ........4C-2
Rear Brake Drum and Shoe Inspection ..............4C-2
Rear Brake Shoe On-Vehicle Inspection ............4C-3
Rear Brake Shoe Removal and Installation ........4C-3
Rear Brake Shoe Inspection ...............................4C-4
Wheel Cylinder Removal and Installation ...........4C-4
Wheel Cylinder Inspection ..................................4C-5
Brake Back Plate Removal and Installation ........4C-5
Specifications .......................................................4C-6
Tightening Torque Specifications ........................4C-6
Special Tools and Equipment .............................4C-6
Recommended Service Material .........................4C-6
Parking Brake .......................................... 4D-1
General Description .............................................4D-1
Parking Brake Cable Construction ......................4D-1
Repair Instructions ..............................................4D-2
Parking Brake Inspection and Adjustment ..........4D-2
Parking Brake Cable Removal and
Installation .........................................................4D-2
Parking Brake Lever Removal and Installation ....4D-3
Page 577 of 1556
Downloaded from www.Manualslib.com manuals search engine Brake Control System and Diagnosis: 4A-6
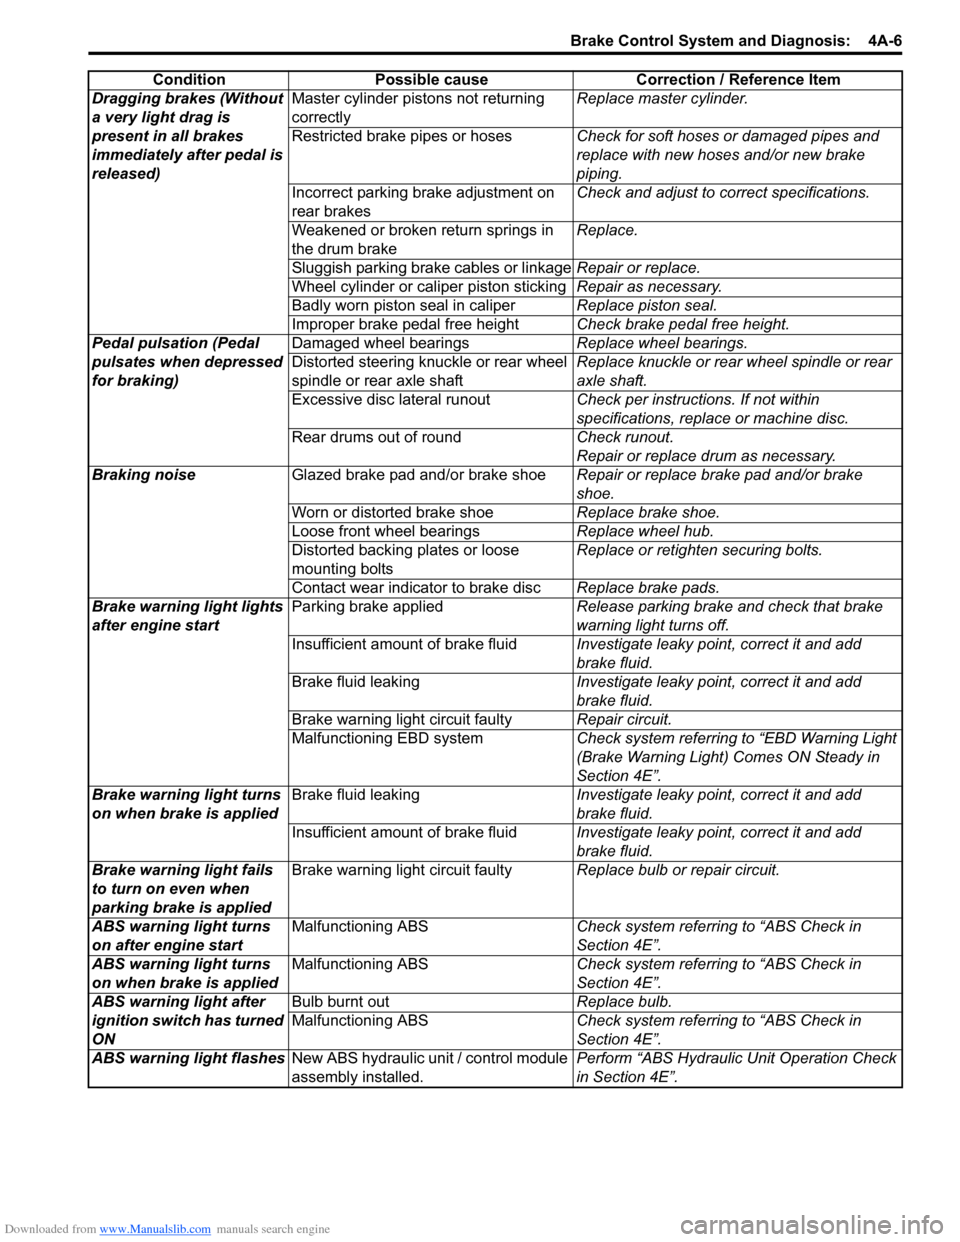
Dragging brakes (Without
a very light drag is
present in all brakes
immediately after pedal is
released)Master cylinder pistons not returning
correctlyReplace master cylinder.
Restricted brake pipes or hosesCheck for soft hoses or damaged pipes and
replace with new hoses and/or new brake
piping.
Incorrect parking brake adjustment on
rear brakesCheck and adjust to correct specifications.
Weakened or broken return springs in
the drum brakeReplace.
Sluggish parking brake cables or linkageRepair or replace.
Wheel cylinder or caliper piston stickingRepair as necessary.
Badly worn piston seal in caliperReplace piston seal.
Improper brake pedal free heightCheck brake pedal free height.
Pedal pulsation (Pedal
pulsates when depressed
for braking)Damaged wheel bearingsReplace wheel bearings.
Distorted steering knuckle or rear wheel
spindle or rear axle shaftReplace knuckle or rear wheel spindle or rear
axle shaft.
Excessive disc lateral runoutCheck per instructions. If not within
specifications, replace or machine disc.
Rear drums out of roundCheck runout.
Repair or replace drum as necessary.
Braking noiseGlazed brake pad and/or brake shoeRepair or replace brake pad and/or brake
shoe.
Worn or distorted brake shoeReplace brake shoe.
Loose front wheel bearingsReplace wheel hub.
Distorted backing plates or loose
mounting boltsReplace or retighten securing bolts.
Contact wear indicator to brake discReplace brake pads.
Brake warning light lights
after engine startParking brake appliedRelease parking brake and check that brake
warning light turns off.
Insufficient amount of brake fluidInvestigate leaky point, correct it and add
brake fluid.
Brake fluid leakingInvestigate leaky point, correct it and add
brake fluid.
Brake warning light circuit faultyRepair circuit.
Malfunctioning EBD systemCheck system referring to “EBD Warning Light
(Brake Warning Light) Comes ON Steady in
Section 4E”.
Brake warning light turns
on when brake is appliedBrake fluid leakingInvestigate leaky point, correct it and add
brake fluid.
Insufficient amount of brake fluidInvestigate leaky point, correct it and add
brake fluid.
Brake warning light fails
to turn on even when
parking brake is appliedBrake warning light circuit faultyReplace bulb or repair circuit.
ABS warning light turns
on after engine startMalfunctioning ABSCheck system referring to “ABS Check in
Section 4E”.
ABS warning light turns
on when brake is appliedMalfunctioning ABSCheck system referring to “ABS Check in
Section 4E”.
ABS warning light after
ignition switch has turned
ON Bulb burnt outReplace bulb.
Malfunctioning ABSCheck system referring to “ABS Check in
Section 4E”.
ABS warning light flashesNew ABS hydraulic unit / control module
assembly installed.Perform “ABS Hydraulic Unit Operation Check
in Section 4E”. Condition Possible cause Correction / Reference Item
Page 606 of 1556
Downloaded from www.Manualslib.com manuals search engine 4E-1 ABS:
Brakes
ABS
Precautions
Precautions in Diagnosing TroublesS6RW0D4500001
To ensure that the trouble diagnosis is done accurately
and smoothly, observe the following and follow “ABS
Check”.
• Diagnostic information stored in ABS control module
memory can be cleared as well as checked by using
SUZUKI scan tool. Before using scan tool, read its
Operator's (Instruction) Manual carefully to have good
understanding as to what functions are available and
how to use it.
• If the vehicle was operated in any of the following
ways, ABS warning light may light momentarily but
this does not indicate anything abnormal in ABS.
– The vehicle was driven with parking brake pulled.
– The vehicle was driven with brake dragging.
– The vehicle was stuck in mud, sand, etc.
– Wheel spin occurred while driving.
– Wheel(s) was rotated while the vehicle was jacked
up.
• Be sure to read “Precautions for Electrical Circuit
Service in Section 00” and “Precaution for CAN
Communication System in Section 00” before
inspection and observe what is written there.
• Be sure to use the trouble diagnosis procedure as
described in “ABS Check”. Failure to follow it may
result in incorrect diagnosis. (Some other diagnosis
trouble code may be stored by mistake in the memory
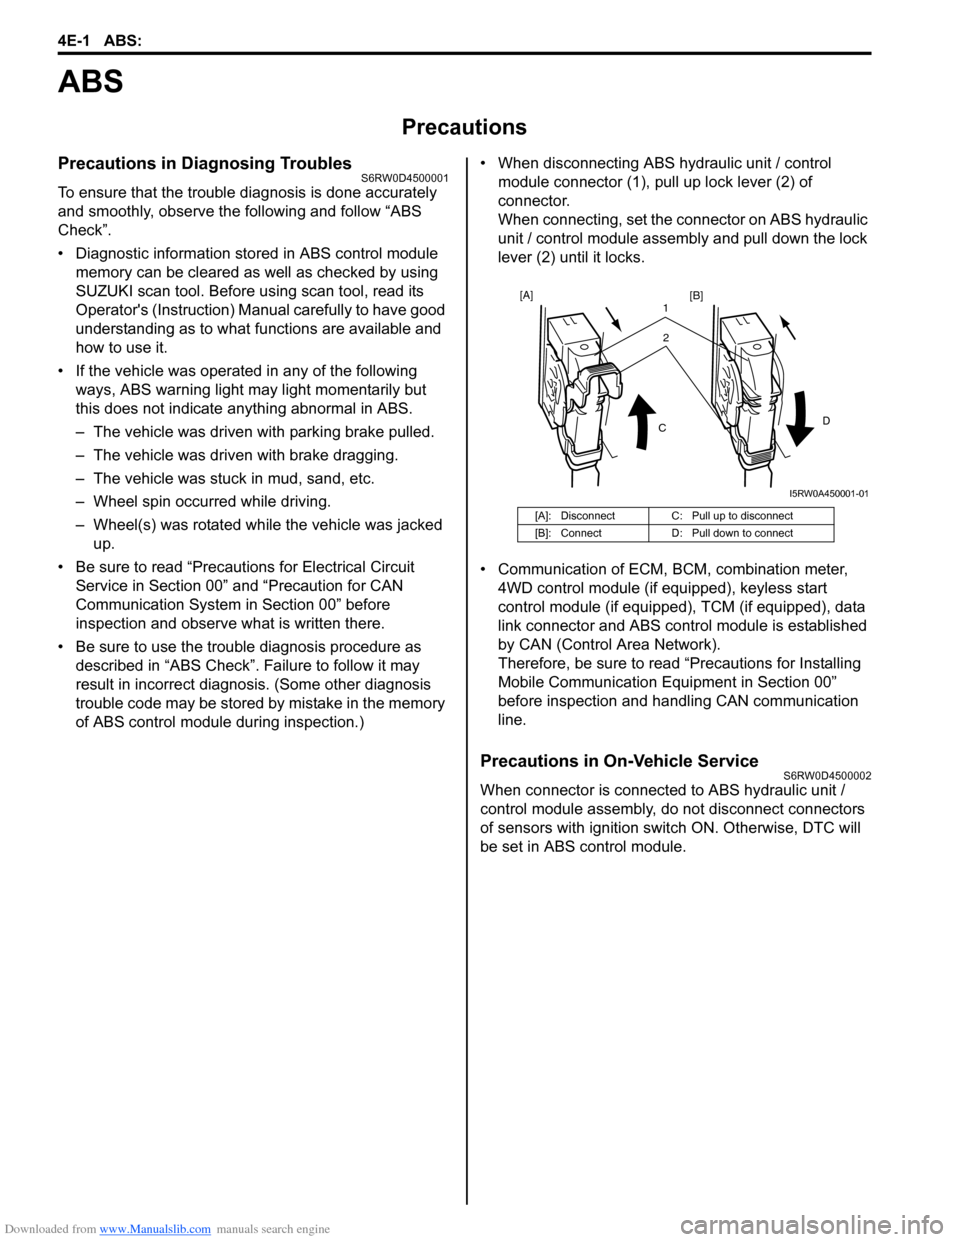
of ABS control module during inspection.)• When disconnecting ABS hydraulic unit / control
module connector (1), pull up lock lever (2) of
connector.
When connecting, set the connector on ABS hydraulic
unit / control module assembly and pull down the lock
lever (2) until it locks.
• Communication of ECM, BCM, combination meter,
4WD control module (if equipped), keyless start
control module (if equipped), TCM (if equipped), data
link connector and ABS control module is established
by CAN (Control Area Network).
Therefore, be sure to read “Precautions for Installing
Mobile Communication Equipment in Section 00”
before inspection and handling CAN communication
line.
Precautions in On-Vehicle ServiceS6RW0D4500002
When connector is connected to ABS hydraulic unit /
control module assembly, do not disconnect connectors
of sensors with ignition switch ON. Otherwise, DTC will
be set in ABS control module.
[A]: Disconnect C: Pull up to disconnect
[B]: Connect D: Pull down to connect
2 1
CD
[A]
[B]
I5RW0A450001-01
Page 611 of 1556
Downloaded from www.Manualslib.com manuals search engine ABS: 4E-6
17+BB
18BLU
WHT12VGRN/ORN 34
30E08-9
RED
WHT 1226
WHT/RED
12V
E08-7
19GRN
GRN
E08-16
12V
5
76
21REDRED/BLK
12V
BLKWHTE08-22 E08-11
23BLKWHTLT GRN/BLKLT GRN
12V
E08-10 E08-21
E08-23
E08-26
E08-1E08-12
24BLKWHT
12V
YELBRNE08-19 E08-20
27
1 2
RED/BLK
WHTRED
WHTRED
WHTRED9
E08-2E08-13WHT
E08-6
RED
9
9
11
9
9
9
REDWHT
WHTRED
12VE08-25
M
BLK
BLK
WHT/BLUWHT/RED
WHT/BLUE08-24
WHT
E08 [A]
1
2
3
4
5
6
7 12
13
14
15
16
17
18
19
20
21
228
9
10
11
23
24
25
26
GRN/WHT
22
12V
BLKWHTWHTWHT/BLKE08-17 E08-18
GRN/ORN28
2033
31
29
25
15
32
GRN/YELE08-3GRN/BLK
8
12V
12V
13
14RED/BLK
RED/BLU
WHTRED6
16
10
BLK [B]
I6RW0D450001-02
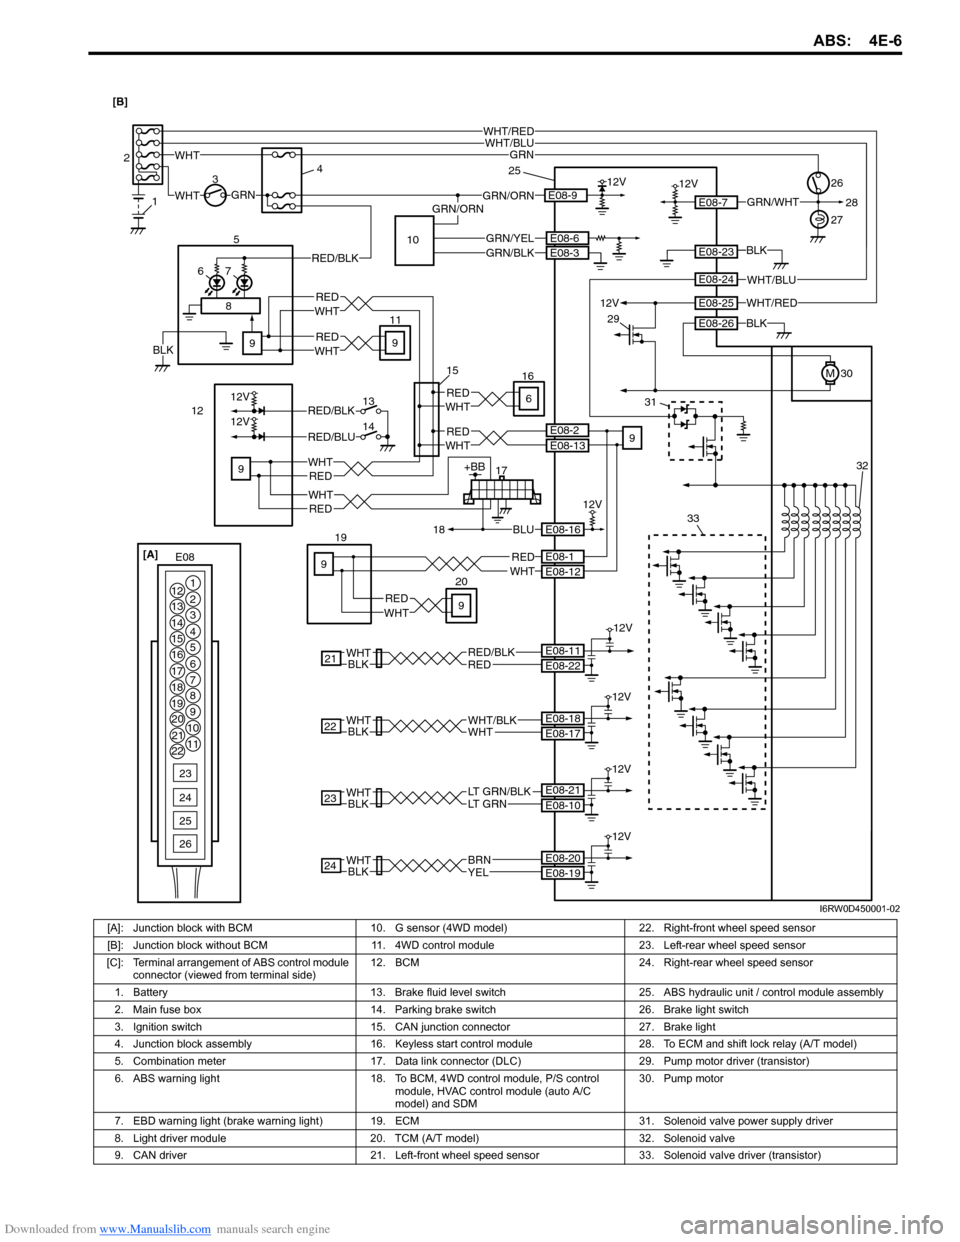
[A]: Junction block with BCM 10. G sensor (4WD model) 22. Right-front wheel speed sensor
[B]: Junction block without BCM 11. 4WD control module 23. Left-rear wheel speed sensor
[C]: Terminal arrangement of ABS control module
connector (viewed from terminal side)12. BCM 24. Right-rear wheel speed sensor
1. Battery 13. Brake fluid level switch 25. ABS hydraulic unit / control module assembly
2. Main fuse box 14. Parking brake switch 26. Brake light switch
3. Ignition switch 15. CAN junction connector 27. Brake light
4. Junction block assembly 16. Keyless start control module 28. To ECM and shift lock relay (A/T model)
5. Combination meter 17. Data link connector (DLC) 29. Pump motor driver (transistor)
6. ABS warning light 18. To BCM, 4WD control module, P/S control
module, HVAC control module (auto A/C
model) and SDM30. Pump motor
7. EBD warning light (brake warning light)19. ECM 31. Solenoid valve power supply driver
8. Light driver module 20. TCM (A/T model) 32. Solenoid valve
9. CAN driver 21. Left-front wheel speed sensor 33. Solenoid valve driver (transistor)