Power steering control module SUZUKI SX4 2006 1.G Service Workshop Manual
[x] Cancel search | Manufacturer: SUZUKI, Model Year: 2006, Model line: SX4, Model: SUZUKI SX4 2006 1.GPages: 1556, PDF Size: 37.31 MB
Page 24 of 1556
Downloaded from www.Manualslib.com manuals search engine 0A-1 General Information:
General Information
General Information
General Description
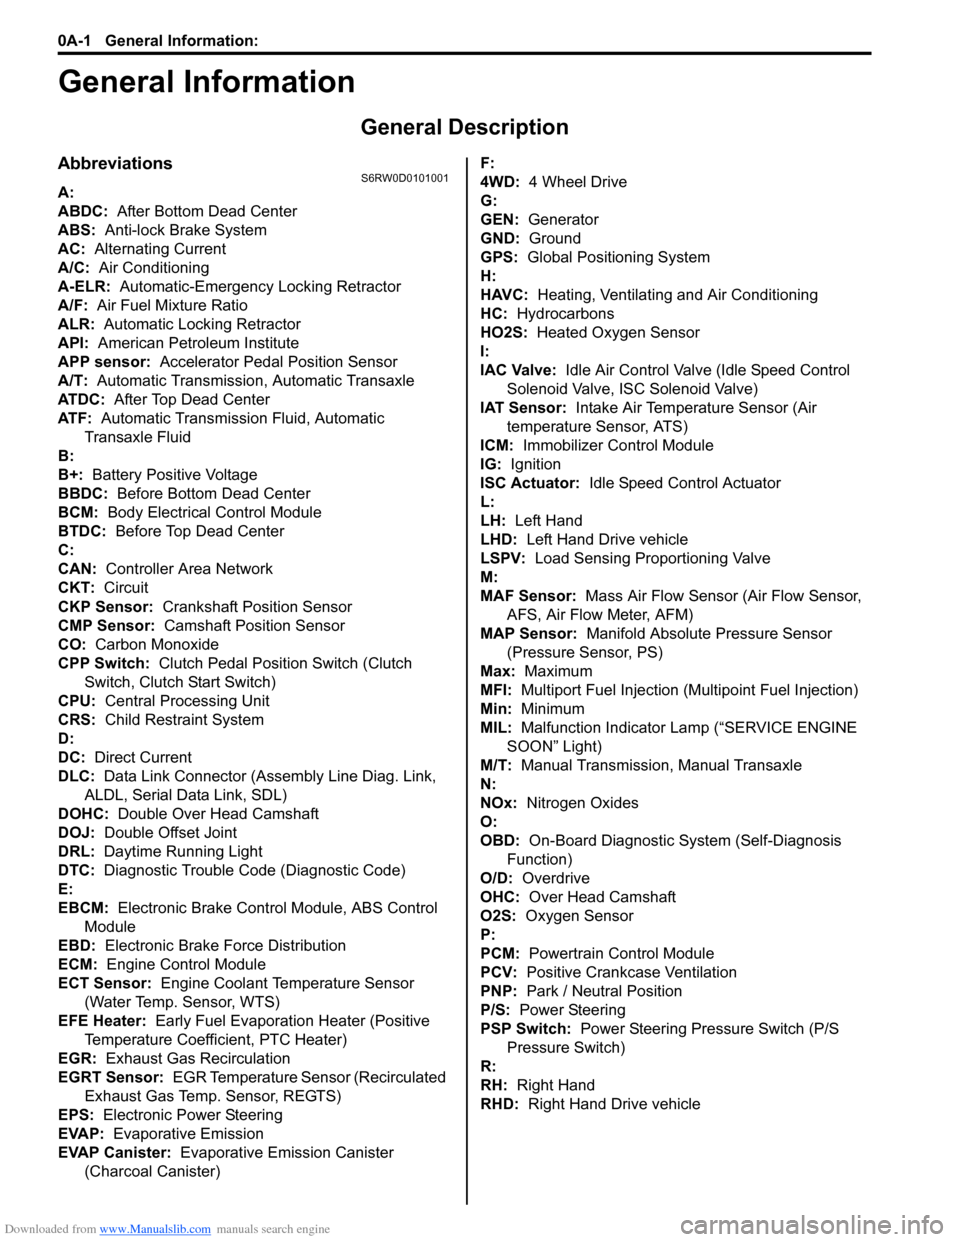
AbbreviationsS6RW0D0101001
A:
ABDC: After Bottom Dead Center
ABS: Anti-lock Brake System
AC: Alternating Current
A/C: Air Conditioning
A-ELR: Automatic-Emergency Locking Retractor
A/F: Air Fuel Mixture Ratio
ALR: Automatic Locking Retractor
API: American Petroleum Institute
APP sensor: Accelerator Pedal Position Sensor
A/T: Automatic Transmission, Automatic Transaxle
AT D C : After Top Dead Center
ATF: Automatic Transmission Fluid, Automatic
Transaxle Fluid
B:
B+: Battery Positive Voltage
BBDC: Before Bottom Dead Center
BCM: Body Electrical Control Module
BTDC: Before Top Dead Center
C:
CAN: Controller Area Network
CKT: Circuit
CKP Sensor: Crankshaft Position Sensor
CMP Sensor: Camshaft Position Sensor
CO: Carbon Monoxide
CPP Switch: Clutch Pedal Position Switch (Clutch
Switch, Clutch Start Switch)
CPU: Central Processing Unit
CRS: Child Restraint System
D:
DC: Direct Current
DLC: Data Link Connector (Assembly Line Diag. Link,
ALDL, Serial Data Link, SDL)
DOHC: Double Over Head Camshaft
DOJ: Double Offset Joint
DRL: Daytime Running Light
DTC: Diagnostic Trouble Code (Diagnostic Code)
E:
EBCM: Electronic Brake Control Module, ABS Control
Module
EBD: Electronic Brake Force Distribution
ECM: Engine Control Module
ECT Sensor: Engine Coolant Temperature Sensor
(Water Temp. Sensor, WTS)
EFE Heater: Early Fuel Evaporation Heater (Positive
Temperature Coefficient, PTC Heater)
EGR: Exhaust Gas Recirculation
EGRT Sensor: EGR Temperature Sensor (Recirculated
Exhaust Gas Temp. Sensor, REGTS)
EPS: Electronic Power Steering
EVAP: Evaporative Emission
EVAP Canister: Evaporative Emission Canister
(Charcoal Canister)F:
4WD: 4 Wheel Drive
G:
GEN: Generator
GND: Ground
GPS: Global Positioning System
H:
HAVC: Heating, Ventilating and Air Conditioning
HC: Hydrocarbons
HO2S: Heated Oxygen Sensor
I:
IAC Valve: Idle Air Control Valve (Idle Speed Control
Solenoid Valve, ISC Solenoid Valve)
IAT Sensor: Intake Air Temperature Sensor (Air
temperature Sensor, ATS)
ICM: Immobilizer Control Module
IG: Ignition
ISC Actuator: Idle Speed Control Actuator
L:
LH: Left Hand
LHD: Left Hand Drive vehicle
LSPV: Load Sensing Proportioning Valve
M:
MAF Sensor: Mass Air Flow Sensor (Air Flow Sensor,
AFS, Air Flow Meter, AFM)
MAP Sensor: Manifold Absolute Pressure Sensor
(Pressure Sensor, PS)
Max: Maximum
MFI: Multiport Fuel Injection (Multipoint Fuel Injection)
Min: Minimum
MIL: Malfunction Indicator Lamp (“SERVICE ENGINE
SOON” Light)
M/T: Manual Transmission, Manual Transaxle
N:
NOx: Nitrogen Oxides
O:
OBD: On-Board Diagnostic System (Self-Diagnosis
Function)
O/D: Overdrive
OHC: Over Head Camshaft
O2S: Oxygen Sensor
P:
PCM: Powertrain Control Module
PCV: Positive Crankcase Ventilation
PNP: Park / Neutral Position
P/S: Power Steering
PSP Switch: Power Steering Pressure Switch (P/S
Pressure Switch)
R:
RH: Right Hand
RHD: Right Hand Drive vehicle
Page 25 of 1556
Downloaded from www.Manualslib.com manuals search engine General Information: 0A-2
S:
SAE: Society of Automotive Engineers
SDM: Sensing and Diagnostic Module (Air Bag
Controller, Air bag Control Module)
SDT: Smart Diagnostic Tester
SFI: Sequential Multiport Fuel Injection
SOHC: Single Over Head Camshaft
T:
TBI: Throttle Body Fuel Injection (Single-Point Fuel
Injection, SPI)
TCC: Torque Converter Clutch
TCM: Transmission Control Module (A/T Controller, A/T
Control Module)
TDC: Top Dead Center
TP Sensor: Throttle Position SensorTVV: Thermal Vacuum Valve (Thermal Vacuum
Switching Valve, TVSV, Bimetal Vacuum Switching
Valve, BVSV)
TWC: Three Way Catalytic Converter (Three Way
Catalyst)
2WD: 2 Wheel Drive
U:
USB: Universal Serial Bus
V:
VIN: Vehicle Identification Number
VSS: Vehicle Speed Sensor
VVT: Variable Valve Timing (Camshaft Position Control)
W:
WU-OC: Warm Up Oxidation Catalytic Converter
WU-TWC: Warm Up Three Way Catalytic Converter
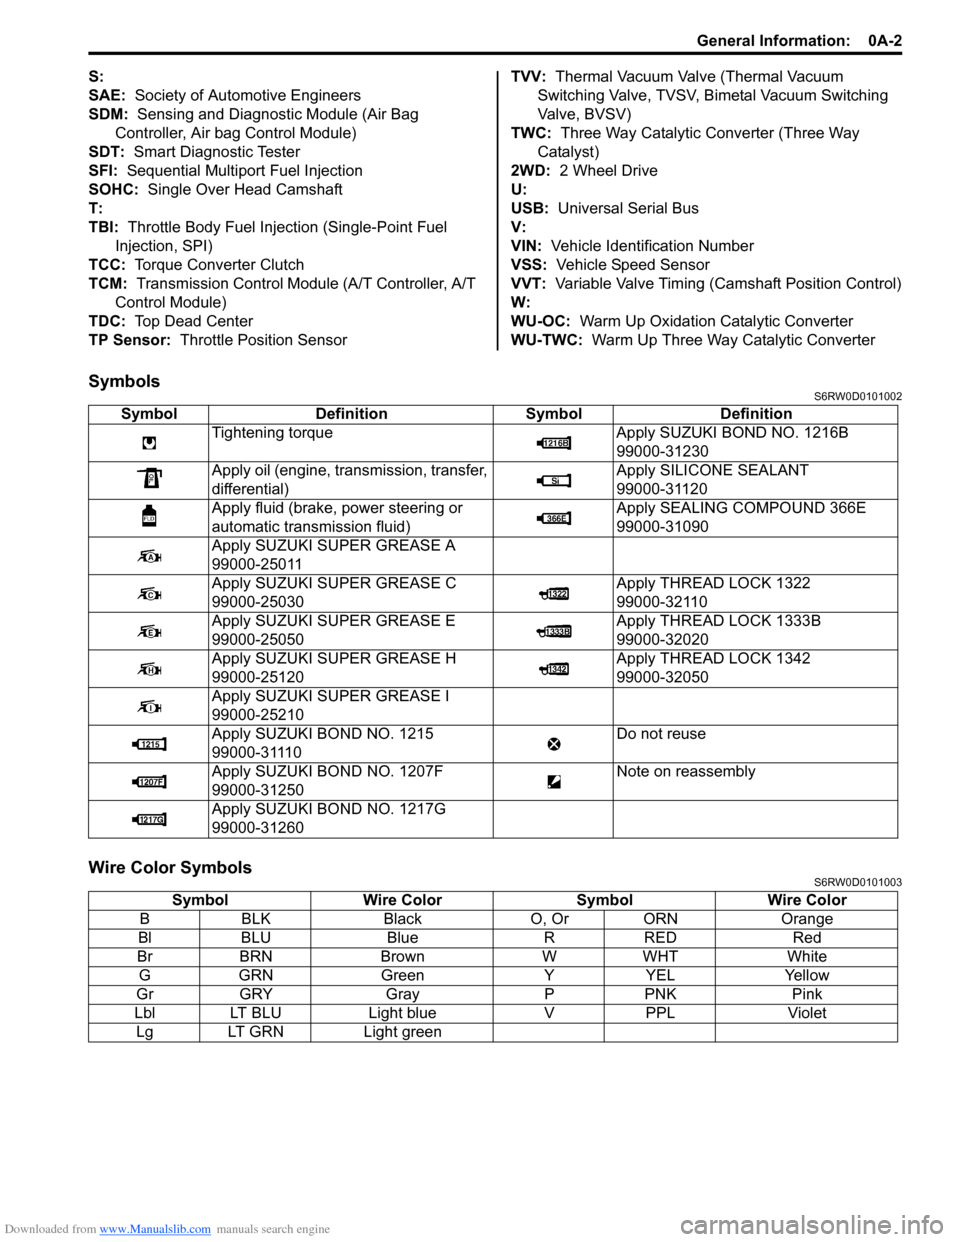
SymbolsS6RW0D0101002
Wire Color SymbolsS6RW0D0101003
Symbol Definition Symbol Definition
Tightening torque Apply SUZUKI BOND NO. 1216B
99000-31230
Apply oil (engine, transmission, transfer,
differential)Apply SILICONE SEALANT
99000-31120
Apply fluid (brake, power steering or
automatic transmission fluid)Apply SEALING COMPOUND 366E
99000-31090
Apply SUZUKI SUPER GREASE A
99000-25011
Apply SUZUKI SUPER GREASE C
99000-25030Apply THREAD LOCK 1322
99000-32110
Apply SUZUKI SUPER GREASE E
99000-25050Apply THREAD LOCK 1333B
99000-32020
Apply SUZUKI SUPER GREASE H
99000-25120Apply THREAD LOCK 1342
99000-32050
Apply SUZUKI SUPER GREASE I
99000-25210
Apply SUZUKI BOND NO. 1215
99000-31110Do not reuse
Apply SUZUKI BOND NO. 1207F
99000-31250Note on reassembly
Apply SUZUKI BOND NO. 1217G
99000-31260
Symbol Wire Color Symbol Wire Color
B BLK Black O, Or ORN Orange
Bl BLU Blue R RED Red
Br BRN Brown W WHT White
G GRN Green Y YEL Yellow
Gr GRY Gray P PNK Pink
Lbl LT BLU Light blue V PPL Violet
Lg LT GRN Light green
Page 617 of 1556
Downloaded from www.Manualslib.com manuals search engine ABS: 4E-12
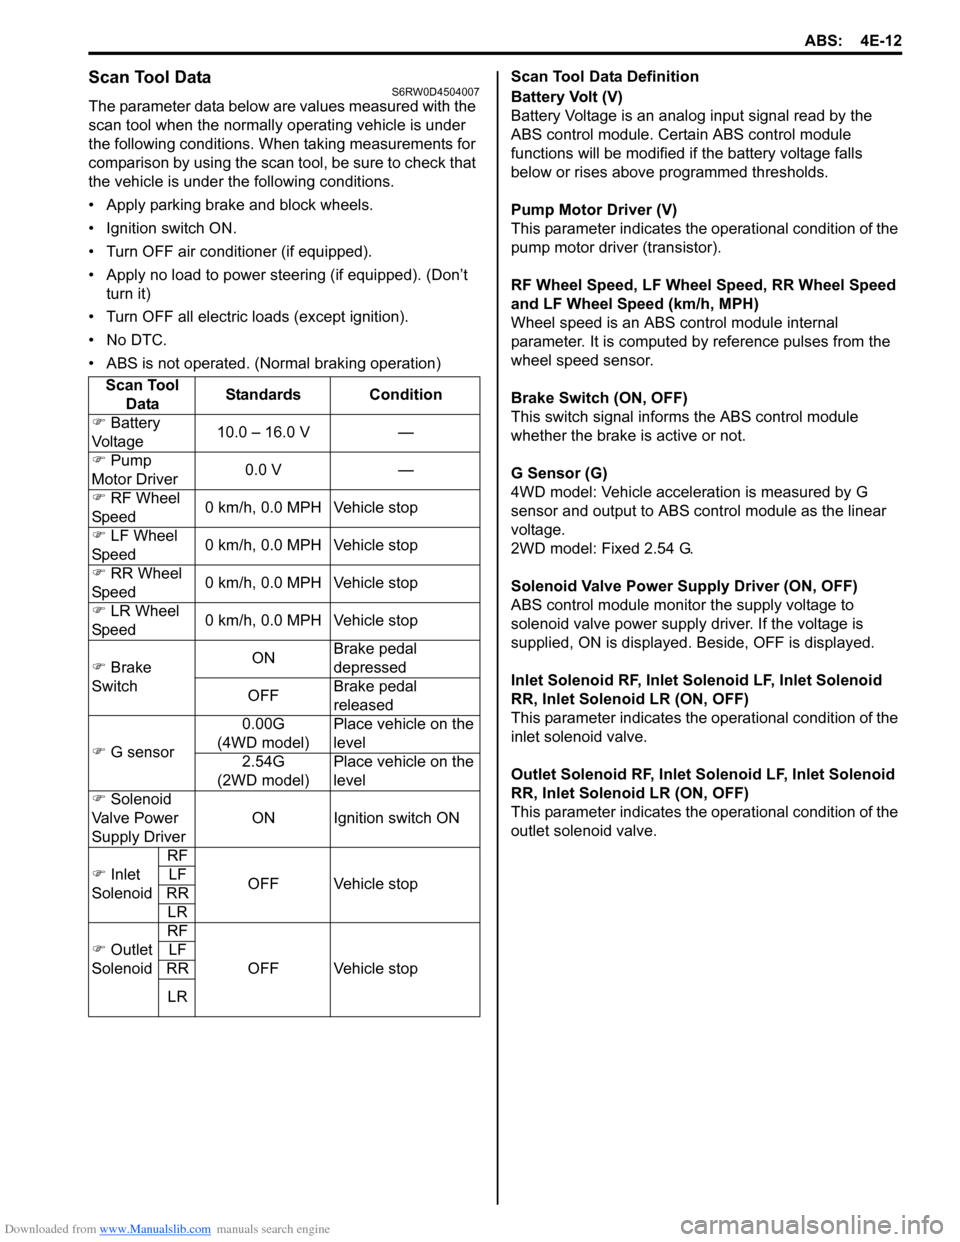
Scan Tool DataS6RW0D4504007
The parameter data below are values measured with the
scan tool when the normally operating vehicle is under
the following conditions. When taking measurements for
comparison by using the scan tool, be sure to check that
the vehicle is under the following conditions.
• Apply parking brake and block wheels.
• Ignition switch ON.
• Turn OFF air conditioner (if equipped).
• Apply no load to power steering (if equipped). (Don’t
turn it)
• Turn OFF all electric loads (except ignition).
• No DTC.
• ABS is not operated. (Normal braking operation)Scan Tool Data Definition
Battery Volt (V)
Battery Voltage is an analog input signal read by the
ABS control module. Certain ABS control module
functions will be modified if the battery voltage falls
below or rises above programmed thresholds.
Pump Motor Driver (V)
This parameter indicates the operational condition of the
pump motor driver (transistor).
RF Wheel Speed, LF Wheel Speed, RR Wheel Speed
and LF Wheel Speed (km/h, MPH)
Wheel speed is an ABS control module internal
parameter. It is computed by reference pulses from the
wheel speed sensor.
Brake Switch (ON, OFF)
This switch signal informs the ABS control module
whether the brake is active or not.
G Sensor (G)
4WD model: Vehicle acceleration is measured by G
sensor and output to ABS control module as the linear
voltage.
2WD model: Fixed 2.54 G.
Solenoid Valve Power Supply Driver (ON, OFF)
ABS control module monitor the supply voltage to
solenoid valve power supply driver. If the voltage is
supplied, ON is displayed. Beside, OFF is displayed.
Inlet Solenoid RF, Inlet Solenoid LF, Inlet Solenoid
RR, Inlet Solenoid LR (ON, OFF)
This parameter indicates the operational condition of the
inlet solenoid valve.
Outlet Solenoid RF, Inlet Solenoid LF, Inlet Solenoid
RR, Inlet Solenoid LR (ON, OFF)
This parameter indicates the operational condition of the
outlet solenoid valve. Scan Tool
DataStandards Condition
�) Battery
Voltage10.0 – 16.0 V —
�) Pump
Motor Driver0.0 V —
�) RF Wheel
Speed0 km/h, 0.0 MPH Vehicle stop
�) LF Wheel
Speed0 km/h, 0.0 MPH Vehicle stop
�) RR Wheel
Speed0 km/h, 0.0 MPH Vehicle stop
�) LR Wheel
Speed0 km/h, 0.0 MPH Vehicle stop
�) Brake
SwitchONBrake pedal
depressed
OFFBrake pedal
released
�) G sensor0.00G
(4WD model)Place vehicle on the
level
2.54G
(2WD model)Place vehicle on the
level
�) Solenoid
Valve Power
Supply DriverON Ignition switch ON
�) Inlet
SolenoidRF
OFF Vehicle stop LF
RR
LR
�) Outlet
SolenoidRF
OFF Vehicle stop LF
RR
LR
Page 865 of 1556
Downloaded from www.Manualslib.com manuals search engine Table of Contents 6- i
6
Section 6
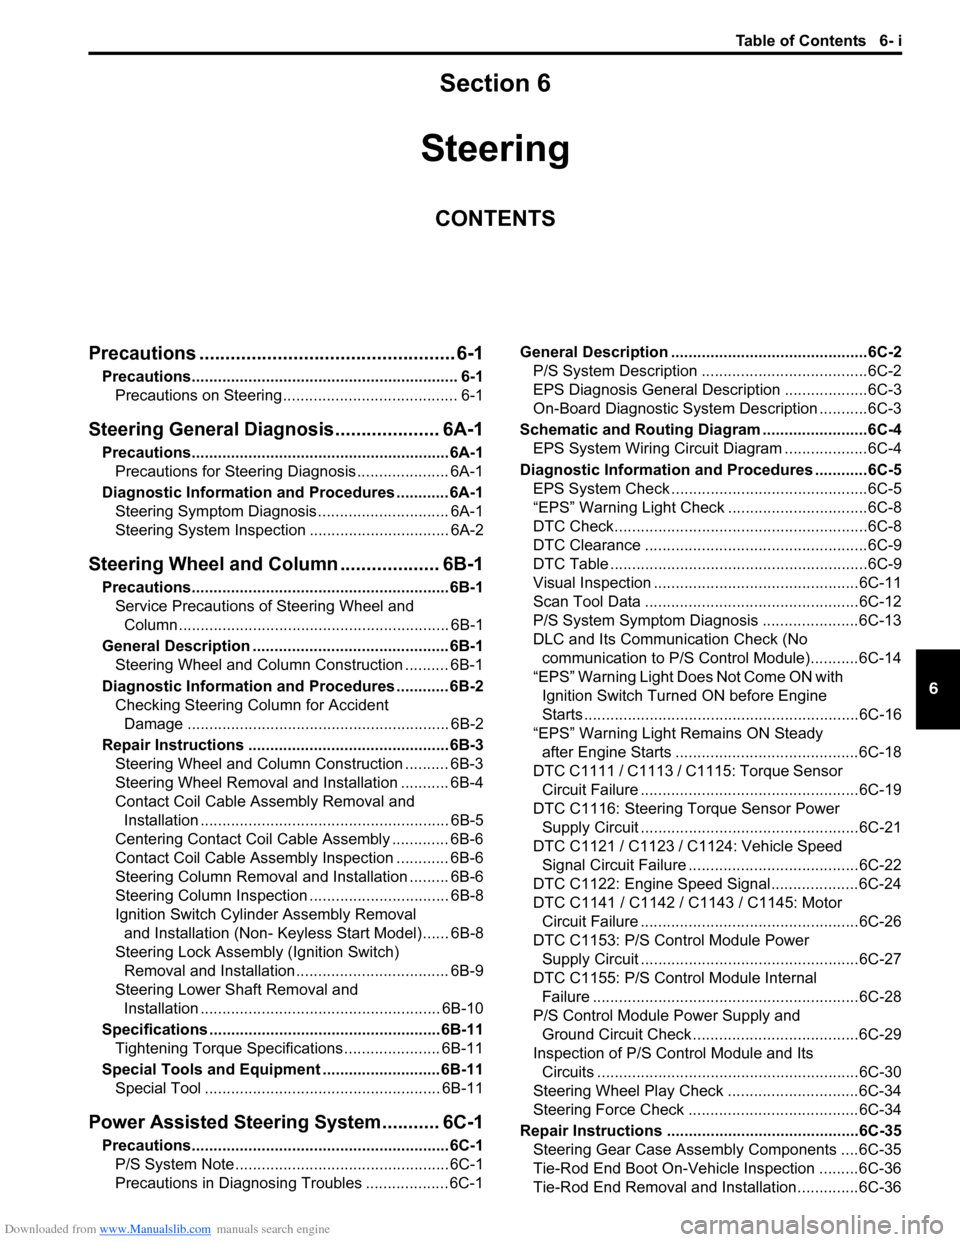
CONTENTS
Steering
Precautions ................................................. 6-1
Precautions............................................................. 6-1
Precautions on Steering........................................ 6-1
Steering General Diagnosis.................... 6A-1
Precautions........................................................... 6A-1
Precautions for Steering Diagnosis ..................... 6A-1
Diagnostic Information and Procedures ............ 6A-1
Steering Symptom Diagnosis .............................. 6A-1
Steering System Inspection ................................ 6A-2
Steering Wheel and Column................... 6B-1
Precautions........................................................... 6B-1
Service Precautions of Steering Wheel and
Column.............................................................. 6B-1
General Description ............................................. 6B-1
Steering Wheel and Column Construction .......... 6B-1
Diagnostic Information and Procedures ............ 6B-2
Checking Steering Column for Accident
Damage ............................................................ 6B-2
Repair Instructions .............................................. 6B-3
Steering Wheel and Column Construction .......... 6B-3
Steering Wheel Removal and Installation ........... 6B-4
Contact Coil Cable Assembly Removal and
Installation ......................................................... 6B-5
Centering Contact Coil Cable Assembly ............. 6B-6
Contact Coil Cable Assembly Inspection ............ 6B-6
Steering Column Removal and Installation ......... 6B-6
Steering Column Inspection ................................ 6B-8
Ignition Switch Cylinder Assembly Removal
and Installation (Non- Keyless Start Model)...... 6B-8
Steering Lock Assembly (Ignition Switch)
Removal and Installation................................... 6B-9
Steering Lower Shaft Removal and
Installation ....................................................... 6B-10
Specifications..................................................... 6B-11
Tightening Torque Specifications ...................... 6B-11
Special Tools and Equipment ........................... 6B-11
Special Tool ...................................................... 6B-11
Power Assisted Steering System........... 6C-1
Precautions........................................................... 6C-1
P/S System Note ................................................. 6C-1
Precautions in Diagnosing Troubles ................... 6C-1General Description .............................................6C-2
P/S System Description ......................................6C-2
EPS Diagnosis General Description ...................6C-3
On-Board Diagnostic System Description ...........6C-3
Schematic and Routing Diagram ........................6C-4
EPS System Wiring Circuit Diagram ...................6C-4
Diagnostic Information and Procedures ............6C-5
EPS System Check .............................................6C-5
“EPS” Warning Light Check ................................6C-8
DTC Check..........................................................6C-8
DTC Clearance ...................................................6C-9
DTC Table ...........................................................6C-9
Visual Inspection ...............................................6C-11
Scan Tool Data .................................................6C-12
P/S System Symptom Diagnosis ......................6C-13
DLC and Its Communication Check (No
communication to P/S Control Module)...........6C-14
“EPS” Warning Light Does Not Come ON with
Ignition Switch Turned ON before Engine
Starts ...............................................................6C-16
“EPS” Warning Light Remains ON Steady
after Engine Starts ..........................................6C-18
DTC C1111 / C1113 / C1115: Torque Sensor
Circuit Failure ..................................................6C-19
DTC C1116: Steering Torque Sensor Power
Supply Circuit ..................................................6C-21
DTC C1121 / C1123 / C1124: Vehicle Speed
Signal Circuit Failure .......................................6C-22
DTC C1122: Engine Speed Signal....................6C-24
DTC C1141 / C1142 / C1143 / C1145: Motor
Circuit Failure ..................................................6C-26
DTC C1153: P/S Control Module Power
Supply Circuit ..................................................6C-27
DTC C1155: P/S Control Module Internal
Failure .............................................................6C-28
P/S Control Module Power Supply and
Ground Circuit Check ......................................6C-29
Inspection of P/S Control Module and Its
Circuits ............................................................6C-30
Steering Wheel Play Check ..............................6C-34
Steering Force Check .......................................6C-34
Repair Instructions ............................................6C-35
Steering Gear Case Assembly Components ....6C-35
Tie-Rod End Boot On-Vehicle Inspection .........6C-36
Tie-Rod End Removal and Installation..............6C-36
Page 881 of 1556
Downloaded from www.Manualslib.com manuals search engine Power Assisted Steering System: 6C-1
Ste eri ng
Power Assisted Steering System
Precautions
P/S System NoteS6RW0D6300001
NOTE
All steering gear fasteners are important attaching parts in that they could affect the performance of
vital parts and systems, and/or could result in major repair expense. They must be replaced with one of
the same part number or with an equivalent part if replacement becomes necessary. Do not use a
replacement part of lesser quality or substitute design. Torque values must be used as specified
during reassembly to assure proper retention of these parts.
Precautions in Diagnosing TroublesS6RW0D6300002
• Take a note of DTC indicated on the SUZUKI scan tool.
• Before inspection, be sure to read “Precautions for Electrical Circuit Service in Section 00” and understand what is
written there.
• DTC C1122 (engine speed signal failure) is indicated when ignition switch is at ON position and engine is not
running, but it means there is nothing abnormal if indication changes to a normal one when engine is started.
• As DTC is stored in memory of the P/S control module, be sure to clear memory after repair by performing the
procedure described in “DTC Clearance”.
Page 882 of 1556
Downloaded from www.Manualslib.com manuals search engine 6C-2 Power Assisted Steering System:
General Description
P/S System DescriptionS6RW0D6301001
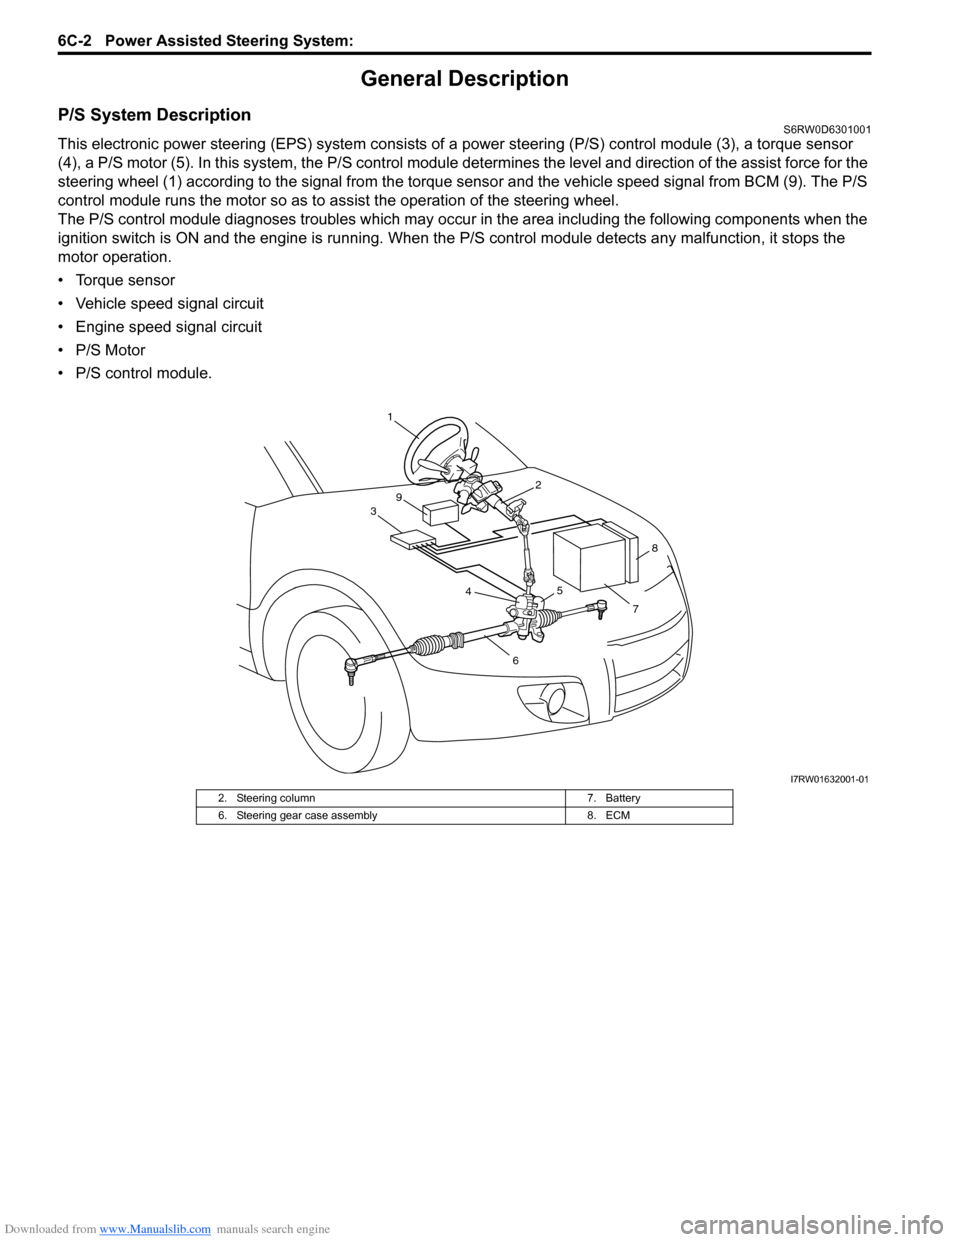
This electronic power steering (EPS) system consists of a power steering (P/S) control module (3), a torque sensor
(4), a P/S motor (5). In this system, the P/S control module determines the level and direction of the assist force for the
steering wheel (1) according to the signal from the torque sensor and the vehicle speed signal from BCM (9). The P/S
control module runs the motor so as to assist the operation of the steering wheel.
The P/S control module diagnoses troubles which may occur in the area including the following components when the
ignition switch is ON and the engine is running. When the P/S control module detects any malfunction, it stops the
motor operation.
• Torque sensor
• Vehicle speed signal circuit
• Engine speed signal circuit
• P/S Motor
• P/S control module.
1
32
4
6
7
5
8
9
I7RW01632001-01
2. Steering column 7. Battery
6. Steering gear case assembly 8. ECM
Page 883 of 1556

Downloaded from www.Manualslib.com manuals search engine Power Assisted Steering System: 6C-3
EPS Diagnosis General DescriptionS6RW0D6301002
The P/S system in this vehicle is controlled by the P/S control module. The P/S control module has an on-board
diagnostic system which detects a malfunction in this system. When diagnosing troubles, be sure to have full
understanding of the outline of “On-Board Diagnostic System Description” and each item in “Precautions in
Diagnosing Troubles”, and then execute diagnosis according to “EPS System Check”.
On-Board Diagnostic System DescriptionS6RW0D6301003
The P/S control module performs the on-board diagnosis (self-diagnosis) on the system and operates the “EPS”
warning light (1) as follows.
• The “EPS” warning light lights when the ignition switch is turned to ON position (but the engine at stop) regardless
of the condition of the P/S control system. This is only to check if the “EPS” warning light is operated properly.
• If the areas monitored by the P/S control module is free from any trouble after the engine start (while engine is
running), the “EPS” warning light turns OFF.
• When the P/S control module detects a trouble which has occurred in the monitored areas the “EPS” warning light
comes ON while the engine is running to warn the driver of such occurrence of the trouble and at the same time it
stores the exact trouble area in memory inside of the P/S control module.
Driving Cycle
A “Driving Cycle” consists of engine startup and engine shutoff.
3 Driving Cycles Detection Logic
The malfunction detected in the first and second driving cycle is stored in P/S control module memory (in the form of
pending DTC) but the “EPS” warning light does not light at these time. It lights up at the third detection of same
malfunction also in the next driving cycle.
1
I7RW01632002-01
Page 884 of 1556
![SUZUKI SX4 2006 1.G Service Workshop Manual Downloaded from www.Manualslib.com manuals search engine 6C-4 Power Assisted Steering System:
Schematic and Routing Diagram
EPS System Wiring Circuit DiagramS6RW0D6302001
[A]
123
45
3 21
4
567
8
9 11 SUZUKI SX4 2006 1.G Service Workshop Manual Downloaded from www.Manualslib.com manuals search engine 6C-4 Power Assisted Steering System:
Schematic and Routing Diagram
EPS System Wiring Circuit DiagramS6RW0D6302001
[A]
123
45
3 21
4
567
8
9 11](/img/20/7612/w960_7612-883.png)
Downloaded from www.Manualslib.com manuals search engine 6C-4 Power Assisted Steering System:
Schematic and Routing Diagram
EPS System Wiring Circuit DiagramS6RW0D6302001
[A]
123
45
3 21
4
567
8
9 11
10 12 13
141516
17 18 19201
2
[B]
1
2
[C] [D]
10 9 8 7654 3 21
16 15 14 13 12 11
26 25 24 2322 21 20 19 18 17
32 31 30 29 28 27
[F][E]
12
BRN RED/
BLU GRY LT GRN/
BLK
BLK
RED
WHT GRN
BLK
E11-1
E11-5
E11-14
E11-12
[J]:E01-44E01-4
[J]:E01-27E01-26
E12-1
E12-2
E11-10E11-8
E11-9
E11-19
E13-1 GRN
GRY
GRN
WHT
G241-25G241-31
RED/BLK
11
12
1314 3 18
20
21
7 19
4 12
22
12V
E13-2BLK
9V
REDE11-20
12V
12V
E61-2
E61-1
610
55
5V
8
E11-115V
PPL
E11-4
9
23
+BB
BLU/
WHTE04-9
1524YELE11-18E31-5
E31-2
E31-39V
3V
E31-4
E31-1IG11617
C07-25
[H]
[G]
G04-15
[I]:G04-22
25L313-3
[I]
I6RW0D630001-01
[A]: P/S control module connector No.1 “E11” (viewed from harness side) 3. Junction block assembly 15. BCM
[B]: P/S control module connector No.2 “E13” (viewed from harness side) 4. Main fuse 16. Output shaft speed sensor
[C]: P/S control module connector No.3 “E12” (viewed from harness side) 5. Front (left/right) wheel speed sensor 17. TCM
[D]: Combination meter connector “G241” (viewed from harness side) 6. ABS control module 18. Individual circuit fuse box No.1
[E]: Torque sensor connector “E31” (viewed from harness side) 7. Combination meter 19. “IGN” fuse
[F]: Motor connector “E61” (viewed from harness side) 8. “EPS” warning light 20. “P/S” fuse
[G]: M/T model 9. Data link connector (DLC) 21. “IG1 SIG” fuse
[H]: A/T model 10. ECM 22. “MTR” fuse
[I]: Junction block without BCM model (Taiwan model) 11. P/S control module 23. To ABS control module
[J]: M15A engine with 4A/T equipped with slip control model (Hong Kong
model)12. P/S motor 24. To HVAC control module
1. Main fuse box 13. Shield 25. To SDM
2. Ignition switch 14. Torque sensor (built into steering gear case)
Page 885 of 1556
Downloaded from www.Manualslib.com manuals search engine Power Assisted Steering System: 6C-5
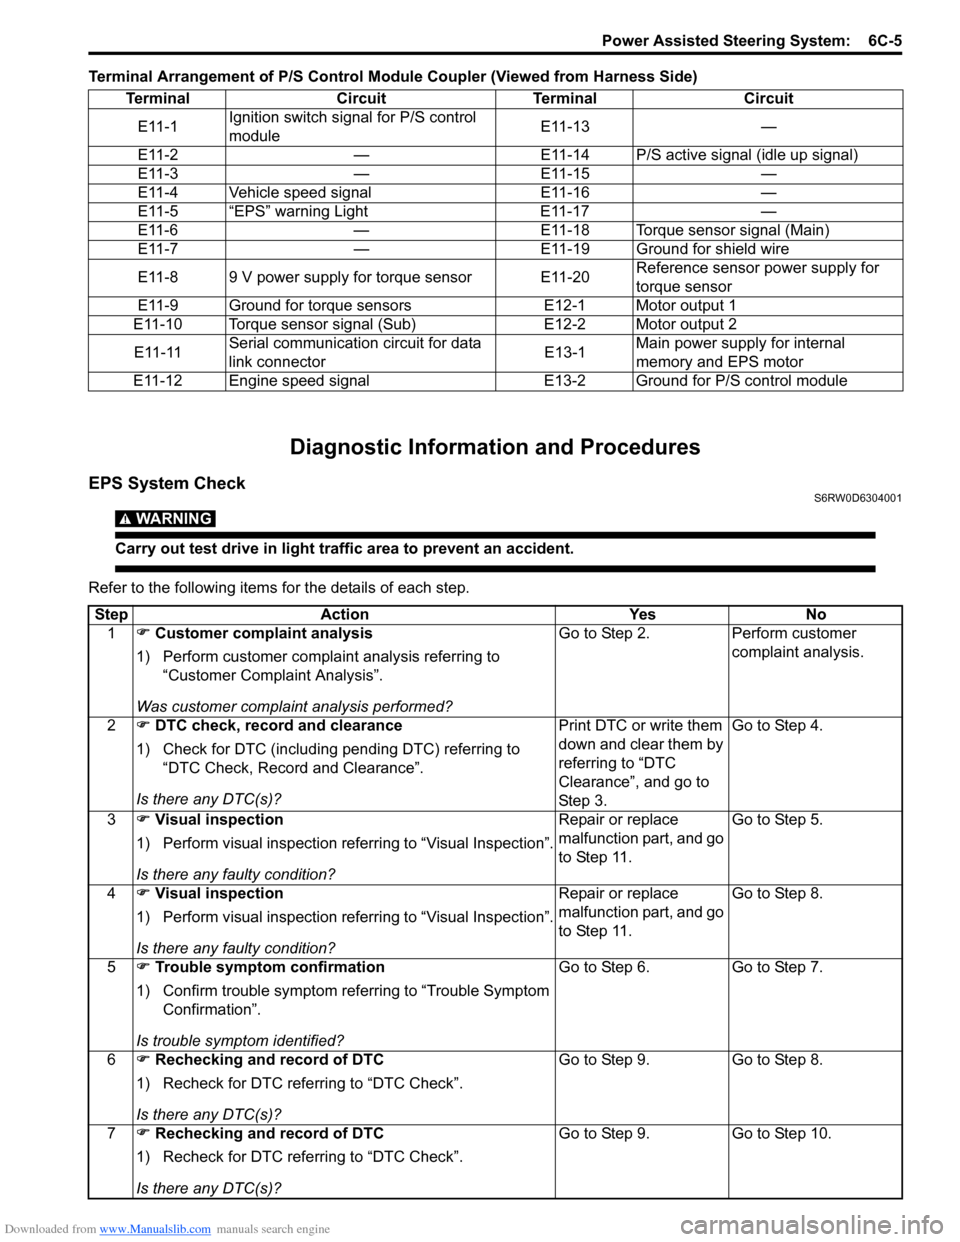
Terminal Arrangement of P/S Control Module Coupler (Viewed from Harness Side)
Diagnostic Information and Procedures
EPS System CheckS6RW0D6304001
WARNING!
Carry out test drive in light traffic area to prevent an accident.
Refer to the following items for the details of each step.Terminal Circuit Terminal Circuit
E11-1Ignition switch signal for P/S control
moduleE11-13 —
E11-2 — E11-14 P/S active signal (idle up signal)
E11-3 — E11-15 —
E11-4 Vehicle speed signal E11-16 —
E11-5 “EPS” warning Light E11-17 —
E11-6 — E11-18 Torque sensor signal (Main)
E11-7 — E11-19 Ground for shield wire
E11-8 9 V power supply for torque sensor E11-20Reference sensor power supply for
torque sensor
E11-9 Ground for torque sensors E12-1 Motor output 1
E11-10 Torque sensor signal (Sub) E12-2 Motor output 2
E11-11Serial communication circuit for data
link connectorE13-1Main power supply for internal
memory and EPS motor
E11-12 Engine speed signal E13-2 Ground for P/S control module
Step Action Yes No
1�) Customer complaint analysis
1) Perform customer complaint analysis referring to
“Customer Complaint Analysis”.
Was customer complaint analysis performed?Go to Step 2. Perform customer
complaint analysis.
2�) DTC check, record and clearance
1) Check for DTC (including pending DTC) referring to
“DTC Check, Record and Clearance”.
Is there any DTC(s)?Print DTC or write them
down and clear them by
referring to “DTC
Clearance”, and go to
St ep 3 .Go to Step 4.
3�) Visual inspection
1) Perform visual inspection referring to “Visual Inspection”.
Is there any faulty condition?Repair or replace
malfunction part, and go
to Step 11.Go to Step 5.
4�) Visual inspection
1) Perform visual inspection referring to “Visual Inspection”.
Is there any faulty condition?Repair or replace
malfunction part, and go
to Step 11.Go to Step 8.
5�) Trouble symptom confirmation
1) Confirm trouble symptom referring to “Trouble Symptom
Confirmation”.
Is trouble symptom identified?Go to Step 6. Go to Step 7.
6�) Rechecking and record of DTC
1) Recheck for DTC referring to “DTC Check”.
Is there any DTC(s)?Go to Step 9. Go to Step 8.
7�) Rechecking and record of DTC
1) Recheck for DTC referring to “DTC Check”.
Is there any DTC(s)?Go to Step 9. Go to Step 10.
Page 888 of 1556
Downloaded from www.Manualslib.com manuals search engine 6C-8 Power Assisted Steering System:
Step 8: Steering Symptom Diagnosis and P/S
System Symptom Diagnosis
Perform basic steering system check according to
“Steering Symptom Diagnosis in Section 6A” first. When
the end of the flow has been reached, check the parts of
the system suspected as a possible cause referring to
“P/S System Symptom Diagnosis” and based on
symptoms appearing on the vehicle (symptoms obtained
through steps of customer complaint analysis, trouble
symptom confirmation and/or basic P/S system check)
and repair or replace faulty parts, if any.
Step 9: Troubleshooting for DTC (See each DTC
Diag. Flow)
Based on the DTC indicated in Step 6 or 7 and referring
to the applicable DTC diag. flow, locate the cause of the
trouble, namely in a sensor, switch, wire harness,
connector, actuator, P/S control module or other part and
repair or replace faulty parts.
Step 10: Intermittent Problems Check
Check parts where an intermittent trouble is easy to
occur (e.g., wire harness, connector, etc.), referring to
“Intermittent and Poor Connection Inspection in Section
00” and related circuit of DTC recorded in Step 2.
Step 11: Final Confirmation Test
Confirm that the problem symptom has gone and the P/
S system is free from any abnormal conditions. If what
has been repaired is related to the DTC, clear the DTC
once, perform DTC confirmation procedure and confirm
that no DTC is indicated.
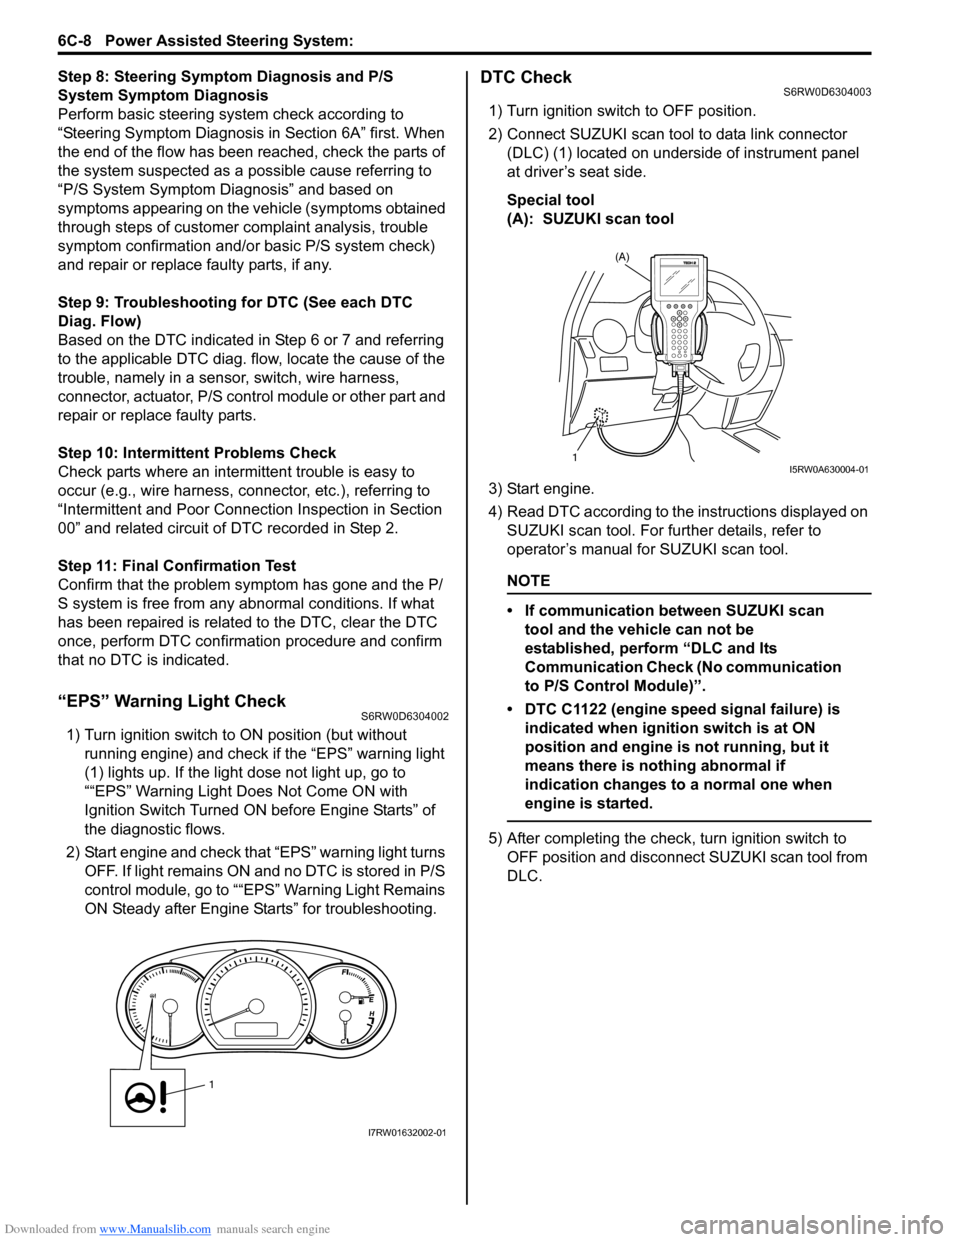
“EPS” Warning Light CheckS6RW0D6304002
1) Turn ignition switch to ON position (but without
running engine) and check if the “EPS” warning light
(1) lights up. If the light dose not light up, go to
““EPS” Warning Light Does Not Come ON with
Ignition Switch Turned ON before Engine Starts” of
the diagnostic flows.
2) Start engine and check that “EPS” warning light turns
OFF. If light remains ON and no DTC is stored in P/S
control module, go to ““EPS” Warning Light Remains
ON Steady after Engine Starts” for troubleshooting.
DTC CheckS6RW0D6304003
1) Turn ignition switch to OFF position.
2) Connect SUZUKI scan tool to data link connector
(DLC) (1) located on underside of instrument panel
at driver’s seat side.
Special tool
(A): SUZUKI scan tool
3) Start engine.
4) Read DTC according to the instructions displayed on
SUZUKI scan tool. For further details, refer to
operator’s manual for SUZUKI scan tool.
NOTE
• If communication between SUZUKI scan
tool and the vehicle can not be
established, perform “DLC and Its
Communication Check (No communication
to P/S Control Module)”.
• DTC C1122 (engine speed signal failure) is
indicated when ignition switch is at ON
position and engine is not running, but it
means there is nothing abnormal if
indication changes to a normal one when
engine is started.
5) After completing the check, turn ignition switch to
OFF position and disconnect SUZUKI scan tool from
DLC.
1
I7RW01632002-01
(A)
1I5RW0A630004-01