change wheel SUZUKI SX4 2008 1.G User Guide
[x] Cancel search | Manufacturer: SUZUKI, Model Year: 2008, Model line: SX4, Model: SUZUKI SX4 2008 1.GPages: 278, PDF Size: 4.07 MB
Page 195 of 278
9-6
INSPECTION AND MAINTENANCE
80J21-03E
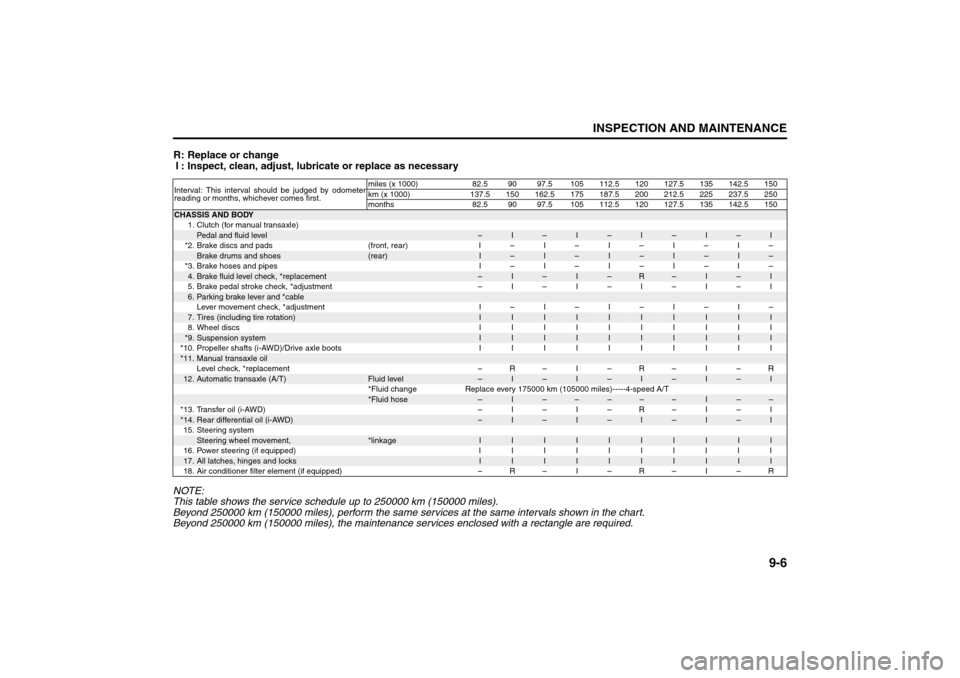
R: Replace or change
I : Inspect, clean, adjust, lubricate or replace as necessary
NOTE:
This table shows the service schedule up to 250000 km (150000 miles).
Beyond 250000 km (150000 miles), perform the same services at the same intervals shown in the chart.
Beyond 250000 km (150000 miles), the maintenance services enclosed with a rectangle are required.Interval: This interval should be judged by odometer
reading or months, whichever comes first.miles (x 1000) 82.5 90 97.5 105 112.5 120 127.5 135 142.5 150
km (x 1000) 137.5 150 162.5 175 187.5 200 212.5 225 237.5 250
months 82.5 90 97.5 105 112.5 120 127.5 135 142.5 150CHASSIS AND BODY
1. Clutch (for manual transaxle)
Pedal and fluid level
–
I
–
I
–
I
–
I
–
I
*2. Brake discs and pads (front, rear) I – I – I – I – I –
Brake drums and shoes
(rear)
I
–
I
–
I
–
I
–
I
–
*3. Brake hoses and pipes I – I – I – I – I –
4.Brake fluid level check, *replacement
–
I
–
I
–
R
–
I
–
I
5. Brake pedal stroke check, *adjustment – I – I – I – I – I
6.Parking brake lever and *cableLever movement check, *adjustment I – I – I – I – I –7.Tires (including tire rotation)
I
I
I
I
I
I
I
I
I
I
8. Wheel discs I I I I I I I I I I
*9.
Suspension system
I
I
I
I
I
I
I
I
I
I
*10. Propeller shafts (i-AWD)/Drive axle boots I I I I I I I I I I
*11.
Manual transaxle oilLevel check, *replacement – R – I – R – I – R
12.
Automatic transaxle (A/T)
Fluid level
–
I
–
I
–
I
–
I
–
I
*Fluid change Replace every 175000 km (105000 miles)-----4-speed A/T
*Fluid hose
–
I
–
–
–
–
–
I
–
–
*13. Transfer oil (i-AWD) – I – I – R – I – I
*14.
Rear differential oil (i-AWD)
–
I
–
I
–
I
–
I
–
I
15. Steering system
Steering wheel movement,
*linkage
I
I
I
I
I
I
I
I
I
I
16. Power steering (if equipped) I I I I I I I I I I
17.
All latches, hinges and locks
I
I
I
I
I
I
I
I
I
I
18. Air conditioner filter element (if equipped) – R – I – R – I – R
Maintenance Recommended under Severe Driving Condi-
tions: 1, 2, 3, 4, 5, 6, 9, 10
Page 198 of 278
9-9INSPECTION AND MAINTENANCE
80J21-03E
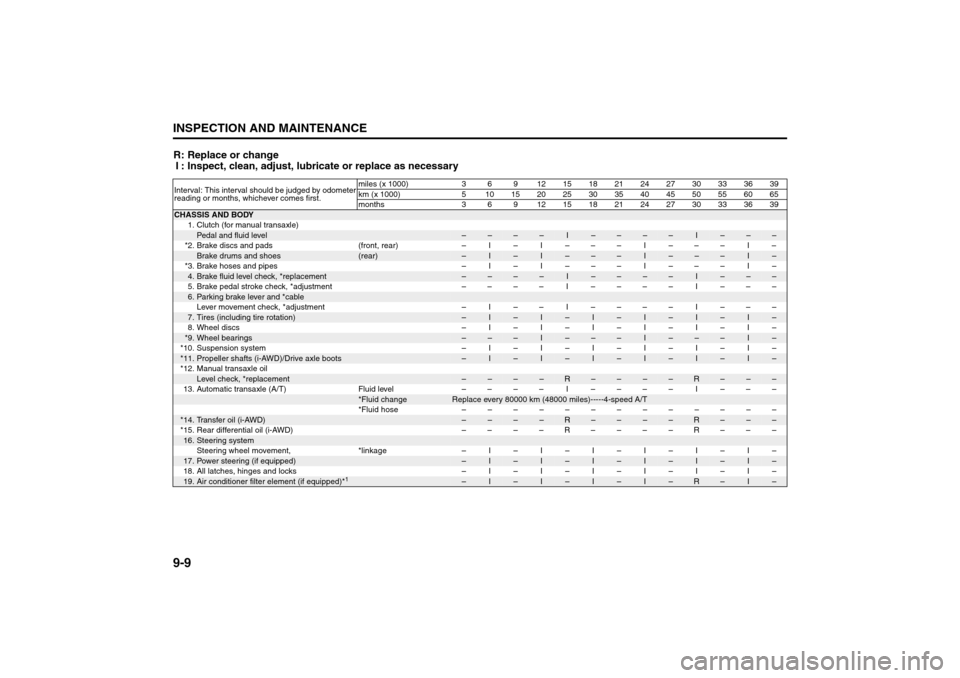
R: Replace or change
I : Inspect, clean, adjust, lubricate or replace as necessaryInterval: This interval should be judged by odometer
reading or months, whichever comes first.miles (x 1000) 3 6 9 12 15 18 21 24 27 30 33 36 39
km (x 1000) 5 101520253035404550556065
months 3 6 9 12 15 18 21 24 27 30 33 36 39CHASSIS AND BODY
1. Clutch (for manual transaxle)
Pedal and fluid level
–
–
–
–
I
–
–
–
–
I
–
–
–
*2. Brake discs and pads (front, rear) – I – I – – – I – – – I –
Brake drums and shoes
(rear)
–
I
–
I
–
–
–
I
–
–
–
I
–
*3. Brake hoses and pipes – I – I – – – I – – – I –
4.Brake fluid level check, *replacement
–
–
–
–
I
–
–
–
–
I
–
–
–
5.Brake pedal stroke check, *adjustment –––– I –––– I –––
6.Parking brake lever and *cableLever movement check, *adjustment – I –– I –––– I –––7.Tires (including tire rotation)
–
I
–
I
–
I
–
I
–
I
–
I
–
8. Wheel discs – I – I – I – I – I – I –
*9.
Wheel bearings
–
–
–
I
–
–
–
I
–
–
–
I
–
*10. Suspension system – I – I – I – I – I – I –
*11.
Propeller shafts (i-AWD)/Drive axle boots
–
I
–
I
–
I
–
I
–
I
–
I
–
*12. Manual transaxle oil
Level check, *replacement
–
–
–
–
R
–
–
–
–
R
–
–
–
13.Automatic transaxle (A/T) Fluid level –––– I –––– I –––
*Fluid change
Replace every 80000 km (48000 miles)-----4-speed A/T
*Fluid hose –––––––––––––
*14.
Transfer oil (i-AWD)
–
–
–
–
R
–
–
–
–
R
–
–
–
*15.Rear differential oil (i-AWD) ––––R––––R–––
16.
Steering systemSteering wheel movement, *linkage – I – I – I – I – I – I –
17.
Power steering (if equipped)
–
I
–
I
–
I
–
I
–
I
–
I
–
18. All latches, hinges and locks – I – I – I – I – I – I –
19.
Air conditioner filter element (if equipped)*
1
–
I
–
I
–
I
–
I
–
R
–
I
–
Engine Oil and Filter: 1, 2
Page 199 of 278
9-10
INSPECTION AND MAINTENANCE
80J21-03E
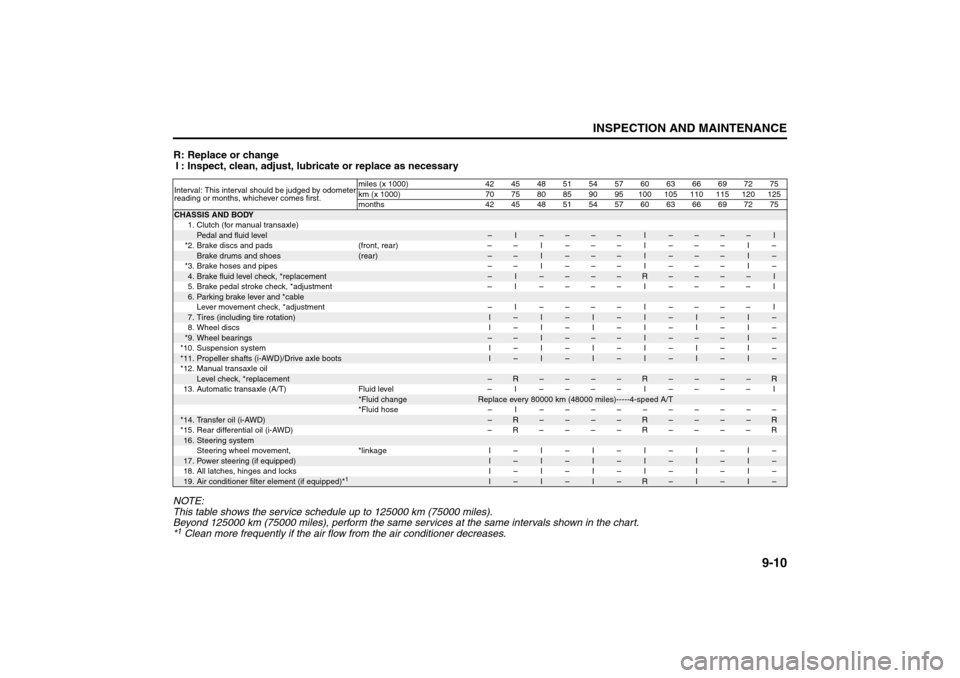
R: Replace or change
I : Inspect, clean, adjust, lubricate or replace as necessary
NOTE:
This table shows the service schedule up to 125000 km (75000 miles).
Beyond 125000 km (75000 miles), perform the same services at the same intervals shown in the chart.
*1 Clean more frequently if the air flow from the air conditioner decreases.Interval: This interval should be judged by odometer
reading or months, whichever comes first.miles (x 1000) 42 45 48 51 54 57 60 63 66 69 72 75
km (x 1000) 70 75 80 85 90 95 100 105 110 115 120 125
months 42 45 48 51 54 57 60 63 66 69 72 75CHASSIS AND BODY
1. Clutch (for manual transaxle)
Pedal and fluid level
–
I
–
–
–
–
I
–
–
–
–
I
*2. Brake discs and pads (front, rear) – – I – – – I – – – I –
Brake drums and shoes
(rear)
–
–
I
–
–
–
I
–
–
–
I
–
*3. Brake hoses and pipes – – I – – – I – – – I –
4.Brake fluid level check, *replacement
–
I
–
–
–
–
R
–
–
–
–
I
5.Brake pedal stroke check, *adjustment – I –––– I –––– I
6.Parking brake lever and *cableLever movement check, *adjustment – I –––– I –––– I7.Tires (including tire rotation)
I
–
I
–
I
–
I
–
I
–
I
–
8.Wheel discs I–I–I–I–I–I–
*9.
Wheel bearings
–
–
I
–
–
–
I
–
–
–
I
–
*10. Suspension system I – I – I – I – I – I –
*11.
Propeller shafts (i-AWD)/Drive axle boots
I
–
I
–
I
–
I
–
I
–
I
–
*12. Manual transaxle oil
Level check, *replacement
–
R
–
–
–
–
R
–
–
–
–
R
13.Automatic transaxle (A/T) Fluid level – I –––– I –––– I
*Fluid change
Replace every 80000 km (48000 miles)-----4-speed A/T
*Fluid hose – I ––––––––––
*14.
Transfer oil (i-AWD)
–
R
–
–
–
–
R
–
–
–
–
R
*15.Rear differential oil (i-AWD) –R––––R––––R
16.
Steering systemSteering wheel movement, *linkage I – I – I – I – I – I –
17.
Power steering (if equipped)
I
–
I
–
I
–
I
–
I
–
I
–
18. All latches, hinges and locks I – I – I – I – I – I –
19.
Air conditioner filter element (if equipped)*
1
I
–
I
–
I
–
R
–
I
–
I
–
Engine Oil and Filter: 1, 2
Gear Oil: 6, 10
Page 217 of 278
9-28
INSPECTION AND MAINTENANCE
80J21-03E
Uniform Tire Quality GradingThe U.S. National Highway Traffic Safety
Administration has developed a grading
system for evaluating the performance of
passenger car tires. The following informa-
tion will help you understand the grading
system, which applies to vehicles sold in
the U.S. Consult your SUZUKI dealer or
tire retailer for help in choosing the correct
replacement tires for your vehicle.
Quality grades can be found where appli-
cable on the tire sidewall between tread
shoulder and maximum section width. For
example:
Treadwear 200 Traction AA Temperature ADOT Quality Grades
Treadwear
Traction AA A B C
Temperature A B CAll Passenger Car Tires Must Conform To
Federal Safety Requirements in Addition
To These GradesTreadwear
The treadwear grade is a comparative rat-
ing based on the wear rate of the tire when
tested under controlled conditions on a
specified government test course. For
example, a tire graded 150 would wear one
and one-half (1 1/2) times as well on the
government course as a tire graded 100.
The relative performance of tires depends
upon the actual conditions of their use,
however and may depart significantly from
the norm due to variations in driving habits,
service practices and differences in road
characteristics and climate.
Traction – AA, A, B, C
The traction grades, from highest to low-
est, are AA, A, B and C. Those grades rep-
resent the tire’s ability to stop on wet
pavement as measured under controlled
conditions on specified government test
surfaces of asphalt and concrete. A tire
marked C may have poor traction perfor-
mance.
CAUTION
For intelligent All Wheel Drive (i-
AWD) models, replacing a tire with
one of a different size, or using differ-
ent brands among the four tires can
result in damage to the drive train.
WARNING
Replacing the wheels and tires
equipped on your vehicle with certain
combinations of aftermarket wheels
and tires can significantly change the
steering and handling characteris-
tics of your vehicle. Oversized tires
may also rub against the fender over
bumps, causing vehicle damage or
tire failure. Therefore, use only those
wheel and tire combinations
approved by SUZUKI Motor Corpora-
tion as standard or optional equip-
ment for your vehicle. For
information regarding the specified
tires, refer to the Tire Information
Label located on the driver’s side
door pillar or the “SPECIFICATIONS”
section.
CAUTION
Replacing the original tires with tires
of a different size may result in false
speedometer or odometer readings.
Check with your SUZUKI dealer
before purchasing replacement tires
that differ in size from the original
tires.
WARNING
The traction grade assigned to this
tire is based on straight-ahead brak-
ing traction tests, and does not
include acceleration, cornering,
hydroplaning or peak traction charac-
teristics.
Tires: 6
Page 218 of 278
9-29INSPECTION AND MAINTENANCE
80J21-03E
Temperature – A, B, C
The temperature grades are A (the high-
est), B and C, representing the tire’s resis-
tance to the generation of heat and its
ability to dissipate heat when tested under
controlled conditions on a specified indoor
laboratory test wheel. Sustained high tem-
perature can cause the material of the tire
to degenerate and reduce tire life, and
excessive temperature can lead to sudden
tire failure. The grade C corresponds to a
level of performance which all passenger
car tires must meet under the Federal
Motor Vehicle Safety Standard No. 109.
Grades B and A represent higher levels of
performance on the laboratory test wheel
than the minimum required by law.
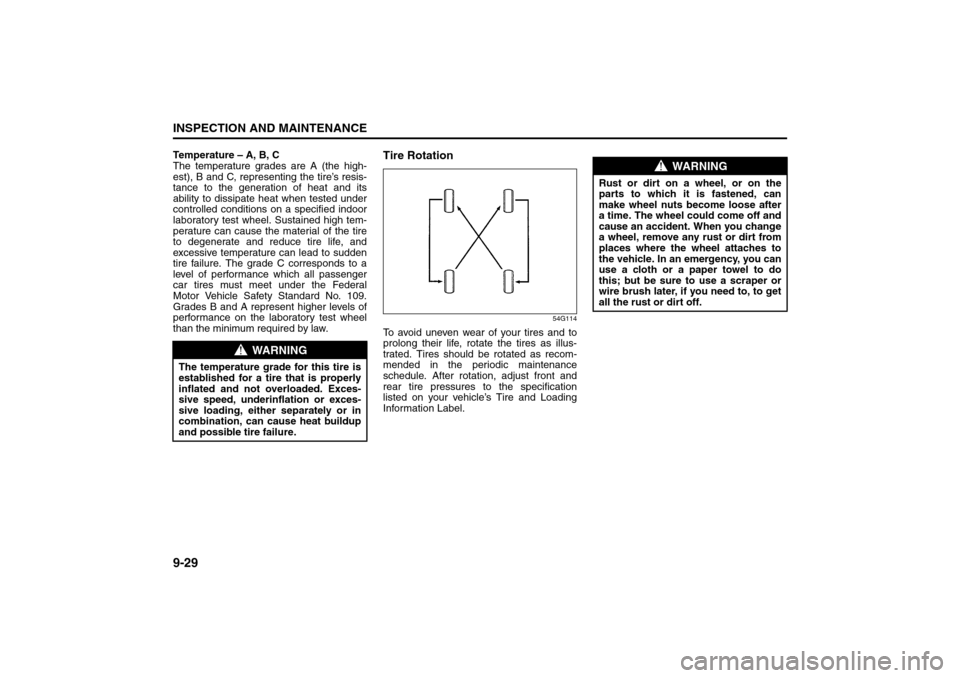
Tire Rotation
54G114
To avoid uneven wear of your tires and to
prolong their life, rotate the tires as illus-
trated. Tires should be rotated as recom-
mended in the periodic maintenance
schedule. After rotation, adjust front and
rear tire pressures to the specification
listed on your vehicle’s Tire and Loading
Information Label.
WARNING
The temperature grade for this tire is
established for a tire that is properly
inflated and not overloaded. Exces-
sive speed, underinflation or exces-
sive loading, either separately or in
combination, can cause heat buildup
and possible tire failure.
WARNING
Rust or dirt on a wheel, or on the
parts to which it is fastened, can
make wheel nuts become loose after
a time. The wheel could come off and
cause an accident. When you change
a wheel, remove any rust or dirt from
places where the wheel attaches to
the vehicle. In an emergency, you can
use a cloth or a paper towel to do
this; but be sure to use a scraper or
wire brush later, if you need to, to get
all the rust or dirt off.
Tires: 6
Page 220 of 278
9-31INSPECTION AND MAINTENANCE
80J21-03E
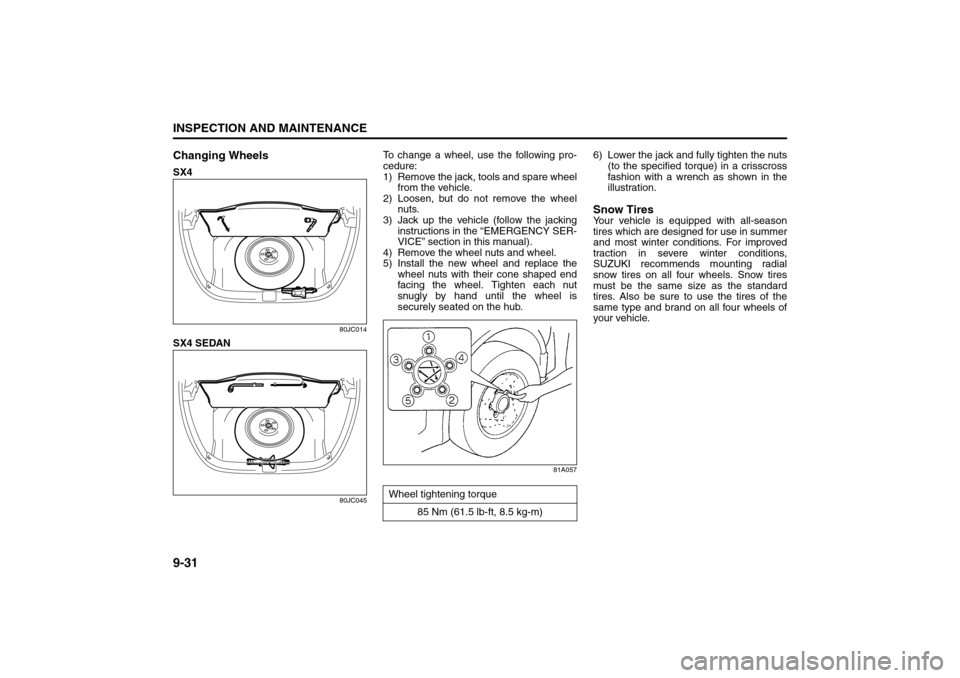
Changing WheelsSX4
80JC014
SX4 SEDAN
80JC045
To change a wheel, use the following pro-
cedure:
1) Remove the jack, tools and spare wheel
from the vehicle.
2) Loosen, but do not remove the wheel
nuts.
3) Jack up the vehicle (follow the jacking
instructions in the “EMERGENCY SER-
VICE” section in this manual).
4) Remove the wheel nuts and wheel.
5) Install the new wheel and replace the
wheel nuts with their cone shaped end
facing the wheel. Tighten each nut
snugly by hand until the wheel is
securely seated on the hub.
81A057
6) Lower the jack and fully tighten the nuts
(to the specified torque) in a crisscross
fashion with a wrench as shown in the
illustration.Snow TiresYour vehicle is equipped with all-season
tires which are designed for use in summer
and most winter conditions. For improved
traction in severe winter conditions,
SUZUKI recommends mounting radial
snow tires on all four wheels. Snow tires
must be the same size as the standard
tires. Also be sure to use the tires of the
same type and brand on all four wheels of
your vehicle.
Wheel tightening torque
85 Nm (61.5 lb-ft, 8.5 kg-m)
Tires: 6
Battery: 9
Page 241 of 278
10-2
EMERGENCY SERVICE
80J21-03E
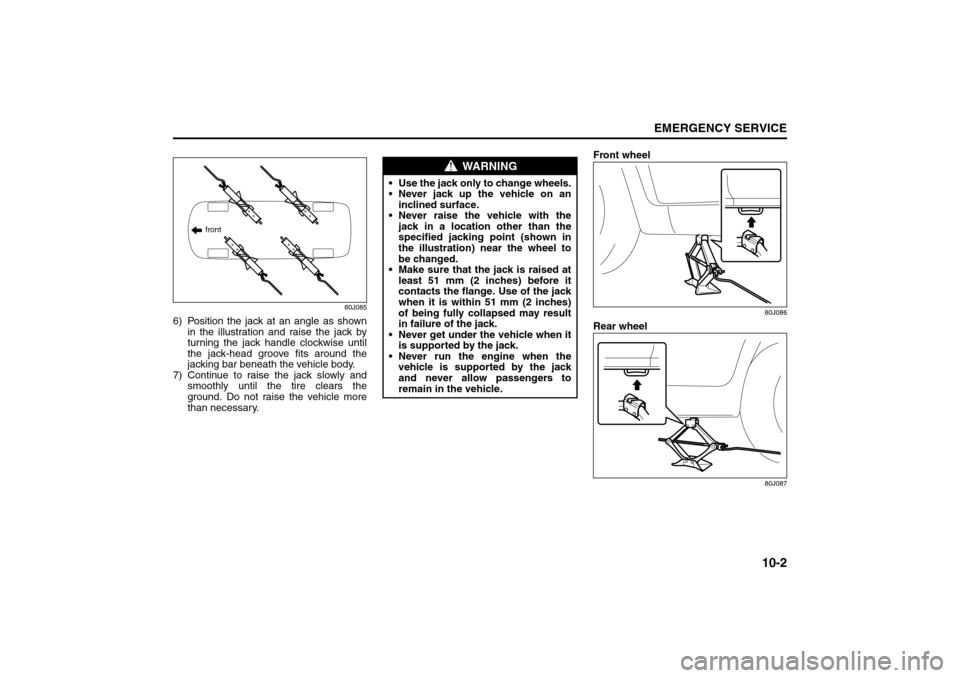
80J085
6) Position the jack at an angle as shown
in the illustration and raise the jack by
turning the jack handle clockwise until
the jack-head groove fits around the
jacking bar beneath the vehicle body.
7) Continue to raise the jack slowly and
smoothly until the tire clears the
ground. Do not raise the vehicle more
than necessary.Front wheel
80J086
Rear wheel
80J087
front
WARNING
Use the jack only to change wheels.
Never jack up the vehicle on an
inclined surface.
Never raise the vehicle with the
jack in a location other than the
specified jacking point (shown in
the illustration) near the wheel to
be changed.
Make sure that the jack is raised at
least 51 mm (2 inches) before it
contacts the flange. Use of the jack
when it is within 51 mm (2 inches)
of being fully collapsed may result
in failure of the jack.
Never get under the vehicle when it
is supported by the jack.
Never run the engine when the
vehicle is supported by the jack
and never allow passengers to
remain in the vehicle.
Jacking Instructions: 5
Page 267 of 278
14-1
SPECIFICATIONS
80J21-03E
14
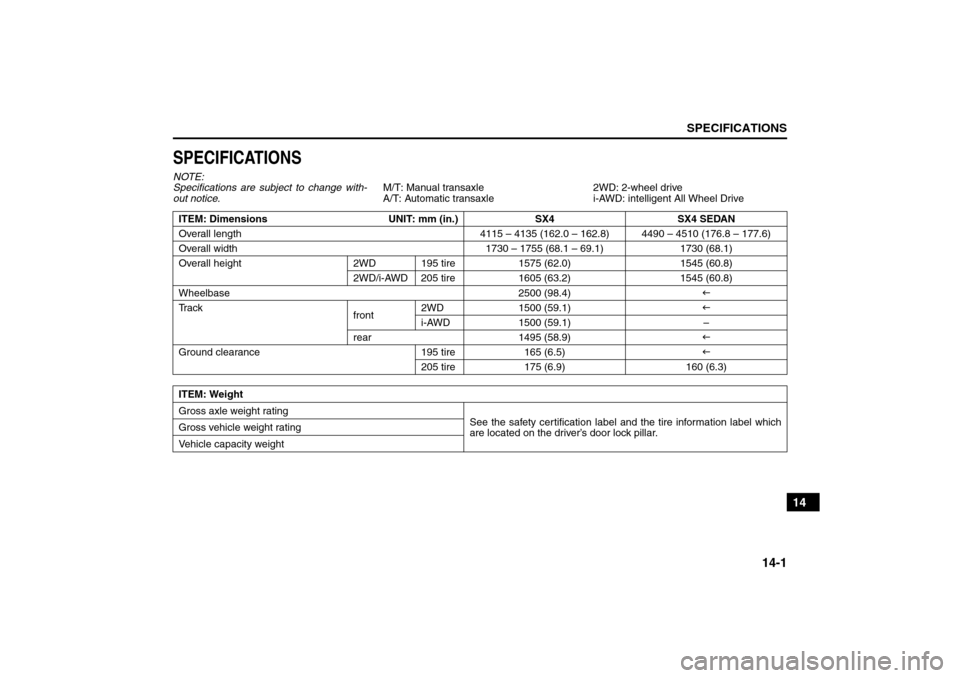
SPECIFICATIONSNOTE:
Specifications are subject to change with-
out notice.M/T: Manual transaxle
A/T: Automatic transaxle2WD: 2-wheel drive
i-AWD: intelligent All Wheel Drive
ITEM: Dimensions UNIT: mm (in.) SX4 SX4 SEDAN
Overall length 4115 – 4135 (162.0 – 162.8) 4490 – 4510 (176.8 – 177.6)
Overall width 1730 – 1755 (68.1 – 69.1) 1730 (68.1)
Overall height 2WD 195 tire 1575 (62.0) 1545 (60.8)
2WD/i-AWD 205 tire 1605 (63.2) 1545 (60.8)
Wheelbase 2500 (98.4)�I
Tr a c k
front2WD 1500 (59.1)�I
i-AWD 1500 (59.1) –
rear 1495 (58.9)�I
Ground clearance 195 tire 165 (6.5)�I
205 tire 175 (6.9) 160 (6.3)
ITEM: Weight
Gross axle weight rating
See the safety certification label and the tire information label which
are located on the driver’s door lock pillar. Gross vehicle weight rating
Vehicle capacity weight
Specifications: 1, 2, 5, 6, 7, 10, 11
Page 273 of 278
15-3
INDEX80J21-03E
If You Can Not Shift Automatic Transaxle Gearshift
Lever Out of “P” (PARK)..................................................... 10-6
If Your Vehicle Gets Stuck .................................................... 7-2
Ignition Key Reminder........................................................... 2-1
Ignition Switch ....................................................................... 3-1
Improving Fuel Economy .................................................... 6-20
Information Display ............................................................. 4-17
Inside Rearview Mirror ........................................................ 2-18
Installation of Child Restraint with Top Strap ................... 2-37
Installation with Lap-Shoulder Seat Belts
(child restraint with no top strap)....................................... 2-31
Installation with the LATCH System .................................. 2-34
Instrument Cluster ................................................................. 4-2
Instrument Light Brightness Control ................................. 4-14
Instrument Panel.................................................................... 4-1
intelligent All Wheel Drive (i-AWD) AUTO Indicator
Light ........................................................................................ 4-9
intelligent All Wheel Drive (i-AWD) LOCK Indicator
Light ........................................................................................ 4-9
Interior Light Switch .............................................................. 5-8JJacking Instructions ............................................................ 10-1
Jump Starting Instructions ................................................. 10-3KKeyless Entry System Transmitter .................................... 2-10
Keyless Start System Indicator Light .................................. 4-8
Keyless Start System Remote Controller ............................ 2-3
Keys ........................................................................................ 2-1LLap-Shoulder Belt ................................................................ 2-24
Lighting Operation................................................................. 3-5Lighting/Turn Signal Control Lever ...................................... 3-5
Lights “On” reminder ............................................................ 3-5
Listening to a CD.................................................................. 4-39
Listening to a CD from an External CD Changer
(Option) ................................................................................. 4-50
Listening to a XM Satellite Radio (Option)......................... 4-47
Listening to Audio for AUX (Option) .................................. 4-49
Listening to the Radio ......................................................... 4-37
Low Fuel Warning Light ........................................................ 4-8
Low Tire Pressure Warning Light ................................ 4-3, 6-15
Luggage Compartment Cover............................................. 5-14
Luggage Compartment Light .............................................. 5-15
MMaintenance Recommended under Severe Driving
Conditions .............................................................................. 9-7
Maintenance Schedule .......................................................... 9-2
Malfunction Indicator Light ................................................... 4-7
Manual Heating and Air Conditioning System .................. 4-25
Manual Transaxle ................................................................... 6-6
Mirrors ................................................................................... 2-18OOdometer .............................................................................. 4-11
Oil Level Check .................................................................... 9-11
Oil Pressure Light.................................................................. 4-6
On-Board Vehicle Computers and Event Data
Recorders ............................................................................. 12-3
Open Door Warning Light ..................................................... 4-8
Outside Rearview Mirrors.................................................... 2-19PParking Brake Lever ..................................................... 5-1, 9-23
Pedals...................................................................................... 5-1