gear SUZUKI SX4 2008 1.G User Guide
[x] Cancel search | Manufacturer: SUZUKI, Model Year: 2008, Model line: SX4, Model: SUZUKI SX4 2008 1.GPages: 278, PDF Size: 4.07 MB
Page 173 of 278
6-18
OPERATING YOUR VEHICLE
80J21-03E
When the TPMS sensor’s electronic sig-
nal is disturbed in one of the following
ways:
– Electric devices or facilities using simi-
lar radio wave frequencies are nearby.
– A lot of snow or ice covers the vehicle,
in particular, around the wheels or
wheel housings.
– Snow tires or tire chains are used.
When you use non-genuine SUZUKI
wheels or tires.Replacing Tires and/or WheelsIf you get a flat tire, Suzuki recommends
that you have an authorized SUZUKI
dealer mount a new tire on the wheel that
had the flat tire, and reinstall this tire on the
vehicle in place of the spare. The TPMS is
already set up to recognize the ID code of
the original wheel, and normal TPMS oper-
ation will be restored.
If you need to replace original wheels on
your vehicle, your dealer must make sure
that TPMS sensors are installed in the new
wheels and must set up the TPMS to rec-
ognize the new sensors.
NOTE:
A TPMS sensor is not installed in the spare
tire. You should use the spare tire only in
an emergency situation, and should
replace the spare tire as soon as possible
to restore normal TPMS operation.
For Vehicles Sold in U.S.A.This device complies with Part 15 of the
FCC Rules.
Operation is subject to the following two
conditions:
1) This device may not cause harmful
interference.
2) This device must accept any interfer-
ence received, including interference
that may cause undesired operation.
NOTE:
Changes or modifications not expressly
approved by the party responsible for com-
pliance could void the user’s authority to
operate the equipment.Traveling to CANADAPlease note that service for the tire pres-
sure monitoring system may not be avail-
able in CANADA should there be any
problems or malfunctions in the system.
Break-In
WARNING
Only use tires and wheels recom-
mended by SUZUKI as standard or
optional equipment for your vehicle.
Use of tires or wheels not recom-
mended by SUZUKI can result in
TPMS failure. Refer to “Tires” in the
“INSPECTION AND MAINTENANCE”
section for additional information.
CAUTION
The future performance and reliabil-
ity of the engine depends on the care
and restraint exercised during its
early life. It is especially important to
observe the following precautions
during the initial 960 km (600 miles)
of vehicle operation.
After starting, do not race the
engine. Warm it up gradually.
Avoid prolonged vehicle operation
at a constant speed. Moving parts
will break in better if you vary your
speed.
Start off from a stop slowly. Avoid
full throttle starts.
Avoid hard stopping, especially
during the first 320 km (200 miles)
of driving.
Do not drive slowly with the tran-
saxle in a high gear.
Drive the vehicle at moderate
engine speeds.
Page 174 of 278
6-19OPERATING YOUR VEHICLE
80J21-03E
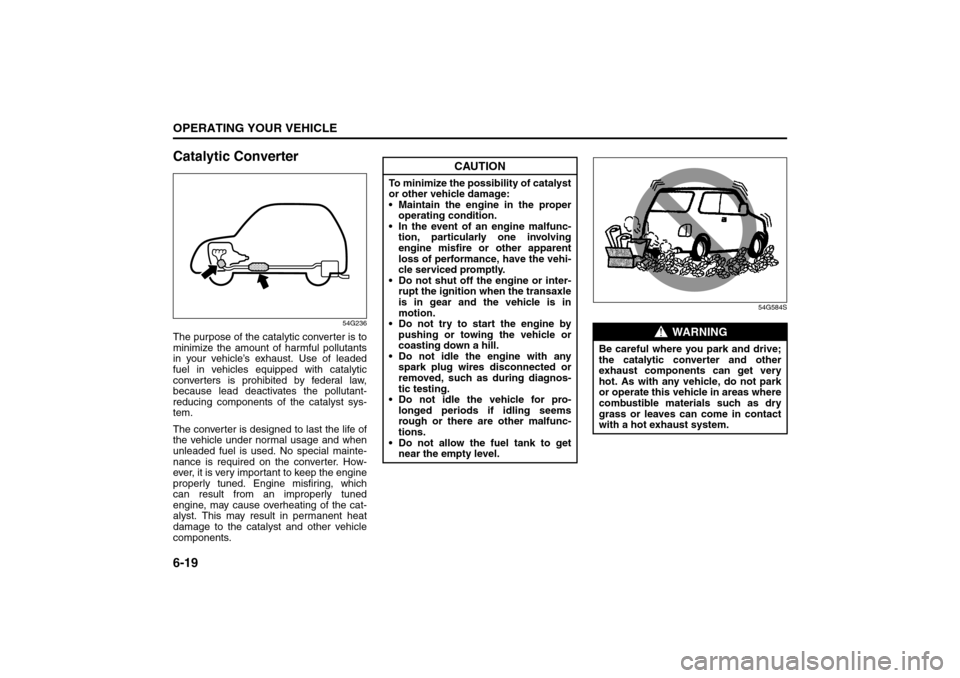
Catalytic Converter
54G236
The purpose of the catalytic converter is to
minimize the amount of harmful pollutants
in your vehicle’s exhaust. Use of leaded
fuel in vehicles equipped with catalytic
converters is prohibited by federal law,
because lead deactivates the pollutant-
reducing components of the catalyst sys-
tem.
The converter is designed to last the life of
the vehicle under normal usage and when
unleaded fuel is used. No special mainte-
nance is required on the converter. How-
ever, it is very important to keep the engine
properly tuned. Engine misfiring, which
can result from an improperly tuned
engine, may cause overheating of the cat-
alyst. This may result in permanent heat
damage to the catalyst and other vehicle
components.
54G584S
CAUTION
To minimize the possibility of catalyst
or other vehicle damage:
Maintain the engine in the proper
operating condition.
In the event of an engine malfunc-
tion, particularly one involving
engine misfire or other apparent
loss of performance, have the vehi-
cle serviced promptly.
Do not shut off the engine or inter-
rupt the ignition when the transaxle
is in gear and the vehicle is in
motion.
Do not try to start the engine by
pushing or towing the vehicle or
coasting down a hill.
Do not idle the engine with any
spark plug wires disconnected or
removed, such as during diagnos-
tic testing.
Do not idle the vehicle for pro-
longed periods if idling seems
rough or there are other malfunc-
tions.
Do not allow the fuel tank to get
near the empty level.
WARNING
Be careful where you park and drive;
the catalytic converter and other
exhaust components can get very
hot. As with any vehicle, do not park
or operate this vehicle in areas where
combustible materials such as dry
grass or leaves can come in contact
with a hot exhaust system.
Page 178 of 278
7-1DRIVING TIPS
80J21-03E
52D078S
Highway DrivingWhen driving at highway speeds, pay
attention to the following:
Stopping distance progressively
increases with vehicle speed. Apply the
brakes far enough ahead of the stopping
point to allow for the extra stopping dis-
tance.
On rainy days, “Hydroplaning” can occur.
“Hydroplaning” is the loss of direct con-
tact between the road surface and the
vehicle’s tires due to a water film forming
between them. Steering or braking the
vehicle while “Hydroplaning” can be very
difficult, and loss of control can occur.
Keep speed down when the road surface
is wet.
At high speeds, the vehicle may be
affected by side winds. Therefore,
reduce speed and be prepared for unex-
pected buffeting, which can occur at the
exits of tunnels, when passing by a cut of
a hill, or when being overtaken by large
vehicles, etc.
Driving on Hills
77J029S
When climbing steep hills, the car may
begin to slow down and show a lack of
power. If this happens, you should shift
to a lower gear so that the engine will
again be operating in its normal power
range. Shift rapidly to prevent the car
from losing momentum.
When driving down a hill, the engine
should be used for braking by shifting to
next lower gear. (Do this with EITHER an
automatic or manual transaxle.)
WARNING
Wear Your Seat Belts at All Times.
Even though air bags are equipped
at the front seating positions, the
driver and all passengers should
be properly restrained at all times,
using the seat belts provided. Refer
to the “Seat Belts and Child
Restraint Systems” section for
instructions on proper use of the
seat belts.
Never drive while under the influ-
ence of alcohol or other drugs.
Alcohol and drugs can seriously
impair your ability to drive safely,
greatly increasing the risk of injury
to yourself and others. You should
also avoid driving when you are
tired, sick, irritated or under stress.
Highway Driving: NO
Driving on Hills: NO
Page 179 of 278
7-2
DRIVING TIPS
80J21-03E
Driving on Slippery Roads
60G089S
Under wet road conditions you should
drive at a lower speed than on dry roads
due to possible slippage of tires during
braking. When driving on icy, snow-cov-
ered, or muddy roads, reduce your speed
and avoid sudden acceleration, abrupt
braking, or sharp steering movements.intelligent All Wheel Drive (i-AWD)
ModelsYour i-AWD provides greater traction on
slippery roads than 2-wheel drive models.
However, your i-AWD will not have as
much traction in deep snow, mud or sand
as multipurpose 4WD vehicles. You should
not attempt to drive your i-AWD in deep
snow, mud or sand. i-AWD models are not
sport/utility vehicles, and are not designed
for off-road use.If Your Vehicle Gets Stuck
If your vehicle gets stuck in snow, mud or
sand, follow the directions below:
1) Shift the transaxle back and forth
between a forward range (or first gear
for manual transaxle) and reverse. This
will create a rocking motion which may
give you enough momentum to free the
vehicle. Press gently on the accelerator
to keep wheel spinning to a minimum
wheel rpm. Remove your foot from the
accelerator while shifting.
Do not race the engine. Excessive
wheel spin will cause the tires to dig
deeper, making it more difficult to free
the vehicle.
2) If your vehicle remains stuck after a few
minutes of rocking, get another vehicle
to pull your vehicle out.
WARNING
Try not to hold the brake pedal down
too long or too often while going
down a steep or long hill. This could
cause the brakes to overheat, result-
ing in reduced braking efficiency.
Failure to take this precaution could
result in loss of vehicle control.
CAUTION
When descending a down hill,
NEVER turn the ignition key to the
“OFF” position. Emission control
system and automatic transaxle (if
equipped) damage may result.
WARNING
Do not allow anyone to stand near the
vehicle when you are rocking it, and
do not spin the wheels faster than an
indicated 40 km/h (25 mph) on the
speedometer. Personal injury and/or
vehicle damage may result from spin-
ning the wheels too fast.
Driving on Hills: NO
Driving on Slippery Roads: NO
Page 189 of 278
INSPECTION AND MAINTENANCE
9
80J21-03E
60G410
INSPECTION AND MAINTENANCEMaintenance Schedule ....................................................... 9-2
Periodic Maintenance Schedule ........................................ 9-3
Maintenance Recommended under Severe Driving
Conditions ........................................................................... 9-7
Engine Oil and Filter ........................................................... 9-11
Gear Oil ................................................................................ 9-14
Automatic Transaxle Fluid ................................................. 9-16
Engine Coolant .................................................................... 9-17
Windshield Washer Fluid ................................................... 9-19
Air Cleaner ........................................................................... 9-19
Spark Plugs ......................................................................... 9-20
Brakes .................................................................................. 9-21
Steering Wheel .................................................................... 9-23
Clutch Pedal ........................................................................ 9-24
Tires ...................................................................................... 9-24
Battery .................................................................................. 9-35
Fuses .................................................................................... 9-35
Headlight Aiming ................................................................. 9-39
Bulb Replacement ............................................................... 9-39
Wiper Blades ....................................................................... 9-44
Air Conditioning System .................................................... 9-48
Page 199 of 278
9-10
INSPECTION AND MAINTENANCE
80J21-03E
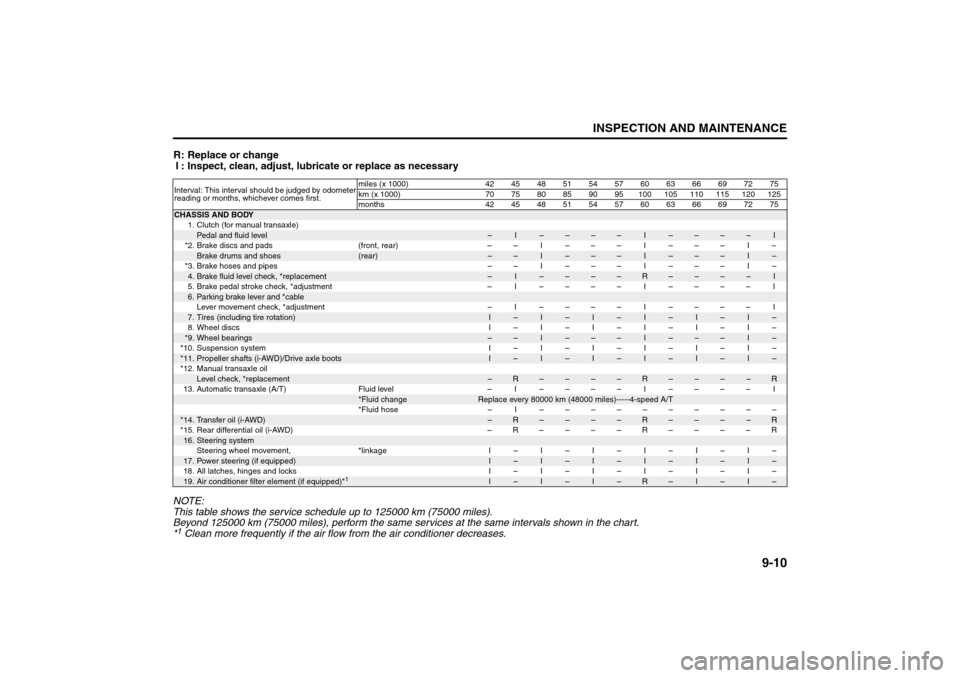
R: Replace or change
I : Inspect, clean, adjust, lubricate or replace as necessary
NOTE:
This table shows the service schedule up to 125000 km (75000 miles).
Beyond 125000 km (75000 miles), perform the same services at the same intervals shown in the chart.
*1 Clean more frequently if the air flow from the air conditioner decreases.Interval: This interval should be judged by odometer
reading or months, whichever comes first.miles (x 1000) 42 45 48 51 54 57 60 63 66 69 72 75
km (x 1000) 70 75 80 85 90 95 100 105 110 115 120 125
months 42 45 48 51 54 57 60 63 66 69 72 75CHASSIS AND BODY
1. Clutch (for manual transaxle)
Pedal and fluid level
–
I
–
–
–
–
I
–
–
–
–
I
*2. Brake discs and pads (front, rear) – – I – – – I – – – I –
Brake drums and shoes
(rear)
–
–
I
–
–
–
I
–
–
–
I
–
*3. Brake hoses and pipes – – I – – – I – – – I –
4.Brake fluid level check, *replacement
–
I
–
–
–
–
R
–
–
–
–
I
5.Brake pedal stroke check, *adjustment – I –––– I –––– I
6.Parking brake lever and *cableLever movement check, *adjustment – I –––– I –––– I7.Tires (including tire rotation)
I
–
I
–
I
–
I
–
I
–
I
–
8.Wheel discs I–I–I–I–I–I–
*9.
Wheel bearings
–
–
I
–
–
–
I
–
–
–
I
–
*10. Suspension system I – I – I – I – I – I –
*11.
Propeller shafts (i-AWD)/Drive axle boots
I
–
I
–
I
–
I
–
I
–
I
–
*12. Manual transaxle oil
Level check, *replacement
–
R
–
–
–
–
R
–
–
–
–
R
13.Automatic transaxle (A/T) Fluid level – I –––– I –––– I
*Fluid change
Replace every 80000 km (48000 miles)-----4-speed A/T
*Fluid hose – I ––––––––––
*14.
Transfer oil (i-AWD)
–
R
–
–
–
–
R
–
–
–
–
R
*15.Rear differential oil (i-AWD) –R––––R––––R
16.
Steering systemSteering wheel movement, *linkage I – I – I – I – I – I –
17.
Power steering (if equipped)
I
–
I
–
I
–
I
–
I
–
I
–
18. All latches, hinges and locks I – I – I – I – I – I –
19.
Air conditioner filter element (if equipped)*
1
I
–
I
–
I
–
R
–
I
–
I
–
Engine Oil and Filter: 1, 2
Gear Oil: 6, 10
Page 200 of 278
9-11INSPECTION AND MAINTENANCE
80J21-03E
Engine Oil and FilterSpecified Oil
52D083
(1) Preferred
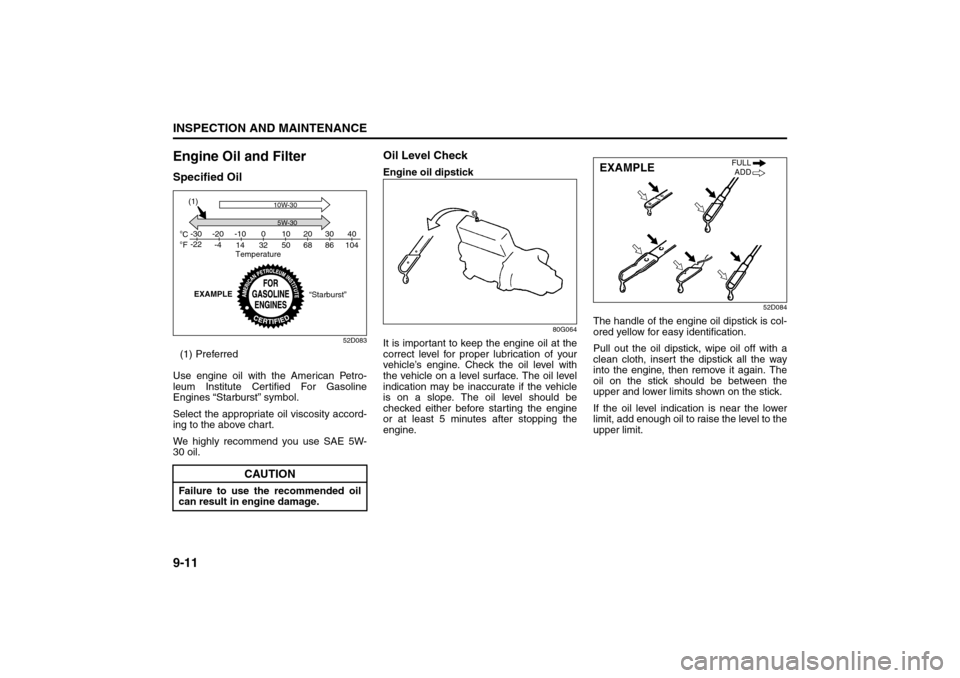
Use engine oil with the American Petro-
leum Institute Certified For Gasoline
Engines “Starburst” symbol.
Select the appropriate oil viscosity accord-
ing to the above chart.
We highly recommend you use SAE 5W-
30 oil.
Oil Level CheckEngine oil dipstick
80G064
It is important to keep the engine oil at the
correct level for proper lubrication of your
vehicle’s engine. Check the oil level with
the vehicle on a level surface. The oil level
indication may be inaccurate if the vehicle
is on a slope. The oil level should be
checked either before starting the engine
or at least 5 minutes after stopping the
engine.
52D084
The handle of the engine oil dipstick is col-
ored yellow for easy identification.
Pull out the oil dipstick, wipe oil off with a
clean cloth, insert the dipstick all the way
into the engine, then remove it again. The
oil on the stick should be between the
upper and lower limits shown on the stick.
If the oil level indication is near the lower
limit, add enough oil to raise the level to the
upper limit.
CAUTION
Failure to use the recommended oil
can result in engine damage.C
Fo o-30
-22-20
-4-10
14 32 50 68 86 104010203040
10W-30
(1)
5W-30
Temperature
EXAMPLE
“Starburst”
EXAMPLE
FULL
ADD
Gear Oil: 6, 10
Page 203 of 278

9-14
INSPECTION AND MAINTENANCE
80J21-03E
80J014
Gear OilSpecified Gear OilManual transaxle (API GL-4)
54G095
Rear differential oil (i-AWD)/Transfer oil
of automatic transaxle model (i-AWD)
(API GL-5 Hypoid)
54G096
When replacing gear oil, use the appropri-
ate viscosity and grade as shown in the
charts below.
We highly recommend you use:
API GL-4 SAE 75W-90 for manual tran-
saxle gear oil
API GL-5 hypoid gear oil SAE 80W-90 for
rear differential oil (i-AWD) and transfer oil
of automatic transaxle model (i-AWD)
CAUTION
Oil leaks from around the oil filter or
drain plug indicate incorrect installa-
tion or gasket damage. If you find any
leaks or are not sure that the filter
has been properly tightened, have
the vehicle inspected by your SUZUKI
dealer.EXAMPLE
API GRADE
Manual transaxle GL-4
Rear differential oil
(i-AWD)/Transfer oil
(i-AWD A/T)GL-5 (Hypoid
gear oil)
Engine Coolant: 1, 2
Page 204 of 278

9-15INSPECTION AND MAINTENANCE
80J21-03E
Manual transaxle
54G097
Transfer case (i-AWD)
80J007
(1) Oil filler and level plugRear differential (i-AWD)
80J015
(1) Oil filler and level plug
Tightening torque
Gear Oil Level CheckThe manual transaxle, transfer gears (i-
AWD A/T) and rear differential (i-AWD) are
lubricated with gear oil. To check the gear
oil level in any of the above locations, use
the following procedure:
1) Park the vehicle on a level surface. Set
parking brake and stop the engine.
2) Remove the oil filler plug (1).
3) Check the inside of the hole with your
finger. If the oil level comes up to the
bottom of the plug hole, the oil level is
correct. If so, reinstall the plug.
4) If the oil level is low, add gear oil
through the filler plug hole (1) until the
oil level reaches the bottom of the filler
hole.Gear Oil ReplacementSince special procedures, materials and
tools are required to change the automatic
transaxle oil, it is recommended that you
trust this job to your authorized SUZUKI
dealer.
(1)
Oil Filler Plug
Manual transaxle21 Nm
(15.2 lb-ft)
(2.1 kg-m)
Transfer 23 Nm
(16.6 lb-ft)
(2.3 kg-m) Rear differential
(1)
Engine Coolant: 1, 2
Windshield Washer Fluid: 3
Page 205 of 278
9-16
INSPECTION AND MAINTENANCE
80J21-03E
Automatic Transaxle FluidSpecified FluidUse an automatic transaxle fluid equivalent
to DEXRON
®-III.
Fluid Level CheckYou must check the fluid level with the
automatic transaxle fluid at normal operat-
ing temperature.
To check the fluid level:
1) To warm up the transaxle fluid, drive the
vehicle or idle the engine until the tem-
perature gauge indicates normal oper-
ating temperature.
2) Then drive for ten more minutes.
NOTE:
Do not check the fluid level if you have just
driven the vehicle for a long time at high
speed, or if you have driven in city traffic in
hot weather. Wait until the fluid cools down
(about 30 minutes), or the fluid level indica-
tion will not be correct.
3) Park your vehicle on level ground.
4) Apply the parking brake and then start
the engine in “P” (Park). Let it idle for
two minutes and keep it running during
the fluid level check.5) With your foot on the brake pedal, move
the gearshift lever through each gear,
pausing for about three seconds in
each range. Then move it back to the
“P” (Park) position.
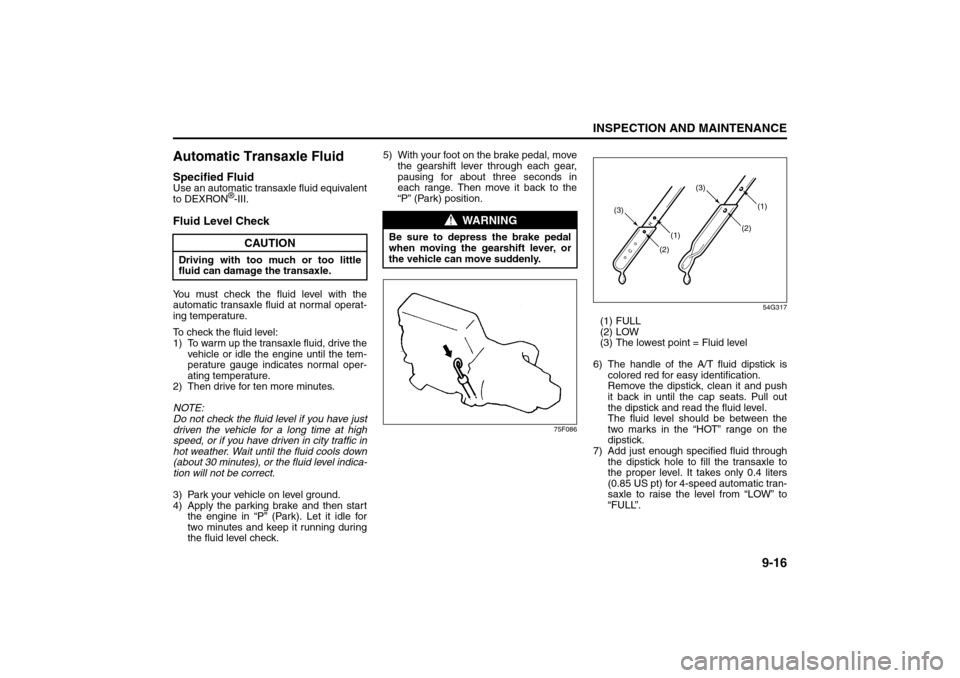
75F08654G317
(1) FULL
(2) LOW
(3) The lowest point = Fluid level
6) The handle of the A/T fluid dipstick is
colored red for easy identification.
Remove the dipstick, clean it and push
it back in until the cap seats. Pull out
the dipstick and read the fluid level.
The fluid level should be between the
two marks in the “HOT” range on the
dipstick.
7) Add just enough specified fluid through
the dipstick hole to fill the transaxle to
the proper level. It takes only 0.4 liters
(0.85 US pt) for 4-speed automatic tran-
saxle to raise the level from “LOW” to
“FULL”.
CAUTION
Driving with too much or too little
fluid can damage the transaxle.
WARNING
Be sure to depress the brake pedal
when moving the gearshift lever, or
the vehicle can move suddenly.
(1)(2) (3)(1)
(2)(3)
Windshield Washer Fluid: 3
Air Cleaner: 1, 2