brake SUZUKI SX4 2008 1.G Owners Manual
[x] Cancel search | Manufacturer: SUZUKI, Model Year: 2008, Model line: SX4, Model: SUZUKI SX4 2008 1.GPages: 278, PDF Size: 4.07 MB
Page 1 of 278
Part No. 99011-80J21-03E
June, 2007
99011-80J21-03E
Printed in Japan
11.5 mm
ENGLISH
Suzuki Red: Magenta 100%, Yello w 100%
Suzuki Blue: Cyan 100%, Magenta 70%
OWNER’S MANU AL
Keep With Vehicle At All Times.
Contains Important Information
On Safety, Operation & Maintenance.
SX4
2008
Made from 100% recycled paper,except for cover.
See page 1-1
SERVICE STATION INFORMATION
Fuel recommendation:Brake and clutch fluid:
Engine oil recommendation:Automatic transaxle fluid:
Tire cold pressure:For further details, see “Engine Oil and Filter” in the
“INSPECTION AND MAINTENANCE” section.
DOT3
An equivalent of DEXRON
See the “Tire Information Label” located on the
driver’s door lock pillar.
Engine oil with “Starburst” symbol
Page 6 of 278
80J21-03E
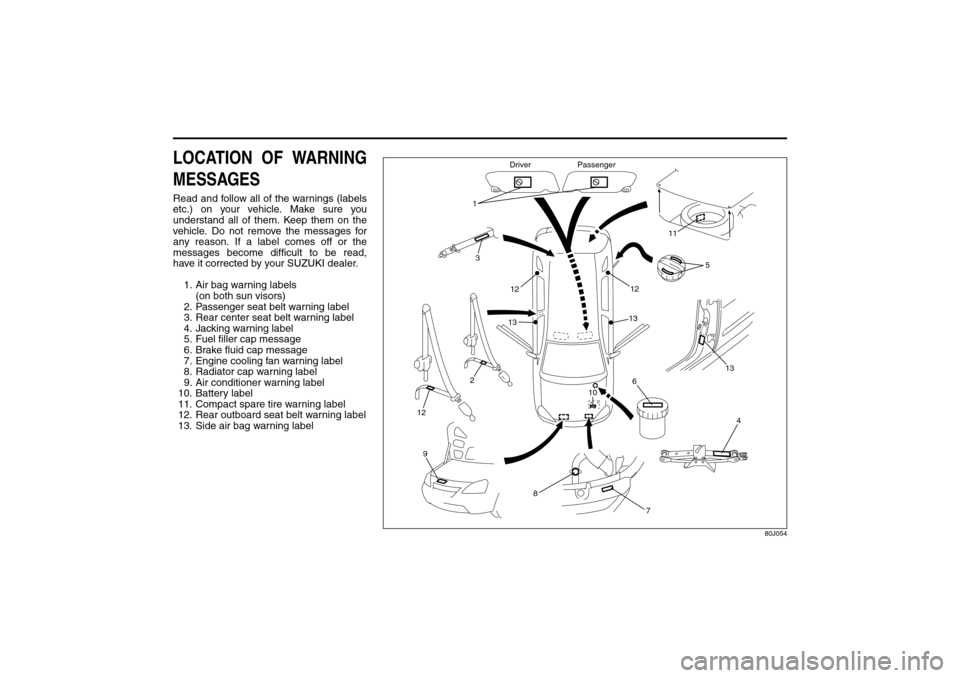
LOCATION OF WARNING
MESSAGESRead and follow all of the warnings (labels
etc.) on your vehicle. Make sure you
understand all of them. Keep them on the
vehicle. Do not remove the messages for
any reason. If a label comes off or the
messages become difficult to be read,
have it corrected by your SUZUKI dealer.
1. Air bag warning labels
(on both sun visors)
2. Passenger seat belt warning label
3. Rear center seat belt warning label
4. Jacking warning label
5. Fuel filler cap message
6. Brake fluid cap message
7. Engine cooling fan warning label
8. Radiator cap warning label
9. Air conditioner warning label
10. Battery label
11. Compact spare tire warning label
12. Rear outboard seat belt warning label
13. Side air bag warning label
80J054
5
6
8
7 10 1
32
9
11
4
12
12
12
13
13
13
Driver Passenger
Page 70 of 278
3-5STEERING COLUMN CONTROLS
80J21-03E
Lighting/Turn Signal Control
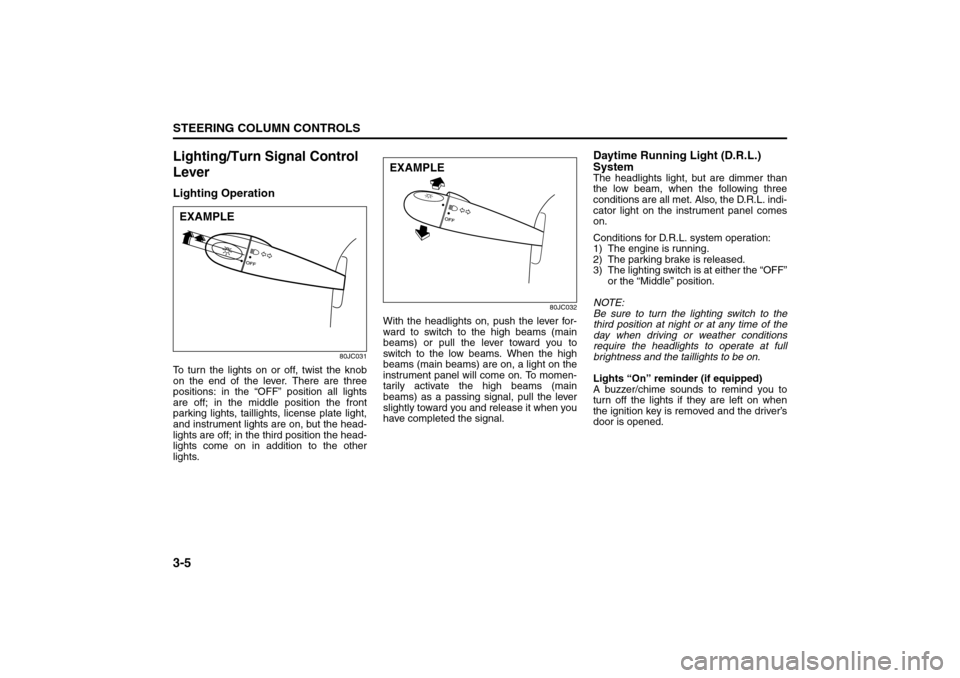
LeverLighting Operation
80JC031
To turn the lights on or off, twist the knob
on the end of the lever. There are three
positions: in the “OFF” position all lights
are off; in the middle position the front
parking lights, taillights, license plate light,
and instrument lights are on, but the head-
lights are off; in the third position the head-
lights come on in addition to the other
lights.
80JC032
With the headlights on, push the lever for-
ward to switch to the high beams (main
beams) or pull the lever toward you to
switch to the low beams. When the high
beams (main beams) are on, a light on the
instrument panel will come on. To momen-
tarily activate the high beams (main
beams) as a passing signal, pull the lever
slightly toward you and release it when you
have completed the signal.
Daytime Running Light (D.R.L.)
SystemThe headlights light, but are dimmer than
the low beam, when the following three
conditions are all met. Also, the D.R.L. indi-
cator light on the instrument panel comes
on.
Conditions for D.R.L. system operation:
1) The engine is running.
2) The parking brake is released.
3) The lighting switch is at either the “OFF”
or the “Middle” position.
NOTE:
Be sure to turn the lighting switch to the
third position at night or at any time of the
day when driving or weather conditions
require the headlights to operate at full
brightness and the taillights to be on.
Lights “On” reminder (if equipped)
A buzzer/chime sounds to remind you to
turn off the lights if they are left on when
the ignition key is removed and the driver’s
door is opened.
EXAMPLE
EXAMPLE
Windshield Wiper and Washer Lever: 8
Rear Window Wiper/Washer Switch: 8
Page 75 of 278
3-10
STEERING COLUMN CONTROLS
80J21-03E
80J026
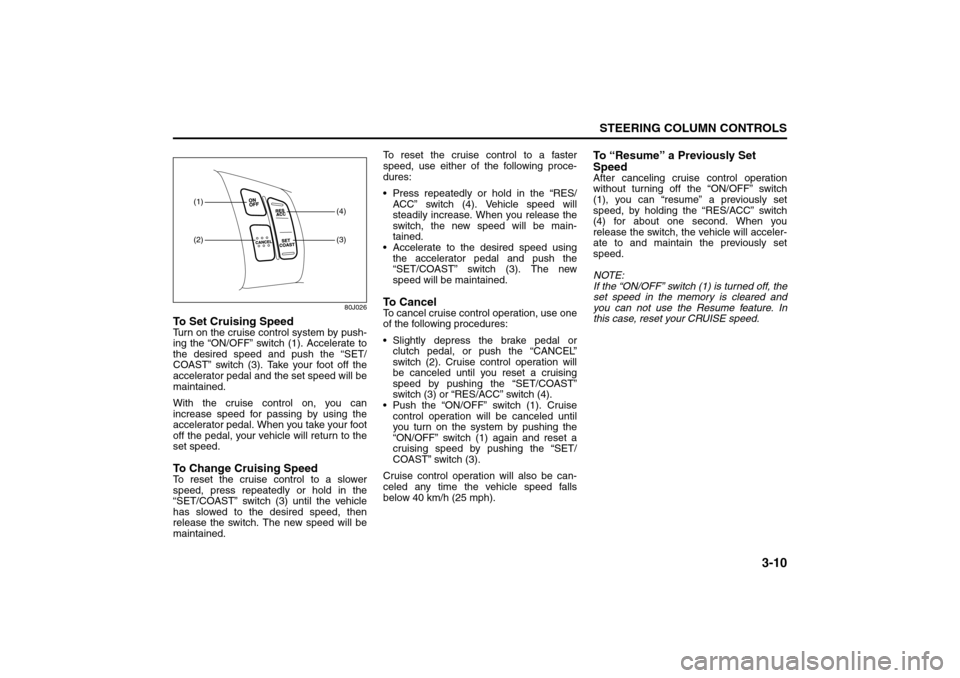
To Set Cruising SpeedTurn on the cruise control system by push-
ing the “ON/OFF” switch (1). Accelerate to
the desired speed and push the “SET/
COAST” switch (3). Take your foot off the
accelerator pedal and the set speed will be
maintained.
With the cruise control on, you can
increase speed for passing by using the
accelerator pedal. When you take your foot
off the pedal, your vehicle will return to the
set speed.To Change Cruising SpeedTo reset the cruise control to a slower
speed, press repeatedly or hold in the
“SET/COAST” switch (3) until the vehicle
has slowed to the desired speed, then
release the switch. The new speed will be
maintained.To reset the cruise control to a faster
speed, use either of the following proce-
dures:
Press repeatedly or hold in the “RES/
ACC” switch (4). Vehicle speed will
steadily increase. When you release the
switch, the new speed will be main-
tained.
Accelerate to the desired speed using
the accelerator pedal and push the
“SET/COAST” switch (3). The new
speed will be maintained.
To C a n c e lTo cancel cruise control operation, use one
of the following procedures:
Slightly depress the brake pedal or
clutch pedal, or push the “CANCEL”
switch (2). Cruise control operation will
be canceled until you reset a cruising
speed by pushing the “SET/COAST”
switch (3) or “RES/ACC” switch (4).
Push the “ON/OFF” switch (1). Cruise
control operation will be canceled until
you turn on the system by pushing the
“ON/OFF” switch (1) again and reset a
cruising speed by pushing the “SET/
COAST” switch (3).
Cruise control operation will also be can-
celed any time the vehicle speed falls
below 40 km/h (25 mph).
To “Resume” a Previously Set
SpeedAfter canceling cruise control operation
without turning off the “ON/OFF” switch
(1), you can “resume” a previously set
speed, by holding the “RES/ACC” switch
(4) for about one second. When you
release the switch, the vehicle will acceler-
ate to and maintain the previously set
speed.
NOTE:
If the “ON/OFF” switch (1) is turned off, the
set speed in the memory is cleared and
you can not use the Resume feature. In
this case, reset your CRUISE speed.
(1)(2)
(3)(4)
Page 81 of 278
4-4
INSTRUMENT PANEL
80J21-03E
Refer to “Tire Pressure Monitoring System”
in the “OPERATING YOUR VEHICLE” sec-
tion for additional details on the tire pres-
sure monitoring system. Refer to “Tires” in
the “INSPECTION AND MAINTENANCE”
section for information on maintaining
proper tire pressure.
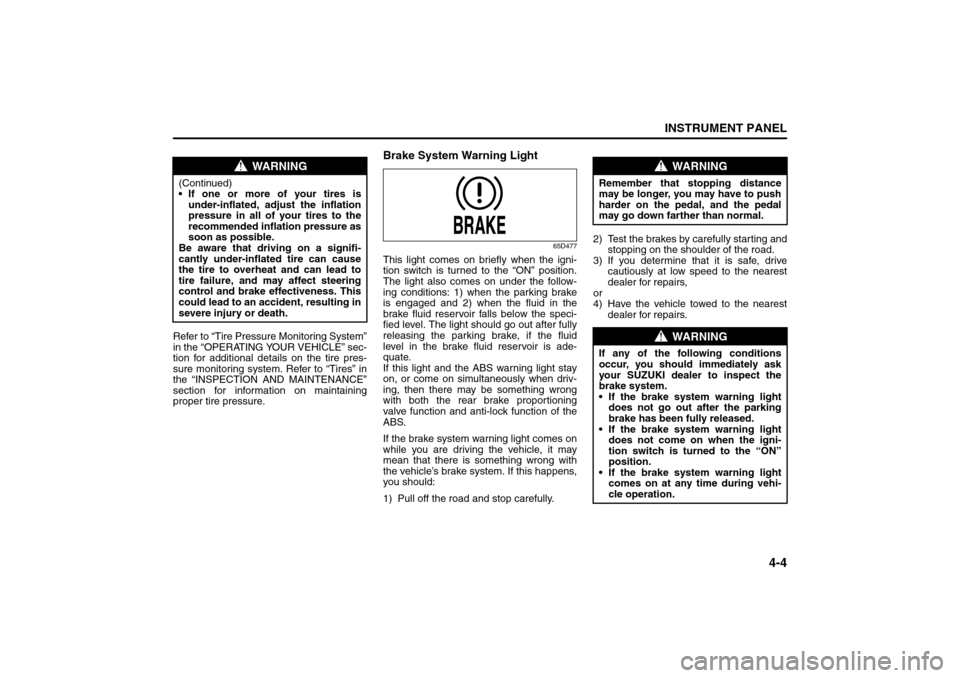
Brake System Warning Light
65D477
This light comes on briefly when the igni-
tion switch is turned to the “ON” position.
The light also comes on under the follow-
ing conditions: 1) when the parking brake
is engaged and 2) when the fluid in the
brake fluid reservoir falls below the speci-
fied level. The light should go out after fully
releasing the parking brake, if the fluid
level in the brake fluid reservoir is ade-
quate.
If this light and the ABS warning light stay
on, or come on simultaneously when driv-
ing, then there may be something wrong
with both the rear brake proportioning
valve function and anti-lock function of the
ABS.
If the brake system warning light comes on
while you are driving the vehicle, it may
mean that there is something wrong with
the vehicle’s brake system. If this happens,
you should:
1) Pull off the road and stop carefully.2) Test the brakes by carefully starting and
stopping on the shoulder of the road.
3) If you determine that it is safe, drive
cautiously at low speed to the nearest
dealer for repairs,
or
4) Have the vehicle towed to the nearest
dealer for repairs.
WARNING
(Continued)
If one or more of your tires is
under-inflated, adjust the inflation
pressure in all of your tires to the
recommended inflation pressure as
soon as possible.
Be aware that driving on a signifi-
cantly under-inflated tire can cause
the tire to overheat and can lead to
tire failure, and may affect steering
control and brake effectiveness. This
could lead to an accident, resulting in
severe injury or death.
WARNING
Remember that stopping distance
may be longer, you may have to push
harder on the pedal, and the pedal
may go down farther than normal.
WARNING
If any of the following conditions
occur, you should immediately ask
your SUZUKI dealer to inspect the
brake system.
If the brake system warning light
does not go out after the parking
brake has been fully released.
If the brake system warning light
does not come on when the igni-
tion switch is turned to the “ON”
position.
If the brake system warning light
comes on at any time during vehi-
cle operation.
Warning and Indicator Lights: 8
Page 82 of 278
4-5INSTRUMENT PANEL
80J21-03E
NOTE:
Because the disc brake system is self-
adjusting, the fluid level will drop as the
brake pads become worn.
Replenishing the brake fluid reservoir is
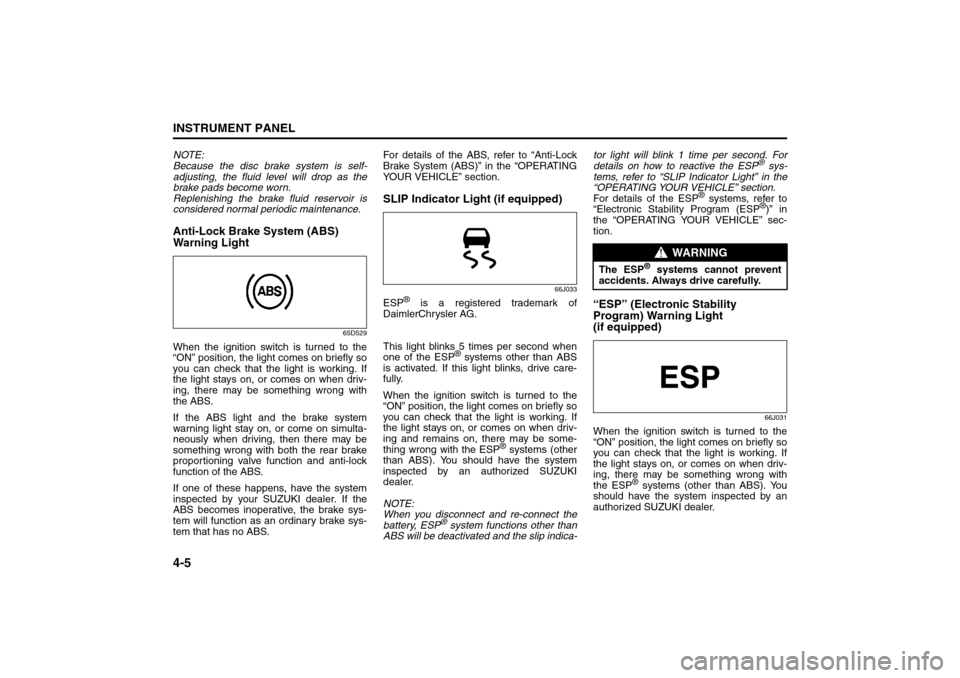
considered normal periodic maintenance.Anti-Lock Brake System (ABS)
Warning Light
65D529
When the ignition switch is turned to the
“ON” position, the light comes on briefly so
you can check that the light is working. If
the light stays on, or comes on when driv-
ing, there may be something wrong with
the ABS.
If the ABS light and the brake system
warning light stay on, or come on simulta-
neously when driving, then there may be
something wrong with both the rear brake
proportioning valve function and anti-lock
function of the ABS.
If one of these happens, have the system
inspected by your SUZUKI dealer. If the
ABS becomes inoperative, the brake sys-
tem will function as an ordinary brake sys-
tem that has no ABS.For details of the ABS, refer to “Anti-Lock
Brake System (ABS)” in the “OPERATING
YOUR VEHICLE” section.
SLIP Indicator Light (if equipped)
66J033
ESP
® is a registered trademark of
DaimlerChrysler AG.
This light blinks 5 times per second when
one of the ESP
® systems other than ABS
is activated. If this light blinks, drive care-
fully.
When the ignition switch is turned to the
“ON” position, the light comes on briefly so
you can check that the light is working. If
the light stays on, or comes on when driv-
ing and remains on, there may be some-
thing wrong with the ESP
® systems (other
than ABS). You should have the system
inspected by an authorized SUZUKI
dealer.
NOTE:
When you disconnect and re-connect the
battery, ESP
® system functions other than
ABS will be deactivated and the slip indica-tor light will blink 1 time per second. For
details on how to reactive the ESP
® sys-
tems, refer to “SLIP Indicator Light” in the
“OPERATING YOUR VEHICLE” section.
For details of the ESP
® systems, refer to
“Electronic Stability Program (ESP
®)” in
the “OPERATING YOUR VEHICLE” sec-
tion.
“ESP” (Electronic Stability
Program) Warning Light
(if equipped)
66J031
When the ignition switch is turned to the
“ON” position, the light comes on briefly so
you can check that the light is working. If
the light stays on, or comes on when driv-
ing, there may be something wrong with
the ESP
® systems (other than ABS). You
should have the system inspected by an
authorized SUZUKI dealer.
WARNING
The ESP
® systems cannot prevent
accidents. Always drive carefully.
Warning and Indicator Lights: 8
Page 87 of 278
4-10
INSTRUMENT PANEL
80J21-03E
NOTE:
When the vehicle speed is increased,
the “i-AWD LOCK” mode will be changed
to the “i-AWD AUTO” mode automati-
cally. The “i-AWD AUTO” indicator light
will come on and stay on.
When the ignition switch is turned to the
“OFF” position, the “i-AWD LOCK” mode
is canceled.
For details of the “i-AWD LOCK” mode,
refer to “Using the 2WD/i-AWD Switch” in
the “OPERATING YOUR VEHICLE” sec-
tion.
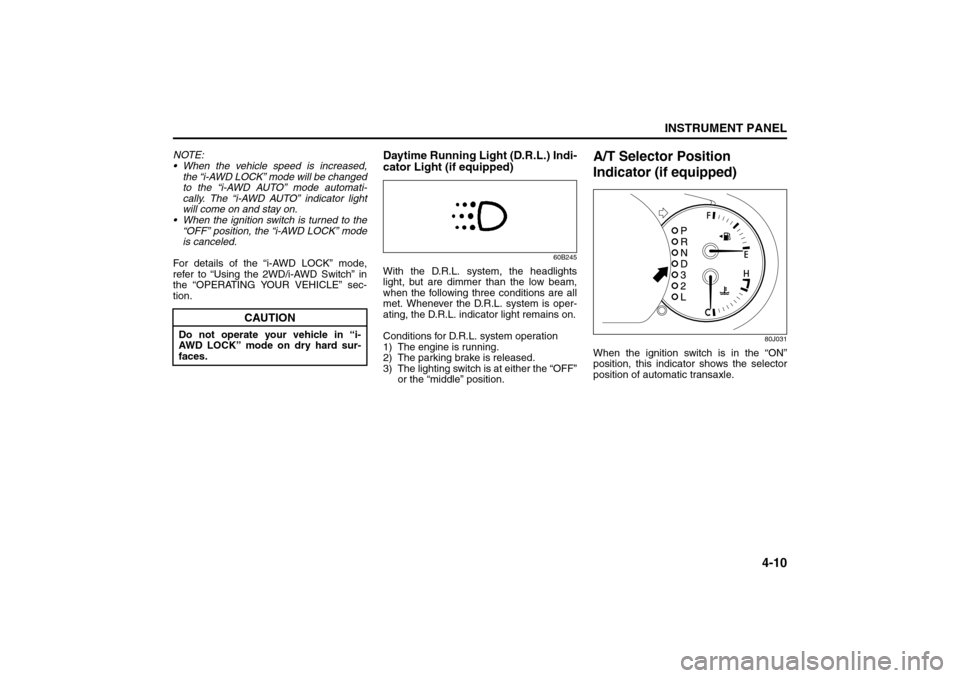
Daytime Running Light (D.R.L.) Indi-
cator Light (if equipped)
60B245
With the D.R.L. system, the headlights
light, but are dimmer than the low beam,
when the following three conditions are all
met. Whenever the D.R.L. system is oper-
ating, the D.R.L. indicator light remains on.
Conditions for D.R.L. system operation
1) The engine is running.
2) The parking brake is released.
3) The lighting switch is at either the “OFF”
or the “middle” position.
A/T Selector Position
Indicator (if equipped)
80J031
When the ignition switch is in the “ON”
position, this indicator shows the selector
position of automatic transaxle.
CAUTION
Do not operate your vehicle in “i-
AWD LOCK” mode on dry hard sur-
faces.
Temperature Gauge: 8
Hazard Warning Switch: 8
Rear Window Defroster Switch:
Page 137 of 278
OTHER CONTROLS AND EQUIPMENT
5
80J21-03E
60G407
OTHER CONTROLS AND EQUIPMENTParking Brake Lever ........................................................... 5-1
Pedals ................................................................................... 5-1
Gearshift Lever .................................................................... 5-2
Fuel Filler Cap ..................................................................... 5-3
Folding Rear Seats (SX4) ................................................... 5-4
Sun Visor ............................................................................. 5-8
Interior Light Switch ........................................................... 5-8
Spot Light ............................................................................ 5-9
Assist Grips (if equipped) .................................................. 5-9
Eyeglasses Holder (if equipped) ........................................ 5-10
Engine Hood ........................................................................ 5-10
Cup Holder and Storage Area (if equipped) ..................... 5-11
Accessory Socket (if equipped) ......................................... 5-11
Frame Hooks ....................................................................... 5-12
Tire Changing Tool ............................................................. 5-13
Luggage Compartment Cover (if equipped) ..................... 5-14
Luggage Compartment Light (SX4) ................................... 5-15
Trunk Light (SX4 SEDAN) ................................................... 5-15
Radio Antenna ..................................................................... 5-16
Roof Rails or Roof Rack Anchors (if equipped) ............... 5-16
Page 138 of 278
5-1OTHER CONTROLS AND EQUIPMENT
80J21-03E
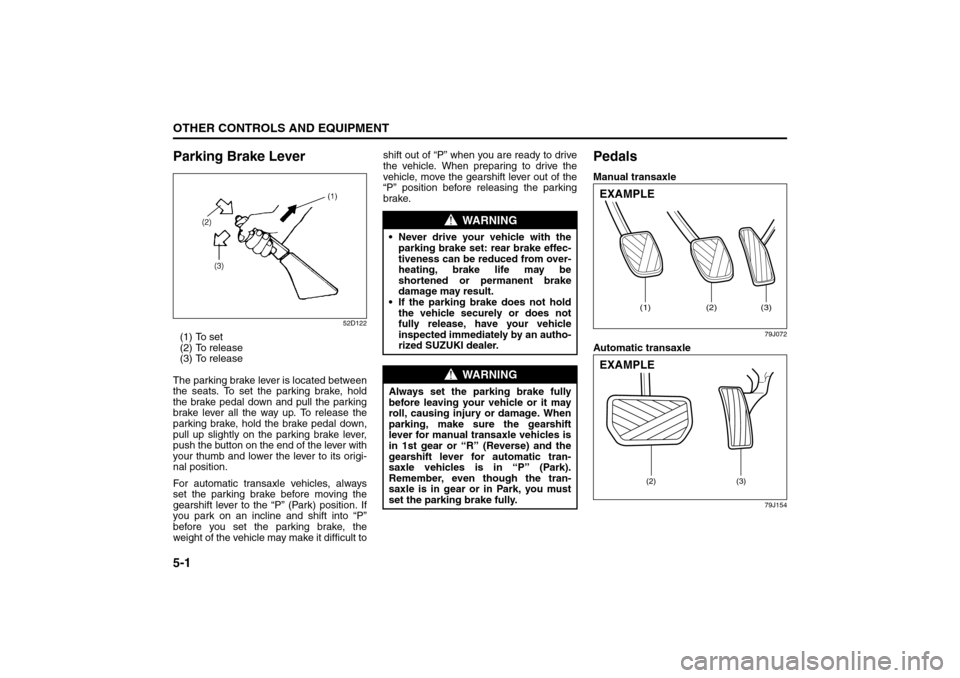
Parking Brake Lever
52D122
(1) To set
(2) To release
(3) To release
The parking brake lever is located between
the seats. To set the parking brake, hold
the brake pedal down and pull the parking
brake lever all the way up. To release the
parking brake, hold the brake pedal down,
pull up slightly on the parking brake lever,
push the button on the end of the lever with
your thumb and lower the lever to its origi-
nal position.
For automatic transaxle vehicles, always
set the parking brake before moving the
gearshift lever to the “P” (Park) position. If
you park on an incline and shift into “P”
before you set the parking brake, the
weight of the vehicle may make it difficult toshift out of “P” when you are ready to drive
the vehicle. When preparing to drive the
vehicle, move the gearshift lever out of the
“P” position before releasing the parking
brake.
PedalsManual transaxle
79J072
Automatic transaxle
79J154
WARNING
Never drive your vehicle with the
parking brake set: rear brake effec-
tiveness can be reduced from over-
heating, brake life may be
shortened or permanent brake
damage may result.
If the parking brake does not hold
the vehicle securely or does not
fully release, have your vehicle
inspected immediately by an autho-
rized SUZUKI dealer.
WARNING
Always set the parking brake fully
before leaving your vehicle or it may
roll, causing injury or damage. When
parking, make sure the gearshift
lever for manual transaxle vehicles is
in 1st gear or “R” (Reverse) and the
gearshift lever for automatic tran-
saxle vehicles is in “P” (Park).
Remember, even though the tran-
saxle is in gear or in Park, you must
set the parking brake fully.
(1)
(2)
(3)
EXAMPLE
(2) (3)
EXAMPLE
Parking Brake Lever: 6
Pedals: 6
Page 139 of 278
5-2
OTHER CONTROLS AND EQUIPMENT
80J21-03E
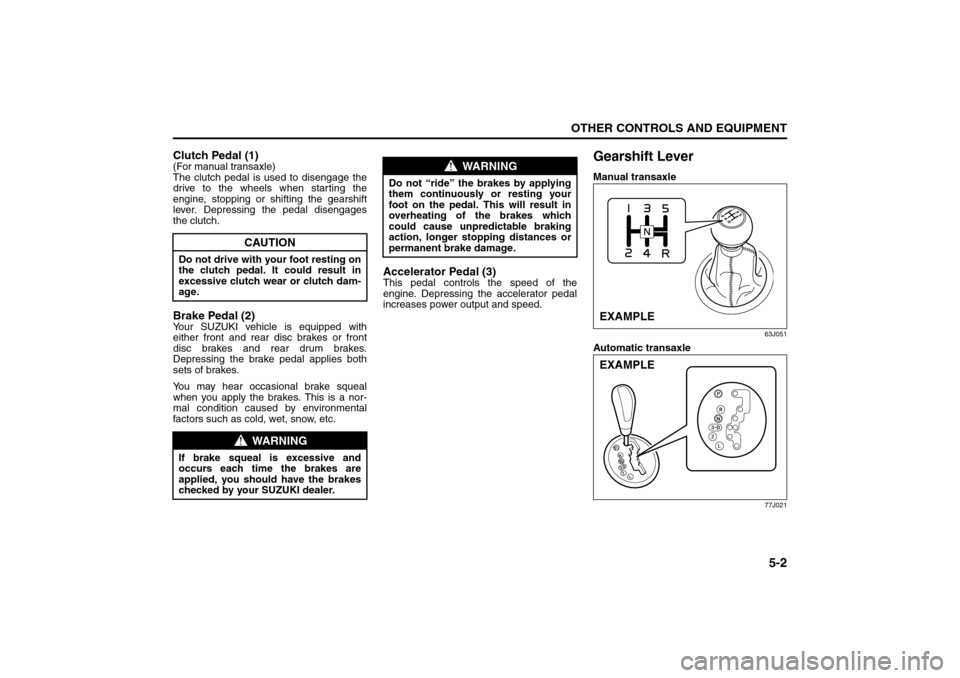
Clutch Pedal (1)(For manual transaxle)
The clutch pedal is used to disengage the
drive to the wheels when starting the
engine, stopping or shifting the gearshift
lever. Depressing the pedal disengages
the clutch.Brake Pedal (2)Your SUZUKI vehicle is equipped with
either front and rear disc brakes or front
disc brakes and rear drum brakes.
Depressing the brake pedal applies both
sets of brakes.
You may hear occasional brake squeal
when you apply the brakes. This is a nor-
mal condition caused by environmental
factors such as cold, wet, snow, etc.
Accelerator Pedal (3)This pedal controls the speed of the
engine. Depressing the accelerator pedal
increases power output and speed.
Gearshift LeverManual transaxle
63J051
Automatic transaxle
77J021
CAUTION
Do not drive with your foot resting on
the clutch pedal. It could result in
excessive clutch wear or clutch dam-
age.
WARNING
If brake squeal is excessive and
occurs each time the brakes are
applied, you should have the brakes
checked by your SUZUKI dealer.
WARNING
Do not “ride” the brakes by applying
them continuously or resting your
foot on the pedal. This will result in
overheating of the brakes which
could cause unpredictable braking
action, longer stopping distances or
permanent brake damage.
EXAMPLEEXAMPLE
Pedals: 6
Gearshift Lever: 10