Engine oil SUZUKI SX4 2008 1.G Owner's Manual
[x] Cancel search | Manufacturer: SUZUKI, Model Year: 2008, Model line: SX4, Model: SUZUKI SX4 2008 1.GPages: 278, PDF Size: 4.07 MB
Page 203 of 278

9-14
INSPECTION AND MAINTENANCE
80J21-03E
80J014
Gear OilSpecified Gear OilManual transaxle (API GL-4)
54G095
Rear differential oil (i-AWD)/Transfer oil
of automatic transaxle model (i-AWD)
(API GL-5 Hypoid)
54G096
When replacing gear oil, use the appropri-
ate viscosity and grade as shown in the
charts below.
We highly recommend you use:
API GL-4 SAE 75W-90 for manual tran-
saxle gear oil
API GL-5 hypoid gear oil SAE 80W-90 for
rear differential oil (i-AWD) and transfer oil
of automatic transaxle model (i-AWD)
CAUTION
Oil leaks from around the oil filter or
drain plug indicate incorrect installa-
tion or gasket damage. If you find any
leaks or are not sure that the filter
has been properly tightened, have
the vehicle inspected by your SUZUKI
dealer.EXAMPLE
API GRADE
Manual transaxle GL-4
Rear differential oil
(i-AWD)/Transfer oil
(i-AWD A/T)GL-5 (Hypoid
gear oil)
Engine Coolant: 1, 2
Page 204 of 278

9-15INSPECTION AND MAINTENANCE
80J21-03E
Manual transaxle
54G097
Transfer case (i-AWD)
80J007
(1) Oil filler and level plugRear differential (i-AWD)
80J015
(1) Oil filler and level plug
Tightening torque
Gear Oil Level CheckThe manual transaxle, transfer gears (i-
AWD A/T) and rear differential (i-AWD) are
lubricated with gear oil. To check the gear
oil level in any of the above locations, use
the following procedure:
1) Park the vehicle on a level surface. Set
parking brake and stop the engine.
2) Remove the oil filler plug (1).
3) Check the inside of the hole with your
finger. If the oil level comes up to the
bottom of the plug hole, the oil level is
correct. If so, reinstall the plug.
4) If the oil level is low, add gear oil
through the filler plug hole (1) until the
oil level reaches the bottom of the filler
hole.Gear Oil ReplacementSince special procedures, materials and
tools are required to change the automatic
transaxle oil, it is recommended that you
trust this job to your authorized SUZUKI
dealer.
(1)
Oil Filler Plug
Manual transaxle21 Nm
(15.2 lb-ft)
(2.1 kg-m)
Transfer 23 Nm
(16.6 lb-ft)
(2.3 kg-m) Rear differential
(1)
Engine Coolant: 1, 2
Windshield Washer Fluid: 3
Page 206 of 278
9-17INSPECTION AND MAINTENANCE
80J21-03E
Changing OilSince special procedures, materials and
tools are required to change the automatic
transaxle oil, it is recommended that you
trust this job to your authorized SUZUKI
dealer.
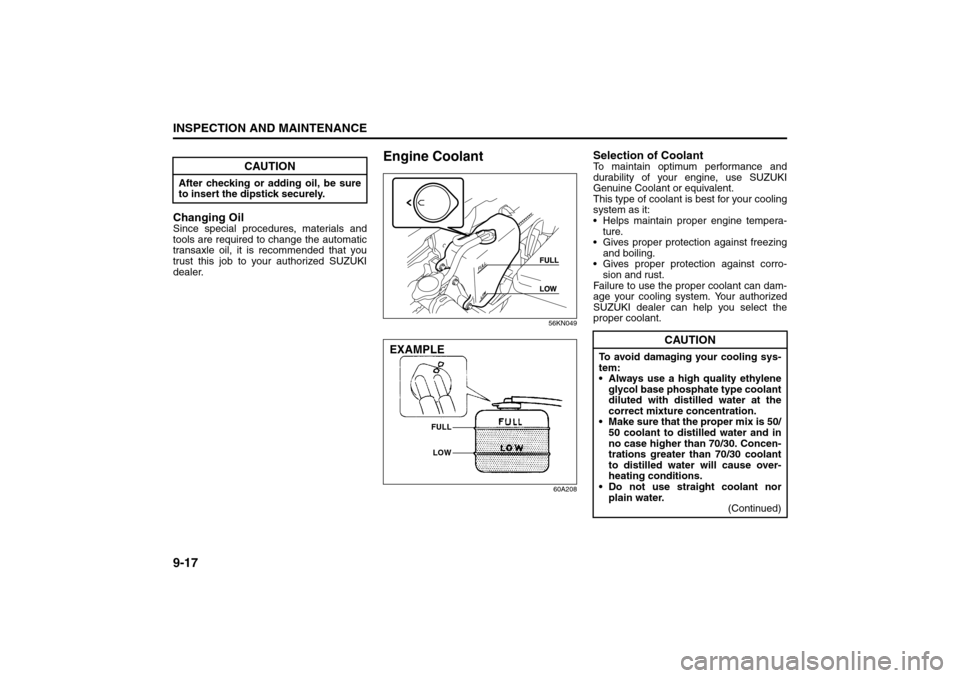
Engine Coolant
56KN049
60A208
Selection of CoolantTo maintain optimum performance and
durability of your engine, use SUZUKI
Genuine Coolant or equivalent.
This type of coolant is best for your cooling
system as it:
Helps maintain proper engine tempera-
ture.
Gives proper protection against freezing
and boiling.
Gives proper protection against corro-
sion and rust.
Failure to use the proper coolant can dam-
age your cooling system. Your authorized
SUZUKI dealer can help you select the
proper coolant.
CAUTION
After checking or adding oil, be sure
to insert the dipstick securely.
EXAMPLE
FULL
LOW
CAUTION
To avoid damaging your cooling sys-
tem:
Always use a high quality ethylene
glycol base phosphate type coolant
diluted with distilled water at the
correct mixture concentration.
Make sure that the proper mix is 50/
50 coolant to distilled water and in
no case higher than 70/30. Concen-
trations greater than 70/30 coolant
to distilled water will cause over-
heating conditions.
Do not use straight coolant nor
plain water.
(Continued)
Spark Plugs: 1, 2
Page 209 of 278
9-20
INSPECTION AND MAINTENANCE
80J21-03E
Spark Plugs
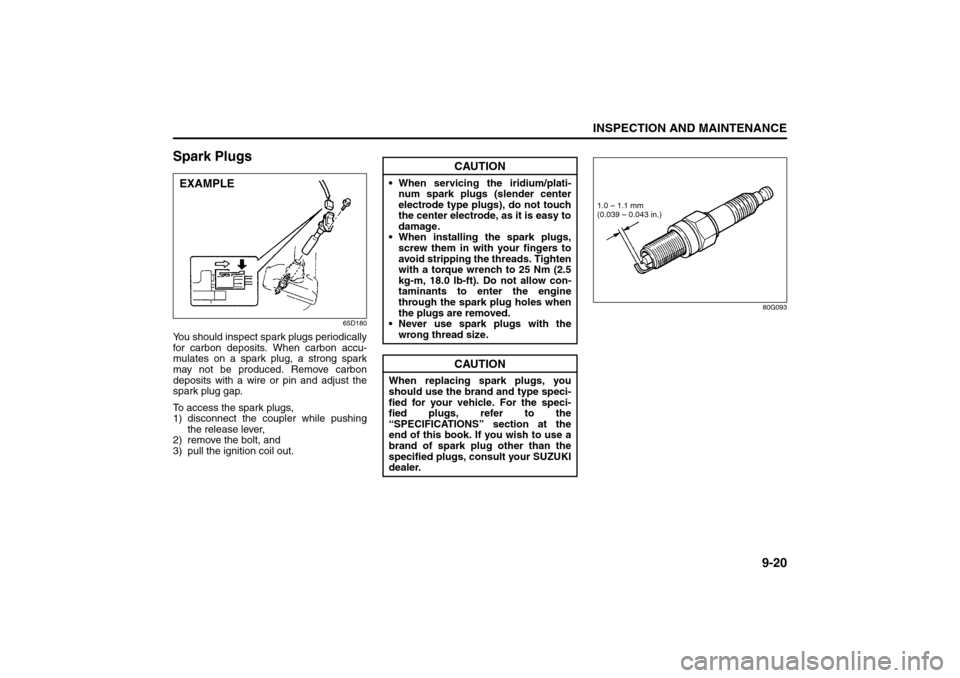
65D180
You should inspect spark plugs periodically
for carbon deposits. When carbon accu-
mulates on a spark plug, a strong spark
may not be produced. Remove carbon
deposits with a wire or pin and adjust the
spark plug gap.
To access the spark plugs,
1) disconnect the coupler while pushing
the release lever,
2) remove the bolt, and
3) pull the ignition coil out.
80G093
EXAMPLE
CAUTION
When servicing the iridium/plati-
num spark plugs (slender center
electrode type plugs), do not touch
the center electrode, as it is easy to
damage.
When installing the spark plugs,
screw them in with your fingers to
avoid stripping the threads. Tighten
with a torque wrench to 25 Nm (2.5
kg-m, 18.0 lb-ft). Do not allow con-
taminants to enter the engine
through the spark plug holes when
the plugs are removed.
Never use spark plugs with the
wrong thread size.
CAUTION
When replacing spark plugs, you
should use the brand and type speci-
fied for your vehicle. For the speci-
fied plugs, refer to the
“SPECIFICATIONS” section at the
end of this book. If you wish to use a
brand of spark plug other than the
specified plugs, consult your SUZUKI
dealer.
1.0 – 1.1 mm
(0.039 – 0.043 in.)
Brakes: 6
Steering Wheel: 6
Page 221 of 278
9-32
INSPECTION AND MAINTENANCE
80J21-03E
GLOSSARY OF TIRE TERMINOL-
OGYAccessory Weight – the combined weight
(in excess of those standard items which
may be replaced) of automatic transaxle,
power steering, power brakes, power win-
dows, power seats, radio, and heater, to
the extent that these items are available as
factory-installed equipment (whether
installed or not).
Cold Tire Inflation Pressure – the pressure
in a tire that has been driven less than 1
mile or has been standing for three hours
or more.
Curb Weight – the weight of a motor vehi-
cle with standard equipment including the
maximum capacity of fuel, oil, and coolant,
and, if so equipped, air conditioning and
additional weight optional engine.
Intended Outboard Sidewall – (1) the side-
wall that contains a whitewall, bears white
lettering or bears manufacturer, brand,
and/or model name molding that is higher
or deeper than the same molding on the
other sidewall of the tire, or (2) the outward
facing sidewall of an asymmetrical tire that
has a particular side that must always face
outward when mounted on a vehicle.
Maximum Inflation Pressure – the maxi-
mum cold inflation pressure a tire is
designed to support in normal service.Maximum Loaded Vehicle Weight – the
sum of curb weight, accessory weight,
vehicle capacity weight (total load capac-
ity), and production options weight.
Normal Occupant Weight – 68 kilograms
times the number of occupants specified in
the second column of Table 1 (shown
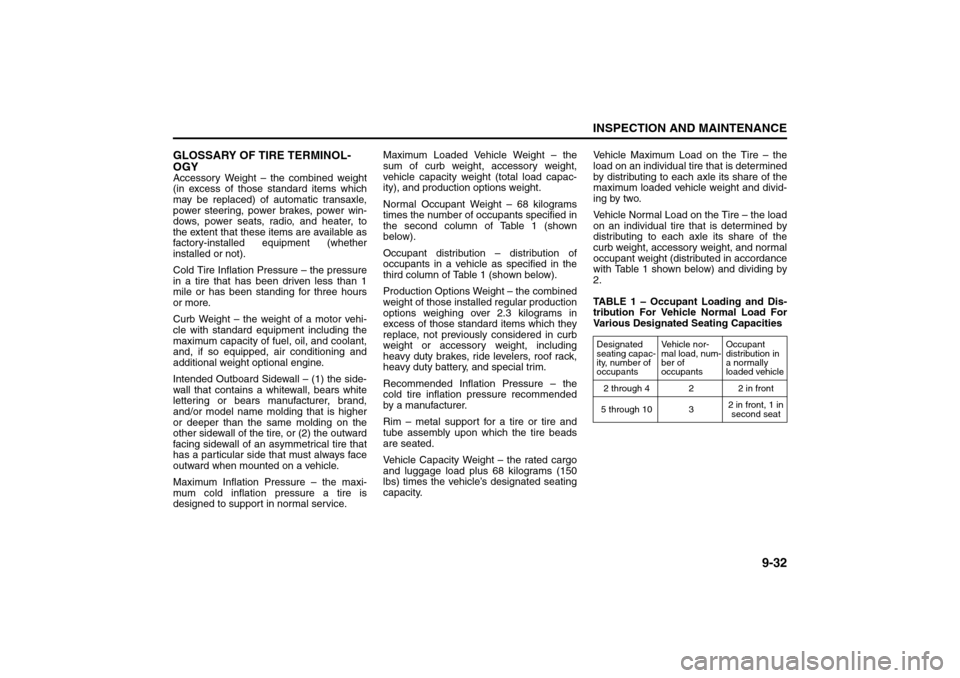
below).
Occupant distribution – distribution of
occupants in a vehicle as specified in the
third column of Table 1 (shown below).
Production Options Weight – the combined
weight of those installed regular production
options weighing over 2.3 kilograms in
excess of those standard items which they
replace, not previously considered in curb
weight or accessory weight, including
heavy duty brakes, ride levelers, roof rack,
heavy duty battery, and special trim.
Recommended Inflation Pressure – the
cold tire inflation pressure recommended
by a manufacturer.
Rim – metal support for a tire or tire and
tube assembly upon which the tire beads
are seated.
Vehicle Capacity Weight – the rated cargo
and luggage load plus 68 kilograms (150
lbs) times the vehicle’s designated seating
capacity.Vehicle Maximum Load on the Tire – the
load on an individual tire that is determined
by distributing to each axle its share of the
maximum loaded vehicle weight and divid-
ing by two.
Vehicle Normal Load on the Tire – the load
on an individual tire that is determined by
distributing to each axle its share of the
curb weight, accessory weight, and normal
occupant weight (distributed in accordance
with Table 1 shown below) and dividing by
2.
TABLE 1 – Occupant Loading and Dis-
tribution For Vehicle Normal Load For
Various Designated Seating Capacities
Designated
seating capac-
ity, number of
occupantsVehicle nor-
mal load, num-
ber of
occupantsOccupant
distribution in
a normally
loaded vehicle
2 through 4 2 2 in front
5 through 10 32 in front, 1 in
second seat
Fuses: 7
Page 237 of 278
9-48
INSPECTION AND MAINTENANCE
80J21-03E
Air Conditioning SystemIf you do not use the air conditioner for a
long period, such as during winter, it may
not give the best performance when you
start using it again. To help maintain opti-
mum performance and durability of your air
conditioner, it needs to be run periodically.
Operate the air conditioner at least once a
month for one minute with the engine
idling. This circulates the refrigerant and oil
and helps protect the internal components.
Page 244 of 278
10-5EMERGENCY SERVICE
80J21-03E
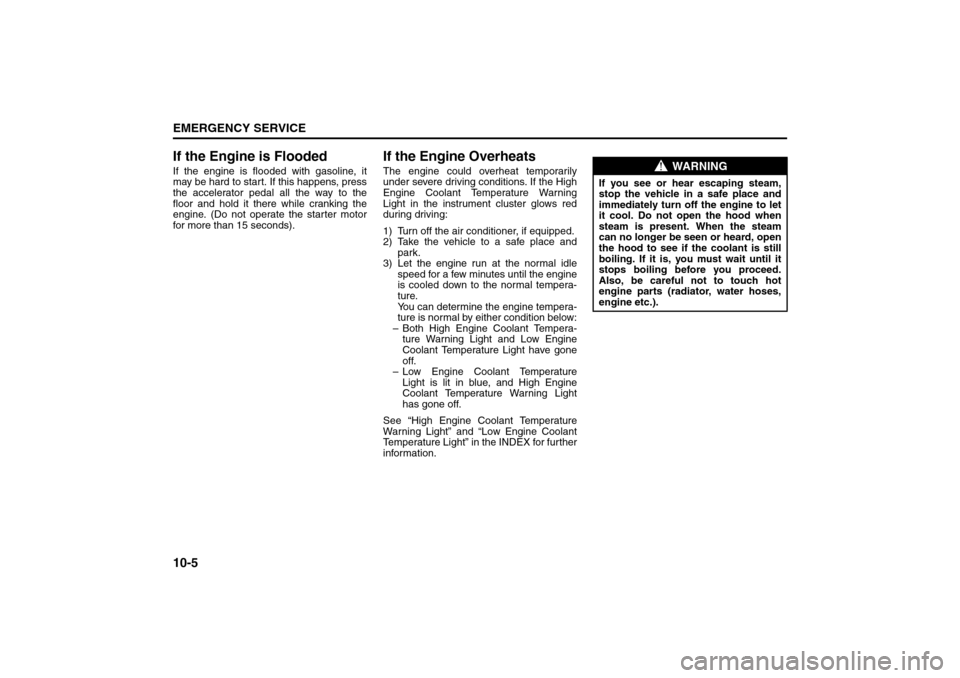
If the Engine is FloodedIf the engine is flooded with gasoline, it
may be hard to start. If this happens, press
the accelerator pedal all the way to the
floor and hold it there while cranking the
engine. (Do not operate the starter motor
for more than 15 seconds).
If the Engine OverheatsThe engine could overheat temporarily
under severe driving conditions. If the High
Engine Coolant Temperature Warning
Light in the instrument cluster glows red
during driving:
1) Turn off the air conditioner, if equipped.
2) Take the vehicle to a safe place and
park.
3) Let the engine run at the normal idle
speed for a few minutes until the engine
is cooled down to the normal tempera-
ture.
You can determine the engine tempera-
ture is normal by either condition below:
– Both High Engine Coolant Tempera-
ture Warning Light and Low Engine
Coolant Temperature Light have gone
off.
– Low Engine Coolant Temperature
Light is lit in blue, and High Engine
Coolant Temperature Warning Light
has gone off.
See “High Engine Coolant Temperature
Warning Light” and “Low Engine Coolant
Temperature Light” in the INDEX for further
information.
WARNING
If you see or hear escaping steam,
stop the vehicle in a safe place and
immediately turn off the engine to let
it cool. Do not open the hood when
steam is present. When the steam
can no longer be seen or heard, open
the hood to see if the coolant is still
boiling. If it is, you must wait until it
stops boiling before you proceed.
Also, be careful not to touch hot
engine parts (radiator, water hoses,
engine etc.).
Jump Starting Instructions: 7
Towing a Disabled Vehicle: 6
Page 251 of 278

11-4
APPEARANCE CARE
80J21-03E
WashingWhen washing the vehicle, follow the
instructions below:
1) Flush the underside of body and wheel
housings with pressurized water to
remove mud and debris. Use plenty of
water.2) Rinse the body to loosen the dirt.
Remove dirt and mud from the body
exterior with running water. You may
use a soft sponge or brush. Do not use
hard materials which can scratch the
paint or plastic. Remember that the
headlight covers or lenses are made of
plastic in many cases.
3) Wash the entire exterior with a mild
detergent or car wash soap using a
sponge or soft cloth. The sponge or
cloth should be frequently soaked in the
soap solution.
4) Once the dirt has been completely
removed, rinse off the detergent with
running water.
5) After rinsing, wipe off the vehicle body
with a wet chamois or cloth and allow it
to dry in the shade.6) Check carefully for damage to painted
surfaces. If there is any damage,
“touch-up” the damage following the
procedure below:
1. Clean all damaged spots and allow
them to dry.
2. Stir the paint and “touch-up” the
damaged spots lightly using a small
brush.
3. Allow the paint to dry completely.
WARNING
Never attempt to wash and wax
your vehicle with the engine run-
ning.
When cleaning the underside of the
body and fender, where there may
be sharp-edged parts, you should
wear gloves and a long-sleeved
shirt to protect your hands and
arms from being cut.
After washing your vehicle, care-
fully test the brakes before driving
to make sure they have maintained
their normal effectiveness.
CAUTION
When washing the vehicle, avoid
directing steam or hot water of
more than 80°C (176°F) on plastic
parts.
To avoid damaging engine compo-
nents, do not use pressurized
water in the engine compartment.
CAUTION
To avoid damage to the paint or plas-
tic surface, do not wipe the dirt off
without ample water. Be sure to fol-
low above procedure.
CAUTION
When using a commercial car wash
product, observe the cautions speci-
fied by the manufacturer. Never use
strong household detergents or
soaps.
CAUTION
If you use an automatic car wash,
make sure that your vehicle’s body
parts, such as spoilers, can not be
damaged. If you are in doubt, consult
the car wash operator for advice.
Vehicle Cleaning:
Page 270 of 278

14-4SPECIFICATIONS
80J21-03E
ITEM: Wheel
Tire size, front and rear SX4 P195/65R15, P205/60R16
SX4 SEDAN P195/65R15, P205/50R17
Tire pressure For the specified tire pressure, see the Tire Information Label located
on the driver’s door lock pillar.
ITEM: Steering
Toe IN 1.0 ± 1.0 mm (0.0393 ± 0.0393 in.)
Camber angle P195/65R15, P205/60R16, P195/65R15 –0° 10’ ± 1°
P205/50R17 –0° 17’ ± 1°
Caster angle P195/65R15, P205/60R16, P195/65R15 3° 40’ ± 2°
P205/50R17 3° 46’ ± 2°
ITEM: Capacities
Coolant (including reserve tank) M/T 7.0 L (14.8 US pt)
A/T 7.5 L (15.8 US pt)
Fuel tank 2WD 50 L (13.2 US gal)
i-AWD 45 L (11.9 US gal)
Engine oil (replaced with filter) 4.5 L (4.7 quarts)
Transaxle oil Manual transaxle: 2.5 L (5.3 US pt)
4-speed automatic transaxle: 7.3 L (15.4 US pt)
Rear differential oil 0.8 L (1.7 US pt)
Transfer gear box oil 0.6 L (1.2 US pt)
Specifications: 1, 2, 5, 6, 7, 10, 11
Page 271 of 278
15-1
INDEX
15
80J21-03E
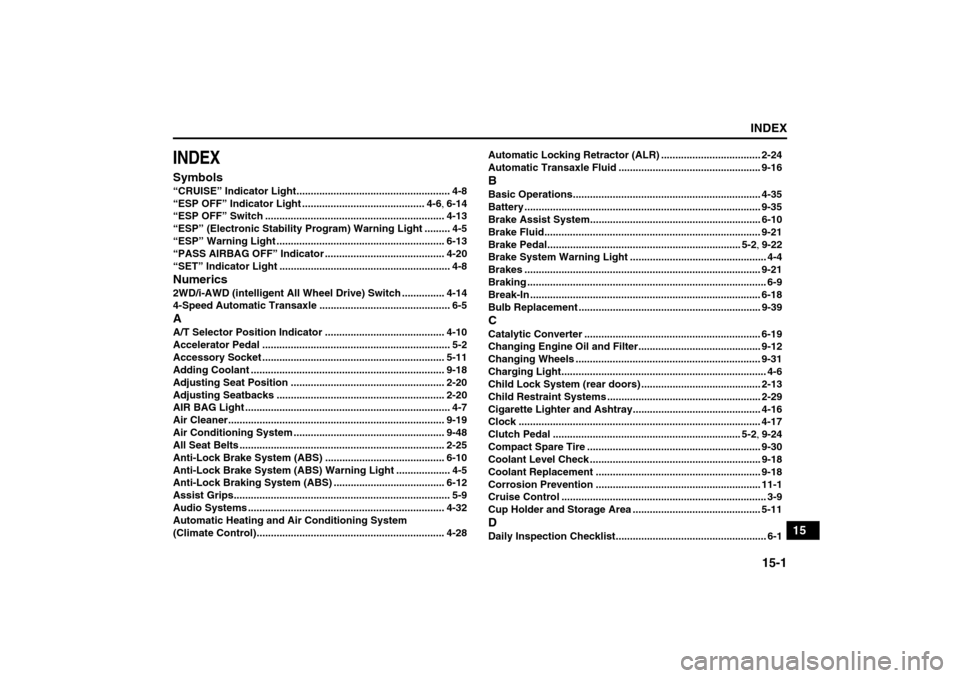
INDEXSymbols“CRUISE” Indicator Light...................................................... 4-8
“ESP OFF” Indicator Light ........................................... 4-6, 6-14
“ESP OFF” Switch ............................................................... 4-13
“ESP” (Electronic Stability Program) Warning Light ......... 4-5
“ESP” Warning Light ........................................................... 6-13
“PASS AIRBAG OFF” Indicator .......................................... 4-20
“SET” Indicator Light ............................................................ 4-8Numerics2WD/i-AWD (intelligent All Wheel Drive) Switch ............... 4-14
4-Speed Automatic Transaxle .............................................. 6-5AA/T Selector Position Indicator .......................................... 4-10
Accelerator Pedal .................................................................. 5-2
Accessory Socket ................................................................ 5-11
Adding Coolant .................................................................... 9-18
Adjusting Seat Position ...................................................... 2-20
Adjusting Seatbacks ........................................................... 2-20
AIR BAG Light ........................................................................ 4-7
Air Cleaner............................................................................ 9-19
Air Conditioning System ..................................................... 9-48
All Seat Belts ........................................................................ 2-25
Anti-Lock Brake System (ABS) .......................................... 6-10
Anti-Lock Brake System (ABS) Warning Light ................... 4-5
Anti-Lock Braking System (ABS) ....................................... 6-12
Assist Grips............................................................................ 5-9
Audio Systems ..................................................................... 4-32
Automatic Heating and Air Conditioning System
(Climate Control).................................................................. 4-28Automatic Locking Retractor (ALR) ................................... 2-24
Automatic Transaxle Fluid .................................................. 9-16
BBasic Operations.................................................................. 4-35
Battery ................................................................................... 9-35
Brake Assist System............................................................ 6-10
Brake Fluid............................................................................ 9-21
Brake Pedal.................................................................... 5-2, 9-22
Brake System Warning Light ................................................ 4-4
Brakes ................................................................................... 9-21
Braking .................................................................................... 6-9
Break-In ................................................................................. 6-18
Bulb Replacement ................................................................ 9-39CCatalytic Converter .............................................................. 6-19
Changing Engine Oil and Filter........................................... 9-12
Changing Wheels ................................................................. 9-31
Charging Light........................................................................ 4-6
Child Lock System (rear doors) .......................................... 2-13
Child Restraint Systems ...................................................... 2-29
Cigarette Lighter and Ashtray............................................. 4-16
Clock ..................................................................................... 4-17
Clutch Pedal .................................................................. 5-2, 9-24
Compact Spare Tire ............................................................. 9-30
Coolant Level Check ............................................................ 9-18
Coolant Replacement .......................................................... 9-18
Corrosion Prevention .......................................................... 11-1
Cruise Control ........................................................................ 3-9
Cup Holder and Storage Area ............................................. 5-11DDaily Inspection Checklist..................................................... 6-1