SUZUKI SX4 2010 1.G Owners Manual
Manufacturer: SUZUKI, Model Year: 2010, Model line: SX4, Model: SUZUKI SX4 2010 1.GPages: 297, PDF Size: 4.51 MB
Page 241 of 297
7-36
INSPECTION AND MAINTENANCE
80J23-03E
Your vehicle is equipped with a battery that
requires infrequent maintenance. You will
never have to add water. You should, how-
ever, periodically check the battery, battery
terminals and battery hold-down bracket
for corrosion. Remove corrosion using a
stiff brush and ammonia mixed with water,
or baking soda mixed with water. After
removing corrosion, rinse with clean water.
The test indicator on the top of the battery
provides information on the condition of
the battery.
If your vehicle is not going to be driven for
a month or longer, disconnect the cable
from the negative terminal of the battery to
help prevent discharge.
FusesYour vehicle has three types of fuses, as
described below:
Main Fuse – The main fuse takes current
directly from the battery.
Primary Fuses – These fuses are between
the main fuse and individual fuses, and are
for electrical load groups.
Individual Fuses – These fuses are for indi-
vidual electrical circuits.
For details on protected circuits, refer to
the “Fuses and Protected Circuits” section
in this manual.
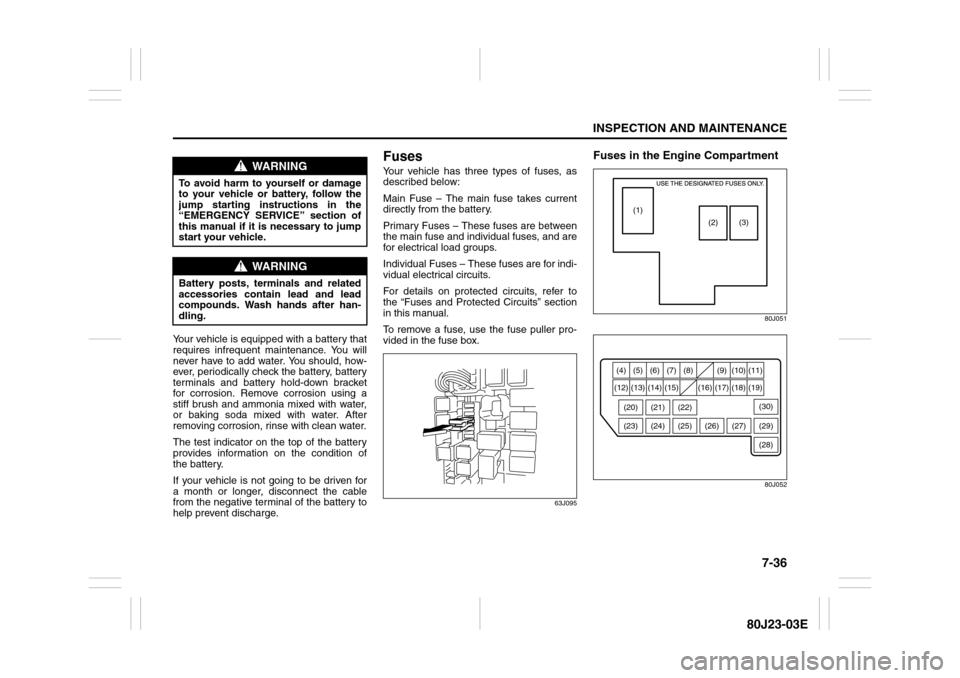
To remove a fuse, use the fuse puller pro-
vided in the fuse box.
63J095
Fuses in the Engine Compartment
80J051
80J052
WARNING
To avoid harm to yourself or damage
to your vehicle or battery, follow the
jump starting instructions in the
“EMERGENCY SERVICE” section of
this manual if it is necessary to jump
start your vehicle.
WARNING
Battery posts, terminals and related
accessories contain lead and lead
compounds. Wash hands after han-
dling.
(1)
(2) (3)
(28) (27) (26) (25) (6) (7) (9) (11)
(15) (16) (17) (18) (19)
(24)
(8) (4) (5) (10)
(22) (21)
(23)(20)(12) (13) (14)
(30)
(29)
Page 242 of 297
7-37INSPECTION AND MAINTENANCE
80J23-03E
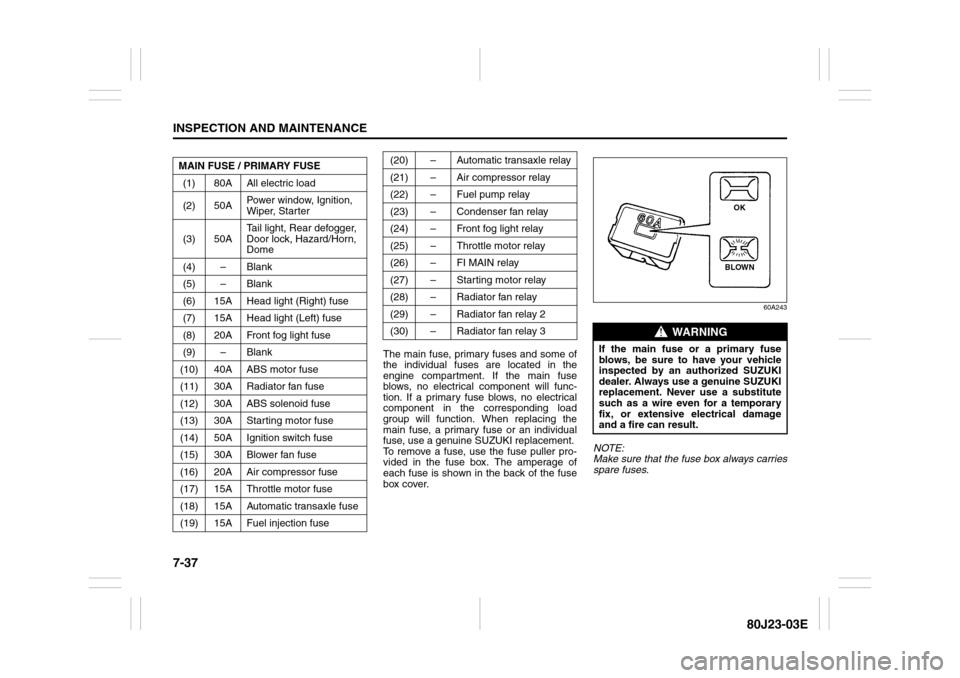
The main fuse, primary fuses and some of
the individual fuses are located in the
engine compartment. If the main fuse
blows, no electrical component will func-
tion. If a primary fuse blows, no electrical
component in the corresponding load
group will function. When replacing the
main fuse, a primary fuse or an individual
fuse, use a genuine SUZUKI replacement.
To remove a fuse, use the fuse puller pro-
vided in the fuse box. The amperage of
each fuse is shown in the back of the fuse
box cover.
60A243
NOTE:
Make sure that the fuse box always carries
spare fuses. MAIN FUSE / PRIMARY FUSE
(1) 80A All electric load
(2) 50APower window, Ignition,
Wiper, Starter
(3) 50ATail light, Rear defogger,
Door lock, Hazard/Horn,
Dome
(4) – Blank
(5) – Blank
(6) 15A Head light (Right) fuse
(7) 15A Head light (Left) fuse
(8) 20A Front fog light fuse
(9) – Blank
(10) 40A ABS motor fuse
(11) 30A Radiator fan fuse
(12) 30A ABS solenoid fuse
(13) 30A Starting motor fuse
(14) 50A Ignition switch fuse
(15) 30A Blower fan fuse
(16) 20A Air compressor fuse
(17) 15A Throttle motor fuse
(18) 15A Automatic transaxle fuse
(19) 15A Fuel injection fuse
(20) – Automatic transaxle relay
(21) – Air compressor relay
(22) – Fuel pump relay
(23) – Condenser fan relay
(24) – Front fog light relay
(25) – Throttle motor relay
(26) – FI MAIN relay
(27) – Starting motor relay
(28) – Radiator fan relay
(29) – Radiator fan relay 2
(30) – Radiator fan relay 3
WARNING
If the main fuse or a primary fuse
blows, be sure to have your vehicle
inspected by an authorized SUZUKI
dealer. Always use a genuine SUZUKI
replacement. Never use a substitute
such as a wire even for a temporary
fix, or extensive electrical damage
and a fire can result.
BLOWNOK
Page 243 of 297
7-38
INSPECTION AND MAINTENANCE
80J23-03E
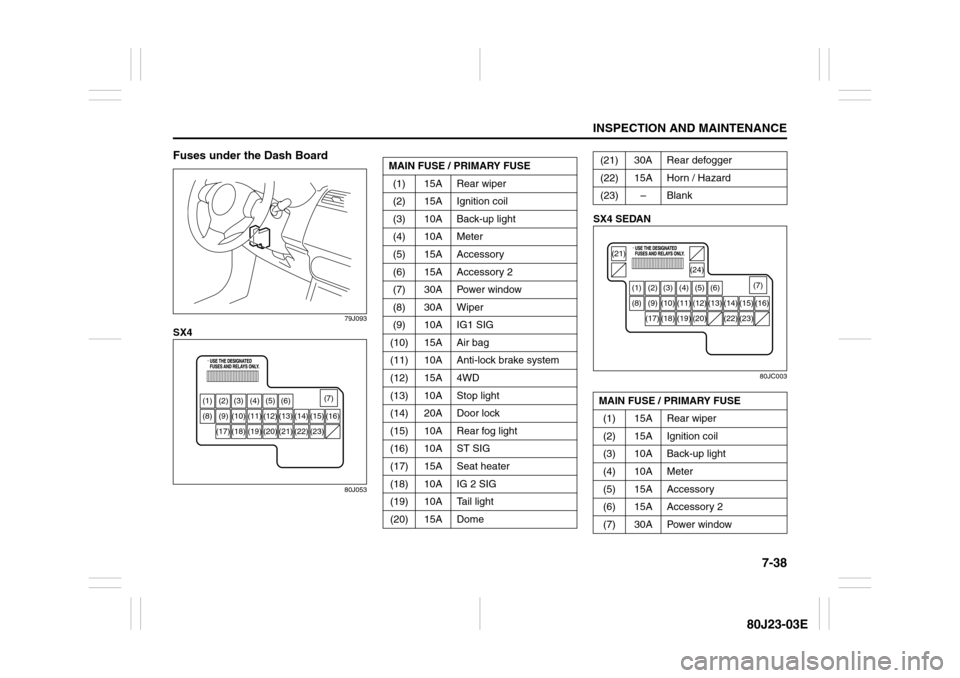
Fuses under the Dash Board
79J093
SX4
80J053
SX4 SEDAN
80JC003
(1) (2) (3) (4) (5) (6)
(8) (9) (10) (11) (12) (13) (14) (15) (16)
(18) (17) (19) (20) (21) (22) (23)(7)
MAIN FUSE / PRIMARY FUSE
(1) 15A Rear wiper
(2) 15A Ignition coil
(3) 10A Back-up light
(4) 10A Meter
(5) 15A Accessory
(6) 15A Accessory 2
(7) 30A Power window
(8) 30A Wiper
(9) 10A IG1 SIG
(10) 15A Air bag
(11) 10A Anti-lock brake system
(12) 15A 4WD
(13) 10A Stop light
(14) 20A Door lock
(15) 10A Rear fog light
(16) 10A ST SIG
(17) 15A Seat heater
(18) 10A IG 2 SIG
(19) 10A Tail light
(20) 15A Dome
(21) 30A Rear defogger
(22) 15A Horn / Hazard
(23) – Blank
MAIN FUSE / PRIMARY FUSE
(1) 15A Rear wiper
(2) 15A Ignition coil
(3) 10A Back-up light
(4) 10A Meter
(5) 15A Accessory
(6) 15A Accessory 2
(7) 30A Power window
(1) (2) (3) (4) (5) (6)
(8) (9) (10) (11) (12) (13)
(21)
(24)
(14) (15) (16)
(18) (17) (19) (20) (22) (23)(7)
Page 244 of 297
7-39INSPECTION AND MAINTENANCE
80J23-03E
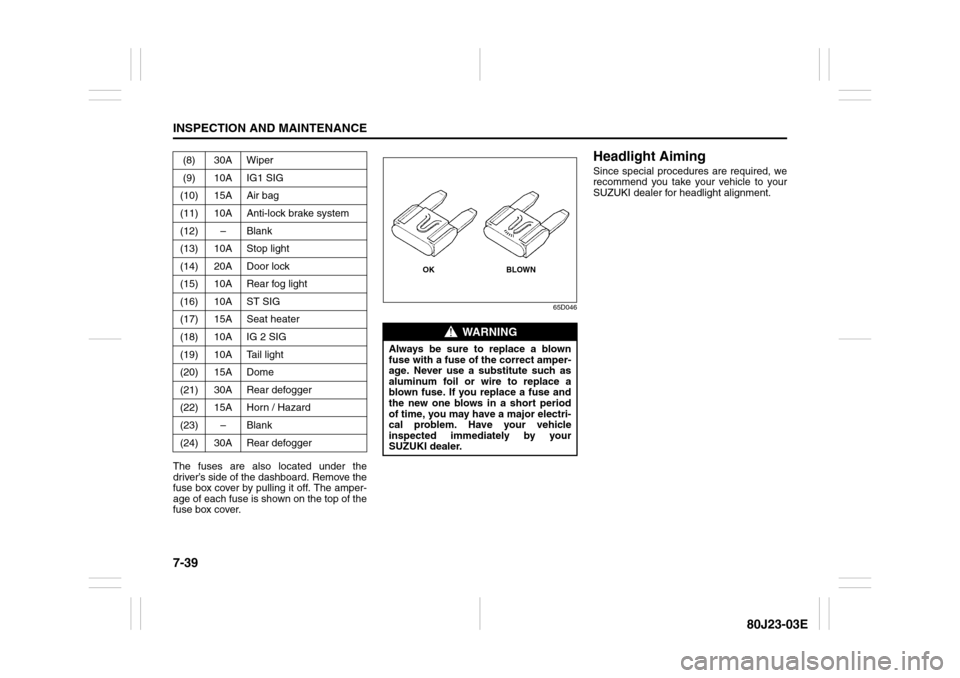
The fuses are also located under the
driver’s side of the dashboard. Remove the
fuse box cover by pulling it off. The amper-
age of each fuse is shown on the top of the
fuse box cover.
65D046
Headlight AimingSince special procedures are required, we
recommend you take your vehicle to your
SUZUKI dealer for headlight alignment. (8) 30A Wiper
(9) 10A IG1 SIG
(10) 15A Air bag
(11) 10A Anti-lock brake system
(12) – Blank
(13) 10A Stop light
(14) 20A Door lock
(15) 10A Rear fog light
(16) 10A ST SIG
(17) 15A Seat heater
(18) 10A IG 2 SIG
(19) 10A Tail light
(20) 15A Dome
(21) 30A Rear defogger
(22) 15A Horn / Hazard
(23) – Blank
(24) 30A Rear defogger
WARNING
Always be sure to replace a blown
fuse with a fuse of the correct amper-
age. Never use a substitute such as
aluminum foil or wire to replace a
blown fuse. If you replace a fuse and
the new one blows in a short period
of time, you may have a major electri-
cal problem. Have your vehicle
inspected immediately by your
SUZUKI dealer.
BLOWN OK
Page 245 of 297
7-40
INSPECTION AND MAINTENANCE
80J23-03E
Bulb ReplacementNOTE:
If it is difficult to replace headlight bulbs or
position light bulbs due to under-hood
components trust this job to your dealer.
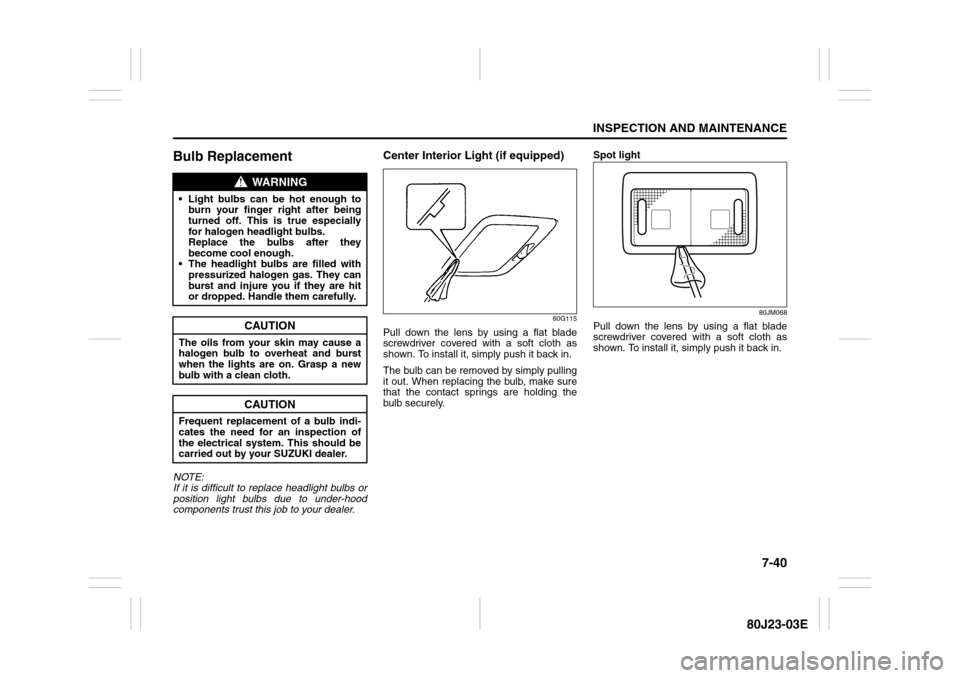
Center Interior Light (if equipped)
60G115
Pull down the lens by using a flat blade
screwdriver covered with a soft cloth as
shown. To install it, simply push it back in.
The bulb can be removed by simply pulling
it out. When replacing the bulb, make sure
that the contact springs are holding the
bulb securely.Spot light
80JM068
Pull down the lens by using a flat blade
screwdriver covered with a soft cloth as
shown. To install it, simply push it back in.
WARNING
Light bulbs can be hot enough to
burn your finger right after being
turned off. This is true especially
for halogen headlight bulbs.
Replace the bulbs after they
become cool enough.
The headlight bulbs are filled with
pressurized halogen gas. They can
burst and injure you if they are hit
or dropped. Handle them carefully.
CAUTION
The oils from your skin may cause a
halogen bulb to overheat and burst
when the lights are on. Grasp a new
bulb with a clean cloth.
CAUTION
Frequent replacement of a bulb indi-
cates the need for an inspection of
the electrical system. This should be
carried out by your SUZUKI dealer.
Page 246 of 297
7-41INSPECTION AND MAINTENANCE
80J23-03E
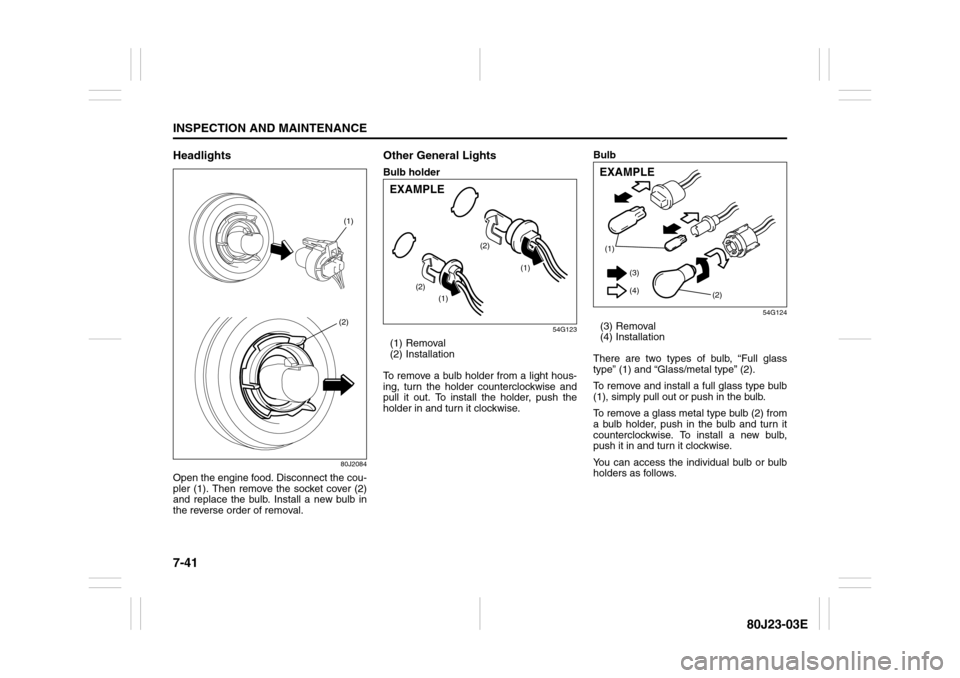
Headlights
80J2084
Open the engine food. Disconnect the cou-
pler (1). Then remove the socket cover (2)
and replace the bulb. Install a new bulb in
the reverse order of removal.
Other General LightsBulb holder
54G123
(1) Removal
(2) Installation
To remove a bulb holder from a light hous-
ing, turn the holder counterclockwise and
pull it out. To install the holder, push the
holder in and turn it clockwise.Bulb
54G124
(3) Removal
(4) Installation
There are two types of bulb, “Full glass
type” (1) and “Glass/metal type” (2).
To remove and install a full glass type bulb
(1), simply pull out or push in the bulb.
To remove a glass metal type bulb (2) from
a bulb holder, push in the bulb and turn it
counterclockwise. To install a new bulb,
push it in and turn it clockwise.
You can access the individual bulb or bulb
holders as follows.
(1)(2)
(1)
(1) (2)(2)
EXAMPLE
(1)
(2) (3)
(4)EXAMPLE
Page 247 of 297
7-42
INSPECTION AND MAINTENANCE
80J23-03E
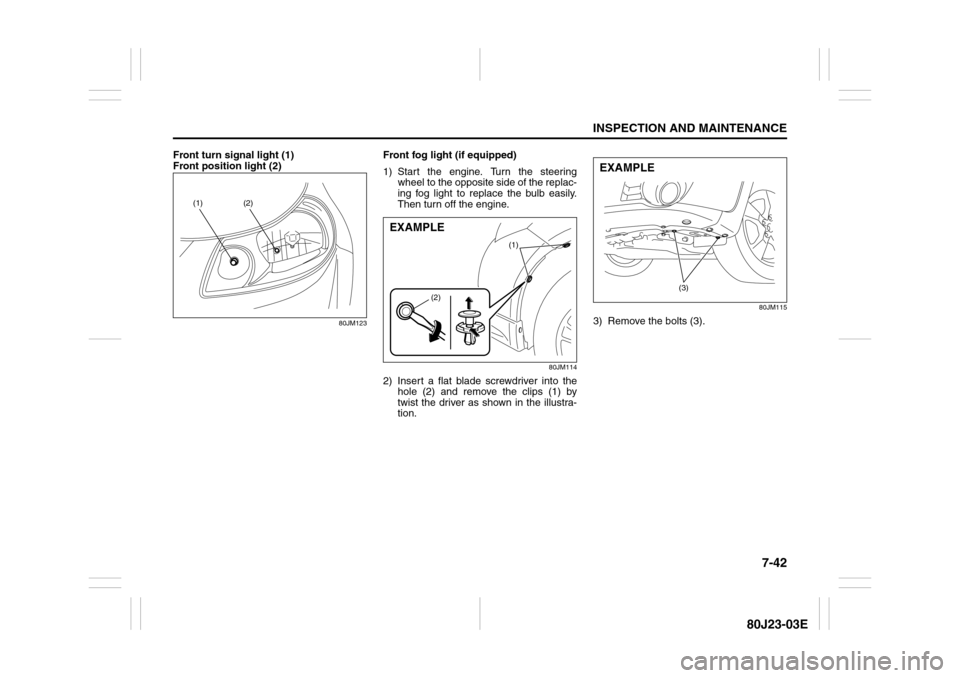
Front turn signal light (1)
Front position light (2)
80JM123
Front fog light (if equipped)
1) Start the engine. Turn the steering
wheel to the opposite side of the replac-
ing fog light to replace the bulb easily.
Then turn off the engine.
80JM114
2) Insert a flat blade screwdriver into the
hole (2) and remove the clips (1) by
twist the driver as shown in the illustra-
tion.
80JM115
3) Remove the bolts (3).
(1)
(2)
(1)
(2)
EXAMPLE
(3)
EXAMPLE
Page 248 of 297
7-43INSPECTION AND MAINTENANCE
80J23-03E
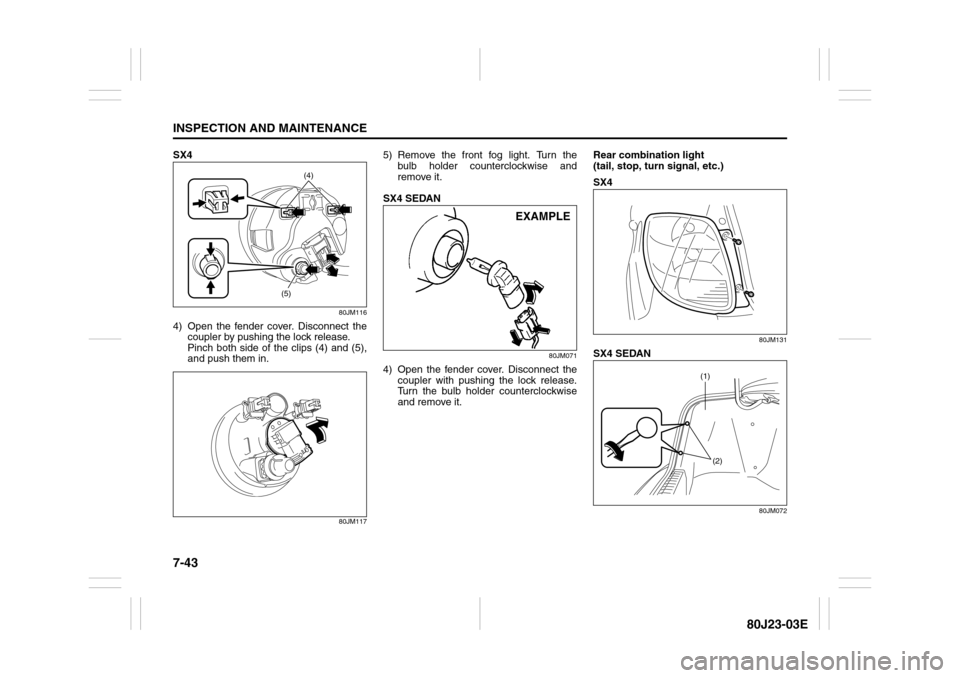
SX4
80JM116
4) Open the fender cover. Disconnect the
coupler by pushing the lock release.
Pinch both side of the clips (4) and (5),
and push them in.
80JM117
5) Remove the front fog light. Turn the
bulb holder counterclockwise and
remove it.
SX4 SEDAN
80JM071
4) Open the fender cover. Disconnect the
coupler with pushing the lock release.
Turn the bulb holder counterclockwise
and remove it.Rear combination light
(tail, stop, turn signal, etc.)
SX4
80JM131
SX4 SEDAN
80JM072
(4)
(5)
EXAMPLE
(2)
(1)
Page 249 of 297
7-44
INSPECTION AND MAINTENANCE
80J23-03E
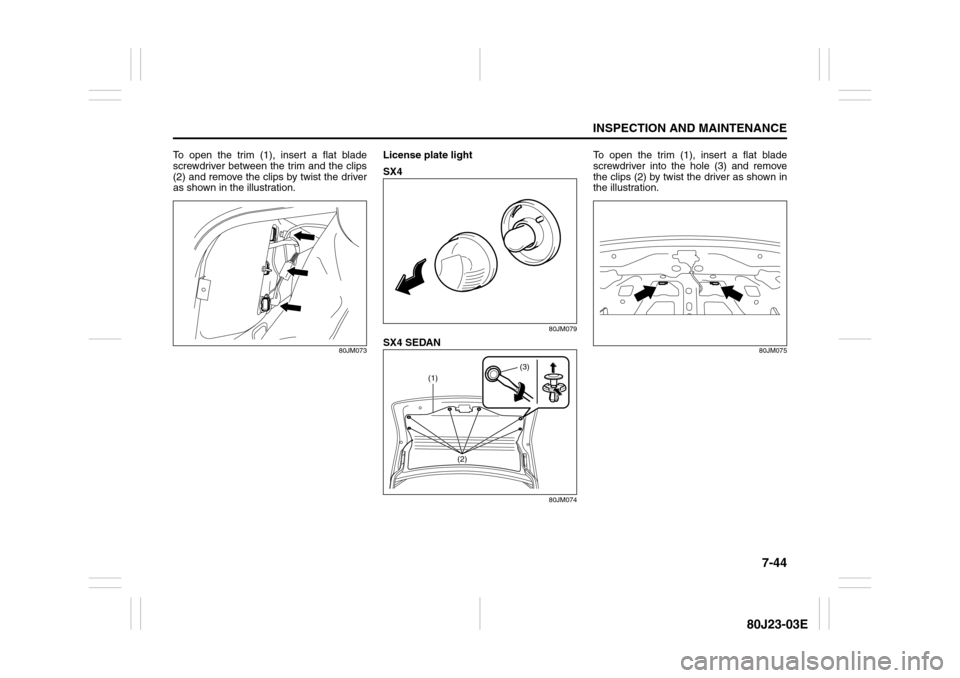
To open the trim (1), insert a flat blade
screwdriver between the trim and the clips
(2) and remove the clips by twist the driver
as shown in the illustration.
80JM073
License plate light
SX4
80JM079
SX4 SEDAN
80JM074
To open the trim (1), insert a flat blade
screwdriver into the hole (3) and remove
the clips (2) by twist the driver as shown in
the illustration.
80JM075
(3)
(1)
(2)
Page 250 of 297
7-45INSPECTION AND MAINTENANCE
80J23-03E
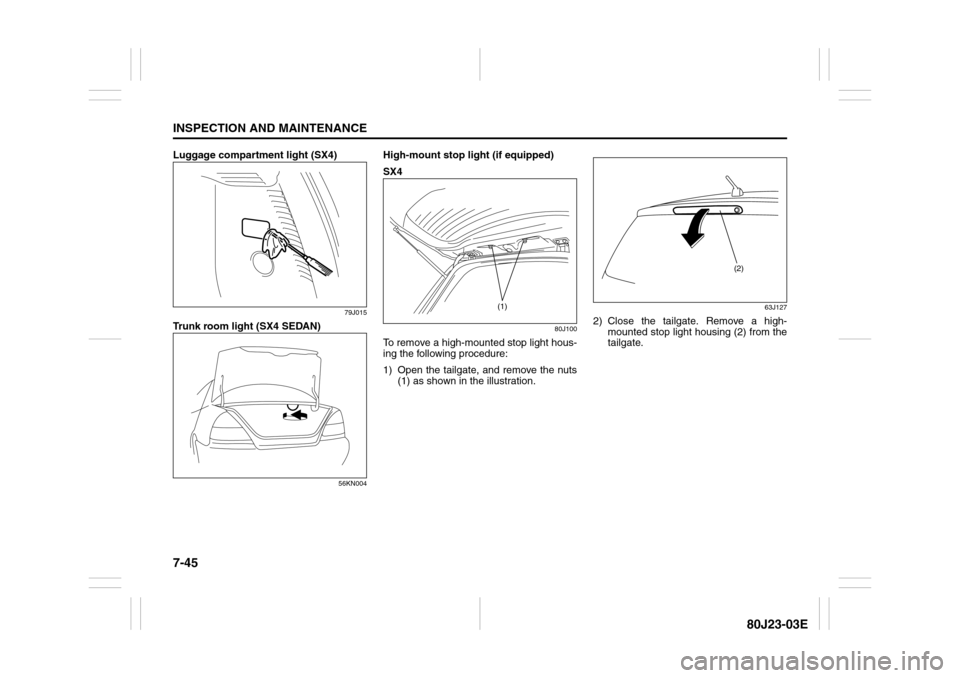
Luggage compartment light (SX4)
79J015
Trunk room light (SX4 SEDAN)
56KN004
High-mount stop light (if equipped)
SX4
80J100
To remove a high-mounted stop light hous-
ing the following procedure:
1) Open the tailgate, and remove the nuts
(1) as shown in the illustration.
63J127
2) Close the tailgate. Remove a high-
mounted stop light housing (2) from the
tailgate.
(1)
(2)