remote start SUZUKI XL7 2007 2.G User Guide
[x] Cancel search | Manufacturer: SUZUKI, Model Year: 2007, Model line: XL7, Model: SUZUKI XL7 2007 2.GPages: 274, PDF Size: 6.12 MB
Page 153 of 274

3-71 INSTRUMENT PANEL
78J00-03E
tinue playing in a slow play mode. You
may also, depending on the radio, perform
reverse slow play by pressing the pause
button and then pressing the fast reverse
button. To cancel slow play mode, press
the play/pause button.
(Previous Track/Chapter):
Press this button to return to the start of
the current track or chapter. Press this but-
ton again to go to the previous track or
chapter. This button may not work when
the DVD is playing the copyright informa-
tion or the previews.
(Next Track/Chapter):
Press this button to go to the beginning of
the next chapter or track. This button may
not work when the DVD is playing the
copyright information or the previews.
(Fast Reverse):
Press this button to fast reverse the DVD
or CD. To stop fast reversing a DVD video,
press the play button. To stop fast revers-
ing a DVD audio or CD, release the fast
reverse button. This button may not work
when the DVD is playing the copyright
information or the previews.
(Fast Forward):
Press this button to fast forward the DVD
or CD. To stop fast forwarding a DVD
video, press the play button. To stop fast
forwarding a DVD audio or CD, release the
fast forward button. This button may not
work when the DVD is playing the copy-
right information or the previews. (Audio):
Press this button to change audio tracks
on DVDs that have this feature when the
DVD is playing. The format and content of
this function will vary for each disc.
(Subtitles):
Press this button to turn ON/OFF subtitles
and to move through subtitle options when
a DVD is playing. The format and content
of this function will vary for each disc.
AUX (Auxiliary):
Press this button to switch the system
between the DVD player and an auxiliary
source.
(Camera):
Press this button to change camera angles
on DVDs that have this feature when a
DVD is playing. The format and content of
this function will vary for each disc.
1 through 0 (Numeric Keypad):
The numeric keypad provides the capabil-
ity of direct chapter or track number selec-
tion.
(Clear):
Press this button within three seconds
after entering a numeric selection, to clear
all numeric inputs.
(Double Digit Entries):
Press this button to select chapter or track
numbers greater than nine. Press this but-
ton before entering the number.Battery Replacement
To change the remote control batteries, do
the following:
1) Remove the battery compartment door
located on the bottom of the remote
control.
2) Replace the two batteries in the com-
partment. Make sure that they are
installed correctly, using the diagram on
the inside of the battery compartment.
3) Close the battery door securely.
If the remote control is to be stored for a
long period of time, remove the batteries
and keep them in a cool, dry place.
Page 154 of 274

3-72 INSTRUMENT PANEL
78J00-03E
Problem Recommended Action
No power. The ignition might not be turned on or in accessory.
The picture does not fill the screen. There are black
borders on the top and bottom or on both sides or it
looks stretched out.Check the display mode settings in the setup menu by pressing the display
menu button on the remote control.
In auxiliary mode, the picture moves or scrolls. Check the auxiliary input connections at both devices.
The remote control does not work. Check to make sure there is no obstruction between the remote control and
the transmitter window.
Check the batteries to make sure they are not dead or installed incorrectly.
After stopping the player, I push Play but sometimes
the DVD starts where I left off and sometimes at the
beginning.If the stop button was pressed one time, the DVD player will resume playing
where the DVD was stopped. If the stop button was pressed two times the
DVD player will begin to play from the beginning of the DVD.
The auxiliary source is running but there is no picture
or sound.Check that the RSE video screen is in the auxiliary source mode.
Check the auxiliary input connections at both devices.
Sometimes the wireless headphone audio cuts out or
buzzes.Check for obstructions, low batteries, reception range, and interference from
cellular telephone towers or by using your cellular telephone in the vehicle.
Check that the headphones are on correctly using the L (left) and R (right)
on the headphones.
I lost the remote and/or the headphones. See your dealer for assistance.
The DVD is playing, but there is no picture or sound. Check that the RSE video screen is sourced to the DVD player.
Page 167 of 274

4-9 DRIVING YOUR VEHICLE
78J00-03E
acceleration skid, too much throttle causes
the driving wheels to spin.
A cornering skid is best handled by easing
your foot off the accelerator pedal.
Remember: Any traction control system
helps avoid only the acceleration skid. If
your traction system is off, then an acceler-
ation skid is also best handled by easing
your foot off the accelerator pedal. Refer to
“Traction Control System (TCS)” and
“Electronic Stability Control” in this section.
If your vehicle starts to slide, ease your
foot off the accelerator pedal and quickly
steer the way you want the vehicle to go. If
you start steering quickly enough, your
vehicle may straighten out. Always be
ready for a second skid if it occurs.
Of course, traction is reduced when water,
snow, ice, gravel, or other material is on
the road. For safety, you will want to slow
down and adjust your driving to these con-
ditions. It is important to slow down on slip-
pery surfaces because stopping distance
will be longer and vehicle control more lim-
ited.
While driving on a surface with reduced
traction, try your best to avoid sudden
steering, acceleration, or braking, including
reducing vehicle speed by shifting to a
lower gear. Any sudden changes could
cause the tires to slide. You may not realize
the surface is slippery until your vehicle is
skidding. Learn to recognize warning clues– such as enough water, ice, or packed
snow on the road to make a mirrored sur-
face – and slow down when you have any
doubt.
If you have the Anti-Lock Brake System
(ABS), remember: It helps avoid only the
braking skid. If you do not have ABS, then
in a braking skid, where the wheels are no
longer rolling, release enough pressure on
the brakes to get the wheels rolling again.
This restores steering control. Push the
brake pedal down steadily when you have
to stop suddenly. As long as the wheels
are rolling, you will have steering control.
Remember: Any Anti-Lock Brake System
(ABS) helps avoid only the braking skid.
Driving at NightNight driving is more dangerous than day
driving. One reason is that some drivers
are likely to be impaired – by alcohol or
drugs, with night vision problems, or by
fatigue.
Here are some tips on night driving.
Drive defensively.
Do not drink and drive.
Adjust the inside rearview mirror to
reduce glare from headlamps behind
you.
Since you cannot see as well, you may
need to slow down and keep more space
between you and other vehicles. Slow down, especially on higher speed
roads. Your vehicle’s headlamps can
light up only much road ahead.
In remote areas, watch for animals.
If you are tired, pull off the road in a safe
place and rest.
No one can see as well at night as in the
daytime. But as we get older these differ-
ences increase. A 50-year-old driver may
require at least twice much light to see the
same thing at night as a 20-year-old.
What you do in the daytime can also affect
your night vision. For example, if you
spend the day in bright sunshine you are
wise to wear sunglasses. Your eyes will
have less trouble adjusting to night. But if
you are driving, do not wear sunglasses at
night. They may cut down on glare from
headlamps, but they also make a lot of
things invisible.
You can be temporarily blinded by
approaching headlamps. It can take a sec-
ond or two, or even several seconds, for
your eyes to re-adjust to the dark. When
you are faced with severe glare, as from a
driver who does not lower the high beams,
or a vehicle with misaimed headlamps,
slow down a little. Avoid staring directly
into the approaching headlamps.
Keep the windshield and all the glass on
your vehicle clean – inside and out. Glare
at night is made much worse by dirt on the
glass. Even the inside of the glass can
Page 190 of 274

5-6 SERVICE AND APPEARANCE CARE
78J00-03E
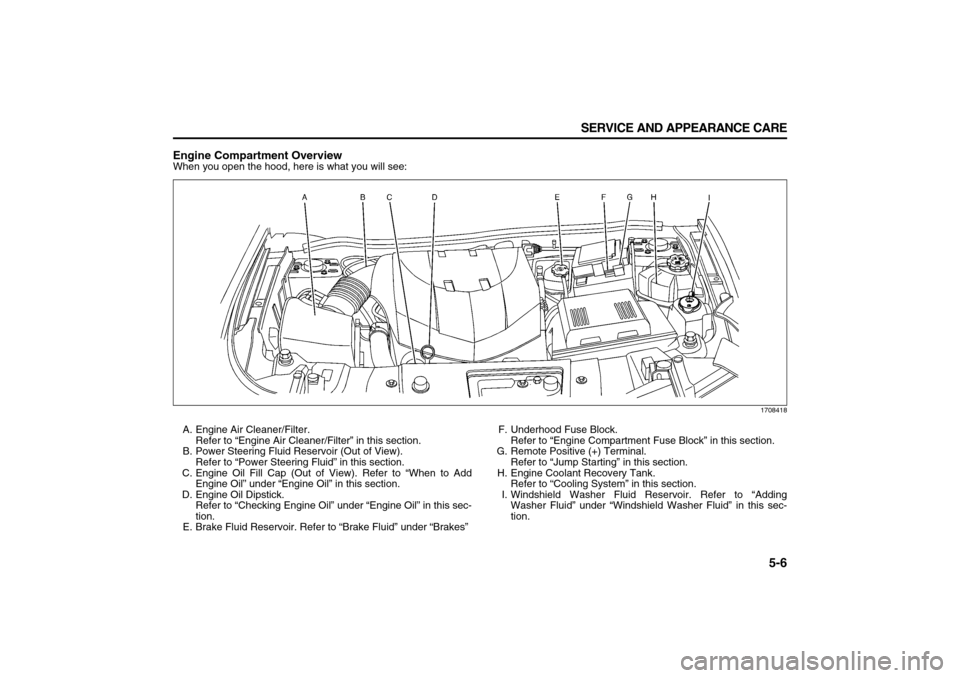
Engine Compartment OverviewWhen you open the hood, here is what you will see:
1708418
A. Engine Air Cleaner/Filter.
Refer to “Engine Air Cleaner/Filter” in this section.
B. Power Steering Fluid Reservoir (Out of View).
Refer to “Power Steering Fluid” in this section.
C. Engine Oil Fill Cap (Out of View). Refer to “When to Add
Engine Oil” under “Engine Oil” in this section.
D. Engine Oil Dipstick.
Refer to “Checking Engine Oil” under “Engine Oil” in this sec-
tion.
E. Brake Fluid Reservoir. Refer to “Brake Fluid” under “Brakes”F. Underhood Fuse Block.
Refer to “Engine Compartment Fuse Block” in this section.
G. Remote Positive (+) Terminal.
Refer to “Jump Starting” in this section.
H. Engine Coolant Recovery Tank.
Refer to “Cooling System” in this section.
I. Windshield Washer Fluid Reservoir. Refer to “Adding
Washer Fluid” under “Windshield Washer Fluid” in this sec-
tion.
Page 204 of 274

5-20 SERVICE AND APPEARANCE CARE
78J00-03E
3) Turn off the ignition on both vehicles.
Unplug unnecessary accessories
plugged into the cigarette lighter or the
accessory power outlets. Turn off the
radio and all lamps that are not needed.
This will avoid sparks and help save
both batteries. And it could save the
radio!
4) Open the hood on the other vehicle and
locate the positive (+) and negative (–)
terminal locations on that vehicle.
You will not use your vehicle’s battery
for jump starting. It has a remote posi-
tive (+) jump starting terminal, located
on the underhood fuse block, for that
purpose. Refer to “Engine Compart-
ment Overview” in this section for more
information on location.
871917
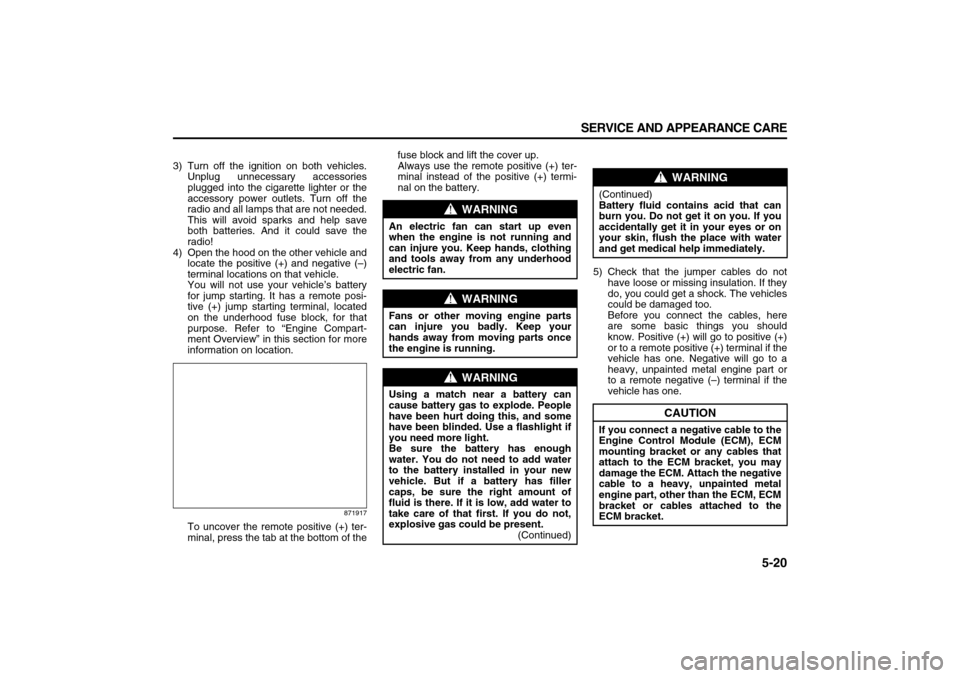
To uncover the remote positive (+) ter-
minal, press the tab at the bottom of thefuse block and lift the cover up.
Always use the remote positive (+) ter-
minal instead of the positive (+) termi-
nal on the battery.
5) Check that the jumper cables do not
have loose or missing insulation. If they
do, you could get a shock. The vehicles
could be damaged too.
Before you connect the cables, here
are some basic things you should
know. Positive (+) will go to positive (+)
or to a remote positive (+) terminal if the
vehicle has one. Negative will go to a
heavy, unpainted metal engine part or
to a remote negative (–) terminal if the
vehicle has one.
WARNING
An electric fan can start up even
when the engine is not running and
can injure you. Keep hands, clothing
and tools away from any underhood
electric fan.
WARNING
Fans or other moving engine parts
can injure you badly. Keep your
hands away from moving parts once
the engine is running.
WARNING
Using a match near a battery can
cause battery gas to explode. People
have been hurt doing this, and some
have been blinded. Use a flashlight if
you need more light.
Be sure the battery has enough
water. You do not need to add water
to the battery installed in your new
vehicle. But if a battery has filler
caps, be sure the right amount of
fluid is there. If it is low, add water to
take care of that first. If you do not,
explosive gas could be present.
(Continued)
WARNING
(Continued)
Battery fluid contains acid that can
burn you. Do not get it on you. If you
accidentally get it in your eyes or on
your skin, flush the place with water
and get medical help immediately.
CAUTION
If you connect a negative cable to the
Engine Control Module (ECM), ECM
mounting bracket or any cables that
attach to the ECM bracket, you may
damage the ECM. Attach the negative
cable to a heavy, unpainted metal
engine part, other than the ECM, ECM
bracket or cables attached to the
ECM bracket.
Page 205 of 274

5-21 SERVICE AND APPEARANCE CARE
78J00-03E
Do not connect positive (+) to negative
(–), or you will get a short that would
damage the battery and maybe other
parts too. And do not connect the nega-
tive (–) cable to the negative (–) termi-
nal on the dead battery because this
can cause sparks.
871918
6) Connect the red positive (+) cable to
the positive (+) terminal location on the
vehicle with the dead battery. Use a
remote positive (+) terminal if the vehi-
cle has one.
7) Do not let the other end touch metal.
Connect it to the positive (+) terminal
location on the vehicle with the good
battery. Use a remote positive (+) termi-
nal if the vehicle has one.
8) Now connect the black negative (–)
cable to the negative (–) terminal loca-
tion on the vehicle with the good bat-
tery. Use a remote negative (–) terminalif the vehicle has one.
Do not let the other end touch anything
until the next step. The other end of the
negative (–) cable does not go to the
dead battery. It goes to a heavy,
unpainted metal engine part or to a
remote negative (–) terminal on the
vehicle with the dead battery.
1737506
9) Connect the other end of the negative
(–) cable at least 18 inches (45 cm)
away from the dead battery, but not
near engine parts that move. The elec-
trical connection is just as good there,
and the chance of sparks getting back
to the battery is much less.
10)Now start the vehicle with the good bat-
tery and run the engine for a while.
11)Try to start the vehicle that had the
dead battery. If it will not start after a
few tries, it probably needs service.Jumper Cable Removal
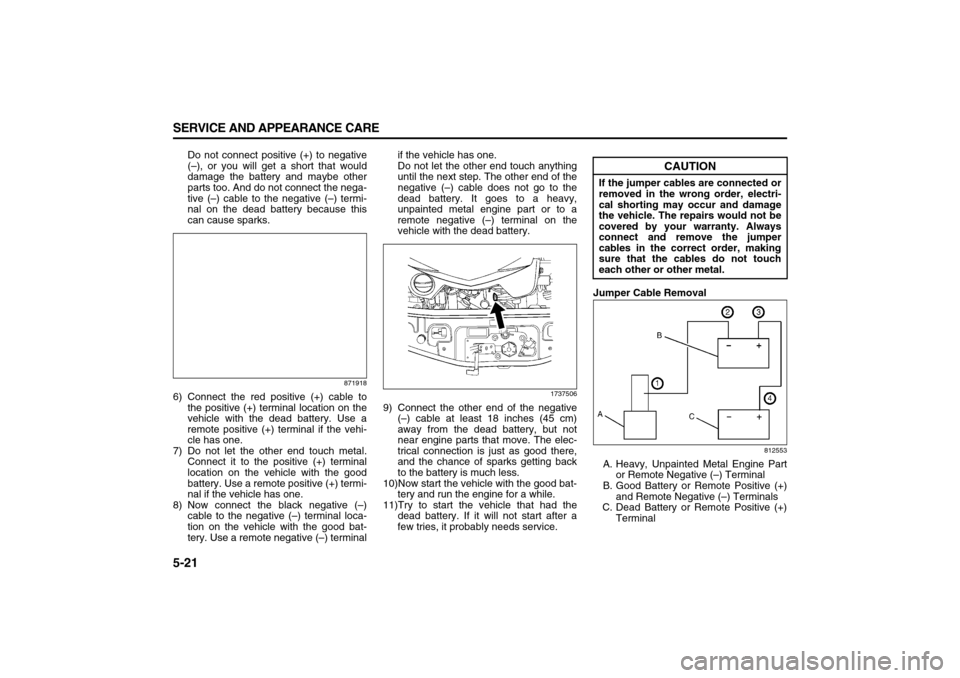
812553
A. Heavy, Unpainted Metal Engine Part
or Remote Negative (–) Terminal
B. Good Battery or Remote Positive (+)
and Remote Negative (–) Terminals
C. Dead Battery or Remote Positive (+)
Terminal
CAUTION
If the jumper cables are connected or
removed in the wrong order, electri-
cal shorting may occur and damage
the vehicle. The repairs would not be
covered by your warranty. Always
connect and remove the jumper
cables in the correct order, making
sure that the cables do not touch
each other or other metal.
Page 271 of 274

8-4 INDEX
78J00-03E N
National Highway Traffic Safety Administration
(NHTSA)
................................................................................7-3
Navigation/Radio System
...................................................3-67
New Vehicle Break-In
..........................................................2-12
Normal Maintenance Replacement Parts
..........................6-17
OOff-Road Recovery
..............................................................4-7
Oil Pressure Light ................................................................3-23
Older Children
......................................................................1-18
On-Board Vehicle Computers and Event Data
Recorders
.............................................................................7-2
Other Warning Devices
.......................................................3-3
Outlet Adjustment
...............................................................3-13
Outside Convex Mirrors
......................................................2-21
Outside Power Mirrors ........................................................2-21
Owner Checks and Services
..............................................6-13
PParking Brake
......................................................................2-17
Parking Over Things That Burn
.........................................2-18
Passenger Airbag Status Indicator ....................................3-17
Passenger Compartment Air Filter ....................................3-14
Passenger Folding Seatback
..............................................1-5
Passenger Safety Belt Reminder Light
.............................3-16
Passenger Sensing System
................................................1-39
Passing
.................................................................................4-7
PASS-Key® III+
....................................................................2-10
Power Door Locks ...............................................................2-5
Power Seat
...........................................................................1-1
Power Steering Fluid
...........................................................5-16
Power Windows
...................................................................2-8Power Windows and Other Power Options
...................... 5-53
Programmable Automatic Door Locks
............................. 2-6
QQuestions and Answers About Safety Belts
.................... 1-10
RRadio Reception
.................................................................. 3-74
Radio with CD (Base)
.......................................................... 3-41
Radio with CD (MP3) ........................................................... 3-44
Radio with CD and DVD (MP3)
........................................... 3-49
Rear Air Conditioning and Heating System
..................... 3-13
Rear Air Conditioning and Heating System and
Electronic Climate Controls
............................................... 3-14
Rear Door Security Locks
.................................................. 2-6
Rear Seat Entertainment System
...................................... 3-67
Rear Seat Passengers
........................................................ 1-15
Rear Seats
........................................................................... 1-6
Rear Window Wiper/Washer
.............................................. 3-5
Recommended Fluids and Lubricants
.............................. 6-16
Recreational Vehicle Towing
............................................. 4-20
Reduced Engine Power Light ............................................ 3-24
Remote Keyless Entry (RKE) System
............................... 2-1
Remote Keyless Entry (RKE) System Operation
............. 2-2
Remote Vehicle Start
.......................................................... 2-4
Replacement Bulbs
............................................................. 5-24
Replacing Restraint System Parts After a Crash
............. 1-43
Reporting Safety Defects
................................................... 7-3
Restraint System Check ..................................................... 1-42
Retained Accessory Power (RAP)
..................................... 2-13
Right Front Passenger Position
........................................ 1-15
Running the Engine While Parked .................................... 2-19