check engine SUZUKI XL7 2007 2.G Owner's Manual
[x] Cancel search | Manufacturer: SUZUKI, Model Year: 2007, Model line: XL7, Model: SUZUKI XL7 2007 2.GPages: 274, PDF Size: 6.12 MB
Page 173 of 274
4-15 DRIVING YOUR VEHICLE
78J00-03E
vehicle has a traction system, you will want
to slow down and adjust your driving to the
road conditions. Under certain conditions,
you may want to turn the traction system
off, such as when driving through deep
snow and loose gravel, to help maintain
vehicle motion at lower speeds. Refer to
“Traction Control System (TCS)” and
“Electronic Stability Control” in this section.
The Anti-Lock Brake System (ABS)
improves your vehicle’s stability when you
make a hard stop on a slippery road. Even
though you have ABS, you will want to
begin stopping sooner than you would on
dry pavement. Refer to “Anti-Lock Brake
System (ABS)” in this section.
Allow greater following distance on any
slippery road.
Watch for slippery spots. The road might
be fine until you hit a spot that is covered
with ice. On an otherwise clear road, ice
patches may appear in shaded areas
where the sun cannot reach, such as
around clumps of trees, behind build-
ings, or under bridges. Sometimes the
surface of a curve or an overpass may
remain icy when the surrounding roads
are clear. If you see a patch of ice ahead
of you, brake before you are on it. Try not
to brake while you are actually on the
ice, and avoid sudden steering maneu-
vers.If You Are Caught in a Blizzard
If you are stopped by heavy snow, you
could be in a serious situation. You should
probably stay with your vehicle unless you
know for sure that you are near help and
you can hike through the snow. Here are
some things to do to summon help and
keep yourself and your passengers safe:
Turn on your hazard flashers.
Tie a red cloth to your vehicle to alert
police that you have been stopped by the
snow.
Put on extra clothing or wrap a blanket
around you. If you do not have blankets
or extra clothing, make body insulators
from newspapers, burlap bags, rags,
floor mats – anything you can wrap
around yourself or tuck under your cloth-
ing to keep warm.
808411
You can run the engine to keep warm, but
be careful.
Run your engine only as long as you must.
This saves fuel. When you run the engine,
make it go a little faster than just idle. That
is, push the accelerator slightly. This uses
less fuel for the heat that you get and it
keeps the battery charged.
You will need a well-charged battery to
restart the vehicle, and possibly for signal-
ing later on with your headlamps. Let the
heater run for a while.
Then, shut the engine off and close the
window almost all the way to preserve the
heat. Start the engine again and repeat
this only when you feel really uncomfort-
WARNING
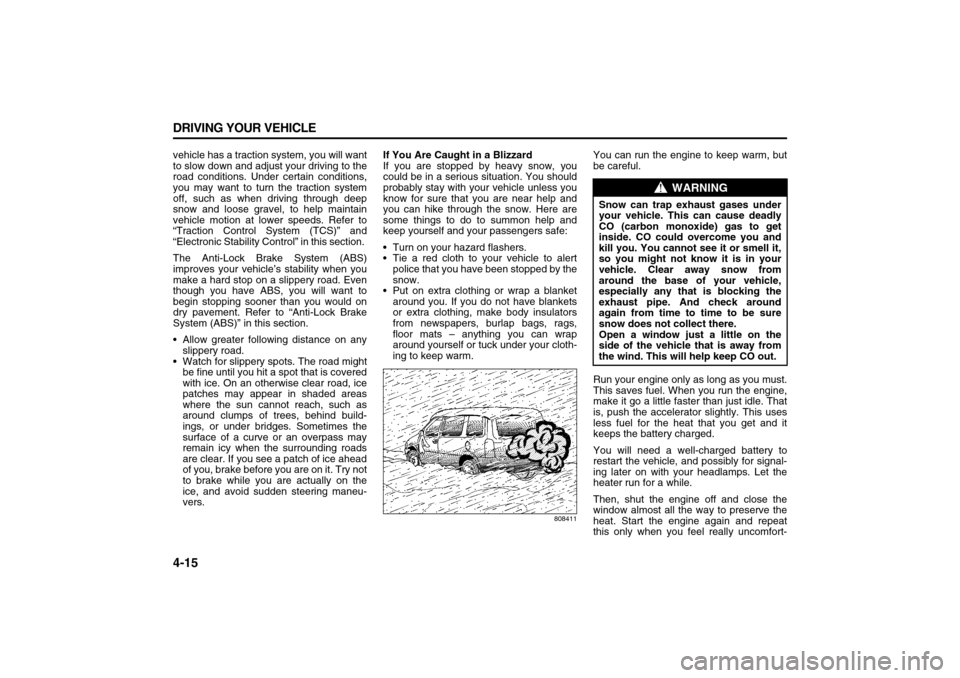
Snow can trap exhaust gases under
your vehicle. This can cause deadly
CO (carbon monoxide) gas to get
inside. CO could overcome you and
kill you. You cannot see it or smell it,
so you might not know it is in your
vehicle. Clear away snow from
around the base of your vehicle,
especially any that is blocking the
exhaust pipe. And check around
again from time to time to be sure
snow does not collect there.
Open a window just a little on the
side of the vehicle that is away from
the wind. This will help keep CO out.
Page 179 of 274
4-21 DRIVING YOUR VEHICLE
78J00-03E
the ground. It can be towed with car carrier
equipment.Level ControlYour vehicle may have this feature. This
self-adjusting type of level control is fully
automatic and will provide a better leveled
riding position as well as better handling
under a variety of passenger and loading
conditions. The system is activated when
sufficient weight is added to the vehicle,
and will automatically adjust vehicle height
thereafter. A hydraulic pump inside each
rear shock absorber raises the rear of the
vehicle to the proper height, based on
inputs from the road surface, while the
vehicle is being driven. It takes approxi-
mately two miles (3.2 km) of driving for the
leveling to complete, depending on the
road surface conditions.
If the loaded vehicle is not moved for
approximately twelve hours, the leveling
system may bleed down to a lower height.
This can be especially apparent if a trailer
is left attached to a parked vehicle for long
periods of time. The vehicle must be driven
to re-level the vehicle. If a self-equalizing
hitch is being used, the vehicle should be
driven approximately two miles (3.2 km)
with the trailer prior to adjusting (leveling)
the hitch.
Towing a TrailerTo identify the trailering capacity of your
vehicle, you should read the information in
“Weight of the Trailer” that appears later in
this section. Trailering is different than just
driving your vehicle by itself. Trailering
means changes in handling, acceleration,
braking, durability, and fuel economy. Suc-cessful, safe trailering takes correct equip-
ment, and it has to be used properly.
That is the reason for this section. In it are
many time-tested, important trailering tips
and safety rules. Many of these are impor-
tant for your safety and that of your pas-
sengers. So please read this section
carefully before you pull a trailer.
If You Do Decide To Pull A Trailer
If you do, here are some important points:
There are many different laws, including
speed limit restrictions, having to do with
trailering. Make sure your rig will be
legal, not only where you live but also
where you will be driving. A good source
for this information can be state or pro-
vincial police.
Consider using a sway control. Refer to
“Hitches” later in this section.
Do not tow a trailer at all during the first
500 miles (800 km) your new vehicle is
driven. Your engine, axle or other parts
could be damaged.
During the first 500 miles (800 km) that
you tow a trailer, do not drive over 50
mph (80 km/h) and do not make starts at
full throttle. This helps your engine and
other parts of your vehicle wear in at the
heavier loads.
WARNING
If you do not use the correct equip-
ment and drive properly, you can lose
control when you pull a trailer. For
example, if the trailer is too heavy,
the brakes may not work well – or
even at all. You and your passengers
could be seriously injured. Pull a
trailer only if you have followed all
the steps in this section. Ask your
dealer for advice and information
about towing a trailer with your vehi-
cle.
CAUTION
Pulling a trailer improperly can dam-
age your vehicle and result in costly
repairs that would not be covered by
your warranty. Always follow the
instructions in this section and check
with your dealer for more information
about towing a trailer with your vehi-
cle.
Page 183 of 274

4-25 DRIVING YOUR VEHICLE
78J00-03E
4) Reapply the regular brakes. Then apply
your parking brake, and then shift to
PARK (P).
5) Release the regular brakes.
When You Are Ready to Leave After
Parking on a Hill
1) Apply your regular brakes and hold the
pedal down while you do the following:
1. Start your engine.
2. Shift into a gear.
3. Release the parking brake.
2) Let up on the brake pedal.
3) Drive slowly until the trailer is clear of
the chocks.
4) Stop and have someone pick up and
store the chocks.
Maintenance When Trailer Towing
Your vehicle will need service more often
when you are pulling a trailer. See the
Maintenance Schedule for more on this.
Things that are especially important in
trailer operation are automatic transaxle
fluid, engine oil, belts, cooling system and
brake system. Each of these is covered in
this manual, and the Index will help you
find them quickly. If you are trailering, it is a
good idea to review these sections before
you start your trip.
Check periodically to see that all hitch nuts
and bolts are tight.
Page 185 of 274
5-1 SERVICE AND APPEARANCE CARE
78J00-03E
ServiceYour dealer knows your vehicle best and
wants you to be happy with it. We hope
you will go to your dealer for all your ser-
vice and parts needs.Accessories and ModificationsWhen you add non-Suzuki accessories to
your vehicle they can affect your vehicle’s
performance and safety, including such
things as, airbags, braking, stability, ride
and handling, emissions systems, aerody-
namics, durability, and electronic systems
like anti-lock brakes, traction control, and
stability control. Some of these accesso-
ries may even cause malfunction or dam-
age not covered by warranty.
Suzuki accessories are designed to com-
plement and function with other systems
on your vehicle. Your Suzuki dealer can
accessorize your vehicle using genuine
Suzuki accessories. When you go to your
Suzuki dealer and ask for Suzuki accesso-
ries, you will know that Suzuki-trained and
supported service technicians will perform
the work using genuine Suzuki accesso-
ries.
California Proposition 65 WarningMost motor vehicles, including this one,
contain and/or emit chemicals known to
the State of California to cause cancer and
birth defects or other reproductive harm.
Engine exhaust, many parts and systems
(including some inside the vehicle), many
fluids, and some component wear by-prod-
ucts contain and/or emit these chemicals.Doing Your Own Service WorkIf you want to do some of your own service
work, you will want to use the proper ser-
vice manual. It tells you much more about
how to service your vehicle than this man-
ual can.Your vehicle has an airbag system. Before
attempting to do your own service work,
refer to “Servicing Your Airbag-Equipped
Vehicle” in “Airbag System” in the “Seats
and Restraint Systems” section.
You should keep a record with all parts
receipts and list the mileage and the date
of any service work you perform. Refer to
“Maintenance Record” in “Maintenance
Schedule” in the “Maintenance Schedule”
section.
Adding Equipment to the Outside of
Your VehicleThings you might add to the outside of
your vehicle can affect the airflow around
it. This may cause wind noise and affect
windshield washer performance. Check
with your dealer before adding equipment
to the outside of your vehicle.
WARNING
You can be injured and your vehicle
could be damaged if you try to do
service work on a vehicle without
knowing enough about it.
Be sure you have sufficient knowl-
edge, experience, the proper
replacement parts, and tools before
you attempt any vehicle mainte-
nance task.
Be sure to use the proper nuts,
bolts, and other fasteners. English
and metric fasteners can be easily
confused. If you use the wrong fas-
teners, parts can later break or fall
off. You could be hurt.
Page 186 of 274

5-2 SERVICE AND APPEARANCE CARE
78J00-03E
FuelUse of the recommended fuel is an impor-
tant part of the proper maintenance of your
vehicle. To help keep the engine clean and
maintain optimum vehicle performance, we
recommend the use of gasoline advertised
as TOP TIER Detergent Gasoline.Gasoline OctaneUse regular unleaded gasoline with a
posted octane rating of 87 or higher. If the
octane rating is less than 87, you may
notice an audible knocking noise when you
drive, commonly referred to as spark
knock. If this occurs, use a gasoline rated
at 87 octane or higher as soon as possible.
If you are using gasoline rated at 87
octane or higher and you hear heavy
knocking, your engine needs service.
Gasoline SpecificationsAt a minimum, gasoline should meet
ASTM specification D 4814 in the United
States or CAN/CGSB-3.5 in Canada.
Some gasolines contain an octane-
enhancing additive called methylcyclopen-
tadienyl manganese tricarbonyl (MMT).
We recommend against the use of gaso-
lines containing MMT. Refer to “Additives”
in this section for additional information.California FuelIf your vehicle is certified to meet California
Emissions Standards, it is designed to
operate on fuels that meet California spec-
ifications. See the underhood emission
control label. If this fuel is not available in
states adopting California emissions stan-
dards, your vehicle will operate satisfacto-
rily on fuels meeting federal specifications,
but emission control system performance
may be affected. The malfunction indicator
lamp may turn on and your vehicle may fail
a smog-check test. Refer to “Malfunction
Indicator Lamp” in “Warning Lights, Gages,
and Indicators” in the “Instrument Panel”
section. If this occurs, return to your autho-
rized dealer for diagnosis. If it is deter-
mined that the condition is caused by the
type of fuel used, repairs may not be cov-
ered by your warranty.
AdditivesTo provide cleaner air, all gasolines in the
United States are now required to contain
additives that will help prevent engine and
fuel system deposits from forming, allow-
ing your emission control system to work
properly. In most cases, you should not
have to add anything to your fuel. How-
ever, some gasolines contain only the min-
imum amount of additive required to meet
U.S. Environmental Protection Agency
regulations. To help keep fuel injectors and
intake valves clean, or if your vehicle expe-
riences problems due to dirty injectors or
valves, look for gasoline that is advertised
as TOP TIER Detergent Gasoline. Also,
your dealer has additives that will help cor-
rect and prevent most deposit-related
problems.
Gasolines containing oxygenates, such as
ethers and ethanol, and reformulated gas-
olines may be available in your area. We
recommend that you use these gasolines,
if they comply with the specifications
described earlier. However, E85 (85% eth-
anol) and other fuels containing more than
10% ethanol must not be used in vehicles
that were not designed for those fuels.
Page 187 of 274
5-3 SERVICE AND APPEARANCE CARE
78J00-03E
Some gasolines that are not reformulated
for low emissions may contain an octane-
enhancing additive called methylcyclopen-
tadienyl manganese tricarbonyl (MMT);
ask the attendant where you buy gasoline
whether the fuel contains MMT. We rec-
ommend against the use of such gaso-
lines. Fuels containing MMT can reduce
the life of spark plugs and the performance
of the emission control system may be
affected. The malfunction indicator lamp
may turn on. If this occurs, return to your
dealer for service.
Fuels in Foreign CountriesIf you plan on driving in another country
outside the United States or Canada, the
proper fuel might be hard to find. Never
use leaded gasoline or any other fuel not
recommended in the previous text on fuel.
Costly repairs caused by use of improper
fuel would not be covered by your war-
ranty.
To check the fuel availability, ask an auto
club, or contact a major oil company that
does business in the country where you
will be driving.Filling the Tank
1733916
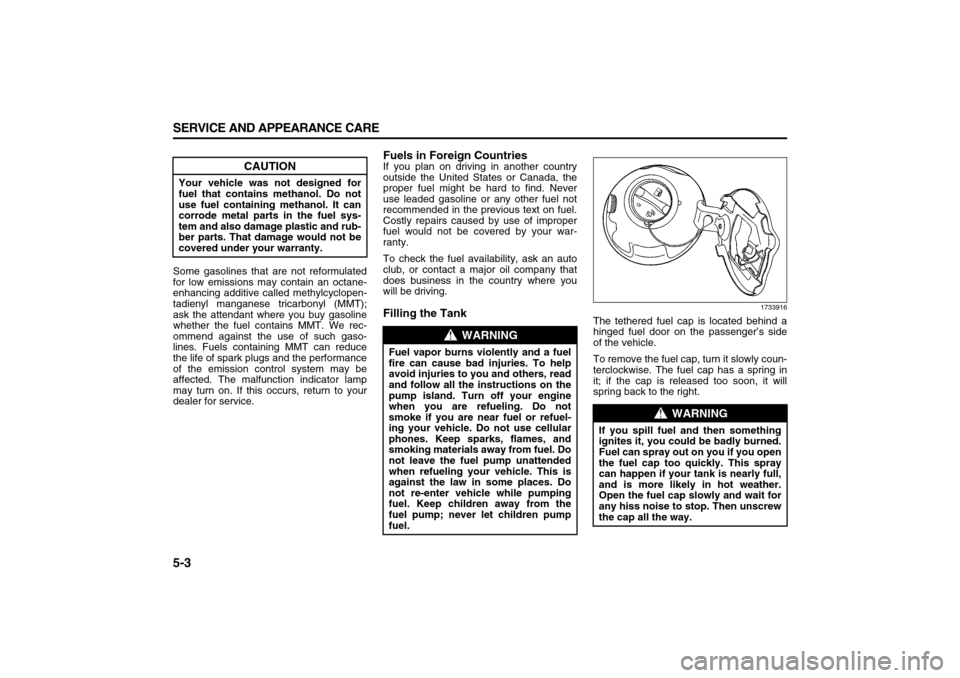
The tethered fuel cap is located behind a
hinged fuel door on the passenger’s side
of the vehicle.
To remove the fuel cap, turn it slowly coun-
terclockwise. The fuel cap has a spring in
it; if the cap is released too soon, it will
spring back to the right.
CAUTION
Your vehicle was not designed for
fuel that contains methanol. Do not
use fuel containing methanol. It can
corrode metal parts in the fuel sys-
tem and also damage plastic and rub-
ber parts. That damage would not be
covered under your warranty.
WARNING
Fuel vapor burns violently and a fuel
fire can cause bad injuries. To help
avoid injuries to you and others, read
and follow all the instructions on the
pump island. Turn off your engine
when you are refueling. Do not
smoke if you are near fuel or refuel-
ing your vehicle. Do not use cellular
phones. Keep sparks, flames, and
smoking materials away from fuel. Do
not leave the fuel pump unattended
when refueling your vehicle. This is
against the law in some places. Do
not re-enter vehicle while pumping
fuel. Keep children away from the
fuel pump; never let children pump
fuel.
WARNING
If you spill fuel and then something
ignites it, you could be badly burned.
Fuel can spray out on you if you open
the fuel cap too quickly. This spray
can happen if your tank is nearly full,
and is more likely in hot weather.
Open the fuel cap slowly and wait for
any hiss noise to stop. Then unscrew
the cap all the way.
Page 189 of 274
5-5 SERVICE AND APPEARANCE CARE
78J00-03E
Checking Things Under the
Hood
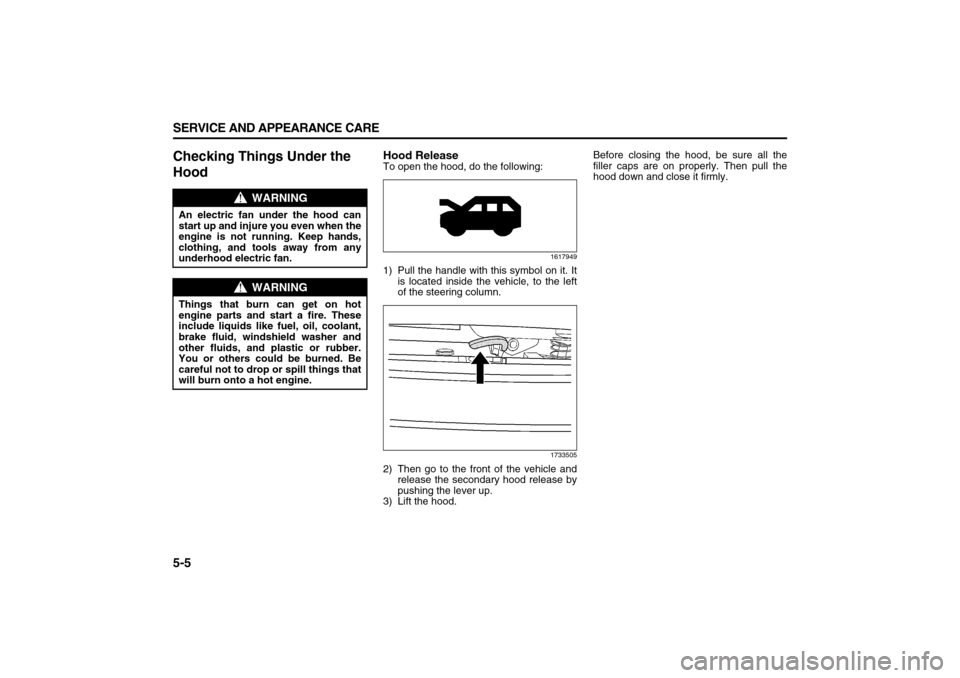
Hood ReleaseTo open the hood, do the following:
1617949
1) Pull the handle with this symbol on it. It
is located inside the vehicle, to the left
of the steering column.
1733505
2) Then go to the front of the vehicle and
release the secondary hood release by
pushing the lever up.
3) Lift the hood.Before closing the hood, be sure all the
filler caps are on properly. Then pull the
hood down and close it firmly.
WARNING
An electric fan under the hood can
start up and injure you even when the
engine is not running. Keep hands,
clothing, and tools away from any
underhood electric fan.
WARNING
Things that burn can get on hot
engine parts and start a fire. These
include liquids like fuel, oil, coolant,
brake fluid, windshield washer and
other fluids, and plastic or rubber.
You or others could be burned. Be
careful not to drop or spill things that
will burn onto a hot engine.
Page 190 of 274
5-6 SERVICE AND APPEARANCE CARE
78J00-03E
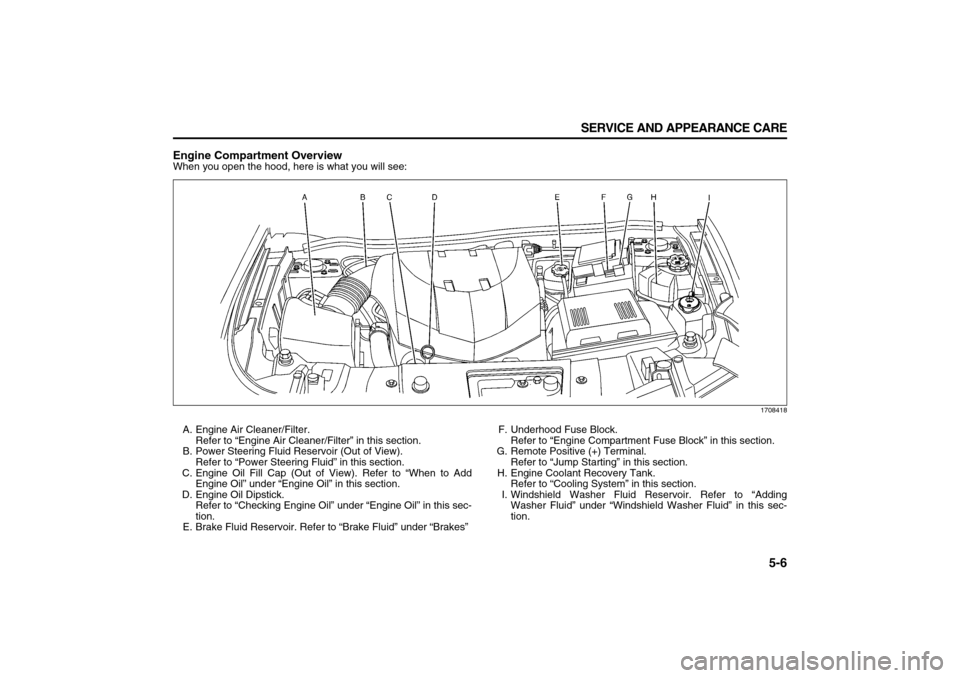
Engine Compartment OverviewWhen you open the hood, here is what you will see:
1708418
A. Engine Air Cleaner/Filter.
Refer to “Engine Air Cleaner/Filter” in this section.
B. Power Steering Fluid Reservoir (Out of View).
Refer to “Power Steering Fluid” in this section.
C. Engine Oil Fill Cap (Out of View). Refer to “When to Add
Engine Oil” under “Engine Oil” in this section.
D. Engine Oil Dipstick.
Refer to “Checking Engine Oil” under “Engine Oil” in this sec-
tion.
E. Brake Fluid Reservoir. Refer to “Brake Fluid” under “Brakes”F. Underhood Fuse Block.
Refer to “Engine Compartment Fuse Block” in this section.
G. Remote Positive (+) Terminal.
Refer to “Jump Starting” in this section.
H. Engine Coolant Recovery Tank.
Refer to “Cooling System” in this section.
I. Windshield Washer Fluid Reservoir. Refer to “Adding
Washer Fluid” under “Windshield Washer Fluid” in this sec-
tion.
Page 191 of 274
5-7 SERVICE AND APPEARANCE CARE
78J00-03E
Engine OilChecking Engine Oil
It is a good idea to check your engine oil
every time you get fuel. In order to get an
accurate reading, the oil must be warm
and the vehicle must be on level ground.
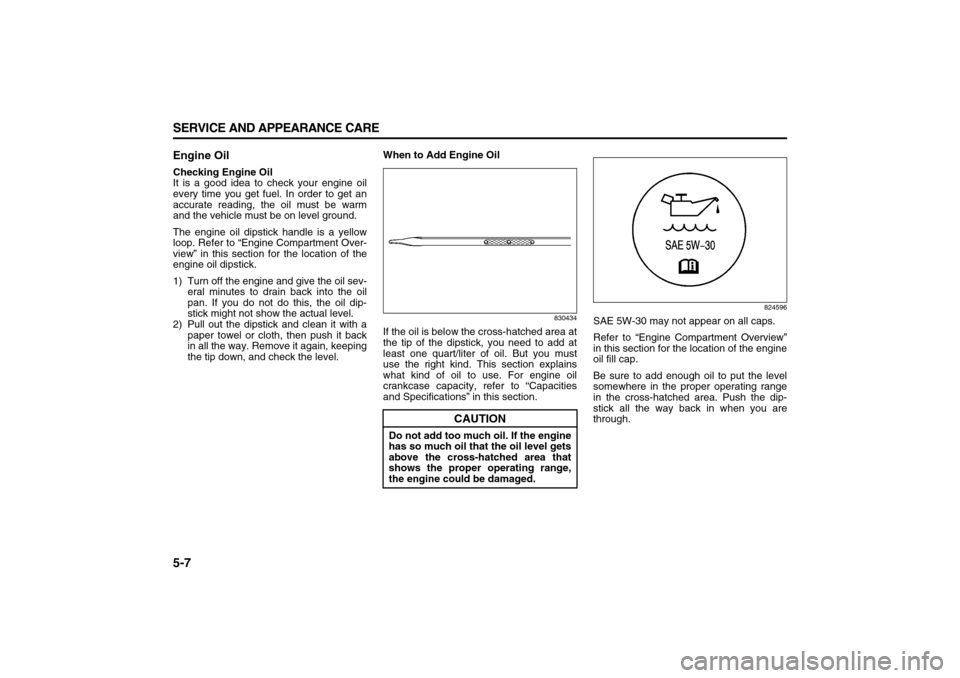
The engine oil dipstick handle is a yellow
loop. Refer to “Engine Compartment Over-
view” in this section for the location of the
engine oil dipstick.
1) Turn off the engine and give the oil sev-
eral minutes to drain back into the oil
pan. If you do not do this, the oil dip-
stick might not show the actual level.
2) Pull out the dipstick and clean it with a
paper towel or cloth, then push it back
in all the way. Remove it again, keeping
the tip down, and check the level.When to Add Engine Oil
830434
If the oil is below the cross-hatched area at
the tip of the dipstick, you need to add at
least one quart/liter of oil. But you must
use the right kind. This section explains
what kind of oil to use. For engine oil
crankcase capacity, refer to “Capacities
and Specifications” in this section.
824596
SAE 5W-30 may not appear on all caps.
Refer to “Engine Compartment Overview”
in this section for the location of the engine
oil fill cap.
Be sure to add enough oil to put the level
somewhere in the proper operating range
in the cross-hatched area. Push the dip-
stick all the way back in when you are
through.
CAUTION
Do not add too much oil. If the engine
has so much oil that the oil level gets
above the cross-hatched area that
shows the proper operating range,
the engine could be damaged.
Page 193 of 274

5-9 SERVICE AND APPEARANCE CARE
78J00-03E
system to work properly, you must reset
the system every time the oil is changed.
When the system has calculated that oil
life has been diminished, it will indicate
that an oil change is necessary. A change
engine oil light and a CHANGE ENGINE
OIL SOON message will come on. Refer to
“Change Engine Oil Light” in “Warning
Lights, Gages, and Indicators” in the
“Instrument Panel” section and “DIC Warn-
ings and Messages” in “Driver Information
Center (DIC)” in the “Instrument Panel”
section. Change your oil as soon as possi-
ble within the next 600 miles (1000 km). It
is possible that, if you are driving under the
best conditions, the oil life system may not
indicate that an oil change is necessary for
over a year. However, your engine oil and
filter must be changed at least once a year
and at this time the system must be reset.
Your dealer has trained service people
who will perform this work and reset the
system. It is also important to check your
oil regularly and keep it at the proper level.
If the system is ever reset accidentally, you
must change your oil at 3000 miles (5000
km) since your last oil change. Remember
to reset the oil life system whenever the oil
is changed.
How to Reset the Engine Oil Life Sys-
tem
The Engine Oil Life System calculates
when to change your engine oil and filter
based on vehicle use. Anytime your oil ischanged, reset the system so it can calcu-
late when the next oil change is required. If
a situation occurs where you change your
oil prior to a change engine oil light or
CHANGE ENGINE OIL SOON message
being turned on, reset the system.
1) Turn the ignition key to RUN with the
engine off.
2) Fully press and release the accelerator
pedal three times within five seconds.
The change engine oil light will flash
while the system is resetting.
3) When the light stops flashing, turn the
key to LOCK.
If the light or message comes back on and
stays on when you start your vehicle, the
engine oil life system has not reset.
Repeat the procedure.
What to Do with Used Oil
Used engine oil contains certain elements
that may be unhealthy for your skin and
could even cause cancer. Do not let used
oil stay on your skin for very long. Clean
your skin and nails with soap and water, or
a good hand cleaner. Wash or properly
dispose of clothing or rags containing used
engine oil. See the manufacturer’s warn-
ings about the use and disposal of oil prod-
ucts.
Used oil can be a threat to the environ-
ment. If you change your own oil, be sure
to drain all the oil from the filter before dis-
posal. Never dispose of oil by putting it inthe trash, pouring it on the ground, into
sewers, or into streams or bodies of water.
Instead, recycle it by taking it to a place
that collects used oil. If you have a prob-
lem properly disposing of your used oil,
ask your dealer, a service station, or a
local recycling center for help.
Engine Air Cleaner/FilterThe engine air cleaner/filter is located in
the engine compartment on the passen-
ger’s side of the vehicle. Refer to “Engine
Compartment Overview” in this section for
more information on location.
When to Inspect the Engine Air Cleaner/
Filter
Inspect the air cleaner/filter at the Mainte-
nance II intervals and replace it at the first
oil change after each 50000 mile (83000
km) interval. Refer to “Scheduled Mainte-
nance” in “Maintenance Schedule” in the
“Maintenance Schedule” section for more
information. If you are driving in dusty/dirty
conditions, inspect the filter at each engine
oil change.
How to Inspect the Engine Air Cleaner/
Filter
To inspect the air cleaner/filter remove the
filter from the vehicle and lightly shake the
filter to release loose dust and dirt. If the fil-
ter remains caked with dirt, a new filter is
required.