check oil TATA SAFARI 2015 User Guide
[x] Cancel search | Manufacturer: TATA, Model Year: 2015, Model line: SAFARI, Model: TATA SAFARI 2015Pages: 161, PDF Size: 2.55 MB
Page 125 of 161
125
R RR R
R
epair epairepair epair
epair
ing a ing a ing a ing a
ing a
T TT T
T
yr yryr yr
yr
e ee e
e
•Mark suitability the tyre position (if original colour dot mark is
not visible) with reference to valve stem hole to ensure that the
tyre is refitted in original location.
•Ensure that balancing weights are not disturbed during removal
of tyres.
•Check the balance weight prior to removal of tyre if found loose,
mark its location on rim & refit properly. Balance the wheel after
every dismantling and assembly of tyre on wheel rim.
•Tightening torque of wheel nut is 12-15 mkg.
•While fitting wheels on vehicle ensure that wheel bolts are free
from dust, scratches, dirt, dents, etc.
•Do not apply any oil on the wheel nut or bolt. Wipe off if present.
T TT T
T
YRES YRESYRES YRES
YRESM A I N T E N A N C E
ProCarManuals.com
Page 129 of 161
129
VEHICLE C VEHICLE CVEHICLE C VEHICLE C
VEHICLE C
ARE AREARE ARE
ARE
W WW W
W
A AA A
A
XING : XING :XING : XING :
XING :
Waxing and polishing is recommended to maintain the gloss
and wet-look appearance of your paint finish.
1. Use a good quality polish and wax for your vehicle.
2. Re-wax your vehicle when the water does not slip off the
surface and collects over the surface in patches.
Further tips for the care of your new vehicle finish : Further tips for the care of your new vehicle finish :Further tips for the care of your new vehicle finish : Further tips for the care of your new vehicle finish :
Further tips for the care of your new vehicle finish :
If your vehicle is washed in an automatic car wash, please
remember that the paint can be scratched by type of brushes,
unfiltered washing water or the washing process itself.
Scratching reduces paint durability and gloss, especially on
darker colours. It is suggested to wash the vehicle by hand with
cool and clean water using a soft cloth or sponge. Please do not
use soap but a car shampoo recommended by your dealer.
Please take the following precautions : Please take the following precautions :Please take the following precautions : Please take the following precautions :
Please take the following precautions :
1. Always wash your vehicle in shade, avoiding direct exposure
to sunlight during washing.
2. Dry wiping your vehicle may lead to the formation of
scratches and hence always use a soft cloth and clean water
while wiping your vehicle.
3. Always keep your vehicle parked in a well ventilated shade.
Exposure to heat with entrapped moisture promotes corrosion.4. Avoid driving on gravel roads, as the possibility of paint
chip off due to the impact of stones is high. If you are
driving on freshly tarred road, check immediately
afterwards for any stains & clean them.
5. External contamination in the form of sap or industrial
fall-out may mar or develop spots on a new finish. Hence
avoid parking your vehicle near trees, which are known
to drop sap, or near factories, which give out heavy smoke.
6. The acid content in bird droppings may damage the newly
painted finish and hence any bird dropping must be
immediately washed off.
7. The paint finish is susceptible to damage in case petrol,
brake fluid, liquid from car battery, oil, antifreeze,
transmission fluid or windshield solvent spills onto the
painted surface. In case of such a spillage immediately
rinse the affected area with water. Avoid wiping the area
far as possible, however if wiping is required, ensure that
you wipe the area gently with soft cotton cloth.
8. Avoid using sharp objects to scrap off tar or mud from a
painted surface as it may develop scratches or may peel
off the paint.
M A I N T E N A N C E
ProCarManuals.com
Page 133 of 161
133
TURBO CHARGER (IF FITTED) TURBO CHARGER (IF FITTED)TURBO CHARGER (IF FITTED) TURBO CHARGER (IF FITTED)
TURBO CHARGER (IF FITTED)
V VV V
V
ar arar ar
ar
iable iable iable iable
iable
T TT T
T
urbine urbine urbine urbine
urbine
T TT T
T
echnolo echnoloechnolo echnolo
echnolo
g gg g
g
y- y- y- y-
y-
VT VTVT VT
VT
T T T T
T
T TT T
T
urb urburb urb
urb
o oo o
o
char charchar char
char
ger : ger :ger : ger :
ger :
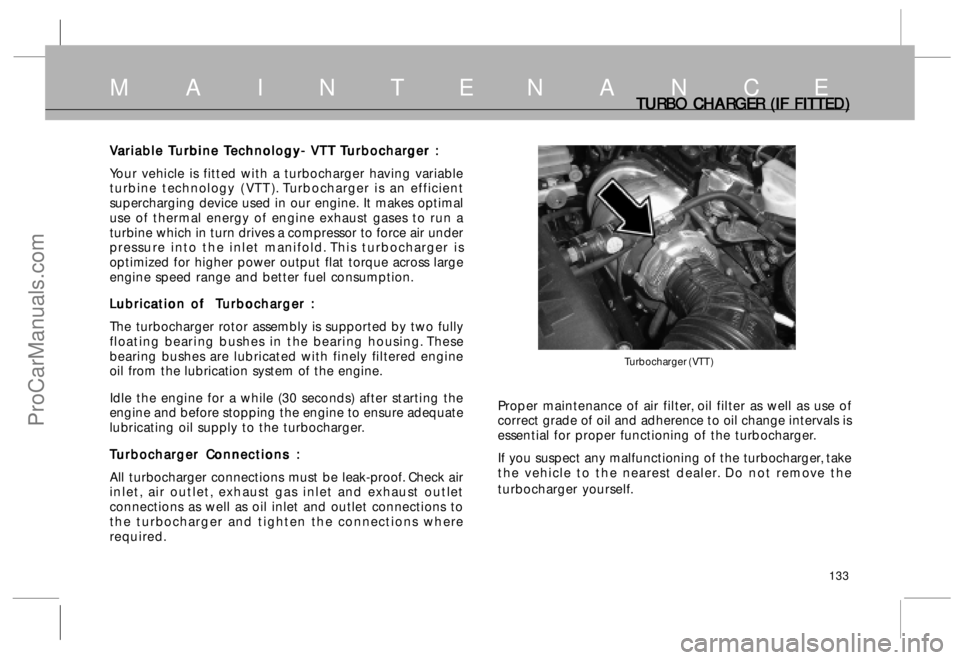
Your vehicle is fitted with a turbocharger having variable
turbine technology ( VTT ). Turbocharger is an efficient
supercharging device used in our engine. It makes optimal
use of thermal energy of engine exhaust gases to run a
turbine which in turn drives a compressor to force air under
pressure into the inlet manifold. This turbocharger is
optimized for higher power output flat torque across large
engine speed range and better fuel consumption.
L LL L
L
ubr ubrubr ubr
ubr
ic icic
ic
ic
a aa a
a
tion of tion of tion of tion of
tion of
T TT T
T
urb urburb urb
urb
o oo o
o
char charchar char
char
ger : ger :ger : ger :
ger :
The turbocharger rotor assembly is supported by two fully
floating bearing bushes in the bearing housing. These
bearing bushes are lubricated with finely filtered engine
oil from the lubrication system of the engine.
Idle the engine for a while (30 seconds) after starting the
engine and before stopping the engine to ensure adequate
lubricating oil supply to the turbocharger.
T TT T
T
urb urburb urb
urb
o oo o
o
char charchar char
char
ger C ger Cger C ger C
ger C
onnec onneconnec onnec
onnec
tions : tions :tions : tions :
tions :
All turbocharger connections must be leak-proof. Check air
inlet, air outlet, exhaust gas inlet and exhaust outlet
connections as well as oil inlet and outlet connections to
the turbocharger and tighten the connections where
required.Proper maintenance of air filter, oil filter as well as use of
correct grade of oil and adherence to oil change intervals is
essential for proper functioning of the turbocharger.
If you suspect any malfunctioning of the turbocharger, take
the vehicle to the nearest dealer. Do not remove the
turbocharger yourself.
M A I N T E N A N C E
Turbocharger ( VTT )
ProCarManuals.com
Page 134 of 161
134
AIR CONDITIONING AIR CONDITIONING AIR CONDITIONING AIR CONDITIONING
AIR CONDITIONING
Air Conditioning Air ConditioningAir Conditioning Air Conditioning
Air Conditioning
The Air Conditioning is a sealed system. Any major maintenance
should be done by Authorised Workshop.
There are couple of things which can be done by you to ensure proper
working of Air conditioning / Heating.
Periodically check the engine’s radiator and air conditioning
condensers for leaves, insects and dirt stuck in front surface.
These block the air flow and reduce the cooling efficiency. Use a light
water spray from a hose or a soft brush to remove them.
NO NONO NO
NO
TICE TICETICE TICE
TICE
Use only low pressure spray or soft bristle brush to clean condenser
and radiator fins.
Run the air conditioning at least once a week during winter season.
Run it at least for ten minutes with vehicle at steady speed and engine
at normal operating condition. This circulates lubrication oil in the
compressor.
For any complaint on A.C. and Heating get it attended at Authorised
Workshop.
NO NONO NO
NO
TICE TICETICE TICE
TICE
The system is charged with R 134 (a) - ‘Non C.F.C.’ refrigerant. Do
not top up with any other refrigerant.
M A I N T E N A N C E
ProCarManuals.com
Page 136 of 161
136
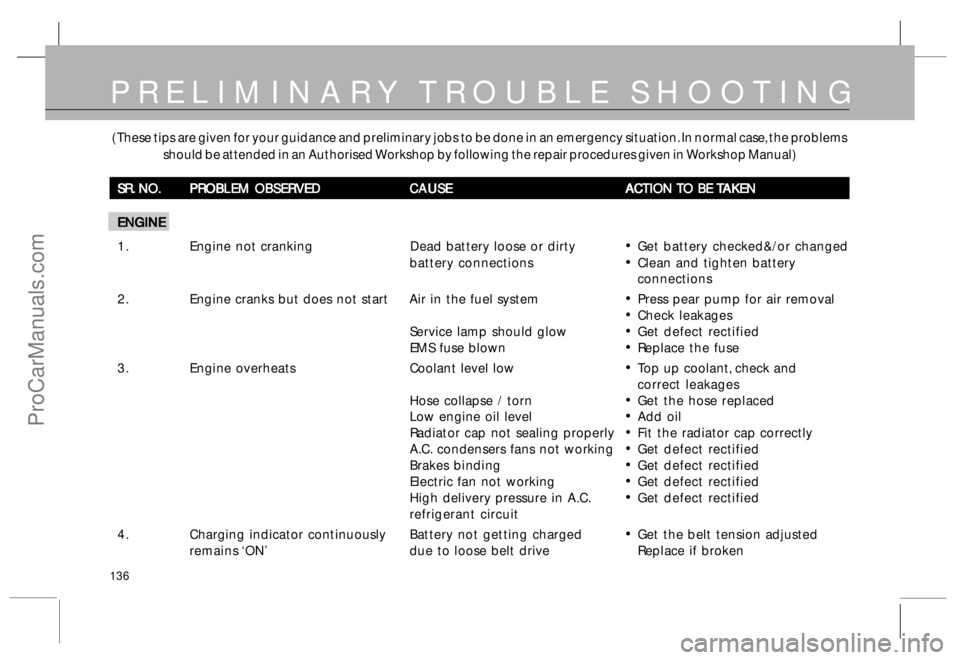
( These tips are given for your guidance and preliminary jobs to be done in an emergency situation. In normal case, the problems
should be attended in an Authorised Workshop by following the repair procedures given in Workshop Manual)
SR. NO. SR. NO.SR. NO. SR. NO.
SR. NO.
PROBLEM OBSERVED PROBLEM OBSERVEDPROBLEM OBSERVED PROBLEM OBSERVED
PROBLEM OBSERVED
CAUSE CAUSECAUSE CAUSE
CAUSE
A AA A
A
CTION CTION CTION CTION
CTION
T TT T
T
O BE O BE O BE O BE
O BE
T TT T
T
AKEN AKENAKEN AKEN
AKEN
ENGINE ENGINEENGINE ENGINE
ENGINE
1 . Engine not cranking Dead battery loose or dirty
•Get battery checked&/or changed
battery connections
•Clean and tighten battery
connections
2 . Engine cranks but does not start Air in the fuel system
•Press pear pump for air removal
•Check leakages
Service lamp should glow
•Get defect rectified
EMS fuse blown
•Replace the fuse
3. Engine overheatsCoolant level low
•Top up coolant, check and
correct leakages
Hose collapse / torn
•Get the hose replaced
Low engine oil level
•Add oil
Radiator cap not sealing properly
•Fit the radiator cap correctly
A.C. condensers fans not working
•Get defect rectified
Brakes binding
•Get defect rectified
Electric fan not working
•Get defect rectified
High delivery pressure in A.C.
•Get defect rectified
refrigerant circuit
4 . Charging indicator continuouslyBattery not getting charged
•Get the belt tension adjusted
remains ‘ON’due to loose belt drive Replace if broken
PRELIMINARY TROUBLE SHOOTING
ProCarManuals.com
Page 138 of 161
138
PRELIMINAR PRELIMINARPRELIMINAR PRELIMINAR
PRELIMINAR
Y Y Y Y
Y
TR TRTR TR
TR
OUBLE SHOO OUBLE SHOOOUBLE SHOO OUBLE SHOO
OUBLE SHOO
TING TINGTING TING
TING
SR. NO. SR. NO.SR. NO. SR. NO.
SR. NO.
PROBLEM OBSERVED PROBLEM OBSERVEDPROBLEM OBSERVED PROBLEM OBSERVED
PROBLEM OBSERVED
PROBABLE CAUSE PROBABLE CAUSEPROBABLE CAUSE PROBABLE CAUSE
PROBABLE CAUSE
A AA A
A
CTION CTION CTION CTION
CTION
T TT T
T
O BE O BE O BE O BE
O BE
T TT T
T
AKEN AKENAKEN AKEN
AKEN
REAR AXLE, LIVE FRONT AXLE REAR AXLE, LIVE FRONT AXLEREAR AXLE, LIVE FRONT AXLE REAR AXLE, LIVE FRONT AXLE
REAR AXLE, LIVE FRONT AXLE
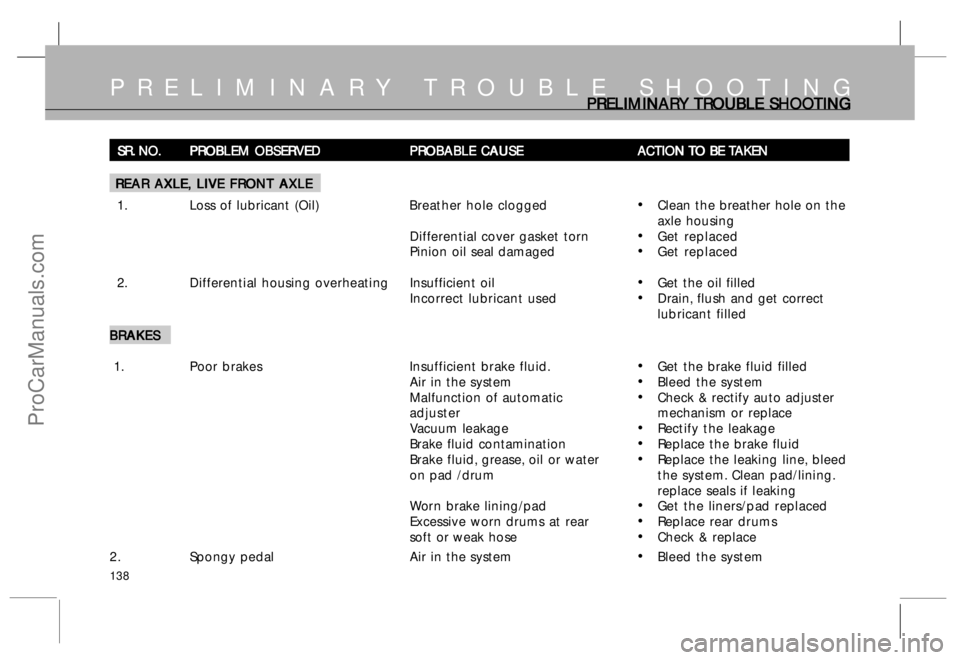
1. Loss of lubricant (Oil) Breather hole clogged
•Clean the breather hole on the
axle housing
Differential cover gasket torn
•Get replaced
Pinion oil seal damaged
•Get replaced
2. Differential housing overheatingInsufficient oil
•Get the oil filled
Incorrect lubricant used
•Drain, flush and get correct
lubricant filled
BRAKES BRAKESBRAKES BRAKES
BRAKES
1. Poor brakes Insufficient brake fluid.
•Get the brake fluid filled
Air in the system
•Bleed the system
Malfunction of automatic
•Check & rectify auto adjuster
adjustermechanism or replace
Vacuum leakage
•Rectify the leakage
Brake fluid contamination
•Replace the brake fluid
Brake fluid, grease, oil or water
•Replace the leaking line, bleed
on pad /drum the system. Clean pad/lining.
replace seals if leaking
Worn brake lining/pad
•Get the liners/pad replaced
Excessive worn drums at rear
•Replace rear drums
soft or weak hose
•Check & replace
2. Spongy pedalAir in the system
•Bleed the system
PRELIMINARY TROUBLE SHOOTING
ProCarManuals.com
Page 146 of 161
146
S E R V I C E S C H E D U L ESERVICE SCHEDULE SERVICE SCHEDULESERVICE SCHEDULE SERVICE SCHEDULE
SERVICE SCHEDULE
SR SRSR SR
SR
x 1000 km x 1000 kmx 1000 km x 1000 km
x 1000 km
NO NONO NO
NO
OPER OPEROPER OPER
OPER
A AA A
A
TIONS TIONSTIONS TIONS
TIONS
FREQUENCY FREQUENCYFREQUENCY FREQUENCY
FREQUENCY
1-1.5 1-1.51-1.5 1-1.5
1-1.5
15 1515 15
15
30 3030 30
30
45 4545 45
45
60 6060 60
60
75 7575 75
75
90 9090 90
90
105 105105 105
105
GENERAL GENERALGENERAL GENERAL
GENERAL
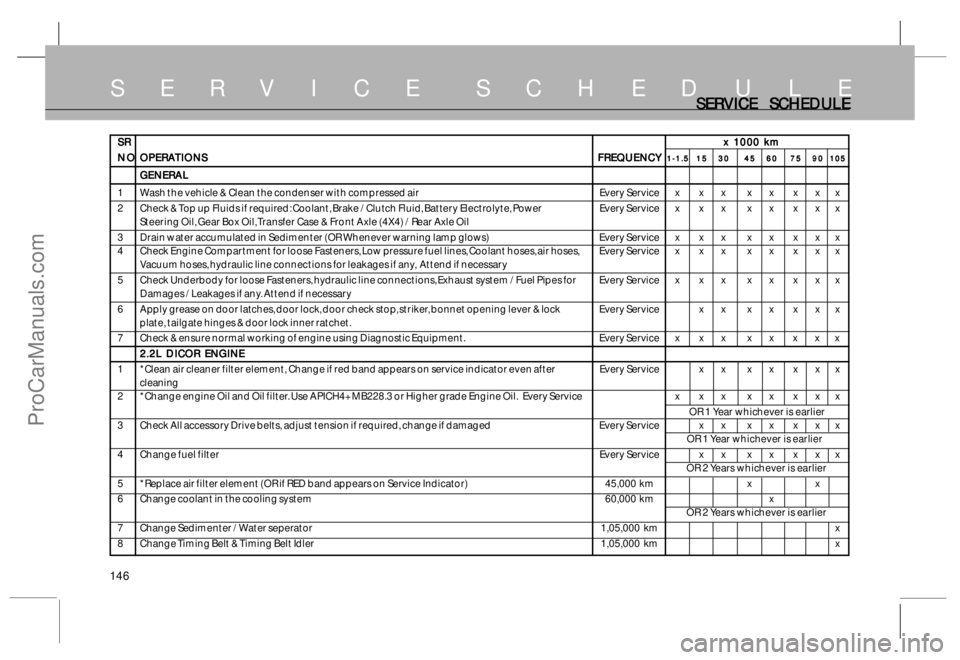
1 Wash the vehicle & Clean the condenser with compressed air Every Service x x x x x x x x
2 Check & Top up Fluids if required: Coolant, Brake / Clutch Fluid, Battery Electrolyte, Power Every Service x x x x x x x x
Steering Oil, Gear Box Oil, Transfer Case & Front Axle (4X4) / Rear Axle Oil
3 Drain water accumulated in Sedimenter (OR Whenever warning lamp glows) Every Service x x x x x x x x
4 Check Engine Compartment for loose Fasteners, Low pressure fuel lines, Coolant hoses, air hoses, Every Service x x x x x x x x
Vacuum hoses, hydraulic line connections for leakages if any, Attend if necessary
5 Check Underbody for loose Fasteners, hydraulic line connections, Exhaust system / Fuel Pipes for Every Service x x x x x x x x
Damages / Leakages if any. Attend if necessary
6 Apply grease on door latches, door lock, door check stop, striker, bonnet opening lever & lock Every Service x x x x x x x
plate, tailgate hinges & door lock inner ratchet.
7 Check & ensure normal working of engine using Diagnostic Equipment. Every Service x x x x x x x x
2.2L DICOR ENGINE 2.2L DICOR ENGINE2.2L DICOR ENGINE 2.2L DICOR ENGINE
2.2L DICOR ENGINE
1 *Clean air cleaner filter element, Change if red band appears on service indicator even after Every Service x x x x x x x
cleaning
2 *Change engine Oil and Oil filter. Use APICH4+MB228.3 or Higher grade Engine Oil.Every Service x x x x x x x x
OR 1 Year whichever is earlier
3 Check All accessory Drive belts, adjust tension if required, change if damaged Every Service x x x x x x x
OR 1 Year whichever is earlier
4 Change fuel filterEvery Service x x x x x x x
OR 2 Years whichever is earlier
5 *Replace air filter element (OR if RED band appears on Service Indicator) 45,000 km x x
6 Change coolant in the cooling system 60,000 km x
OR 2 Years whichever is earlier
7 Change Sedimenter / Water seperator1,05,000 km x
8 Change Timing Belt & Timing Belt Idler1,05,000 km x
ProCarManuals.com
Page 147 of 161
147
S E R V I C E S C H E D U L ESERVICE SCHEDULE SERVICE SCHEDULESERVICE SCHEDULE SERVICE SCHEDULE
SERVICE SCHEDULE
SR SRSR SR
SR
x 1000 km x 1000 kmx 1000 km x 1000 km
x 1000 km
NO NONO NO
NO
OPER OPEROPER OPER
OPER
A AA A
A
TIONS TIONSTIONS TIONS
TIONS
FREQUENCY FREQUENCYFREQUENCY FREQUENCY
FREQUENCY
1-1.5 1-1.51-1.5 1-1.5
1-1.5
15 1515 15
15
30 3030 30
30
45 4545 45
45
60 6060 60
60
75 7575 75
75
90 9090 90
90
105 105105 105
105
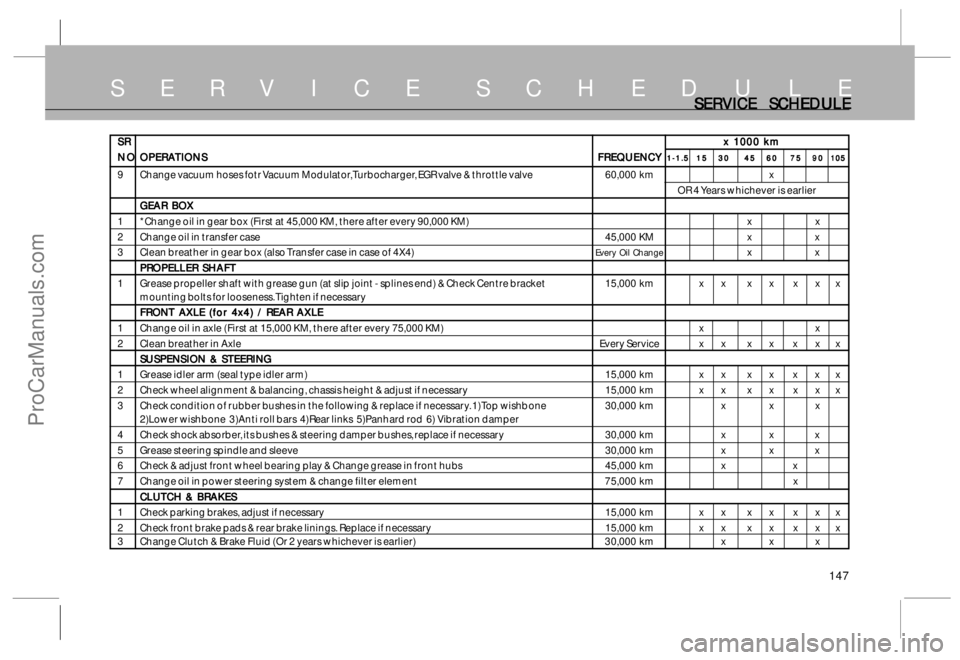
9 Change vacuum hoses fotr Vacuum Modulator, Turbocharger, EGR valve & throttle valve 60,000 km x
OR 4 Years whichever is earlier
GEAR BOX GEAR BOXGEAR BOX GEAR BOX
GEAR BOX
1 *Change oil in gear box (First at 45,000 KM, there after every 90,000 KM) x x
2 Change oil in transfer case 45,000 KM x x
3 Clean breather in gear box (also Transfer case in case of 4X4)
Every Oil Changexx
PROPELLER SHAFT PROPELLER SHAFTPROPELLER SHAFT PROPELLER SHAFT
PROPELLER SHAFT
1 Grease propeller shaft with grease gun (at slip joint - splines end) & Check Centre bracket 15,000 km x x x x x x x
mounting bolts for looseness. Tighten if necessary
FRONT AXLE (for 4x4) / REAR AXLE FRONT AXLE (for 4x4) / REAR AXLEFRONT AXLE (for 4x4) / REAR AXLE FRONT AXLE (for 4x4) / REAR AXLE
FRONT AXLE (for 4x4) / REAR AXLE
1 Change oil in axle (First at 15,000 KM, there after every 75,000 KM) x x
2 Clean breather in Axle Every Service x x x x x x x
SUSPENSION & STEERING SUSPENSION & STEERINGSUSPENSION & STEERING SUSPENSION & STEERING
SUSPENSION & STEERING
1 Grease idler arm (seal type idler arm) 15,000 km x x x x x x x
2 Check wheel alignment & balancing, chassis height & adjust if necessary 15,000 km x x x x x x x
3 Check condition of rubber bushes in the following & replace if necessary. 1)Top wishbone 30,000 km x x x
2)Lower wishbone 3)Anti roll bars 4)Rear links 5)Panhard rod 6) Vibration damper
4 Check shock absorber, its bushes & steering damper bushes, replace if necessary 30,000 km x x x
5 Grease steering spindle and sleeve 30,000 km x x x
6 Check & adjust front wheel bearing play & Change grease in front hubs 45,000 km x x
7 Change oil in power steering system & change filter element 75,000 km x
CLUTCH & BRAKES CLUTCH & BRAKESCLUTCH & BRAKES CLUTCH & BRAKES
CLUTCH & BRAKES
1 Check parking brakes, adjust if necessary15,000 km x x x x x x x
2 Check front brake pads & rear brake linings. Replace if necessary 15,000 km x x x x x x x
3 Change Clutch & Brake Fluid (Or 2 years whichever is earlier) 30,000 km x x x
ProCarManuals.com
Page 148 of 161
148
S E R V I C E S C H E D U L ESER SERSER SER
SER
VICE SCHEDULE VICE SCHEDULEVICE SCHEDULE VICE SCHEDULE
VICE SCHEDULE
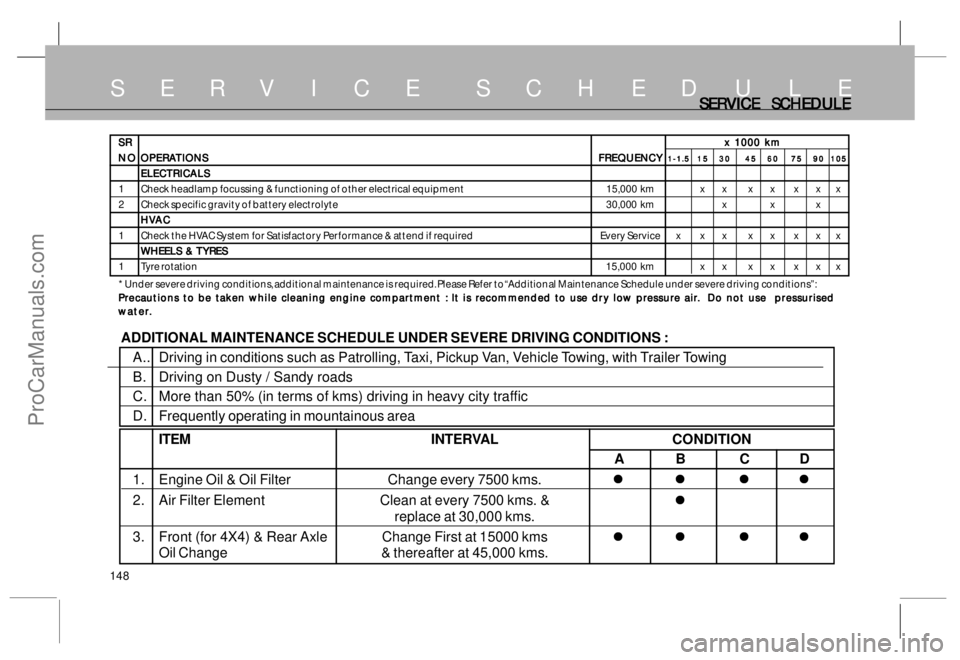
ADDITIONAL MAINTENANCE SCHEDULE UNDER SEVERE DRIVING CONDITIONS :
A.. Driving in conditions such as Patrolling, Taxi, Pickup Van, Vehicle Towing, with Trailer Towing
B. Driving on Dusty / Sandy roads
C. More than 50% (in terms of kms) driving in heavy city traffic
D. Frequently operating in mountainous area
ITEMINTERVAL CONDITION
AB CD
1. Engine Oil & Oil Filter Change every 7500 kms.
�z �z�z �z
�z
�z �z�z �z
�z
�z �z�z �z
�z
�z �z�z �z
�z
2. Air Filter Element Clean at every 7500 kms. &
�z �z�z �z
�z
replace at 30,000 kms.
3. Front (for 4X4) & Rear Axle Change First at 15000 kms
�z �z�z �z
�z
�z �z�z �z
�z
�z �z�z �z
�z
�z �z�z �z
�z
Oil Change & thereafter at 45,000 kms.
SR SRSR SR
SR
x 1000 km x 1000 kmx 1000 km x 1000 km
x 1000 km
NO NONO NO
NO
OPER OPEROPER OPER
OPER
A AA A
A
TIONS TIONSTIONS TIONS
TIONS
FREQUENCY FREQUENCYFREQUENCY FREQUENCY
FREQUENCY
1-1.5 1-1.51-1.5 1-1.5
1-1.5
15 1515 15
15
30 3030 30
30
45 4545 45
45
60 6060 60
60
75 7575 75
75
90 9090 90
90
105 105105 105
105
ELECTRICALS ELECTRICALSELECTRICALS ELECTRICALS
ELECTRICALS
1 Check headlamp focussing & functioning of other electrical equipment 15,000 km x x x x x x x
2 Check specific gravity of battery electrolyte 30,000 km x x x
HV HVHV HV
HV
A AA A
A
C CC C
C
1 Check the HVAC System for Satisfactory Performance & attend if required Every Service x x x x x x x x
WHEELS & WHEELS & WHEELS & WHEELS &
WHEELS &
T TT T
T
YRES YRESYRES YRES
YRES
1 Tyre rotation15,000 km x x x x x x x
* Under severe driving conditions, additional maintenance is required. Please Refer to “Additional Maintenance Schedule under severe driving conditions”:
P PP P
P
r rr r
r
ec ecec ec
ec
autions t autions tautions t autions t
autions t
o b o bo b o b
o b
e tak e take tak e tak
e tak
en while cleaning engine c en while cleaning engine cen while cleaning engine c en while cleaning engine c
en while cleaning engine c
ompar omparompar ompar
ompar
tmen tmentmen tmen
tmen
t : t :t : t :
t :
I I I I
I
t is r t is rt is r t is r
t is r
ec ecec ec
ec
ommended t ommended tommended t ommended t
ommended t
o use dr o use dro use dr o use dr
o use dr
y lo y loy lo y lo
y lo
w pr w prw pr w pr
w pr
essur essuressur essur
essur
e air e aire air e air
e air
.. ..
.
D D D D
D
o not use pr o not use pro not use pr o not use pr
o not use pr
essur essuressur essur
essur
ised isedised ised
ised
w ww w
w
a aa a
a
t tt t
t
er erer er
er
.. ..
.
ProCarManuals.com
Page 156 of 161
156
A L P H A B E T I C A L I N D E X ALPHABETIC INDEX ALPHABETIC INDEX ALPHABETIC INDEX ALPHABETIC INDEX
ALPHABETIC INDEX
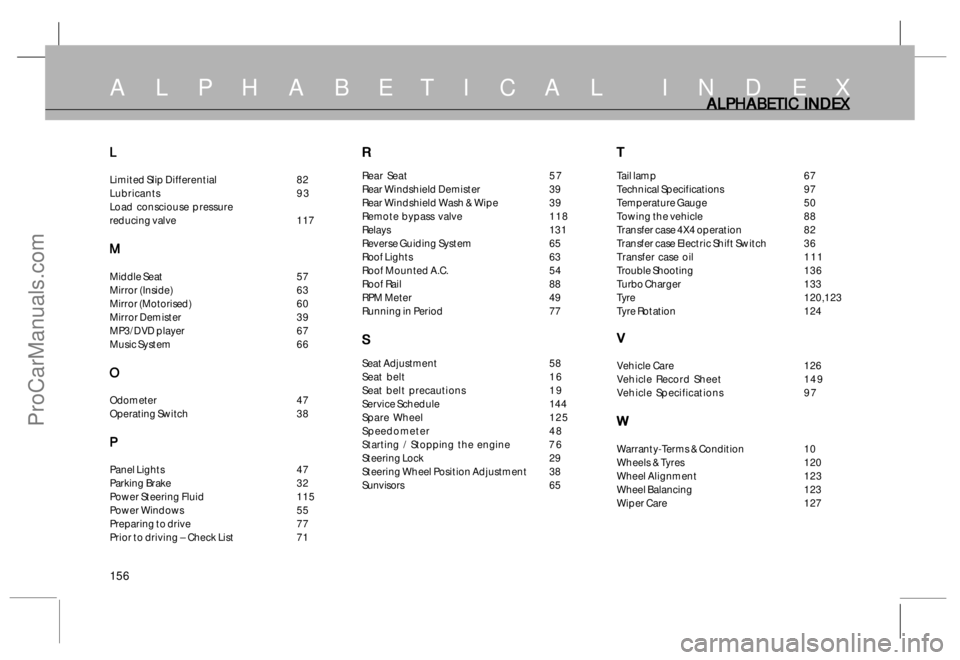
L LL L
L
Limited Slip Differential 82
Lubricants 9 3
Load consciouse pressure
reducing valve 117
M MM M
M
Middle Seat 57
Mirror (Inside) 63
Mirror (Motorised) 60
Mirror Demister 39
MP3/DVD player 67
Music System 66
O OO O
O
Odometer 47
Operating Switch 38
P PP P
P
Panel Lights 47
Parking Brake 32
Power Steering Fluid 115
Power Windows 55
Preparing to drive 77
Prior to driving – Check List 71
R RR R
R
Rear Seat 5 7
Rear Windshield Demister 39
Rear Windshield Wash & Wipe 39
Remote bypass valve 1 1 8
Relays 131
Reverse Guiding System 65
Roof Lights 63
Roof Mounted A.C. 54
Roof Rail 88
RPM Meter 49
Running in Period 77
S SS S
S
Seat Adjustment 58
Seat belt 1 6
Seat belt precautions 1 9
Service Schedule 144
Spare Wheel 1 2 5
Speedometer 4 8
Starting / Stopping the engine 7 6
Steering Lock 29
Steering Wheel Position Adjustment 38
Sunvisors 6 5
T TT T
T
Tail lamp 67
Technical Specifications 97
Temperature Gauge 50
Towing the vehicle 88
Transfer case 4X4 operation 82
Transfer case Electric Shift Switch 36
Transfer case oil 1 1 1
Trouble Shooting 136
Turbo Charger 133
Tyre 120,123
Tyre Rotation 124
V VV V
V
Vehicle Care 126
Vehicle Record Sheet 1 4 9
Vehicle Specifications 9 7
W WW W
W
Warranty-Terms & Condition 10
Wheels & Tyres 120
Wheel Alignment 123
Wheel Balancing 123
Wiper Care 127
ProCarManuals.com