rear view mirror TATA SAFARI 2015 Owners Manual
[x] Cancel search | Manufacturer: TATA, Model Year: 2015, Model line: SAFARI, Model: TATA SAFARI 2015Pages: 161, PDF Size: 2.55 MB
Page 39 of 161
39
D R I V I N G C O N T R O L SREAR REAR REAR REAR
REAR
WINDSHIELD DEMISTER AND HAZARD WINDSHIELD DEMISTER AND HAZARD WINDSHIELD DEMISTER AND HAZARD WINDSHIELD DEMISTER AND HAZARD
WINDSHIELD DEMISTER AND HAZARD
W WW W
W
ARNING ARNINGARNING ARNING
ARNING
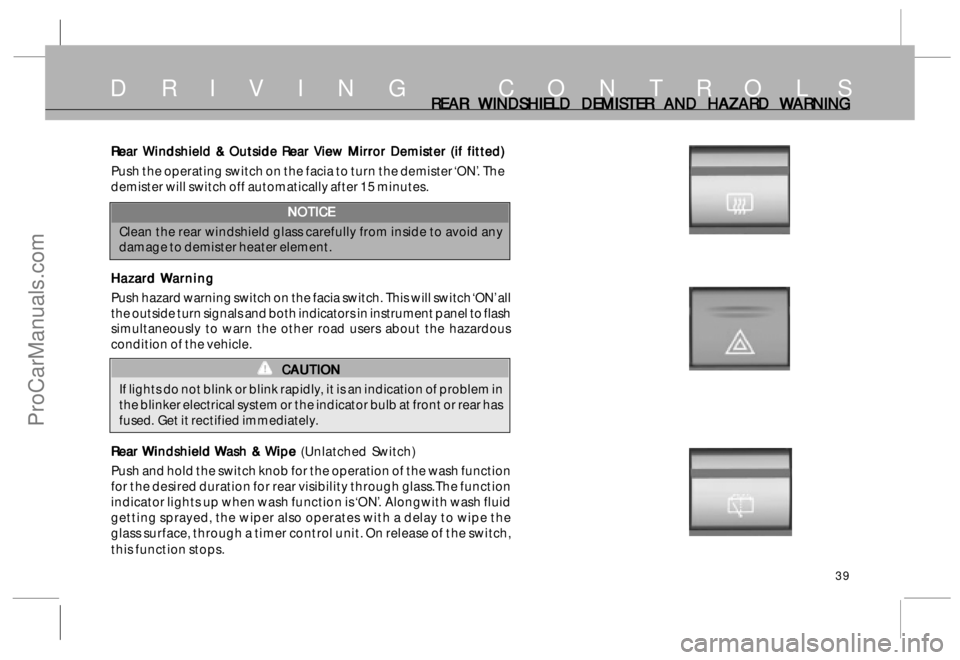
Rear Windshield & Outside Rear View Mirror Demister (if fitted) Rear Windshield & Outside Rear View Mirror Demister (if fitted)Rear Windshield & Outside Rear View Mirror Demister (if fitted) Rear Windshield & Outside Rear View Mirror Demister (if fitted)
Rear Windshield & Outside Rear View Mirror Demister (if fitted)
Push the operating switch on the facia to turn the demister ‘ON’. The
demister will switch off automatically after 15 minutes.
NOTICE NOTICENOTICE NOTICE
NOTICE
Clean the rear windshield glass carefully from inside to avoid any
damage to demister heater element.
Hazar HazarHazar Hazar
Hazar
d d d d
d
W WW W
W
ar arar ar
ar
ning ningning ning
ning
Push hazard warning switch on the facia switch. This will switch ‘ON’ all
the outside turn signals and both indicators in instrument panel to flash
simultaneously to warn the other road users about the hazardous
condition of the vehicle.
CAUTION CAUTIONCAUTION CAUTION
CAUTION
If lights do not blink or blink rapidly, it is an indication of problem in
the blinker electrical system or the indicator bulb at front or rear has
fused. Get it rectified immediately.
R RR R
R
ear ear ear ear
ear
W WW W
W
indshield indshield indshield indshield
indshield
W WW W
W
ash & ash & ash & ash &
ash &
W WW W
W
ip ipip ip
ip
e e e e
e (Unlatched Switch)
Push and hold the switch knob for the operation of the wash function
for the desired duration for rear visibility through glass. The function
indicator lights up when wash function is ‘ON’. Alongwith wash fluid
getting sprayed, the wiper also operates with a delay to wipe the
glass surface, through a timer control unit. On release of the switch,
this function stops.
ProCarManuals.com
Page 51 of 161
51
COMFORT AND CONVENIENCE
• •• •
•Air conditioning and heating Air conditioning and heatingAir conditioning and heating Air conditioning and heating
Air conditioning and heating
• •• •
•Front windshield and door glass demister Front windshield and door glass demisterFront windshield and door glass demister Front windshield and door glass demister
Front windshield and door glass demister
• •• •
•Power windows Power windowsPower windows Power windows
Power windows
• •• •
•Front seat Front seatFront seat Front seat
Front seat
• •• •
•Headrestraint HeadrestraintHeadrestraint Headrestraint
Headrestraint
• •• •
•Middle seat Middle seatMiddle seat Middle seat
Middle seat
• •• •
•Armrest cum cup holder Armrest cum cup holderArmrest cum cup holder Armrest cum cup holder
Armrest cum cup holder
• •• •
•Jump seats (if fitted) Jump seats (if fitted)Jump seats (if fitted) Jump seats (if fitted)
Jump seats (if fitted)
• •• •
•Jack & tools Jack & toolsJack & tools Jack & tools
Jack & tools
• •• •
•Motorised rear view mirrors Motorised rear view mirrorsMotorised rear view mirrors Motorised rear view mirrors
Motorised rear view mirrors
• •• •
•Cigarette lighter and ash tray Cigarette lighter and ash trayCigarette lighter and ash tray Cigarette lighter and ash tray
Cigarette lighter and ash tray
• •• •
•Fuel filler flap Fuel filler flapFuel filler flap Fuel filler flap
Fuel filler flap
• •• •
•M MM M
M
echanic echanicechanic echanic
echanic
ally Op ally Opally Op ally Op
ally Op
er erer er
er
a aa a
a
t tt t
t
ed F ed Fed F ed F
ed F
uel uel uel uel
uel
T TT T
T
ank F ank Fank F ank F
ank F
lap laplap lap
lap
• •• •
•Glove box Glove boxGlove box Glove box
Glove box
• •• •
•Inside rear view mirror Inside rear view mirrorInside rear view mirror Inside rear view mirror
Inside rear view mirror
• •• •
•Sun visors Sun visorsSun visors Sun visors
Sun visors
• •• •
•Interior roof lights Interior roof lightsInterior roof lights Interior roof lights
Interior roof lights
• •• •
•Reverse guiding system Reverse guiding systemReverse guiding system Reverse guiding system
Reverse guiding system
• •• •
•Analog Clock Analog ClockAnalog Clock Analog Clock
Analog Clock
• •• •
•Music System Music SystemMusic System Music System
Music System
• •• •
•MP3 / DVD Player MP3 / DVD PlayerMP3 / DVD Player MP3 / DVD Player
MP3 / DVD Player
• •• •
•T TT T
T
ail Lamp ail Lampail Lamp ail Lamp
ail Lamp
• •• •
•High Mounted Stop Lamp High Mounted Stop LampHigh Mounted Stop Lamp High Mounted Stop Lamp
High Mounted Stop Lamp
This section gives you information on the different comfort
and convenience features provided in your vehicle.
There are many features as listed alongside in TATA SAFARI.
To get the maximum benefit from these features, please
read information in this section.
ProCarManuals.com
Page 60 of 161
60
COMFORT AND CONVENIENCE
Motorised Rear View Mirror Motorised Rear View MirrorMotorised Rear View Mirror Motorised Rear View Mirror
Motorised Rear View Mirror
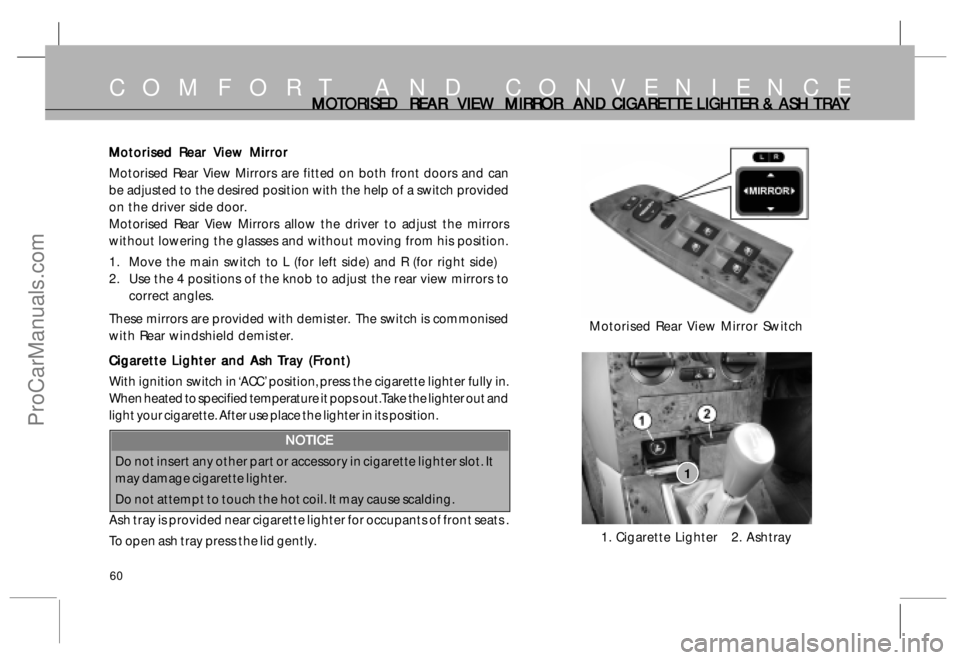
Motorised Rear View Mirrors are fitted on both front doors and can
be adjusted to the desired position with the help of a switch provided
on the driver side door.
Motorised Rear View Mirrors allow the driver to adjust the mirrors
without lowering the glasses and without moving from his position.
1. Move the main switch to L (for left side) and R (for right side)
2. Use the 4 positions of the knob to adjust the rear view mirrors to
correct angles.
These mirrors are provided with demister. The switch is commonised
with Rear windshield demister.
C CC C
C
igar igarigar igar
igar
ett ettett ett
ett
e Ligh e Lighe Ligh e Ligh
e Ligh
t tt t
t
er and A er and Aer and A er and A
er and A
sh sh sh sh
sh
T TT T
T
r rr r
r
a aa a
a
y (F y (Fy (F y (F
y (F
r rr r
r
on onon on
on
t) t)t) t)
t)
With ignition switch in ‘ACC’ position, press the cigarette lighter fully in.
When heated to specified temperature it pops out. Take the lighter out and
light your cigarette. After use place the lighter in its position.
NOTICE NOTICENOTICE NOTICE
NOTICE
Do not insert any other part or accessory in cigarette lighter slot. It
may damage cigarette lighter.
Do not attempt to touch the hot coil. It may cause scalding.
Ash tray is provided near cigarette lighter for occupants of front seats .
To open ash tray press the lid gently.1. Cigarette Lighter 2. Ashtray1
MO MOMO MO
MO
T TT T
T
ORISED REAR ORISED REAR ORISED REAR ORISED REAR
ORISED REAR
VIE VIEVIE VIE
VIE
W MIRR W MIRRW MIRR W MIRR
W MIRR
OR AND CIGARET OR AND CIGARETOR AND CIGARET OR AND CIGARET
OR AND CIGARET
TE LIGHTER & ASH TE LIGHTER & ASH TE LIGHTER & ASH TE LIGHTER & ASH
TE LIGHTER & ASH
TR TRTR TR
TR
A AA A
A
Y YY Y
Y
Motorised Rear View Mirror Switch
ProCarManuals.com
Page 63 of 161
63
INSIDE REAR INSIDE REAR INSIDE REAR INSIDE REAR
INSIDE REAR
VIE VIEVIE VIE
VIE
W MIRR W MIRRW MIRR W MIRR
W MIRR
OR AND INTERIOR R OR AND INTERIOR ROR AND INTERIOR R OR AND INTERIOR R
OR AND INTERIOR R
OOF LIGHT OOF LIGHTOOF LIGHT OOF LIGHT
OOF LIGHT
S SS S
S
Inside Rear View Mirror Inside Rear View MirrorInside Rear View Mirror Inside Rear View Mirror
Inside Rear View Mirror
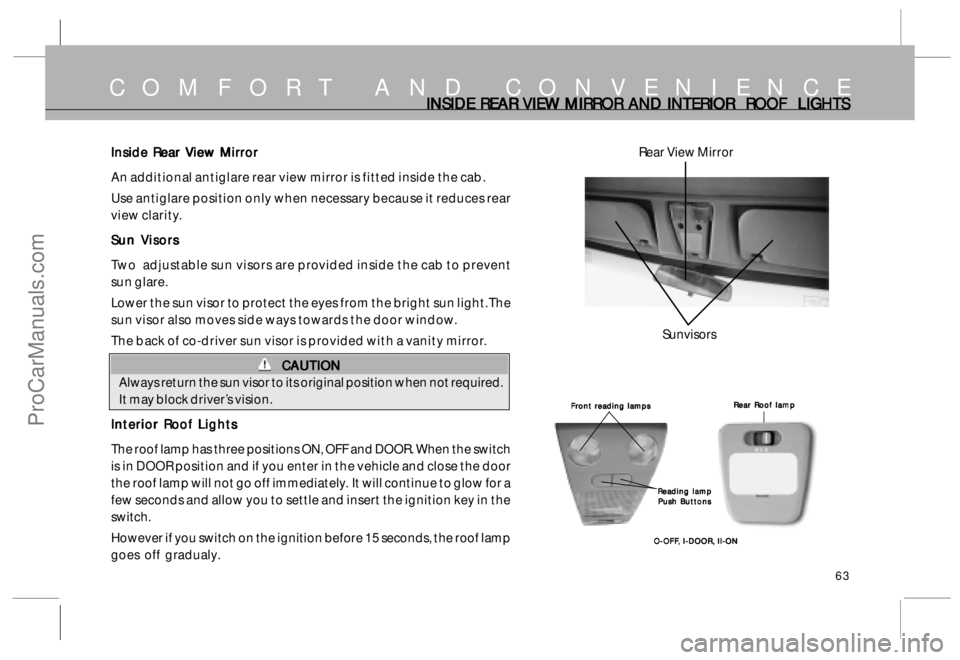
An additional antiglare rear view mirror is fitted inside the cab.
Use antiglare position only when necessary because it reduces rear
view clarity.
Sun Visors Sun VisorsSun Visors Sun Visors
Sun Visors
Two adjustable sun visors are provided inside the cab to prevent
sun glare.
Lower the sun visor to protect the eyes from the bright sun light. The
sun visor also moves side ways towards the door window.
The back of co-driver sun visor is provided with a vanity mirror.
CAUTION CAUTIONCAUTION CAUTION
CAUTION
Always return the sun visor to its original position when not required.
It may block driver’s vision.
Interior Roof Lights Interior Roof LightsInterior Roof Lights Interior Roof Lights
Interior Roof Lights
The roof lamp has three positions ON, OFF and DOOR. When the switch
is in DOOR position and if you enter in the vehicle and close the door
the roof lamp will not go off immediately. It will continue to glow for a
few seconds and allow you to settle and insert the ignition key in the
switch.
However if you switch on the ignition before 15 seconds, the roof lamp
goes off gradualy.
COMFORT AND CONVENIENCE
Front reading lamps Front reading lampsFront reading lamps Front reading lamps
Front reading lamps
Reading lamp Reading lampReading lamp Reading lamp
Reading lamp
Push Buttons Push ButtonsPush Buttons Push Buttons
Push Buttons
O-OFF O-OFFO-OFF O-OFF
O-OFF
,, ,,
,
I-DOOR, I-DOOR, I-DOOR, I-DOOR,
I-DOOR,
II-ON II-ON II-ON II-ON
II-ONRear Roof lamp Rear Roof lampRear Roof lamp Rear Roof lamp
Rear Roof lamp
Sunvisors Rear View Mirror
ProCarManuals.com
Page 65 of 161
65
COMFORT AND CONVENIENCE
Reverse Guiding System (if fitted) Reverse Guiding System (if fitted)Reverse Guiding System (if fitted) Reverse Guiding System (if fitted)
Reverse Guiding System (if fitted)
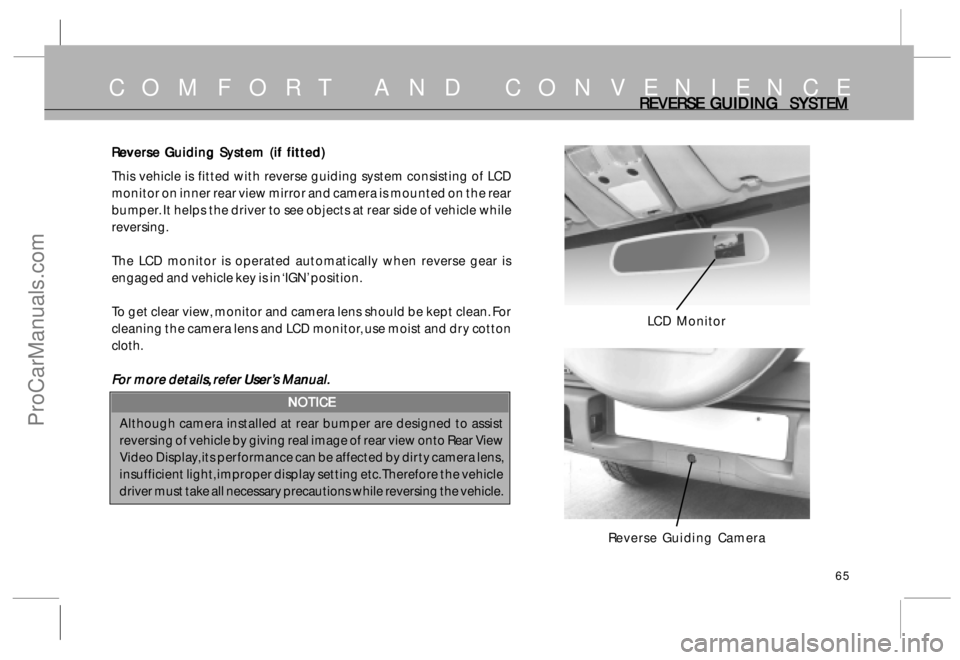
This vehicle is fitted with reverse guiding system consisting of LCD
monitor on inner rear view mirror and camera is mounted on the rear
bumper. It helps the driver to see objects at rear side of vehicle while
reversing.
The LCD monitor is operated automatically when reverse gear is
engaged and vehicle key is in ‘IGN’ position.
To get clear view, monitor and camera lens should be kept clean. For
cleaning the camera lens and LCD monitor, use moist and dry cotton
cloth.
F FF F
F
or mor or moror mor or mor
or mor
e details e detailse details e details
e details
,, ,,
,
r r r r
r
ef efef ef
ef
er U er Uer U er U
er U
ser serser ser
ser
’’ ’’
’
s M s Ms M s M
s M
anual. anual.anual. anual.
anual.
NOTICE NOTICENOTICE NOTICE
NOTICE
Although camera installed at rear bumper are designed to assist
reversing of vehicle by giving real image of rear view onto Rear View
Video Display, its performance can be affected by dirty camera lens,
insufficient light, improper display setting etc. Therefore the vehicle
driver must take all necessary precautions while reversing the vehicle.
REVERSE GUIDING SYSTEM REVERSE GUIDING SYSTEMREVERSE GUIDING SYSTEM REVERSE GUIDING SYSTEM
REVERSE GUIDING SYSTEM
LCD Monitor
Reverse Guiding Camera
ProCarManuals.com
Page 66 of 161
66
DIGIT DIGITDIGIT DIGIT
DIGIT
AL CL AL CLAL CL AL CL
AL CL
OCK & MUSIC SY OCK & MUSIC SYOCK & MUSIC SY OCK & MUSIC SY
OCK & MUSIC SY
STEM (IF FIT STEM (IF FITSTEM (IF FIT STEM (IF FIT
STEM (IF FIT
TED) TED)TED) TED)
TED)COMFORT AND CONVENIENCE
Analog Clock Analog ClockAnalog Clock Analog Clock
Analog Clock
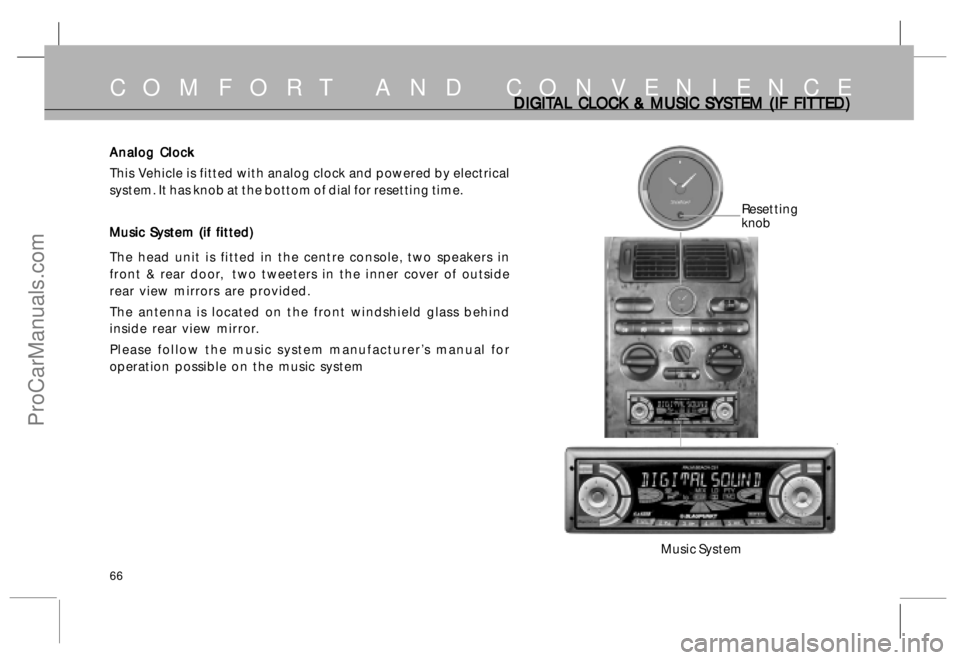
This Vehicle is fitted with analog clock and powered by electrical
system. It has knob at the bottom of dial for resetting time.
Music System (if fitted) Music System (if fitted)Music System (if fitted) Music System (if fitted)
Music System (if fitted)
The head unit is fitted in the centre console, two speakers in
front & rear door, two tweeters in the inner cover of outside
rear view mirrors are provided.
The antenna is located on the front windshield glass behind
inside rear view mirror.
Please follow the music system manufacturer’s manual for
operation possible on the music system
Music System
Resetting
knob
ProCarManuals.com
Page 71 of 161
71
P R I O R T O D R I V I N GCHECKS CHECKSCHECKS CHECKS
CHECKS
CHECK CHECKCHECK CHECK
CHECK
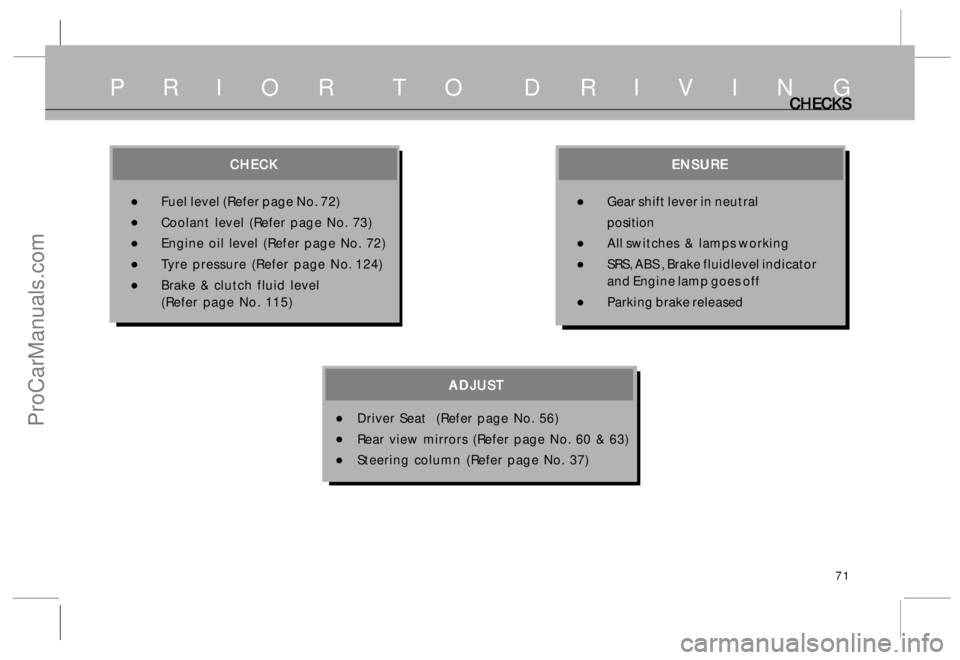
•Fuel level (Refer page No. 72)
•Coolant level (Refer page No. 73)
•Engine oil level (Refer page No. 72)
•Tyre pressure (Refer page No. 124)
•Brake & clutch fluid level
(Refer page No. 115)
ENSURE ENSUREENSURE ENSURE
ENSURE
•Gear shift lever in neutral
position
•All switches & lamps working
•SRS, ABS , Brake fluidlevel indicator
and Engine lamp goes off
•Parking brake released
ADJUST ADJUSTADJUST ADJUST
ADJUST
•Driver Seat (Refer page No. 56)
•Rear view mirrors (Refer page No. 60 & 63)
•Steering column (Refer page No. 37)
ProCarManuals.com
Page 77 of 161
77
D R I V I N GPREP PREPPREP PREP
PREP
ARING ARING ARING ARING
ARING
T TT T
T
O DRIVE & R O DRIVE & RO DRIVE & R O DRIVE & R
O DRIVE & R
UNNING IN PERIOD UNNING IN PERIODUNNING IN PERIOD UNNING IN PERIOD
UNNING IN PERIOD
Preparing to Drive Preparing to DrivePreparing to Drive Preparing to Drive
Preparing to Drive
The following checks and adjustments should be done
before you start driving the vehicle.
1 . Ensure all mirrors, windows and outside lights are clean
and unobstructed. Remove dust, frost, snow or ice if
any, on these.
2 . Ensure bonnet is fully closed.
3 . Check that any items you may be carrying inside with
you are stored properly or fastened down securely.
4 . Check adjustment of seat. If required adjust to your
convenience.
5 . Check adjustment of all rear view mirrors.
6 . Check adjustment of steering wheel.
7 . If the doors are not properly closed you will get a audio
warning/indicator light as soon as you insert the ignition
key in the switch. Make sure all doors are properly closed
and locked.
8 . If the seat belts of driver & co-driver are not fastened you
will get an audio warning as soon as you turn the key to
ignition position. Fasten your seat belt, ensure co-driver
seat passenger has also fastened the seat belt (see
Your Safety).9 . Check and ensure that all the gauges and indicator lights
in the instrument panel are working.
Running-in Period Running-in PeriodRunning-in Period Running-in Period
Running-in Period
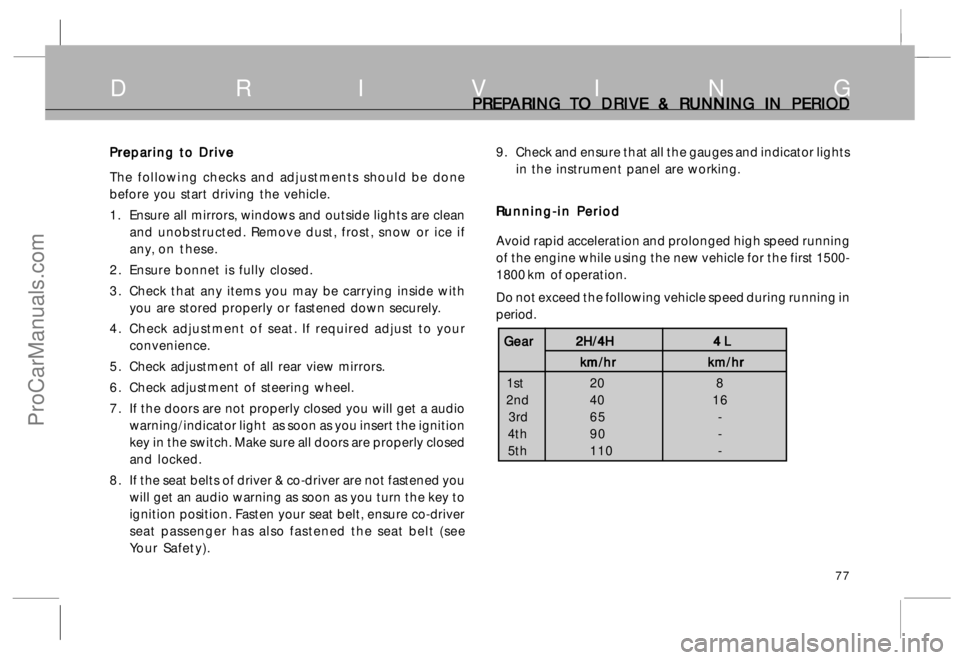
Avoid rapid acceleration and prolonged high speed running
of the engine while using the new vehicle for the first 1500-
1800 km of operation.
Do not exceed the following vehicle speed during running in
period.
Gear GearGear Gear
Gear
2H/4H 2H/4H 2H/4H 2H/4H
2H/4H
4 L 4 L 4 L 4 L
4 L
km/hr km/hr km/hr km/hr
km/hr
km/hr km/hr km/hr km/hr
km/hr
1st 20 8
2nd 40 16
3rd 65 -
4th 90 -
5th 110 -
ProCarManuals.com