roof TATA SAFARI 2015 Owners Manual
[x] Cancel search | Manufacturer: TATA, Model Year: 2015, Model line: SAFARI, Model: TATA SAFARI 2015Pages: 161, PDF Size: 2.55 MB
Page 51 of 161
51
COMFORT AND CONVENIENCE
• •• •
•Air conditioning and heating Air conditioning and heatingAir conditioning and heating Air conditioning and heating
Air conditioning and heating
• •• •
•Front windshield and door glass demister Front windshield and door glass demisterFront windshield and door glass demister Front windshield and door glass demister
Front windshield and door glass demister
• •• •
•Power windows Power windowsPower windows Power windows
Power windows
• •• •
•Front seat Front seatFront seat Front seat
Front seat
• •• •
•Headrestraint HeadrestraintHeadrestraint Headrestraint
Headrestraint
• •• •
•Middle seat Middle seatMiddle seat Middle seat
Middle seat
• •• •
•Armrest cum cup holder Armrest cum cup holderArmrest cum cup holder Armrest cum cup holder
Armrest cum cup holder
• •• •
•Jump seats (if fitted) Jump seats (if fitted)Jump seats (if fitted) Jump seats (if fitted)
Jump seats (if fitted)
• •• •
•Jack & tools Jack & toolsJack & tools Jack & tools
Jack & tools
• •• •
•Motorised rear view mirrors Motorised rear view mirrorsMotorised rear view mirrors Motorised rear view mirrors
Motorised rear view mirrors
• •• •
•Cigarette lighter and ash tray Cigarette lighter and ash trayCigarette lighter and ash tray Cigarette lighter and ash tray
Cigarette lighter and ash tray
• •• •
•Fuel filler flap Fuel filler flapFuel filler flap Fuel filler flap
Fuel filler flap
• •• •
•M MM M
M
echanic echanicechanic echanic
echanic
ally Op ally Opally Op ally Op
ally Op
er erer er
er
a aa a
a
t tt t
t
ed F ed Fed F ed F
ed F
uel uel uel uel
uel
T TT T
T
ank F ank Fank F ank F
ank F
lap laplap lap
lap
• •• •
•Glove box Glove boxGlove box Glove box
Glove box
• •• •
•Inside rear view mirror Inside rear view mirrorInside rear view mirror Inside rear view mirror
Inside rear view mirror
• •• •
•Sun visors Sun visorsSun visors Sun visors
Sun visors
• •• •
•Interior roof lights Interior roof lightsInterior roof lights Interior roof lights
Interior roof lights
• •• •
•Reverse guiding system Reverse guiding systemReverse guiding system Reverse guiding system
Reverse guiding system
• •• •
•Analog Clock Analog ClockAnalog Clock Analog Clock
Analog Clock
• •• •
•Music System Music SystemMusic System Music System
Music System
• •• •
•MP3 / DVD Player MP3 / DVD PlayerMP3 / DVD Player MP3 / DVD Player
MP3 / DVD Player
• •• •
•T TT T
T
ail Lamp ail Lampail Lamp ail Lamp
ail Lamp
• •• •
•High Mounted Stop Lamp High Mounted Stop LampHigh Mounted Stop Lamp High Mounted Stop Lamp
High Mounted Stop Lamp
This section gives you information on the different comfort
and convenience features provided in your vehicle.
There are many features as listed alongside in TATA SAFARI.
To get the maximum benefit from these features, please
read information in this section.
ProCarManuals.com
Page 54 of 161
54
ROOF MOUNTED A.C. ROOF MOUNTED A.C.ROOF MOUNTED A.C. ROOF MOUNTED A.C.
ROOF MOUNTED A.C.
AND FR AND FR AND FR AND FR
AND FR
ONT ONT ONT ONT
ONT
WINDSHIELD WINDSHIELDWINDSHIELD WINDSHIELD
WINDSHIELD
,, ,,
,
DOOR GL DOOR GL DOOR GL DOOR GL
DOOR GL
ASS DEMISTER ASS DEMISTERASS DEMISTER ASS DEMISTER
ASS DEMISTER
Roof Mounted A.C. Unit (if fitted) Roof Mounted A.C. Unit (if fitted)Roof Mounted A.C. Unit (if fitted) Roof Mounted A.C. Unit (if fitted)
Roof Mounted A.C. Unit (if fitted)
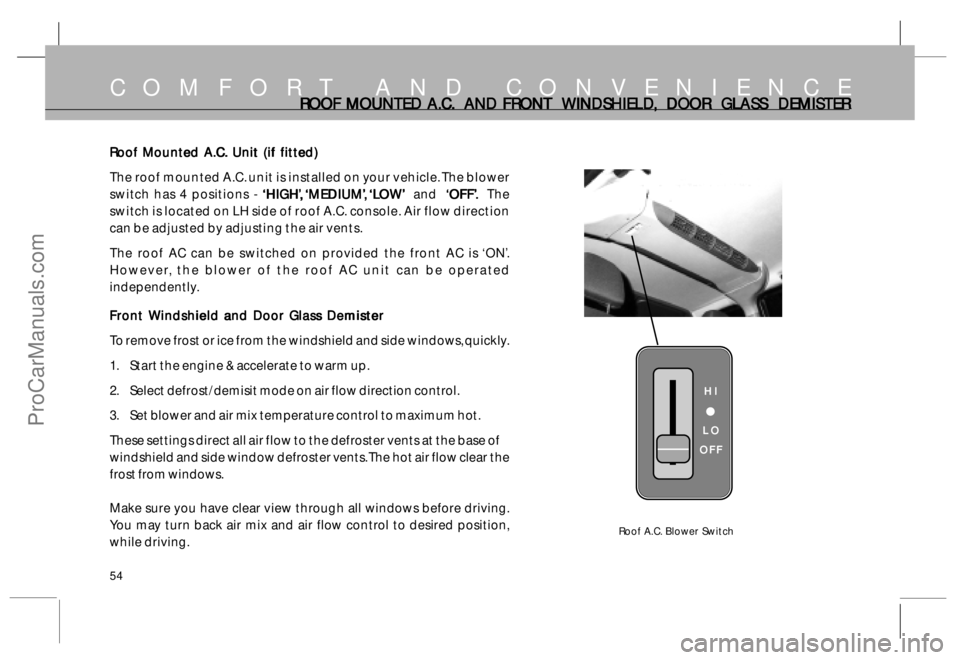
The roof mounted A.C. unit is installed on your vehicle. The blower
switch has 4 positions -
‘HIGH ‘HIGH‘HIGH ‘HIGH
‘HIGH
’’ ’’
’
,, ,,
,
‘‘ ‘‘
‘
MEDIUM MEDIUMMEDIUM MEDIUM
MEDIUM
’’ ’’
’
,, ,,
,
‘L ‘L‘L ‘L
‘L
O OO O
O
W WW W
W
’’ ’’
’
and
‘‘ ‘‘
‘
OFF’ OFF’OFF’ OFF’
OFF’
.. ..
. The
switch is located on LH side of roof A.C. console. Air flow direction
can be adjusted by adjusting the air vents.
The roof AC can be switched on provided the front AC is ‘ON’.
However, the blower of the roof AC unit can be operated
independently.
Front Windshield and Door Glass Demister Front Windshield and Door Glass DemisterFront Windshield and Door Glass Demister Front Windshield and Door Glass Demister
Front Windshield and Door Glass Demister
To remove frost or ice from the windshield and side windows, quickly.
1. Start the engine & accelerate to warm up.
2. Select defrost/demisit mode on air flow direction control.
3. Set blower and air mix temperature control to maximum hot.
These settings direct all air flow to the defroster vents at the base of
windshield and side window defroster vents. The hot air flow clear the
frost from windows.
Make sure you have clear view through all windows before driving.
You may turn back air mix and air flow control to desired position,
while driving.
COMFORT AND CONVENIENCE
Roof A.C. Blower Switch
HI HIHI HI
HI
LO LOLO LO
LO
OFF OFFOFF OFF
OFF
ProCarManuals.com
Page 63 of 161
63
INSIDE REAR INSIDE REAR INSIDE REAR INSIDE REAR
INSIDE REAR
VIE VIEVIE VIE
VIE
W MIRR W MIRRW MIRR W MIRR
W MIRR
OR AND INTERIOR R OR AND INTERIOR ROR AND INTERIOR R OR AND INTERIOR R
OR AND INTERIOR R
OOF LIGHT OOF LIGHTOOF LIGHT OOF LIGHT
OOF LIGHT
S SS S
S
Inside Rear View Mirror Inside Rear View MirrorInside Rear View Mirror Inside Rear View Mirror
Inside Rear View Mirror
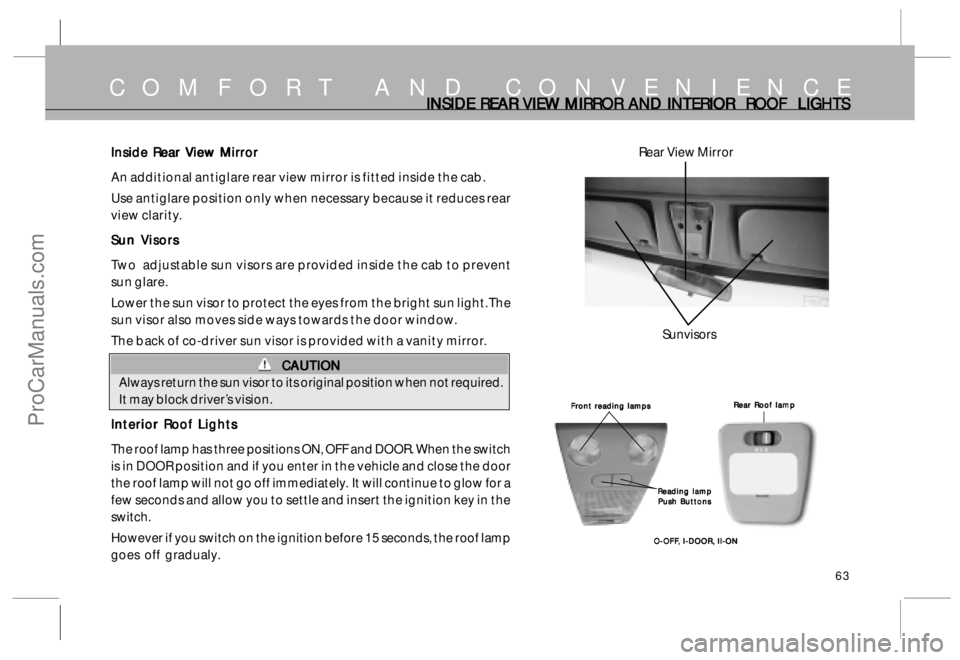
An additional antiglare rear view mirror is fitted inside the cab.
Use antiglare position only when necessary because it reduces rear
view clarity.
Sun Visors Sun VisorsSun Visors Sun Visors
Sun Visors
Two adjustable sun visors are provided inside the cab to prevent
sun glare.
Lower the sun visor to protect the eyes from the bright sun light. The
sun visor also moves side ways towards the door window.
The back of co-driver sun visor is provided with a vanity mirror.
CAUTION CAUTIONCAUTION CAUTION
CAUTION
Always return the sun visor to its original position when not required.
It may block driver’s vision.
Interior Roof Lights Interior Roof LightsInterior Roof Lights Interior Roof Lights
Interior Roof Lights
The roof lamp has three positions ON, OFF and DOOR. When the switch
is in DOOR position and if you enter in the vehicle and close the door
the roof lamp will not go off immediately. It will continue to glow for a
few seconds and allow you to settle and insert the ignition key in the
switch.
However if you switch on the ignition before 15 seconds, the roof lamp
goes off gradualy.
COMFORT AND CONVENIENCE
Front reading lamps Front reading lampsFront reading lamps Front reading lamps
Front reading lamps
Reading lamp Reading lampReading lamp Reading lamp
Reading lamp
Push Buttons Push ButtonsPush Buttons Push Buttons
Push Buttons
O-OFF O-OFFO-OFF O-OFF
O-OFF
,, ,,
,
I-DOOR, I-DOOR, I-DOOR, I-DOOR,
I-DOOR,
II-ON II-ON II-ON II-ON
II-ONRear Roof lamp Rear Roof lampRear Roof lamp Rear Roof lamp
Rear Roof lamp
Sunvisors Rear View Mirror
ProCarManuals.com
Page 88 of 161
88
Descending Sharp Gradients Descending Sharp GradientsDescending Sharp Gradients Descending Sharp Gradients
Descending Sharp Gradients
•Select the 4L mode and depending on the severity of the gradient, shift into
appropriate gear. Use engine braking judiciously without over-revving the engine.
•Brake application under such situations should be done very smoothly to avoid loss of
control.
Select appropriate gear so that gear changing or clutch disengagement is not involved
while descending the gradient.
T TT T
T
o oo o
o
wing the wing the wing the wing the
wing the
V VV V
V
ehicle ehicleehicle ehicle
ehicle
•For towing the vehicle, the best way is to use a recovery van.
•Alternatively use a rigid tow bar.
•Avoid using flexible cable or rope as your vehicle may crash into towing vehicle when
it stops suddenly.
•Switch ‘ON’ Hazard warning switch to warn the other road users.
•Keep the engine in idling so that power steering assistance is available. This will also
built the vacuum for the brakes.
•In case of brake failure, use parking brake to control the vehicle.
Roof Rail Roof RailRoof Rail Roof Rail
Roof Rail
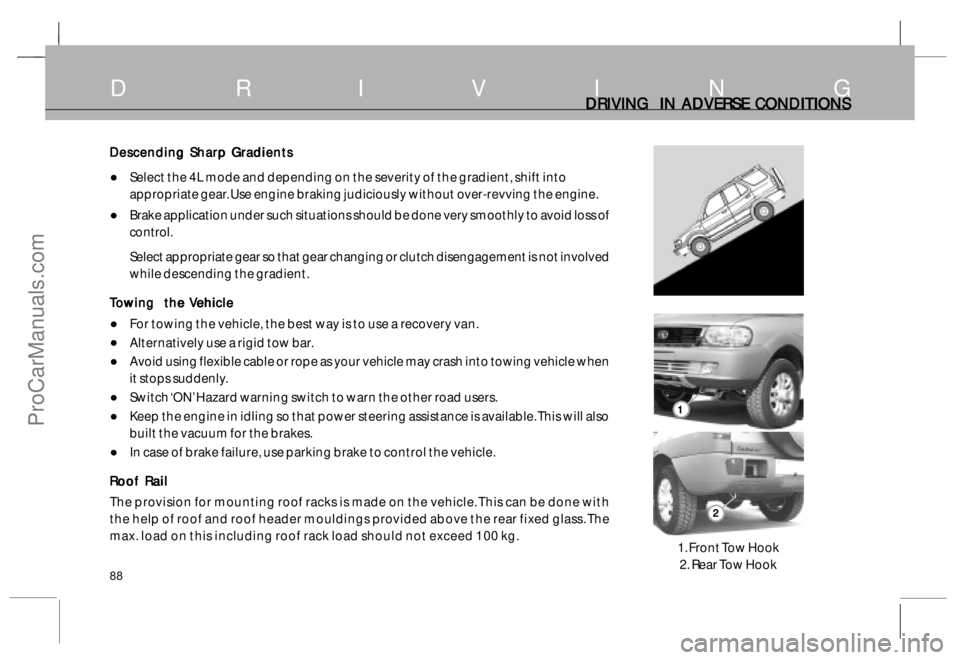
The provision for mounting roof racks is made on the vehicle. This can be done with
the help of roof and roof header mouldings provided above the rear fixed glass. The
max. load on this including roof rack load should not exceed 100 kg.
D R I V I N GDRIVING IN ADVERSE CONDITIONS DRIVING IN ADVERSE CONDITIONSDRIVING IN ADVERSE CONDITIONS DRIVING IN ADVERSE CONDITIONS
DRIVING IN ADVERSE CONDITIONS
1 11 1
1
2 22 2
2
1. Front Tow Hook
2. Rear Tow Hook
ProCarManuals.com
Page 133 of 161
133
TURBO CHARGER (IF FITTED) TURBO CHARGER (IF FITTED)TURBO CHARGER (IF FITTED) TURBO CHARGER (IF FITTED)
TURBO CHARGER (IF FITTED)
V VV V
V
ar arar ar
ar
iable iable iable iable
iable
T TT T
T
urbine urbine urbine urbine
urbine
T TT T
T
echnolo echnoloechnolo echnolo
echnolo
g gg g
g
y- y- y- y-
y-
VT VTVT VT
VT
T T T T
T
T TT T
T
urb urburb urb
urb
o oo o
o
char charchar char
char
ger : ger :ger : ger :
ger :
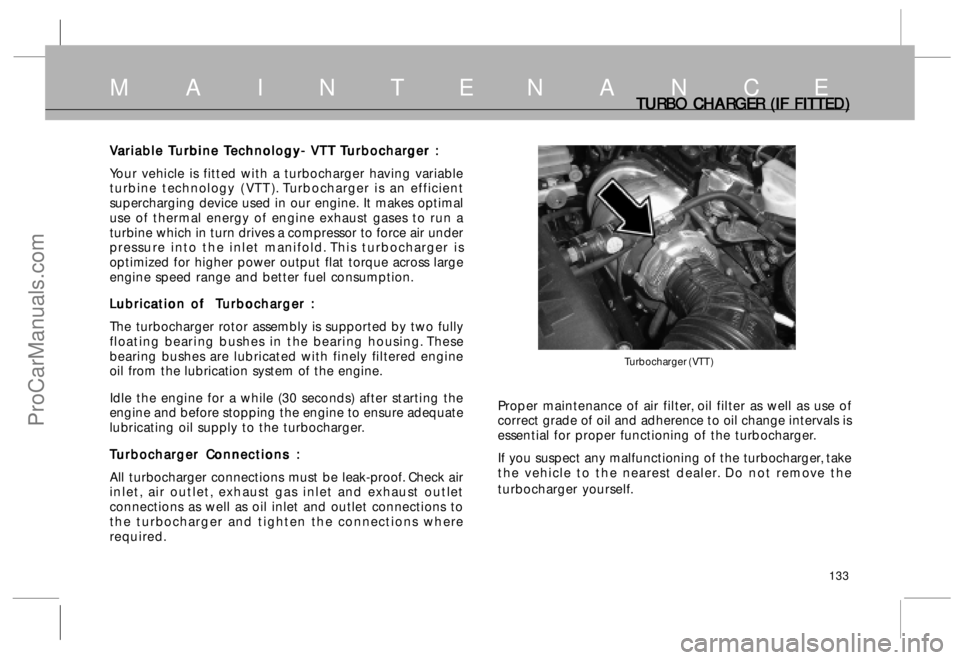
Your vehicle is fitted with a turbocharger having variable
turbine technology ( VTT ). Turbocharger is an efficient
supercharging device used in our engine. It makes optimal
use of thermal energy of engine exhaust gases to run a
turbine which in turn drives a compressor to force air under
pressure into the inlet manifold. This turbocharger is
optimized for higher power output flat torque across large
engine speed range and better fuel consumption.
L LL L
L
ubr ubrubr ubr
ubr
ic icic
ic
ic
a aa a
a
tion of tion of tion of tion of
tion of
T TT T
T
urb urburb urb
urb
o oo o
o
char charchar char
char
ger : ger :ger : ger :
ger :
The turbocharger rotor assembly is supported by two fully
floating bearing bushes in the bearing housing. These
bearing bushes are lubricated with finely filtered engine
oil from the lubrication system of the engine.
Idle the engine for a while (30 seconds) after starting the
engine and before stopping the engine to ensure adequate
lubricating oil supply to the turbocharger.
T TT T
T
urb urburb urb
urb
o oo o
o
char charchar char
char
ger C ger Cger C ger C
ger C
onnec onneconnec onnec
onnec
tions : tions :tions : tions :
tions :
All turbocharger connections must be leak-proof. Check air
inlet, air outlet, exhaust gas inlet and exhaust outlet
connections as well as oil inlet and outlet connections to
the turbocharger and tighten the connections where
required.Proper maintenance of air filter, oil filter as well as use of
correct grade of oil and adherence to oil change intervals is
essential for proper functioning of the turbocharger.
If you suspect any malfunctioning of the turbocharger, take
the vehicle to the nearest dealer. Do not remove the
turbocharger yourself.
M A I N T E N A N C E
Turbocharger ( VTT )
ProCarManuals.com
Page 156 of 161

156
A L P H A B E T I C A L I N D E X ALPHABETIC INDEX ALPHABETIC INDEX ALPHABETIC INDEX ALPHABETIC INDEX
ALPHABETIC INDEX
L LL L
L
Limited Slip Differential 82
Lubricants 9 3
Load consciouse pressure
reducing valve 117
M MM M
M
Middle Seat 57
Mirror (Inside) 63
Mirror (Motorised) 60
Mirror Demister 39
MP3/DVD player 67
Music System 66
O OO O
O
Odometer 47
Operating Switch 38
P PP P
P
Panel Lights 47
Parking Brake 32
Power Steering Fluid 115
Power Windows 55
Preparing to drive 77
Prior to driving – Check List 71
R RR R
R
Rear Seat 5 7
Rear Windshield Demister 39
Rear Windshield Wash & Wipe 39
Remote bypass valve 1 1 8
Relays 131
Reverse Guiding System 65
Roof Lights 63
Roof Mounted A.C. 54
Roof Rail 88
RPM Meter 49
Running in Period 77
S SS S
S
Seat Adjustment 58
Seat belt 1 6
Seat belt precautions 1 9
Service Schedule 144
Spare Wheel 1 2 5
Speedometer 4 8
Starting / Stopping the engine 7 6
Steering Lock 29
Steering Wheel Position Adjustment 38
Sunvisors 6 5
T TT T
T
Tail lamp 67
Technical Specifications 97
Temperature Gauge 50
Towing the vehicle 88
Transfer case 4X4 operation 82
Transfer case Electric Shift Switch 36
Transfer case oil 1 1 1
Trouble Shooting 136
Turbo Charger 133
Tyre 120,123
Tyre Rotation 124
V VV V
V
Vehicle Care 126
Vehicle Record Sheet 1 4 9
Vehicle Specifications 9 7
W WW W
W
Warranty-Terms & Condition 10
Wheels & Tyres 120
Wheel Alignment 123
Wheel Balancing 123
Wiper Care 127
ProCarManuals.com