heater TESLA MODEL 3 2018 Owner's Manual
[x] Cancel search | Manufacturer: TESLA, Model Year: 2018, Model line: MODEL 3, Model: TESLA MODEL 3 2018Pages: 165, PDF Size: 8.63 MB
Page 22 of 165
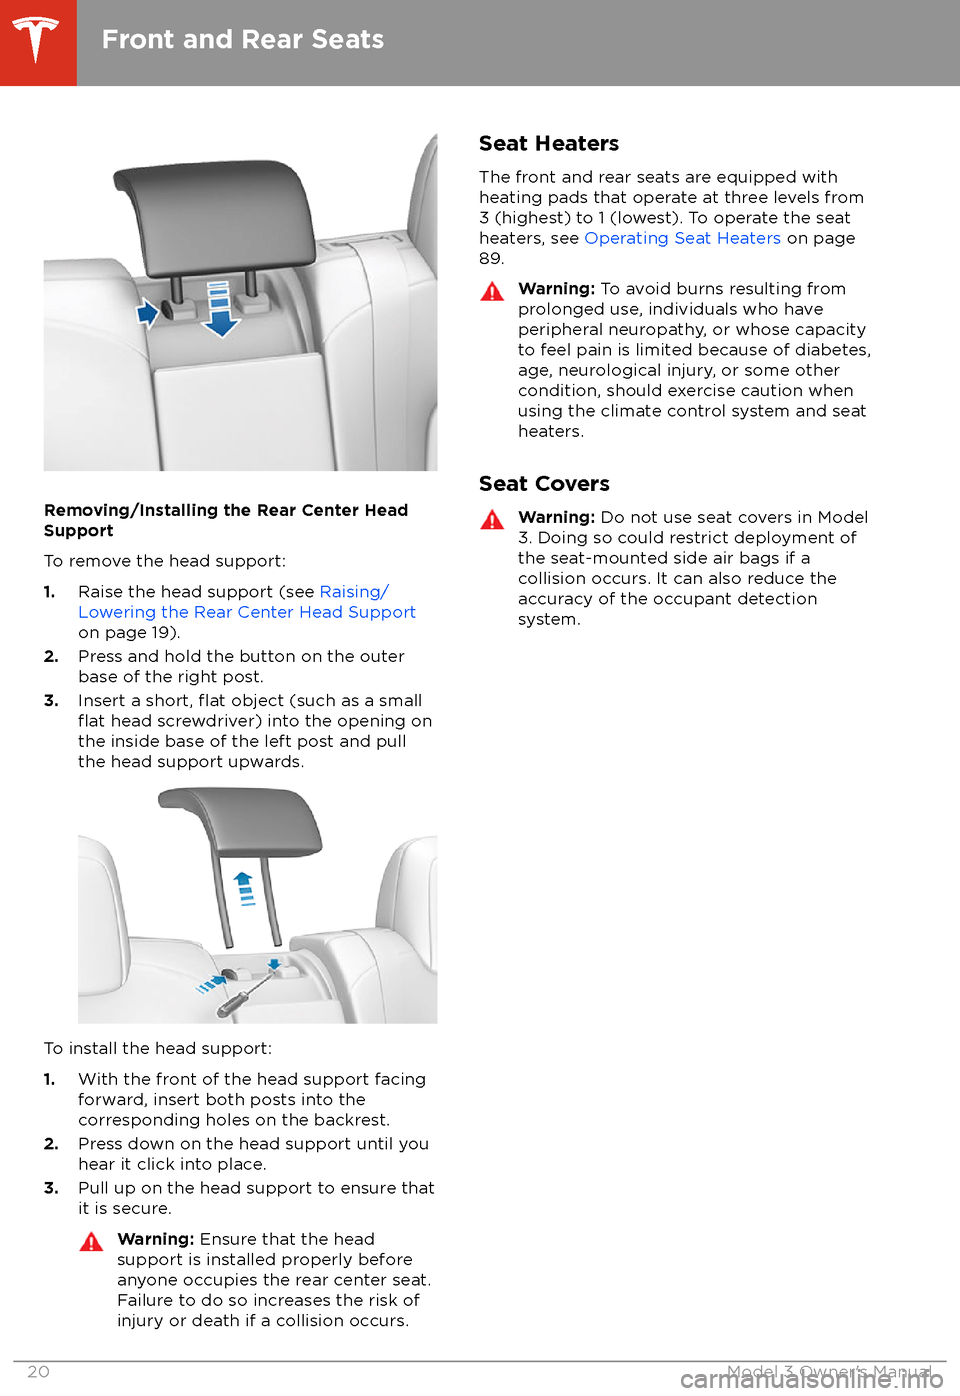
Removing/Installing the Rear Center Head
Support
To remove the head support:
1. Raise the head support (see Raising/
Lowering the Rear Center Head Support on page 19).
2. Press and hold the button on the outer
base of the right post.
3. Insert a short,
flat object (such as a smallflat head screwdriver) into the opening on
the inside base of the left post and pull
the head support upwards.
To install the head support:
1. With the front of the head support facing
forward, insert both posts into the corresponding holes on the backrest.
2. Press down on the head support until you
hear it click into place.
3. Pull up on the head support to ensure that
it is secure.
Warning: Ensure that the head
support is installed properly before
anyone occupies the rear center seat.
Failure to do so increases the risk of injury or death if a collision occurs.Seat Heaters
The front and rear seats are equipped with
heating pads that operate at three levels from
3 (highest) to 1 (lowest). To operate the seat
heaters, see Operating Seat Heaters on page
89.Warning: To avoid burns resulting from
prolonged use, individuals who have
peripheral neuropathy, or whose capacity
to feel pain is limited because of diabetes,
age, neurological injury, or some other
condition, should exercise caution when
using the climate control system and seat heaters.
Seat Covers
Warning: Do not use seat covers in Model
3. Doing so could restrict deployment of
the seat-mounted side air bags if a collision occurs. It can also reduce theaccuracy of the occupant detection
system.
Front and Rear Seats
20Model 3 Owner
Page 89 of 165
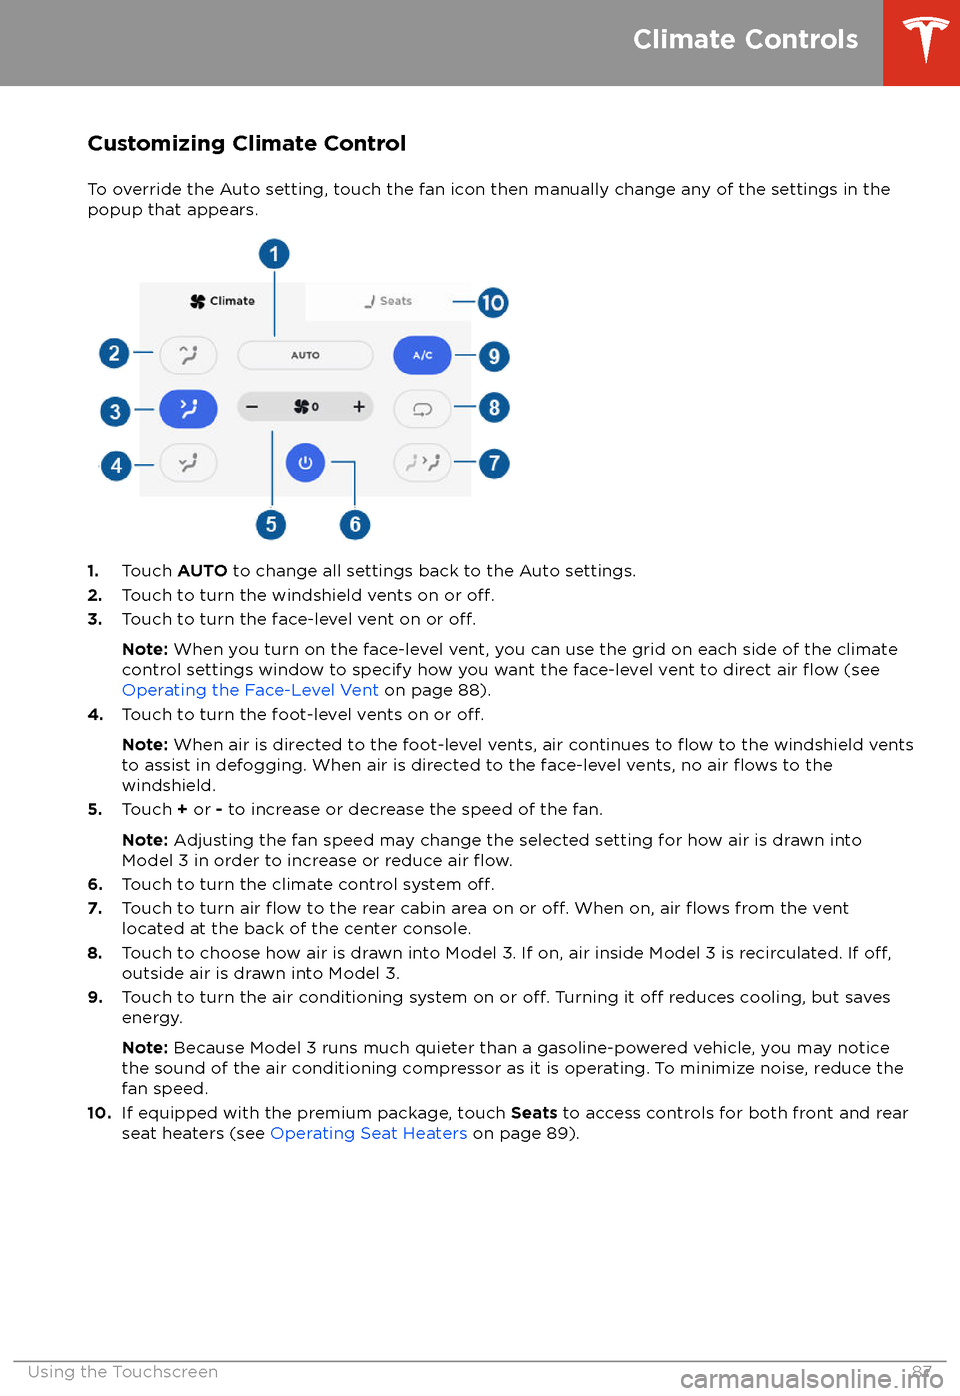
Customizing Climate ControlTo override the Auto setting, touch the fan icon then manually change any of the settings in thepopup that appears.
1. Touch AUTO to change all settings back to the Auto settings.
2. Touch to turn the windshield vents on or off.3.Touch to turn the face-level vent on or off.
Note: When you turn on the face-level vent, you can use the grid on each side of the climate
control settings window to specify how you want the face-level vent to direct air flow (see
Operating the Face-Level Vent on page 88).
4. Touch to turn the foot-level vents on or
off.
Note: When air is directed to the foot-level vents, air continues to flow to the windshield vents
to assist in defogging. When air is directed to the face-level vents, no air flows to the
windshield.
5. Touch + or - to increase or decrease the speed of the fan.
Note: Adjusting the fan speed may change the selected setting for how air is drawn into
Model 3 in order to increase or reduce air
flow.6. Touch to turn the climate control system off.7. Touch to turn air flow to the rear cabin area on or off. When on, air flows from the vent
located at the back of the center console.
8. Touch to choose how air is drawn into Model 3. If on, air inside Model 3 is recirculated. If
off,outside air is drawn into Model 3.
9. Touch to turn the air conditioning system on or off. Turning it off reduces cooling, but saves
energy.
Note: Because Model 3 runs much quieter than a gasoline-powered vehicle, you may notice
the sound of the air conditioning compressor as it is operating. To minimize noise, reduce the fan speed.
10. If equipped with the premium package, touch Seats to access controls for both front and rear
seat heaters (see Operating Seat Heaters on page 89).
Climate Controls
Using the Touchscreen87
Page 91 of 165
Operating Seat Heaters
To control the front seat heaters for the driver
and passenger, touch the corresponding
control on the main climate control area. To
control rear seat heaters, and access duplicate
controls for the front seat heaters, touch the
fan icon, touch the Seats tab, then touch the
seat for which you want to adjust heating.
Seat heaters operate at three setting levels
from 3 (highest) to 1 (lowest). When
operating, the associated seat icon displays
twisting lines that turn red to indicate the
setting level.
Climate Control Operating Tips
Page 107 of 165
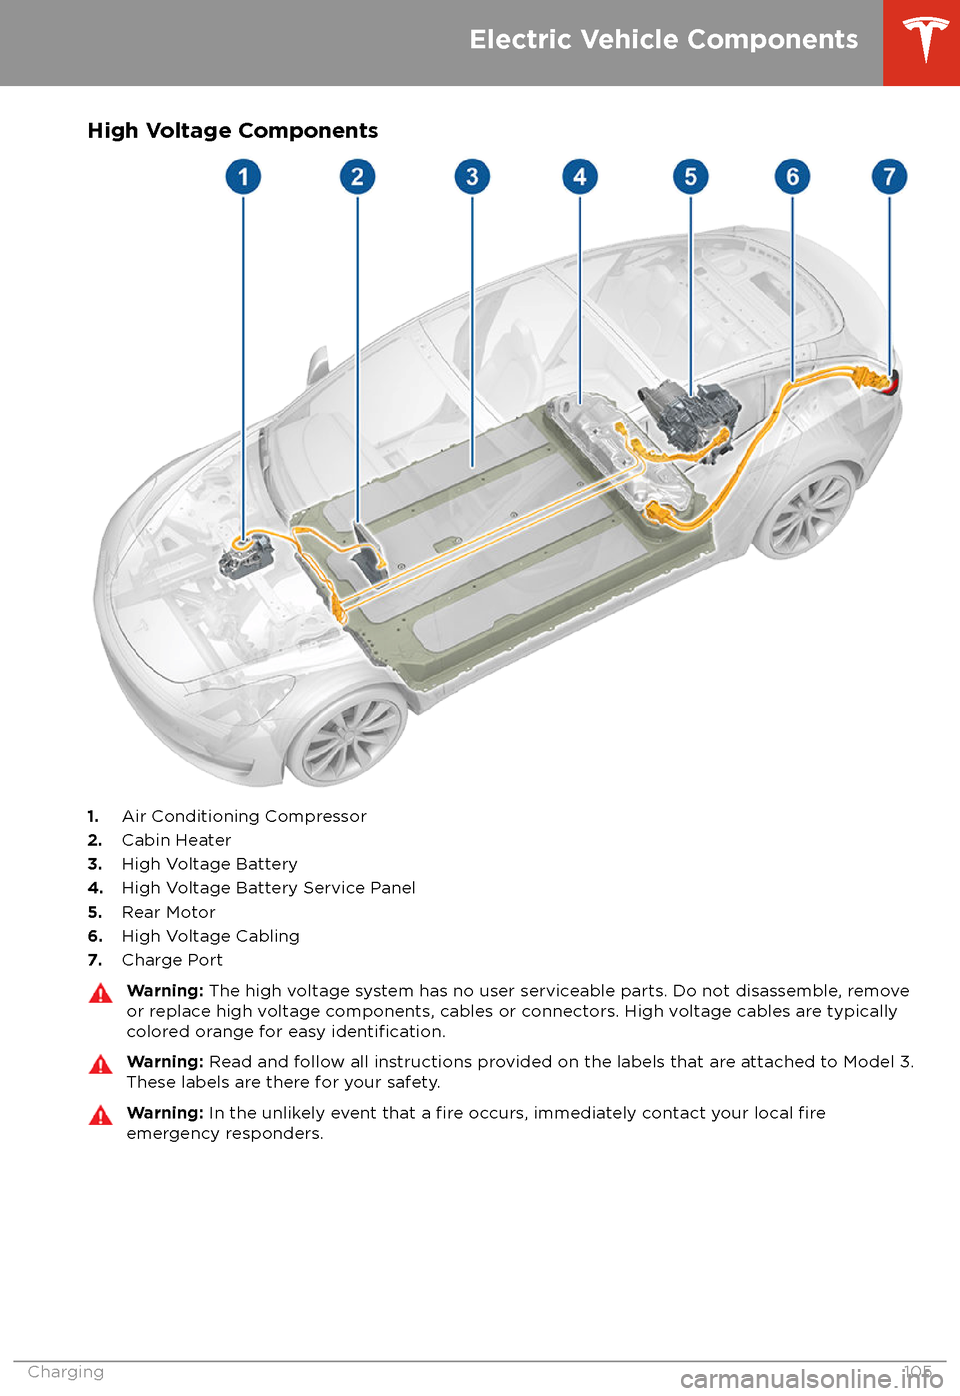
High Voltage Components
1.Air Conditioning Compressor
2. Cabin Heater
3. High Voltage Battery
4. High Voltage Battery Service Panel
5. Rear Motor
6. High Voltage Cabling
7. Charge Port
Warning:
The high voltage system has no user serviceable parts. Do not disassemble, remove
or replace high voltage components, cables or connectors. High voltage cables are typically colored orange for easy
identification.
Warning: Read and follow all instructions provided on the labels that are attached to Model 3.
These labels are there for your safety.Warning: In the unlikely event that a fire occurs, immediately contact your local fireemergency responders.
Electric Vehicle Components
Charging105
Page 163 of 165
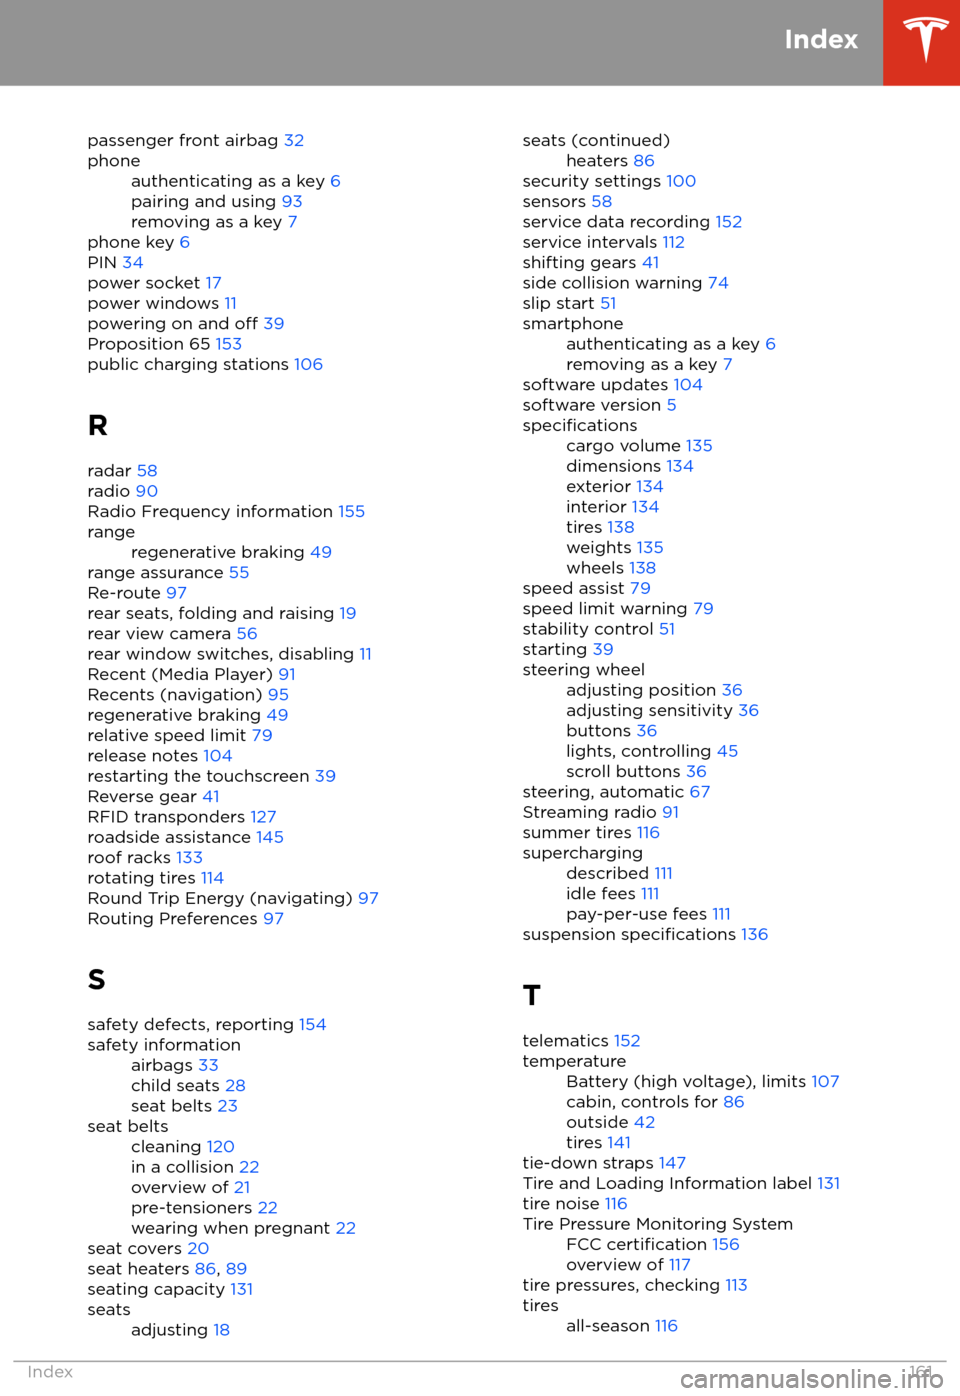
passenger front airbag 32phoneauthenticating as a key 6
pairing and using 93
removing as a key 7
phone key 6
PIN 34
power socket 17
power windows 11
powering on and
off 39
Proposition 65 153
public charging stations 106
R radar 58
radio 90
Radio Frequency information 155
rangeregenerative braking 49
range assurance 55
Re-route 97
rear seats, folding and raising 19
rear view camera 56
rear window switches, disabling 11
Recent (Media Player) 91
Recents (navigation) 95
regenerative braking 49
relative speed limit 79
release notes 104
restarting the touchscreen 39
Reverse gear 41
RFID transponders 127
roadside assistance 145
roof racks 133
rotating tires 114
Round Trip Energy (navigating) 97
Routing Preferences 97
S safety defects, reporting 154
safety informationairbags 33
child seats 28
seat belts 23seat beltscleaning 120
in a collision 22
overview of 21
pre-tensioners 22
wearing when pregnant 22
seat covers 20
seat heaters 86, 89
seating capacity 131
seatsadjusting 18seats (continued)heaters 86
security settings 100
sensors 58
service data recording 152
service intervals 112
shifting gears 41
side collision warning 74
slip start 51
smartphoneauthenticating as a key 6
removing as a key 7
software updates 104
software version 5
specificationscargo volume 135
dimensions 134
exterior 134
interior 134
tires 138
weights 135
wheels 138
speed assist 79
speed limit warning 79
stability control 51
starting 39
steering wheeladjusting position 36
adjusting sensitivity 36
buttons 36
lights, controlling 45
scroll buttons 36
steering, automatic 67
Streaming radio 91
summer tires 116
superchargingdescribed 111
idle fees 111
pay-per-use fees 111
suspension specifications 136
T telematics 152
temperatureBattery (high voltage), limits 107
cabin, controls for 86
outside 42
tires 141
tie-down straps 147
Tire and Loading Information label 131
tire noise 116
Tire Pressure Monitoring SystemFCC certification 156
overview of 117
tire pressures, checking 113
tiresall-season 116
Index
Index161