wheel TESLA MODEL 3 2020 s User Guide
[x] Cancel search | Manufacturer: TESLA, Model Year: 2020, Model line: MODEL 3, Model: TESLA MODEL 3 2020Pages: 220, PDF Size: 9.65 MB
Page 71 of 220
Park Assist
How Park Assist Works
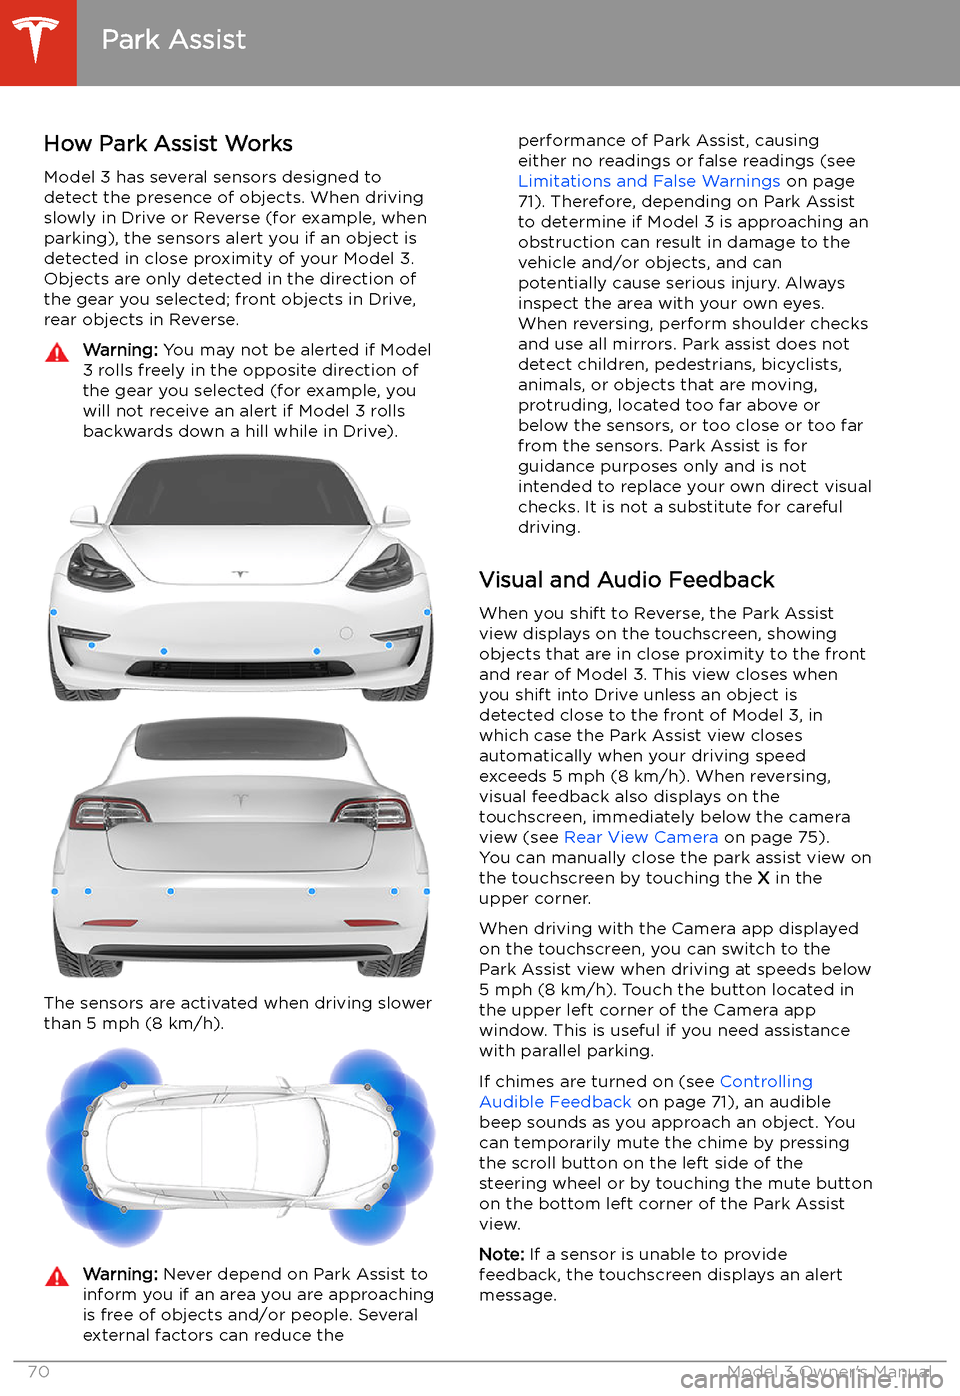
Model 3 has several sensors designed to
detect the presence of objects. When driving
slowly in Drive or Reverse (for example, when
parking), the sensors alert you if an object is
detected in close proximity of your Model 3.
Objects are only detected in the direction of
the gear you selected; front objects in Drive,
rear objects in Reverse.
Warning: You may not be alerted if Model
3 rolls freely in the opposite direction of
the gear you selected (for example, you
will not receive an alert if Model 3 rolls
backwards down a hill while in Drive).
The sensors are activated when driving slower
than 5 mph (8 km/h).
Warning: Never depend on Park Assist to
inform you if an area you are approaching is free of objects and/or people. Several
external factors can reduce theperformance of Park Assist, causing
either no readings or false readings (see
Limitations and False Warnings on page
71). Therefore, depending on Park Assist
to determine if Model 3 is approaching an
obstruction can result in damage to the vehicle and/or objects, and can
potentially cause serious injury. Always
inspect the area with your own eyes.
When reversing, perform shoulder checks and use all mirrors. Park assist does not
detect children, pedestrians, bicyclists,
animals, or objects that are moving, protruding, located too far above or
below the sensors, or too close or too far
from the sensors. Park Assist is for
guidance purposes only and is not intended to replace your own direct visual
checks. It is not a substitute for careful
driving.
Visual and Audio Feedback
When you shift to Reverse, the Park Assist
view displays on the touchscreen, showing objects that are in close proximity to the front
and rear of Model 3. This view closes when you shift into Drive unless an object is
detected close to the front of Model 3, in
which case the Park Assist view closes automatically when your driving speed
exceeds 5 mph (8 km/h). When reversing,
visual feedback also displays on the touchscreen, immediately below the camera
view (see Rear View Camera on page 75).
You can manually close the park assist view on
the touchscreen by touching the X in the
upper corner.
When driving with the Camera app displayed
on the touchscreen, you can switch to the
Park Assist view when driving at speeds below
5 mph (8 km/h). Touch the button located in
the upper left corner of the Camera app
window. This is useful if you need assistance
with parallel parking.
If chimes are turned on (see Controlling
Audible Feedback on page 71), an audible
beep sounds as you approach an object. You
can temporarily mute the chime by pressing
the scroll button on the left side of the
steering wheel or by touching the mute button on the bottom left corner of the Park Assist
view.
Note: If a sensor is unable to provide
feedback, the touchscreen displays an alert
message.
Park Assist
70Model 3 Owner
Page 72 of 220
Caution: Keep sensors clean from dirt,
debris, snow, and ice. Avoid using a high
pressure power washer on the sensors
and do not clean a sensor with a sharp or abrasive object that can scratch or
damage its surface.Caution: Do not install accessories or
stickers on or near the parking sensors.
Controlling Audible Feedback
You can use Park Assist with or without
audible feedback. To turn chimes on or off,
touch Controls > Safety & Security > Park
Assist Chimes .
To mute the chimes temporarily, press the
scroll button on the left side of the steering
wheel or touch the mute button in the corner
of the Park Assist view. The chimes are muted
until you shift into a different gear or drive
over 5 mph (8 km/h).
Limitations and False Warnings The parking sensors may not function
correctly in these situations:
Page 76 of 220
Rear View Camera
Camera Location
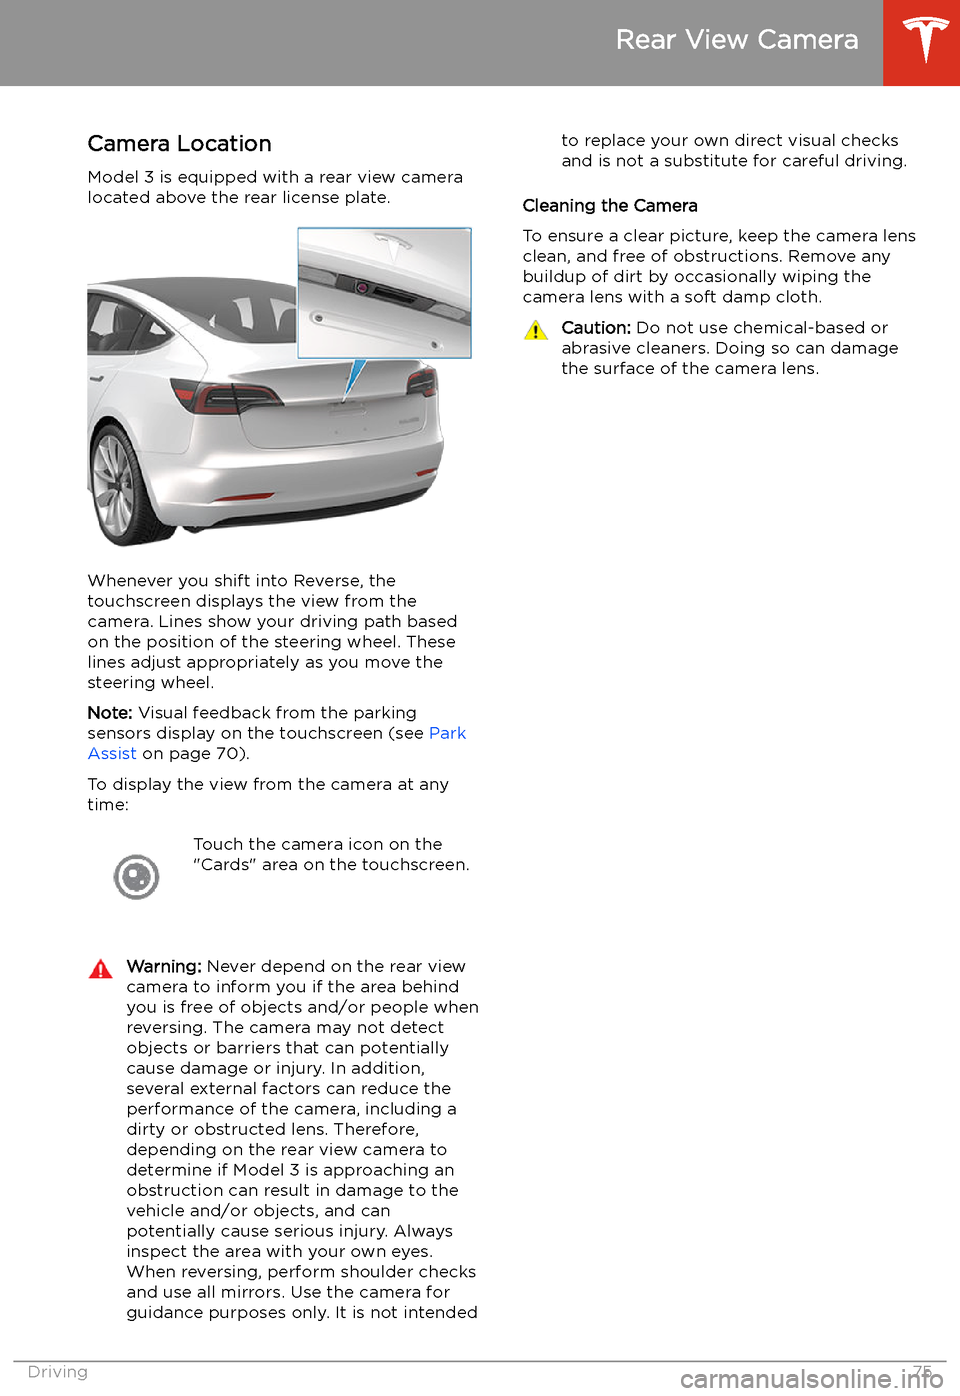
Model 3 is equipped with a rear view camera
located above the rear license plate.
Whenever you shift into Reverse, the
touchscreen displays the view from the
camera. Lines show your driving path based
on the position of the steering wheel. These
lines adjust appropriately as you move the
steering wheel.
Note: Visual feedback from the parking
sensors display on the touchscreen (see Park
Assist on page 70).
To display the view from the camera at any
time:
Touch the camera icon on the
"Cards" area on the touchscreen.Warning: Never depend on the rear view
camera to inform you if the area behind
you is free of objects and/or people when
reversing. The camera may not detect
objects or barriers that can potentially
cause damage or injury. In addition, several external factors can reduce the
performance of the camera, including a
dirty or obstructed lens. Therefore,
depending on the rear view camera to
determine if Model 3 is approaching an
obstruction can result in damage to the vehicle and/or objects, and canpotentially cause serious injury. Always
inspect the area with your own eyes.
When reversing, perform shoulder checks and use all mirrors. Use the camera forguidance purposes only. It is not intendedto replace your own direct visual checks
and is not a substitute for careful driving.
Cleaning the Camera
To ensure a clear picture, keep the camera lens clean, and free of obstructions. Remove any
buildup of dirt by occasionally wiping the
camera lens with a soft damp cloth.
Caution: Do not use chemical-based or
abrasive cleaners. Doing so can damage
the surface of the camera lens.
Rear View Camera
Driving75
Page 102 of 220

To Cancel Parking
Autopark cancels the parking sequence when
you manually move the steering wheel, change gears, or touch Cancel on the
touchscreen. Autopark also cancels parking
when:
Page 110 of 220
Warning: Keep your hands on the steering
wheel at all times. If the vehicle senses your hands are not on the steering wheel,Model 3 sounds a chime and the hazard
warning lights
Page 133 of 220
If Navigate on Autopilot (if available in your
market region) is enabled, you can turn it on
for the navigation route by touching Navigate
on Autopilot in the turn-by-turn direction list.
Navigate on Autopilot is an extension of Autosteer that automatically changes lanesand steers Model 3 onto the appropriate
exit(s) when navigating on controlled access
roads (such as freeways). For details, see
Navigate on Autopilot on page 96.The route overview icon displays
when a navigation route is active.
Touch this icon at any time to view
an overview of your navigation
route, or to change the orientation
of the map (see Overview on page
130), which also zooms the map to
show the current leg of your trip.
The black pin at the end of the
route line represents your
destination.Mute/unmute navigation volume.
Note: You can also mute the
volume of the navigation system by
pressing the scroll button on the
left side of the steering wheel while
navigation instructions are being
spoken. A volume control specific
to navigation instructions is also
available by touching the settings
icon on the map (see Overview on
page 130).
To stop navigating, touch CANCEL, located
below the turn-by-turn direction list.
Note: If a data connection is not available,
onboard maps allow you to navigate to any location, but you must enter the location
Page 168 of 220
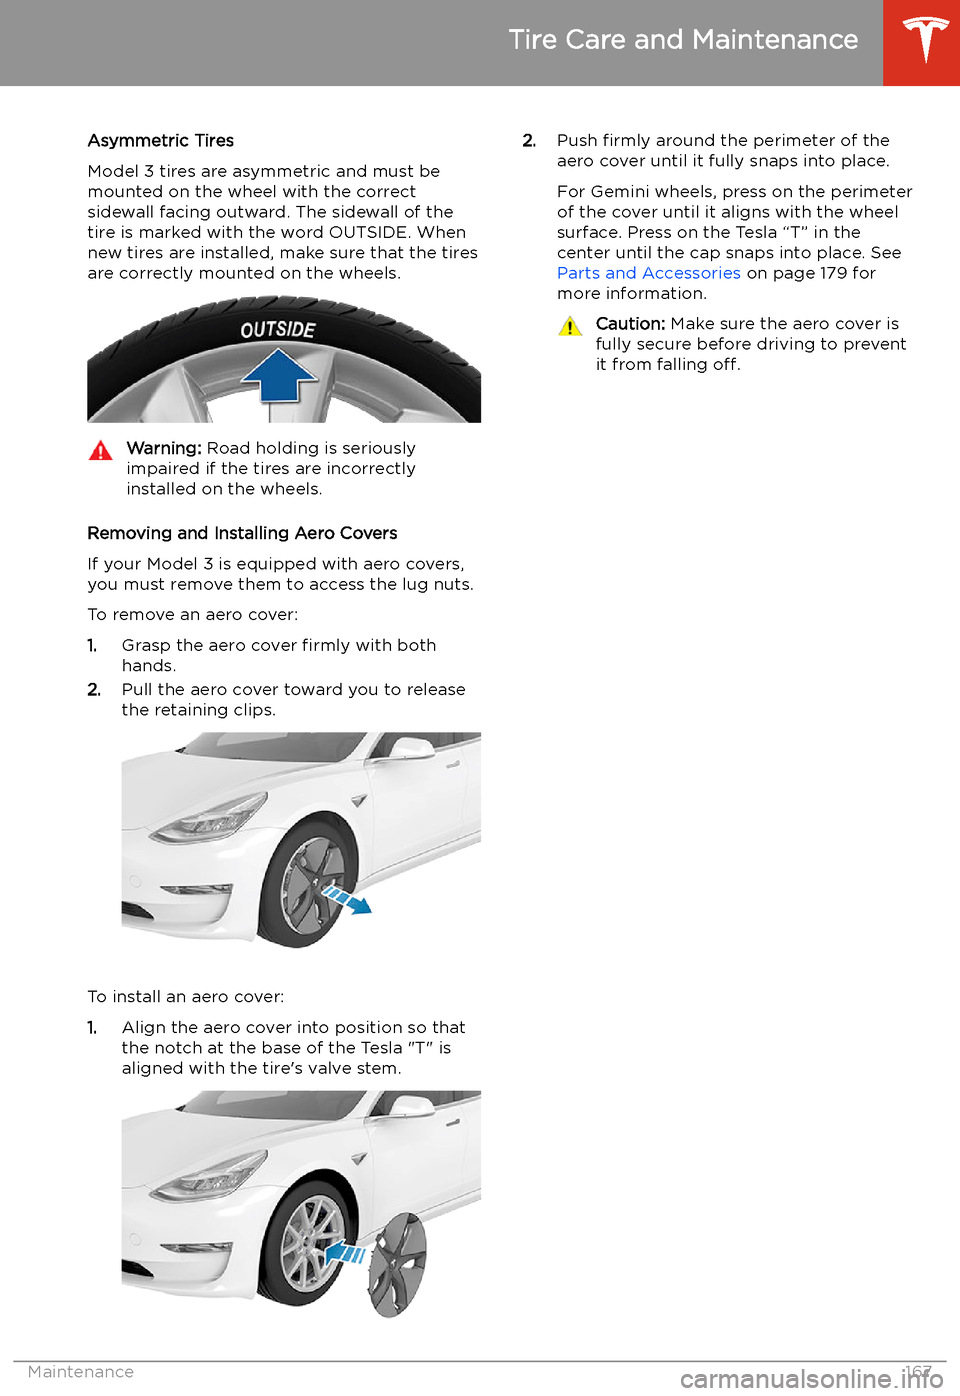
Asymmetric Tires
Model 3 tires are asymmetric and must be
mounted on the wheel with the correct
sidewall facing outward. The sidewall of the
tire is marked with the word OUTSIDE. When
new tires are installed, make sure that the tires
are correctly mounted on the wheels.Warning: Road holding is seriously
impaired if the tires are incorrectly
installed on the wheels.
Removing and Installing Aero Covers
If your Model 3 is equipped with aero covers,
you must remove them to access the lug nuts.
To remove an aero cover:
1. Grasp the aero cover firmly with both
hands.
2. Pull the aero cover toward you to release
the retaining clips.
To install an aero cover:
1. Align the aero cover into position so that
the notch at the base of the Tesla "T" is aligned with the tire
Page 169 of 220
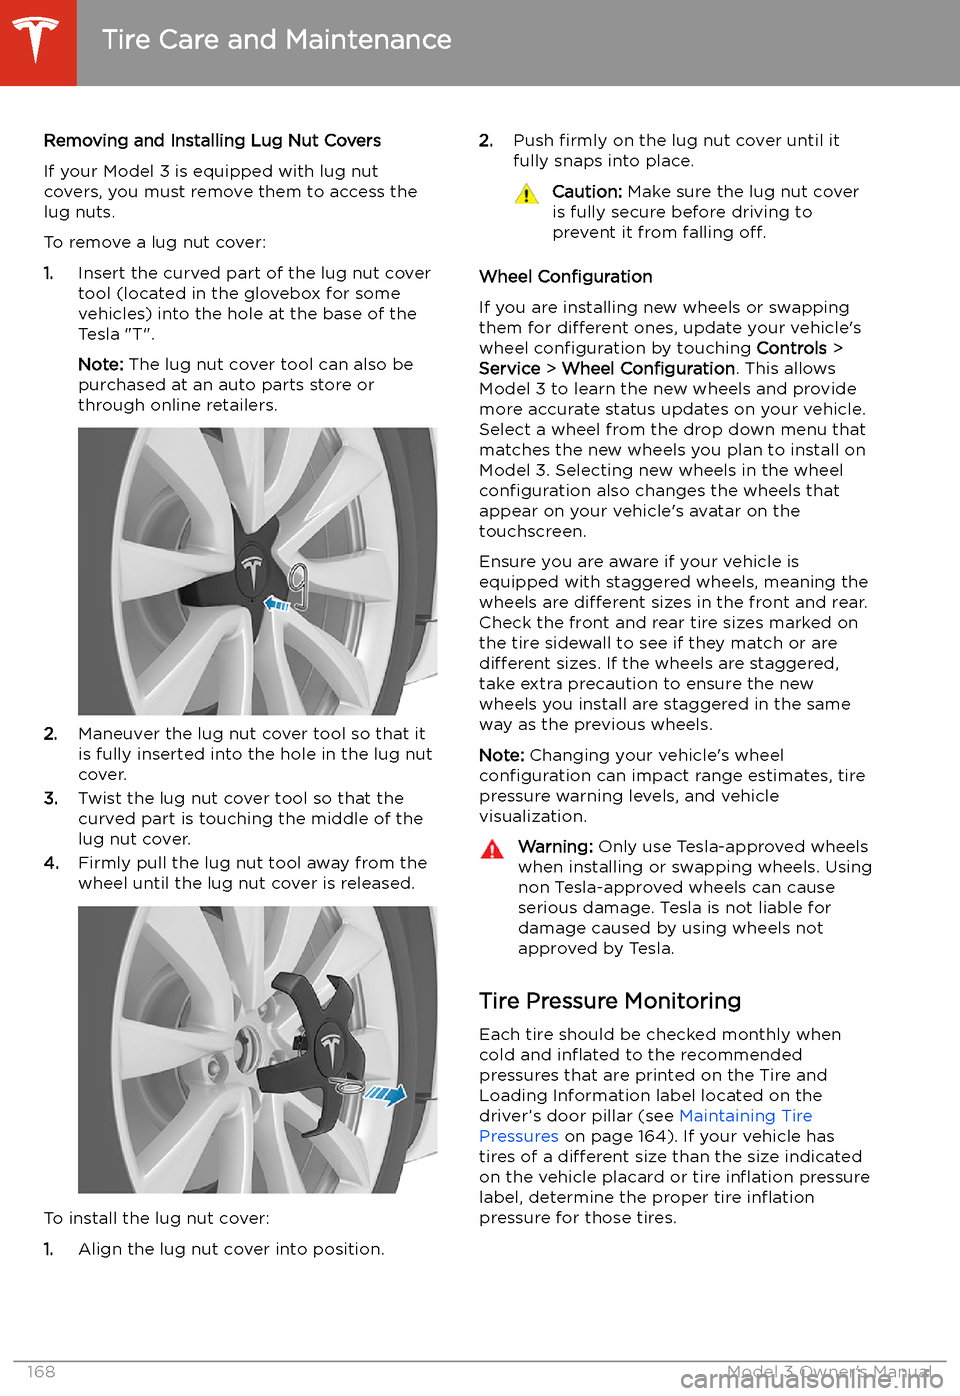
Removing and Installing Lug Nut Covers
If your Model 3 is equipped with lug nut covers, you must remove them to access the
lug nuts.
To remove a lug nut cover:
1. Insert the curved part of the lug nut cover
tool (located in the glovebox for some
vehicles) into the hole at the base of the
Tesla "T".
Note: The lug nut cover tool can also be
purchased at an auto parts store or
through online retailers.
2. Maneuver the lug nut cover tool so that it
is fully inserted into the hole in the lug nut
cover.
3. Twist the lug nut cover tool so that the
curved part is touching the middle of the
lug nut cover.
4. Firmly pull the lug nut tool away from the
wheel until the lug nut cover is released.
To install the lug nut cover:
1. Align the lug nut cover into position.
2.
Push firmly on the lug nut cover until it
fully snaps into place.Caution: Make sure the lug nut cover
is fully secure before driving to
prevent it from falling off.
Wheel Configuration
If you are installing new wheels or swapping
them for different ones, update your vehicle
Page 171 of 220
TPMS malfunctions can occur for a variety of
reasons, including installing replacement or
alternate tires or wheels that prevent the
TPMS from functioning properly. Always check
the TPMS malfunction indicator light after replacing one or more tires or wheels on yourvehicle to ensure that the replacement tires or
wheels allow the TPMS to continue to function
properly.
Note: If a tire has been replaced or repaired
using a different tire sealant than the one
available from Tesla, and a low tire pressure is
detected, it is possible that the tire sensor has
been damaged. Contact Tesla to have the fault repaired as soon as possible.Seasonal Tire Types
Summer Tires
Your vehicle may be originally equipped with high performance summer tires or all season
tires. Tesla recommends using winter tires if
driving in cold temperatures or on roads
where snow or ice may be present. Contact
Tesla for winter tire recommendations.Warning: In cold temperatures or on snow
or ice, summer tires do not provide
adequate traction. Selecting and installing the appropriate tires for winter conditions
is important to ensure the safety and
optimum performance of your Model 3.
All-Season Tires
Your Model 3 may be originally equipped with all-season tires. These tires are designed to
provide adequate traction in most conditions
year-round, but may not provide the same level of traction as winter tires in snowy or icy
conditions. All-season tires can be identified
by “ALL SEASON" and/or "M+S” (mud and
snow) on the tire sidewall.
Winter Tires
Use winter tires to increase traction in snowy
or icy conditions. When installing winter tires,
always install a complete set of four tires at
the same time. Winter tires must be the same
diameter, brand, construction and tread
pattern on all four wheels. Contact Tesla for
winter tire recommendations.
Winter tires can be identified by a
mountain/snow
Page 180 of 220
Parts and Accessories
Parts, Accessories, and
Modifications
Use only genuine Tesla parts and accessories.
Tesla performs rigorous testing on parts to
ensure their suitability, safety, and reliability.
Purchase these parts from Tesla, where they
are professionally installed and where you can receive expert advice about modifications to
Model 3. Accessories are available for
purchase from Tesla stores or online at www.tesla.com .
Note: Some accessories may not be available
in your market region.
Tesla is unable to assess parts manufactured
by other distributors and therefore accepts no responsibility if you use non-Tesla parts onModel 3.
Warning: Installing non-approved parts
and accessories, or performing non- approved modifications, can affect the
performance of Model 3 and the safety of
its occupants. Any damage caused by
using or installing non-approved parts, or by performing non-approved
modifications, is not covered by the
warranty.Warning: Tesla does not accept liability
for death, personal injury or damage that
occurs if you use or install non-approved
accessories or make non-approved
modifications.Accessory Wheels and Tires
If your Model 3 is fitted with Tesla accessory
wheels or tires, the Gross Axle Weight Rating
(GAWR), wheel, tire, and loading information
may be different from the labels shown on the
vehicle. Refer to the relevant following section
for updated information.
Note: If your vehicle is not fitted with Tesla
accessory wheels or tires (it is fitted with the
factory original wheels and tires, including
Tesla genuine replacement parts), refer to the
labels attached to the center door pillar for
the most accurate information for your Model 3.
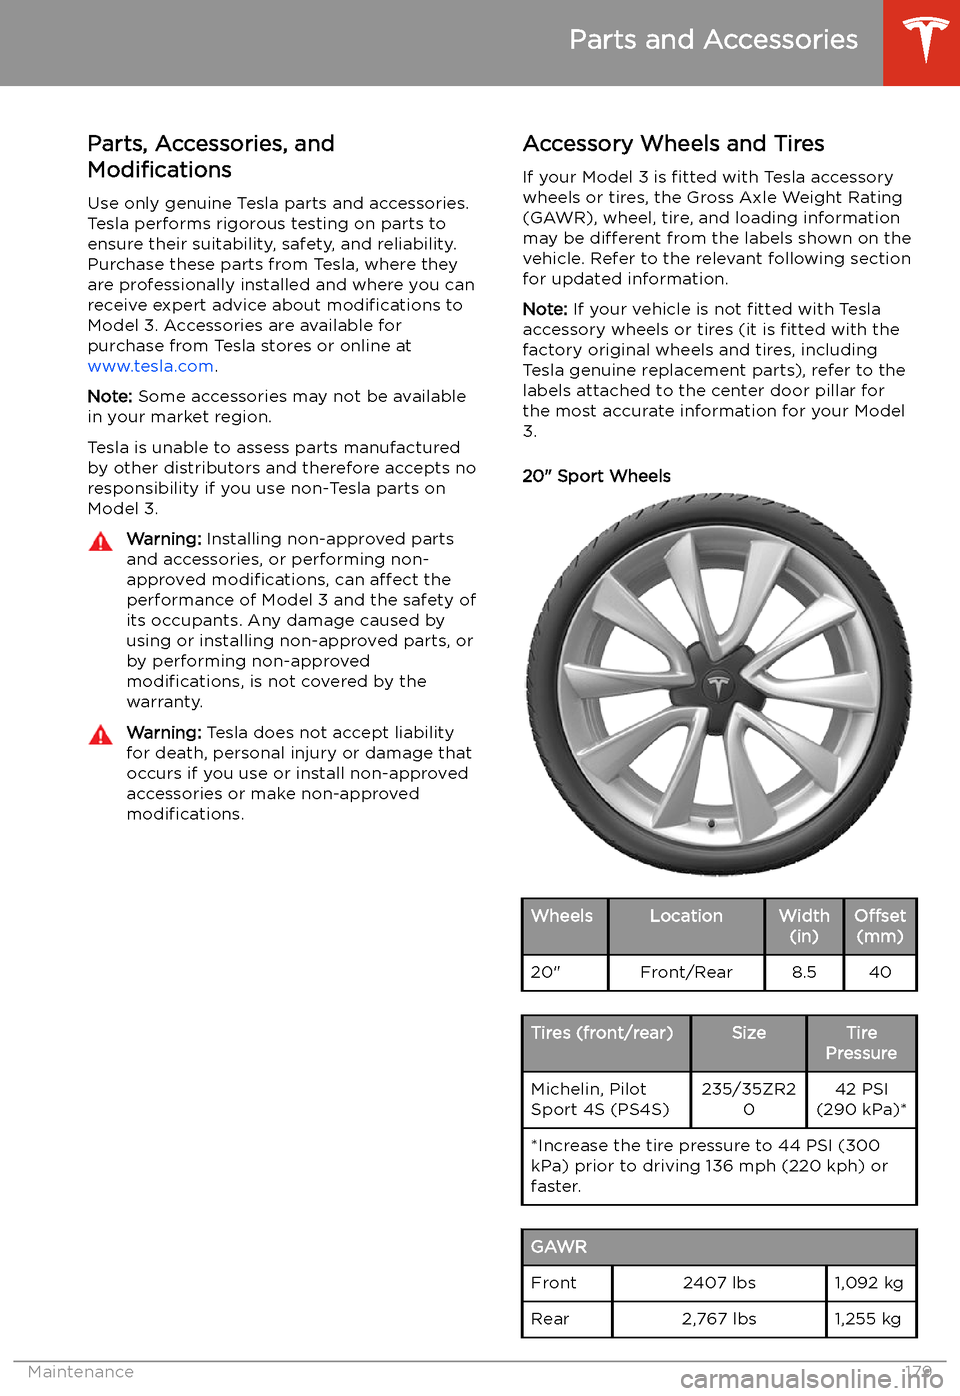
20" Sport WheelsWheelsLocationWidth (in)Offset(mm)20"Front/Rear8.540Tires (front/rear)SizeTire
PressureMichelin, Pilot
Sport 4S (PS4S)235/35ZR2 042 PSI
(290 kPa)**Increase the tire pressure to 44 PSI (300
kPa) prior to driving 136 mph (220 kph) or faster.GAWRFront2407 lbs1,092 kgRear2,767 lbs1,255 kg
Parts and Accessories
Maintenance179