ESP TESLA MODEL 3 2020 Owner's Manuals
[x] Cancel search | Manufacturer: TESLA, Model Year: 2020, Model line: MODEL 3, Model: TESLA MODEL 3 2020Pages: 220, PDF Size: 9.65 MB
Page 21 of 220
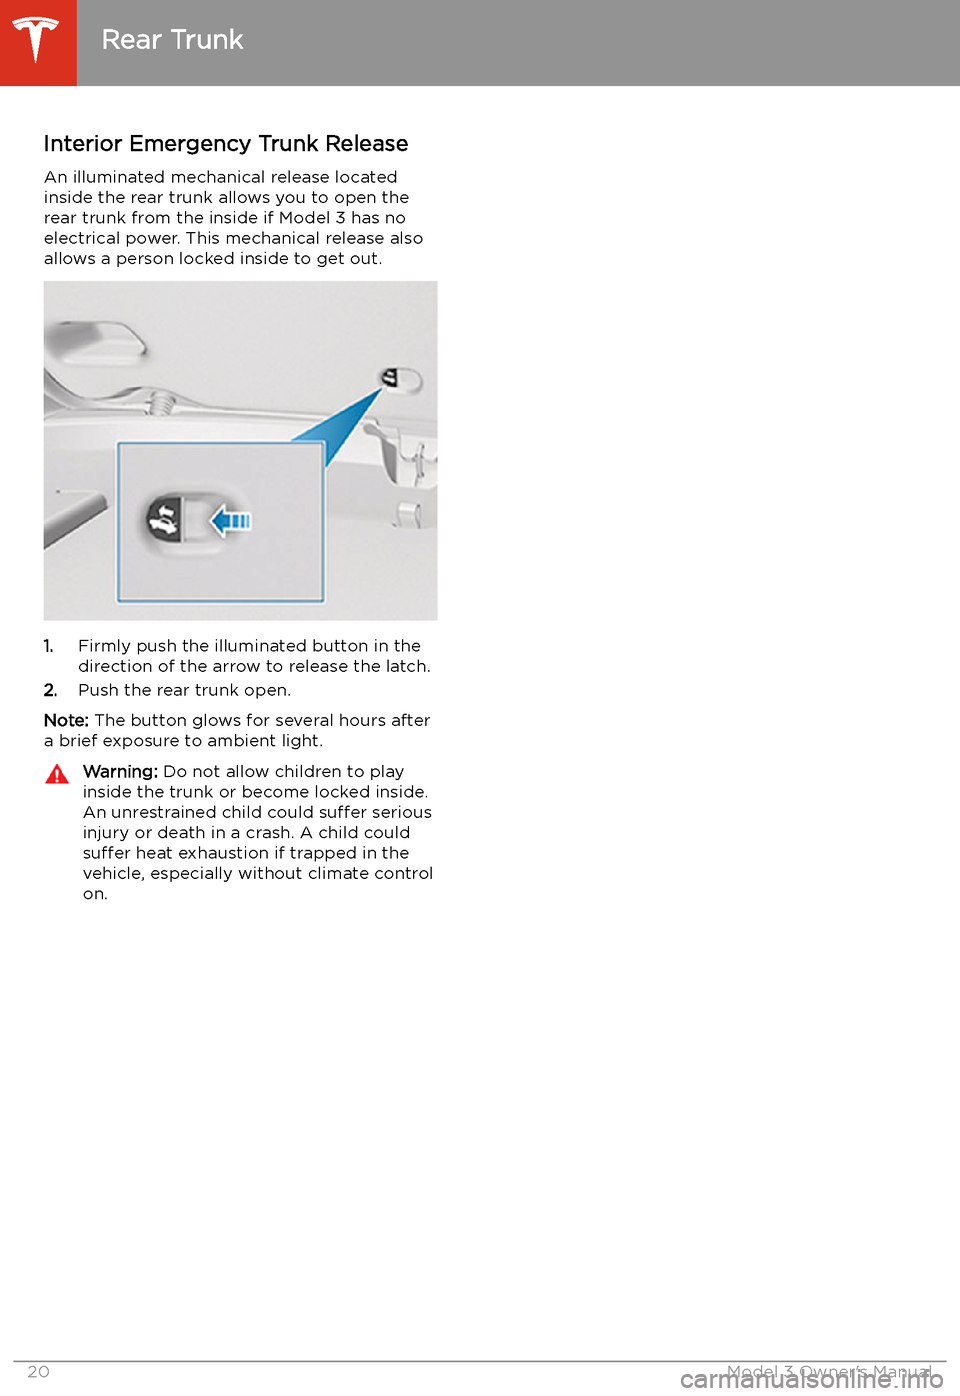
Interior Emergency Trunk ReleaseAn illuminated mechanical release located
inside the rear trunk allows you to open the rear trunk from the inside if Model 3 has no
electrical power. This mechanical release also
allows a person locked inside to get out.
1. Firmly push the illuminated button in the
direction of the arrow to release the latch.
2. Push the rear trunk open.
Note: The button glows for several hours after
a brief exposure to ambient light.
Warning: Do not allow children to play
inside the trunk or become locked inside.
An unrestrained child could suffer serious
injury or death in a crash. A child could
suffer heat exhaustion if trapped in the
vehicle, especially without climate control
on.
Rear Trunk
20Model 3 Owner
Page 37 of 220
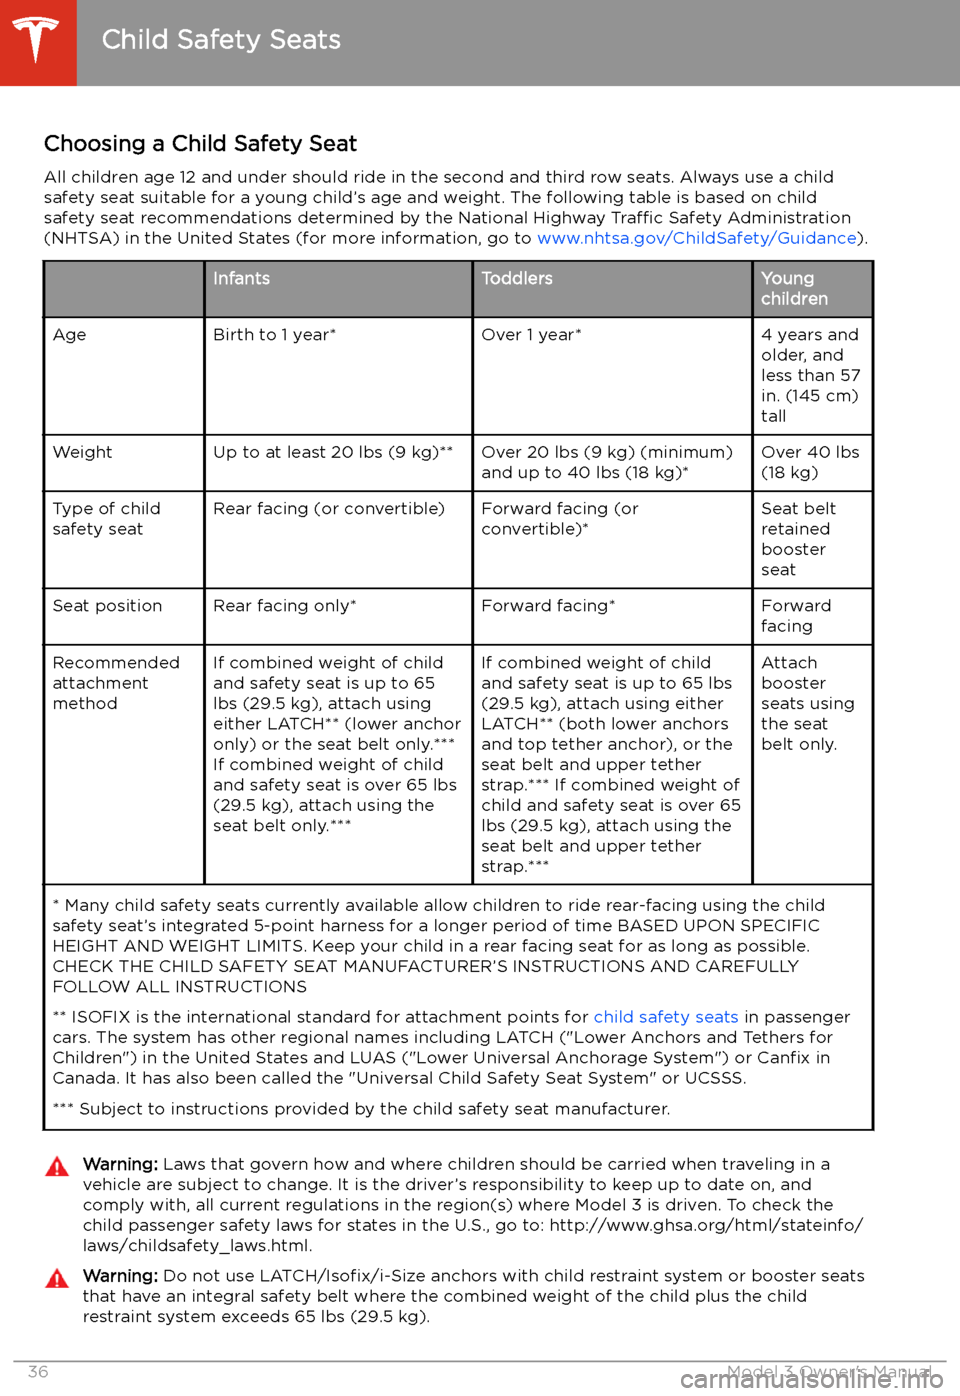
Choosing a Child Safety SeatAll children age 12 and under should ride in the second and third row seats. Always use a child
safety seat suitable for a young child’s age and weight. The following table is based on child
safety seat recommendations determined by the National Highway Traffic Safety Administration
(NHTSA) in the United States (for more information, go to www.nhtsa.gov/ChildSafety/Guidance).InfantsToddlersYoung
childrenAgeBirth to 1 year*Over 1 year*4 years and
older, and
less than 57
in. (145 cm)
tallWeightUp to at least 20 lbs (9 kg)**Over 20 lbs (9 kg) (minimum)
and up to 40 lbs (18 kg)*Over 40 lbs
(18 kg)Type of child
safety seatRear facing (or convertible)Forward facing (or
convertible)*Seat belt
retained
booster
seatSeat positionRear facing only*Forward facing*Forward
facingRecommended
attachment
methodIf combined weight of child
and safety seat is up to 65
lbs (29.5 kg), attach using
either LATCH** (lower anchor
only) or the seat belt only.***
If combined weight of child
and safety seat is over 65 lbs
(29.5 kg), attach using the
seat belt only.***If combined weight of child
and safety seat is up to 65 lbs
(29.5 kg), attach using either
LATCH** (both lower anchors
and top tether anchor), or the
seat belt and upper tether
strap.*** If combined weight of
child and safety seat is over 65
lbs (29.5 kg), attach using the
seat belt and upper tether
strap.***Attach
booster
seats using
the seat
belt only.* Many child safety seats currently available allow children to ride rear-facing using the child
safety seat’s integrated 5-point harness for a longer period of time BASED UPON SPECIFIC
HEIGHT AND WEIGHT LIMITS. Keep your child in a rear facing seat for as long as possible.
CHECK THE CHILD SAFETY SEAT MANUFACTURER’S INSTRUCTIONS AND CAREFULLY
FOLLOW ALL INSTRUCTIONS
** ISOFIX is the international standard for attachment points for child safety seats in passenger
cars. The system has other regional names including LATCH ("Lower Anchors and Tethers for
Children") in the United States and LUAS ("Lower Universal Anchorage System") or Canfix in
Canada. It has also been called the "Universal Child Safety Seat System" or UCSSS.
*** Subject to instructions provided by the child safety seat manufacturer.Warning: Laws that govern how and where children should be carried when traveling in a
vehicle are subject to change. It is the driver’s responsibility to keep up to date on, and
comply with, all current regulations in the region(s) where Model 3 is driven. To check the
child passenger safety laws for states in the U.S., go to: http://www.ghsa.org/html/stateinfo/
laws/childsafety_laws.html.Warning: Do not use LATCH/Isofix/i-Size anchors with child restraint system or booster seats
that have an integral safety belt where the combined weight of the child plus the child restraint system exceeds 65 lbs (29.5 kg).
Child Safety Seats
36Model 3 Owner
Page 56 of 220
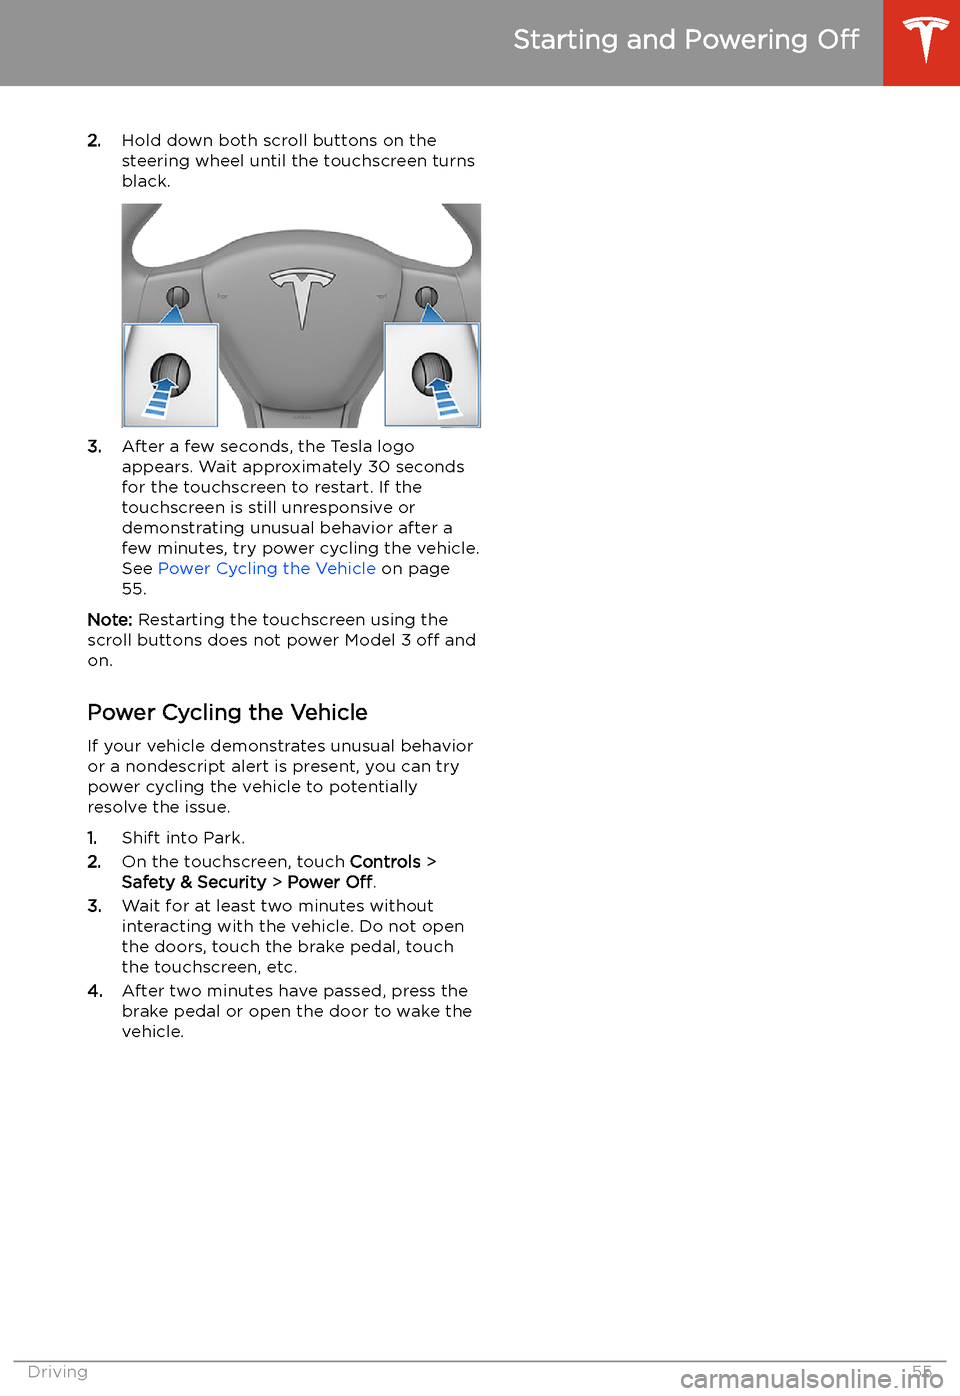
2.Hold down both scroll buttons on the
steering wheel until the touchscreen turns
black.
3. After a few seconds, the Tesla logo
appears. Wait approximately 30 seconds for the touchscreen to restart. If the
touchscreen is still unresponsive or
demonstrating unusual behavior after a
few minutes, try power cycling the vehicle.
See Power Cycling the Vehicle on page
55.
Note: Restarting the touchscreen using the
scroll buttons does not power Model 3 off and
on.
Power Cycling the Vehicle
If your vehicle demonstrates unusual behavior or a nondescript alert is present, you can try
power cycling the vehicle to potentially
resolve the issue.
1. Shift into Park.
2. On the touchscreen, touch Controls >
Safety & Security > Power Off.
3. Wait for at least two minutes without
interacting with the vehicle. Do not open
the doors, touch the brake pedal, touch the touchscreen, etc.
4. After two minutes have passed, press the
brake pedal or open the door to wake the
vehicle.
Starting and Powering Off
Driving55
Page 69 of 220
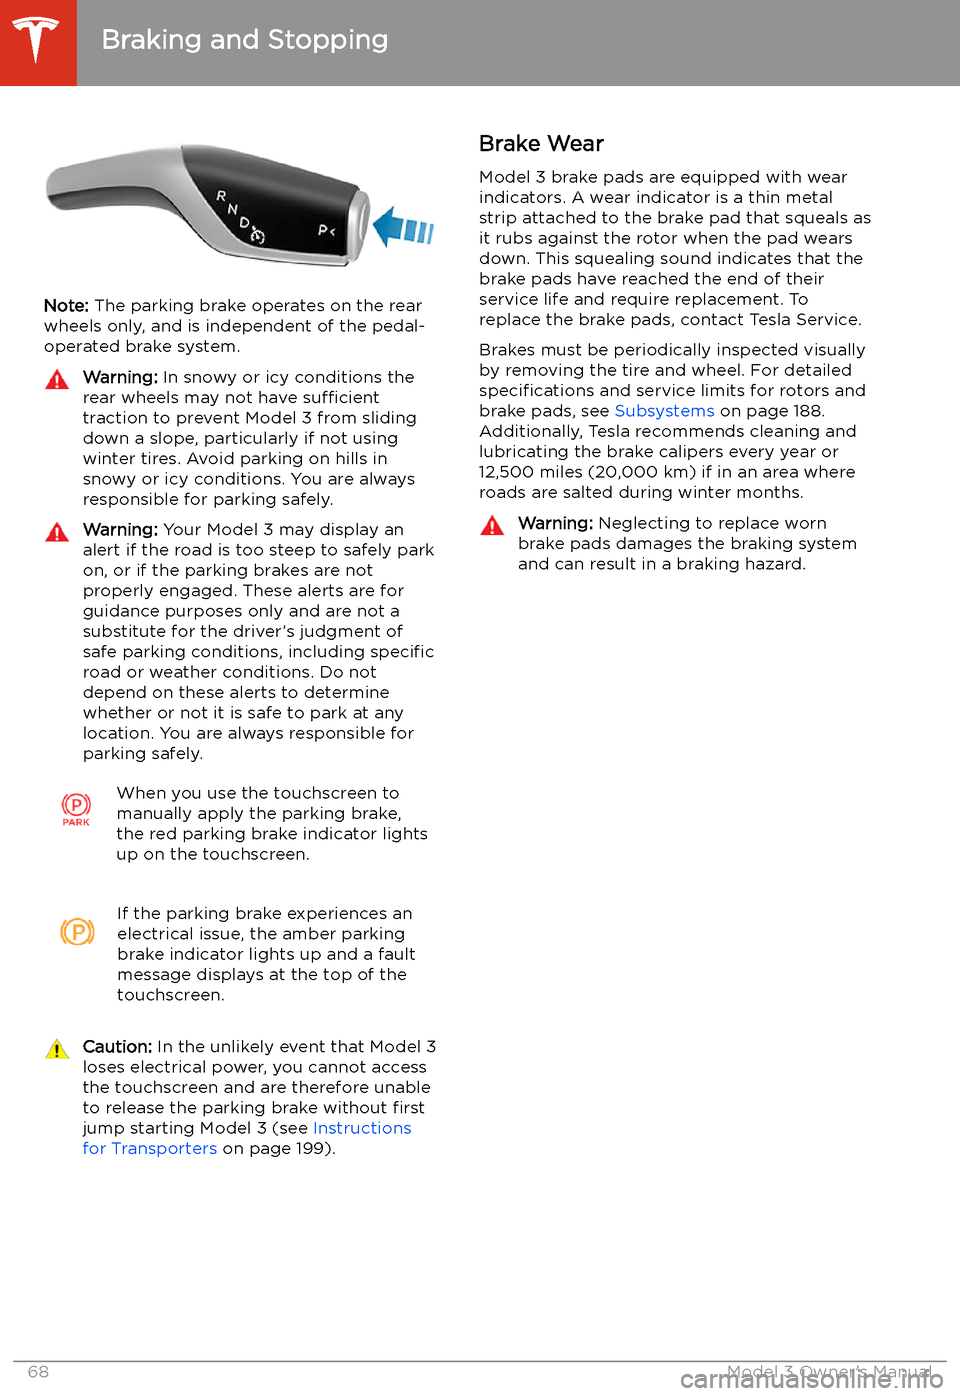
Note: The parking brake operates on the rear
wheels only, and is independent of the pedal-
operated brake system.
Warning: In snowy or icy conditions the
rear wheels may not have sufficient
traction to prevent Model 3 from sliding
down a slope, particularly if not using winter tires. Avoid parking on hills in
snowy or icy conditions. You are always responsible for parking safely.Warning: Your Model 3 may display an
alert if the road is too steep to safely park
on, or if the parking brakes are not
properly engaged. These alerts are for
guidance purposes only and are not a
substitute for the driver’s judgment of safe parking conditions, including specific
road or weather conditions. Do not
depend on these alerts to determine
whether or not it is safe to park at any location. You are always responsible for
parking safely.When you use the touchscreen to
manually apply the parking brake,
the red parking brake indicator lights
up on the touchscreen.If the parking brake experiences an
electrical issue, the amber parking brake indicator lights up and a fault
message displays at the top of the
touchscreen.Caution: In the unlikely event that Model 3
loses electrical power, you cannot access
the touchscreen and are therefore unable to release the parking brake without first
jump starting Model 3 (see Instructions
for Transporters on page 199).Brake Wear
Model 3 brake pads are equipped with wear indicators. A wear indicator is a thin metal
strip attached to the brake pad that squeals as
it rubs against the rotor when the pad wears
down. This squealing sound indicates that the
brake pads have reached the end of their service life and require replacement. To
replace the brake pads, contact Tesla Service.
Brakes must be periodically inspected visually by removing the tire and wheel. For detailed
specifications and service limits for rotors and
brake pads, see Subsystems on page 188.
Additionally, Tesla recommends cleaning and
lubricating the brake calipers every year or
12,500 miles (20,000 km) if in an area where
roads are salted during winter months.Warning: Neglecting to replace worn
brake pads damages the braking system
and can result in a braking hazard.
Braking and Stopping
68Model 3 Owner
Page 109 of 220
Lane Assist
The Autopilot cameras and ultrasonic sensors
monitor the markers on the lane you are
driving in as well as the areas surrounding Model 3 for the presence of vehicles or other
objects.
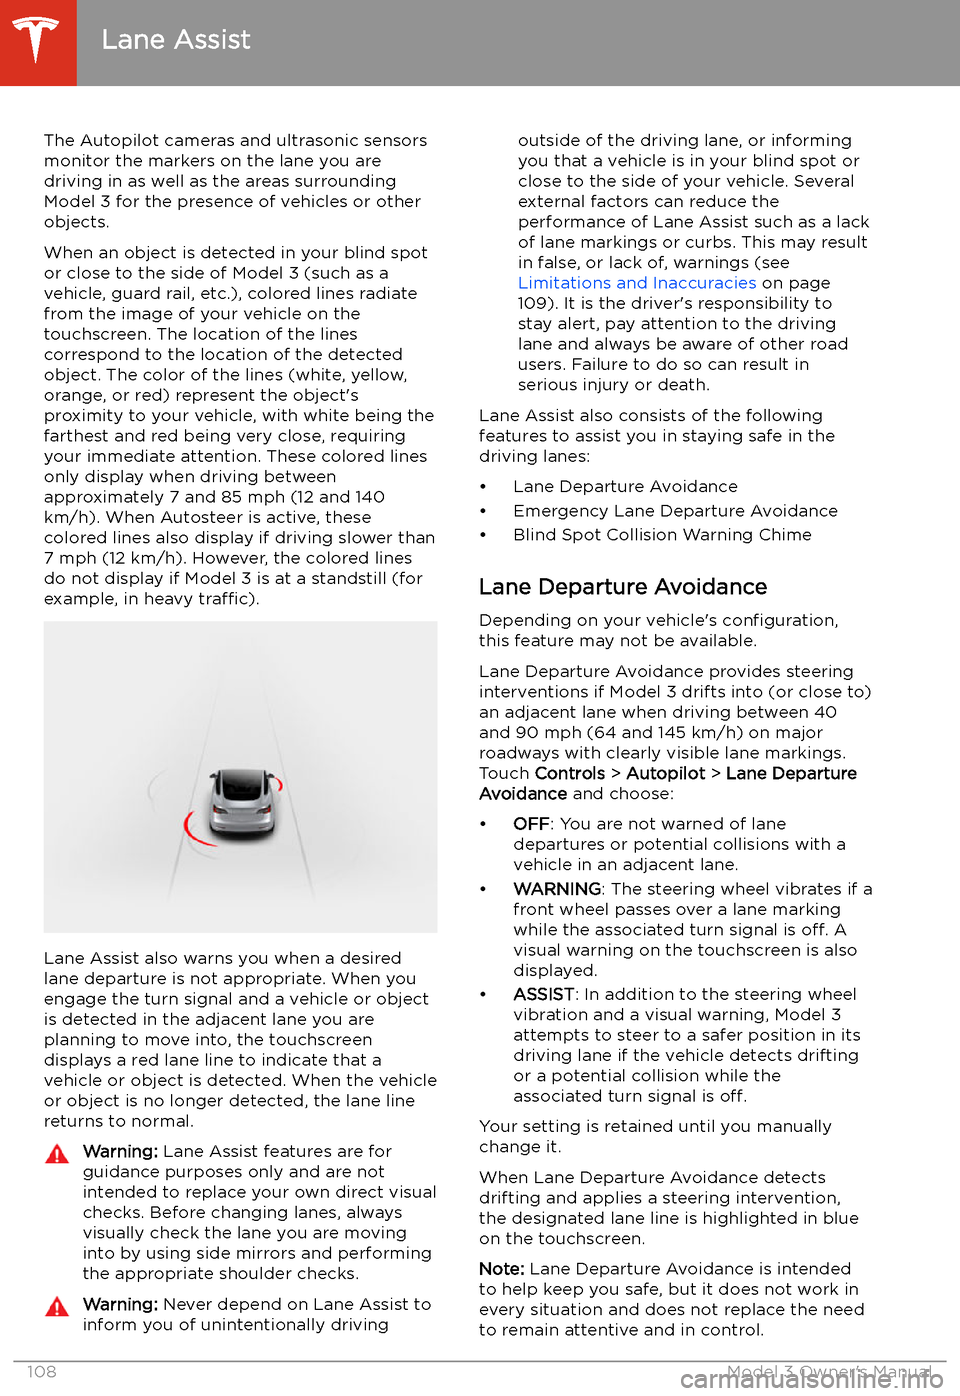
When an object is detected in your blind spot
or close to the side of Model 3 (such as a
vehicle, guard rail, etc.), colored lines radiate
from the image of your vehicle on the
touchscreen. The location of the lines
correspond to the location of the detected object. The color of the lines (white, yellow,
orange, or red) represent the object
Page 128 of 220
Operating Seat Heaters
To control the front seat heaters for the driver
and passenger, touch the corresponding
control on the main climate control area at the
bottom of the touchscreen. To control the rear
seat heaters (if equipped) or access duplicate
controls for the front seat heaters, touch the
fan icon, then touch the seat heater icon
followed by the seat for which you want to
adjust heating. Seat heaters operate at three
setting levels from 3 (highest) to 1 (lowest).
When operating, the associated seat icon displays twisting lines that turn red to indicatethe setting level. You can touch All Off to turn
off all seat heaters simultaneously.
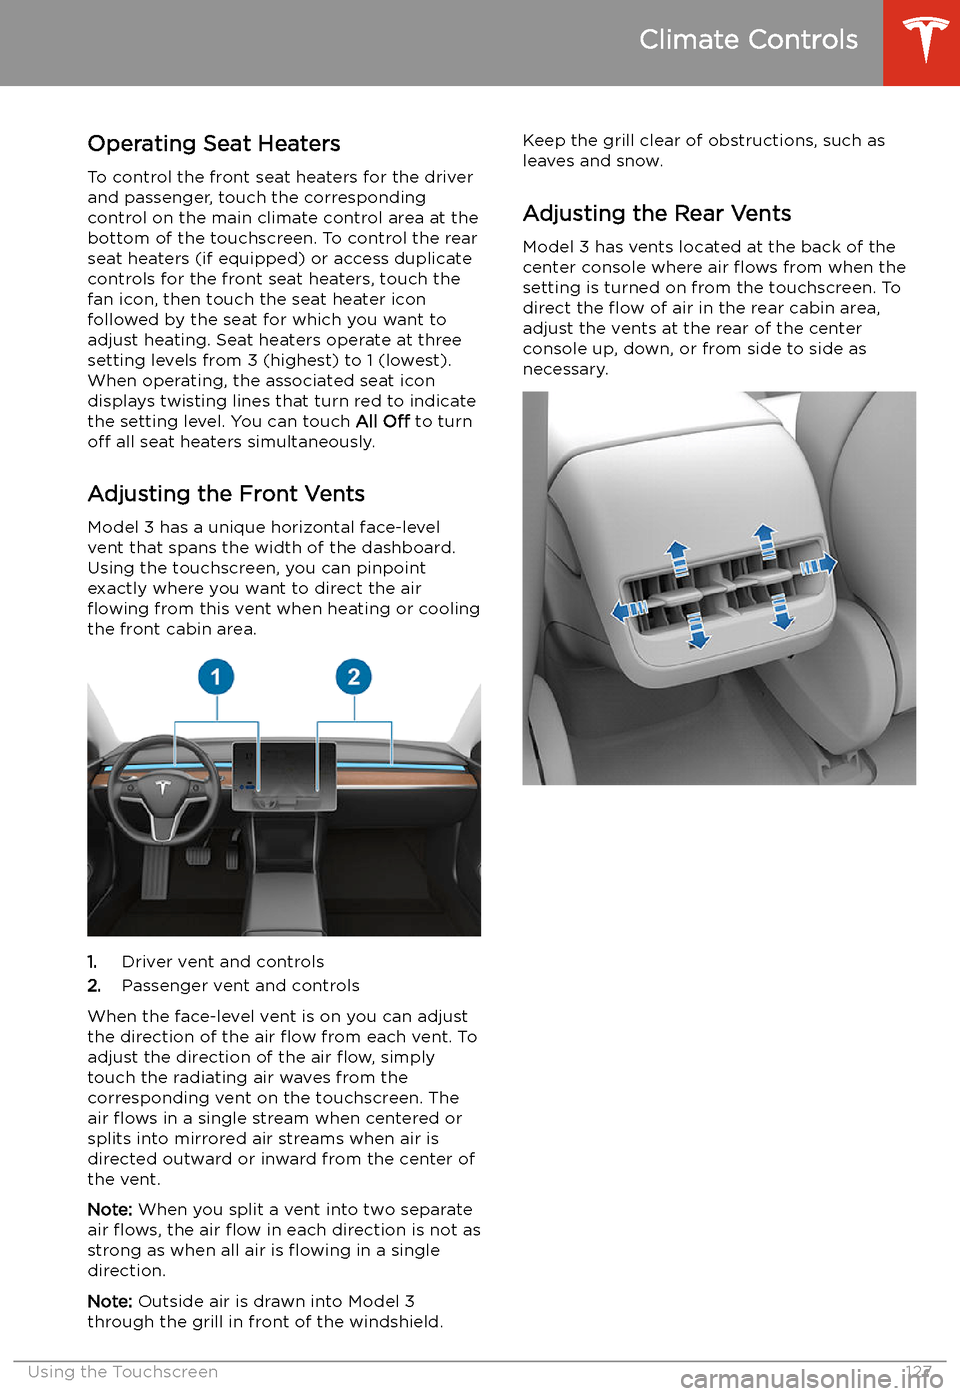
Adjusting the Front Vents Model 3 has a unique horizontal face-level
vent that spans the width of the dashboard.
Using the touchscreen, you can pinpoint
exactly where you want to direct the air
Page 132 of 220
Increase or decrease the volume of
spoken navigation instructions by
touching - or +, respectively.
Decreasing all the way to the left
mutes the instructions. You can
also mute navigation instructions
when a navigation route is active
by touching the volume icon on the
turn-by-turn direction list.
Customize how the navigation
system works by adjusting these settings (the available settings vary
depending on your market region
and vehicle configuration):
Page 149 of 220
Once programmed, you can operate the
device by touching its corresponding
HomeLink icon on the touchscreen
Page 151 of 220
Connecting to Wi-Fi
Wi-Fi is available as a data connection method and is often faster than cellular data networks.
Connecting to Wi-Fi is especially useful in areas with limited or no cellular connectivity.
To ensure fast, reliable delivery of software
and map updates, Tesla recommends leaving your vehicle connected to a Wi-Fi network
whenever possible (for example, if parked in
your garage overnight).
To connect to a Wi-Fi network:
1. Touch the cellular icon (usually LTE or 3G)
on the top corner of your touchscreen.
Model 3 will start scanning and display the
detected Wi-Fi networks that are within
range.
2. Select the Wi-Fi network you want to use,
enter the password (if necessary), then
touch Confirm .
3. Your vehicle connects to the Wi-Fi
network and will automatically connect to it whenever the network is within range.
You can also connect to a hidden network that
isn
Page 154 of 220
Charging
Electric Vehicle Components
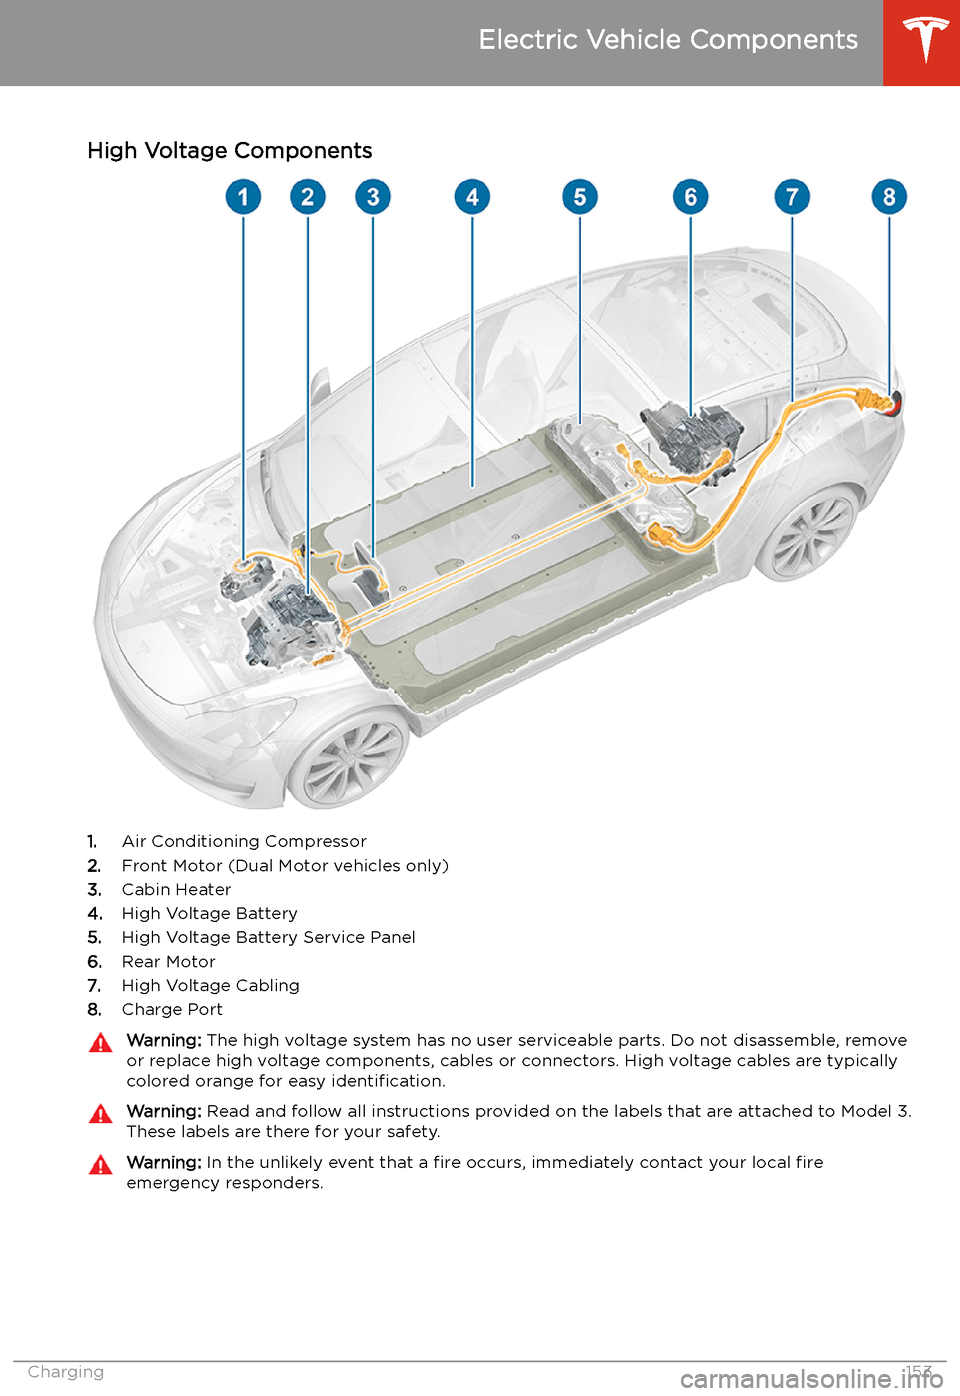
High Voltage Components
1. Air Conditioning Compressor
2. Front Motor (Dual Motor vehicles only)
3. Cabin Heater
4. High Voltage Battery
5. High Voltage Battery Service Panel
6. Rear Motor
7. High Voltage Cabling
8. Charge Port
Warning:
The high voltage system has no user serviceable parts. Do not disassemble, remove
or replace high voltage components, cables or connectors. High voltage cables are typically colored orange for easy identification.Warning: Read and follow all instructions provided on the labels that are attached to Model 3.
These labels are there for your safety.Warning: In the unlikely event that a fire occurs, immediately contact your local fire
emergency responders.
Electric Vehicle Components
Charging153