service TESLA MODEL 3 2021 Owner´s Manual
[x] Cancel search | Manufacturer: TESLA, Model Year: 2021, Model line: MODEL 3, Model: TESLA MODEL 3 2021Pages: 248, PDF Size: 7.76 MB
Page 187 of 248
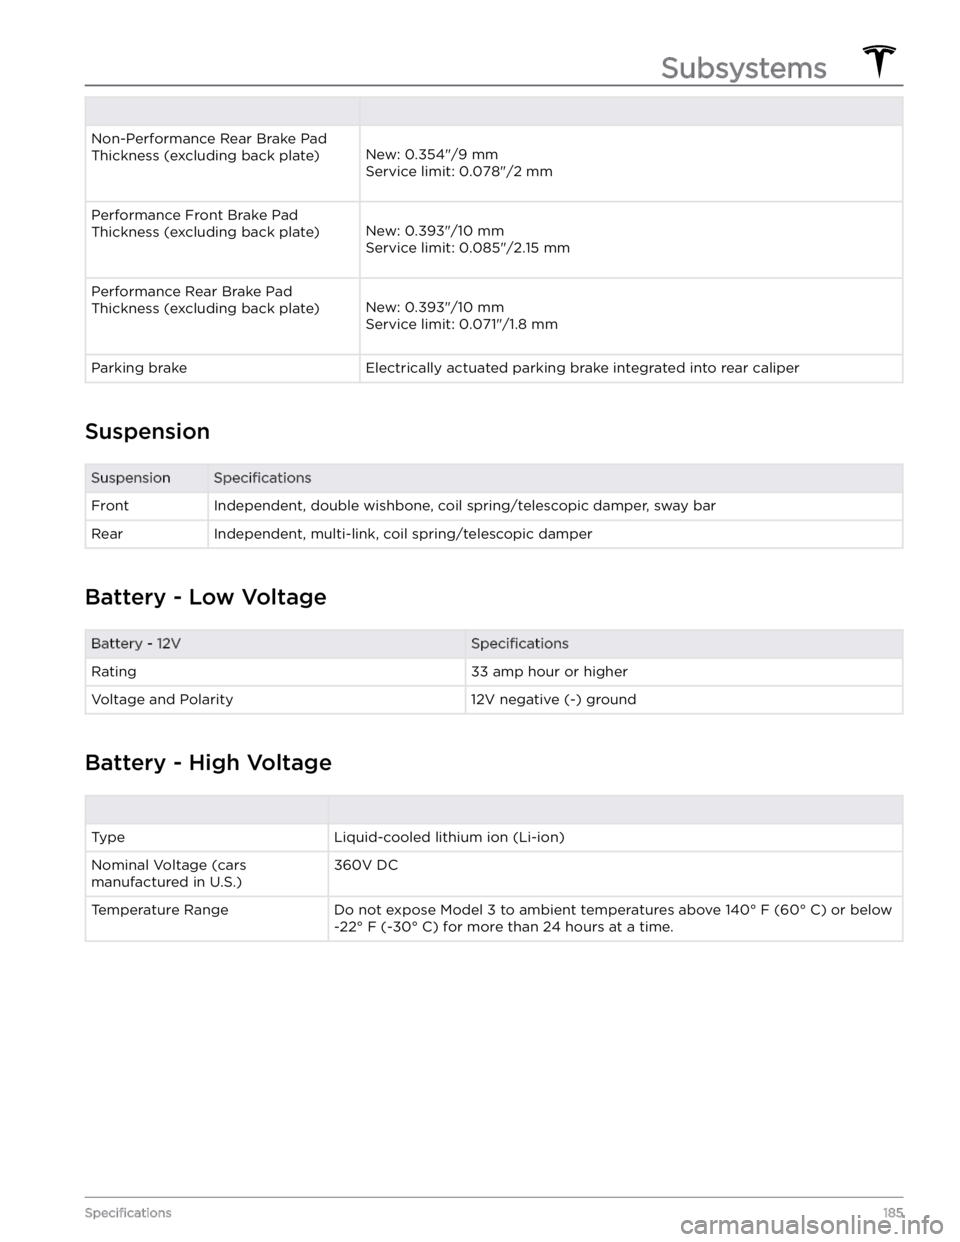
Non-Performance Rear Brake Pad
Thickness (excluding back plate)
New: 0.354"/9 mm
Service limit: 0.078"/2 mm
Performance Front Brake Pad
Thickness (excluding back plate)
New: 0.393"/10 mm
Service limit: 0.085"/2.15 mm
Performance Rear Brake Pad
Thickness (excluding back plate)
New: 0.393"/10 mm
Service limit: 0.071"/1.8 mm
Parking brakeElectrically actuated parking brake integrated into rear caliper
Suspension
SuspensionSpecificationsFrontIndependent, double wishbone, coil spring/telescopic damper, sway barRearIndependent, multi-link, coil spring/telescopic damper
Battery - Low Voltage
Battery - 12VSpecificationsRating33 amp hour or higherVoltage and Polarity12V negative (-) ground
Battery - High Voltage
TypeLiquid-cooled lithium ion (Li-ion)Nominal Voltage (cars
manufactured in U.S.)360V DCTemperature RangeDo not expose Model 3 to ambient temperatures above 140
Page 195 of 248

Tesla Roadside Assistance is available to you 24 hours a day, 365 days a year, for the duration of your warranty period. Tesla Roadside Assistance is also available to speak with roadside service professionals to answer any
questions and explain the proper procedure for transporting your vehicle.
When contacting Tesla Roadside Assistance, please provide:
Page 196 of 248
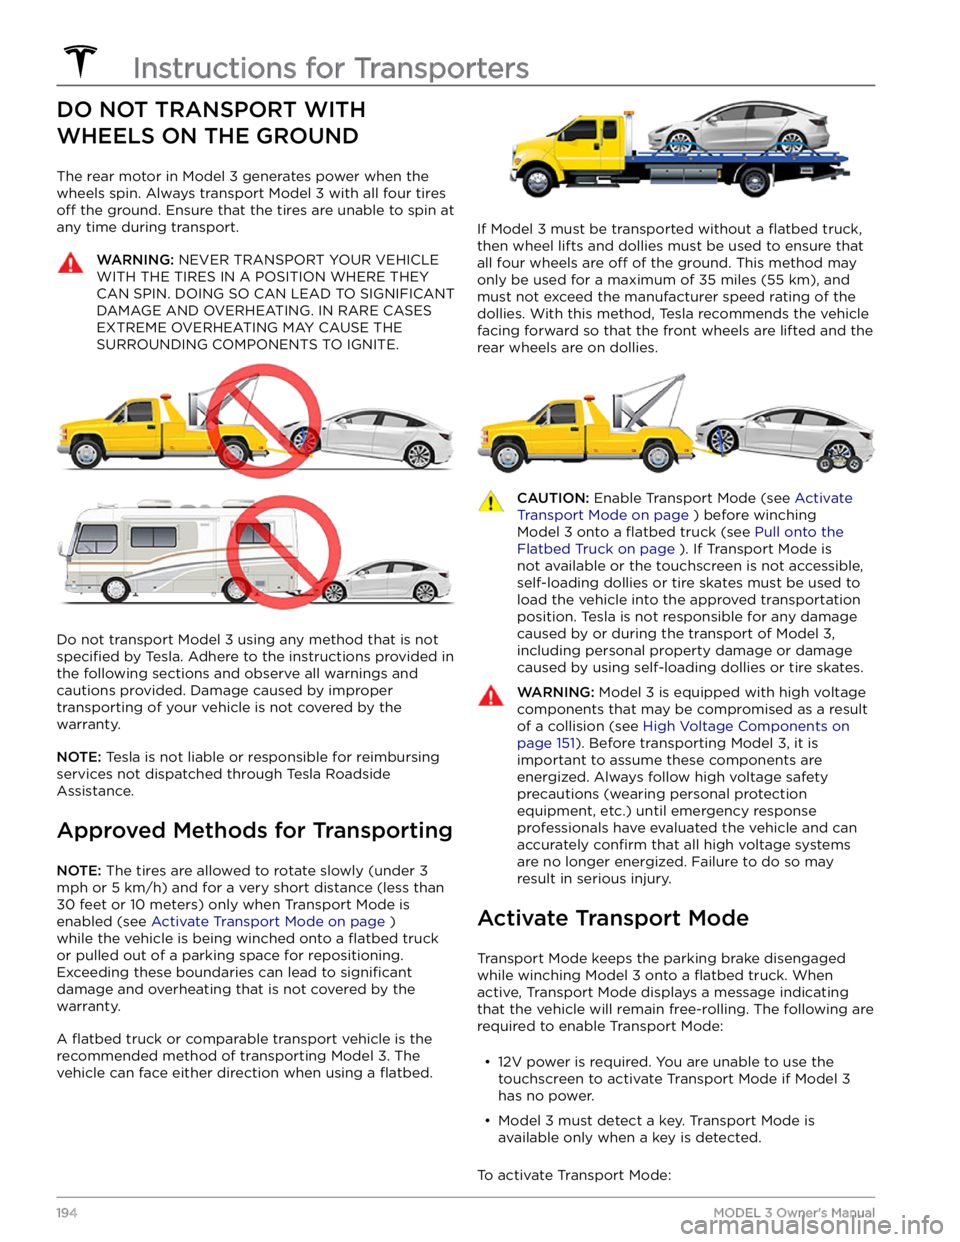
DO NOT TRANSPORT WITH
WHEELS ON THE GROUND
The rear motor in Model 3 generates power when the
wheels spin. Always transport
Model 3 with all four tires
off the ground. Ensure that the tires are unable to spin at
any time during transport.
WARNING: NEVER TRANSPORT YOUR VEHICLE
WITH THE TIRES IN A POSITION WHERE THEY
CAN SPIN. DOING SO CAN LEAD TO SIGNIFICANT
DAMAGE AND OVERHEATING. IN RARE CASES
EXTREME OVERHEATING MAY CAUSE THE
SURROUNDING COMPONENTS TO IGNITE.
Do not transport Model 3 using any method that is not
specified by Tesla. Adhere to the instructions provided in
the following sections and observe all warnings and
cautions provided. Damage caused by improper
transporting of your vehicle is not covered by the
warranty.
NOTE: Tesla is not liable or responsible for reimbursing
services not dispatched through Tesla Roadside Assistance.
Approved Methods for Transporting
NOTE: The tires are allowed to rotate slowly (under 3
mph or 5 km/h) and for a very short distance (less than
30 feet or 10 meters) only when Transport Mode is
enabled (see
Activate Transport Mode on page )
while the vehicle is being winched onto a
flatbed truck
or pulled out of a parking space for repositioning.
Exceeding these boundaries can lead to
significant
damage and overheating that is not covered by the
warranty.
A flatbed truck or comparable transport vehicle is the
recommended method of transporting
Model 3. The
vehicle can face either direction when using a
flatbed.
If Model 3 must be transported without a flatbed truck,
then wheel lifts and dollies must be used to ensure that
all four wheels are
off of the ground. This method may
only be used for a maximum of
35 miles (55 km), and
must not exceed the manufacturer speed rating of the
dollies. With this method, Tesla recommends the vehicle
facing forward so that the front wheels are lifted and the rear wheels are on dollies.
CAUTION: Enable Transport Mode (see Activate
Transport Mode on page ) before winching
Model 3 onto a flatbed truck (see Pull onto the
Flatbed Truck on page ). If Transport Mode is
not available or the touchscreen is not accessible,
self-loading dollies or tire skates must be used to
load the vehicle into the approved transportation
position. Tesla is not responsible for any damage
caused by or during the transport of Model 3,
including personal property damage or damage
caused by using self-loading dollies or tire skates.
WARNING: Model 3 is equipped with high voltage
components that may be compromised as a result
of a collision (see High Voltage Components on
page 151). Before transporting Model 3, it is
important to assume these components are
energized. Always follow high voltage safety
precautions (wearing personal protection
equipment, etc.) until emergency response
professionals have evaluated the vehicle and can
accurately confirm that all high voltage systems
are no longer energized. Failure to do so may
result in serious injury.
Activate Transport Mode
Transport Mode keeps the parking brake disengaged
while winching
Model 3 onto a flatbed truck. When
active, Transport Mode displays a message indicating that the vehicle will remain free-rolling. The following are
required to enable Transport Mode:
Page 197 of 248
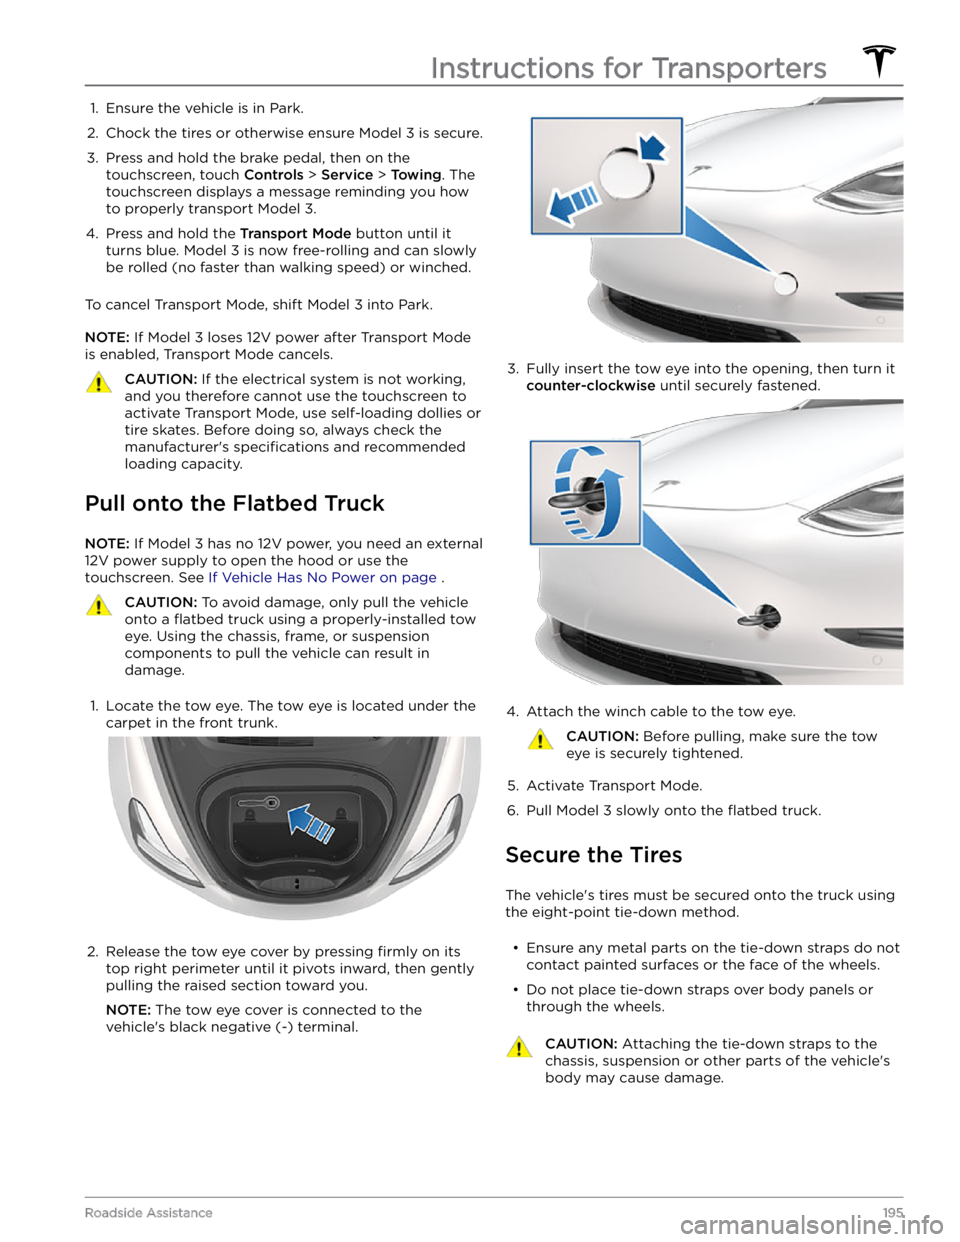
1. Ensure the vehicle is in Park.2.
Chock the tires or otherwise ensure Model 3 is secure.
3.
Press and hold the brake pedal, then on the touchscreen, touch
Controls > Service > Towing. The
touchscreen displays a message reminding you how
to properly transport
Model 3.
4.
Press and hold the Transport Mode button until it
turns blue.
Model 3 is now free-rolling and can slowly
be rolled (no faster than walking speed) or winched.
To cancel Transport Mode, shift Model 3 into Park.
NOTE: If Model 3 loses 12V power after Transport Mode
is enabled, Transport Mode cancels.
CAUTION: If the electrical system is not working,
and you therefore cannot use the touchscreen to
activate Transport Mode, use self-loading dollies or
tire skates. Before doing so, always check the
manufacturer
Page 199 of 248
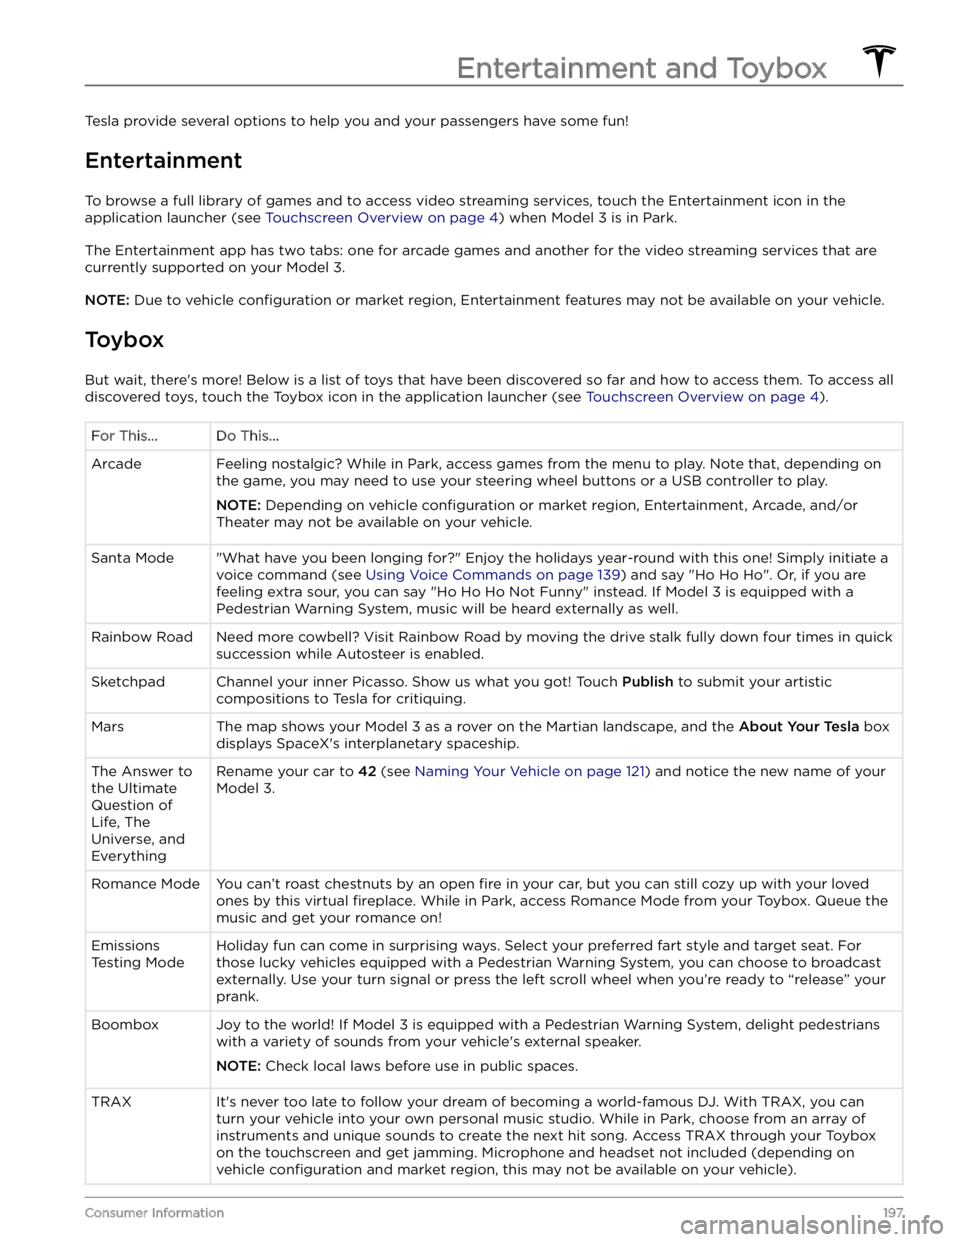
Tesla provide several options to help you and your passengers have some fun!
Entertainment
To browse a full library of games and to access video streaming services, touch the Entertainment icon in the
application launcher (see
Touchscreen Overview on page 4) when Model 3 is in Park.
The Entertainment app has two tabs: one for arcade games and another for the video streaming services that are
currently supported on your
Model 3.
NOTE: Due to vehicle configuration or market region, Entertainment features may not be available on your vehicle.
Toybox
But wait, there
Page 201 of 248
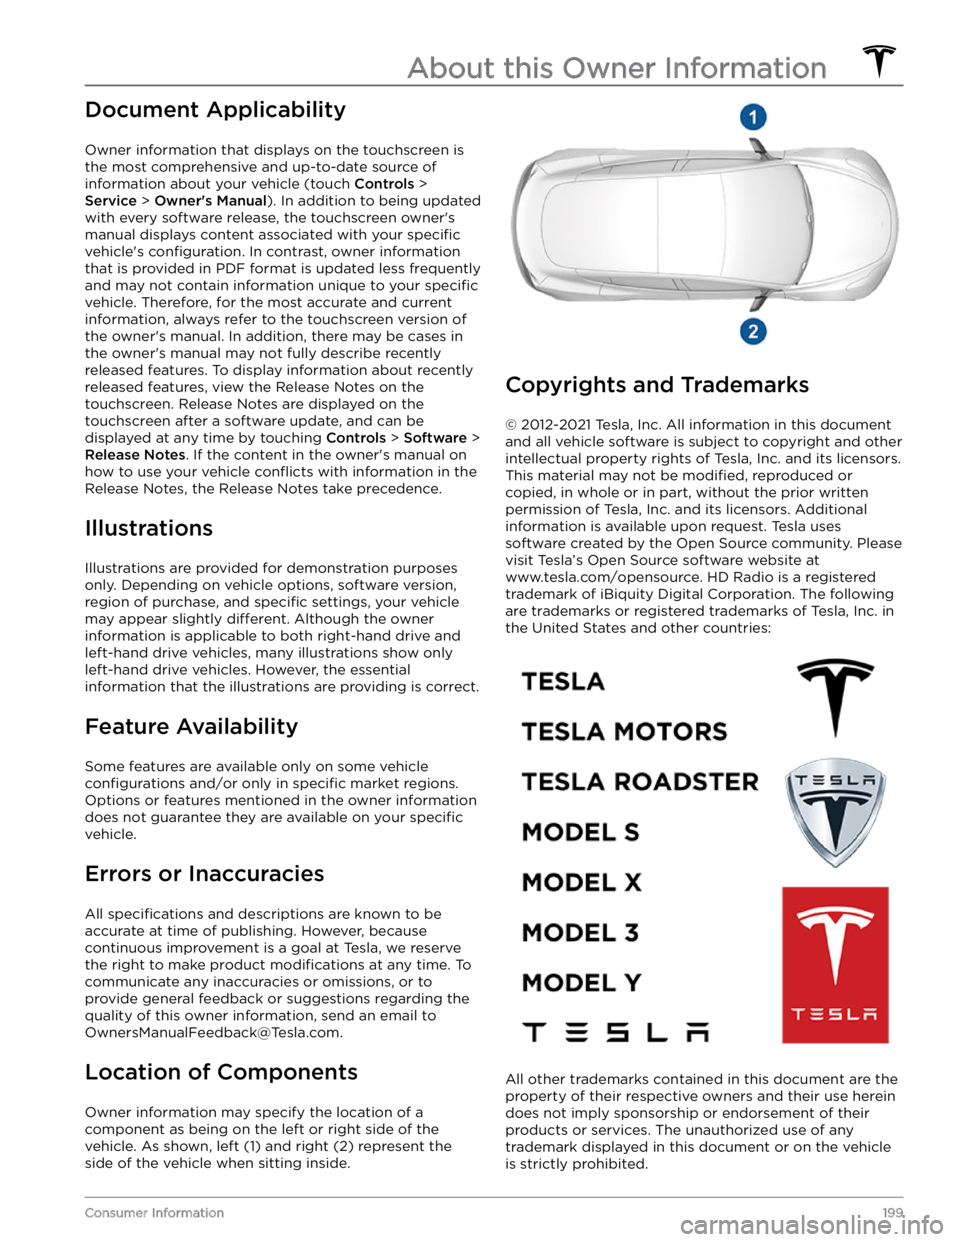
Document Applicability
Owner information that displays on the touchscreen is the most comprehensive and up-to-date source of information about your vehicle (touch
Controls >
Service > Owner
Page 209 of 248

This is often a temporary issue that will clear up when condensation evaporates or a particular environmental
condition is no longer present.
If the alert does not clear by the end of your drive, inspect and clean the front camera area at the top center of the
windshield before your next planned drive. Check the camera surface for condensation, dirt, or other debris and
attempt to clear any obstruction. See the
About Autopilot on page 78 sections “How It Works” and “Cleaning
Cameras and Sensors” for more on front camera location and tips for careful cleaning.
Although condensation on the inside of the front camera enclosure cannot be wiped clean, you can usually clear it
quicker by following these steps:
1.
Pre-condition the cabin with the temperature set to High and A/C turned ON.
2.
Turn on the front windshield defroster.
Once all front cameras regain adequate visibility, the alert will clear and both Traffic-Aware Cruise Control and
Autosteer should again be available.
If this alert persists throughout subsequent drives but no front camera obstruction is visible, schedule service at your earliest convenience. Your vehicle is OK to drive in the meantime.
(APP_w224)
Cruise control unavailable
Continue driving to allow cameras to calibrate
Traffic-Aware Cruise Control and Autosteer are unavailable because the cameras on your vehicle are not fully
calibrated. Continue to your destination. Your vehicle is OK to drive.
Traffic-Aware Cruise Control and Autosteer will remain unavailable until camera calibration is complete.
Your vehicle must maneuver with great precision when features like Traffic-Aware Cruise Control and Autosteer are
active. Before these features can be used for the
first time, the cameras must complete an initial self-calibration.
Occasionally, one or more cameras can become uncalibrated.
For your convenience, a calibration progress indicator is displayed on the touchscreen. Calibration typically completes after your vehicle has driven 20-25 miles (32-40 km), but the distance varies depending on road and
environmental conditions. For example, driving on a straight road with highly visible lane markings helps the cameras calibrate quicker.
See Drive to Calibrate Cameras on page 79 for more information.
When calibration is complete, Traffic-Aware Cruise Control and Autosteer should be available.
If the alert persists and camera calibration has not completed after your vehicle has driven 100 miles (160 km) or
more, or
Traffic-Aware Cruise Control and Autosteer remain unavailable despite successful camera calibration,
schedule service at your earliest convenience. Your vehicle is OK to drive in the meantime.
(APP_w304)
Camera blocked or blinded
Clean camera or wait for it to regain visibility
One or more of the vehicle cameras is blocked or blinded due to external conditions. When the cameras cannot
provide accurate visual information, some or all Autopilot features may be temporarily unavailable.
Cameras can be blocked or blinded due to many factors, including:
Page 210 of 248

Continue to your destination. Your vehicle is OK to drive.
This is often a temporary issue that will be resolved when condensation evaporates or a particular environmental
condition is no longer present.
If the alert does not clear by the time you reach your destination, check camera surfaces for condensation, dirt, or
other debris.
For camera locations, see About Autopilot on page 78.
Clean the cameras as necessary before your next planned drive. For recommended cleaning procedures, see
Cleaning Cameras and Sensors on page 80.
If you continue to see this alert after cleaning the cameras, check the inside surfaces of the door pillar camera
enclosures for condensation.
Although condensation inside the camera enclosures cannot be wiped clean, you can usually clear it faster by
following these steps:
1.
Pre-condition the cabin with the temperature set to High and A/C turned ON.
2.
Turn on the front windshield defroster.
3.
Direct the air vents toward the door pillar cameras.
For more information on clearing condensation from camera enclosures, see Cleaning Cameras and Sensors on page
80.
If the alert does not clear by the end of your next planned drive, despite cleaning the indicated camera(s) and
following recommended steps to clear condensation, schedule service at your next convenient opportunity. Your vehicle is OK to drive in the meantime.
(CC_a001)
Unable to charge - Insu
Page 211 of 248

(CC_a003)
Unable to charge - Wall Connector GFCI tripped
Disconnect and retry or use different equipment
What this alert means:
Ground fault. Current is leaking through an unsafe path. Possible Line to ground or Neutral to ground fault.
What to do:
Try again by disconnecting the Wall Connector from the vehicle and reconnecting. If the problem persists, turn OFF
the circuit breaker servicing the Wall Connector, wait 10 seconds, turn the circuit breaker ON again, then try
reconnecting the Wall Connector to the vehicle. If the problem persists, contact Tesla.
(CC_a004)
Unable to charge - Wall Connector issue
Wall Connector needs service
What this alert means:
Wall Connector hardware issue. Possible issues include:
1.
Contactor not working
2.
Self-test of internal ground fault monitoring circuit failed
3.
Thermal sensor disconnected
4.
Other hardware component issues
What to do:
An internal issue was detected by the Wall Connector.
1.
Try charging again by disconnecting the Wall Connector from the vehicle and reconnecting.
2.
If the issue persists, turn OFF the circuit breaker for the Wall Connector, wait 10 seconds, and turn the circuit
breaker ON again. Then try reconnecting the Wall Connector to the vehicle.
3.
If the issue persists, check for loose connections.
a.
Make sure there is no power to the Wall Connector.
b.
Remove the face plate and inspect the wiring terminals for any loose connections.
c.
Contact an electrician if necessary to make sure all wires are properly connected and torqued according to the
instructions in the Wall Connector Installation Manual.
4.
Once all connections have been checked and made secure, restore power to the Wall Connector and try charging
again by reconnecting to the vehicle.
5.
If the issue persists, the Wall Connector needs service. Schedule a service appointment through your Mobile App.
(CC_a005)
Unable to charge - Wall Connector GFCI tripped
Disconnect and retry or use different equipment
What this alert means:
Ground fault. Current is leaking through an unsafe path. Possible Line to ground or Neutral to ground fault.
What to do:
Troubleshooting Alerts
209Consumer Information
Page 213 of 248

(CC_a010)
Unable to charge - Wall Connector issue
Wall Connector needs service
What this alert means:
Wall Connector hardware issue. Possible issues include:
1.
Contactor not working
2.
Self-test of internal ground fault monitoring circuit failed
3.
Thermal sensor disconnected
4.
Other hardware component issues
What to do:
An internal issue was detected by the Wall Connector.
1.
Try charging again by disconnecting the Wall Connector from the vehicle and reconnecting.
2.
If the issue persists, turn OFF the circuit breaker for the Wall Connector, wait 10 seconds, and turn the circuit
breaker ON again. Then try reconnecting the Wall Connector to the vehicle.
3.
If the issue persists, check for loose connections.
a.
Make sure there is no power to the Wall Connector.
b.
Remove the face plate and inspect the wiring terminals for any loose connections.
c.
Contact an electrician if necessary to make sure all wires are properly connected and torqued according to the
instructions in the Wall Connector Installation Manual.
4.
Once all connections have been checked and made secure, restore power to the Wall Connector and try charging
again by reconnecting to the vehicle.
5.
If the issue persists, the Wall Connector needs service. Schedule a service appointment through your Mobile App.
(CC_a011)
Unable to charge - Wall Connector too hot
Let Wall Connector cool and try again
What this alert means:
Over temperature protection (latchoff).
What to do:
Make sure the Wall Connector is not covered by anything and that there is no heat source nearby. If the problem
persists in normal ambient temperatures (under 100