ESP TESLA MODEL 3 2021 Owner´s Manual
[x] Cancel search | Manufacturer: TESLA, Model Year: 2021, Model line: MODEL 3, Model: TESLA MODEL 3 2021Pages: 248, PDF Size: 7.76 MB
Page 17 of 248
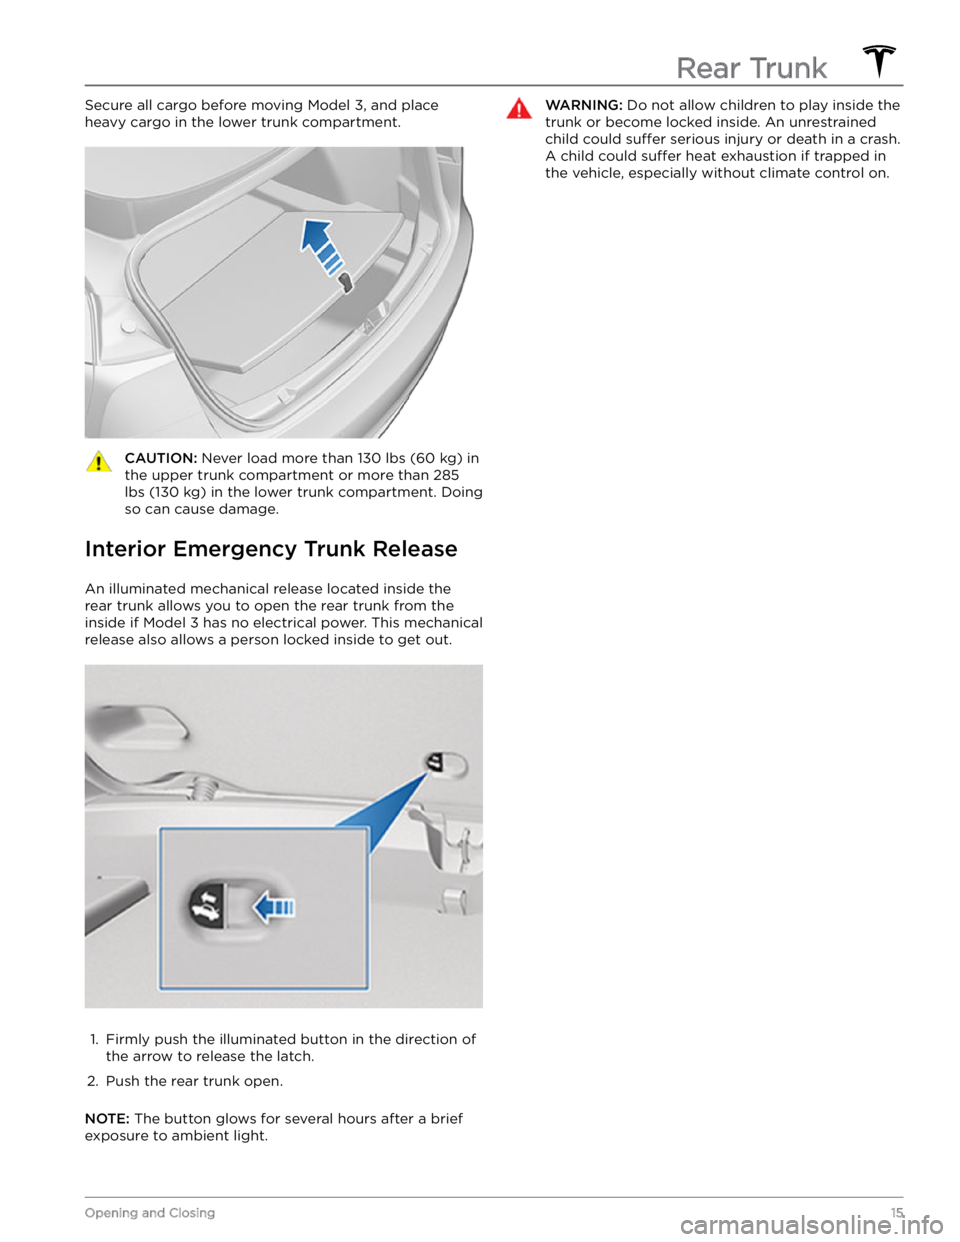
Secure all cargo before moving Model 3, and place
heavy cargo in the lower trunk compartment.CAUTION: Never load more than 130 lbs (60 kg) in
the upper trunk compartment or more than 285
lbs (130 kg) in the lower trunk compartment. Doing
so can cause damage.
Interior Emergency Trunk Release
An illuminated mechanical release located inside the rear trunk allows you to open the rear trunk from the inside if
Model 3 has no electrical power. This mechanical
release also allows a person locked inside to get out.
1.
Firmly push the illuminated button in the direction of the arrow to release the latch.
2.
Push the rear trunk open.
NOTE: The button glows for several hours after a brief
exposure to ambient light.
WARNING: Do not allow children to play inside the
trunk or become locked inside. An unrestrained
child could suffer serious injury or death in a crash.
A child could suffer heat exhaustion if trapped in
the vehicle, especially without climate control on.Rear Trunk
15Opening and Closing
Page 26 of 248
WARNING: Riding in a moving vehicle with the
seat back reclined can result in serious injuries in a
collision, as you could slide under the lap belt or
be propelled into the seat belt. Ensure your seat
back is reclined no more than 30 degrees when
the vehicle is moving.
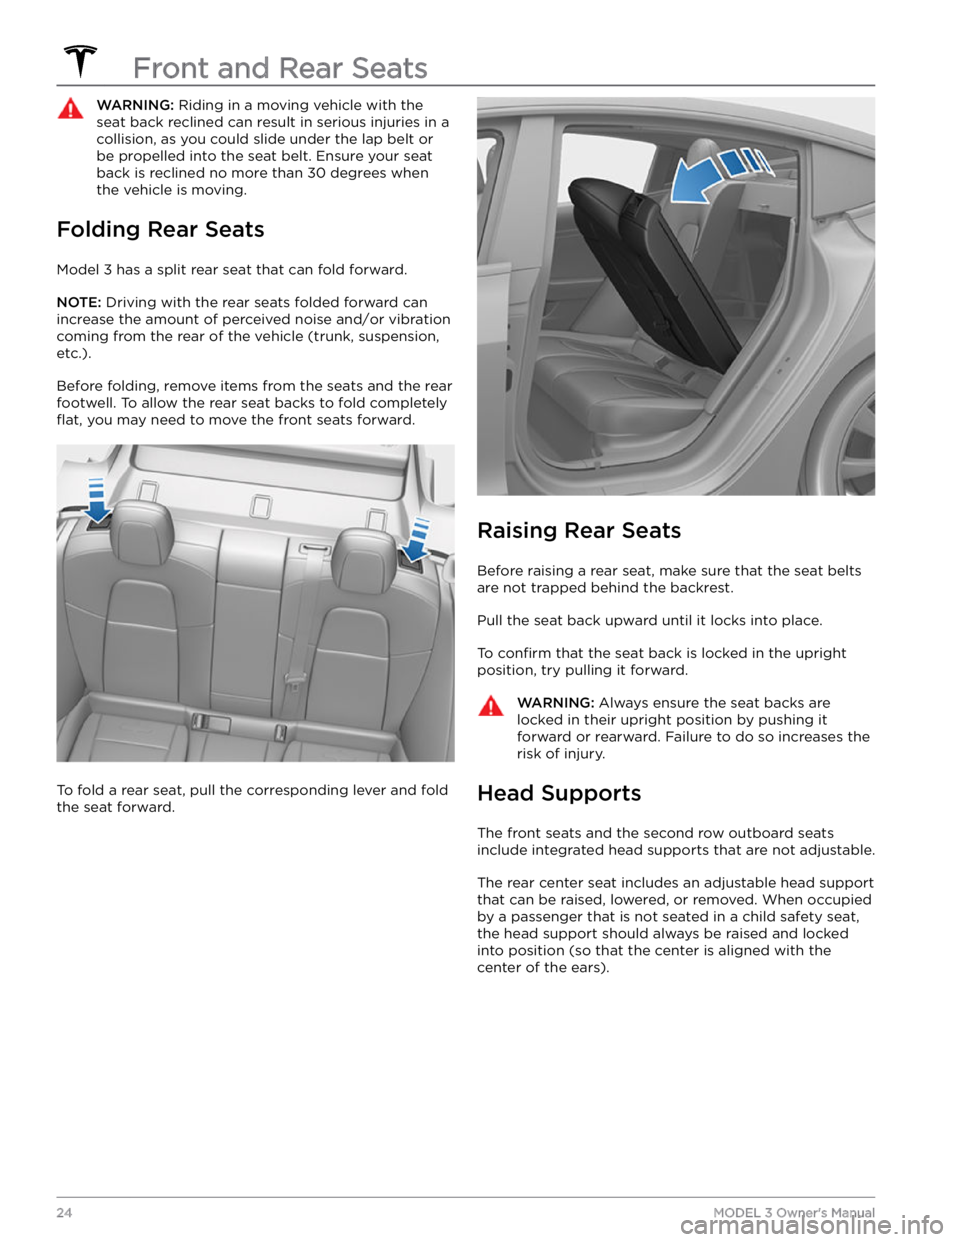
Folding Rear Seats
Model 3 has a split rear seat that can fold forward.
NOTE: Driving with the rear seats folded forward can
increase the amount of perceived noise and/or vibration
coming from the rear of the vehicle (trunk, suspension, etc.).
Before folding, remove items from the seats and the rear footwell. To allow the rear seat backs to fold completely
flat, you may need to move the front seats forward.
To fold a rear seat, pull the corresponding lever and fold the seat forward.
Raising Rear Seats
Before raising a rear seat, make sure that the seat belts are not trapped behind the backrest.
Pull the seat back upward until it locks into place.
To confirm that the seat back is locked in the upright
position, try pulling it forward.
WARNING: Always ensure the seat backs are
locked in their upright position by pushing it
forward or rearward. Failure to do so increases the
risk of injury.
Head Supports
The front seats and the second row outboard seats
include integrated head supports that are not adjustable.
The rear center seat includes an adjustable head support
that can be raised, lowered, or removed. When occupied
by a passenger that is not seated in a child safety seat, the head support should always be raised and locked into position (so that the center is aligned with the
center of the ears).
Front and Rear Seats
24MODEL 3 Owner
Page 27 of 248
WARNING: To minimize the risk of severe injury or
death in the event of a collision, ensure that head
supports are positioned correctly before sitting in,
or operating, Model 3.
WARNING: When installing a seat belt retained
child safety seat in the center seating position in
the second row, you must lower the associated
head support (described next).
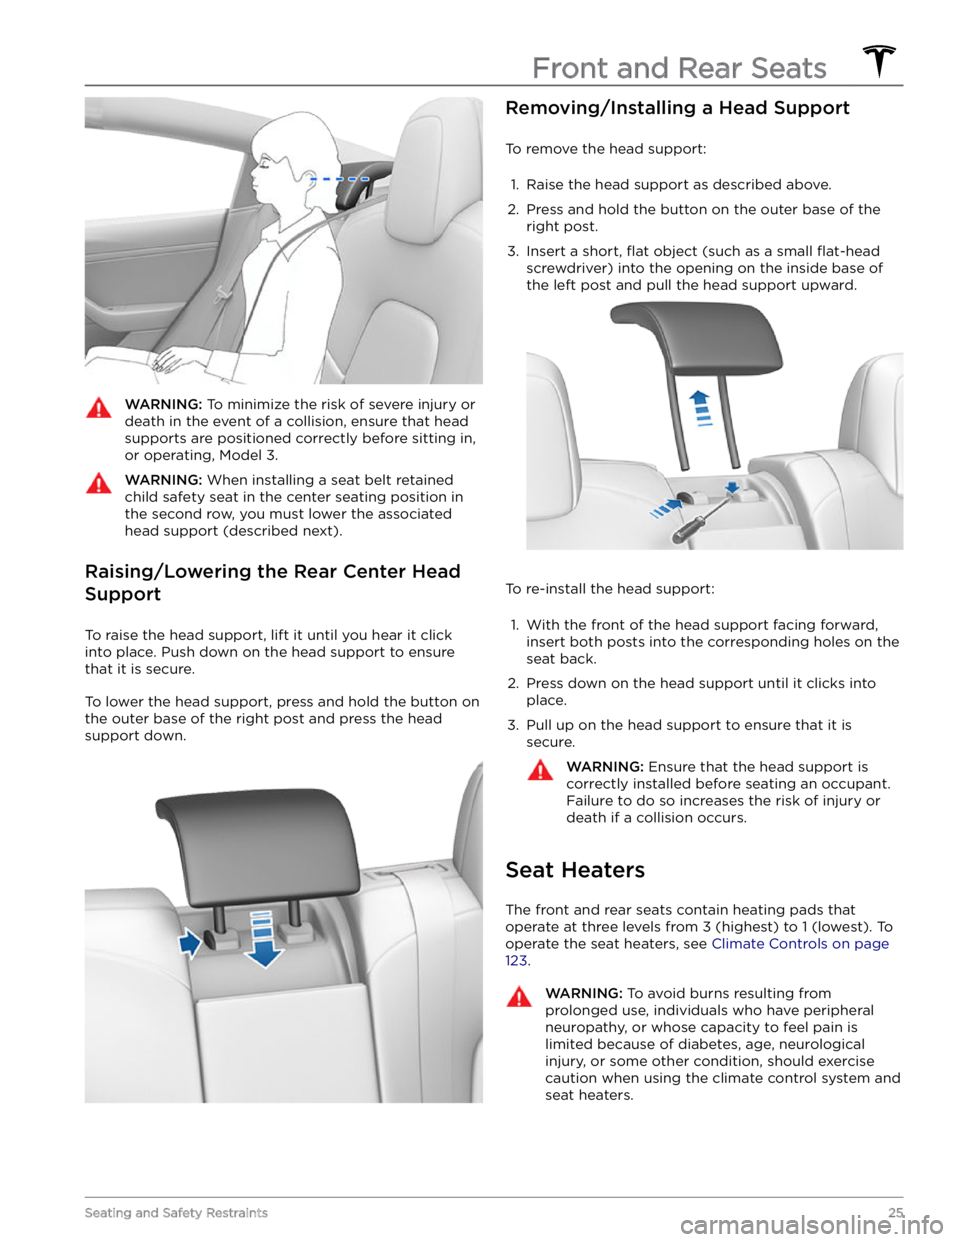
Raising/Lowering the Rear Center Head Support
To raise the head support, lift it until you hear it click
into place. Push down on the head support to ensure that it is secure.
To lower the head support, press and hold the button on the outer base of the right post and press the head support down.
Removing/Installing a Head Support
To remove the head support:
1.
Raise the head support as described above.
2.
Press and hold the button on the outer base of the
right post.
3.
Insert a short, flat object (such as a small flat-head
screwdriver) into the opening on the inside base of
the left post and pull the head support upward.
To re-install the head support:
1.
With the front of the head support facing forward, insert both posts into the corresponding holes on the
seat back.
2.
Press down on the head support until it clicks into place.
3.
Pull up on the head support to ensure that it is secure.
WARNING: Ensure that the head support is
correctly installed before seating an occupant.
Failure to do so increases the risk of injury or
death if a collision occurs.
Seat Heaters
The front and rear seats contain heating pads that
operate at three levels from 3 (highest) to 1 (lowest).
To
operate the seat heaters, see Climate Controls on page
123.
WARNING: To avoid burns resulting from
prolonged use, individuals who have peripheral
neuropathy, or whose capacity to feel pain is
limited because of diabetes, age, neurological
injury, or some other condition, should exercise
caution when using the climate control system and
seat heaters.
Front and Rear Seats
25Seating and Safety Restraints
Page 55 of 248
WARNING: Proceed with caution when adjusting
headlights. Tesla has carefully calibrated the
position of the headlights to be in an optimum
position for most driving scenarios. Tesla
recommends that you do not adjust headlights
unless you are familiar with how headlights should
be adjusted. Once adjusted, you will be unable to
automatically restore them to their originally
calibrated position. Contact Tesla for assistance
when adjusting headlights.
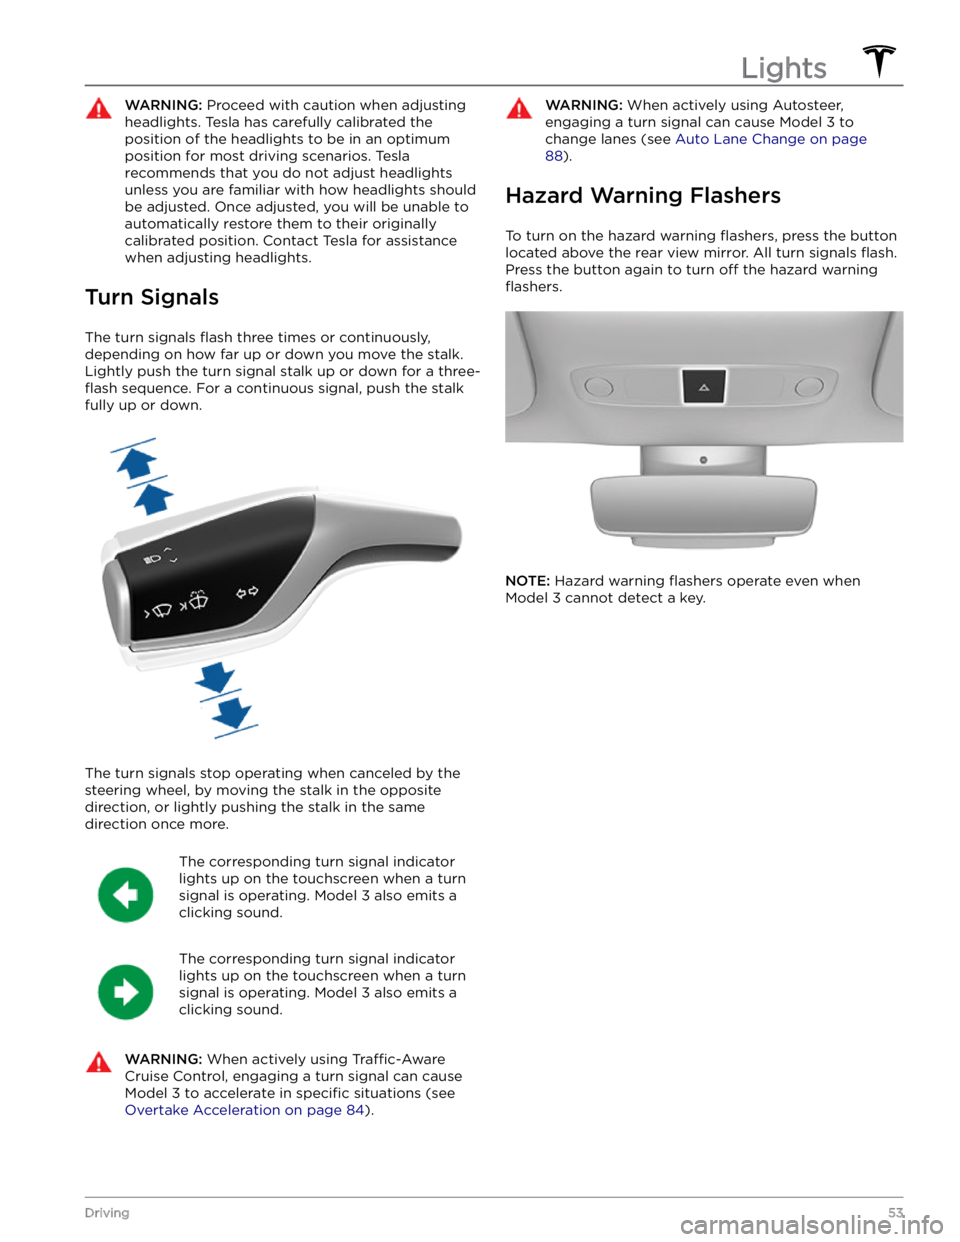
Turn Signals
The turn signals flash three times or continuously,
depending on how far up or down you move the stalk.
Lightly push the turn signal stalk up or down for a
three-
flash sequence. For a continuous signal, push the stalk
fully up or down.
The turn signals stop operating when canceled by the steering wheel, by moving the stalk in the opposite direction, or lightly pushing the stalk in the same
direction once more.
The corresponding turn signal indicator
lights up on the touchscreen when a turn
signal is operating.
Model 3 also emits a
clicking sound.
The corresponding turn signal indicator
lights up on the touchscreen when a turn
signal is operating.
Model 3 also emits a
clicking sound.
WARNING: When actively using Traffic-Aware
Cruise Control, engaging a turn signal can cause
Model 3 to accelerate in specific situations (see
Overtake Acceleration on page 84).
WARNING: When actively using Autosteer,
engaging a turn signal can cause Model 3 to
change lanes (see Auto Lane Change on page
88).
Hazard Warning Flashers
To turn on the hazard warning flashers, press the button
located above the rear view mirror. All turn signals
flash.
Press the button again to turn off the hazard warning
flashers.
NOTE: Hazard warning flashers operate even when
Model 3 cannot detect a key.
Lights
53Driving
Page 60 of 248
Braking SystemsWARNING: Properly functioning braking systems
are critical to ensure safety. If you experience a
problem with the brake pedal, brake calipers, or
any component of a Model 3 braking system,
contact Tesla immediately.
Model 3 has an anti-lock braking system (ABS) that
prevents the wheels from locking when you apply
maximum brake pressure. This improves steering control
during heavy braking in most road conditions.
During emergency braking conditions, the ABS
constantly monitors the speed of each wheel and varies
the brake pressure according to the grip available.
The alteration of brake pressure can be felt as a pulsing sensation through the brake pedal. This demonstrates that the ABS is operating and is not a cause for concern. Keep
firm and steady pressure on the brake pedal while
experiencing the pulsing.
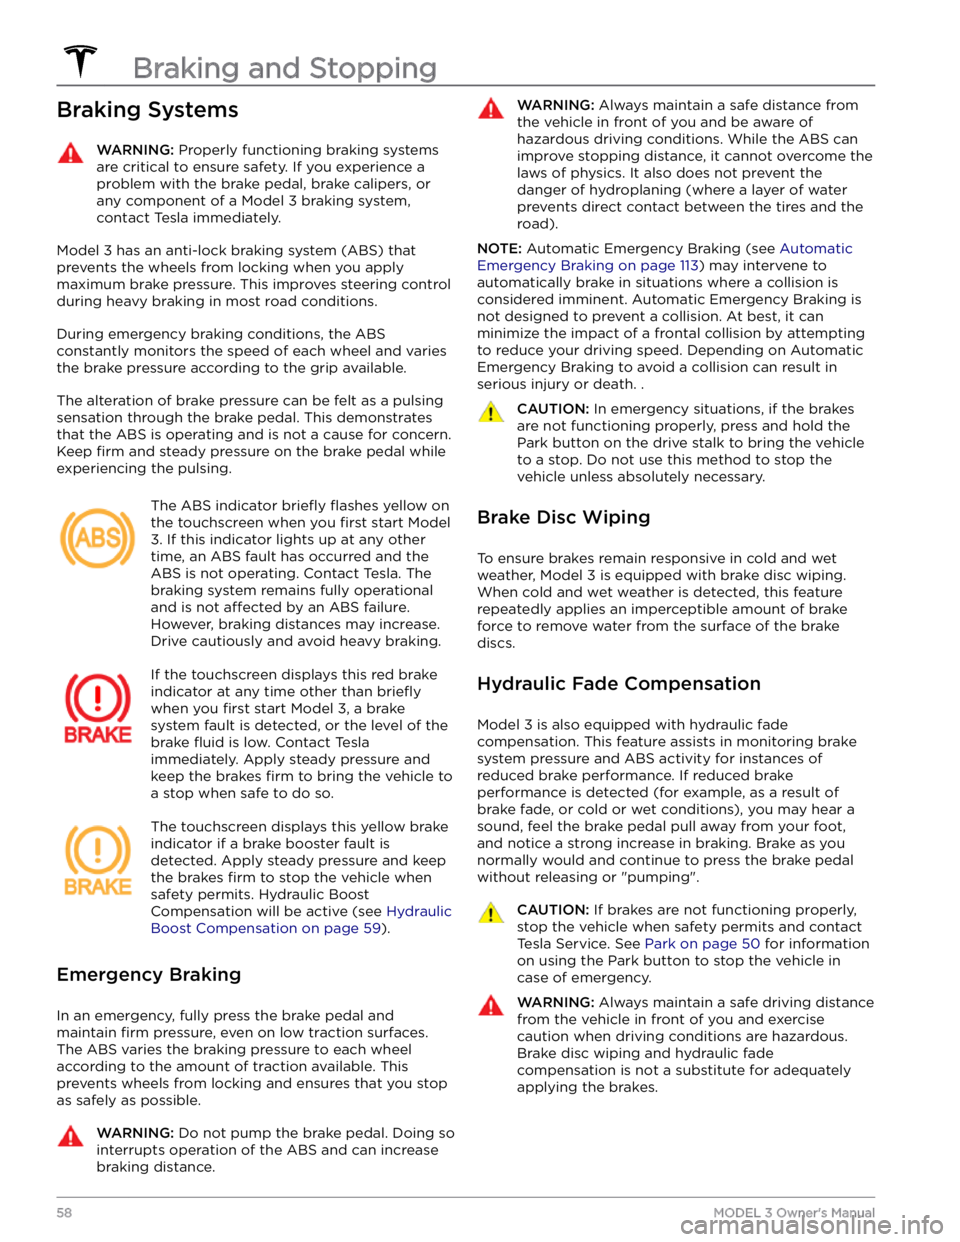
The ABS indicator briefly flashes yellow on
the
touchscreen when you first start Model
3. If this indicator lights up at any other
time, an ABS fault has occurred and the ABS is not operating. Contact Tesla. The
braking system remains fully operational
and is not
affected by an ABS failure.
However, braking distances may increase. Drive cautiously and avoid heavy braking.
If the touchscreen displays this red brake
indicator at any time other than
briefly
when you first start Model 3, a brake
system fault is detected, or the level of the
brake
fluid is low. Contact Tesla
immediately. Apply steady pressure and
keep the brakes
firm to bring the vehicle to
a stop when safe to do so.
The touchscreen displays this yellow brake
indicator if a brake booster fault is detected. Apply steady pressure and keep
the brakes
firm to stop the vehicle when
safety permits. Hydraulic Boost
Compensation will be active (see
Hydraulic
Boost Compensation on page 59).
Emergency Braking
In an emergency, fully press the brake pedal and
maintain
firm pressure, even on low traction surfaces.
The ABS varies the braking pressure to each wheel according to the amount of traction available. This prevents wheels from locking and ensures that you stop as safely as possible.
WARNING: Do not pump the brake pedal. Doing so
interrupts operation of the ABS and can increase
braking distance.
WARNING: Always maintain a safe distance from
the vehicle in front of you and be aware of
hazardous driving conditions. While the ABS can
improve stopping distance, it cannot overcome the
laws of physics. It also does not prevent the
danger of hydroplaning (where a layer of water
prevents direct contact between the tires and the
road).
NOTE: Automatic Emergency Braking (see Automatic
Emergency Braking on page 113) may intervene to
automatically brake in situations where a collision is considered imminent. Automatic Emergency Braking is
not designed to prevent a collision. At best, it can
minimize the impact of a frontal collision by attempting to reduce your driving speed. Depending on Automatic
Emergency Braking to avoid a collision can result in serious injury or death. .
CAUTION: In emergency situations, if the brakes
are not functioning properly, press and hold the
Park button on the drive stalk to bring the vehicle
to a stop. Do not use this method to stop the
vehicle unless absolutely necessary.
Brake Disc Wiping
To ensure brakes remain responsive in cold and wet
weather,
Model 3 is equipped with brake disc wiping.
When cold and wet weather is detected, this feature repeatedly applies an imperceptible amount of brake force to remove water from the surface of the brake discs.
Hydraulic Fade Compensation
Model 3 is also equipped with hydraulic fade
compensation. This feature assists in monitoring brake system pressure and ABS activity for instances of reduced brake performance. If reduced brake
performance is detected (for example, as a result of
brake fade, or cold or wet conditions), you may hear a sound, feel the brake pedal pull away from your foot, and notice a strong increase in braking. Brake as you
normally would and continue to press the brake pedal
without releasing or "pumping".
CAUTION: If brakes are not functioning properly,
stop the vehicle when safety permits and contact
Tesla Service. See Park on page 50 for information
on using the Park button to stop the vehicle in
case of emergency.
WARNING: Always maintain a safe driving distance
from the vehicle in front of you and exercise
caution when driving conditions are hazardous.
Brake disc wiping and hydraulic fade
compensation is not a substitute for adequately
applying the brakes.
Braking and Stopping
58MODEL 3 Owner
Page 62 of 248
WARNING: Do not rely on regenerative braking
and your chosen Stopping Mode to keep you and
your vehicle safe. Various factors such as driving
with a heavy vehicle load, on a steep hill, or on wet
or icy roads affect deceleration rate and the
distance at which Model 3 will come to a stop.
Drive attentively and always stay prepared to use
the brake pedal to stop as appropriate based on
traffic and road conditions.
WARNING: Forward Collision Warning and
Automatic Emergency Braking (if equipped) do
not operate when driving at very low speeds (see
Collision Avoidance Assist on page 112). Do not
rely on these features to warn you, or to prevent or
reduce the impact of a collision.
NOTE: Your chosen setting is retained in your Driver
Profile until you manually change it.
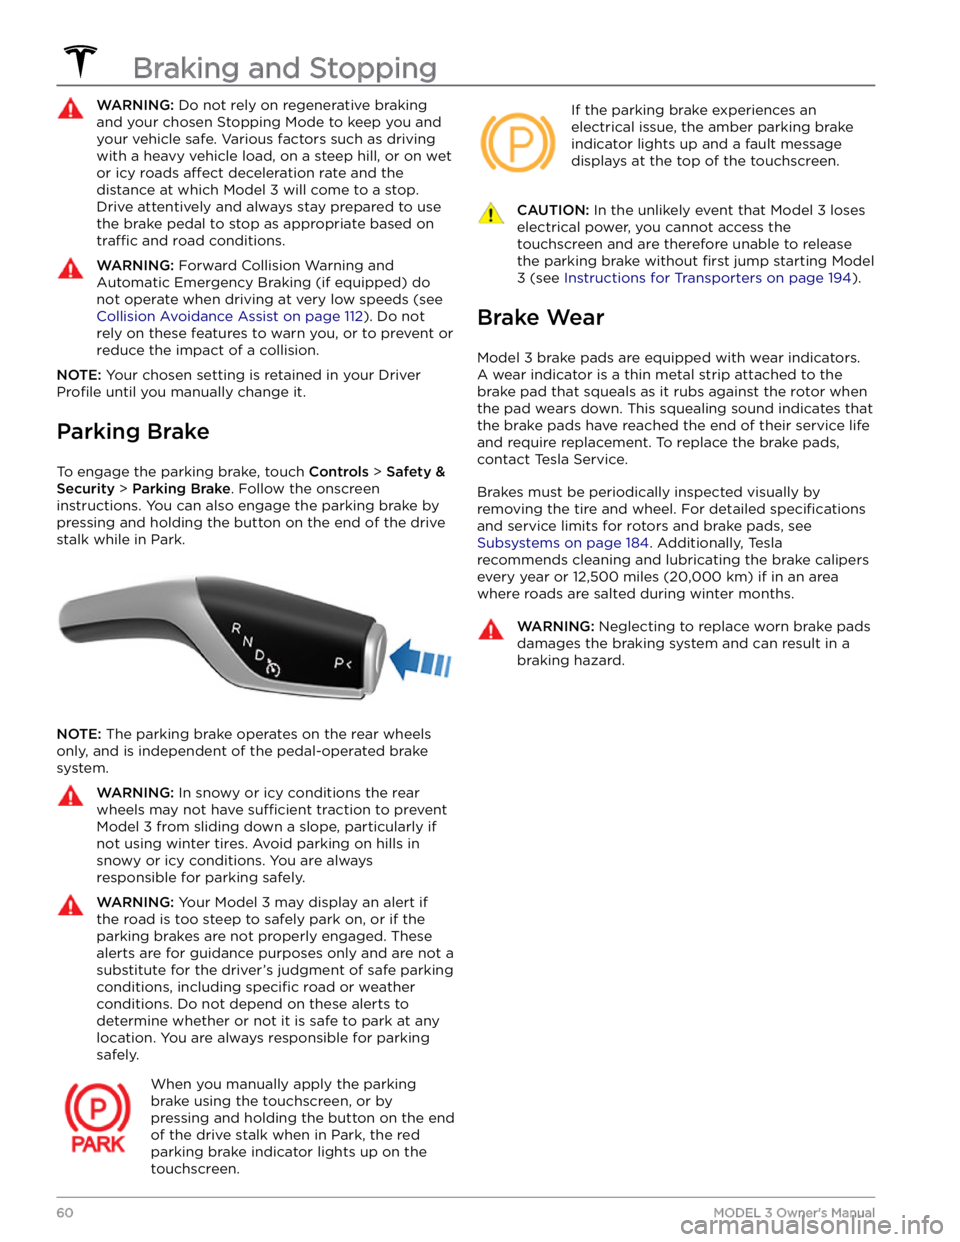
Parking Brake
To engage the parking brake, touch Controls > Safety &
Security > Parking Brake. Follow the onscreen
instructions.
You can also engage the parking brake by
pressing and holding the button on the end of the drive
stalk while in Park.
NOTE: The parking brake operates on the rear wheels
only, and is independent of the pedal-operated brake
system.
WARNING: In snowy or icy conditions the rear
wheels may not have sufficient traction to prevent
Model 3 from sliding down a slope, particularly if
not using winter tires. Avoid parking on hills in
snowy or icy conditions. You are always
responsible for parking safely.
WARNING: Your Model 3 may display an alert if
the road is too steep to safely park on, or if the
parking brakes are not properly engaged. These
alerts are for guidance purposes only and are not a
substitute for the driver
Page 82 of 248
Cleaning Cameras and Sensors
To ensure the various Autopilot components can provide
information that is as accurate as possible, keep them
clean and free of obstructions, condensation, or damage. See
Cleaning on page 167.
Condensation can form inside the camera enclosures,
especially if you park your vehicle outside in cold or wet
conditions. The
touchscreen may display an alert stating
that a camera is blocked and that some or all Autopilot
features may be temporarily restricted until the camera vision is clear. To proactively dry the condensation, precondition the cabin by setting it to a warm temperature, turning the windshield defroster on, and directing the front air vents toward the door pillars (see
Mobile App on page 149).
CAUTION: Do not wipe an exposed lens with your
hands or a cloth in an attempt to remove dirt or
debris. The debris can damage the surface of the
lens when wiped.
CAUTION: Do not use chemical-based or abrasive
cleaners. Doing so can damage surfaces.
CAUTION: Do not clean an ultrasonic sensor or
camera lens with a sharp or abrasive object that
can scratch or damage its surface.
About Autopilot
80MODEL 3 Owner
Page 96 of 248
NOTE: Depending on market region, vehicle
configuration, options purchased, and software version,
your vehicle may not be equipped with Traffic Light and
Stop Sign Control, or the feature may not operate
exactly as described.
NOTE: Traffic Light and Stop Sign Control is a BETA
feature and works best on roads that are frequently
driven by Tesla vehicles. Traffic Light and Stop Sign
Control attempts to stop at all traffic lights and may also
stop at green lights.
Traffic Light and Stop Sign Control is designed to
recognize and respond to
traffic lights and stop signs,
slowing
Model 3 to a stop when using Traffic-Aware
cruise control or Autosteer. This feature uses the
vehicle
Page 99 of 248
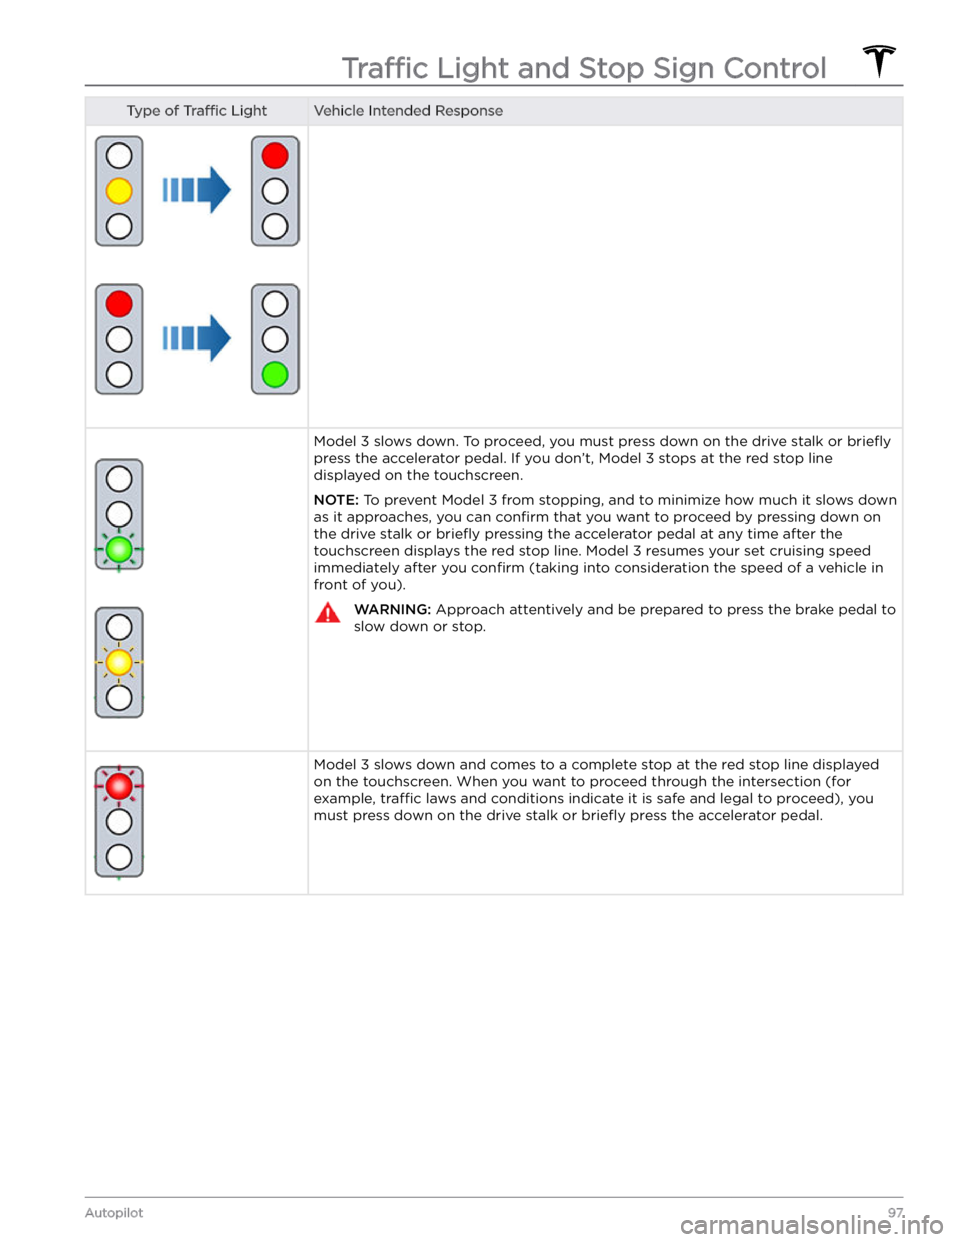
Type of Traffic LightVehicle Intended ResponseModel 3 slows down. To proceed, you must press down on the drive stalk or briefly
press the accelerator pedal. If you don
Page 100 of 248
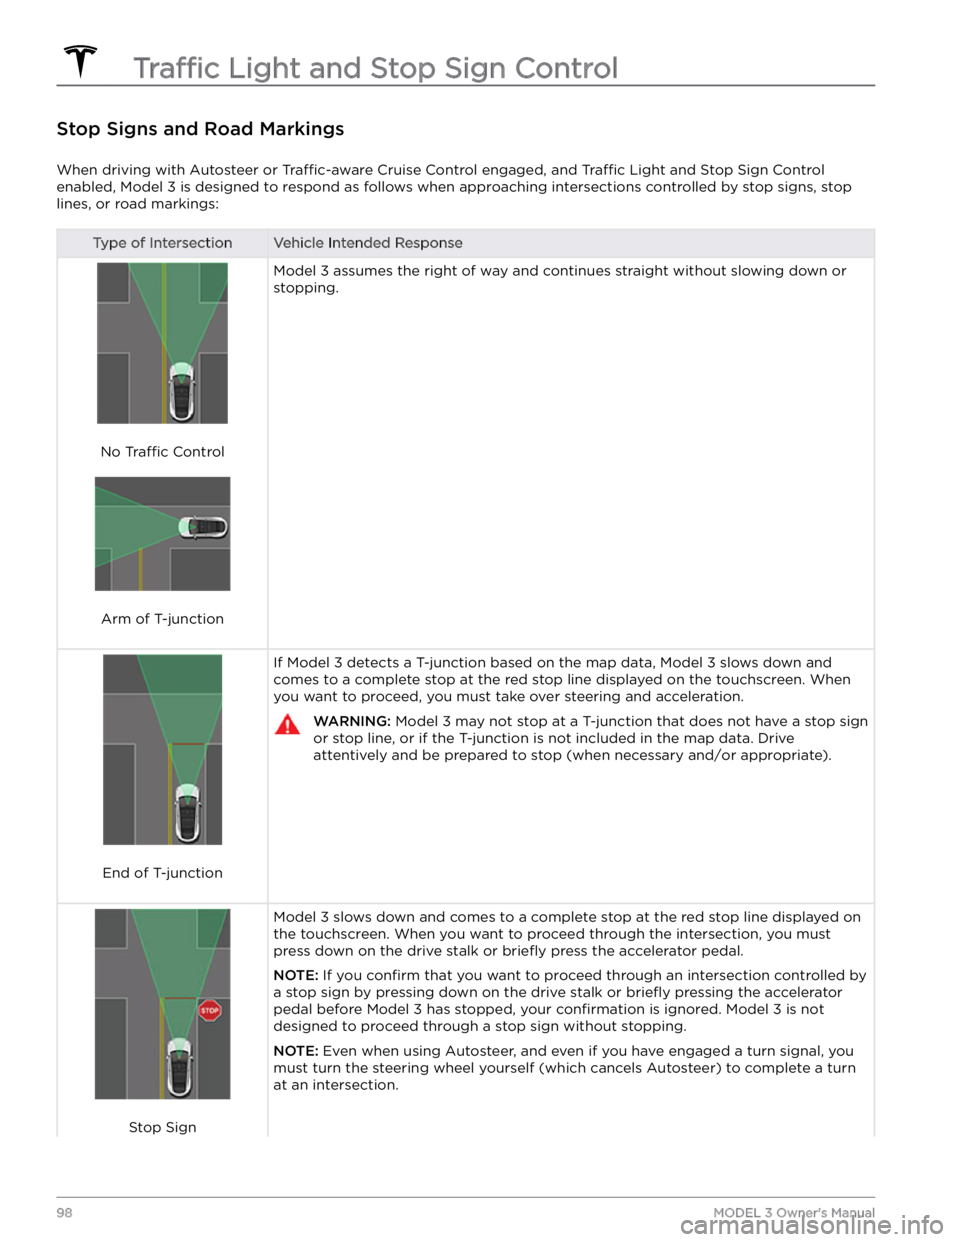
Stop Signs and Road Markings
When driving with Autosteer or Traffic-aware Cruise Control engaged, and Traffic Light and Stop Sign Control
enabled,
Model 3 is designed to respond as follows when approaching intersections controlled by stop signs, stop
lines, or road markings:
Type of IntersectionVehicle Intended Response
No Traffic Control
Arm of T-junction
Model 3 assumes the right of way and continues straight without slowing down or
stopping.
End of T-junction
If Model 3 detects a T-junction based on the map data, Model 3 slows down and
comes to a complete stop at the red stop line displayed on the
touchscreen. When
you want to proceed, you must take over steering and acceleration.
WARNING: Model 3 may not stop at a T-junction that does not have a stop sign
or stop line, or if the T-junction is not included in the map data. Drive
attentively and be prepared to stop (when necessary and/or appropriate).
Stop Sign
Model 3 slows down and comes to a complete stop at the red stop line displayed on
the
touchscreen. When you want to proceed through the intersection, you must
press down on the drive stalk or briefly press the accelerator pedal.
NOTE: If you confirm that you want to proceed through an intersection controlled by
a stop sign by
pressing down on the drive stalk or briefly pressing the accelerator
pedal before
Model 3 has stopped, your confirmation is ignored. Model 3 is not
designed to proceed through a stop sign without stopping.
NOTE: Even when using Autosteer, and even if you have engaged a turn signal, you
must turn the
steering wheel yourself (which cancels Autosteer) to complete a turn
at an intersection.
Traffic Light and Stop Sign Control
98MODEL 3 Owner