warning light TESLA MODEL S 2014 (Europe) User Guide
[x] Cancel search | Manufacturer: TESLA, Model Year: 2014, Model line: MODEL S, Model: TESLA MODEL S 2014Pages: 152, PDF Size: 17.5 MB
Page 63 of 152
Cruise Control
DRIVING4.23
Cruise ControlOperating Cruise Control
Cruise control makes it easy for you to maintain
a consistent speed without holding your foot
on the accelerator. This is useful when driving at
the same speed over a long distance.
You must be driving over 32 km/h to operate
cruise control.
WARNING: Do not use cruise control on
winding or slippery road surfaces, or
when traffic conditions make it unsafe to drive
at a consistent speed.
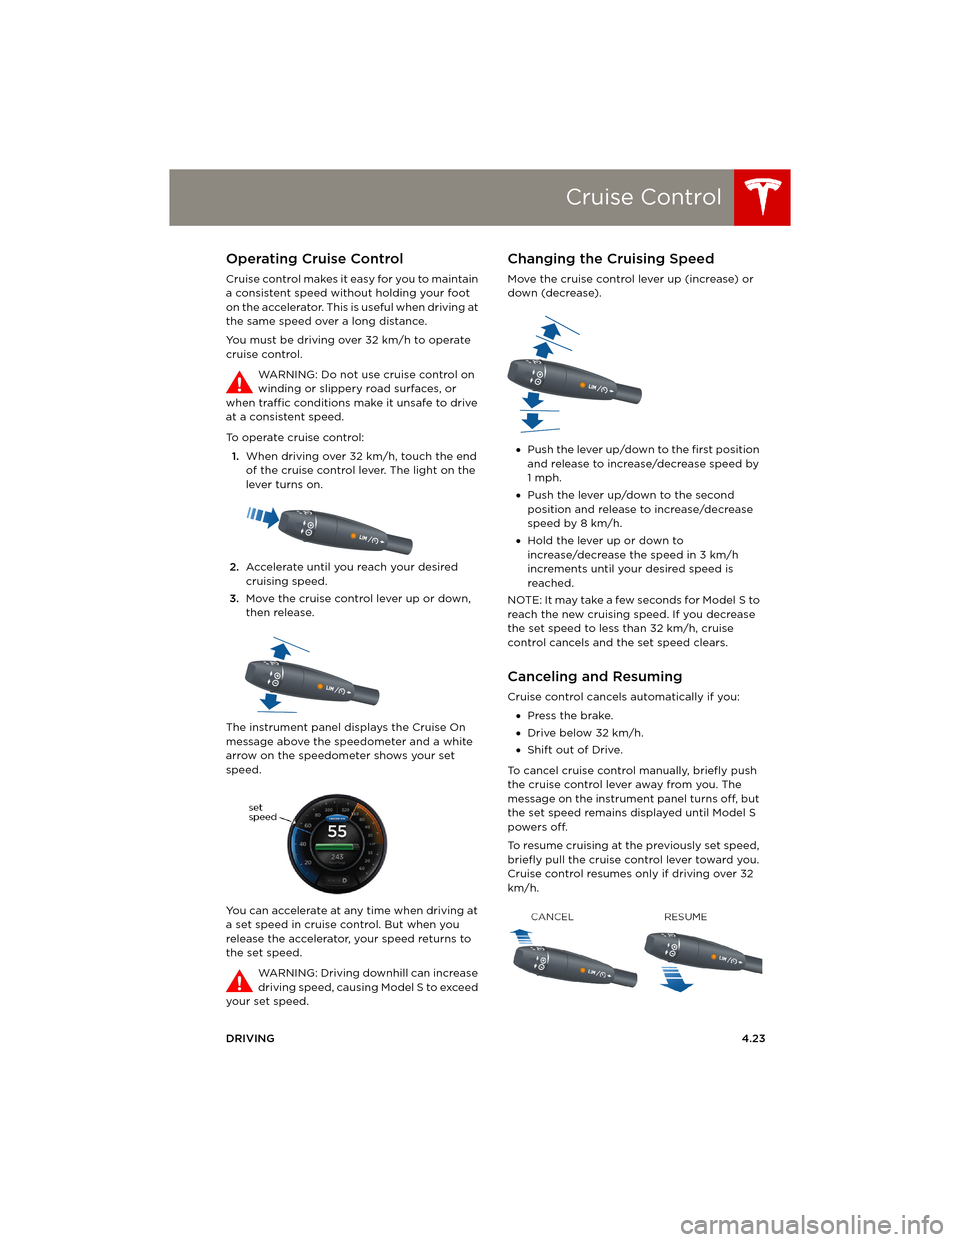
To operate cruise control:
1.When driving over 32 km/h, touch the end
of the cruise control lever. The light on the
lever turns on.
2.Accelerate until you reach your desired
cruising speed.
3.Move the cruise control lever up or down,
then release.
The instrument panel displays the Cruise On
message above the speedometer and a white
arrow on the speedometer shows your set
speed.
You can accelerate at any time when driving at
a set speed in cruise control. But when you
release the accelerator, your speed returns to
the set speed.
WARNING: Driving downhill can increase
driving speed, causing Model S to exceed
your set speed.
Changing the Cruising Speed
Move the cruise control lever up (increase) or
down (decrease).
•Push the lever up/down to the first position
and release to increase/decrease speed by
1mph.
•Push the lever up/down to the second
position and release to increase/decrease
speed by 8 km/h.
•Hold the lever up or down to
increase/decrease the speed in 3 km/h
increments until your desired speed is
reached.
NOTE: It may take a few seconds for Model S to
reach the new cruising speed. If you decrease
the set speed to less than 32 km/h, cruise
control cancels and the set speed clears.
Canceling and Resuming
Cruise control cancels automatically if you:
•Press the brake.
•Drive below 32 km/h.
•Shift out of Drive.
To cancel cruise control manually, briefly push
the cruise control lever away from you. The
message on the instrument panel turns off, but
the set speed remains displayed until Model S
powers off.
To resume cruising at the previously set speed,
briefly pull the cruise control lever toward you.
Cruise control resumes only if driving over 32
km/h.
book.book Page 23 Friday, July 19, 2013 12:53 PM
Page 67 of 152
Touchscreen Overview
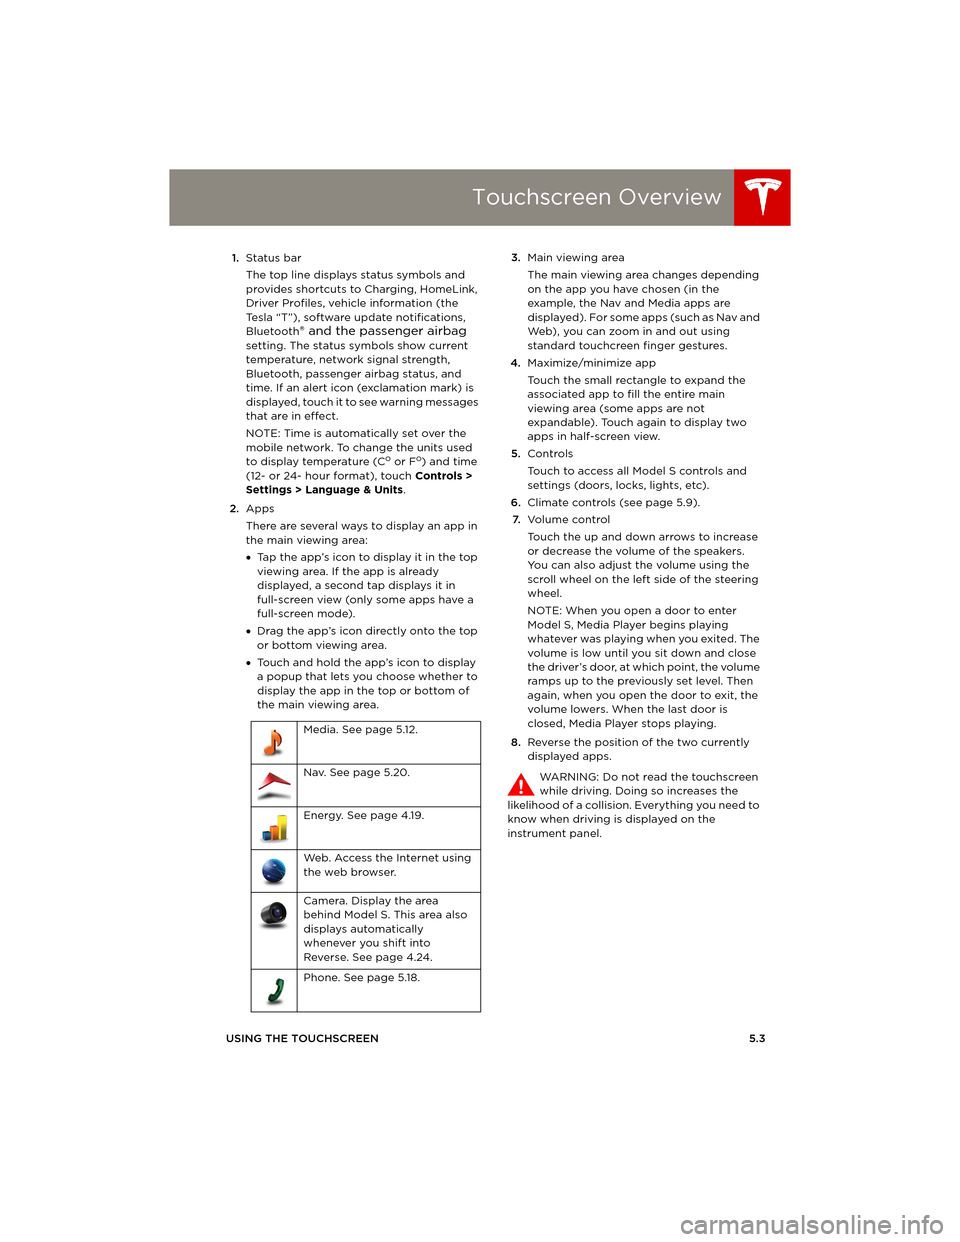
USING THE TOUCHSCREEN5.3 1.Status bar
The top line displays status symbols and
provides shortcuts to Charging, HomeLink,
Driver Profiles, vehicle information (the
Tesla “T”), software update notifications,
Bluetooth
® and the passenger airbag
setting. The status symbols show current
temperature, network signal strength,
Bluetooth, passenger airbag status, and
time. If an alert icon (exclamation mark) is
displayed, touch it to see warning messages
that are in effect.
NOTE: Time is automatically set over the
mobile network. To change the units used
to display temperature (C
o or Fo) and time
(12- or 24- hour format), touch Controls >
Settings > Language & Units.
2.Apps
There are several ways to display an app in
the main viewing area:
•Tap the app’s icon to display it in the top
viewing area. If the app is already
displayed, a second tap displays it in
full-screen view (only some apps have a
full-screen mode).
•Drag the app’s icon directly onto the top
or bottom viewing area.
•Touch and hold the app’s icon to display
a popup that lets you choose whether to
display the app in the top or bottom of
the main viewing area. 3.Main viewing area
The main viewing area changes depending
on the app you have chosen (in the
example, the Nav and Media apps are
displayed). For some apps (such as Nav and
Web), you can zoom in and out using
standard touchcreen finger gestures.
4.Maximize/minimize app
Touch the small rectangle to expand the
associated app to fill the entire main
viewing area (some apps are not
expandable). Touch again to display two
apps in half-screen view.
5.Controls
Touch to access all Model S controls and
settings (doors, locks, lights, etc).
6.Climate controls (see page 5.9).
7.Vo l u m e co n t r o l
Touch the up and down arrows to increase
or decrease the volume of the speakers.
You can also adjust the volume using the
scroll wheel on the left side of the steering
wheel.
NOTE: When you open a door to enter
Model S, Media Player begins playing
whatever was playing when you exited. The
volume is low until you sit down and close
the driver’s door, at which point, the volume
ramps up to the previously set level. Then
again, when you open the door to exit, the
volume lowers. When the last door is
closed, Media Player stops playing.
8.Reverse the position of the two currently
displayed apps.
WARNING: Do not read the touchscreen
while driving. Doing so increases the
likelihood of a collision. Everything you need to
know when driving is displayed on the
instrument panel. Media. See page 5.12.
Nav. See page 5.20.
Energy. See page 4.19.
Web. Access the Internet using
the web browser.
Camera. Display the area
behind Model S. This area also
displays automatically
whenever you shift into
Reverse. See page 4.24.
Phone. See page 5.18.
book.book Page 3 Friday, July 19, 2013 12:53 PM
Page 69 of 152
Touchscreen - Controls
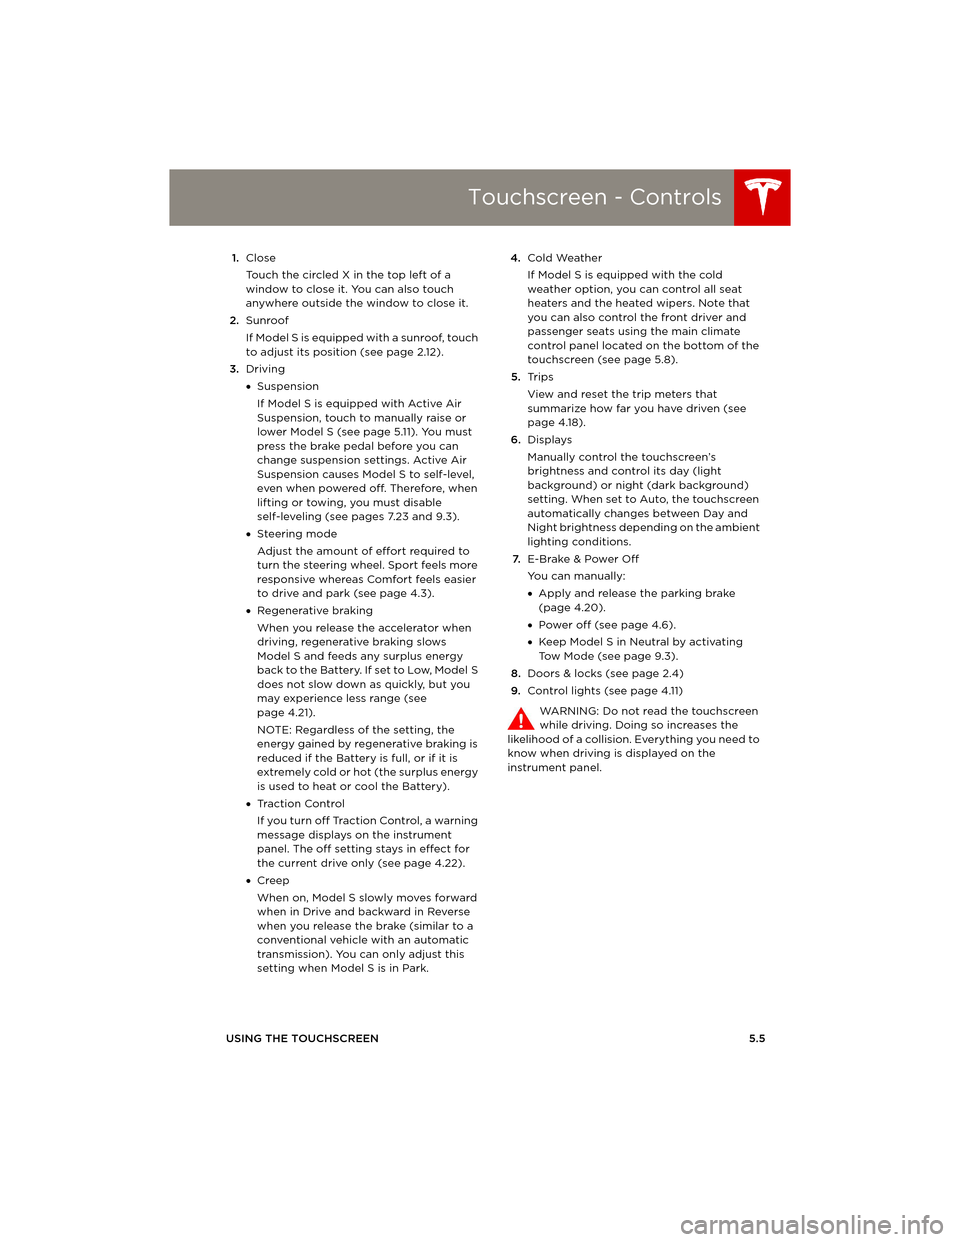
USING THE TOUCHSCREEN5.5 1.Close
Touch the circled X in the top left of a
window to close it. You can also touch
anywhere outside the window to close it.
2.Sunroof
If Model S is equipped with a sunroof, touch
to adjust its position (see page 2.12).
3.Driving
•Suspension
If Model S is equipped with Active Air
Suspension, touch to manually raise or
lower Model S (see page 5.11). You must
press the brake pedal before you can
change suspension settings. Active Air
Suspension causes Model S to self-level,
even when powered off. Therefore, when
lifting or towing, you must disable
self-leveling (see pages 7.23 and 9.3).
•Steering mode
Adjust the amount of effort required to
turn the steering wheel. Sport feels more
responsive whereas Comfort feels easier
to drive and park (see page 4.3).
•Regenerative braking
When you release the accelerator when
driving, regenerative braking slows
Model S and feeds any surplus energy
b a c k t o t h e B a t t e r y. I f s e t t o L o w, M o d e l S
does not slow down as quickly, but you
may experience less range (see
page 4.21).
NOTE: Regardless of the setting, the
energy gained by regenerative braking is
reduced if the Battery is full, or if it is
extremely cold or hot (the surplus energy
is used to heat or cool the Battery).
•Tr a c t i o n C o n t r o l
If you turn off Traction Control, a warning
message displays on the instrument
panel. The off setting stays in effect for
the current drive only (see page 4.22).
•Creep
When on, Model S slowly moves forward
when in Drive and backward in Reverse
when you release the brake (similar to a
conventional vehicle with an automatic
transmission). You can only adjust this
setting when Model S is in Park.4.Cold Weather
If Model S is equipped with the cold
weather option, you can control all seat
heaters and the heated wipers. Note that
you can also control the front driver and
passenger seats using the main climate
control panel located on the bottom of the
touchscreen (see page 5.8).
5.Tr i p s
View and reset the trip meters that
summarize how far you have driven (see
page 4.18).
6.Displays
Manually control the touchscreen’s
brightness and control its day (light
background) or night (dark background)
setting. When set to Auto, the touchscreen
automatically changes between Day and
Night brightness depending on the ambient
lighting conditions.
7.E-Brake & Power Off
You can manually:
•Apply and release the parking brake
(page 4.20).
•Power off (see page 4.6).
•Keep Model S in Neutral by activating
Tow Mode (see page 9.3).
8.Doors & locks (see page 2.4)
9.Control lights (see page 4.11)
WARNING: Do not read the touchscreen
while driving. Doing so increases the
likelihood of a collision. Everything you need to
know when driving is displayed on the
instrument panel.
book.book Page 5 Friday, July 19, 2013 12:53 PM
Page 71 of 152
Touchscreen - Settings
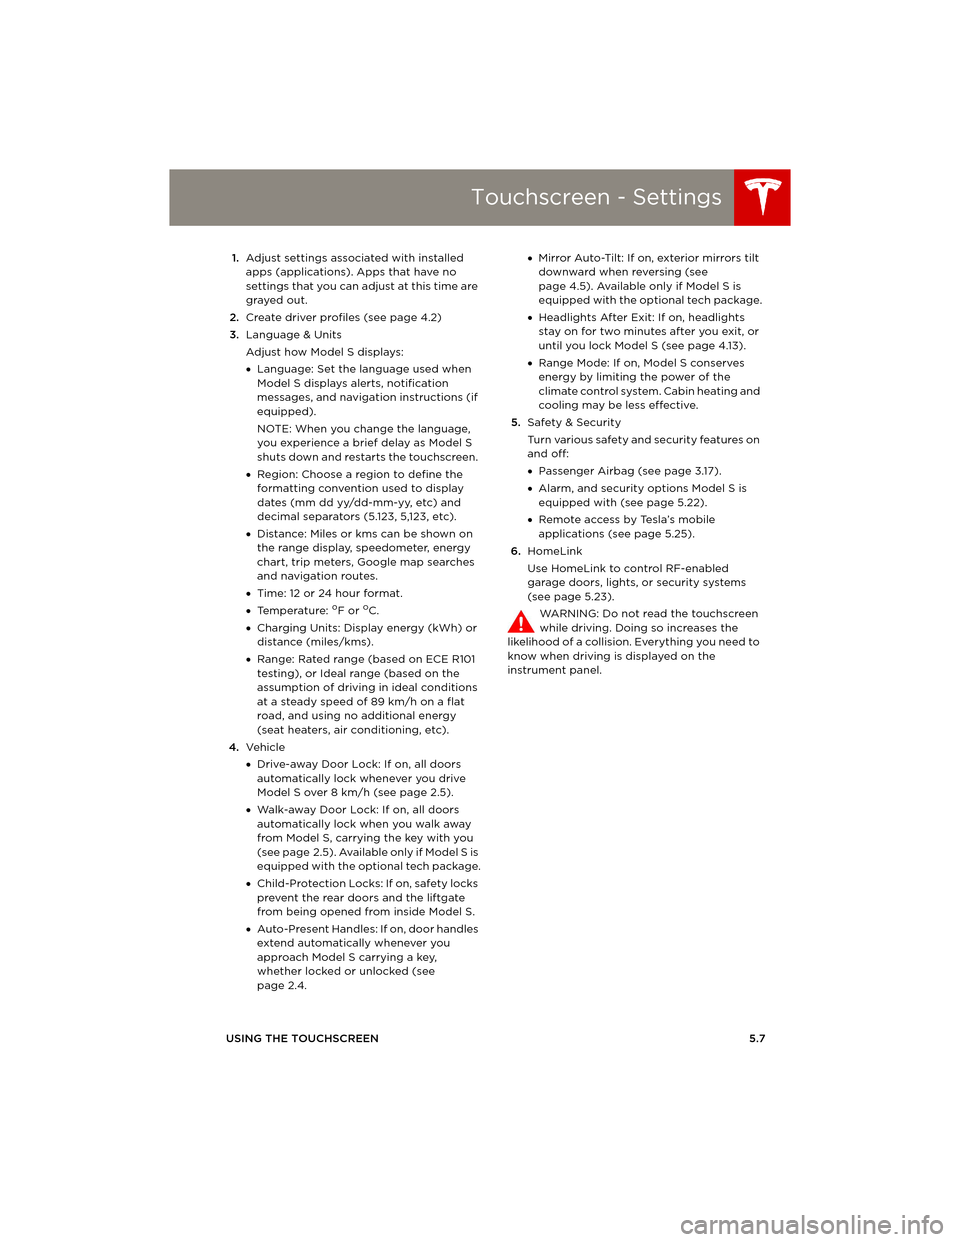
USING THE TOUCHSCREEN5.7 1.Adjust settings associated with installed
apps (applications). Apps that have no
settings that you can adjust at this time are
grayed out.
2.Create driver profiles (see page 4.2)
3.Language & Units
Adjust how Model S displays:
•Language: Set the language used when
Model S displays alerts, notification
messages, and navigation instructions (if
equipped).
NOTE: When you change the language,
you experience a brief delay as Model S
shuts down and restarts the touchscreen.
•Region: Choose a region to define the
formatting convention used to display
dates (mm dd yy/dd-mm-yy, etc) and
decimal separators (5.123, 5,123, etc).
•Distance: Miles or kms can be shown on
the range display, speedometer, energy
chart, trip meters, Google map searches
and navigation routes.
•Time: 12 or 24 hour format.
•Temperature:
oF or oC.
•Charging Units: Display energy (kWh) or
distance (miles/kms).
•Range: Rated range (based on ECE R101
testing), or Ideal range (based on the
assumption of driving in ideal conditions
at a steady speed of 89 km/h on a flat
road, and using no additional energy
(seat heaters, air conditioning, etc).
4.Ve h i c l e
•Drive-away Door Lock: If on, all doors
automatically lock whenever you drive
Model S over 8 km/h (see page 2.5).
•Walk-away Door Lock: If on, all doors
automatically lock when you walk away
from Model S, carrying the key with you
(see page 2.5). Available only if Model S is
equipped with the optional tech package.
•Child-Protection Locks: If on, safety locks
prevent the rear doors and the liftgate
from being opened from inside Model S.
•Auto-Present Handles: If on, door handles
extend automatically whenever you
approach Model S carrying a key,
whether locked or unlocked (see
page 2.4.•Mirror Auto-Tilt: If on, exterior mirrors tilt
downward when reversing (see
page 4.5). Available only if Model S is
equipped with the optional tech package.
•Headlights After Exit: If on, headlights
stay on for two minutes after you exit, or
until you lock Model S (see page 4.13).
•Range Mode: If on, Model S conserves
energy by limiting the power of the
climate control system. Cabin heating and
cooling may be less effective.
5.Safety & Security
Turn various safety and security features on
and off:
•Passenger Airbag (see page 3.17).
•Alarm, and security options Model S is
equipped with (see page 5.22).
•Remote access by Tesla’s mobile
applications (see page 5.25).
6.HomeLink
Use HomeLink to control RF-enabled
garage doors, lights, or security systems
(see page 5.23).
WARNING: Do not read the touchscreen
while driving. Doing so increases the
likelihood of a collision. Everything you need to
know when driving is displayed on the
instrument panel.
book.book Page 7 Friday, July 19, 2013 12:53 PM
Page 72 of 152
Climate ControlsClimate Controls
5.8MODEL S OWNERS MANUAL
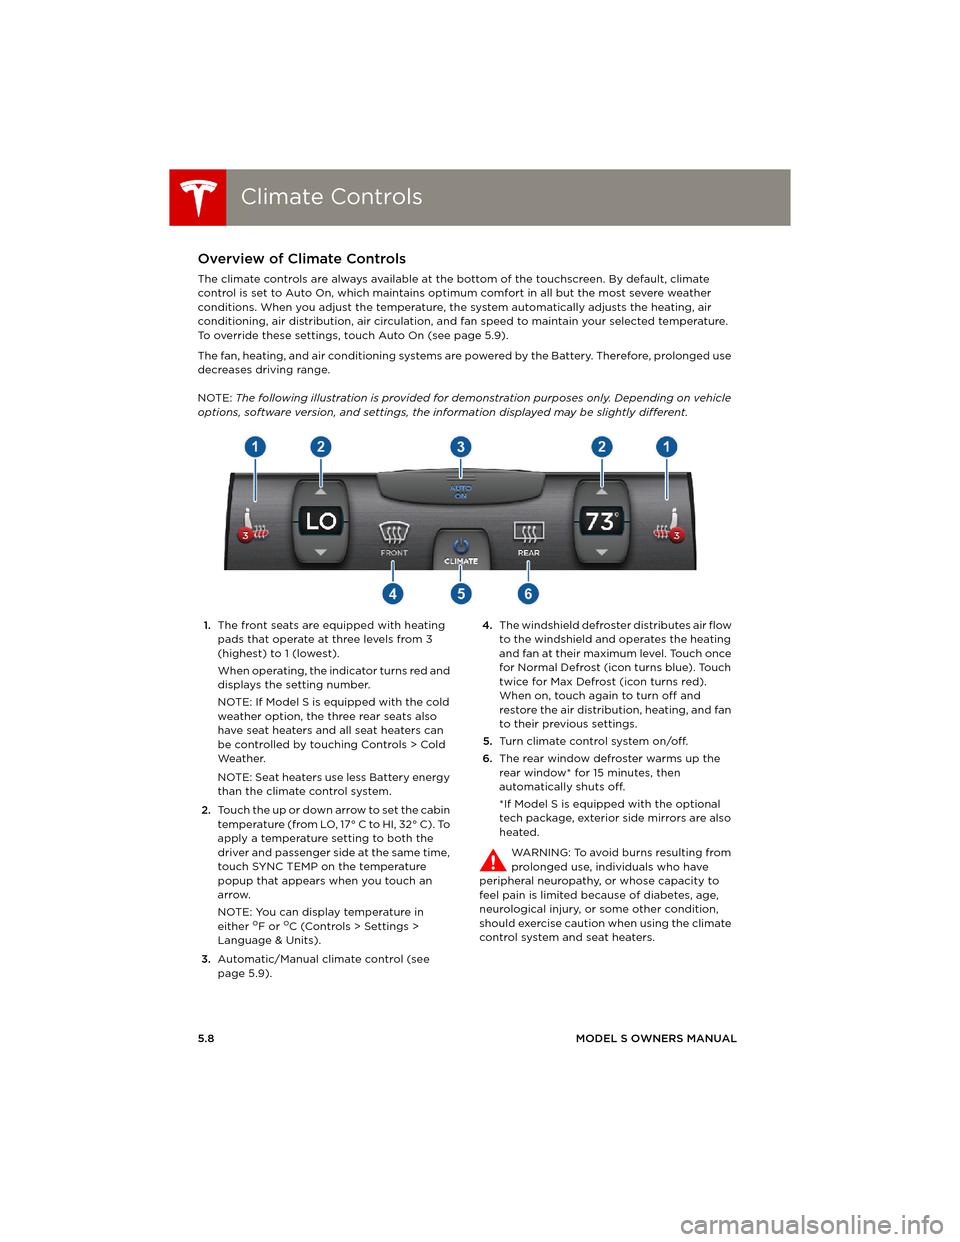
Climate ControlsOverview of Climate Controls
The climate controls are always available at the bottom of the touchscreen. By default, climate
control is set to Auto On, which maintains optimum comfort in all but the most severe weather
conditions. When you adjust the temperature, the system automatically adjusts the heating, air
conditioning, air distribution, air circulation, and fan speed to maintain your selected temperature.
To override these settings, touch Auto On (see page 5.9).
The fan, heating, and air conditioning systems are powered by the Battery. Therefore, prolonged use
decreases driving range.
NOTE: The following illustration is provided for demonstration purposes only. Depending on vehicle
options, software version, and settings, the information displayed may be slightly different.
1.The front seats are equipped with heating
pads that operate at three levels from 3
(highest) to 1 (lowest).
When operating, the indicator turns red and
displays the setting number.
NOTE: If Model S is equipped with the cold
weather option, the three rear seats also
have seat heaters and all seat heaters can
be controlled by touching Controls > Cold
We a t h e r.
NOTE: Seat heaters use less Battery energy
than the climate control system.
2.Touch the up or down arrow to set the cabin
temperature (from LO, 17° C to HI, 32° C). To
apply a temperature setting to both the
driver and passenger side at the same time,
touch SYNC TEMP on the temperature
popup that appears when you touch an
arrow.
NOTE: You can display temperature in
either
oF or oC (Controls > Settings >
Language & Units).
3.Automatic/Manual climate control (see
page 5.9).4.The windshield defroster distributes air flow
to the windshield and operates the heating
and fan at their maximum level. Touch once
for Normal Defrost (icon turns blue). Touch
twice for Max Defrost (icon turns red).
When on, touch again to turn off and
restore the air distribution, heating, and fan
to their previous settings.
5.Turn climate control system on/off.
6.The rear window defroster warms up the
rear window* for 15 minutes, then
automatically shuts off.
*If Model S is equipped with the optional
tech package, exterior side mirrors are also
heated.
WARNING: To avoid burns resulting from
prolonged use, individuals who have
peripheral neuropathy, or whose capacity to
feel pain is limited because of diabetes, age,
neurological injury, or some other condition,
should exercise caution when using the climate
control system and seat heaters.
book.book Page 8 Friday, July 19, 2013 12:53 PM
Page 87 of 152
HomeLink® Universal Transceiver
USING THE TOUCHSCREEN5.23
HomeLink® Universal TransceiverAbout HomeLink®
If Model S is equipped with the optional
tech package, you can program the
HomeLink® Universal Transceiver to operate up
to three garage doors, gates, lights, and
security systems that can transmit Radio
Frequency (RF) signals.
Programming HomeLink
1.Park in front of the device you want to
program, and have the device’s remote
control ready.
2.To u c h Controls > Settings > HomeLink on
the touchscreen.
3.To u c h Enter Name, then use the onscreen
keyboard to enter a name for your
HomeLink device.
4.To u c h Create HomeLink.
5.Follow the onscreen instructions.
Once programmed, you can operate the device
by touching its corresponding HomeLink icon
on the touchscreen’s status bar. HomeLink
remembers the location of your programmed
devices. When you approach a known location,
the HomeLink control on the touchscreen
automatically drops down. When you drive
away, it disappears.
NOTE: For security reasons, erase your
HomeLink settings if you sell Model S.
WARNING: Your device might open or
close during programming. Before
programming, make sure that the device
is clear of any people or objects.
WARNING: Do not use the HomeLink
Universal Transceiver with a garage door
that does not meet federal safety
standards. A garage door opener that
cannot detect an object in its path and
then automatically stop and reverse,
does not meet these standards. Using a
garage door opener without these
features increases the risk of injury or
death.
book.book Page 23 Friday, July 19, 2013 12:53 PM
Page 100 of 152
Maintenance ScheduleMaintenance Schedule
7.2MODEL S OWNERS MANUAL
MAINTENANCE
Maintenance ScheduleService Intervals
Regular maintenance is the key to ensuring the
continued reliability and efficiency of your
Model S.
Take Model S to Tesla at the regularly scheduled
maintenance intervals of every 12 months, or
every 20,000 kms, whichever comes first.
Model S must be serviced by Tesla-certified
technicians. Damages or failures caused by
maintenance or repairs performed by non-Tesla
certified technicians are not covered by the
warranty.
Fluid Replacement
Do not change or top up Battery coolant and
brake fluid yourself. Tesla service technicians
replace fluids at the regularly scheduled service
intervals:
•Brake fluid - every 2 years or 40,000 kms,
whichever comes first.
•Battery coolant - every 4 years or
80,000 kms, whichever comes first.
NOTE: Any damage from opening the Battery
coolant reservoir is excluded from the warranty.
Daily and Monthly Checks
In addition to the regularly scheduled
maintenance performed by Tesla, you should
carry out a few simple checks more frequently.
Daily Checks
•Check the Battery’s charge level, displayed
on the instrument panel.
•Check that all exterior lights, horn, turn
signals, and wipers and washers are
working.
•Check the operation of the brakes,
including the parking brake.
•Check the operation of the seat belts
(see page 3.5).
•Look for fluid deposits underneath Model S
that might indicate a leak. It is normal for a
small pool of water to form (caused by the
air conditioning system’s dehumidifying
process).
Monthly Checks
•Check the condition and pressure of each
tire (see page 7.3).
•Check washer fluid level and top up if
necessary (see page 7.18).
•Check that the air conditioning system is
operating (see page 5.9).
CAUTION: Contact Tesla immediately if
you notice any significant or sudden drop
in fluid levels or uneven tire wear.
High Voltage Safety
Your Model S has been designed and built with
safety as a priority. However, be aware of these
precautions to protect yourself from the risk of
injury inherent in all high-voltage systems:
•Read and follow all instructions provided on
the labels that are attached to Model S.
These labels are there for your safety.
•The high voltage system has no
user-serviceable parts. Do not disassemble,
remove or replace high voltage
components, cables or connectors. High
voltage cables are colored orange for easy
identification.
•If an accident occurs, do not touch any high
voltage wiring, connectors, or components
connected to the wiring.
•In the unlikely event that a fire occurs,
immediately contact your local fire
emergency responders.
WARNING: Always disconnect the charge
cable before working underneath
Model S, even if charging is not in progress.
WARNING: Keep your hands and clothing
away from cooling fans. Some fans
operate even when Model S is powered off.
WARNING: Some fluids (battery acid,
Battery coolant, brake fluid, windshield
washer additives, etc.) used in motor vehicles
are poisonous and should not be inhaled,
swallowed, or brought into contact with open
wounds. For your safety, always read and follow
instructions printed on fluid containers.
Dispose of used fluids and other
chemicals at authorized waste disposal
sites. It is illegal to pollute drains, waterways or
soil.
book.book Page 2 Friday, July 19, 2013 12:53 PM
Page 101 of 152
Tire Care and Maintenance
MAINTENANCE7.3
Tire Care and MaintenanceMaintaining Tire Pressures
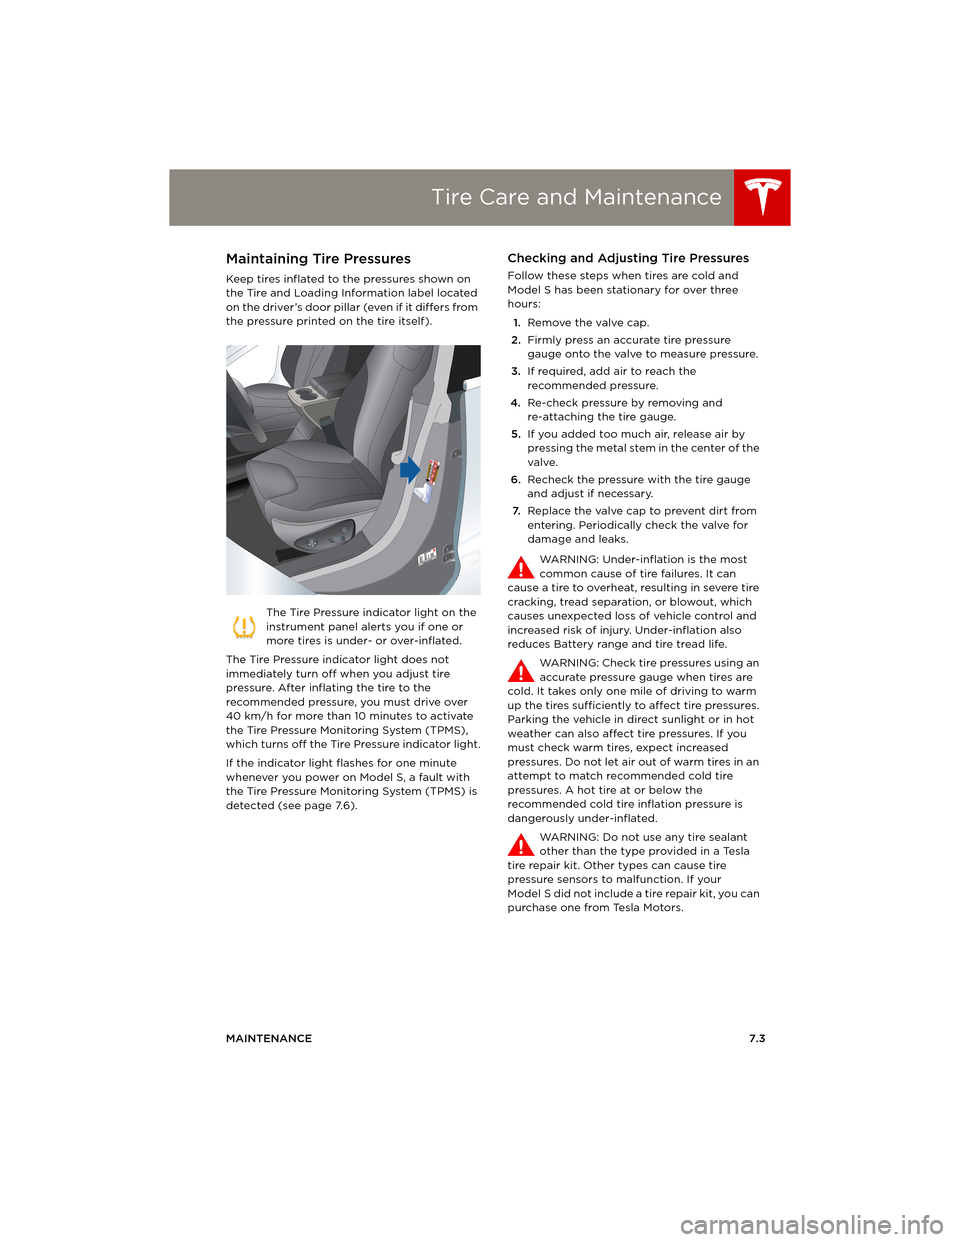
Keep tires inflated to the pressures shown on
the Tire and Loading Information label located
on the driver’s door pillar (even if it differs from
the pressure printed on the tire itself).
The Tire Pressure indicator light on the
instrument panel alerts you if one or
more tires is under- or over-inflated.
The Tire Pressure indicator light does not
immediately turn off when you adjust tire
pressure. After inflating the tire to the
recommended pressure, you must drive over
40 km/h for more than 10 minutes to activate
the Tire Pressure Monitoring System (TPMS),
which turns off the Tire Pressure indicator light.
If the indicator light flashes for one minute
whenever you power on Model S, a fault with
the Tire Pressure Monitoring System (TPMS) is
detected (see page 7.6).
Checking and Adjusting Tire Pressures
Follow these steps when tires are cold and
Model S has been stationary for over three
hours:
1.Remove the valve cap.
2.Firmly press an accurate tire pressure
gauge onto the valve to measure pressure.
3.If required, add air to reach the
recommended pressure.
4.Re-check pressure by removing and
re-attaching the tire gauge.
5.If you added too much air, release air by
pressing the metal stem in the center of the
valve.
6.Recheck the pressure with the tire gauge
and adjust if necessary.
7.Replace the valve cap to prevent dirt from
entering. Periodically check the valve for
damage and leaks.
WARNING: Under-inflation is the most
common cause of tire failures. It can
cause a tire to overheat, resulting in severe tire
cracking, tread separation, or blowout, which
causes unexpected loss of vehicle control and
increased risk of injury. Under-inflation also
reduces Battery range and tire tread life.
WARNING: Check tire pressures using an
accurate pressure gauge when tires are
cold. It takes only one mile of driving to warm
up the tires sufficiently to affect tire pressures.
Parking the vehicle in direct sunlight or in hot
weather can also affect tire pressures. If you
must check warm tires, expect increased
pressures. Do not let air out of warm tires in an
attempt to match recommended cold tire
pressures. A hot tire at or below the
recommended cold tire inflation pressure is
dangerously under-inflated.
WARNING: Do not use any tire sealant
other than the type provided in a Tesla
tire repair kit. Other types can cause tire
pressure sensors to malfunction. If your
Model S did not include a tire repair kit, you can
purchase one from Tesla Motors.
book.book Page 3 Friday, July 19, 2013 12:53 PM
Page 103 of 152
Tire Care and Maintenance
MAINTENANCE7.5
Improving Tire Mileage
To improve the mileage you get from your tires,
maintain tires at the recommended tire
pressures (see page 7.3), observe speed limits
and advisory speeds, and avoid:
•Pulling away quickly, or hard acceleration.
•Fast turns and heavy braking.
•Potholes and objects in the road.
•Hitting curbs when parking.
•Contaminating tires with fluids that can
cause damage.
Replacing Tires and Wheels
Tires degrade over time due to the effects of
ultraviolet light, extreme temperatures, high
loads, and environmental conditions. It is
recommended that tires are replaced every six
years, or sooner if required.
Wheel rims and tires are matched to suit the
handling characteristics of the vehicle.
Replacement tires must comply with the
original specification. If tires other than those
specified are used, ensure that the load and
speed ratings marked on the tire (see
page 8.10) equal or exceed those of the original
specification.
Ideally, you should replace all four tires at the
same time. If this is not possible, replace the
tires in pairs (both front or both rear). When
replacing tires, always re-balance and check
the alignment of wheels.
For the specification of the original wheels and
tires installed on Model S, see page 8.8.
WARNING: For your safety, use only tires
and wheels that match the original
specification. Tires that do not match the
original specification can affect the operation
of the Tire Pressure Monitoring System (TPMS).
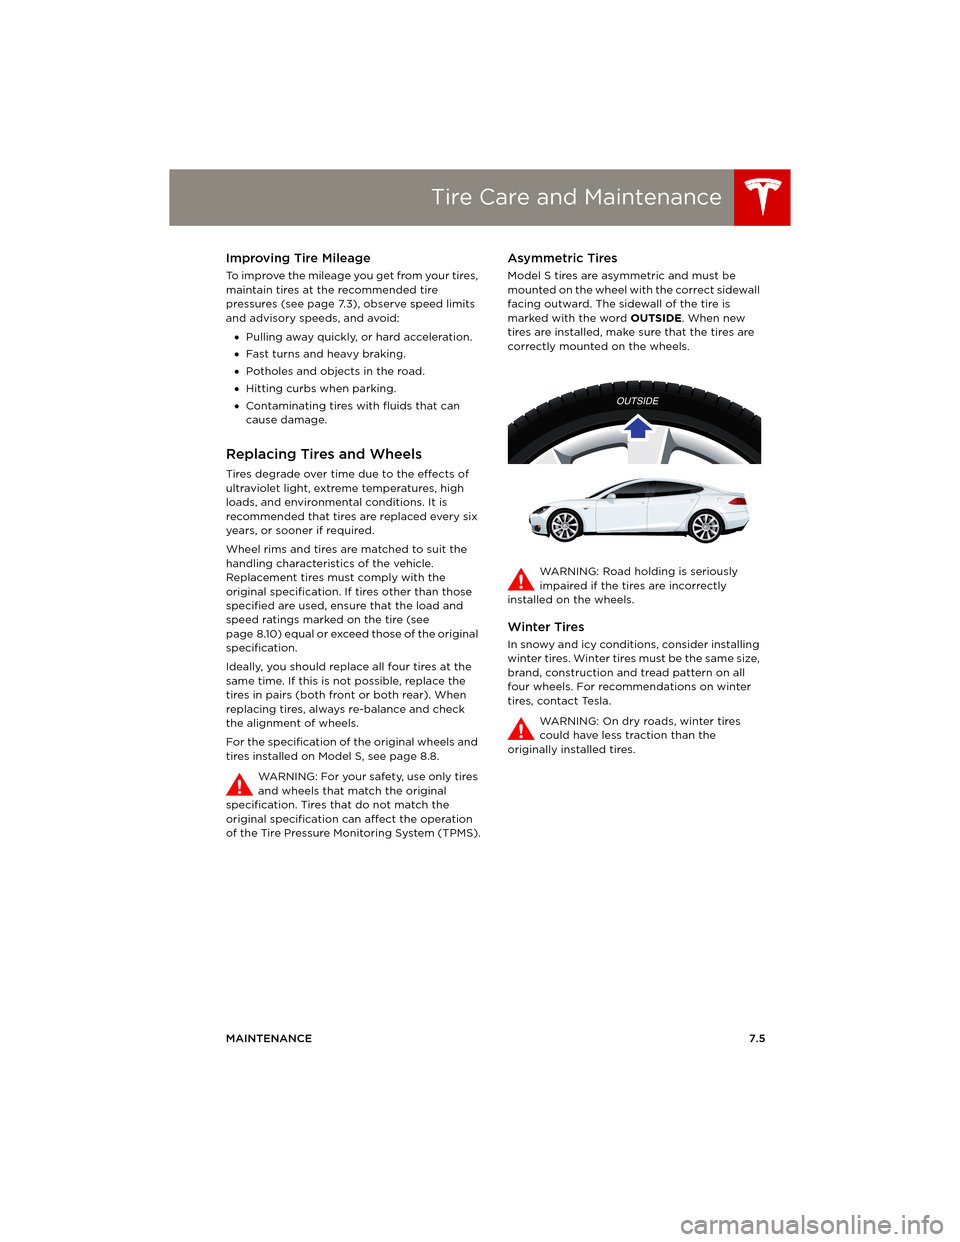
Asymmetric Tires
Model S tires are asymmetric and must be
mounted on the wheel with the correct sidewall
facing outward. The sidewall of the tire is
marked with the word OUTSIDE. When new
tires are installed, make sure that the tires are
correctly mounted on the wheels.
WARNING: Road holding is seriously
impaired if the tires are incorrectly
installed on the wheels.
Winter Tires
In snowy and icy conditions, consider installing
winter tires. Winter tires must be the same size,
brand, construction and tread pattern on all
four wheels. For recommendations on winter
tires, contact Tesla.
WARNING: On dry roads, winter tires
could have less traction than the
originally installed tires.
book.book Page 5 Friday, July 19, 2013 12:53 PM
Page 104 of 152
Tire Care and MaintenanceTire Care and Maintenance
7.6MODEL S OWNERS MANUAL
Using Tire Chains
Tesla has tested and approved Security Chain
Company (SCC) Model Z-563 chains for use on
the rear wheels. These chains must only be
used if your Model S has 245/45R19 rear tires
installed. Do not use chains on 21” tires.
When installing tire chains, follow the
instructions provided by the tire chain
manufacturer. Mount them as tightly as
possible.
When using tire chains:
•Drive slowly—do not exceed 48 km/h.
•Avoid heavily loading Model S (heavy loads
can reduce the clearance between the tires
and the body).
•Remove the tire chains as soon as
conditions allow.
NOTE: Tire chains are prohibited in some
jurisdictions. Check local laws before installing
tire chains.
CAUTION: Using non-recommended tire
chains, or using tire chains on other sized
tires, can damage the suspension, body,
wheels, and/or brake lines. Damage caused by
using non-recommended tire chains is not
covered by the warranty.
CAUTION: Ensure that tire chains cannot
touch suspension components or brake
lines. If you hear the chains making
unusual noises that would indicate contact with
Model S, stop and investigate immediately.
Tire Pressure Monitoring
Each tire should be checked monthly when
cold and inflated to the recommended
pressures that are printed on the Tire and
Loading Information label located on the
driver’s door pillar (see page 7.3). If your
vehicle has tires of a different size than the size
indicated on the vehicle placard or tire inflation
pressure label, determine the proper tire
inflation pressure for those tires.
As an added safety feature, your vehicle has
been equipped with a tire pressure monitoring
system (TPMS) that displays a low tire pressure
telltale (Tire Pressure Warning) on the
instrument panel when one or more of your
tires is significantly under-inflated. Accordingly,
when the Tire Pressure indicator light displays
on the instrument panel alerting you of low tire pressure, stop and check your tires as soon as
possible, and inflate them to the proper
pressure (see page 7.3). Driving on a
significantly under-inflated tire causes the tire
to overheat and can lead to tire failure.
Under-inflation also reduces fuel efficiency and
tire tread life, and may affect the vehicle's
handling and stopping ability.
If Model S detects a fault with the Tire
Pressure Monitoring System (TPMS),
this indicator flashes for one minute
whenever you power on Model S.
NOTE: Installing accessories that are not
approved by Tesla can interfere with the TPMS
system.
WARNING: The TPMS is not a substitute
for proper tire maintenance, including
manually checking tire pressures and regularly
inspecting the condition of tires. It is the
driver's responsibility to maintain correct tire
pressure, even if under-inflation has not
reached the level for the TPMS to trigger the
Tire Pressure Warning on the instrument panel.
TPMS Malfunction
Model S has also been equipped with a TPMS
malfunction indicator to indicate when the
system is not operating properly.
The TPMS malfunction indicator is combined
with the low tire pressure indicator light. When
the system detects a malfunction, the indicator
light flashes for approximately one minute after
Model S powers on, and then remains
continuously lit. This sequence continues upon
subsequent vehicle start-ups as long as the
malfunction exists.
When the TPMS malfunction indicator is on, the
system might not be able to detect or signal
low tire pressure as intended. TPMS
malfunctions can occur for a variety of reasons,
including installing replacement or alternate
tires or wheels on the vehicle that prevent the
TPMS from functioning properly. Always check
the TPMS malfunction indicator light after
replacing one or more tires or wheels on your
vehicle to ensure that the replacement or
alternate tires and wheels allow the TPMS to
continue to function properly.
NOTE: If a tire has been replaced or repaired
using a different tire sealant than the one
available from Tesla, and a low tire pressure is
book.book Page 6 Friday, July 19, 2013 12:53 PM