child lock TESLA MODEL S 2014 Owner's manual (Europe)
[x] Cancel search | Manufacturer: TESLA, Model Year: 2014, Model line: MODEL S, Model: TESLA MODEL S 2014Pages: 152, PDF Size: 17.5 MB
Page 9 of 152
2.1
OPENING AND CLOSING
Doors
Keyless Locking and Unlocking .................. 2.2
Using the Key ..................................................... 2.2
Using Exterior Door Handles ...................... 2.4
Using Interior Door Handles ........................ 2.4
Interior Locking and Unlocking.................. 2.4
Child-protection Locks................................... 2.5
Drive-away Locking......................................... 2.5
Walk-away Locking ......................................... 2.5
Unlocking with a Dead Key Battery .......... 2.5
Opening Interior Doors with No Power ... 2.6
Windows
Opening from the Exterior ........................... 2.7
Opening and Closing from the Interior .... 2.7
Locking Rear Windows .................................. 2.7
Rear Trunk
Opening................................................................ 2.8
Closing .................................................................. 2.8
Adjusting the Opening Height .................... 2.8
Interior Release ................................................. 2.9
Opening with No Power ................................ 2.9
Front Trunk
Opening.............................................................. 2.10
Closing ................................................................ 2.10
Interior Emergency Release ........................ 2.11
Opening with No Power ............................... 2.11
SunroofOpening and Closing .................................... 2.12
Glove Box
Opening and Closing .................................... 2.13
Cup Holders
Opening and Closing .................................... 2.14
book.book Page 1 Friday, July 19, 2013 12:53 PM
Page 12 of 152
DoorsDoors
2.4MODEL S OWNERS MANUAL
Using Exterior Door Handles
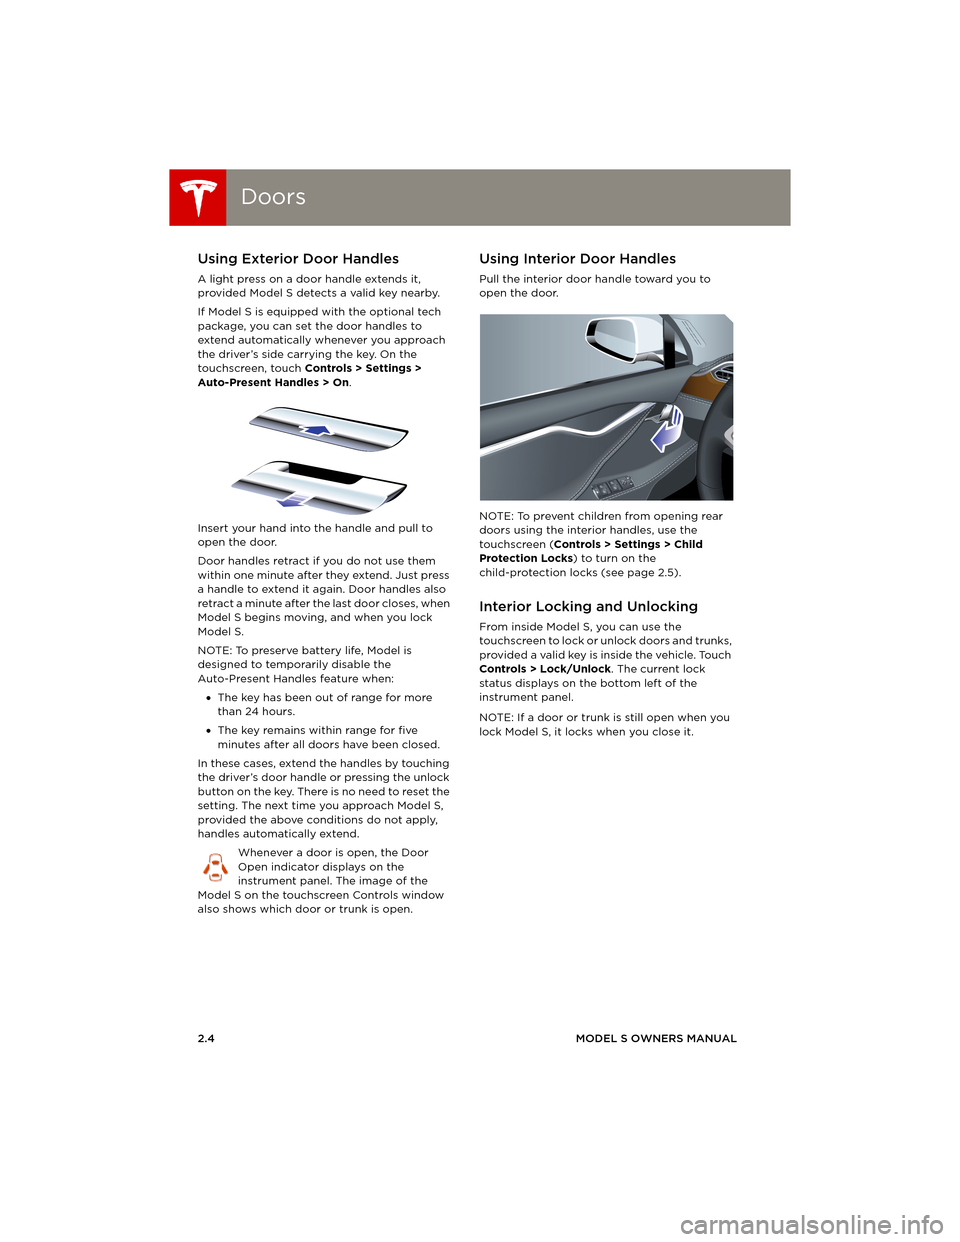
A light press on a door handle extends it,
provided Model S detects a valid key nearby.
If Model S is equipped with the optional tech
package, you can set the door handles to
extend automatically whenever you approach
the driver’s side carrying the key. On the
touchscreen, touch Controls > Settings >
Auto-Present Handles > On.
Insert your hand into the handle and pull to
open the door.
Door handles retract if you do not use them
within one minute after they extend. Just press
a handle to extend it again. Door handles also
retract a minute after the last door closes, when
Model S begins moving, and when you lock
Model S.
NOTE: To preserve battery life, Model is
designed to temporarily disable the
Auto-Present Handles feature when:
•The key has been out of range for more
than 24 hours.
•The key remains within range for five
minutes after all doors have been closed.
In these cases, extend the handles by touching
the driver’s door handle or pressing the unlock
button on the key. There is no need to reset the
setting. The next time you approach Model S,
provided the above conditions do not apply,
handles automatically extend.
Whenever a door is open, the Door
Open indicator displays on the
instrument panel. The image of the
Model S on the touchscreen Controls window
also shows which door or trunk is open.
Using Interior Door Handles
Pull the interior door handle toward you to
open the door.
NOTE: To prevent children from opening rear
doors using the interior handles, use the
touchscreen (Controls > Settings > Child
Protection Locks) to turn on the
child-protection locks (see page 2.5).
Interior Locking and Unlocking
From inside Model S, you can use the
touchscreen to lock or unlock doors and trunks,
provided a valid key is inside the vehicle. Touch
Controls > Lock/Unlock. The current lock
status displays on the bottom left of the
instrument panel.
NOTE: If a door or trunk is still open when you
lock Model S, it locks when you close it.
opening & closing.fm Page 4 Friday, July 26, 2013 2:01 PM
Page 13 of 152
Doors
OPENING AND CLOSING2.5
Child-protection Locks
Model S has child-protection locks on the rear
doors and liftgate to prevent them from being
opened using interior handles. Use the
touchscreen to turn child protection locks on or
off. Touch Controls > Settings > Child
Protection Locks.
NOTE: It is recommended that you turn
child-protection locks on whenever children are
seated in the rear seats.
Drive-away Locking
Model S can automatically lock all doors
(including the trunks) whenever your driving
speed exceeds 8 km/h. To turn this feature on
or off, touch Controls > Settings > Drive-Away
Door Lock.
Walk-away Locking
If Model S is equipped with the optional tech
package, Model S doors and trunks can
automatically lock whenever you walk away
carrying the key.
To turn this feature on or off, touch Controls >
Settings > Walk-Away Door Lock.
NOTE: If all doors are closed and you
double-click the key to unlock Model S,
walk-away locking is temporarily suspended
until the next time you use the key to lock
Model S. This allows you to keep Model S
unlocked in your garage.
Unlocking with a Dead Key Battery
If Model S does not unlock when you walk up to
it, or when you press the unlock button on your
key, the key’s battery may be dead. If this is the
case, you can still unlock and drive Model S.
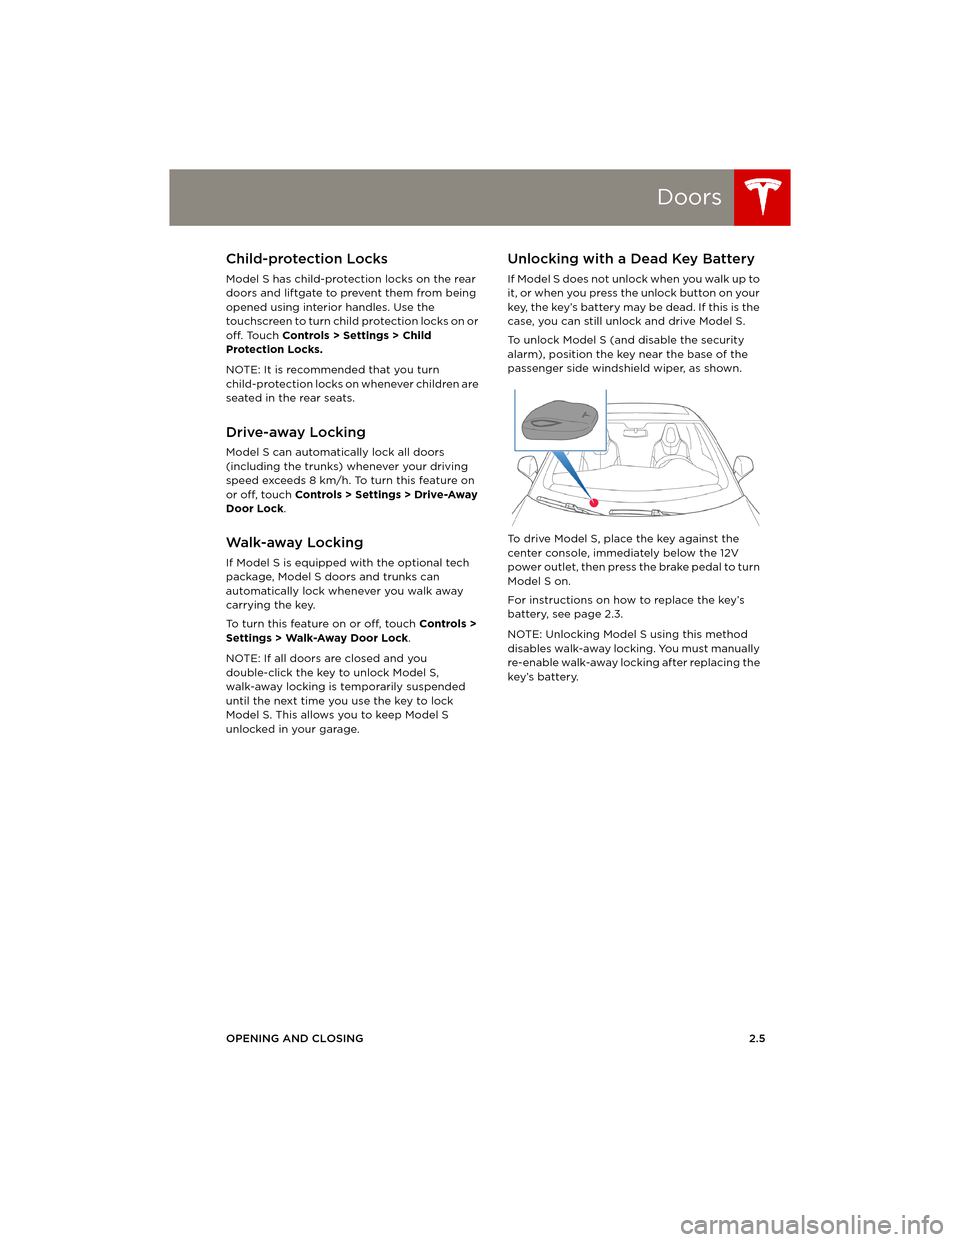
To unlock Model S (and disable the security
alarm), position the key near the base of the
passenger side windshield wiper, as shown.
To drive Model S, place the key against the
center console, immediately below the 12V
power outlet, then press the brake pedal to turn
Model S on.
For instructions on how to replace the key’s
battery, see page 2.3.
NOTE: Unlocking Model S using this method
disables walk-away locking. You must manually
re-enable walk-away locking after replacing the
key’s battery.
book.book Page 5 Friday, July 19, 2013 12:53 PM
Page 15 of 152
Windows
OPENING AND CLOSING2.7
Wi ndow sOpening from the Exterior
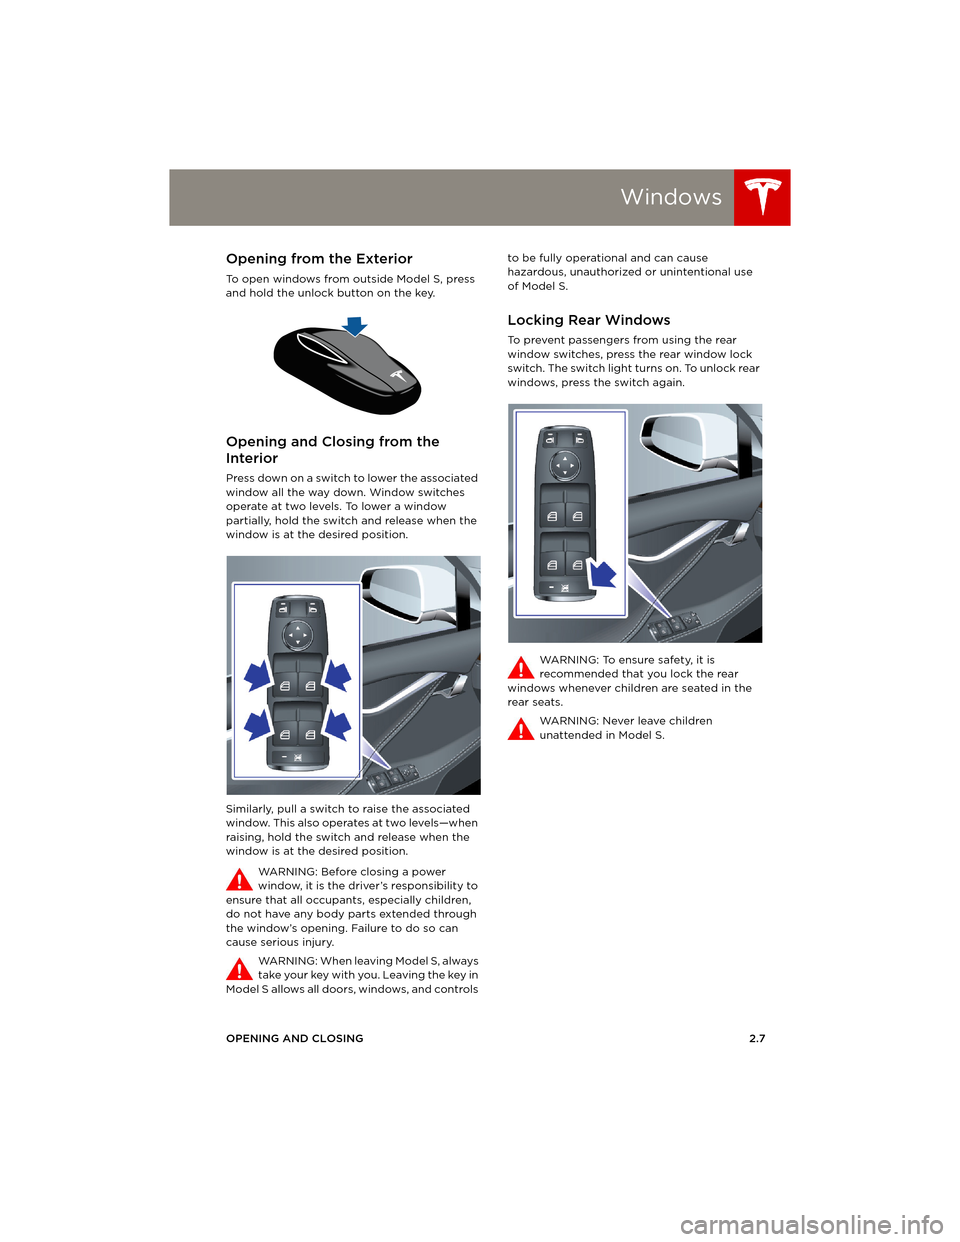
To open windows from outside Model S, press
and hold the unlock button on the key.
Opening and Closing from the
Interior
Press down on a switch to lower the associated
window all the way down. Window switches
operate at two levels. To lower a window
partially, hold the switch and release when the
window is at the desired position.
Similarly, pull a switch to raise the associated
window. This also operates at two levels—when
raising, hold the switch and release when the
window is at the desired position.
WARNING: Before closing a power
window, it is the driver’s responsibility to
ensure that all occupants, especially children,
do not have any body parts extended through
the window’s opening. Failure to do so can
cause serious injury.
WARNING: When leaving Model S, always
take your key with you. Leaving the key in
Model S allows all doors, windows, and controls to be fully operational and can cause
hazardous, unauthorized or unintentional use
of Model S.
Locking Rear Windows
To prevent passengers from using the rear
window switches, press the rear window lock
switch. The switch light turns on. To unlock rear
windows, press the switch again.
WARNING: To ensure safety, it is
recommended that you lock the rear
windows whenever children are seated in the
rear seats.
WARNING: Never leave children
unattended in Model S.
book.book Page 7 Friday, July 19, 2013 12:53 PM
Page 17 of 152
Rear Trunk
OPENING AND CLOSING2.9
Interior Release
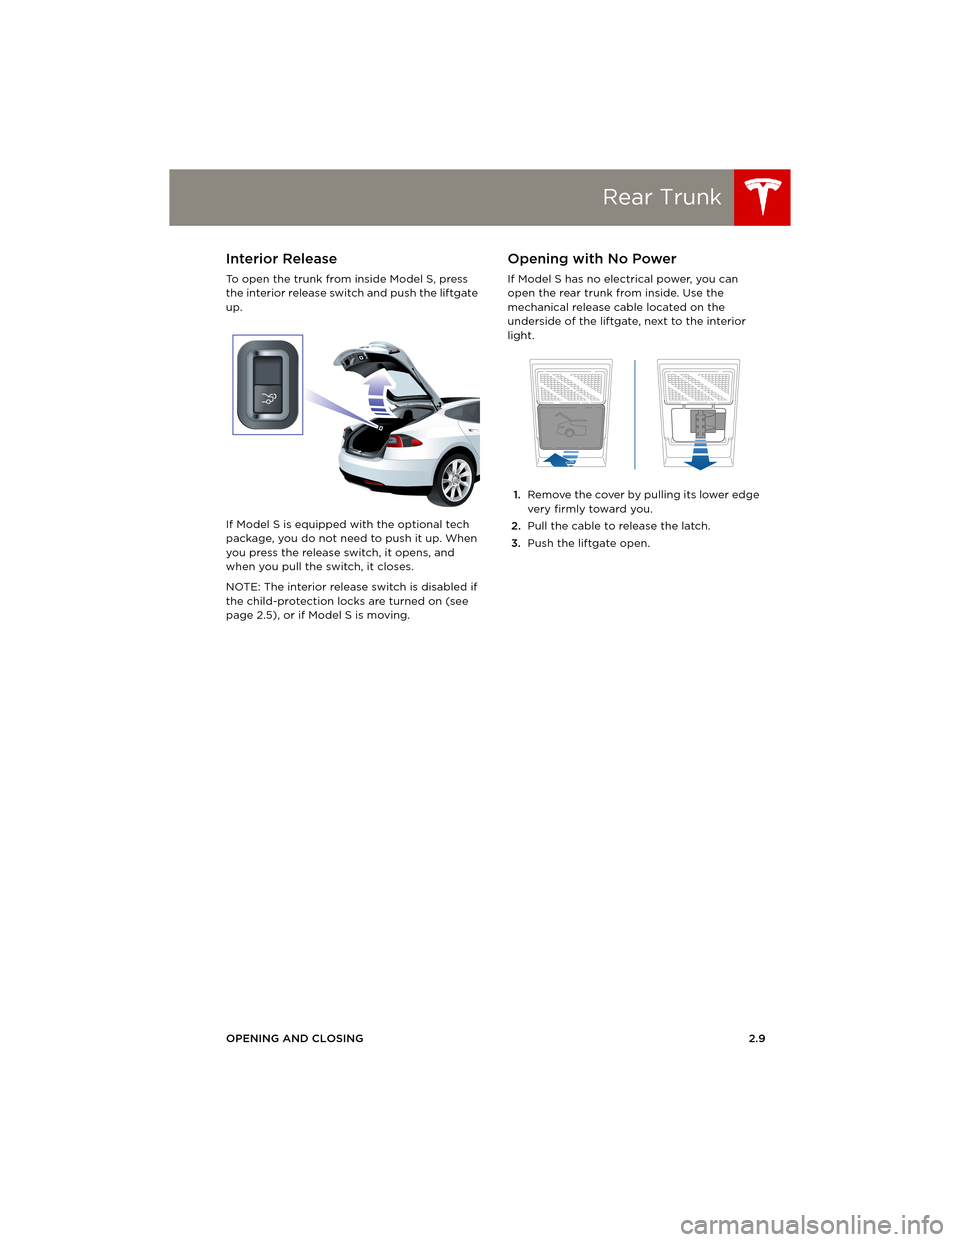
To open the trunk from inside Model S, press
the interior release switch and push the liftgate
up.
If Model S is equipped with the optional tech
package, you do not need to push it up. When
you press the release switch, it opens, and
when you pull the switch, it closes.
NOTE: The interior release switch is disabled if
the child-protection locks are turned on (see
page 2.5), or if Model S is moving.
Opening with No Power
If Model S has no electrical power, you can
open the rear trunk from inside. Use the
mechanical release cable located on the
underside of the liftgate, next to the interior
light.
1.Remove the cover by pulling its lower edge
very firmly toward you.
2.Pull the cable to release the latch.
3.Push the liftgate open.
book.book Page 9 Friday, July 19, 2013 12:53 PM
Page 26 of 152
Seat BeltsSeat Belts
3.4MODEL S OWNERS MANUAL
Seat BeltsWearing Seat Belts
Using seat belts and child safety seats is the
most effective way to protect occupants if a
collision occurs. Therefore, wearing a seat belt
is required by law in most jurisdictions.
Both the driver and passenger seats are
equipped with three-point inertia reel seat
belts. Inertia reel belts are automatically
tensioned to allow occupants to move
comfortably during normal driving conditions.
The seat belt reel automatically locks to prevent
movement of occupants if Model S experiences
a force associated with hard acceleration,
braking, cornering, or an impact in a collision.
The seat belt reminder on the
instrument panel alerts you if a seat belt
for an occupied seat is not fastened. If
the belt remains unfastened, the reminder
flashes and an intermittent chime sounds. If all
occupants are buckled up and the reminder
stays on, re-fasten seat belts to ensure they are
correctly latched. Also remove any heavy
object (such as a briefcase) from an
unoccupied seat. If the reminder light continues
to stay on, contact Tesla.
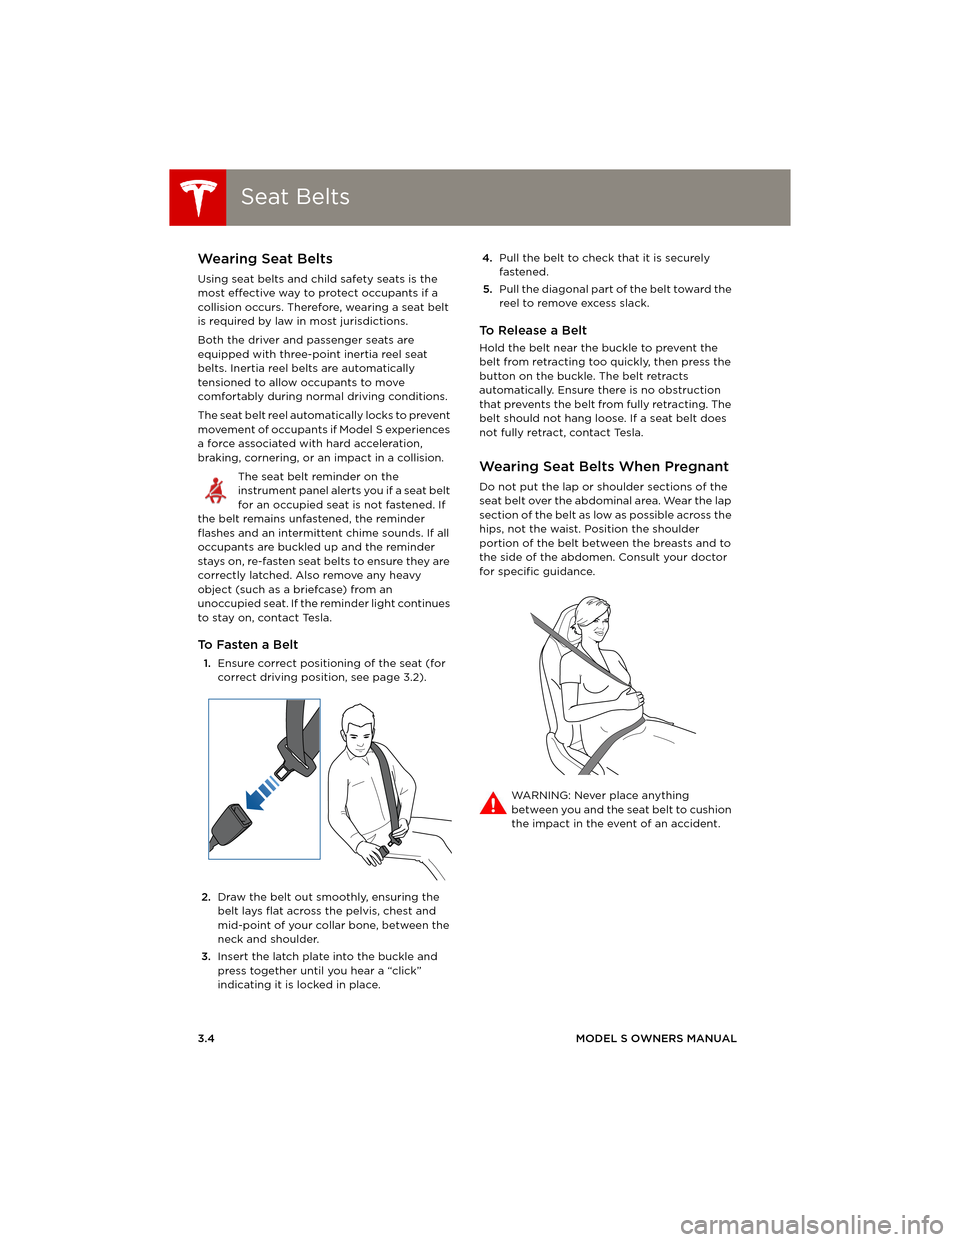
To F a s t e n a B e l t
1.Ensure correct positioning of the seat (for
correct driving position, see page 3.2).
2.Draw the belt out smoothly, ensuring the
belt lays flat across the pelvis, chest and
mid-point of your collar bone, between the
neck and shoulder.
3.Insert the latch plate into the buckle and
press together until you hear a “click”
indicating it is locked in place.4.Pull the belt to check that it is securely
fastened.
5.Pull the diagonal part of the belt toward the
reel to remove excess slack.
To Release a Belt
Hold the belt near the buckle to prevent the
belt from retracting too quickly, then press the
button on the buckle. The belt retracts
automatically. Ensure there is no obstruction
that prevents the belt from fully retracting. The
belt should not hang loose. If a seat belt does
not fully retract, contact Tesla.
Wearing Seat Belts When Pregnant
Do not put the lap or shoulder sections of the
seat belt over the abdominal area. Wear the lap
section of the belt as low as possible across the
hips, not the waist. Position the shoulder
portion of the belt between the breasts and to
the side of the abdomen. Consult your doctor
for specific guidance.
WARNING: Never place anything
between you and the seat belt to cushion
the impact in the event of an accident.
book.book Page 4 Friday, July 19, 2013 12:53 PM
Page 33 of 152
Tesla Built In Rear Facing Child Seats
SEATING AND SAFETY RESTRAINTS 3.11
Tesla Built In Rear Facing Child SeatsUsage Restrictions
The Tesla built in rear facing child seats are child
restraint systems and are approved to United
Nations ECE Regulation R44.04 standards for
use by children in Mass Groups II and III,
weighing 15 - 36 kg. These seats must only be
used for children who are between 3 and 12
years old, and 98 - 135 cm tall.
Always ensure the top of the child’s head
cannot contact the vehicle and that the child is
seated comfortably with the seat belts
positioned and latched correctly. The child’s
pelvis must be held securely in place by the lap
belt. Follow all instructions provided and do
not use supplemental child safety seats in
these seats.
NOTE: To draw more air into the rear seating
areas, it is recommended that whenever a child
is seated in the Tesla built in rear facing child
seats, you set the climate control system to
draw outside air into Model S, instead of
recirculating the air. See page 5.9.
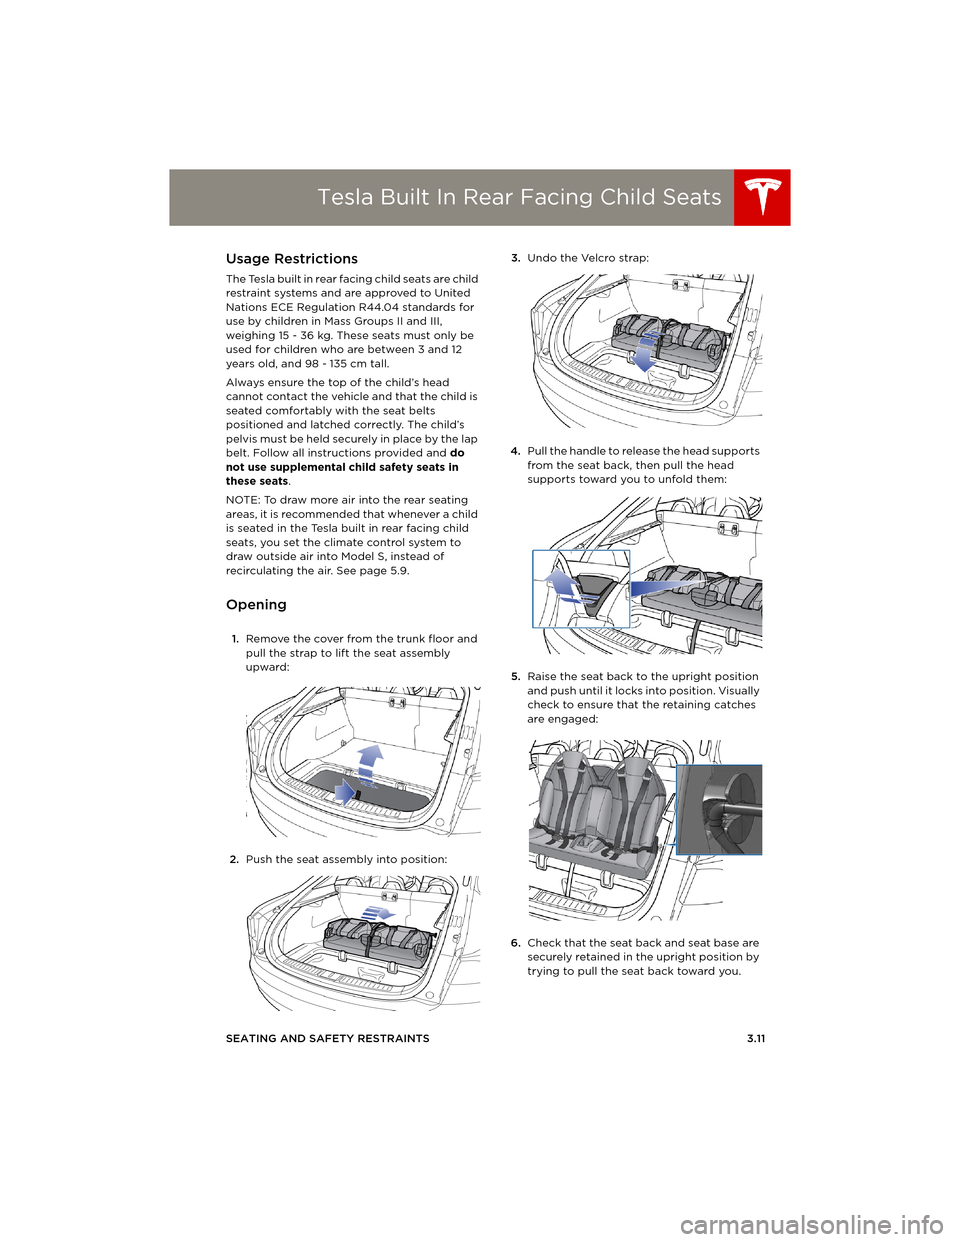
Opening
1.Remove the cover from the trunk floor and
pull the strap to lift the seat assembly
upward:
2.Push the seat assembly into position:3.Undo the Velcro strap:
4.Pull the handle to release the head supports
from the seat back, then pull the head
supports toward you to unfold them:
5.Raise the seat back to the upright position
and push until it locks into position. Visually
check to ensure that the retaining catches
are engaged:
6.Check that the seat back and seat base are
securely retained in the upright position by
trying to pull the seat back toward you.
book.book Page 11 Friday, July 19, 2013 12:53 PM
Page 40 of 152
AirbagsAirbags
3.18MODEL S OWNERS MANUAL
Inflation Effects
When airbags inflate, a fine powder is released.
This powder can irritate the skin and should be
thoroughly flushed from the eyes and from any
cuts or abrasions.
After inflation, the airbags deflate to provide a
gradual cushioning effect for the occupants
and to ensure the driver’s forward vision is not
obscured.
If airbags have inflated, or if your vehicle has
been in an accident, always have the airbags,
seat belt pre-tensioners and any associated
components checked and, if necessary,
replaced by Tesla.
In a collision, in addition to the airbags inflating:
•Doors unlock and the door handles extend.
•Hazard warning lights turn on.
•Interior lights turn on.
•High voltage is disabled.
To restore Battery power, use the touchscreen
to manually power off Model S (see page 4.6),
then press the brake to power it back on again.
Airbag Warning Indicator
The airbag indicator on the instrument
panel remains lit if the airbag system is
malfunctioning. The only time this
indicator should light up is briefly when
Model S first starts up, in which case it turns off
within a few seconds. If it remains lit, contact
Tesla immediately and do not drive.
Airbag Warnings
All occupants, including the driver,
should always wear their seat belts
whether or not an airbag is also provided at
their seating position to minimize the risk of
severe injury or death in the event of a crash.
Front seat occupants should not place
their arms over the airbag module, as an
inflating bag can cause fractures or other
injuries.
WARNING: Do not use seat covers on
Model S. Doing so could restrict
deployment of the side air bags if an
accident occurs. It can also reduce the
accuracy of the occupant detection system.
WARNING: Airbags inflate with
considerable speed and force, which can
cause injury. To limit injuries, ensure that
occupants are wearing seat belts and are
correctly seated, with the seat positioned as far
back as possible.
WARNING: Do not use a child safety seat
or seat young children on a seat with an
operational airbag in front of it. Doing so can
cause injury or death if the airbag inflates.
WARNING: To ensure correct inflation of
the side airbags, maintain an
unobstructed gap between an occupant’s torso
and the side of Model S.
WARNING: Passengers should not lean
their heads against the doors. Doing so
can cause injury if a curtain airbag inflates.
WARNING: Do not allow passengers to
obstruct the operation of an airbag by
placing feet, knees or any other part of the
body on or near an airbag.
WARNING: Do not attach or place objects
on or near the front airbags, the side of
the front seats, the headliner at the side of the
vehicle, or any other airbag cover that could
interfere with inflation of an airbag. Objects can
cause serious injury if the vehicle is in a crash
severe enough to cause the airbag to inflate.
WARNING: Following inflation, some
airbag components are hot. Do not touch
until they have cooled.
book.book Page 18 Friday, July 19, 2013 12:53 PM
Page 71 of 152
Touchscreen - Settings
USING THE TOUCHSCREEN5.7 1.Adjust settings associated with installed
apps (applications). Apps that have no
settings that you can adjust at this time are
grayed out.
2.Create driver profiles (see page 4.2)
3.Language & Units
Adjust how Model S displays:
•Language: Set the language used when
Model S displays alerts, notification
messages, and navigation instructions (if
equipped).
NOTE: When you change the language,
you experience a brief delay as Model S
shuts down and restarts the touchscreen.
•Region: Choose a region to define the
formatting convention used to display
dates (mm dd yy/dd-mm-yy, etc) and
decimal separators (5.123, 5,123, etc).
•Distance: Miles or kms can be shown on
the range display, speedometer, energy
chart, trip meters, Google map searches
and navigation routes.
•Time: 12 or 24 hour format.
•Temperature:
oF or oC.
•Charging Units: Display energy (kWh) or
distance (miles/kms).
•Range: Rated range (based on ECE R101
testing), or Ideal range (based on the
assumption of driving in ideal conditions
at a steady speed of 89 km/h on a flat
road, and using no additional energy
(seat heaters, air conditioning, etc).
4.Ve h i c l e
•Drive-away Door Lock: If on, all doors
automatically lock whenever you drive
Model S over 8 km/h (see page 2.5).
•Walk-away Door Lock: If on, all doors
automatically lock when you walk away
from Model S, carrying the key with you
(see page 2.5). Available only if Model S is
equipped with the optional tech package.
•Child-Protection Locks: If on, safety locks
prevent the rear doors and the liftgate
from being opened from inside Model S.
•Auto-Present Handles: If on, door handles
extend automatically whenever you
approach Model S carrying a key,
whether locked or unlocked (see
page 2.4.•Mirror Auto-Tilt: If on, exterior mirrors tilt
downward when reversing (see
page 4.5). Available only if Model S is
equipped with the optional tech package.
•Headlights After Exit: If on, headlights
stay on for two minutes after you exit, or
until you lock Model S (see page 4.13).
•Range Mode: If on, Model S conserves
energy by limiting the power of the
climate control system. Cabin heating and
cooling may be less effective.
5.Safety & Security
Turn various safety and security features on
and off:
•Passenger Airbag (see page 3.17).
•Alarm, and security options Model S is
equipped with (see page 5.22).
•Remote access by Tesla’s mobile
applications (see page 5.25).
6.HomeLink
Use HomeLink to control RF-enabled
garage doors, lights, or security systems
(see page 5.23).
WARNING: Do not read the touchscreen
while driving. Doing so increases the
likelihood of a collision. Everything you need to
know when driving is displayed on the
instrument panel.
book.book Page 7 Friday, July 19, 2013 12:53 PM
Page 143 of 152
i
INDEX
A
ABS (Anti-lock Braking System) ................. 4-20
access panel, removing .....................................7-16
accessories, installing ...................................... 7-24
accessories, plugging into power socket .5-16
air circulation ......................................................... 5-9
air conditioning
operating tips
................................................. 5-10
overview ............................................................. 5-8
air distribution ....................................................... 5-9
air filter ................................................................... 5-10
air suspension
automatic adjustments
.................................5-11
indicator lights ..................................................5-11
Jack mode ..........................................................5-11
manual settings ................................................5-11
air vents .................................................................. 5-10
airbags
after a collision
................................................3-18
front passenger, disabling ..........................3-17
how they work ................................................ 3-16
indicator lights .................................................3-18
inflation effects ...............................................3-18
location of .........................................................3-15
safety information ..........................................3-18
types of ............................................................. 3-16
alarm ........................................................................5-22
antifreeze ................................................................7-16
anti-lock braking (ABS) .................................. 4-20
audio
devices, connecting
...................................... 5-16
devices, playing from ....................................5-15
playing files .......................................................5-15
steering wheel buttons ................................. 4-3
automatic car washes ........................................ 7-12
B
backup camera ................................................... 4-24
battery (12V)
going flat
............................................................6-4
specifications .................................................... 8-7
Battery (high voltage)
care of
..................................................................6-4
coolant ................................................................7-16
discharge, impact of .......................................6-4
fluid check .........................................................7-16
general information ........................................6-4
specifications .................................................... 8-7
temperature limits ...........................................6-4
battery (key), replacing ..................................... 2-3
Bluetooth
audio devices, connecting
..........................5-15
general information .......................................5-17
phone, connecting .........................................5-18
phone, contacts and media ........................5-17
phone, disconnecting ...................................5-17
phone, pairing ..................................................5-17
phone, unpairing .............................................5-17body repairs
......................................................... 7-24
body touch up ..................................................... 7-14
brake fluid replacement ..................................... 7-2
brakes
anti-lock (ABS)
..............................................4-20
emergency braking ......................................4-20
fluid level ........................................................... 7-17
inspecting ........................................................4-20
regenerative braking .................................... 4-21
specifications ....................................................8-6
wear ...................................................................4-20
C
cabin temperature control ................................5-8
camera (rear view) ............................................ 4-24
capacity weight .....................................................8-3
car cover ................................................................ 7-14
car washes ............................................................. 7-12
carpets, cleaning ................................................. 7-13
chains ........................................................................7-6
charge cable
connecting
..........................................................6-5
disconnecting ....................................................6-5
charge current .......................................................6-7
charge levels ...........................................................6-7
charge port .............................................................6-5
charge port light .................................................. 6-6
charging
adapters
..............................................................6-3
charge port ........................................................6-5
connecting the charge cable ......................6-5
current setting ..................................................6-7
disconnecting the charge cable .................6-5
equipment summary ......................................6-3
High Power Wall Connector ........................6-3
instructions .........................................................6-5
light ...................................................................... 6-6
mobile equipment for ....................................6-3
public charging stations ................................6-3
set charge limit .................................................6-7
settings ................................................................6-7
status ....................................................................6-8
stopping ..............................................................6-5
charging schedule, setting ................................6-7
child protection
disabling liftgate
.............................................. 2-5
disabling rear door handles ......................... 2-5
locking rear windows ..................................... 2-7
child seats
choosing
.............................................................. 3-7
general guidelines ........................................... 3-7
installation methods .......................................3-8
installing multiple .............................................3-9
ISOFIX type, installing ...................................3-9
larger children ...................................................3-8
rear facing, opening ....................................... 3-11
rear facing, restrictions ................................ 3-11
rear facing, safety .......................................... 3-14
rear facing, seating a child ......................... 3-13
book.book Page i Friday, July 19, 2013 12:53 PM