suspension TESLA MODEL S 2014 Owner's manual (Europe)
[x] Cancel search | Manufacturer: TESLA, Model Year: 2014, Model line: MODEL S, Model: TESLA MODEL S 2014Pages: 152, PDF Size: 17.5 MB
Page 3 of 152
P/N: 1028871-07-A REV: 1i
TABLE OF CONTENTS
OVERVIEWInterior Overview............................................... 1.2
Exterior Overview ............................................. 1.3
OPENING AND CLOSING
Doors ..................................................................... 2.2
Windows .............................................................. 2.7
Rear Trunk........................................................... 2.8
Front Trunk ....................................................... 2.10
Sunroof ............................................................... 2.12
Glove Box .......................................................... 2.13
Cup Holders ...................................................... 2.14
SEATING AND SAFETY
RESTRAINTS
Front and Rear Seats ...................................... 3.2
Seat Belts............................................................ 3.4
Child Safety Seats ............................................ 3.7
Tesla Built In Rear Facing Child Seats..... 3.11
Airbags ............................................................... 3.15
DRIVINGDriver Profiles ................................................... 4.2
Steering Wheel ................................................. 4.3
Mirrors .................................................................. 4.5
Starting and Powering Off ........................... 4.6
Gears .................................................................... 4.7
Instrument Panel.............................................. 4.8
Lights ................................................................... 4.11
Wipers and Washers ..................................... 4.15
Park Assist......................................................... 4.16
Trip Information .............................................. 4.18
Energy Usage................................................... 4.19
Brakes ................................................................ 4.20
Traction Control............................................. 4.22
Cruise Control ................................................. 4.23
Rear View Camera ........................................ 4.24
USING THE TOUCHSCREEN
Touchscreen Overview.................................. 5.2
Touchscreen - Controls................................. 5.4
Touchscreen - Settings................................. 5.6
Climate Controls ............................................... 5.8
Active Air Suspension ................................... 5.11
Media and Audio............................................. 5.12
Phone .................................................................. 5.17Maps ..................................................................... 5.19
Navigation ....................................................... 5.20
Security Settings ............................................ 5.22
HomeLink® Universal Transceiver............ 5.23
Software Updates .......................................... 5.24
Mobile App ....................................................... 5.25
CHARGING
Electric Vehicle Components ...................... 6.2
Battery Information ........................................ 6.4
Charging Model S ............................................ 6.5
MAINTENANCE
Maintenance Schedule ................................... 7.2
Tire Care and Maintenance .......................... 7.3
Temporary Tire Repair................................... 7.8
Cleaning.............................................................. 7.12
Wiper Blades and Washer Jets ................. 7.15
Fluid Reservoirs ............................................... 7.16
Fuses.................................................................... 7.19
Jacking and Lifting ........................................ 7.23
Parts and Accessories .................................. 7.24
SPECIFICATIONS
Identification Labels ....................................... 8.2
Vehicle Loading ................................................ 8.3
Dimensions and Weights .............................. 8.5
Subsystems ........................................................ 8.6
Wheels and Tires.............................................. 8.8
ROADSIDE ASSISTANCE
About Roadside Assistance......................... 9.2
Instructions for Transporters ...................... 9.3
CONSUMER INFORMATIONDisclaimers ....................................................... 10.2
Reporting Concerns ...................................... 10.3
book.book Page i Friday, July 19, 2013 12:53 PM
Page 49 of 152
Instrument Panel
DRIVING4.9
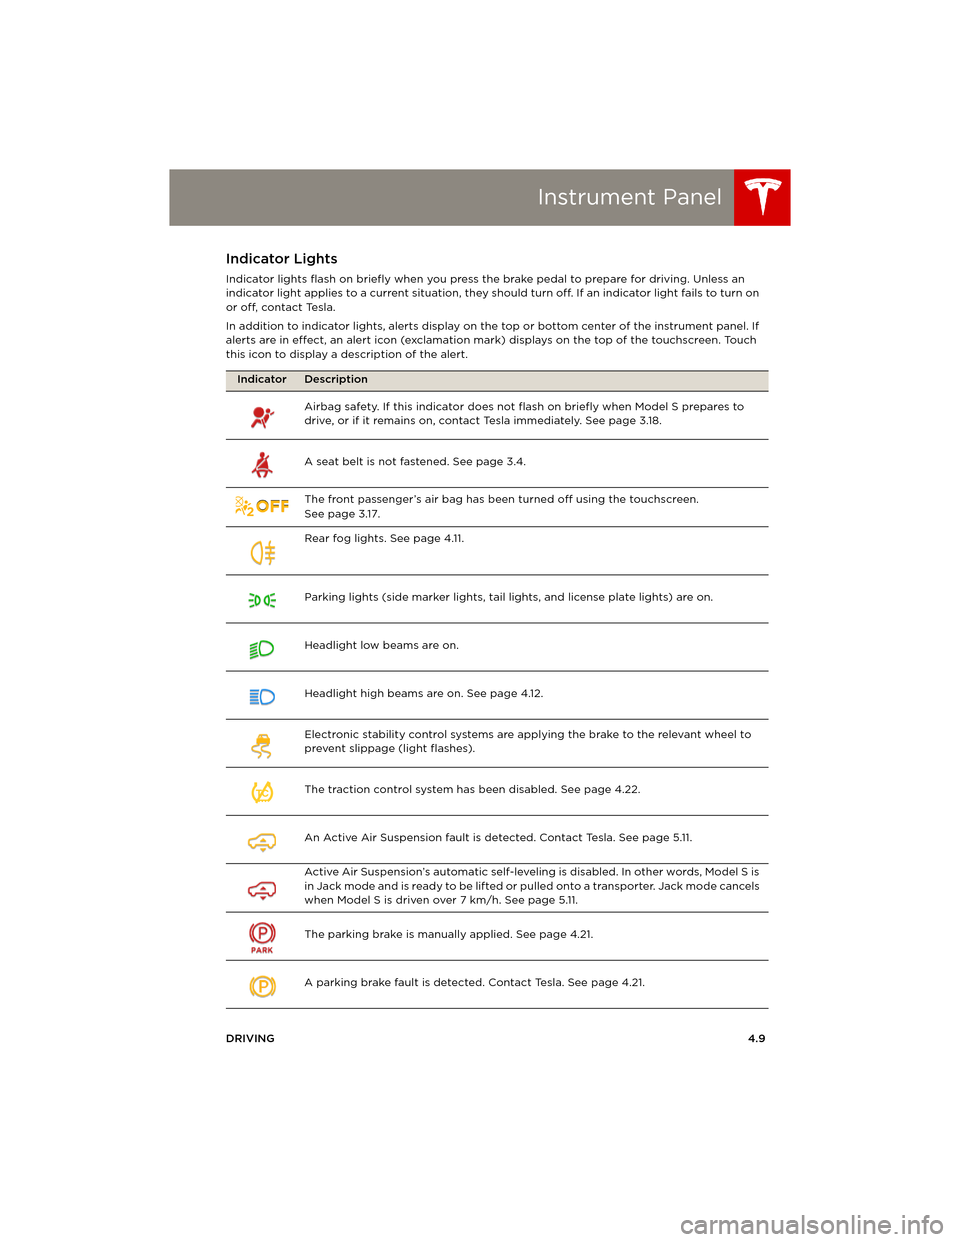
Indicator Lights
Indicator lights flash on briefly when you press the brake pedal to prepare for driving. Unless an
indicator light applies to a current situation, they should turn off. If an indicator light fails to turn on
or off, contact Tesla.
In addition to indicator lights, alerts display on the top or bottom center of the instrument panel. If
alerts are in effect, an alert icon (exclamation mark) displays on the top of the touchscreen. Touch
this icon to display a description of the alert.
Indicator Description
Airbag safety. If this indicator does not flash on briefly when Model S prepares to
drive, or if it remains on, contact Tesla immediately. See page 3.18.
A seat belt is not fastened. See page 3.4.
The front passenger’s air bag has been turned off using the touchscreen.
Seepage3.17.
Rear fog lights. See page 4.11.
Parking lights (side marker lights, tail lights, and license plate lights) are on.
Headlight low beams are on.
Headlight high beams are on. See page 4.12.
Electronic stability control systems are applying the brake to the relevant wheel to
prevent slippage (light flashes).
The traction control system has been disabled. See page 4.22.
An Active Air Suspension fault is detected. Contact Tesla. See page 5.11.
Active Air Suspension’s automatic self-leveling is disabled. In other words, Model S is
i n J a c k m o d e a n d i s r e a d y t o b e l i f t e d o r pulled onto a transporter. Jack mode cancels
when Model S is driven over 7 km/h. See page 5.11.
The parking brake is manually applied. See page 4.21.
A parking brake fault is detected. Contact Tesla. See page 4.21.
TC
book.book Page 9 Friday, July 19, 2013 12:53 PM
Page 52 of 152
LightsLights
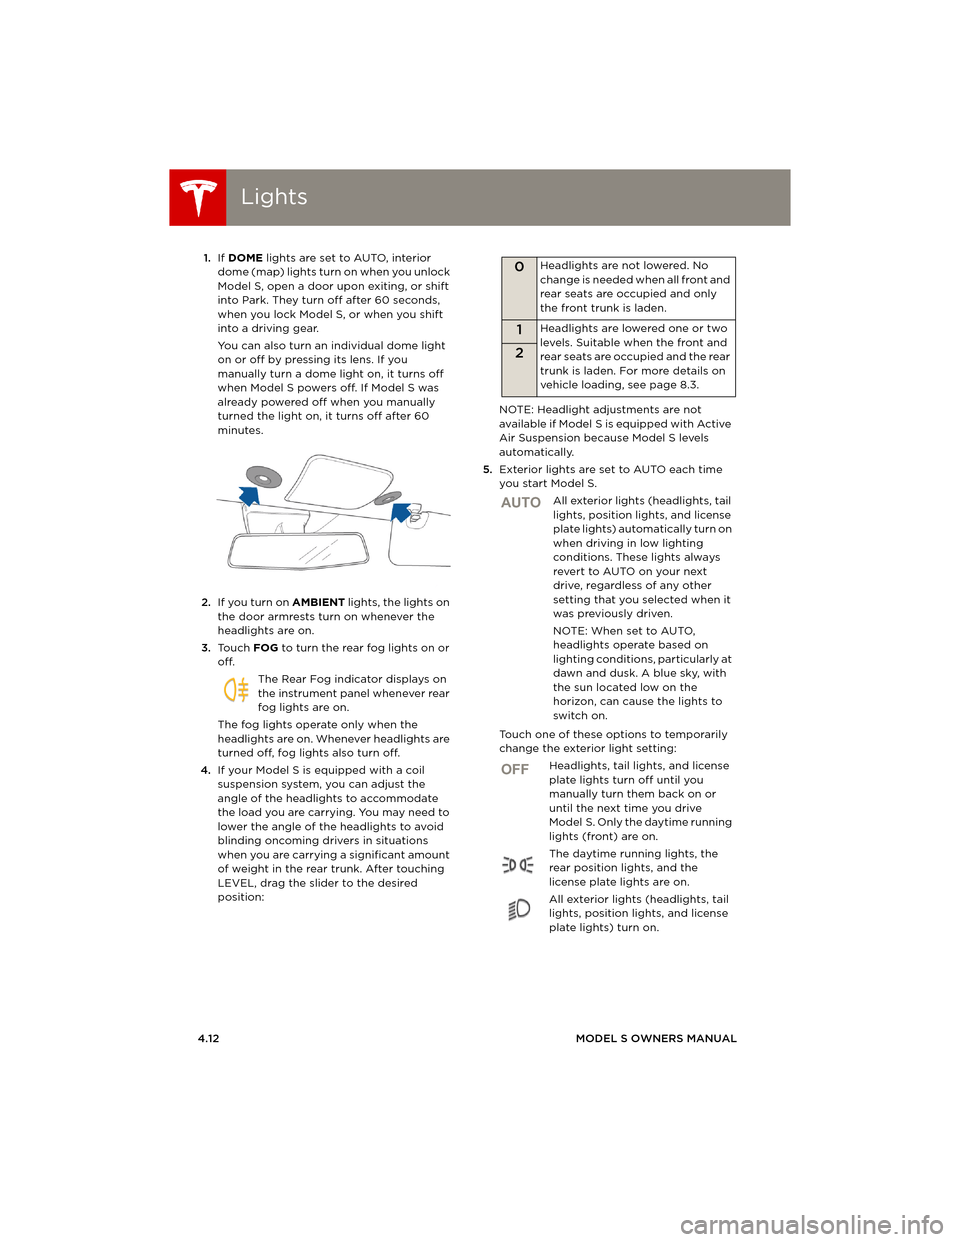
4.12MODEL S OWNERS MANUAL 1.If DOME lights are set to AUTO, interior
dome (map) lights turn on when you unlock
Model S, open a door upon exiting, or shift
into Park. They turn off after 60 seconds,
when you lock Model S, or when you shift
into a driving gear.
You can also turn an individual dome light
on or off by pressing its lens. If you
manually turn a dome light on, it turns off
when Model S powers off. If Model S was
already powered off when you manually
turned the light on, it turns off after 60
minutes.
2.If you turn on AMBIENT lights, the lights on
the door armrests turn on whenever the
headlights are on.
3.To u c h FOG to turn the rear fog lights on or
off.
The Rear Fog indicator displays on
the instrument panel whenever rear
fog lights are on.
The fog lights operate only when the
headlights are on. Whenever headlights are
turned off, fog lights also turn off.
4.If your Model S is equipped with a coil
suspension system, you can adjust the
angle of the headlights to accommodate
the load you are carrying. You may need to
lower the angle of the headlights to avoid
blinding oncoming drivers in situations
when you are carrying a significant amount
of weight in the rear trunk. After touching
LEVEL, drag the slider to the desired
position:NOTE: Headlight adjustments are not
available if Model S is equipped with Active
Air Suspension because Model S levels
automatically.
5.Exterior lights are set to AUTO each time
you start Model S.
All exterior lights (headlights, tail
lights, position lights, and license
plate lights) automatically turn on
when driving in low lighting
conditions. These lights always
revert to AUTO on your next
drive, regardless of any other
setting that you selected when it
was previously driven.
NOTE: When set to AUTO,
headlights operate based on
lighting conditions, particularly at
dawn and dusk. A blue sky, with
the sun located low on the
horizon, can cause the lights to
switch on.
Touch one of these options to temporarily
change the exterior light setting:
Headlights, tail lights, and license
plate lights turn off until you
manually turn them back on or
until the next time you drive
Model S. Only the daytime running
lights (front) are on.
The daytime running lights, the
rear position lights, and the
license plate lights are on.
All exterior lights (headlights, tail
lights, position lights, and license
plate lights) turn on.
0Headlights are not lowered. No
change is needed when all front and
rear seats are occupied and only
the front trunk is laden.
1Headlights are lowered one or two
levels. Suitable when the front and
rear seats are occupied and the rear
trunk is laden. For more details on
vehicle loading, see page 8.3.
2
AUTO
OFF
book.book Page 12 Friday, July 19, 2013 12:53 PM
Page 65 of 152
5.1
USING THE TOUCHSCREEN
Touchscreen Overview
The Big Picture .................................................. 5.2
Touchscreen - Controls
Controlling Model S Features ..................... 5.4
Touchscreen - SettingsCustomizing Model S ..................................... 5.6
Climate Controls
Overview of Climate Controls ..................... 5.8
Customizing Climate Control...................... 5.9
Ventilation ......................................................... 5.10
Climate Control Operating Tips................ 5.10
Active Air Suspension
Automatic Height Adjustments ................. 5.11
Manual Height Adjustments ........................ 5.11
Jack Mode .......................................................... 5.11
Media and Audio
Overview............................................................ 5.12
AM and FM Radio Services ......................... 5.13
DAB Radio Services ...................................... 5.13
Internet Radio .................................................. 5.14
Media Settings ................................................. 5.14
Favorites ............................................................ 5.15
My Music & Devices ....................................... 5.15
USB Connections ............................................ 5.16
12V Power Socket........................................... 5.16
PhoneBluetooth® Compatibility ............................. 5.17
Pairing a Bluetooth Phone .......................... 5.17
Importing Contacts........................................ 5.17
Unpairing a Bluetooth Phone .................... 5.17
Connecting to a Paired Phone .................. 5.18
Making a Phone Call ...................................... 5.18
Receiving a Phone Call................................. 5.18
In Call Options ................................................. 5.18
Maps
Using Maps........................................................ 5.19
NavigationNavigation Overview ................................... 5.20
Starting Navigation....................................... 5.20
During Navigation .......................................... 5.21
Security Settings
About the Security System........................ 5.22
HomeLink® Universal Transceiver
About HomeLink® .......................................... 5.23
Programming HomeLink ............................. 5.23
Software Updates
Loading New Software ................................ 5.24
Viewing Release Notes ................................ 5.24
Mobile AppModel S Mobile App...................................... 5.25
book.book Page 1 Friday, July 19, 2013 12:53 PM
Page 69 of 152
Touchscreen - Controls
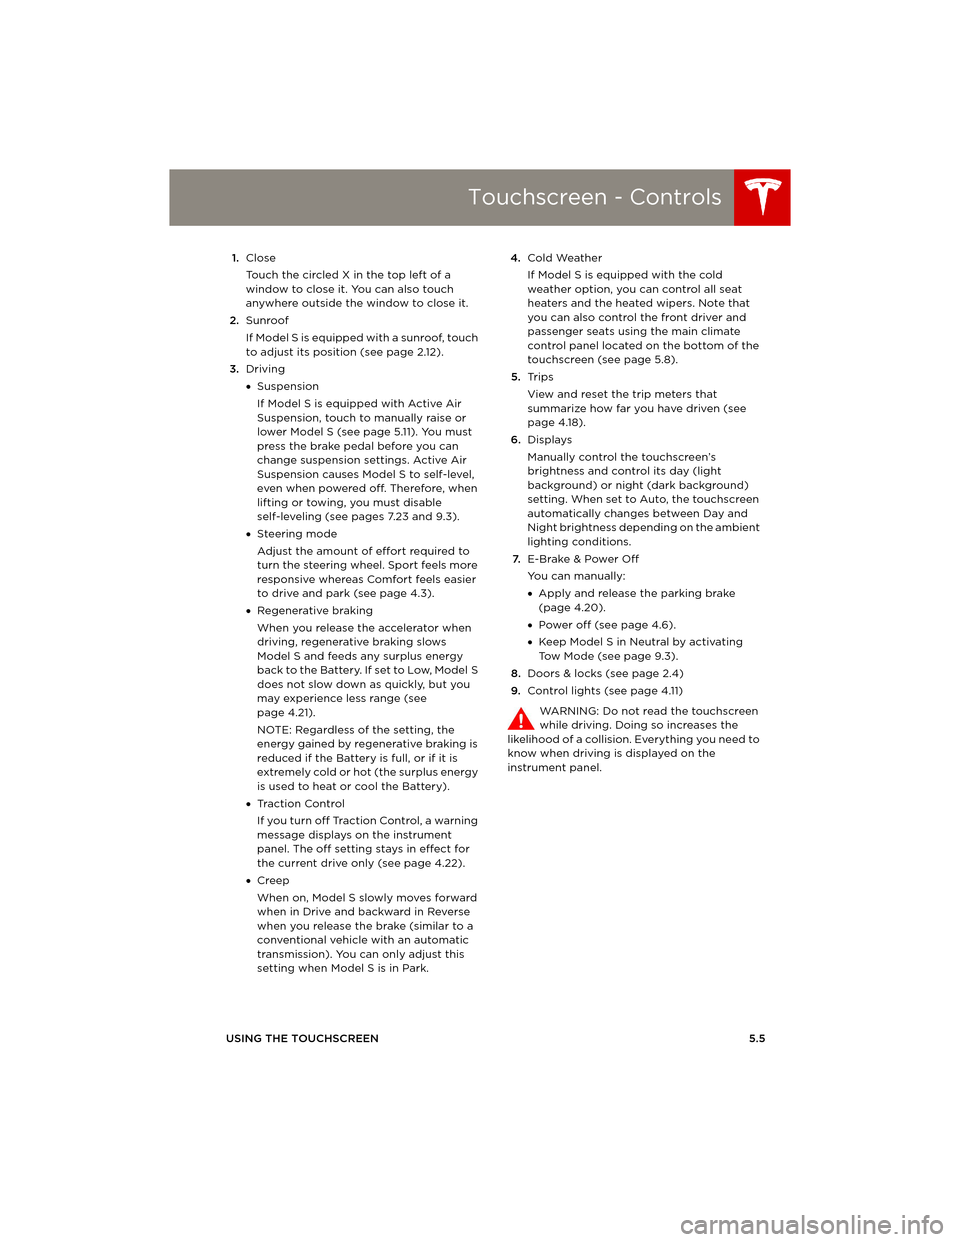
USING THE TOUCHSCREEN5.5 1.Close
Touch the circled X in the top left of a
window to close it. You can also touch
anywhere outside the window to close it.
2.Sunroof
If Model S is equipped with a sunroof, touch
to adjust its position (see page 2.12).
3.Driving
•Suspension
If Model S is equipped with Active Air
Suspension, touch to manually raise or
lower Model S (see page 5.11). You must
press the brake pedal before you can
change suspension settings. Active Air
Suspension causes Model S to self-level,
even when powered off. Therefore, when
lifting or towing, you must disable
self-leveling (see pages 7.23 and 9.3).
•Steering mode
Adjust the amount of effort required to
turn the steering wheel. Sport feels more
responsive whereas Comfort feels easier
to drive and park (see page 4.3).
•Regenerative braking
When you release the accelerator when
driving, regenerative braking slows
Model S and feeds any surplus energy
b a c k t o t h e B a t t e r y. I f s e t t o L o w, M o d e l S
does not slow down as quickly, but you
may experience less range (see
page 4.21).
NOTE: Regardless of the setting, the
energy gained by regenerative braking is
reduced if the Battery is full, or if it is
extremely cold or hot (the surplus energy
is used to heat or cool the Battery).
•Tr a c t i o n C o n t r o l
If you turn off Traction Control, a warning
message displays on the instrument
panel. The off setting stays in effect for
the current drive only (see page 4.22).
•Creep
When on, Model S slowly moves forward
when in Drive and backward in Reverse
when you release the brake (similar to a
conventional vehicle with an automatic
transmission). You can only adjust this
setting when Model S is in Park.4.Cold Weather
If Model S is equipped with the cold
weather option, you can control all seat
heaters and the heated wipers. Note that
you can also control the front driver and
passenger seats using the main climate
control panel located on the bottom of the
touchscreen (see page 5.8).
5.Tr i p s
View and reset the trip meters that
summarize how far you have driven (see
page 4.18).
6.Displays
Manually control the touchscreen’s
brightness and control its day (light
background) or night (dark background)
setting. When set to Auto, the touchscreen
automatically changes between Day and
Night brightness depending on the ambient
lighting conditions.
7.E-Brake & Power Off
You can manually:
•Apply and release the parking brake
(page 4.20).
•Power off (see page 4.6).
•Keep Model S in Neutral by activating
Tow Mode (see page 9.3).
8.Doors & locks (see page 2.4)
9.Control lights (see page 4.11)
WARNING: Do not read the touchscreen
while driving. Doing so increases the
likelihood of a collision. Everything you need to
know when driving is displayed on the
instrument panel.
book.book Page 5 Friday, July 19, 2013 12:53 PM
Page 75 of 152
Active Air Suspension
USING THE TOUCHSCREEN5.11
Active A ir SuspensionAutomatic Height Adjustments
If Model S is equipped with Active Air
Suspension, the system adjusts the height
based on driving speed. It also maintains a level
height between the front and rear when
carrying loads.
NOTE: When Model S starts, you might hear the
sound of a compressor as the system’s
reservoir fills with air.
If Model S is moving, Active Air Suspension
adjusts height as follows:
•Whenever you drive between 90 and 115
km/h, the suspension lowers to Low to
improve aerodynamics and handling. When
your driving slows to less than 65 km/h, the
suspension raises back to Standard.
•Whenever you drive over 115 km/h, the
suspension immediately lowers to Low.
•Whenever you drive at a speed less than
40 km/h, the suspension immediately
raises to Standard.
•If you set the suspension to Low, then drive
over 7 km/h, the suspension reverts to
Standard.
•If you set the suspension to Very High, then
drive over 15 km/h, the suspension lowers
to High.
•If you set the suspension to High, then drive
over 30 km/h, the suspension lowers to
Standard.
After driving, the height of the suspension
periodically levels, even when Model S is
powered off.
If a fault is detected with the air
suspension system, a yellow indicator
displays on the instrument panel. If the
problem persists, contact Tesla.
Manual Height Adjustments
CAUTION: Before adjusting the
suspension height, ensure Model S is
clear of all obstacles above and below.
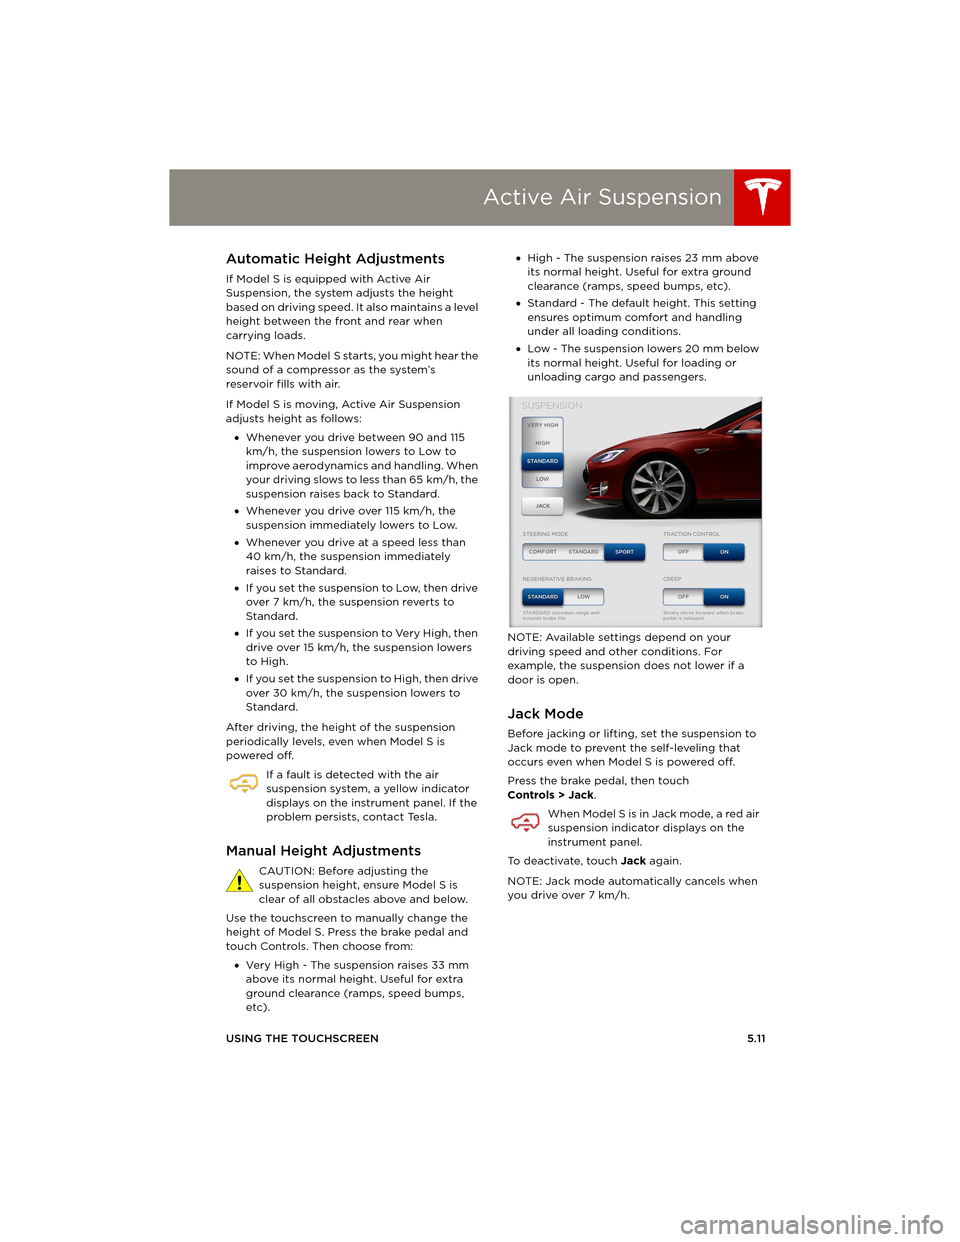
Use the touchscreen to manually change the
height of Model S. Press the brake pedal and
touch Controls. Then choose from:
•Very High - The suspension raises 33 mm
above its normal height. Useful for extra
ground clearance (ramps, speed bumps,
etc).•High - The suspension raises 23 mm above
its normal height. Useful for extra ground
clearance (ramps, speed bumps, etc).
•Standard - The default height. This setting
ensures optimum comfort and handling
under all loading conditions.
•Low - The suspension lowers 20 mm below
its normal height. Useful for loading or
unloading cargo and passengers.
NOTE: Available settings depend on your
driving speed and other conditions. For
example, the suspension does not lower if a
door is open.
Jack Mode
Before jacking or lifting, set the suspension to
Jack mode to prevent the self-leveling that
occurs even when Model S is powered off.
Press the brake pedal, then touch
Controls > Jack.
When Model S is in Jack mode, a red air
suspension indicator displays on the
instrument panel.
To deactivate, touch Jack again.
NOTE: Jack mode automatically cancels when
you drive over 7 km/h.
book.book Page 11 Friday, July 19, 2013 12:53 PM
Page 104 of 152
Tire Care and MaintenanceTire Care and Maintenance
7.6MODEL S OWNERS MANUAL
Using Tire Chains
Tesla has tested and approved Security Chain
Company (SCC) Model Z-563 chains for use on
the rear wheels. These chains must only be
used if your Model S has 245/45R19 rear tires
installed. Do not use chains on 21” tires.
When installing tire chains, follow the
instructions provided by the tire chain
manufacturer. Mount them as tightly as
possible.
When using tire chains:
•Drive slowly—do not exceed 48 km/h.
•Avoid heavily loading Model S (heavy loads
can reduce the clearance between the tires
and the body).
•Remove the tire chains as soon as
conditions allow.
NOTE: Tire chains are prohibited in some
jurisdictions. Check local laws before installing
tire chains.
CAUTION: Using non-recommended tire
chains, or using tire chains on other sized
tires, can damage the suspension, body,
wheels, and/or brake lines. Damage caused by
using non-recommended tire chains is not
covered by the warranty.
CAUTION: Ensure that tire chains cannot
touch suspension components or brake
lines. If you hear the chains making
unusual noises that would indicate contact with
Model S, stop and investigate immediately.
Tire Pressure Monitoring
Each tire should be checked monthly when
cold and inflated to the recommended
pressures that are printed on the Tire and
Loading Information label located on the
driver’s door pillar (see page 7.3). If your
vehicle has tires of a different size than the size
indicated on the vehicle placard or tire inflation
pressure label, determine the proper tire
inflation pressure for those tires.
As an added safety feature, your vehicle has
been equipped with a tire pressure monitoring
system (TPMS) that displays a low tire pressure
telltale (Tire Pressure Warning) on the
instrument panel when one or more of your
tires is significantly under-inflated. Accordingly,
when the Tire Pressure indicator light displays
on the instrument panel alerting you of low tire pressure, stop and check your tires as soon as
possible, and inflate them to the proper
pressure (see page 7.3). Driving on a
significantly under-inflated tire causes the tire
to overheat and can lead to tire failure.
Under-inflation also reduces fuel efficiency and
tire tread life, and may affect the vehicle's
handling and stopping ability.
If Model S detects a fault with the Tire
Pressure Monitoring System (TPMS),
this indicator flashes for one minute
whenever you power on Model S.
NOTE: Installing accessories that are not
approved by Tesla can interfere with the TPMS
system.
WARNING: The TPMS is not a substitute
for proper tire maintenance, including
manually checking tire pressures and regularly
inspecting the condition of tires. It is the
driver's responsibility to maintain correct tire
pressure, even if under-inflation has not
reached the level for the TPMS to trigger the
Tire Pressure Warning on the instrument panel.
TPMS Malfunction
Model S has also been equipped with a TPMS
malfunction indicator to indicate when the
system is not operating properly.
The TPMS malfunction indicator is combined
with the low tire pressure indicator light. When
the system detects a malfunction, the indicator
light flashes for approximately one minute after
Model S powers on, and then remains
continuously lit. This sequence continues upon
subsequent vehicle start-ups as long as the
malfunction exists.
When the TPMS malfunction indicator is on, the
system might not be able to detect or signal
low tire pressure as intended. TPMS
malfunctions can occur for a variety of reasons,
including installing replacement or alternate
tires or wheels on the vehicle that prevent the
TPMS from functioning properly. Always check
the TPMS malfunction indicator light after
replacing one or more tires or wheels on your
vehicle to ensure that the replacement or
alternate tires and wheels allow the TPMS to
continue to function properly.
NOTE: If a tire has been replaced or repaired
using a different tire sealant than the one
available from Tesla, and a low tire pressure is
book.book Page 6 Friday, July 19, 2013 12:53 PM
Page 118 of 152

FusesFuses
7.20MODEL S OWNERS MANUAL
Fuse Box 1
Access to fuse box 1 requires removal of components that must be performed by a Tesla service
technician. The following fuse list is provided only to assist you in determining if a fuse in this box
needs to be replaced. Contact Tesla Service if one of these fuses needs to be replaced.
Fuse RatingCircuit Protected
NOTE: THESE FUSES MUST BE REPLACED BY A TESLA SERVICE TECHNICIAN
1 5 A Accessory sensor, radio, USB hub
2 5 A Headlight leveling system (EU/China Coil Suspension vehicles only)
3 5 A Vanity lights, rear view mirror
4 30 A Outboard rear seat heaters (cold weather option)
5 15 A Seat heater (driver’s seat)
6 20 A Base audio amplifier
7 15 A Seat heater (front passenger seat)
820 APremium audio amplifier
9 25 A Sunroof
10 5 A Passive safety restraints
11 5 A Steering column controls
12 5 A Sensor for Drive mode and Yaw Rate (Stability/Traction Control)
13 15 A Wiper park
14 5 A Drive inverter
15 20 A Electric parking brake
16 5 A Parking/blind spot sensors
17 20 A Electric parking brake
18 5 A Not used
19 5 A In-vehicle HVAC sensor
20 5 A Cabin air heater logic
21 15 A Battery coolant pump 1
22 5 A Inlet actuators
23 15 A Powertrain coolant pump
24 5 A Cabin climate control
25 15 A Battery coolant pump 2
26 - Not used
27 10 A Thermal controller
book.book Page 20 Friday, July 19, 2013 12:53 PM
Page 119 of 152
Fuses
MAINTENANCE7.21
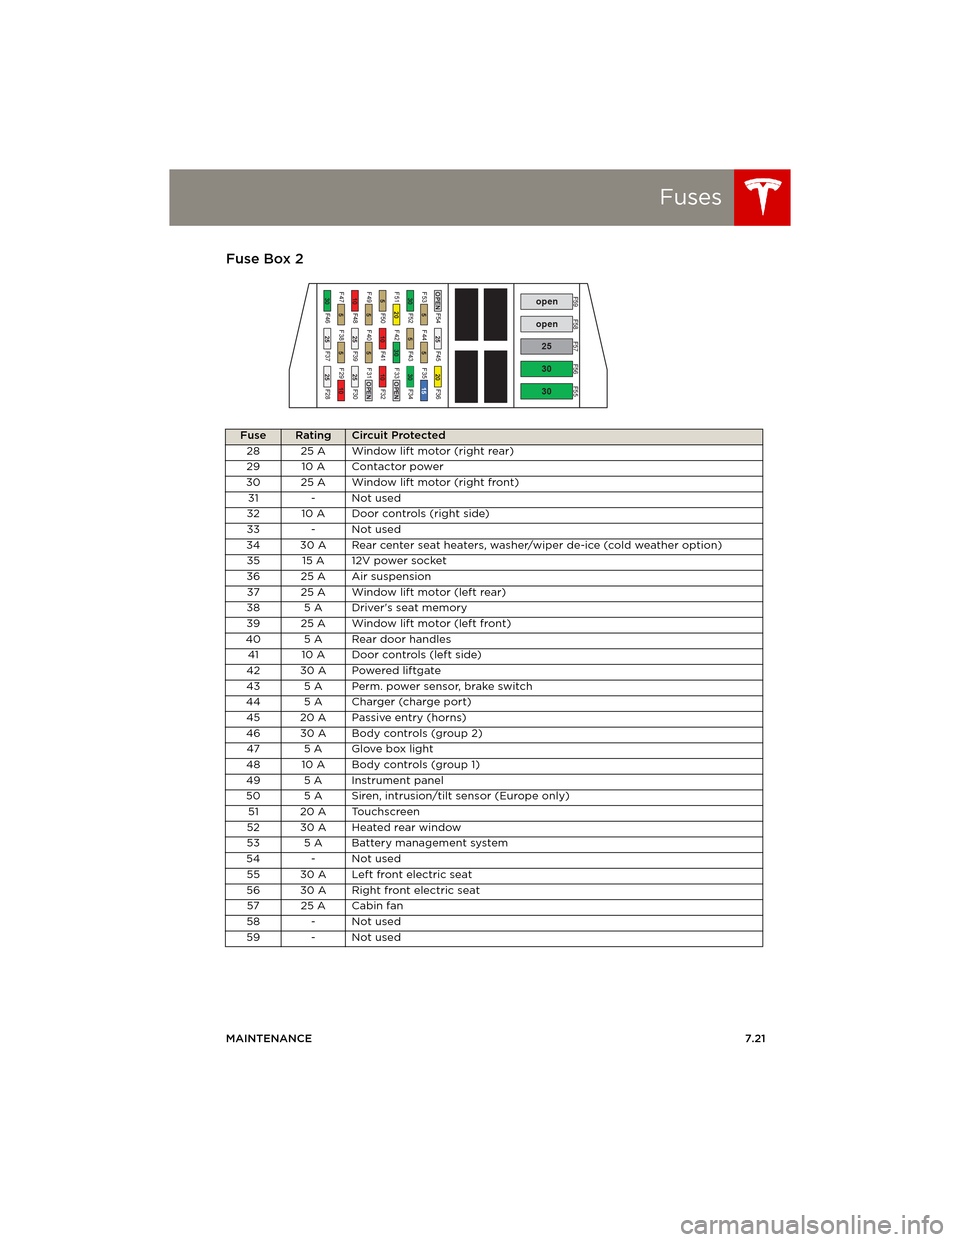
Fuse Box 2
Fuse RatingCircuit Protected
28 25 A Window lift motor (right rear)
29 10 A Contactor power
30 25 A Window lift motor (right front)
31 - Not used
32 10 A Door controls (right side)
33 - Not used
34 30 A Rear center seat heaters, washer/wiper de-ice (cold weather option)
35 15 A 12V power socket
36 25 A Air suspension
37 25 A Window lift motor (left rear)
38 5 A Driver's seat memory
39 25 A Window lift motor (left front)
40 5 A Rear door handles
41 10 A Door controls (left side)
42 30 A Powered liftgate
43 5 A Perm. power sensor, brake switch
44 5 A Charger (charge port)
45 20 A Passive entry (horns)
46 30 A Body controls (group 2)
47 5 A Glove box light
48 10 A Body controls (group 1)
49 5 A Instrument panel
50 5 A Siren, intrusion/tilt sensor (Europe only)
51 20 A Touchscreen
52 30 A Heated rear window
53 5 A Battery management system
54 - Not used
55 30 A Left front electric seat
56 30 A Right front electric seat
57 25 A Cabin fan
58 - Not used
59 - Not used
book.book Page 21 Friday, July 19, 2013 12:53 PM
Page 121 of 152
Jacking and Lifting
MAINTENANCE7.23
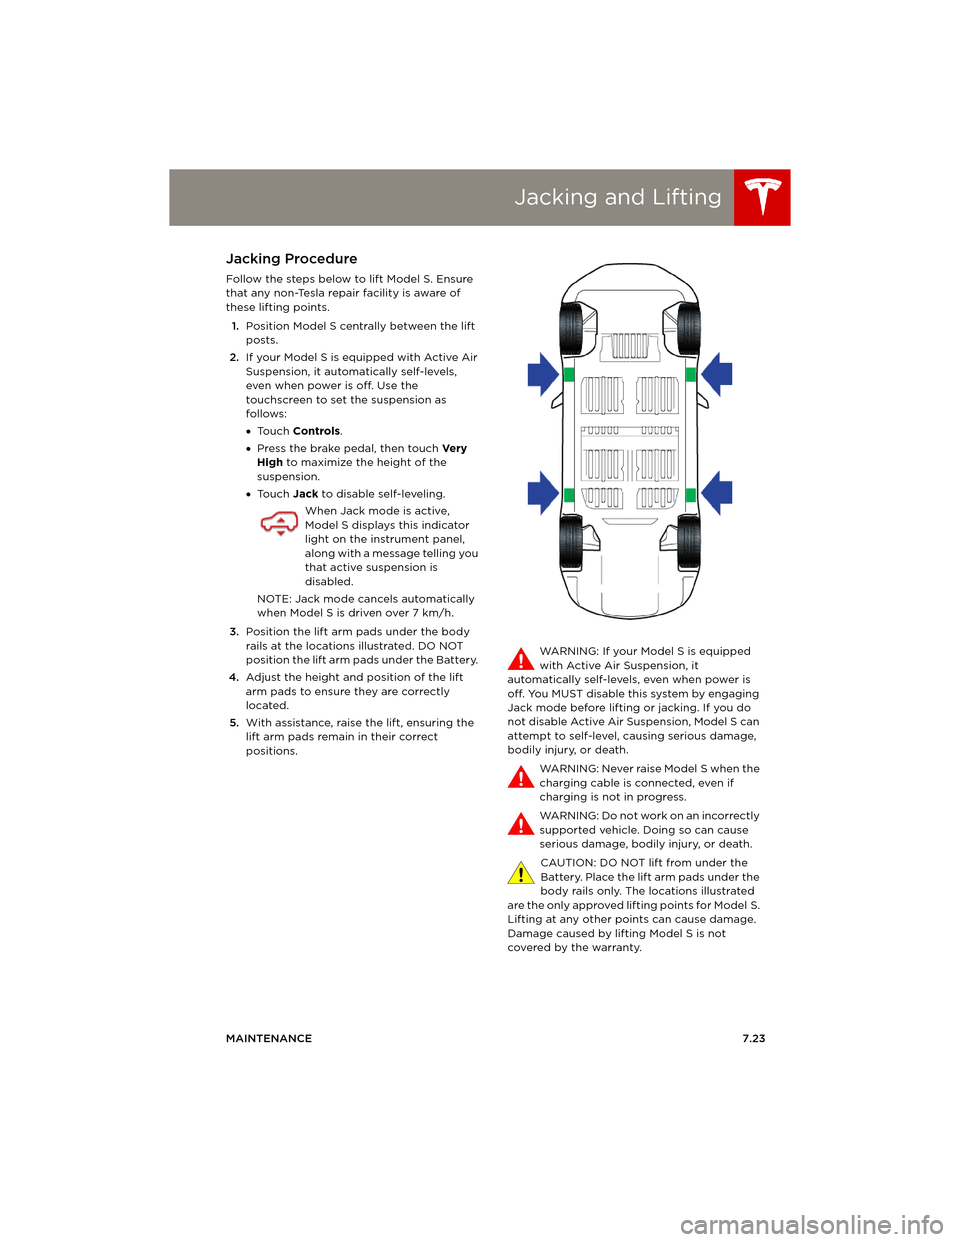
Jacking and LiftingJacking Procedure
Follow the steps below to lift Model S. Ensure
that any non-Tesla repair facility is aware of
these lifting points.
1.Position Model S centrally between the lift
posts.
2.If your Model S is equipped with Active Air
Suspension, it automatically self-levels,
even when power is off. Use the
touchscreen to set the suspension as
follows:
•To u c h Controls.
•Press the brake pedal, then touch Ve r y
High to maximize the height of the
suspension.
•To u c h Jack to disable self-leveling.
When Jack mode is active,
Model S displays this indicator
light on the instrument panel,
along with a message telling you
that active suspension is
disabled.
NOTE: Jack mode cancels automatically
when Model S is driven over 7 km/h.
3.Position the lift arm pads under the body
rails at the locations illustrated. DO NOT
position the lift arm pads under the Battery.
4.Adjust the height and position of the lift
arm pads to ensure they are correctly
located.
5.With assistance, raise the lift, ensuring the
lift arm pads remain in their correct
positions.WARNING: If your Model S is equipped
with Active Air Suspension, it
automatically self-levels, even when power is
off. You MUST disable this system by engaging
Jack mode before lifting or jacking. If you do
not disable Active Air Suspension, Model S can
attempt to self-level, causing serious damage,
bodily injury, or death.
WARNING: Never raise Model S when the
charging cable is connected, even if
charging is not in progress.
WARNING: Do not work on an incorrectly
supported vehicle. Doing so can cause
serious damage, bodily injury, or death.
CAUTION: DO NOT lift from under the
Battery. Place the lift arm pads under the
body rails only. The locations illustrated
are the only approved lifting points for Model S.
Lifting at any other points can cause damage.
Damage caused by lifting Model S is not
covered by the warranty.
book.book Page 23 Friday, July 19, 2013 12:53 PM