key TESLA MODEL S 2015 User Guide
[x] Cancel search | Manufacturer: TESLA, Model Year: 2015, Model line: MODEL S, Model: TESLA MODEL S 2015Pages: 164, PDF Size: 4.78 MB
Page 21 of 164
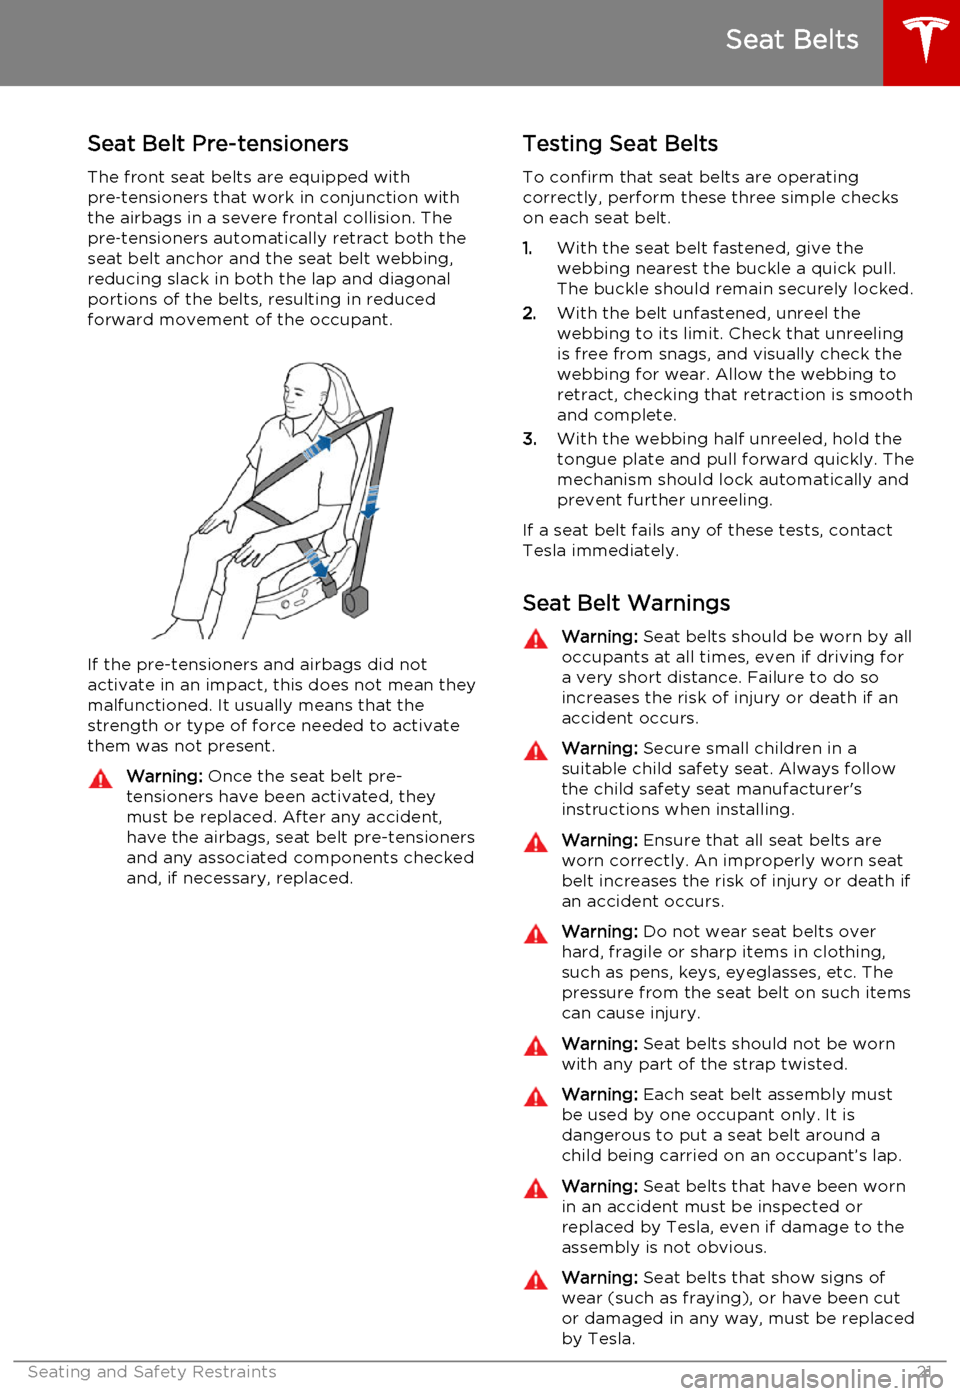
Seat Belt Pre-tensionersThe front seat belts are equipped with
pre ‑tensioners that work in conjunction with
the airbags in a severe frontal collision. The
pre ‑tensioners automatically retract both the
seat belt anchor and the seat belt webbing, reducing slack in both the lap and diagonalportions of the belts, resulting in reducedforward movement of the occupant.
If the pre-tensioners and airbags did notactivate in an impact, this does not mean they
malfunctioned. It usually means that the
strength or type of force needed to activate them was not present.
Warning: Once the seat belt pre-
tensioners have been activated, they
must be replaced. After any accident,
have the airbags, seat belt pre-tensioners and any associated components checkedand, if necessary, replaced.Testing Seat Belts
To confirm that seat belts are operating
correctly, perform these three simple checks
on each seat belt.
1. With the seat belt fastened, give the
webbing nearest the buckle a quick pull. The buckle should remain securely locked.
2. With the belt unfastened, unreel the
webbing to its limit. Check that unreeling is free from snags, and visually check thewebbing for wear. Allow the webbing toretract, checking that retraction is smoothand complete.
3. With the webbing half unreeled, hold the
tongue plate and pull forward quickly. The
mechanism should lock automatically and
prevent further unreeling.
If a seat belt fails any of these tests, contact Tesla immediately.
Seat Belt WarningsWarning: Seat belts should be worn by all
occupants at all times, even if driving for a very short distance. Failure to do so
increases the risk of injury or death if an
accident occurs.Warning: Secure small children in a
suitable child safety seat. Always follow
the child safety seat manufacturer's
instructions when installing.Warning: Ensure that all seat belts are
worn correctly. An improperly worn seat
belt increases the risk of injury or death if
an accident occurs.Warning: Do not wear seat belts over
hard, fragile or sharp items in clothing, such as pens, keys, eyeglasses, etc. The
pressure from the seat belt on such items can cause injury.Warning: Seat belts should not be worn
with any part of the strap twisted.Warning: Each seat belt assembly must
be used by one occupant only. It is
dangerous to put a seat belt around a
child being carried on an occupant’s lap.Warning: Seat belts that have been worn
in an accident must be inspected or
replaced by Tesla, even if damage to the
assembly is not obvious.Warning: Seat belts that show signs of
wear (such as fraying), or have been cut or damaged in any way, must be replacedby Tesla.
Seat Belts
Seating and Safety Restraints21
Page 41 of 164
Starting Model S
When you open a door, Model S powers on the instrument panel and touchscreen. Thecenter circle on the instrument panel displaysthe status of doors and the charge level, and
you can operate all controls.
To drive:
• PRESS THE BRAKE - the center circle on
the instrument panel changes to display
the speedometer, power meter, charge level, and selected gear (P, R, N, or D).
• SELECT A GEAR - all the way down for
Drive and all the way up for Reverse.
Everything you need to know when driving
Model S displays on the instrument panel.
Key Not Inside
If Model S does not detect a key when you
press the brake, the instrument panel displays
a message telling you that a key was not
detected.
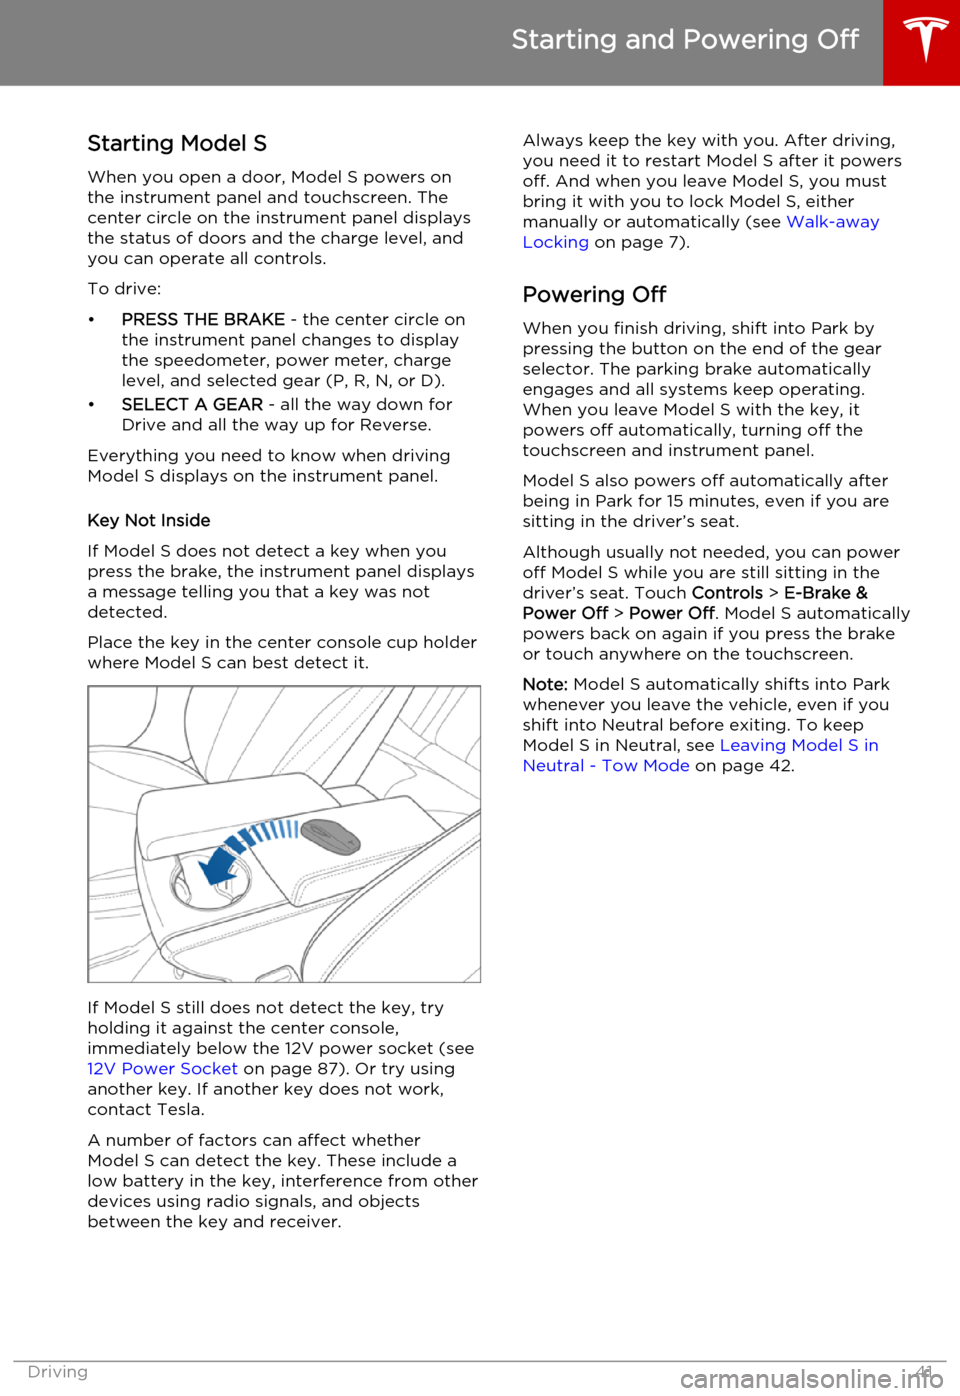
Place the key in the center console cup holder
where Model S can best detect it.
If Model S still does not detect the key, try
holding it against the center console,
immediately below the 12V power socket (see 12V Power Socket on page 87). Or try using
another key. If another key does not work,
contact Tesla.
A number of factors can affect whether
Model S can detect the key. These include a
low battery in the key, interference from other
devices using radio signals, and objects
between the key and receiver.
Always keep the key with you. After driving,
you need it to restart Model S after it powers
off. And when you leave Model S, you must
bring it with you to lock Model S, either manually or automatically (see Walk-away
Locking on page 7).
Powering Off When you finish driving, shift into Park by
pressing the button on the end of the gear
selector. The parking brake automatically
engages and all systems keep operating.
When you leave Model S with the key, it
powers off automatically, turning off the
touchscreen and instrument panel.
Model S also powers off automatically after
being in Park for 15 minutes, even if you are
sitting in the driver’s seat.
Although usually not needed, you can power
off Model S while you are still sitting in the
driver’s seat. Touch Controls > E-Brake &
Power Off > Power Off . Model S automatically
powers back on again if you press the brake
or touch anywhere on the touchscreen.
Note: Model S automatically shifts into Park
whenever you leave the vehicle, even if you shift into Neutral before exiting. To keep
Model S in Neutral, see Leaving Model S in
Neutral - Tow Mode on page 42.
Starting and Powering Off
Driving41
Page 50 of 164
Headlights After ExitWhen you stop driving and park Model S in
low lighting conditions, the exterior lights
automatically turn on. They automatically turn
off after two minutes or when you lock Model S.
You can turn this feature on and off using the
touchscreen. Touch Controls > Settings >
Vehicle > Headlights After Exit .
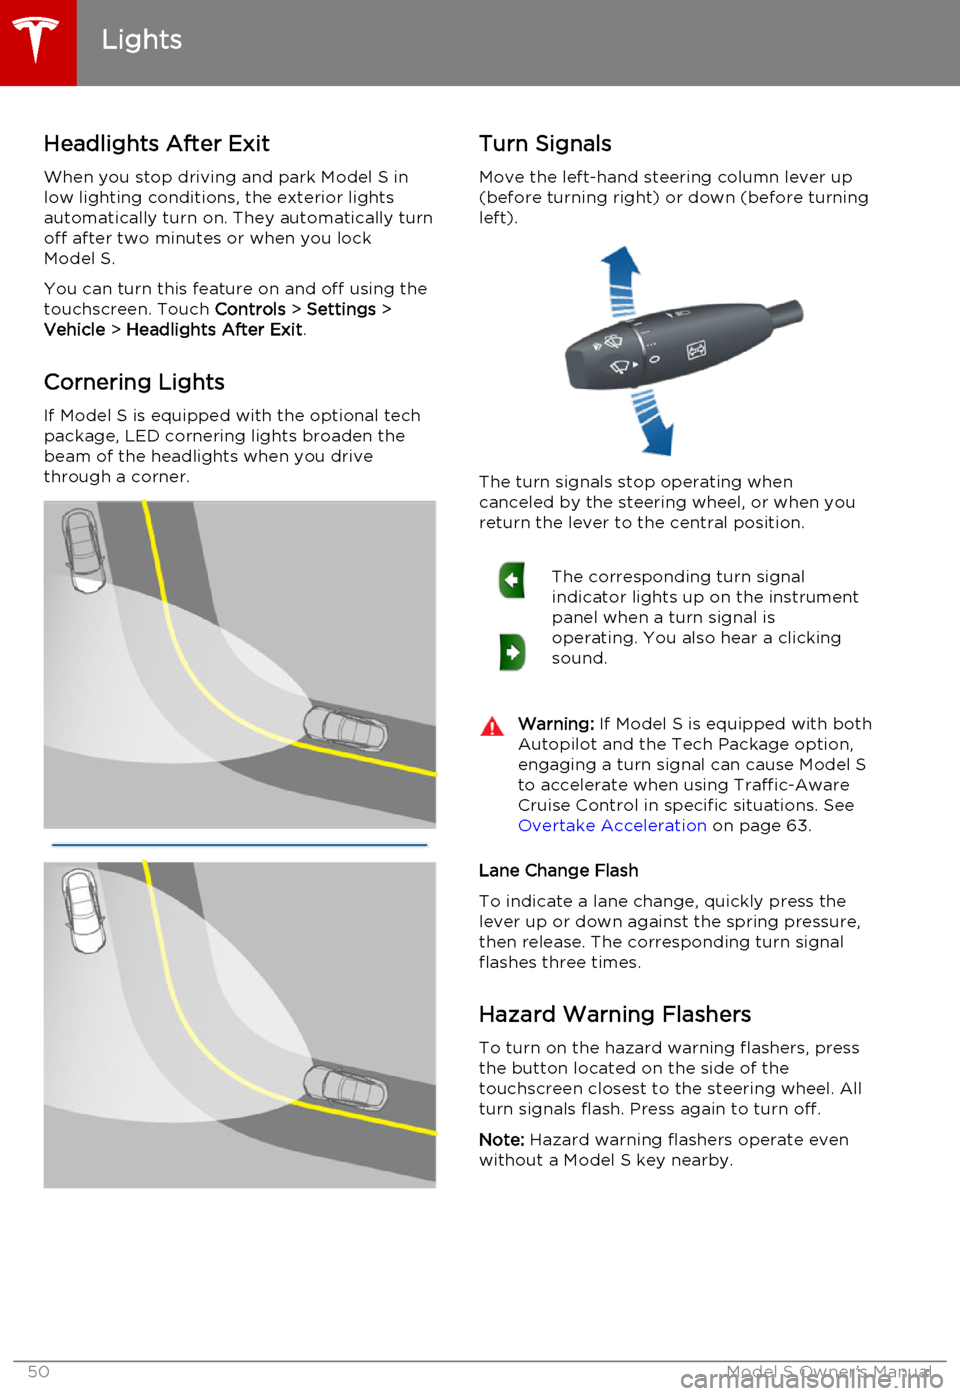
Cornering Lights
If Model S is equipped with the optional tech package, LED cornering lights broaden the
beam of the headlights when you drive
through a corner.Turn Signals
Move the left-hand steering column lever up(before turning right) or down (before turning
left).
The turn signals stop operating when
canceled by the steering wheel, or when you return the lever to the central position.
The corresponding turn signal
indicator lights up on the instrument
panel when a turn signal is
operating. You also hear a clicking
sound.Warning: If Model S is equipped with both
Autopilot and the Tech Package option, engaging a turn signal can cause Model S
to accelerate when using Traffic-Aware
Cruise Control in specific situations. See Overtake Acceleration on page 63.
Lane Change Flash
To indicate a lane change, quickly press the
lever up or down against the spring pressure, then release. The corresponding turn signalflashes three times.
Hazard Warning Flashers
To turn on the hazard warning flashers, press
the button located on the side of the
touchscreen closest to the steering wheel. All turn signals flash. Press again to turn off.
Note: Hazard warning flashers operate even
without a Model S key nearby.
Lights
50Model S Owner's Manual
Page 78 of 164
1.Adjust settings associated with installed
apps (applications). Settings associated with apps that are either unavailable on
your Model , or have no settings that you
can adjust at this time, are grayed out.
2. Manage driver profiles (see Driver Profiles
on page 36).
3. Units & Format
Adjust how Model S displays:
• Distance: Miles or km can be shown on the range display, speedometer,
energy chart, trip meters, Google map searches and navigation routes.
• Time Format: 12 or 24 hour.
• Temperature: o
C or o
F.
• Energy & Charging: Display remaining energy and charging units as either a
percentage of battery energy
remaining, or as an estimate of the
distance that you can drive. When you choose Distance, you can display
mileage based on either:
• Rated - based on EPA testing.
• Ideal - assumes ideal driving conditions based on driving at a
steady speed of 55 mph
(89 km/h) on a flat road, and using no additional energy (seat
heaters, air conditioning, etc).
Note: When anticipating when you
need to charge, use range estimates as a general guideline only.
4. Vehicle
• Drive-away Door Lock: If on, all doors automatically lock whenever you
drive Model S over 5 mph (8 km/h)
(see Drive-away Locking on page 7).
• Walk-away Door Lock: If on, all doors automatically lock when you walkaway from Model S, carrying the key with you (see Walk-away Locking on
page 7). Available only if Model S is
equipped with the optional tech
package.
• Child-Protection Lock: If on, safety locks prevent the rear doors and theliftgate from being opened from
inside Model S.• Auto-Present Handles: If on, door handles extend automatically
whenever you approach Model S carrying a key, whether locked orunlocked (see Using Exterior Door
Handles on page 6). Note that to
preserve battery life, Model is
designed to temporarily disable the
Auto-Present Handles feature when
the key has been out of range for
more than 48 hours, or if the key
remains within range for five minutes
after all doors have been closed.
• Headlights After Exit: If on, headlights stay on for two minutes after you exit,
or until you lock Model S (see
Headlights After Exit on page 50).
• Mirror Auto-Tilt: If on, exterior mirrors tilt downward when reversing (see Mirrors on page 40). Available only if
Model S is equipped with the optional tech package.
• Mirror Auto-Fold: If on, exterior mirrors fold when you lock Model S
with the key or walk-away locking. They extend automatically when you
return to Model S. Available only if
Model S is equipped with both folding mirrors (newer models) and the
optional tech package. For newer
Model S vehicles, you can also fold
mirrors manually by touching the
center mirror control button (see
Mirrors on page 40).
• Ionizer: If on, the air ionizer freshens the air in the cabin.
• Smart Preconditioning: If on, Model S predicts your driving schedule and
adjusts the temperature of the cabin and the Battery so the vehicle is
comfortable and ready to drive. It may take some time for Model S to
learn your driving habits.
5. Safety & Security
Turn various safety and security features
on and off:
• Active safety devices Model S is equipped with, such as Park Assist
Chimes (see Park Assist on page 66).
• Alarm, and security options Model S is equipped with (see Security Settings
on page 95).
• Remote access by Tesla’s mobile applications (see Mobile App on page
100).
6. Displays
Settings
78Model S Owner's Manual
Page 87 of 164
USB Connections
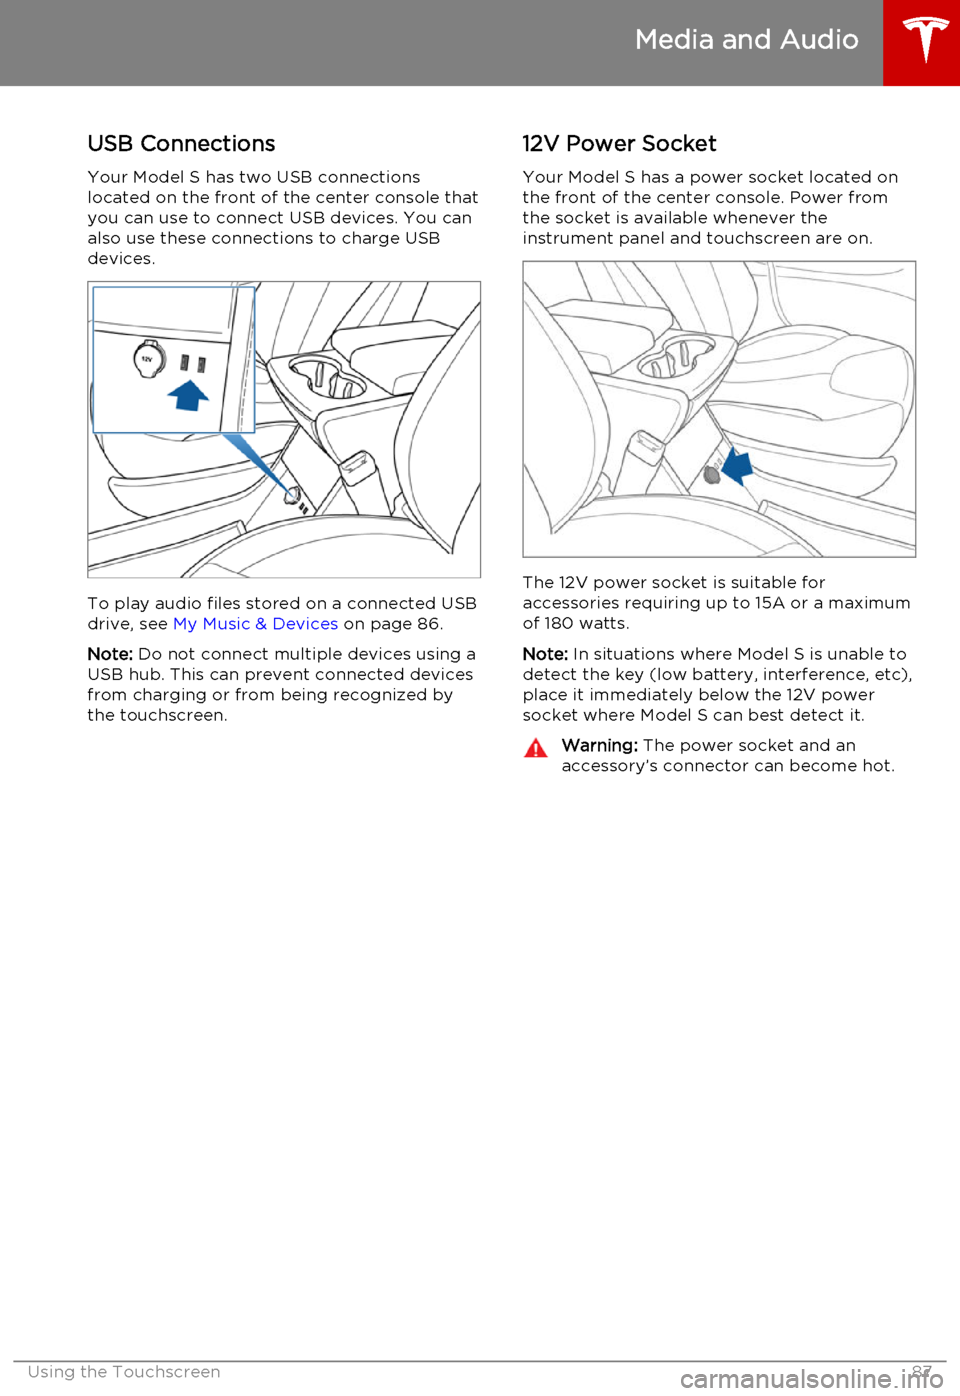
Your Model S has two USB connections
located on the front of the center console that
you can use to connect USB devices. You can
also use these connections to charge USB devices.
To play audio files stored on a connected USBdrive, see My Music & Devices on page 86.
Note: Do not connect multiple devices using a
USB hub. This can prevent connected devices from charging or from being recognized bythe touchscreen.
12V Power Socket
Your Model S has a power socket located on
the front of the center console. Power from
the socket is available whenever the
instrument panel and touchscreen are on.
The 12V power socket is suitable for
accessories requiring up to 15A or a maximum
of 180 watts.
Note: In situations where Model S is unable to
detect the key (low battery, interference, etc), place it immediately below the 12V power
socket where Model S can best detect it.
Warning: The power socket and an
accessory’s connector can become hot.
Media and Audio
Using the Touchscreen87
Page 95 of 164

About the Security System
If Model S does not detect a key nearby and a locked door or trunk is opened, an alarmsounds and headlights and turn signals flash.
To deactivate the alarm, press any button on
the key.
To manually enable or disable the alarm
system, touch Controls > Settings > Safety &
Security > Alarm . When set to on, Model S
activates its alarm one minute after the doors
lock and a recognized key is no longer
detected nearby.
Security Settings
Using the Touchscreen95
Page 96 of 164
About HomeLinkIf Model S is equipped with the optional tech
package, you can program the HomeLink ®
Universal Transceiver to operate up to three
garage doors, gates, lights, and security
systems that can transmit Radio Frequency
(RF) signals.
Programming HomeLink
1. Park Model S in front of the device you
want to program, and have the device’s
remote control ready.
2. Touch Controls > Settings > HomeLink on
the touchscreen.
3. Touch Add New HomeLink , then use the
onscreen keyboard to enter a name for
your HomeLink device.
4. Touch Program .
5. Follow the onscreen instructions.
Once programmed, you can operate the device by touching its corresponding
HomeLink icon on the touchscreen’s status bar. HomeLink remembers the location of
your programmed devices. When you approach a known location, the HomeLink
control on the touchscreen automatically
drops down. When you drive away, it
disappears.
Note: For security reasons, erase your
HomeLink settings if you sell Model S.Warning: Your device might open or
close during programming. Before
programming, make sure that the device is clear of any people or objects.Warning: Do not use the HomeLink
Universal Transceiver with a garage door that does not meet safety standards. Agarage door opener that cannot detectan object in its path and then
automatically stop and reverse, does not
meet these standards. Using a garage
door opener without these features
increases the risk of injury or death.
Troubleshooting HomeLink
When programming a HomeLink device, the touchscreen steps you through a two-part
programming process:
• First, Model S records the signal from the remote. The touchscreen instructs you to
stand in front of the car, point the remote
at the front bumper and press and hold
the button until the headlights flash.
When headlights flash, Model S has
learned the remote and you can touch
Continue on the touchscreen . If the
headlights do not flash, refer to the
guidelines below.
• Next, the device's receiver learns Model S. The touchscreen instructs you to press
the LEARN button on the garage door or
gate's receiver. If training the receiver
does not work, refer to the guidelines
below.
NOTE: Only devices that are equipped
with a “rolling code” remote need to learn
Model S. If you have a very old device that
is not equipped with a rolling code
remote, the device does not need to learn
Model S and you can skip this part. You
can also skip this step if your receiver is
Quick-Train compatible. The opener
should work.
Headlights do not flash
• Check the batteries in the remote. It is a good idea to replace the batteries before
you start programming.
• Hold the remote against the nose cone, with the button pressed, about 6 inches to
the left of the Tesla emblem. In some
cases you must hold the remote for up to
three minutes.
• Check compatibility of the remote by contacting the HomeLink manufacturer
( www.homelink.com ).
After programming, the device does not work
• Park Model S with its front bumper as close as possible to the HomeLink device
(garage door, gate, etc).
• Make sure you haven’t reached the device receiver's limit of learned remotes/cars.
Most receivers can learn up to five
remotes/cars. If the receiver's memory is
full, you must clear the memory and
restart the programming process. For
instructions on how to clear the receiver's
memory, refer to the owner
documentation provided with the
HomeLink device.
• Make sure you are pressing the receiver's LEARN button. Most receivers have twobuttons and a LED. One button is a RESET
button and the other is a LEARN button.
Pressing the LEARN button usually causes the LED to flash. For instructions on how
to put the receiver into learning mode, refer to the owner documentation
provided with the HomeLink device.
HomeLink ®
Universal Transceiver
96Model S Owner's Manual
Page 104 of 164
Opening the Charge Port
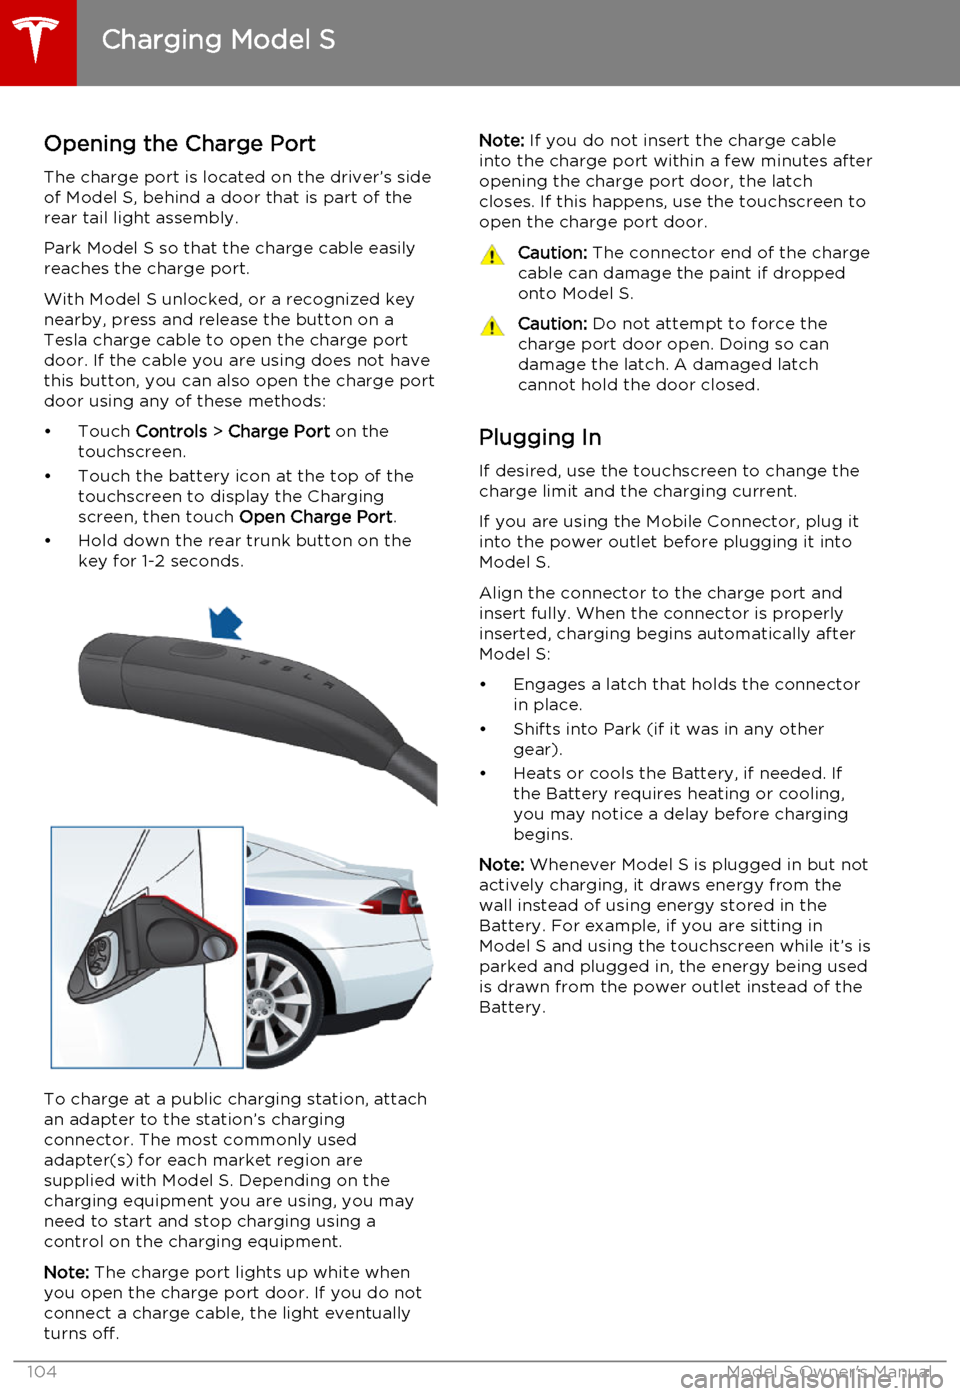
The charge port is located on the driver’s side of Model S, behind a door that is part of therear tail light assembly.
Park Model S so that the charge cable easily
reaches the charge port.
With Model S unlocked, or a recognized key
nearby, press and release the button on a
Tesla charge cable to open the charge port door. If the cable you are using does not havethis button, you can also open the charge portdoor using any of these methods:
• Touch Controls > Charge Port on the
touchscreen.
• Touch the battery icon at the top of the touchscreen to display the Charging
screen, then touch Open Charge Port.
• Hold down the rear trunk button on the key for 1-2 seconds.
To charge at a public charging station, attach
an adapter to the station’s chargingconnector. The most commonly usedadapter(s) for each market region aresupplied with Model S. Depending on thecharging equipment you are using, you may
need to start and stop charging using a control on the charging equipment.
Note: The charge port lights up white when
you open the charge port door. If you do not
connect a charge cable, the light eventually
turns off.
Note: If you do not insert the charge cable
into the charge port within a few minutes after
opening the charge port door, the latch
closes. If this happens, use the touchscreen to
open the charge port door.Caution: The connector end of the charge
cable can damage the paint if dropped onto Model S.Caution: Do not attempt to force the
charge port door open. Doing so can
damage the latch. A damaged latch
cannot hold the door closed.
Plugging In
If desired, use the touchscreen to change the
charge limit and the charging current.
If you are using the Mobile Connector, plug it into the power outlet before plugging it intoModel S.
Align the connector to the charge port and
insert fully. When the connector is properly
inserted, charging begins automatically after Model S:
• Engages a latch that holds the connector in place.
• Shifts into Park (if it was in any other gear).
• Heats or cools the Battery, if needed. If the Battery requires heating or cooling,
you may notice a delay before charging begins.
Note: Whenever Model S is plugged in but not
actively charging, it draws energy from the wall instead of using energy stored in the
Battery. For example, if you are sitting in
Model S and using the touchscreen while it’s is
parked and plugged in, the energy being used
is drawn from the power outlet instead of the
Battery.
Charging Model S
104Model S Owner's Manual
Page 105 of 164
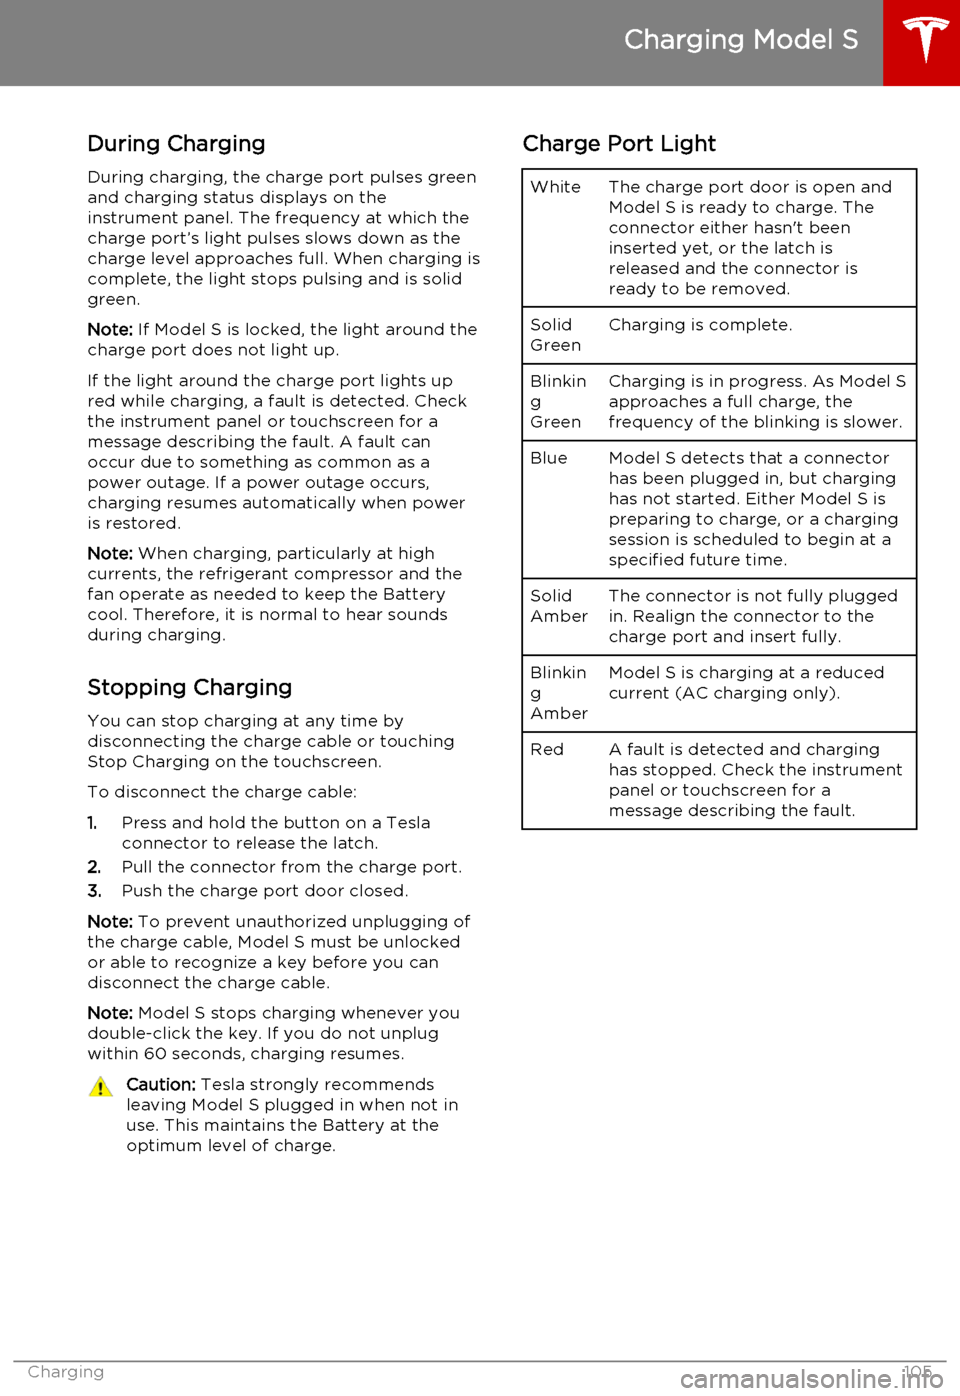
During ChargingDuring charging, the charge port pulses green
and charging status displays on the instrument panel. The frequency at which thecharge port’s light pulses slows down as thecharge level approaches full. When charging iscomplete, the light stops pulsing and is solid
green.
Note: If Model S is locked, the light around the
charge port does not light up.
If the light around the charge port lights up
red while charging, a fault is detected. Check
the instrument panel or touchscreen for a
message describing the fault. A fault can
occur due to something as common as a
power outage. If a power outage occurs,
charging resumes automatically when power
is restored.
Note: When charging, particularly at high
currents, the refrigerant compressor and the
fan operate as needed to keep the Battery cool. Therefore, it is normal to hear sounds
during charging.
Stopping Charging You can stop charging at any time by
disconnecting the charge cable or touching
Stop Charging on the touchscreen.
To disconnect the charge cable:
1. Press and hold the button on a Tesla
connector to release the latch.
2. Pull the connector from the charge port.
3. Push the charge port door closed.
Note: To prevent unauthorized unplugging of
the charge cable, Model S must be unlocked
or able to recognize a key before you can
disconnect the charge cable.
Note: Model S stops charging whenever you
double-click the key. If you do not unplug
within 60 seconds, charging resumes.Caution: Tesla strongly recommends
leaving Model S plugged in when not in
use. This maintains the Battery at the optimum level of charge.Charge Port LightWhiteThe charge port door is open and
Model S is ready to charge. The
connector either hasn't been
inserted yet, or the latch is
released and the connector is
ready to be removed.Solid
GreenCharging is complete.Blinkin
g
GreenCharging is in progress. As Model S approaches a full charge, the
frequency of the blinking is slower.BlueModel S detects that a connector has been plugged in, but charging
has not started. Either Model S is
preparing to charge, or a charging
session is scheduled to begin at a
specified future time.Solid
AmberThe connector is not fully plugged
in. Realign the connector to the
charge port and insert fully.Blinkin
g
AmberModel S is charging at a reduced
current (AC charging only).RedA fault is detected and charging
has stopped. Check the instrument
panel or touchscreen for a
message describing the fault.
Charging Model S
Charging105
Page 108 of 164
Service Intervals
Regular maintenance is the key to ensuring
the continued reliability and efficiency of your
Model S.
Rotate the tires every 5000 miles (8000 km),
maintain the correct tire pressures, and take Model S to Tesla at the regularly scheduledmaintenance intervals of every 12 months, orevery 12,500 miles (20,000 km), whichever
comes first. It is also important to perform the
daily and monthly checks described below.
Model S must be serviced by Tesla-certified
technicians. Damages or failures caused by
maintenance or repairs performed by non-
Tesla certified technicians are not covered by
the warranty.
Daily Checks • Check the Battery’s charge level, displayed on the instrument panel.
• Check that all exterior lights, horn, turn signals, and wipers and washers are
working.
• Check the operation of the brakes, including the parking brake.
• Check the operation of the seat belts (see Seat Belts on page 20).
• Look for fluid deposits underneath Model S that might indicate a leak. It is
normal for a small pool of water to form
(caused by the air conditioning system’s dehumidifying process).
Monthly Checks • Check the mileage to determine if the tires need to be rotated (every
5000 miles/8000 km), and check the
condition and pressure of each tire (see
Tire Care and Maintenance on page 109).
• Check washer fluid level and top up if necessary (see Topping Up Washer Fluid
on page 125).
• Check that the air conditioning system is operating (see Climate Controls on page
80).Warning: Contact Tesla immediately if
you notice any significant or sudden drop in fluid levels or uneven tire wear.Fluid Replacement Intervals
Do not change or top up Battery coolant and
brake fluid yourself. Tesla service technicians replace fluids at the regularly scheduled
service intervals:
• Brake fluid. Every 2 years or 25,000 miles (40,000 km), whichever comes first.
• Battery coolant. Every 5 years or 62,500 miles (100,000 km), whichever
comes first.
Note: Any damage from opening the Battery
coolant reservoir is excluded from the warranty.
High Voltage Safety Your Model S has been designed and built
with safety as a priority. However, be aware of these precautions to protect yourself from the
risk of injury inherent in all high-voltage
systems:
• Read and follow all instructions provided on the labels that are attached to Model S.These labels are there for your safety.
• The high voltage system has no user- serviceable parts. Do not disassemble,
remove or replace high voltage components, cables or connectors. High
voltage cables are colored orange for
easy identification.
• If an accident occurs, do not touch any high voltage wiring, connectors, or
components connected to the wiring.
• In the unlikely event that a fire occurs, immediately contact your local fire
emergency responders.Warning: Always disconnect the charge
cable before working underneath Model S, even if charging is not in
progress.Warning: Keep your hands and clothing
away from cooling fans. Some fans
operate even when Model S is powered
off.Caution: Some fluids (battery acid,
Battery coolant, brake fluid, windshield
washer additives, etc.) used in motor
vehicles are poisonous and should not be
inhaled, swallowed, or brought into contact with open wounds. For your
safety, always read and follow
instructions printed on fluid containers.
Maintenance Schedule
108Model S Owner's Manual