light TESLA MODEL S 2015 User Guide
[x] Cancel search | Manufacturer: TESLA, Model Year: 2015, Model line: MODEL S, Model: TESLA MODEL S 2015Pages: 164, PDF Size: 4.78 MB
Page 14 of 164

Opening and Closing
To open the glove box, press the switch located on the side of the touchscreen. If you
leave the glove box open for five minutes, its
light automatically turns off.
Note: The glove box locks whenever Model S
is locked externally, using the key or walk- away locking. It does not lock when Model S is
locked using the touchscreen.
Warning: When driving, keep the glove
box closed to prevent injury to a
passenger if a collision or sudden stop
occurs.
Glove Box
14Model S Owner's Manual
Page 15 of 164
Opening and Closing
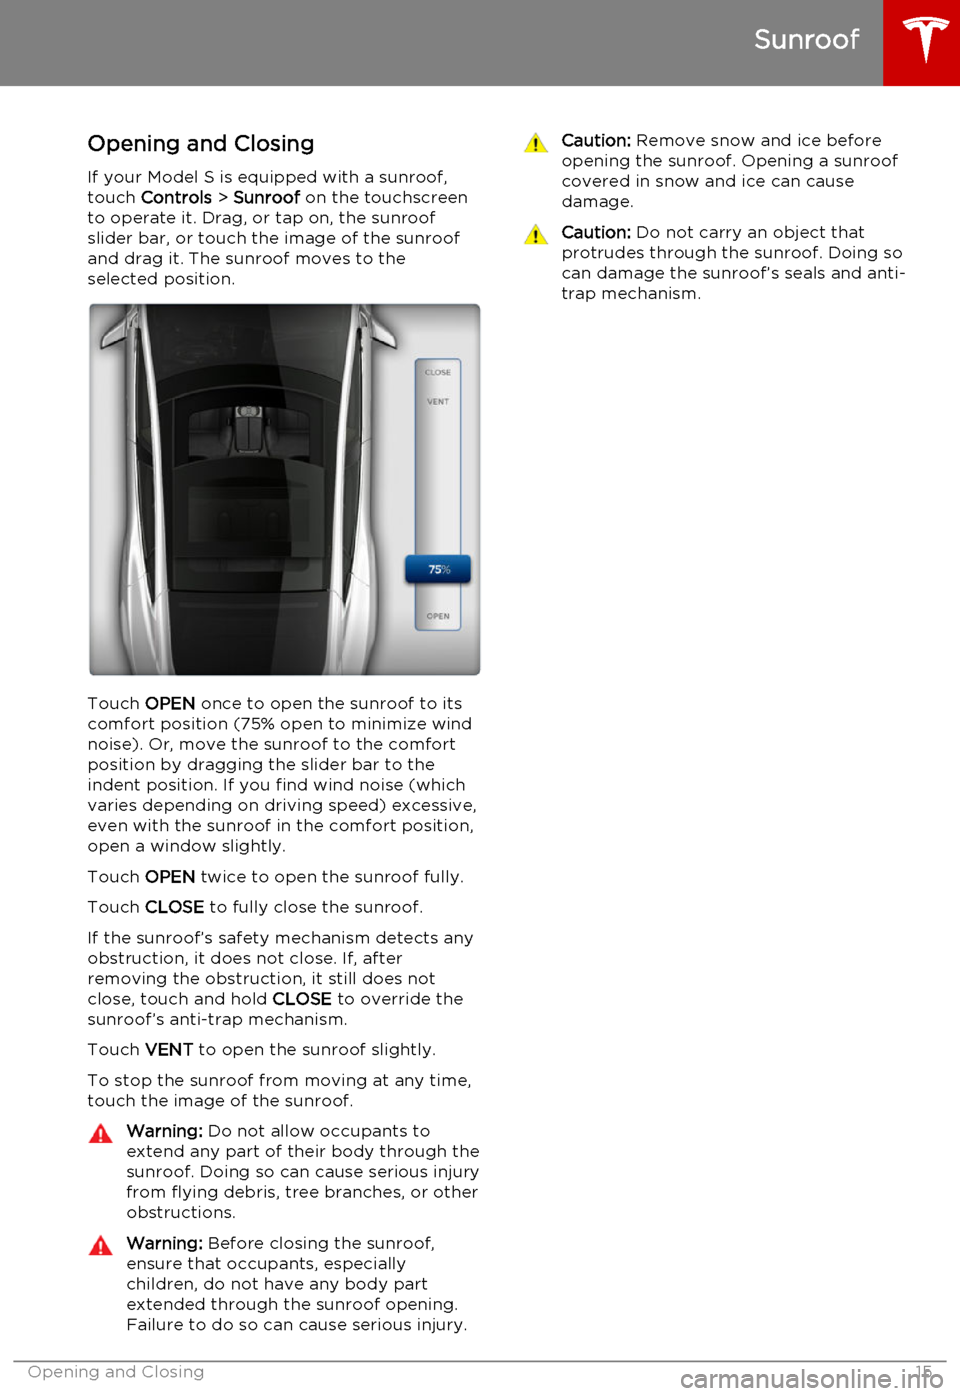
If your Model S is equipped with a sunroof, touch Controls > Sunroof on the touchscreen
to operate it. Drag, or tap on, the sunroof
slider bar, or touch the image of the sunroof
and drag it. The sunroof moves to the
selected position.
Touch OPEN once to open the sunroof to its
comfort position (75% open to minimize wind
noise). Or, move the sunroof to the comfort
position by dragging the slider bar to the indent position. If you find wind noise (which
varies depending on driving speed) excessive,
even with the sunroof in the comfort position, open a window slightly.
Touch OPEN twice to open the sunroof fully.
Touch CLOSE to fully close the sunroof.
If the sunroof’s safety mechanism detects any
obstruction, it does not close. If, after
removing the obstruction, it still does not close, touch and hold CLOSE to override the
sunroof’s anti-trap mechanism.
Touch VENT to open the sunroof slightly.
To stop the sunroof from moving at any time, touch the image of the sunroof.
Warning: Do not allow occupants to
extend any part of their body through the
sunroof. Doing so can cause serious injury from flying debris, tree branches, or other
obstructions.Warning: Before closing the sunroof,
ensure that occupants, especially
children, do not have any body part
extended through the sunroof opening.
Failure to do so can cause serious injury.Caution: Remove snow and ice before
opening the sunroof. Opening a sunroof
covered in snow and ice can cause
damage.Caution: Do not carry an object that
protrudes through the sunroof. Doing so can damage the sunroof’s seals and anti-trap mechanism.
Sunroof
Opening and Closing15
Page 17 of 164
Correct Driving Position
The seat, head support, seat belt and airbags work together to maximize your safety. Using
these correctly ensures greater protection.
Position the seat so you can wear the seat belt
correctly, while being as far away from the
front airbag as possible:
1. Sit upright with both feet on the floor and
the seat back reclined no more than 30
degrees.
2. Make sure you can easily reach the pedals
and that your arms are slightly bent when
holding the steering wheel. Your chest
should be at least 10 inches (25 cm) from the center of the airbag cover.
3. Place the shoulder section of the seat belt
mid-way between your neck and your
shoulder. Fit the lap section of the belt
tightly across your hips, not across your stomach.
Model S seats include integrated head
supports that cannot be adjusted or removed.
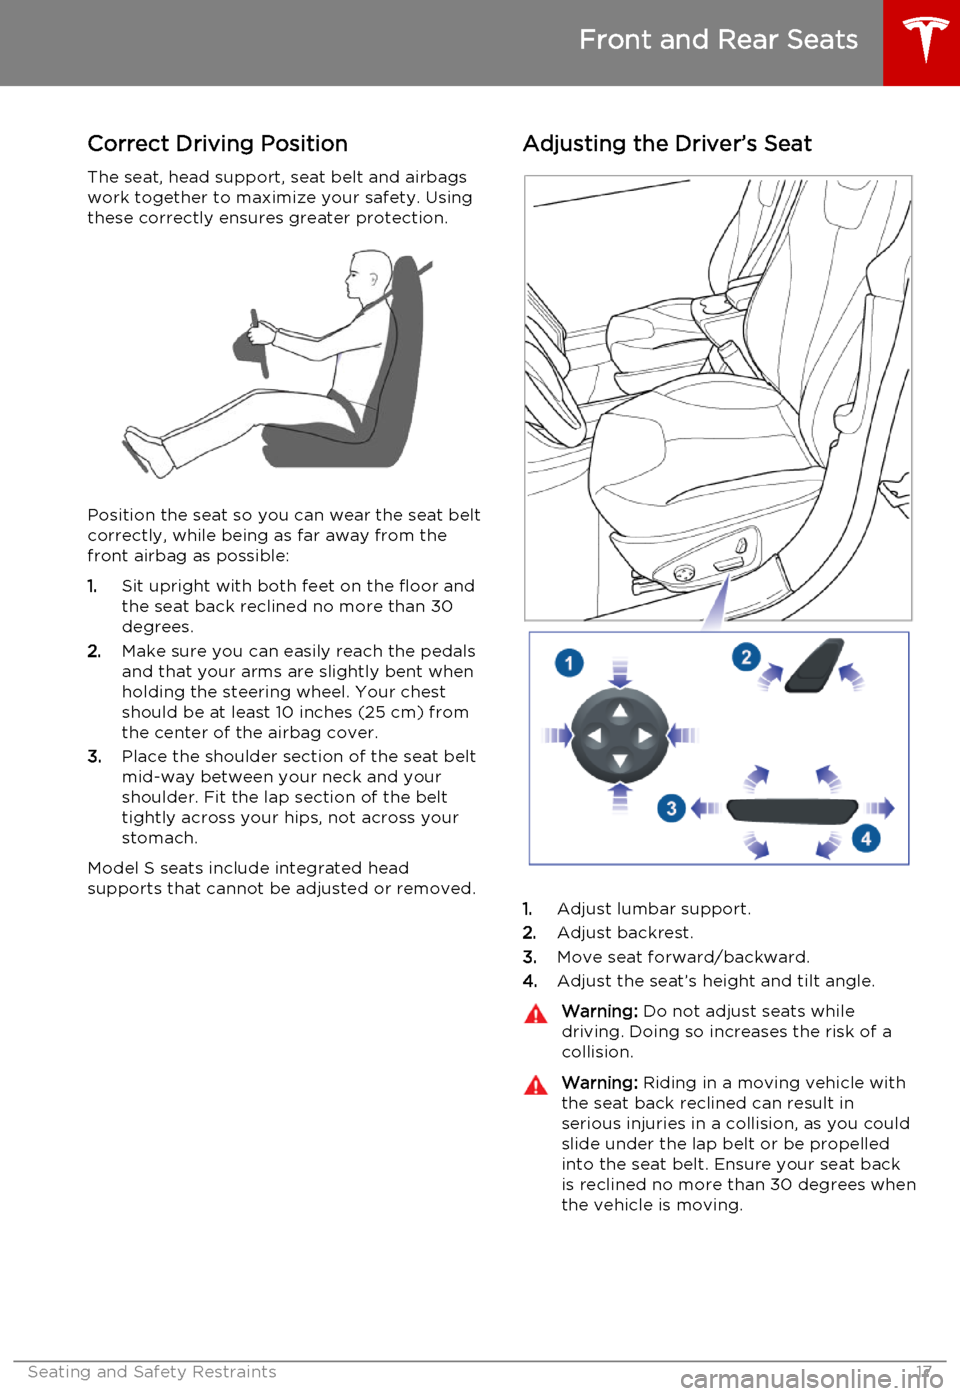
Adjusting the Driver’s Seat
1. Adjust lumbar support.
2. Adjust backrest.
3. Move seat forward/backward.
4. Adjust the seat’s height and tilt angle.
Warning:
Do not adjust seats while
driving. Doing so increases the risk of a
collision.Warning: Riding in a moving vehicle with
the seat back reclined can result in serious injuries in a collision, as you could
slide under the lap belt or be propelled
into the seat belt. Ensure your seat back is reclined no more than 30 degrees when
the vehicle is moving.
Front and Rear Seats
Seating and Safety Restraints17
Page 20 of 164
Wearing Seat Belts
Using seat belts and child safety seats is the most effective way to protect occupants if a
collision occurs. Therefore, wearing a seat belt
is required by law in most jurisdictions.
Both the driver and passenger seats are
equipped with three-point inertia reel seat
belts. Inertia reel belts are automatically
tensioned to allow occupants to move
comfortably during normal driving conditions.
To securely hold child safety seats, all
passenger seating positions are equipped with
an automatic locking retractor (ALR) that, by pulling the seat belt beyond the length
needed for a typical adult occupant, locks the
belt into place until the seat belt is unbuckled
(see Installing Seat Belt Retained Child Seats
on page 25).
The seat belt reel automatically locks to prevent movement of occupants if Model Sexperiences a force associated with hard
acceleration, braking, cornering, or an impact in a collision.The seat belt reminder on the
instrument panel alerts you if a seat
belt for an occupied seat is not
fastened. If the belt remains
unfastened, the reminder flashes and
an intermittent chime sounds. If all
occupants are buckled up and the
reminder stays on, re-fasten seat
belts to ensure they are correctly
latched. Also remove any heavy
objects (such as a briefcase) from an
unoccupied seat. If the reminder
light continues to stay on, contact
Tesla.
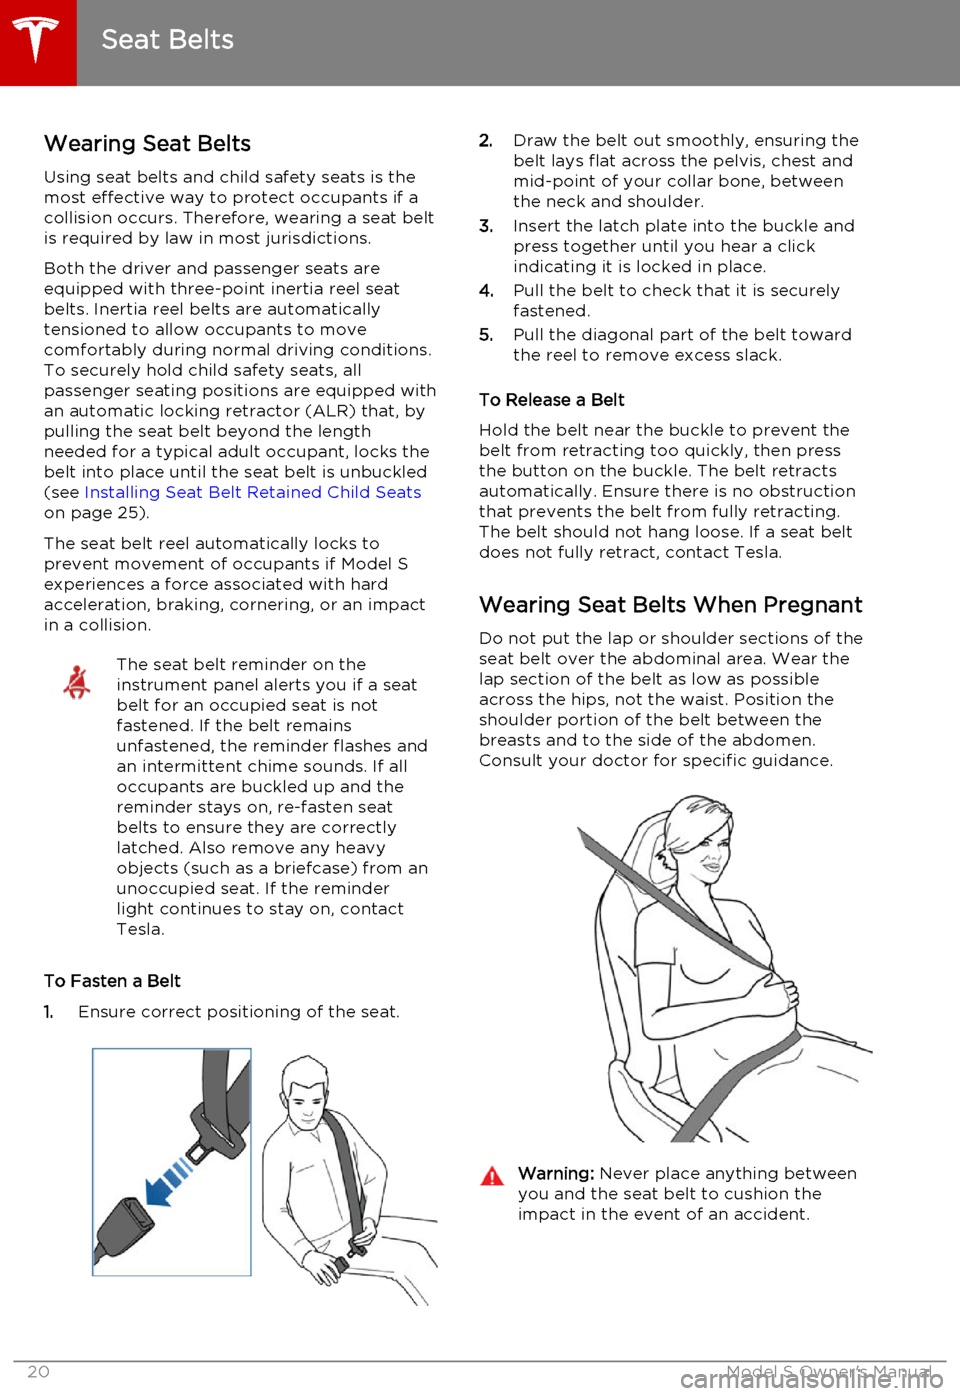
To Fasten a Belt
1. Ensure correct positioning of the seat.
2.
Draw the belt out smoothly, ensuring the
belt lays flat across the pelvis, chest and
mid-point of your collar bone, between
the neck and shoulder.
3. Insert the latch plate into the buckle and
press together until you hear a click indicating it is locked in place.
4. Pull the belt to check that it is securely
fastened.
5. Pull the diagonal part of the belt toward
the reel to remove excess slack.
To Release a Belt
Hold the belt near the buckle to prevent the
belt from retracting too quickly, then press
the button on the buckle. The belt retracts
automatically. Ensure there is no obstruction
that prevents the belt from fully retracting.
The belt should not hang loose. If a seat belt does not fully retract, contact Tesla.
Wearing Seat Belts When Pregnant Do not put the lap or shoulder sections of the
seat belt over the abdominal area. Wear the
lap section of the belt as low as possible across the hips, not the waist. Position theshoulder portion of the belt between thebreasts and to the side of the abdomen.
Consult your doctor for specific guidance.Warning: Never place anything between
you and the seat belt to cushion the
impact in the event of an accident.
Seat Belts
20Model S Owner's Manual
Page 27 of 164

Testing a Child Safety SeatBefore seating a child, always make sure thechild safety seat is not loose:
1. Hold the child safety seat by the belt path
and try to slide the safety seat from side
to side and front to back.
2. If the seat moves more than one inch
(2.5 cm), it is too loose. Tighten the belt
or reconnect the LATCH retained child
safety seat.
3. If you are unable to reduce slack, try a
different seat location or try another child
safety seat.
Warnings - Child Safety SeatsWarning: Extreme hazard! Do not seat a
child on the front passenger seat even if
you are using a child safety seat. This seat has an airbag in front of it. Although this
airbag is disabled when Model S detects a lightweight passenger, do not rely on
technology to protect your child.Warning: Do not use a forward facing
child safety seat until your child weighs
over 20 lbs (9 kg) and can sit
independently. Up to the age of two, a child's spine and neck are not sufficientlydeveloped to avoid injury in a frontal
impact.Warning: Do not allow a baby or infant to
be held on a lap. All children should be
restrained in an appropriate child safety
seat at all times.Warning: To ensure children are safely
seated, follow all instructions provided in this document and by the manufacturerof the child safety seat.Warning: Children should ride in a rear
facing child safety seat using the seat’s
integrated 5-point harness for as long as
possible.Warning: Do not use seat belt extenders
when installing a child safety seat or booster seat.Warning: When seating larger children,
make sure the child's head is supported and the child’s seat belt is properlyadjusted and fastened. The shoulder
portion of the belt must be away from the face and neck, and the lap portion mustnot be over the stomach.Warning: Never attach two child safety
seats to one anchor point. In a collision,one anchor point may be incapable of
securing both seats.Warning: Child restraint anchorages are
designed to withstand only those loads imposed by correctly fitted child
restraints. Under no circumstances are
they to be used for adult seatbelts,
harnesses, or for attaching other items or equipment to the vehicle.Warning: Always check harnesses and
tether straps for damage and wear.Warning: Do not use seat belt extenders
on a seat belt that is being used to install
a child safety seat or booster seat.Warning: Never leave a child unattended,
even if the child is secured in a child
safety seat.Warning: Never use a child safety seat
that has been involved in an accident.
Have the seat inspected or replaced as a
described in the child safety seat
manufacturer’s instructions.
Child Safety Seats
Seating and Safety Restraints27
Page 35 of 164
Inflation Effects
When airbags inflate, a fine powder is
released. This powder can irritate the skin and should be thoroughly flushed from the eyes
and from any cuts or abrasions.
After inflation, the airbags deflate to provide a
gradual cushioning effect for the occupants and to ensure the driver’s forward vision is notobscured.
If airbags have inflated, or if your vehicle has been in an accident, always have the airbags,
seat belt pre-tensioners and any associated
components checked and, if necessary,
replaced by Tesla.
In a collision, in addition to the airbags
inflating:
• Doors unlock and the door handles extend.
• Hazard warning lights turn on.
• Interior lights turn on.
• High voltage is disabled.
To restore Battery power, use the touchscreen
to manually power off Model S, then press the
brake to power it back on again.
Airbag Warning IndicatorThe airbag indicator on the
instrument panel remains lit if the
airbag system is malfunctioning. The
only time this indicator should light
up is briefly when Model S first starts
up, in which case it turns off within a few seconds. If it remains lit, contact
Tesla immediately and do not drive.
Airbag Warnings
Warning: All occupants, including the
driver, should always wear their seat
belts, whether or not an airbag is also
provided at their seating position, to
minimize the risk of severe injury or death
in the event of a collision.Warning: Front seat occupants should
not place their arms over the airbag
module, as an inflating bag can cause
fractures or other injuries.Warning: Do not use seat covers on
Model S. Doing so could restrict
deployment of the side air bags if an
accident occurs. It can also reduce theaccuracy of the occupant detection
system.Warning: Airbags inflate with
considerable speed and force, which can
cause injury. To limit injuries, ensure that
occupants are wearing seat belts and are
correctly seated, with the seat positioned
as far back as possible. The National
Highway Traffic Safety Administration (NHTSA) recommends a minimum
distance of 10" (25 cm) between an occupant’s chest and an airbag.Warning: Do not use a child safety seat or
seat young children on a seat with an operational airbag in front of it. Doing socan cause injury or death if the airbaginflates.Warning: To ensure correct inflation of
the side airbags, maintain an
unobstructed gap between an occupant’s
torso and the side of Model S.Warning: Passengers should not lean their
heads against the doors. Doing so can cause injury if a curtain airbag inflates.Warning: Do not allow passengers to
obstruct the operation of an airbag by
placing feet, knees or any other part of the body on or near an airbag.Warning: Do not attach or place objects
on or near the front airbags, the side of
the front seats, the headliner at the side of the vehicle, or any other airbag coverthat could interfere with inflation of an
airbag. Objects can cause serious injury if the vehicle is in a collision severe enoughto cause the airbag to inflate.Warning: Following inflation, some airbag
components are hot. Do not touch until
they have cooled.
Airbags
Seating and Safety Restraints35
Page 37 of 164
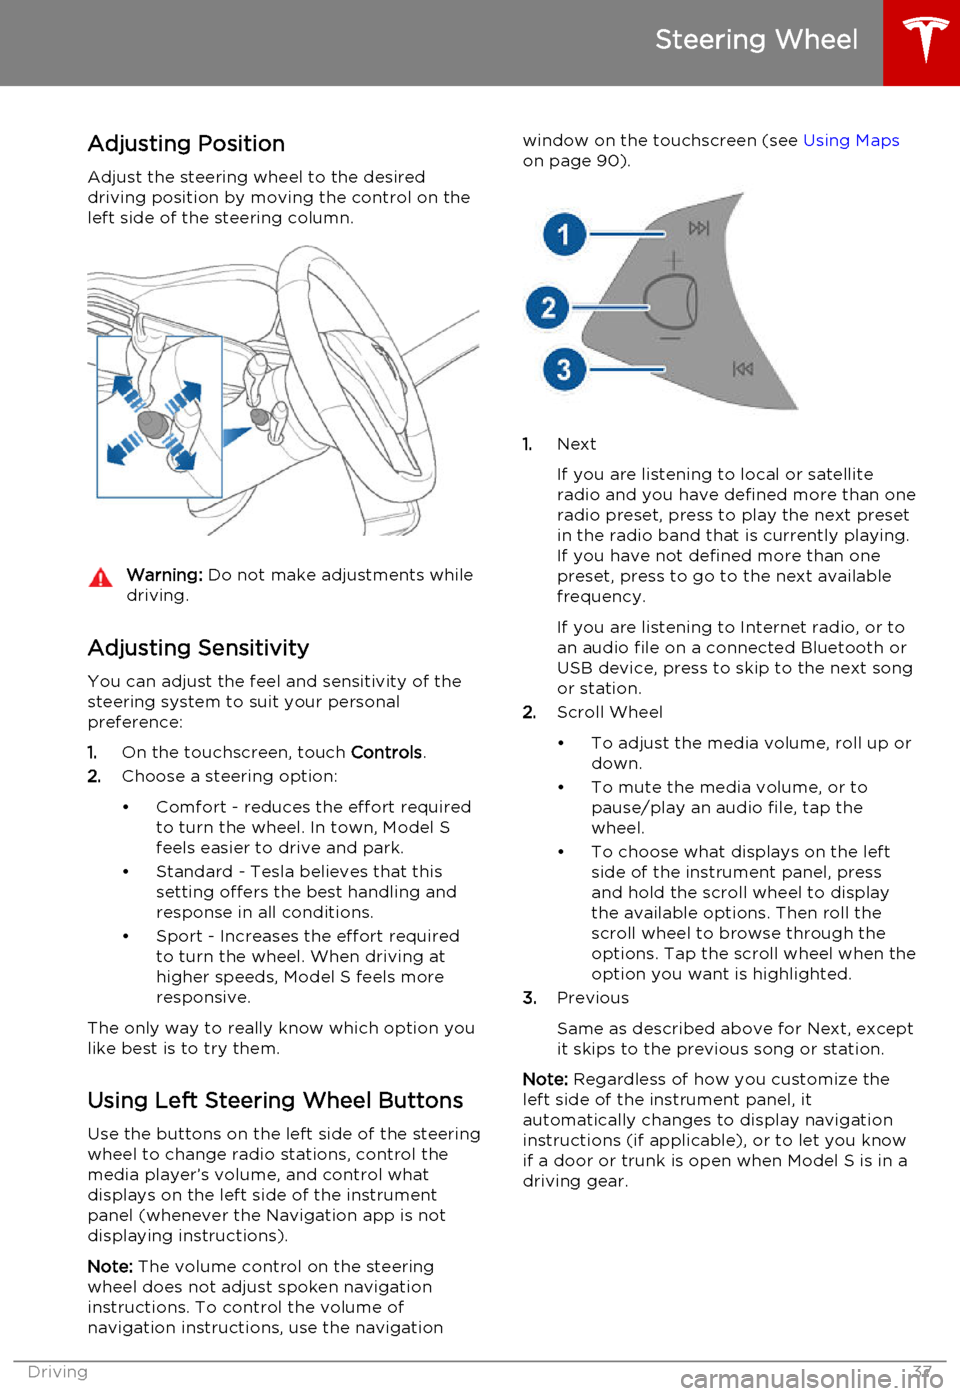
Adjusting Position
Adjust the steering wheel to the desired driving position by moving the control on the
left side of the steering column.Warning: Do not make adjustments while
driving.
Adjusting Sensitivity
You can adjust the feel and sensitivity of the
steering system to suit your personal preference:
1. On the touchscreen, touch Controls.
2. Choose a steering option:
• Comfort - reduces the effort required to turn the wheel. In town, Model S
feels easier to drive and park.
• Standard - Tesla believes that this setting offers the best handling andresponse in all conditions.
• Sport - Increases the effort required to turn the wheel. When driving athigher speeds, Model S feels more
responsive.
The only way to really know which option you
like best is to try them.
Using Left Steering Wheel Buttons
Use the buttons on the left side of the steering
wheel to change radio stations, control the
media player’s volume, and control what
displays on the left side of the instrument panel (whenever the Navigation app is not
displaying instructions).
Note: The volume control on the steering
wheel does not adjust spoken navigation instructions. To control the volume of
navigation instructions, use the navigation
window on the touchscreen (see Using Maps
on page 90).
1. Next
If you are listening to local or satellite
radio and you have defined more than one
radio preset, press to play the next preset in the radio band that is currently playing.
If you have not defined more than one
preset, press to go to the next available
frequency.
If you are listening to Internet radio, or to
an audio file on a connected Bluetooth or USB device, press to skip to the next song
or station.
2. Scroll Wheel
• To adjust the media volume, roll up or down.
• To mute the media volume, or to pause/play an audio file, tap the
wheel.
• To choose what displays on the left side of the instrument panel, press
and hold the scroll wheel to display
the available options. Then roll the
scroll wheel to browse through the
options. Tap the scroll wheel when the option you want is highlighted.
3. Previous
Same as described above for Next, except
it skips to the previous song or station.
Note: Regardless of how you customize the
left side of the instrument panel, it
automatically changes to display navigation instructions (if applicable), or to let you knowif a door or trunk is open when Model S is in a
driving gear.
Steering Wheel
Driving37
Page 38 of 164
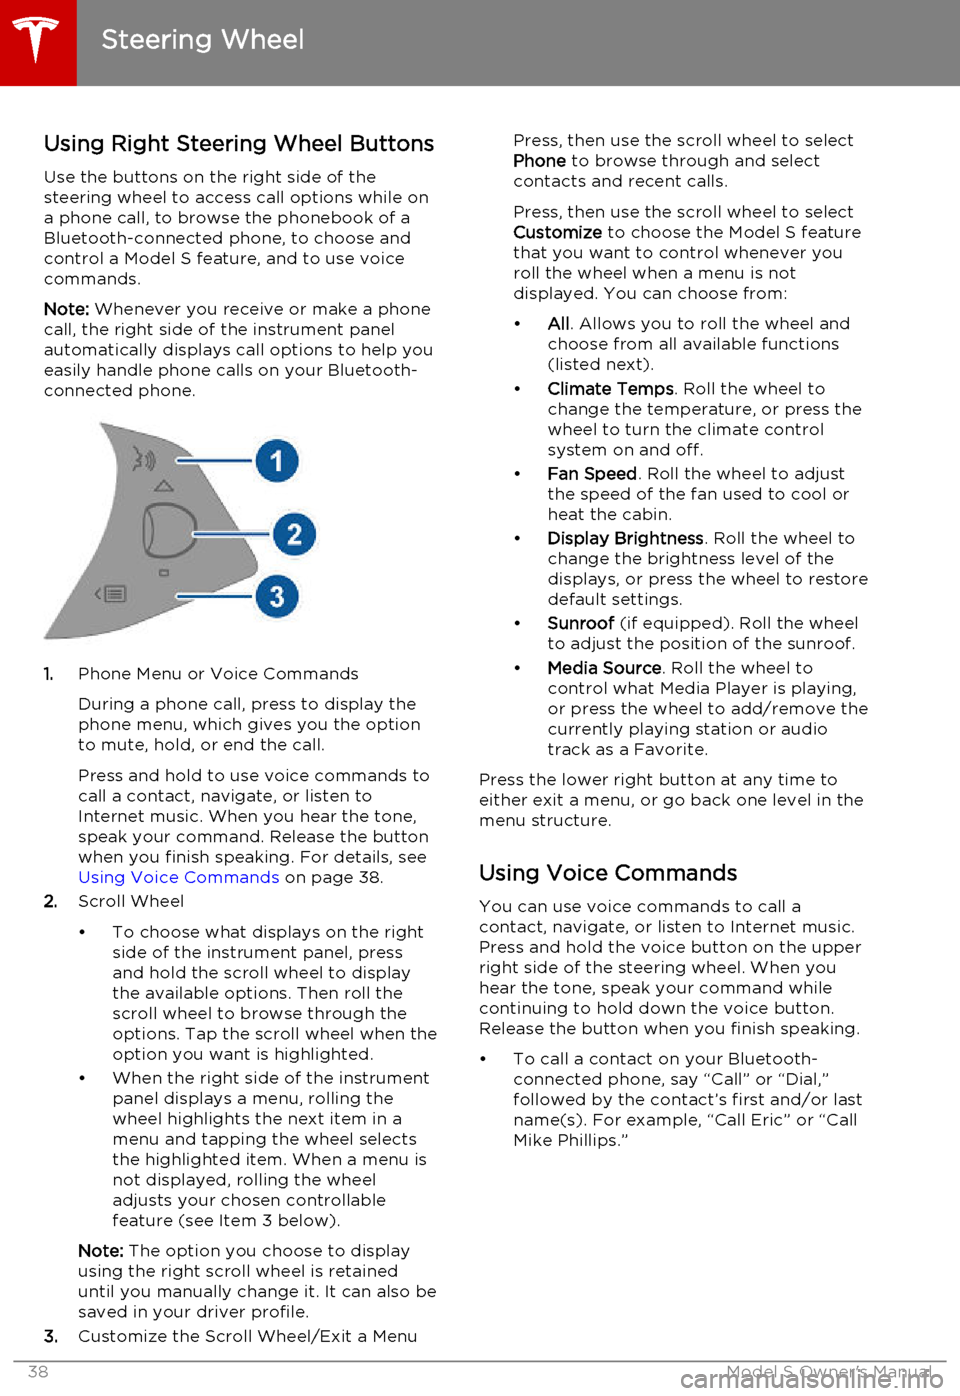
Using Right Steering Wheel Buttons
Use the buttons on the right side of the steering wheel to access call options while ona phone call, to browse the phonebook of aBluetooth-connected phone, to choose and
control a Model S feature, and to use voice commands.
Note: Whenever you receive or make a phone
call, the right side of the instrument panel
automatically displays call options to help you
easily handle phone calls on your Bluetooth-
connected phone.
1. Phone Menu or Voice Commands
During a phone call, press to display the phone menu, which gives you the option
to mute, hold, or end the call.
Press and hold to use voice commands to
call a contact, navigate, or listen to
Internet music. When you hear the tone,
speak your command. Release the button
when you finish speaking. For details, see Using Voice Commands on page 38.
2. Scroll Wheel
• To choose what displays on the right side of the instrument panel, press
and hold the scroll wheel to display
the available options. Then roll the
scroll wheel to browse through the options. Tap the scroll wheel when the
option you want is highlighted.
• When the right side of the instrument panel displays a menu, rolling the
wheel highlights the next item in a
menu and tapping the wheel selects
the highlighted item. When a menu is
not displayed, rolling the wheel
adjusts your chosen controllable
feature (see Item 3 below).
Note: The option you choose to display
using the right scroll wheel is retained
until you manually change it. It can also be
saved in your driver profile.
3. Customize the Scroll Wheel/Exit a Menu
Press, then use the scroll wheel to select
Phone to browse through and select
contacts and recent calls.
Press, then use the scroll wheel to select
Customize to choose the Model S feature
that you want to control whenever you
roll the wheel when a menu is not
displayed. You can choose from:
• All. Allows you to roll the wheel and
choose from all available functions
(listed next).
• Climate Temps . Roll the wheel to
change the temperature, or press the
wheel to turn the climate control
system on and off.
• Fan Speed . Roll the wheel to adjust
the speed of the fan used to cool or heat the cabin.
• Display Brightness . Roll the wheel to
change the brightness level of the
displays, or press the wheel to restore default settings.
• Sunroof (if equipped). Roll the wheel
to adjust the position of the sunroof.
• Media Source . Roll the wheel to
control what Media Player is playing,
or press the wheel to add/remove the
currently playing station or audio track as a Favorite.
Press the lower right button at any time to either exit a menu, or go back one level in the
menu structure.
Using Voice Commands
You can use voice commands to call a
contact, navigate, or listen to Internet music.
Press and hold the voice button on the upper
right side of the steering wheel. When you
hear the tone, speak your command while
continuing to hold down the voice button.
Release the button when you finish speaking.
• To call a contact on your Bluetooth- connected phone, say “Call” or “Dial,”
followed by the contact’s first and/or last name(s). For example, “Call Eric” or “Call
Mike Phillips.”
Steering Wheel
38Model S Owner's Manual
Page 40 of 164
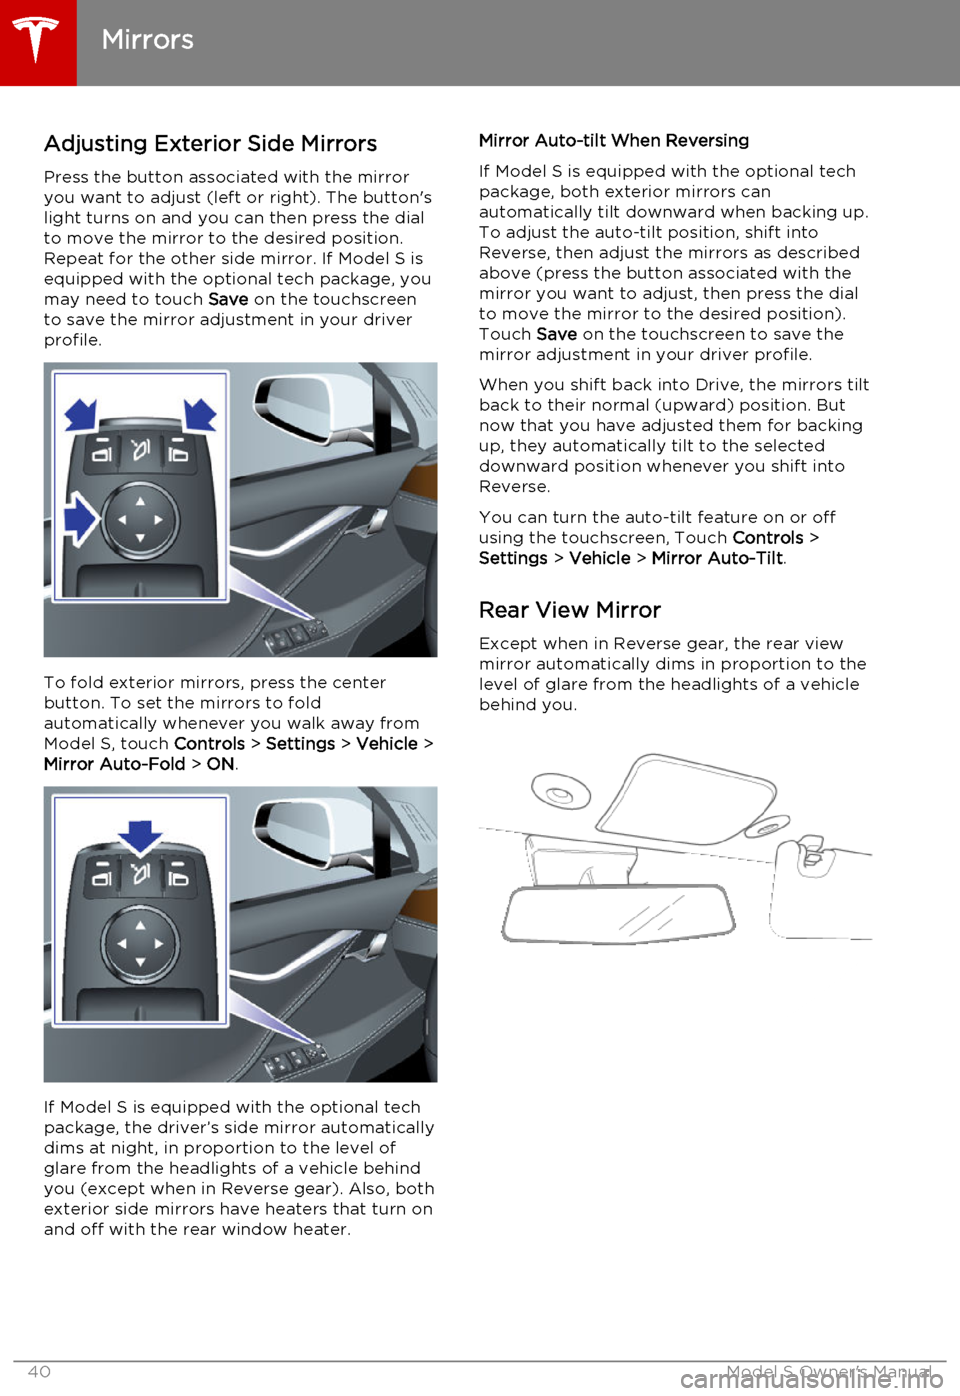
Adjusting Exterior Side MirrorsPress the button associated with the mirror
you want to adjust (left or right). The button's
light turns on and you can then press the dial
to move the mirror to the desired position.
Repeat for the other side mirror. If Model S is
equipped with the optional tech package, you
may need to touch Save on the touchscreen
to save the mirror adjustment in your driver
profile.
To fold exterior mirrors, press the center
button. To set the mirrors to fold
automatically whenever you walk away from Model S, touch Controls > Settings > Vehicle >
Mirror Auto-Fold > ON .
If Model S is equipped with the optional tech
package, the driver’s side mirror automatically
dims at night, in proportion to the level of
glare from the headlights of a vehicle behind
you (except when in Reverse gear). Also, both
exterior side mirrors have heaters that turn on and off with the rear window heater.
Mirror Auto-tilt When Reversing
If Model S is equipped with the optional tech
package, both exterior mirrors can
automatically tilt downward when backing up.
To adjust the auto-tilt position, shift into
Reverse, then adjust the mirrors as described above (press the button associated with themirror you want to adjust, then press the dial
to move the mirror to the desired position). Touch Save on the touchscreen to save the
mirror adjustment in your driver profile.
When you shift back into Drive, the mirrors tilt back to their normal (upward) position. But
now that you have adjusted them for backing
up, they automatically tilt to the selected
downward position whenever you shift into
Reverse.
You can turn the auto-tilt feature on or off using the touchscreen, Touch Controls >
Settings > Vehicle > Mirror Auto-Tilt .
Rear View Mirror
Except when in Reverse gear, the rear view mirror automatically dims in proportion to thelevel of glare from the headlights of a vehiclebehind you.
Mirrors
40Model S Owner's Manual
Page 42 of 164
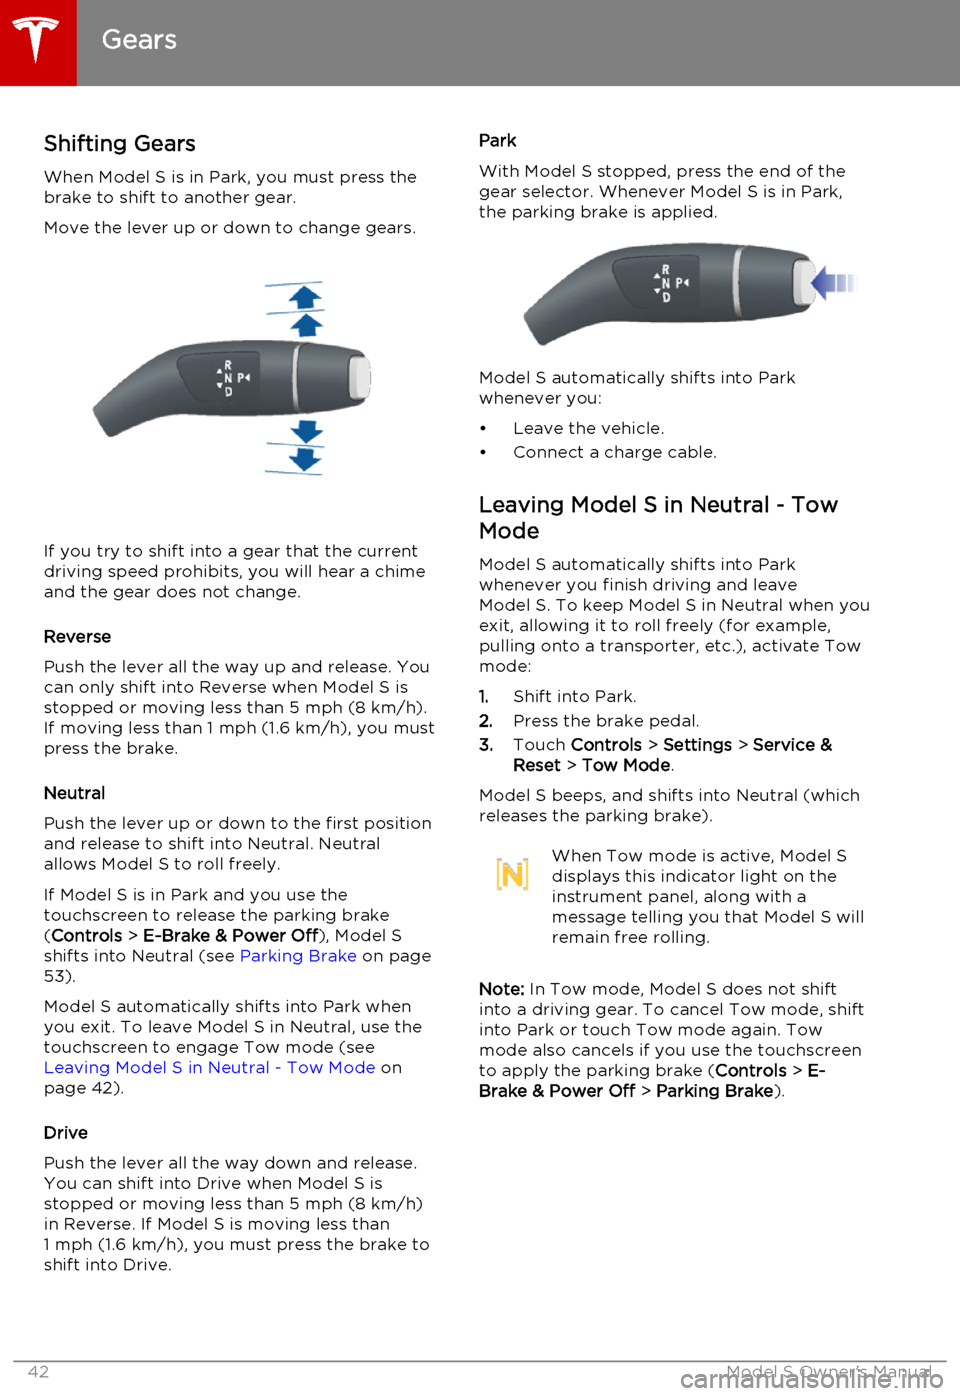
Shifting GearsWhen Model S is in Park, you must press the
brake to shift to another gear.
Move the lever up or down to change gears.
If you try to shift into a gear that the current
driving speed prohibits, you will hear a chime
and the gear does not change.
Reverse
Push the lever all the way up and release. You can only shift into Reverse when Model S is
stopped or moving less than 5 mph (8 km/h). If moving less than 1 mph (1.6 km/h), you must
press the brake.
Neutral
Push the lever up or down to the first position
and release to shift into Neutral. Neutral
allows Model S to roll freely.
If Model S is in Park and you use the
touchscreen to release the parking brake ( Controls > E-Brake & Power Off ), Model S
shifts into Neutral (see Parking Brake on page
53).
Model S automatically shifts into Park when you exit. To leave Model S in Neutral, use the
touchscreen to engage Tow mode (see Leaving Model S in Neutral - Tow Mode on
page 42).
Drive
Push the lever all the way down and release. You can shift into Drive when Model S isstopped or moving less than 5 mph (8 km/h)
in Reverse. If Model S is moving less than
1 mph (1.6 km/h), you must press the brake to shift into Drive.
Park
With Model S stopped, press the end of the gear selector. Whenever Model S is in Park,
the parking brake is applied.
Model S automatically shifts into Park
whenever you:
• Leave the vehicle.
• Connect a charge cable.
Leaving Model S in Neutral - Tow
Mode
Model S automatically shifts into Parkwhenever you finish driving and leaveModel S. To keep Model S in Neutral when youexit, allowing it to roll freely (for example,pulling onto a transporter, etc.), activate Tow
mode:
1. Shift into Park.
2. Press the brake pedal.
3. Touch Controls > Settings > Service &
Reset > Tow Mode .
Model S beeps, and shifts into Neutral (which
releases the parking brake).
When Tow mode is active, Model S
displays this indicator light on the
instrument panel, along with a
message telling you that Model S will
remain free rolling.
Note: In Tow mode, Model S does not shift
into a driving gear. To cancel Tow mode, shift into Park or touch Tow mode again. Towmode also cancels if you use the touchscreen
to apply the parking brake ( Controls > E-
Brake & Power Off > Parking Brake ).
Gears
42Model S Owner's Manual