sensor TESLA MODEL S 2015 User Guide
[x] Cancel search | Manufacturer: TESLA, Model Year: 2015, Model line: MODEL S, Model: TESLA MODEL S 2015Pages: 164, PDF Size: 4.78 MB
Page 67 of 164
Caution: Keep sensors clean from dirt,
debris, snow, and ice. Avoid using a high
pressure power washer on the sensors
and do not clean a sensor with a sharp or abrasive object that can scratch ordamage its surface.Caution: Do not install accessories or
stickers on or near the parking sensors.
Controlling Audible Feedback
You can use Park Assist with or without
audible feedback. To turn chimes on or off,
touch Controls > Settings > Safety &
Security > Park Assist Chimes .
You can also mute the chimes temporarily by
pressing the scroll wheel on the left side of
the steering wheel or by touching the mute
button in the bottom left corner of the Park
Assist view. The chimes are muted until you
shift into a different gear or drive over 5 mph
(8 km/h).
Limitations and False Warnings
The parking sensors may not function
correctly in these situations:
• One or more of the parking sensors is damaged, dirty, or covered (such as mud,
ice, or snow).
• Object is located below approximately 8 inches (20 cm) (such as a curb or lowbarrier).
• Weather conditions (heavy rain, snow, or fog) are interfering with sensor operation.
• Object is thin (such as a sign post).
• A sensor’s operating range has been exceeded.
• Object is sound-absorbing or soft (such as powder snow).
• Object is sloped (such as a sloped embankment).
• Model S has been parked in, or being driven in, extremely hot or cold
temperatures.
• The sensors are affected by other electrical equipment or devices that
generate ultrasonic waves.
• Object is located too close to the bumper. • A bumper is misaligned or damaged.
• An object that is mounted to Model S is interfering with and/or obstructing the
sensor (such as a bike rack or a bumper
sticker).
Other Parking Aids
In addition to Park Assist, when shifted into
Reverse gear, the backup camera displays a
view of the area behind Model S. See Rear
View Camera on page 71.
Park Assist
Driving67
Page 71 of 164
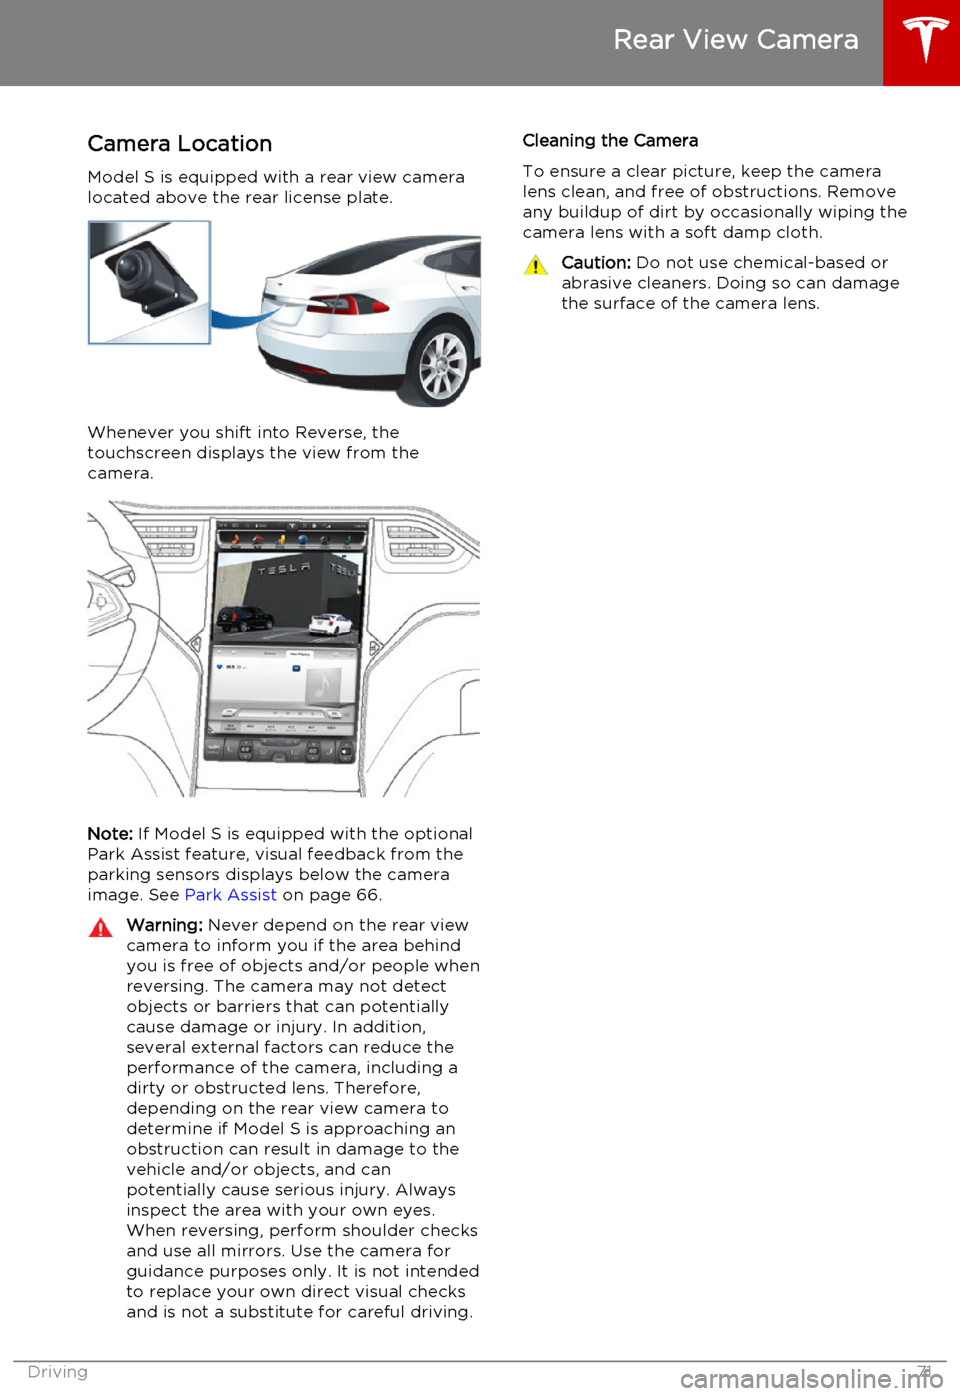
Camera LocationModel S is equipped with a rear view camera
located above the rear license plate.
Whenever you shift into Reverse, the
touchscreen displays the view from the
camera.
Note: If Model S is equipped with the optional
Park Assist feature, visual feedback from the
parking sensors displays below the camera image. See Park Assist on page 66.
Warning:
Never depend on the rear view
camera to inform you if the area behind
you is free of objects and/or people when
reversing. The camera may not detect
objects or barriers that can potentially cause damage or injury. In addition,several external factors can reduce the
performance of the camera, including a dirty or obstructed lens. Therefore,
depending on the rear view camera to determine if Model S is approaching anobstruction can result in damage to the
vehicle and/or objects, and can
potentially cause serious injury. Always
inspect the area with your own eyes.
When reversing, perform shoulder checks
and use all mirrors. Use the camera for
guidance purposes only. It is not intended to replace your own direct visual checks
and is not a substitute for careful driving.Cleaning the Camera
To ensure a clear picture, keep the camera
lens clean, and free of obstructions. Remove any buildup of dirt by occasionally wiping the
camera lens with a soft damp cloth.Caution: Do not use chemical-based or
abrasive cleaners. Doing so can damage
the surface of the camera lens.
Rear View Camera
Driving71
Page 79 of 164
Manually control the touchscreen’s
brightness and control its day (light
background) or night (dark background)
setting. When set to Auto, the
touchscreen automatically changes between Day and Night brightness
depending on the ambient lighting
conditions. To disable the touchscreen
momentarily for cleaning purposes, touch
Clean Mode . You can also put Model S
into an energy saving mode so it consumes less energy when not in use
(see Getting Maximum Range on page
70). Note that the Displays settings can
also be accessed from the Controls
window.
7. HomeLink
If the HomeLink feature is available in your region, use it to control RF-enabled
garage doors, lights, or security systems
(see HomeLink ®
Universal Transceiver on
page 96).
8. Driver Assistance
If your vehicle is equipped with Driver Assistance features, you can control
features that can provide a safer driving experience
• Lane Departure Warning: If on, the steering wheel vibrates if a front
wheel passes over a lane marking and
the associated turn signal is off (see
Lane Departure Warning on page 57).
• Overtake Acceleration: If on when Traffic-Aware Cruise Control is
operating, Model S accelerates when you engage the turn signal to indicate
a move into the passing lane (see Traffic-Aware Cruise Control on page
60).
• Speed Assist: Control how speed limits are determined and how
warnings are issued when you exceed the speed limit (see Speed Assist on
page 55).
• Forward Collision Warning: Control when warnings display on the
instrument panel if Model S detects a
vehicle, bike, or pedestrian ahead and
a collision is considered likely unless
you take immediate corrective action
(see Forward Collision Warning on
page 58).
9. Service & Reset
Turn various service-related features on
and off:• Service Mode: If on, moves wiper blades to the service position to make
them easier to access when replacing
them. Model S must be in Park. See
Wiper Blades and Washer Jets on
page 121.
• Tire Pressure Monitor: Touch Reset
Sensors to reset the TPMS sensors
after replacing a wheel (see Resetting
the TPMS Sensors on page 113).
• Tow Mode: Activate Tow Mode to keep Model S in Neutral (see Leaving
Model S in Neutral - Tow Mode on
page 42).
• Factory Reset: Touch Erase & Reset to
erase all personal data (saved addresses, music favorites, etc.) and
restore all customized settings to
their factory defaults.
10. Manual
Display this owners manual.Warning: Do not read the touchscreen
while driving. Doing so increases the
likelihood of a collision.
Naming Model S
To further personalize your Model S, you can
name it. The name you give your Model S will appear in the mobile app. To name your
Model S, touch the Tesla “T” at the top center
of the touchscreen, then touch Name Your
Vehicle .
When you save, Name Your Vehicle is
replaced by the name you provided. You can
touch the name at any time to rename your
Model S.
Erasing Personal Data
You can erase all personal data (saved
addresses, music favorites, imported contacts,
HomeLink programming, etc.) and restore all
customized settings to their factory defaults.
This is useful when transferring ownership of
Model S. Touch Settings > Service & Reset >
Factory Reset > Erase & Reset . Before erasing,
Model S verifies your credentials by
prompting you to enter the user name and
password associated with your MY TESLA
account.
Settings
Using the Touchscreen79
Page 109 of 164
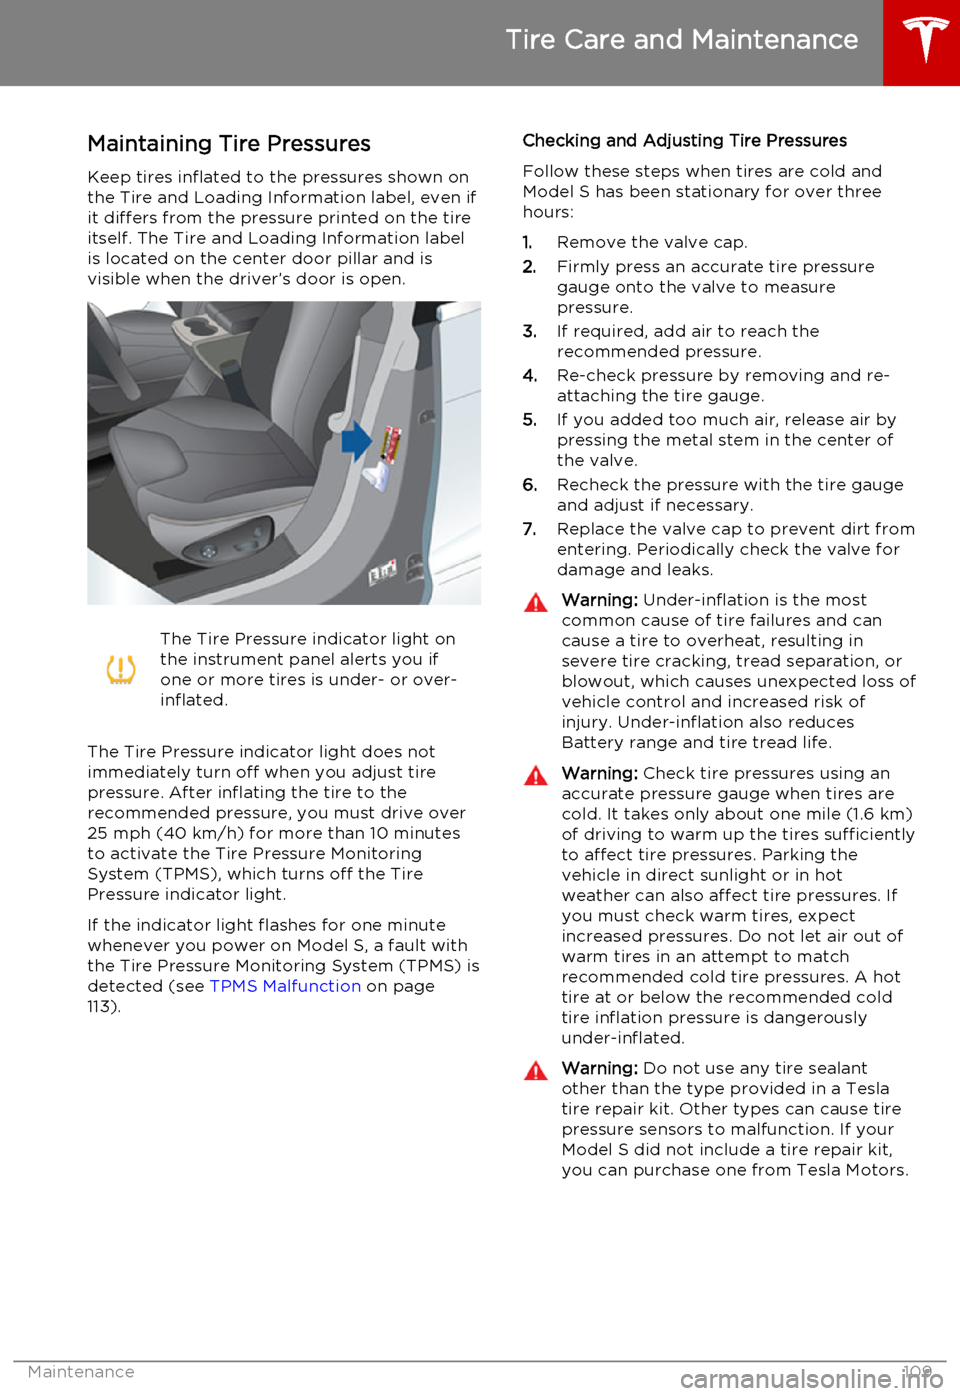
Maintaining Tire PressuresKeep tires inflated to the pressures shown onthe Tire and Loading Information label, even ifit differs from the pressure printed on the tire
itself. The Tire and Loading Information label is located on the center door pillar and isvisible when the driver’s door is open.The Tire Pressure indicator light on
the instrument panel alerts you if
one or more tires is under- or over-
inflated.
The Tire Pressure indicator light does not
immediately turn off when you adjust tire
pressure. After inflating the tire to the
recommended pressure, you must drive over
25 mph (40 km/h) for more than 10 minutes to activate the Tire Pressure MonitoringSystem (TPMS), which turns off the TirePressure indicator light.
If the indicator light flashes for one minute whenever you power on Model S, a fault with
the Tire Pressure Monitoring System (TPMS) is detected (see TPMS Malfunction on page
113).
Checking and Adjusting Tire Pressures
Follow these steps when tires are cold and
Model S has been stationary for over three
hours:
1. Remove the valve cap.
2. Firmly press an accurate tire pressure
gauge onto the valve to measure
pressure.
3. If required, add air to reach the
recommended pressure.
4. Re-check pressure by removing and re-
attaching the tire gauge.
5. If you added too much air, release air by
pressing the metal stem in the center of
the valve.
6. Recheck the pressure with the tire gauge
and adjust if necessary.
7. Replace the valve cap to prevent dirt from
entering. Periodically check the valve for damage and leaks.Warning: Under-inflation is the most
common cause of tire failures and can
cause a tire to overheat, resulting in
severe tire cracking, tread separation, or
blowout, which causes unexpected loss of vehicle control and increased risk ofinjury. Under-inflation also reduces
Battery range and tire tread life.Warning: Check tire pressures using an
accurate pressure gauge when tires are
cold. It takes only about one mile (1.6 km) of driving to warm up the tires sufficiently
to affect tire pressures. Parking the
vehicle in direct sunlight or in hot
weather can also affect tire pressures. If you must check warm tires, expectincreased pressures. Do not let air out of
warm tires in an attempt to match
recommended cold tire pressures. A hot tire at or below the recommended coldtire inflation pressure is dangerously
under-inflated.Warning: Do not use any tire sealant
other than the type provided in a Tesla tire repair kit. Other types can cause tire
pressure sensors to malfunction. If your Model S did not include a tire repair kit,
you can purchase one from Tesla Motors.
Tire Care and Maintenance
Maintenance109
Page 111 of 164
Replacing Tires and Wheels
Tires degrade over time due to the effects of
ultraviolet light, extreme temperatures, high loads, and environmental conditions. It isrecommended that tires are replaced everysix years, or sooner if required.
Wheel rims and tires are matched to suit the
handling characteristics of the vehicle. Replacement tires must comply with the
original specification. If tires other than those
specified are used, ensure that the load and speed ratings marked on the tire equal orexceed those of the original specification.
Ideally, you should replace all four tires at the
same time. If this is not possible, replace the
tires in pairs (both front or both rear). When
replacing tires, always re-balance and check
the alignment of wheels.
If you replace a wheel, the TPMS (Tire
Pressure Monitoring System) sensors need to
be reset to ensure they provide accurate
warnings when tires are under- or over-
inflated (see Resetting the TPMS Sensors on
page 113).Warning: For your safety, use only tires
and wheels that match the original
specification (see Wheels and Tires on
page 143). Tires that do not match the original specification can affect the
operation of the Tire Pressure Monitoring System (TPMS).Warning: Never exceed the speed rating
of your vehicle's tires. The speed rating is
shown on the sidewall of your tires (see
Understanding Tire Markings on page
145).Asymmetric Tires
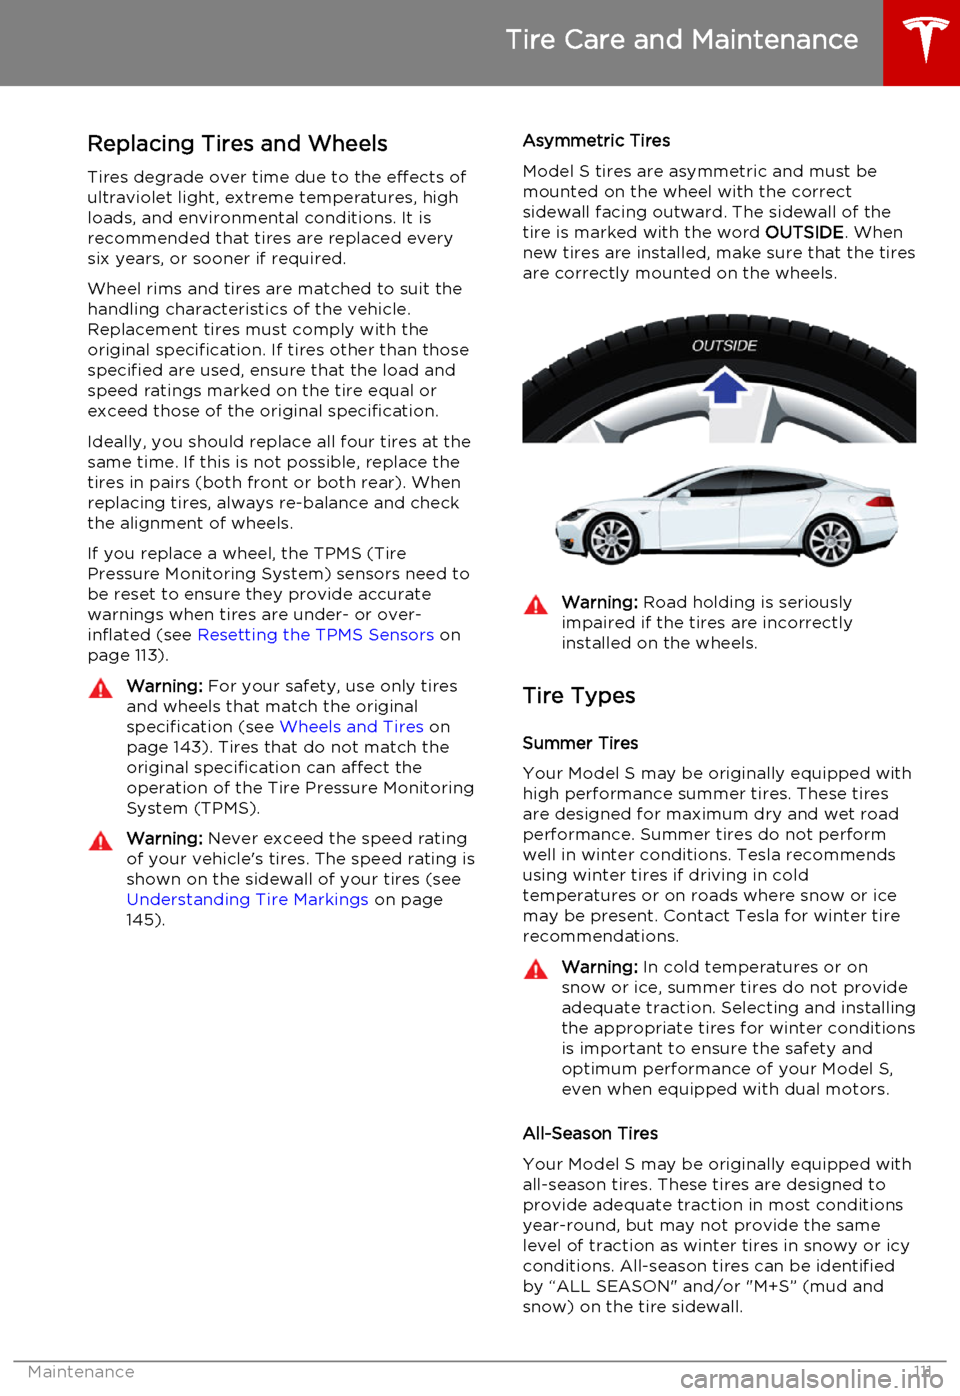
Model S tires are asymmetric and must be mounted on the wheel with the correctsidewall facing outward. The sidewall of thetire is marked with the word OUTSIDE. When
new tires are installed, make sure that the tires
are correctly mounted on the wheels.Warning: Road holding is seriously
impaired if the tires are incorrectly
installed on the wheels.
Tire Types
Summer Tires
Your Model S may be originally equipped with high performance summer tires. These tires
are designed for maximum dry and wet road performance. Summer tires do not performwell in winter conditions. Tesla recommendsusing winter tires if driving in cold
temperatures or on roads where snow or ice
may be present. Contact Tesla for winter tire recommendations.
Warning: In cold temperatures or on
snow or ice, summer tires do not provide
adequate traction. Selecting and installing the appropriate tires for winter conditionsis important to ensure the safety andoptimum performance of your Model S,
even when equipped with dual motors.
All-Season Tires
Your Model S may be originally equipped with all-season tires. These tires are designed to
provide adequate traction in most conditions
year-round, but may not provide the same
level of traction as winter tires in snowy or icy
conditions. All-season tires can be identified by “ALL SEASON" and/or "M+S” (mud and
snow) on the tire sidewall.
Tire Care and Maintenance
Maintenance111
Page 113 of 164
for the TPMS to trigger the Tire PressureWarning on the instrument panel.
Resetting the TPMS Sensors
After replacing one or more wheels, the TPMS sensors must be reset to ensure tire pressurewarnings are accurate. However, note that theTPMS sensors do not need to be reset after
replacing a tire or rotating wheels.
Note: When changing to 21" wheels
(Performance Plus models), the TPMS may
generate false tire pressure warnings. Bring
Model S to a Tesla Service center for further
adjustment.
Note: Do not reset the TPMS sensors in an
attempt to clear tire pressure warnings.
To reset TPMS sensors:
1. Inflate all tires to their recommend
pressures, as indicated on the Tire and Loading Information label located on the
driver’s door pillar.
2. Get ready to drive for ten minutes, then,
on the Model S touchscreen, touch
Controls > Settings > Service & Reset >
Tire Pressure Monitor > Reset Sensors .
3. Follow the onscreen instructions.
Replacing a Tire Sensor
If the Tire Pressure warning indicator displays frequently, contact Tesla to determine if a tiresensor needs to be replaced. Tire sensors
must be replaced by a Tesla service technician
who can perform a brief setup procedure. If a non-Tesla service center repairs or replaces atire, the tire sensor will not work until Tesla
performs the setup procedure.
TPMS Malfunction
Model S has also been equipped with a TPMS
malfunction indicator to indicate when the
system is not operating properly.
The TPMS malfunction indicator is
combined with the tire pressure
indicator light. When the system
detects a malfunction, the indicator
flashes for approximately one
minute after Model S powers on, and
then remains continuously lit. This
sequence continues upon
subsequent vehicle start-ups as long
as the malfunction exists. When the
TPMS malfunction indicator is on,
the system might not be able to
detect or signal under- and over-
inflated tires as intended.
TPMS malfunctions can occur for a variety of reasons, including installing replacement oralternate tires or wheels that prevent theTPMS from functioning properly. Alwayscheck the TPMS malfunction indicator light
after replacing one or more tires or wheels on
your vehicle to ensure that the replacement
tires or wheels allow the TPMS to continue to
function properly.
Note: If a tire has been replaced or repaired
using a different tire sealant than the one
available from Tesla, and a low tire pressure is
detected, it is possible that the tire sensor has
been damaged. Contact Tesla to have the
fault repaired as soon as possible.
Tire Care and Maintenance
Maintenance113
Page 114 of 164

Tire Repair KitYour Model S has no spare tire. Depending on
the legislations that apply to the region in which you purchased Model S, a tire repair kitmay or may not be included. If a tire repair kitwas not provided in Model S upon delivery,you can purchase one from Tesla.
Note: Although Model S does not have a spare
tire, in the event of a flat tire, Roadside
Assistance provides towing coverage for up
to 50 miles.
The tire repair kit consists of a compressor
and a canister of tire sealant (enough to repair
one tire). When injected into a tire, the sealant
can penetrate a small puncture up to 1/4"
(6 mm) to form a temporary repair.
Note: For punctures larger than 1/4” (6 mm),
severe tread damage, a damaged sidewall,
ripped tires or tires that have come off the
rim, call Roadside Assistance.
Warning: The tire repair kit is a temporary
repair only. You must repair or replace a
damaged tire as soon as possible.Warning: Do not exceed 30 mph
(48 km/h) when driving with a tire that
has been temporarily repaired with sealant.Warning: Follow all directions and
warnings on the tire repair kit before
starting a repair.Caution: Do not drive on a deflated tire as
this can cause serious damage.Tire Sealant Canister
The tire sealant provided in the Tesla tire repair kit is approved for use with Model S andis designed not to damage the TPMS (TirePressure Monitoring System) sensors.
Therefore, you must replace it only with one
of the same type and capacity (see Replacing
the Sealant Canister on page 117). Tire
sealant canisters can be purchased from Tesla.
The tire sealant has an expiration date printed
on the outside of the canister. If the expiration
date has passed, the sealant might not work as expected. Always replace an expired tire
sealant canister.Warning: Do not use any tire sealant
other than the one available from Tesla. Doing so could cause tire pressure
sensors to malfunction.Warning: Always read and follow the
safety and handling instructions printed on the sealant canister.Warning: Keep tire sealant out of the
reach of children.Warning: Tire sealant can be harmful if it
contacts the eyes or if swallowed or
inhaled. If the sealant comes into contact with your eyes, immediately flush withwater and seek medical attention ifirritation persists. If swallowed, do notinduce vomiting and seek medical
assistance immediately. If inhaled,
breathe fresh air. Inhalation can cause
drowsiness and dizziness. If breathing is
affected, seek medical assistance
immediately.
Temporary Tire Repair
114Model S Owner's Manual
Page 118 of 164
Cleaning the Exterior
To prevent damage to the paint, immediately
remove corrosive substances (bird droppings, tree resin, dead insects, tar spots, road salt,industrial fallout, etc). Do not wait untilModel S is due for a complete wash. If
necessary, use denatured alcohol to remove
tar spots and stubborn grease stains, then
immediately wash the area with water and a
mild, non-detergent soap to remove the
alcohol.
Follow these steps when washing the exterior of Model S:
1. Rinse Thoroughly
Before washing, flush grime and grit from
the bodywork using a hose. Flush away accumulations of mud in areas where
debris easily collects (such as wheel arches and panel seams). If salt has beenused on the highways (such as duringwinter months), thoroughly rinse all tracesof road salt from the underside of the
vehicle.
2. Hand Wash
Hand wash Model S using a soft cloth and cold or lukewarm water containing a mild,
good quality car shampoo.
3. Rinse with Clean Water
After washing, rinse with clean water to
prevent soap from drying on the surfaces.
4. Dry Thoroughly and Clean Exterior Glass
After washing and rinsing, dry thoroughly with a chamois.
Clean windows and mirrors using an
automotive glass cleaner. Do not scrape,
or use any abrasive cleaning fluid on glass
or mirrored surfaces.Cautions for Exterior CleaningCaution: Do not use windshield treatment
fluids. Doing so can interfere with wiper
friction and cause a chattering sound.Caution: Do not use hot water and
detergents.Caution: In hot weather, do not wash in
direct sunlight.Caution: If using a pressure washer,
maintain a distance of at least 12" (30 cm) between the nozzle and the surface ofModel S. Keep the nozzle moving and do
not concentrate the water jet on any one area.Caution: Do not aim water hoses directly
at window, door or hood seals, or through wheel apertures onto brake components.Caution: Avoid using tight-napped or
rough cloths, such as washing mitts.Caution: If washing in an automatic car
wash, use Touchless car washes only. These car washes have no parts (brushes,etc.) that touch the surfaces of Model S.Using any other type of car wash could
cause damage that is not covered by the warranty.Caution: Do not used chemical based
wheel cleaners. These can damage the finish on the wheels.Caution: Avoid using a high pressure
power washer on the rear view camera or
parking sensors (if equipped) and do not
clean a sensor or camera lens with a
sharp or abrasive object that can scratch
or damage its surface.
Cleaning
118Model S Owner's Manual
Page 121 of 164
Checking and Replacing Wiper
BladesCaution: Wiper blades do not lock into a
lifted position. When cleaning or
replacing a wiper blade, lift the wiper arm
only a short distance from the windshield,
just far enough to access the blade. Do not lift a wiper arm beyond its intendedposition. Doing so can cause damage thatis not covered by the warranty.
To make wiper blades easy to access, turn offthe wipers, shift Model S into Park, then use
the touchscreen to move them to the service
position. Touch Controls > Settings > Service
& Reset > Service Mode > ON .
Note: Wipers automatically return to their
normal position when you shift Model S out of
Park.
Periodically check and clean the edge of the wiper blade and check the rubber for cracks,
splits and roughness. If damaged, replace the
blade immediately to prevent damage to the glass.
Contaminants on the windshield, or on the wiper blades, can reduce the effectiveness of
the wiper blades. Contaminants include ice,
wax spray from car washes, washer fluid with
bug and/or water repellent, bird droppings,
tree sap, and other organic substances.
Follow these guidelines for cleaning:
• Clean the windshield using non-abrasive glass cleaner.
• Lift the wiper arm a short distance away from the windshield, just far enough toaccess the wiper blade, then wipe the
blade clean using isopropyl (rubbing)
alcohol or washer fluid.
If the wipers remain ineffective after cleaning,
replace the wiper blades.
For optimum performance, replace wiper
blades at least once a year.
To replace wiper blades:
1. Turn off the wipers, shift Model S into
Park, then use the touchscreen to move
the wipers to the service position. Touch
Controls > Settings > Service & Reset >
Service Mode > ON .
Note: Wipers must be OFF to turn on
Service Mode.
2. Lift the wiper arm a short distance away
from the windshield, just far enough to
access the wiper blade.
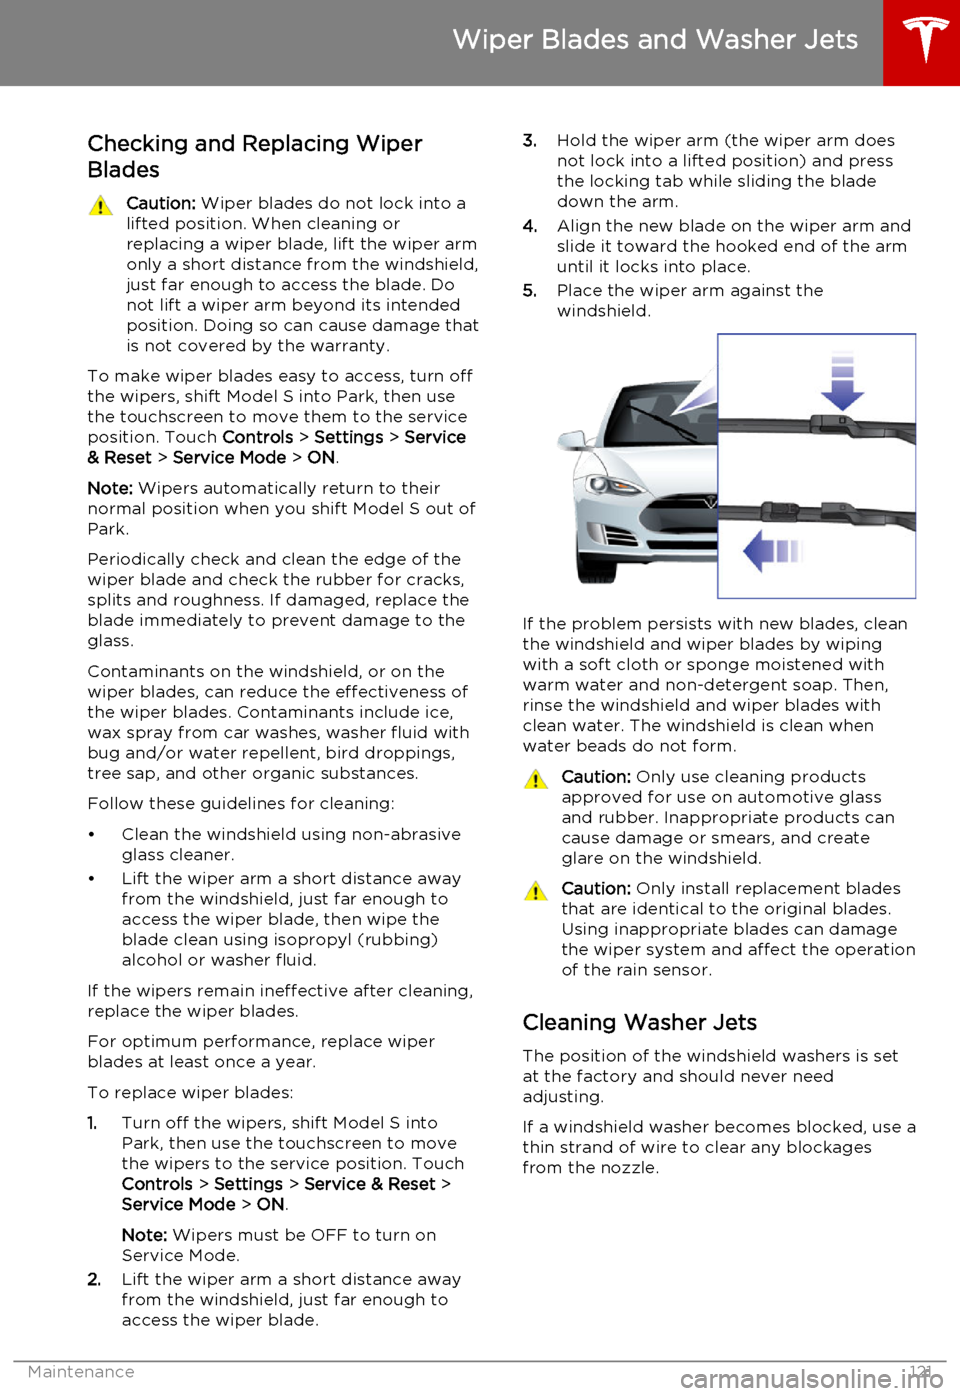
3. Hold the wiper arm (the wiper arm does
not lock into a lifted position) and press
the locking tab while sliding the blade
down the arm.
4. Align the new blade on the wiper arm and
slide it toward the hooked end of the arm
until it locks into place.
5. Place the wiper arm against the
windshield.
If the problem persists with new blades, clean
the windshield and wiper blades by wiping
with a soft cloth or sponge moistened with
warm water and non-detergent soap. Then,
rinse the windshield and wiper blades with clean water. The windshield is clean when
water beads do not form.
Caution: Only use cleaning products
approved for use on automotive glass and rubber. Inappropriate products can
cause damage or smears, and create
glare on the windshield.Caution: Only install replacement blades
that are identical to the original blades.
Using inappropriate blades can damage
the wiper system and affect the operation of the rain sensor.
Cleaning Washer Jets
The position of the windshield washers is set
at the factory and should never need adjusting.
If a windshield washer becomes blocked, use a
thin strand of wire to clear any blockages
from the nozzle.
Wiper Blades and Washer Jets
Maintenance121
Page 129 of 164
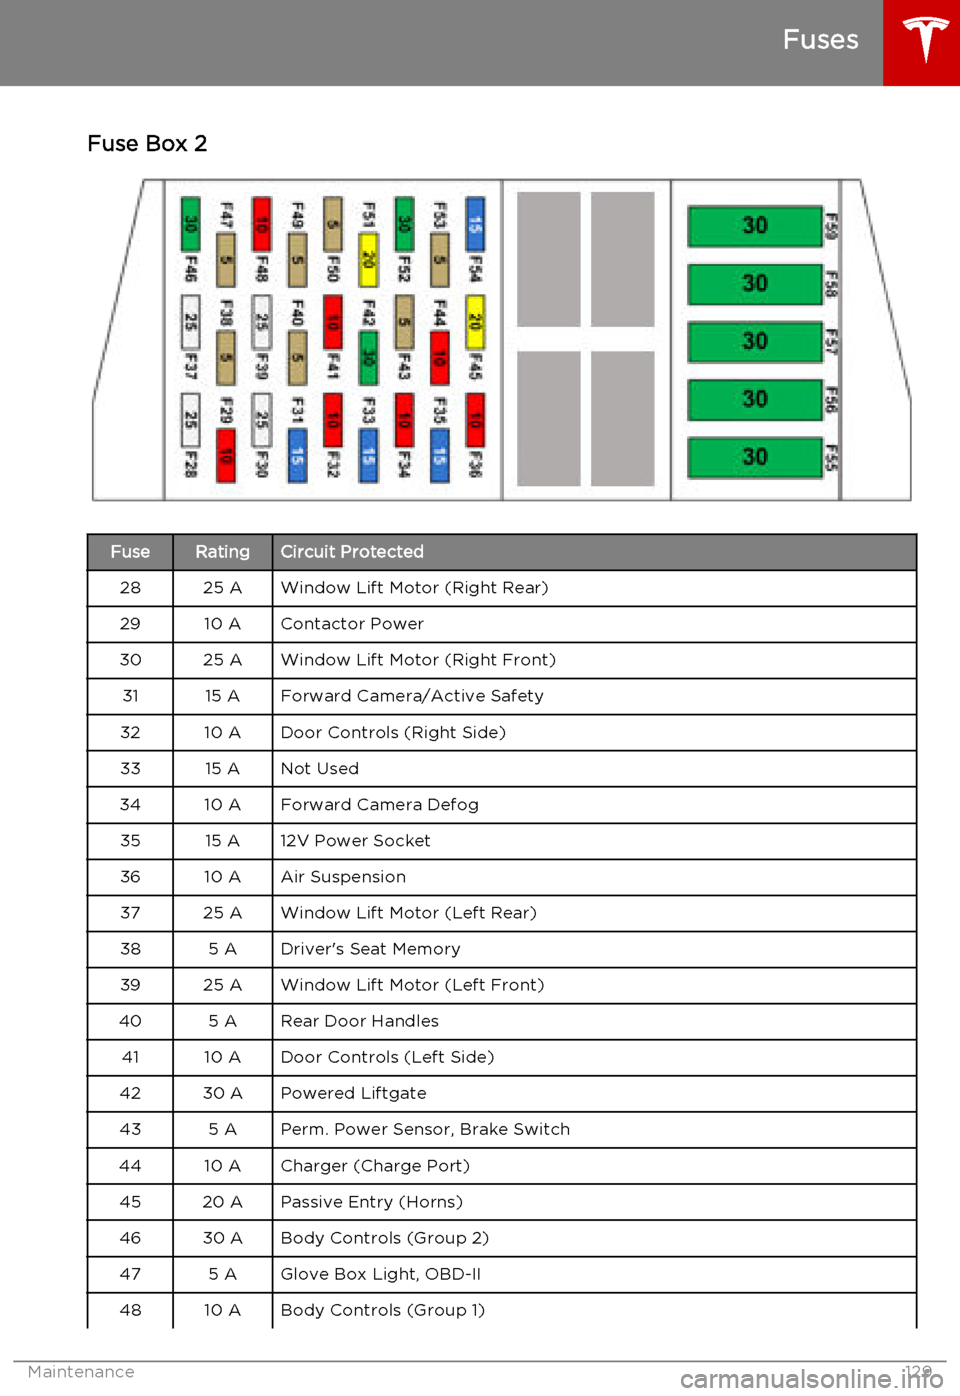
Fuse Box 2FuseRatingCircuit Protected2825 AWindow Lift Motor (Right Rear)2910 AContactor Power3025 AWindow Lift Motor (Right Front)3115 AForward Camera/Active Safety3210 ADoor Controls (Right Side)3315 ANot Used3410 AForward Camera Defog3515 A12V Power Socket3610 AAir Suspension3725 AWindow Lift Motor (Left Rear)385 ADriver's Seat Memory3925 AWindow Lift Motor (Left Front)405 ARear Door Handles4110 ADoor Controls (Left Side)4230 APowered Liftgate435 APerm. Power Sensor, Brake Switch4410 ACharger (Charge Port)4520 APassive Entry (Horns)4630 ABody Controls (Group 2)475 AGlove Box Light, OBD-II4810 ABody Controls (Group 1)
Fuses
Maintenance129