tow TESLA MODEL S 2015 Owner's Guide
[x] Cancel search | Manufacturer: TESLA, Model Year: 2015, Model line: MODEL S, Model: TESLA MODEL S 2015Pages: 164, PDF Size: 4.78 MB
Page 82 of 164
Ventilation
Outside air is drawn into Model S through the
grill in front of the windshield. Keep the grill
clear of obstructions such as leaves and snow.
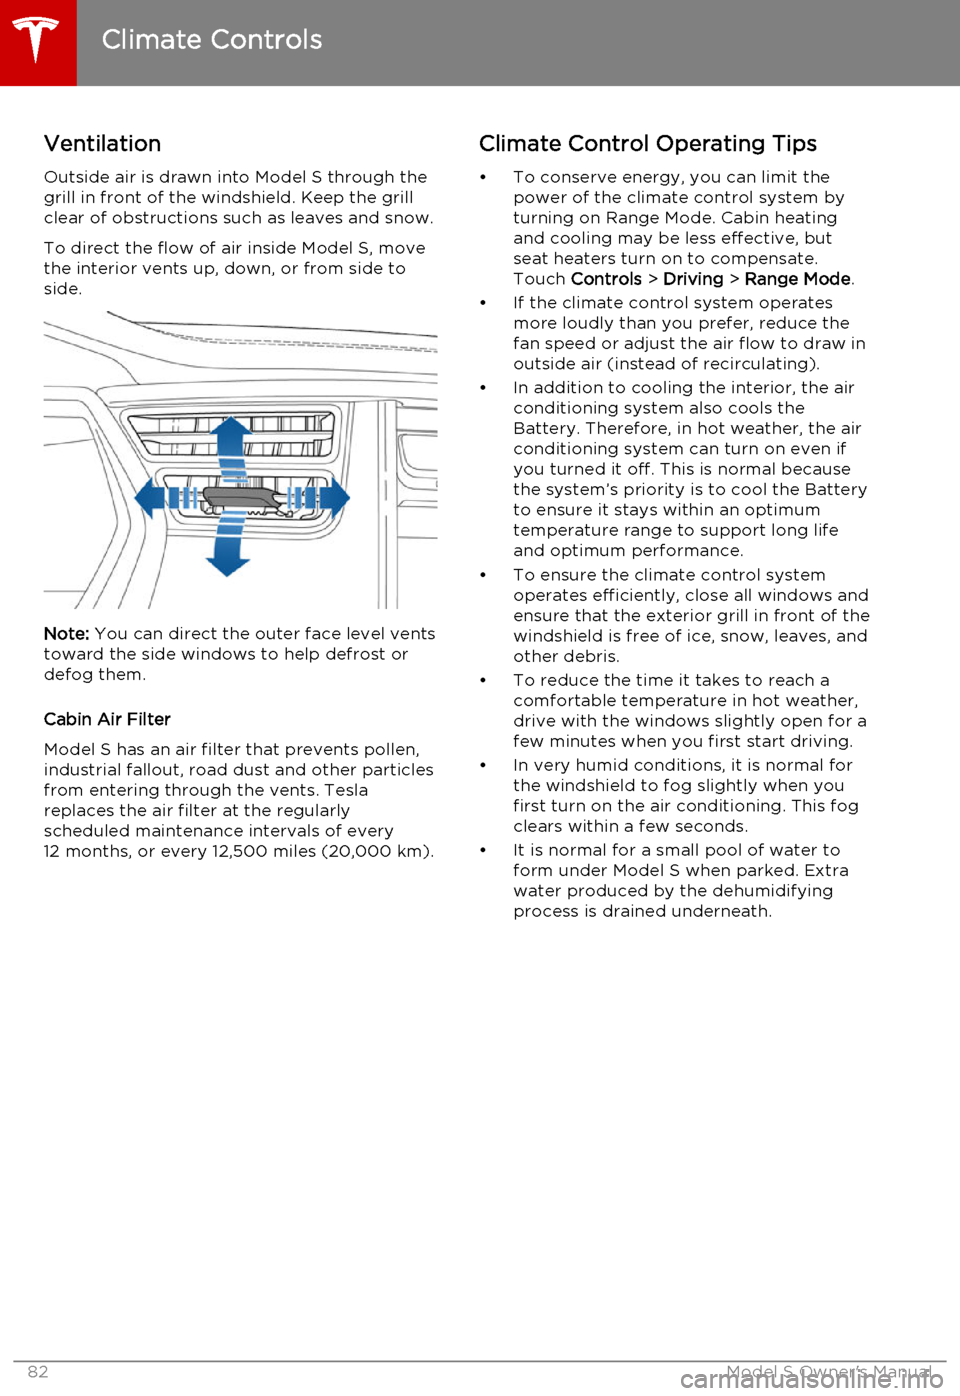
To direct the flow of air inside Model S, move
the interior vents up, down, or from side to
side.
Note: You can direct the outer face level vents
toward the side windows to help defrost or defog them.
Cabin Air Filter
Model S has an air filter that prevents pollen,
industrial fallout, road dust and other particles
from entering through the vents. Tesla replaces the air filter at the regularly
scheduled maintenance intervals of every 12 months, or every 12,500 miles (20,000 km).
Climate Control Operating Tips
• To conserve energy, you can limit the power of the climate control system by
turning on Range Mode. Cabin heating and cooling may be less effective, butseat heaters turn on to compensate.
Touch Controls > Driving > Range Mode .
• If the climate control system operates more loudly than you prefer, reduce thefan speed or adjust the air flow to draw in
outside air (instead of recirculating).
• In addition to cooling the interior, the air conditioning system also cools the
Battery. Therefore, in hot weather, the air
conditioning system can turn on even if
you turned it off. This is normal because the system’s priority is to cool the Battery
to ensure it stays within an optimum
temperature range to support long life and optimum performance.
• To ensure the climate control system operates efficiently, close all windows and
ensure that the exterior grill in front of the
windshield is free of ice, snow, leaves, and
other debris.
• To reduce the time it takes to reach a comfortable temperature in hot weather,
drive with the windows slightly open for a
few minutes when you first start driving.
• In very humid conditions, it is normal for the windshield to fog slightly when you
first turn on the air conditioning. This fog
clears within a few seconds.
• It is normal for a small pool of water to form under Model S when parked. Extra
water produced by the dehumidifying
process is drained underneath.
Climate Controls
82Model S Owner's Manual
Page 85 of 164
OverviewTouch the Media icon to listen to the radio or
play audio files. The touchscreen displays the
Media Player. Media Player has two tabs. Use the Browse tab to select what you want to
play and use the Now Playing tab to view and
control what is currently playing. You can play
AM and FM radio (including HD), and XM
satellite radio (if Model S is equipped with the optional sound package). You can also play
Internet radio (such as TuneIn), and audio files from a Bluetooth-connected device or a USB-
connected flash drive.
To adjust the media volume, roll the scroll
wheel on the left side of the steering wheel up or down. To mute the volume, tap the wheel.
AM and FM Radio
Model S provides AM and FM radio services. These can be selected from the Browse tab orusing the Source Picker, located in the upperright corner of the Media Player window.
You can manually tune the radio to any
frequency by touching and dragging the channel selector bar on the Now Playing
screen. The channel selector bar allows you to move from one available radio station to the
next.
XM Radio If Model S is equipped with the optional sound
studio package, you can listen to XM radio, a
subscription-based satellite radio service. To
receive XM radio channels, you must provide
the radio service provider with the radio ID for
your touchscreen.
To view the radio ID:
1. Select the XM radio source.
2. Tune it to channel 0.
3. The Radio ID displays in the station
information area.
To select an XM radio channel, you can either
manually scroll through the channel numbers,
or you can browse the channels by category.
To browse by category, touch Browse >
Radio > XM Satellite Radio .
Note: On newer models, XM radio is available
only if Model S is equipped with both the optional sound studio package and thepanoramic roof. To optimize aerodynamics,
Model S does not have an external antenna.
The internal antenna is compatible only with the transparent panoramic roof.Internet Radio
Internet radio services are accessed over a
data connection. To use Internet radio, touch
Media > Browse > Internet .
Choose your desired Internet radio service
(for example, TuneIn), then browse through the available categories and/or stations. When
you select a specific station or episode, Media Player starts playing it and displays the NowPlaying screen.
To play the next (and in some cases previous) available station, episode, or track beingprovided by the Internet radio service, touch
the arrows on the Now Playing screen, or use
the buttons on the left side of the steering
wheel (see Using Left Steering Wheel Buttons
on page 37). The exact function of these
controls vary depending on the specific
Internet service you are listening to.
You can also use voice commands to play a
specific song, artist, or album from an Internet
radio service. For details, see Using Voice
Commands on page 38.
Internet Radio Account Registration
Model S provides you with one or more
Internet radio services. To enter your log in
information, touch Controls > Settings >
Apps > Media Player . Enter the email and
password associated with the Internet radio
account(s) you want to use, then touch Log
In .
Slacker
You can use your own Slacker account or the
one that Tesla has already set up for you. To
use your own account, log in as described above.
Note: If you have a Slacker Premium account,
you can shuffle tracks in a playlist or repeat any track using the shuffle/repeat icons
displayed below the album cover art on the
Now Playing tab.
TuneIn
TuneIn does not require an account for it to work. But if you have a TuneIn account (go towww.tunein.com), you can log in as describedabove.
When playing a TuneIn podcast, you can rewind or fast forward to any location in the
podcast by dragging the slider bar on the Now Playing tab.
Media and Audio
Using the Touchscreen85
Page 103 of 164
About the Battery
Model S has one of the most sophisticated
battery systems in the world. The most important way to preserve the Battery is to
LEAVE YOUR MODEL S PLUGGED IN when
you are not using it. This is particularly
important if you are not planning to drive
Model S for several weeks. When plugged in,
Model S wakes up when needed to
automatically maintain a charge level that
maximizes the lifetime of the Battery.
There is no advantage to waiting until the
Battery’s level is low before charging. In fact,
the Battery performs best when charged
regularly.
Note: If the Model S Battery becomes
completely discharged in a situation in which
towing is required, the owner is responsible for towing expenses. Discharge-related
towing expenses are not covered under the
Roadside Assistance policy.
Battery Care
Never allow the Battery to fully discharge.
Even when Model S is not being driven, its
Battery discharges very slowly to power the
onboard electronics. On average, the Battery discharges at a rate of 1% per day. Situations
can arise in which you must leave Model S
unplugged for an extended period of time (for
example, at an airport when traveling). In these situations, keep the 1% in mind to ensure
that you leave the Battery with a sufficient
charge level. For example, over a two week
period (14 days), the Battery discharges by
approximately 14%.
Discharging the Battery to 0% may
permanently damage the Battery. To protect against a complete discharge, Model S enters
a low-power consumption mode when the
charge level drops to 5%. In this mode, the
Battery stops supporting the onboard electronics to slow the discharge rate to
approximately 4% per month. Once this low-
power consumption mode is active, it is
important to plug in Model S within two
months to avoid Battery damage.
Note: When the low-power consumption
mode is active, the auxiliary 12V battery is no
longer being charged and can completely
discharge within 12 hours. In the unlikely event
that this occurs, you may need to jump start
or replace the 12V battery before you can
charge. In this situation, contact Tesla.Temperature Limits
For better long-term performance, avoid
exposing Model S to ambient temperatures above 140° F (60° C) or below -22° F (-30° C)
for more than 24 hours at a time.
Energy Saving Feature
Model S has an energy-saving feature that
reduces the amount of energy being consumed when Model S is not in use. Touch
Controls > Displays > Energy Saving . For more
information on maximizing range and saving
energy, see Getting Maximum Range on page
70.
Battery Warnings and CautionsWarning: The Battery has no parts that an
owner or a non-Tesla authorized service technician can service. Under no
circumstances should you open or
tamper with the Battery. Always contact Tesla to arrange for Battery servicing.Caution: If the Battery’s charge level falls
to 0%, you must plug it in. If you leave it
unplugged for an extended period, it may
not be possible to charge Model S or use
the vehicle without jump starting or
replacing the 12V battery. Leaving Model S unplugged for an extendedperiod can also result in permanent
Battery damage. If you are unable to
charge Model S, contact Tesla
immediately.Caution: The Battery requires no owner
maintenance. Do not remove the filler cap
and do not add fluid. If the instrument
panel warns you that the fluid level is low, contact Tesla immediately.
Battery Information
Charging103
Page 114 of 164

Tire Repair KitYour Model S has no spare tire. Depending on
the legislations that apply to the region in which you purchased Model S, a tire repair kitmay or may not be included. If a tire repair kitwas not provided in Model S upon delivery,you can purchase one from Tesla.
Note: Although Model S does not have a spare
tire, in the event of a flat tire, Roadside
Assistance provides towing coverage for up
to 50 miles.
The tire repair kit consists of a compressor
and a canister of tire sealant (enough to repair
one tire). When injected into a tire, the sealant
can penetrate a small puncture up to 1/4"
(6 mm) to form a temporary repair.
Note: For punctures larger than 1/4” (6 mm),
severe tread damage, a damaged sidewall,
ripped tires or tires that have come off the
rim, call Roadside Assistance.
Warning: The tire repair kit is a temporary
repair only. You must repair or replace a
damaged tire as soon as possible.Warning: Do not exceed 30 mph
(48 km/h) when driving with a tire that
has been temporarily repaired with sealant.Warning: Follow all directions and
warnings on the tire repair kit before
starting a repair.Caution: Do not drive on a deflated tire as
this can cause serious damage.Tire Sealant Canister
The tire sealant provided in the Tesla tire repair kit is approved for use with Model S andis designed not to damage the TPMS (TirePressure Monitoring System) sensors.
Therefore, you must replace it only with one
of the same type and capacity (see Replacing
the Sealant Canister on page 117). Tire
sealant canisters can be purchased from Tesla.
The tire sealant has an expiration date printed
on the outside of the canister. If the expiration
date has passed, the sealant might not work as expected. Always replace an expired tire
sealant canister.Warning: Do not use any tire sealant
other than the one available from Tesla. Doing so could cause tire pressure
sensors to malfunction.Warning: Always read and follow the
safety and handling instructions printed on the sealant canister.Warning: Keep tire sealant out of the
reach of children.Warning: Tire sealant can be harmful if it
contacts the eyes or if swallowed or
inhaled. If the sealant comes into contact with your eyes, immediately flush withwater and seek medical attention ifirritation persists. If swallowed, do notinduce vomiting and seek medical
assistance immediately. If inhaled,
breathe fresh air. Inhalation can cause
drowsiness and dizziness. If breathing is
affected, seek medical assistance
immediately.
Temporary Tire Repair
114Model S Owner's Manual
Page 121 of 164
Checking and Replacing Wiper
BladesCaution: Wiper blades do not lock into a
lifted position. When cleaning or
replacing a wiper blade, lift the wiper arm
only a short distance from the windshield,
just far enough to access the blade. Do not lift a wiper arm beyond its intendedposition. Doing so can cause damage thatis not covered by the warranty.
To make wiper blades easy to access, turn offthe wipers, shift Model S into Park, then use
the touchscreen to move them to the service
position. Touch Controls > Settings > Service
& Reset > Service Mode > ON .
Note: Wipers automatically return to their
normal position when you shift Model S out of
Park.
Periodically check and clean the edge of the wiper blade and check the rubber for cracks,
splits and roughness. If damaged, replace the
blade immediately to prevent damage to the glass.
Contaminants on the windshield, or on the wiper blades, can reduce the effectiveness of
the wiper blades. Contaminants include ice,
wax spray from car washes, washer fluid with
bug and/or water repellent, bird droppings,
tree sap, and other organic substances.
Follow these guidelines for cleaning:
• Clean the windshield using non-abrasive glass cleaner.
• Lift the wiper arm a short distance away from the windshield, just far enough toaccess the wiper blade, then wipe the
blade clean using isopropyl (rubbing)
alcohol or washer fluid.
If the wipers remain ineffective after cleaning,
replace the wiper blades.
For optimum performance, replace wiper
blades at least once a year.
To replace wiper blades:
1. Turn off the wipers, shift Model S into
Park, then use the touchscreen to move
the wipers to the service position. Touch
Controls > Settings > Service & Reset >
Service Mode > ON .
Note: Wipers must be OFF to turn on
Service Mode.
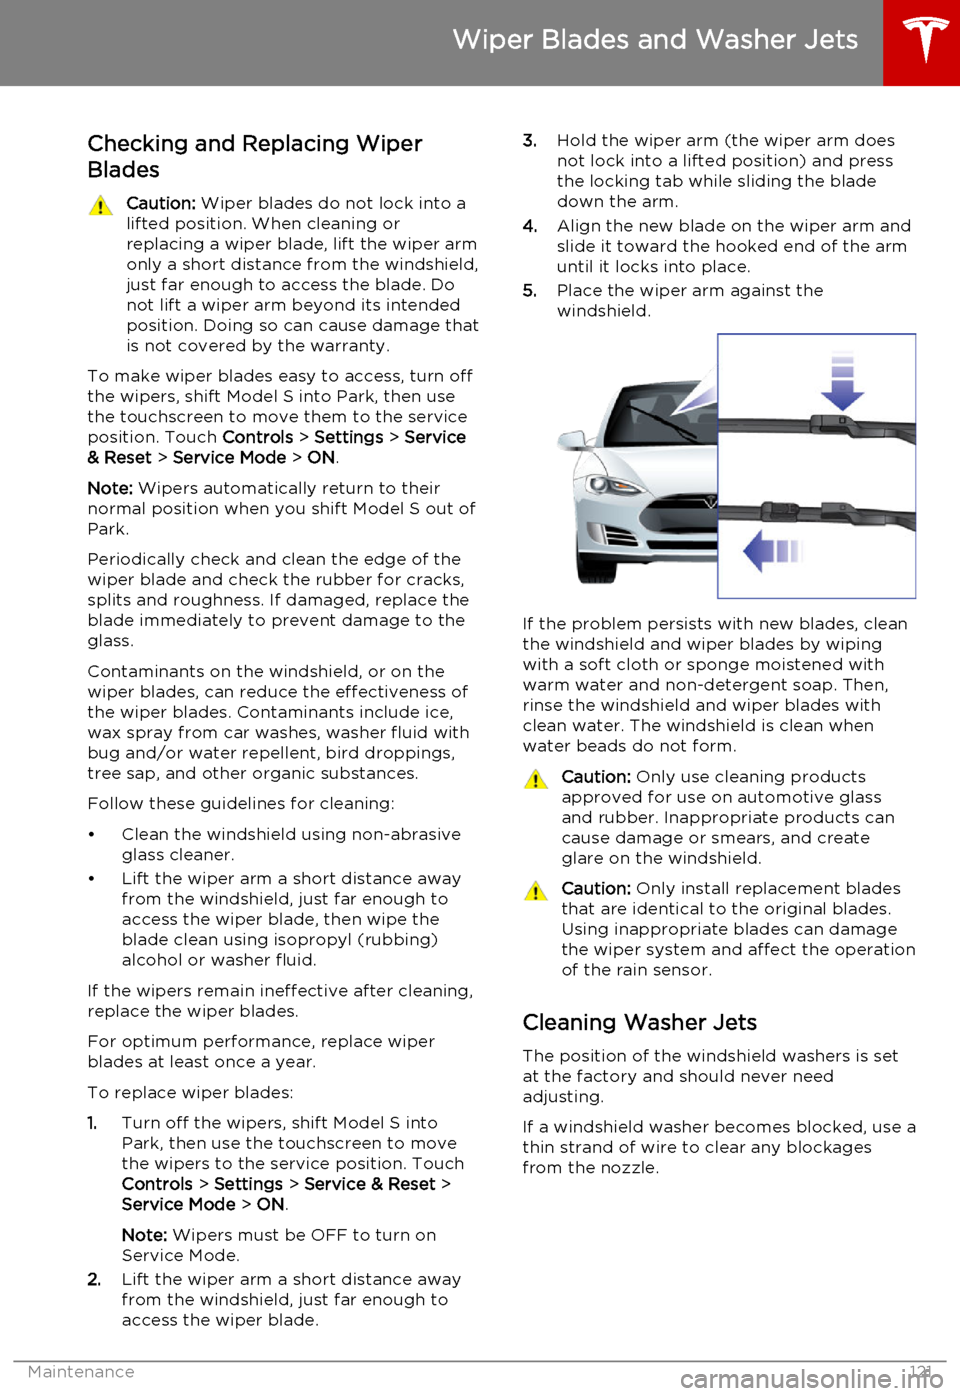
2. Lift the wiper arm a short distance away
from the windshield, just far enough to
access the wiper blade.
3. Hold the wiper arm (the wiper arm does
not lock into a lifted position) and press
the locking tab while sliding the blade
down the arm.
4. Align the new blade on the wiper arm and
slide it toward the hooked end of the arm
until it locks into place.
5. Place the wiper arm against the
windshield.
If the problem persists with new blades, clean
the windshield and wiper blades by wiping
with a soft cloth or sponge moistened with
warm water and non-detergent soap. Then,
rinse the windshield and wiper blades with clean water. The windshield is clean when
water beads do not form.
Caution: Only use cleaning products
approved for use on automotive glass and rubber. Inappropriate products can
cause damage or smears, and create
glare on the windshield.Caution: Only install replacement blades
that are identical to the original blades.
Using inappropriate blades can damage
the wiper system and affect the operation of the rain sensor.
Cleaning Washer Jets
The position of the windshield washers is set
at the factory and should never need adjusting.
If a windshield washer becomes blocked, use a
thin strand of wire to clear any blockages
from the nozzle.
Wiper Blades and Washer Jets
Maintenance121
Page 123 of 164
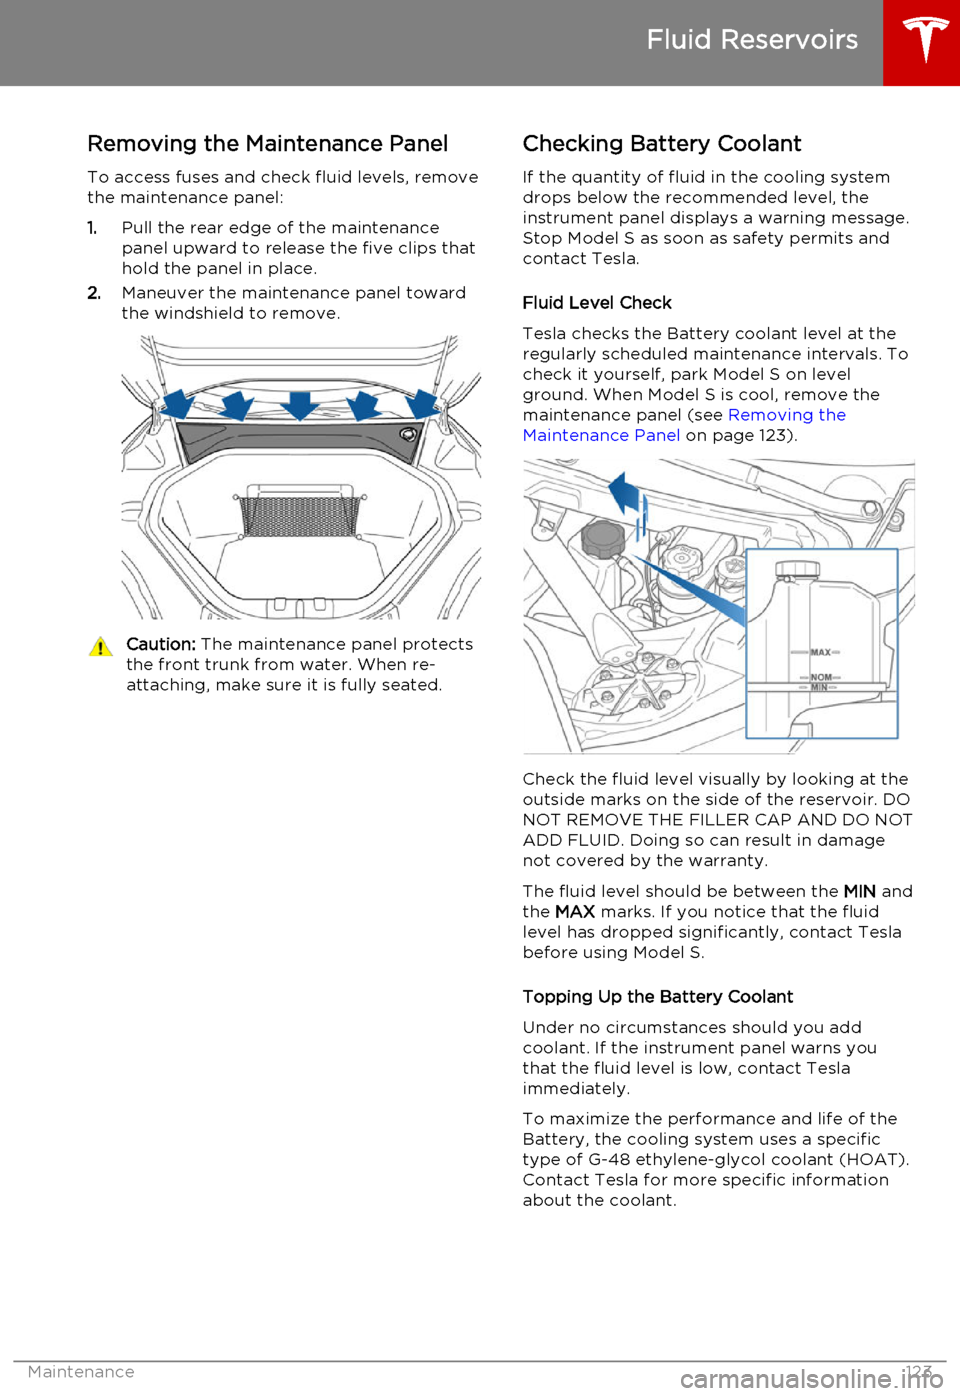
Removing the Maintenance Panel
To access fuses and check fluid levels, remove the maintenance panel:
1. Pull the rear edge of the maintenance
panel upward to release the five clips that
hold the panel in place.
2. Maneuver the maintenance panel toward
the windshield to remove.Caution: The maintenance panel protects
the front trunk from water. When re- attaching, make sure it is fully seated.Checking Battery Coolant
If the quantity of fluid in the cooling system
drops below the recommended level, the
instrument panel displays a warning message.
Stop Model S as soon as safety permits and
contact Tesla.
Fluid Level Check
Tesla checks the Battery coolant level at the
regularly scheduled maintenance intervals. To
check it yourself, park Model S on level
ground. When Model S is cool, remove the
maintenance panel (see Removing the
Maintenance Panel on page 123).
Check the fluid level visually by looking at the
outside marks on the side of the reservoir. DO
NOT REMOVE THE FILLER CAP AND DO NOT ADD FLUID. Doing so can result in damage
not covered by the warranty.
The fluid level should be between the MIN and
the MAX marks. If you notice that the fluid
level has dropped significantly, contact Tesla before using Model S.
Topping Up the Battery Coolant
Under no circumstances should you add coolant. If the instrument panel warns youthat the fluid level is low, contact Teslaimmediately.
To maximize the performance and life of the Battery, the cooling system uses a specific
type of G-48 ethylene-glycol coolant (HOAT).
Contact Tesla for more specific information
about the coolant.
Fluid Reservoirs
Maintenance123
Page 137 of 164
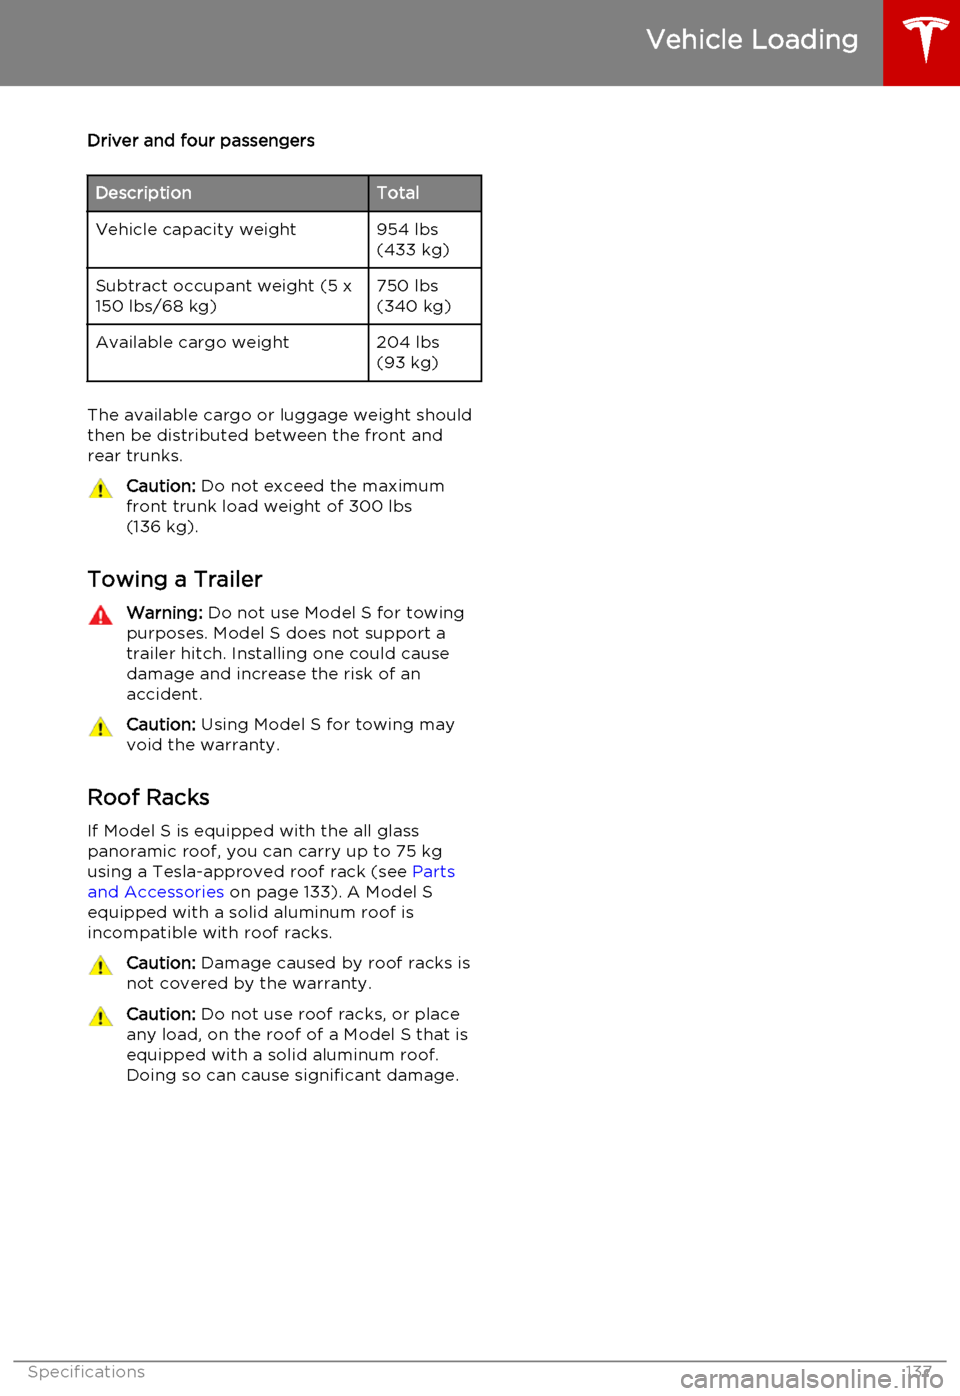
Driver and four passengersDescriptionTotalVehicle capacity weight954 lbs
(433 kg)Subtract occupant weight (5 x
150 lbs/68 kg)750 lbs
(340 kg)Available cargo weight204 lbs
(93 kg)
The available cargo or luggage weight should
then be distributed between the front and
rear trunks.
Caution: Do not exceed the maximum
front trunk load weight of 300 lbs
(136 kg).
Towing a Trailer
Warning: Do not use Model S for towing
purposes. Model S does not support a
trailer hitch. Installing one could cause
damage and increase the risk of an
accident.Caution: Using Model S for towing may
void the warranty.
Roof Racks
If Model S is equipped with the all glass
panoramic roof, you can carry up to 75 kg
using a Tesla-approved roof rack (see Parts
and Accessories on page 133). A Model S
equipped with a solid aluminum roof is incompatible with roof racks.
Caution: Damage caused by roof racks is
not covered by the warranty.Caution: Do not use roof racks, or place
any load, on the roof of a Model S that is equipped with a solid aluminum roof.Doing so can cause significant damage.
Vehicle Loading
Specifications137
Page 139 of 164

WeightsCurb Weight* (85 kWh Battery)4,630 lbs2,100 kgCurb Weight* (60 kWh Battery)4,407 lbs1,999 kgGross Vehicle Weight Rating5,710 lbs2,590 kgGross Vehicle Weight Distribution -
19" wheelsFront: 2,425 lbs
Rear: 3,285 lbsFront: 1,100 kgRear: 1,490 kgGross Vehicle Weight Distribution -
21" wheelsFront: 2,612 lbs
Rear: 3,097 lbsFront: 1,185 kgRear: 1,405 kgGross Axle Weight Rating- Front2,813 lbs1,276 kgGross Axle Weight Rating- Front
(Performance Plus models)2,723 lbs1,235 kgGross Axle Weight Rating - Rear: 19"
wheels3,307 lbs1,500 kgGross Axle Weight Rating - Rear: 21"
wheels3,131 lbs1,420 kgTrailer TowingNot permissible*Curb Weight = weight of the vehicle with correct fluid levels, no occupants and no cargo
Dimensions and Weights
Specifications139
Page 150 of 164
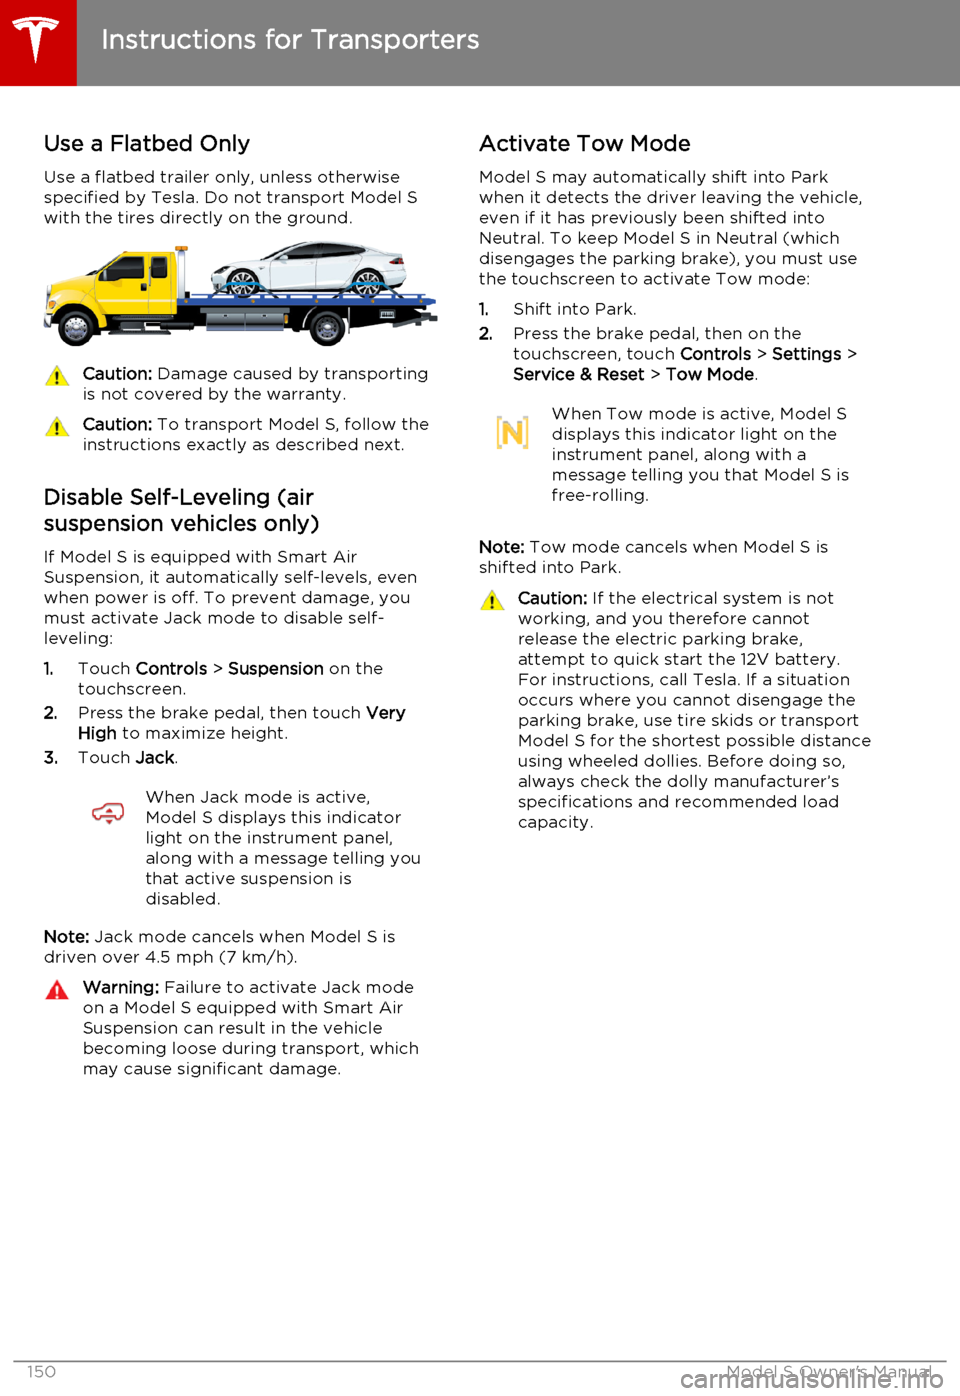
Use a Flatbed Only
Use a flatbed trailer only, unless otherwise
specified by Tesla. Do not transport Model S with the tires directly on the ground.Caution: Damage caused by transporting
is not covered by the warranty.Caution: To transport Model S, follow the
instructions exactly as described next.
Disable Self-Leveling (air
suspension vehicles only)
If Model S is equipped with Smart Air
Suspension, it automatically self-levels, even when power is off. To prevent damage, you
must activate Jack mode to disable self- leveling:
1. Touch Controls > Suspension on the
touchscreen.
2. Press the brake pedal, then touch Very
High to maximize height.
3. Touch Jack.
When Jack mode is active,
Model S displays this indicator
light on the instrument panel,
along with a message telling you
that active suspension is
disabled.
Note: Jack mode cancels when Model S is
driven over 4.5 mph (7 km/h).
Warning: Failure to activate Jack mode
on a Model S equipped with Smart Air
Suspension can result in the vehicle becoming loose during transport, which
may cause significant damage.Activate Tow Mode
Model S may automatically shift into Park
when it detects the driver leaving the vehicle, even if it has previously been shifted into
Neutral. To keep Model S in Neutral (which disengages the parking brake), you must use
the touchscreen to activate Tow mode:
1. Shift into Park.
2. Press the brake pedal, then on the
touchscreen, touch Controls > Settings >
Service & Reset > Tow Mode .When Tow mode is active, Model S
displays this indicator light on the
instrument panel, along with a
message telling you that Model S is
free-rolling.
Note: Tow mode cancels when Model S is
shifted into Park.
Caution: If the electrical system is not
working, and you therefore cannot
release the electric parking brake,
attempt to quick start the 12V battery.
For instructions, call Tesla. If a situation
occurs where you cannot disengage the
parking brake, use tire skids or transport
Model S for the shortest possible distance
using wheeled dollies. Before doing so,
always check the dolly manufacturer’s specifications and recommended load
capacity.
Instructions for Transporters
150Model S Owner's Manual
Page 151 of 164
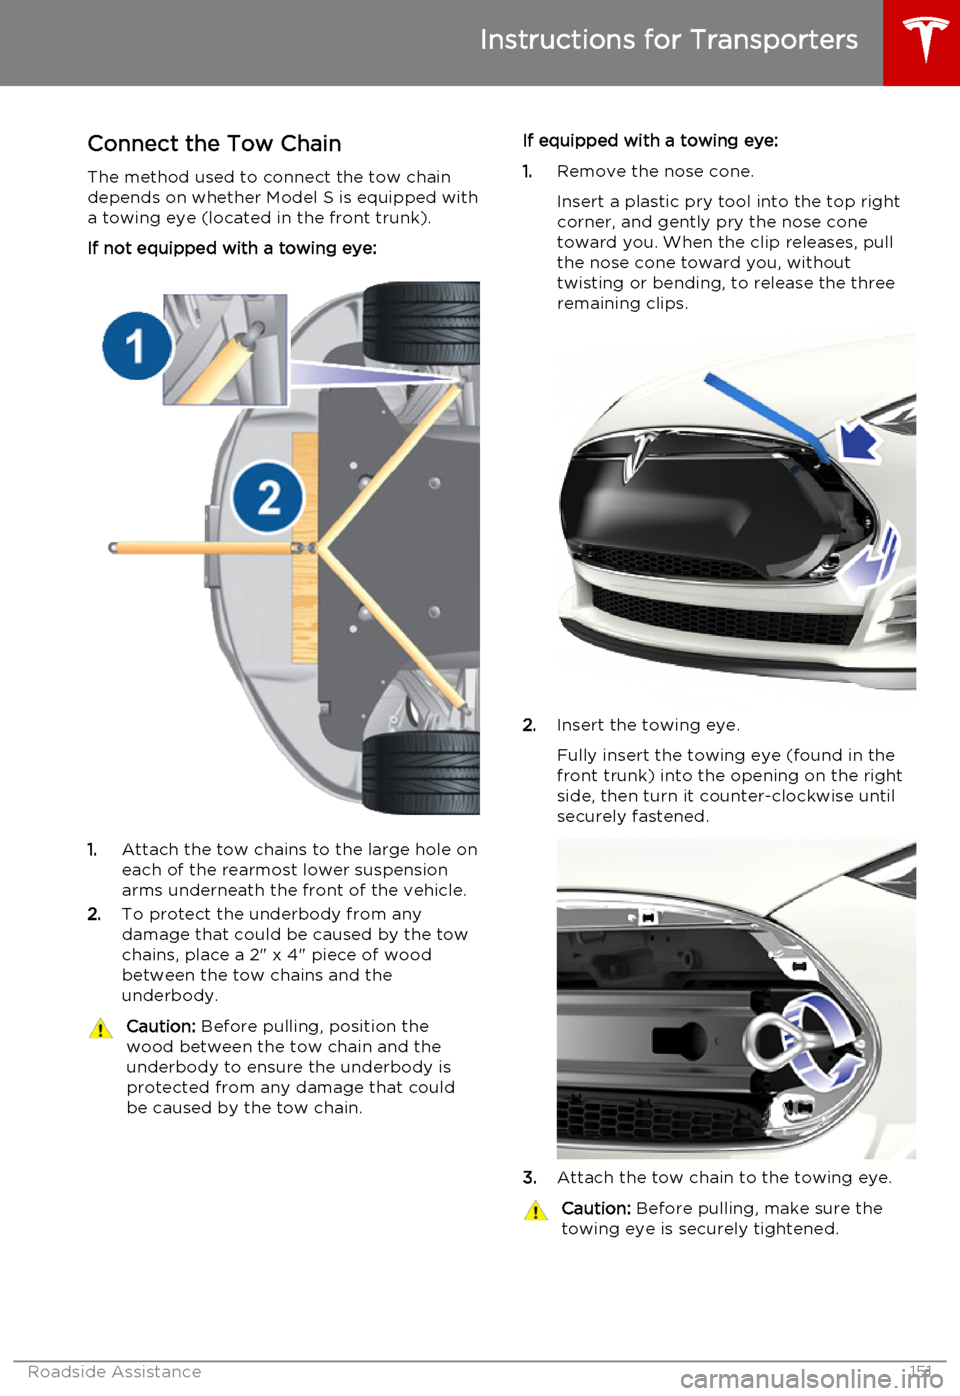
Connect the Tow Chain
The method used to connect the tow chain depends on whether Model S is equipped with
a towing eye (located in the front trunk).
If not equipped with a towing eye:
1. Attach the tow chains to the large hole on
each of the rearmost lower suspension arms underneath the front of the vehicle.
2. To protect the underbody from any
damage that could be caused by the tow
chains, place a 2" x 4" piece of wood
between the tow chains and the
underbody.
Caution: Before pulling, position the
wood between the tow chain and the
underbody to ensure the underbody is protected from any damage that couldbe caused by the tow chain.If equipped with a towing eye:
1. Remove the nose cone.
Insert a plastic pry tool into the top right
corner, and gently pry the nose cone
toward you. When the clip releases, pull
the nose cone toward you, without
twisting or bending, to release the three
remaining clips.
2. Insert the towing eye.
Fully insert the towing eye (found in the
front trunk) into the opening on the right
side, then turn it counter-clockwise until securely fastened.
3. Attach the tow chain to the towing eye.
Caution:
Before pulling, make sure the
towing eye is securely tightened.
Instructions for Transporters
Roadside Assistance151