warning TESLA MODEL S 2015 Repair Manual
[x] Cancel search | Manufacturer: TESLA, Model Year: 2015, Model line: MODEL S, Model: TESLA MODEL S 2015Pages: 164, PDF Size: 4.78 MB
Page 124 of 164

Checking Brake FluidWarning: Contact Tesla immediately if
you notice increased movement of the
brake pedal or a significant loss of brake
fluid. Driving under these conditions can result in extended stopping distances orcomplete brake failure.The Brake indicator on the
instrument panel alerts you if the
quantity of fluid in the brake
reservoir drops below the
recommended level. If it displays
while driving, stop as soon as safety
permits by gently applying the
brakes. Do not continue driving.
Contact Tesla immediately.
Fluid Level Check
Tesla checks the brake fluid level at the
regularly scheduled maintenance intervals. To check it yourself, park Model S on level
ground. When Model S is cool, remove the maintenance panel (see Removing the
Maintenance Panel on page 123).
Check the fluid level visually by looking at the
outside marks on the side of the reservoir
without removing the filler cap.
The brake fluid level should always be
between the MIN and the MAX marks.
Note: Although brake fluid level drops slightly
during normal use as a result of brake pad wear, it should not drop below the MIN mark.
Topping Up the Brake Fluid
Do not top up your brake fluid. Tesla service does this when you bring Model S in for
regular servicing. The following instructions are provided for information purposes andfuture reference only:
1. Clean the filler cap before removing to
prevent dirt from entering the reservoir.
2. Unscrew the cap and remove.
3. Top up the reservoir to the MAX mark
using brake fluid meeting DOT3 or DOT4 specifications.
4. Replace the filler cap.Warning: Only use new fluid from a
sealed air-tight container. Never use previously used fluid or fluid from apreviously opened container—fluid
absorbs moisture which decreases
braking performance.Warning: Brake fluid is highly toxic. Keep
containers sealed and out of the reach of children. In the event of accidentalconsumption, seek medical attention
immediately.Caution: Brake fluid damages painted
surfaces. Immediately soak up any spills
with an absorbent cloth and wash the
area with a mixture of car shampoo and
water.
Fluid Reservoirs
124Model S Owner's Manual
Page 125 of 164
Topping Up Washer Fluid
The only reservoir into which you can add
fluid is the washer fluid reservoir located
under the front trunk. When the level is low, a
message displays on the instrument panel.
Do not use formulated washer fluids that contain water repellent or bug wash. These
fluids can cause streaking, smearing, and squeaking or other noises.
Operate the washers periodically to check
that the nozzles are clear and properly
directed.
To top up washer fluid:
1. Clean the filler cap before opening to
prevent dirt from entering the reservoir.
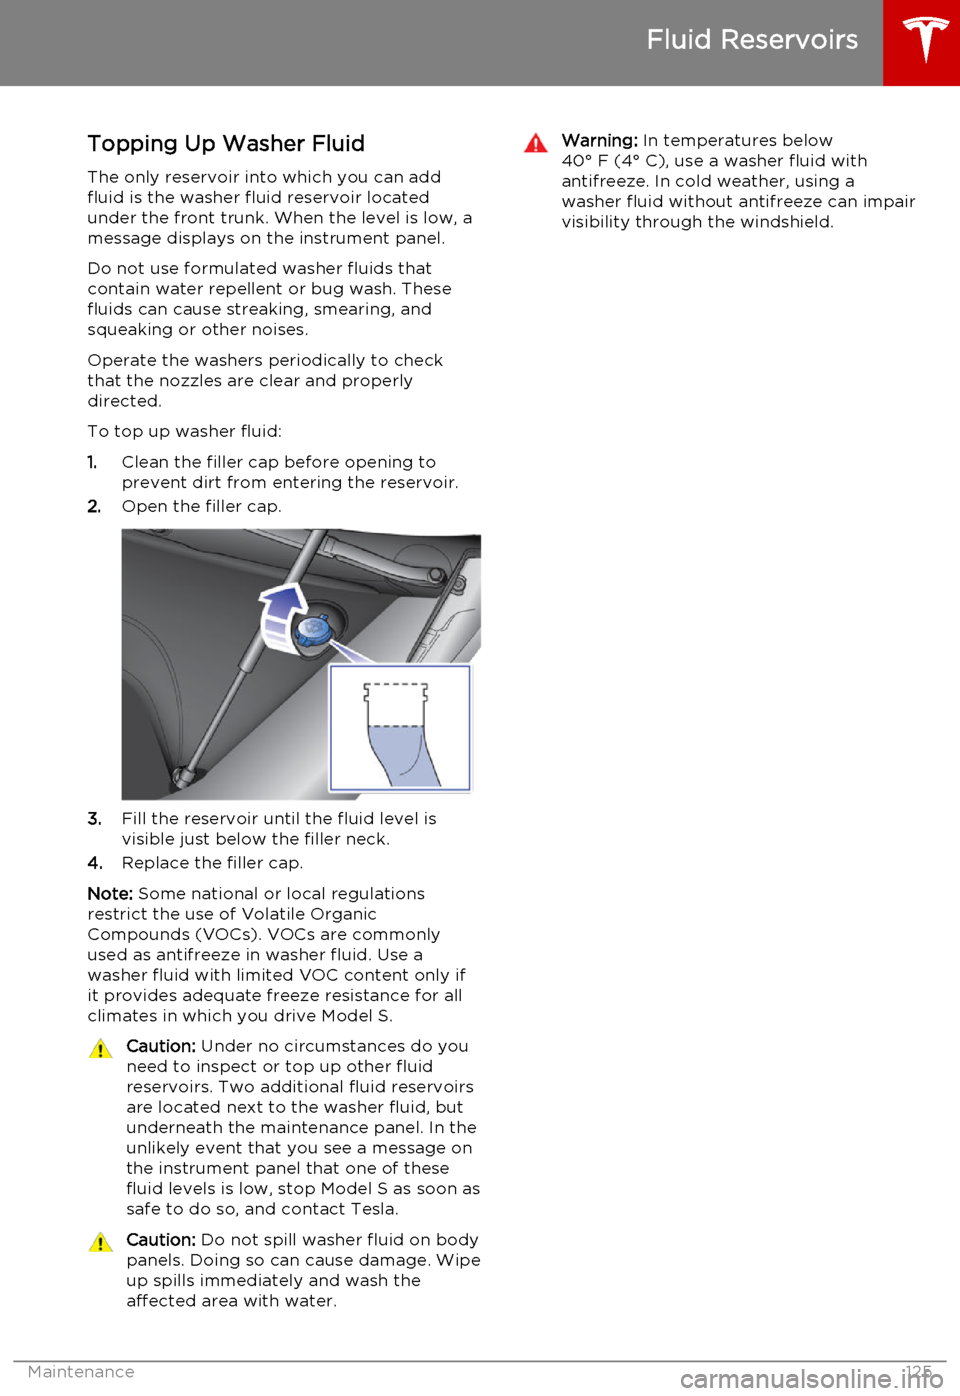
2. Open the filler cap.
3.Fill the reservoir until the fluid level is
visible just below the filler neck.
4. Replace the filler cap.
Note: Some national or local regulations
restrict the use of Volatile Organic
Compounds (VOCs). VOCs are commonly used as antifreeze in washer fluid. Use a
washer fluid with limited VOC content only if
it provides adequate freeze resistance for all climates in which you drive Model S.
Caution: Under no circumstances do you
need to inspect or top up other fluid
reservoirs. Two additional fluid reservoirs
are located next to the washer fluid, but underneath the maintenance panel. In the
unlikely event that you see a message on the instrument panel that one of these
fluid levels is low, stop Model S as soon as safe to do so, and contact Tesla.Caution: Do not spill washer fluid on body
panels. Doing so can cause damage. Wipe
up spills immediately and wash the
affected area with water.Warning: In temperatures below
40° F (4° C), use a washer fluid with
antifreeze. In cold weather, using a
washer fluid without antifreeze can impair
visibility through the windshield.
Fluid Reservoirs
Maintenance125
Page 126 of 164
Fuse Box Locations
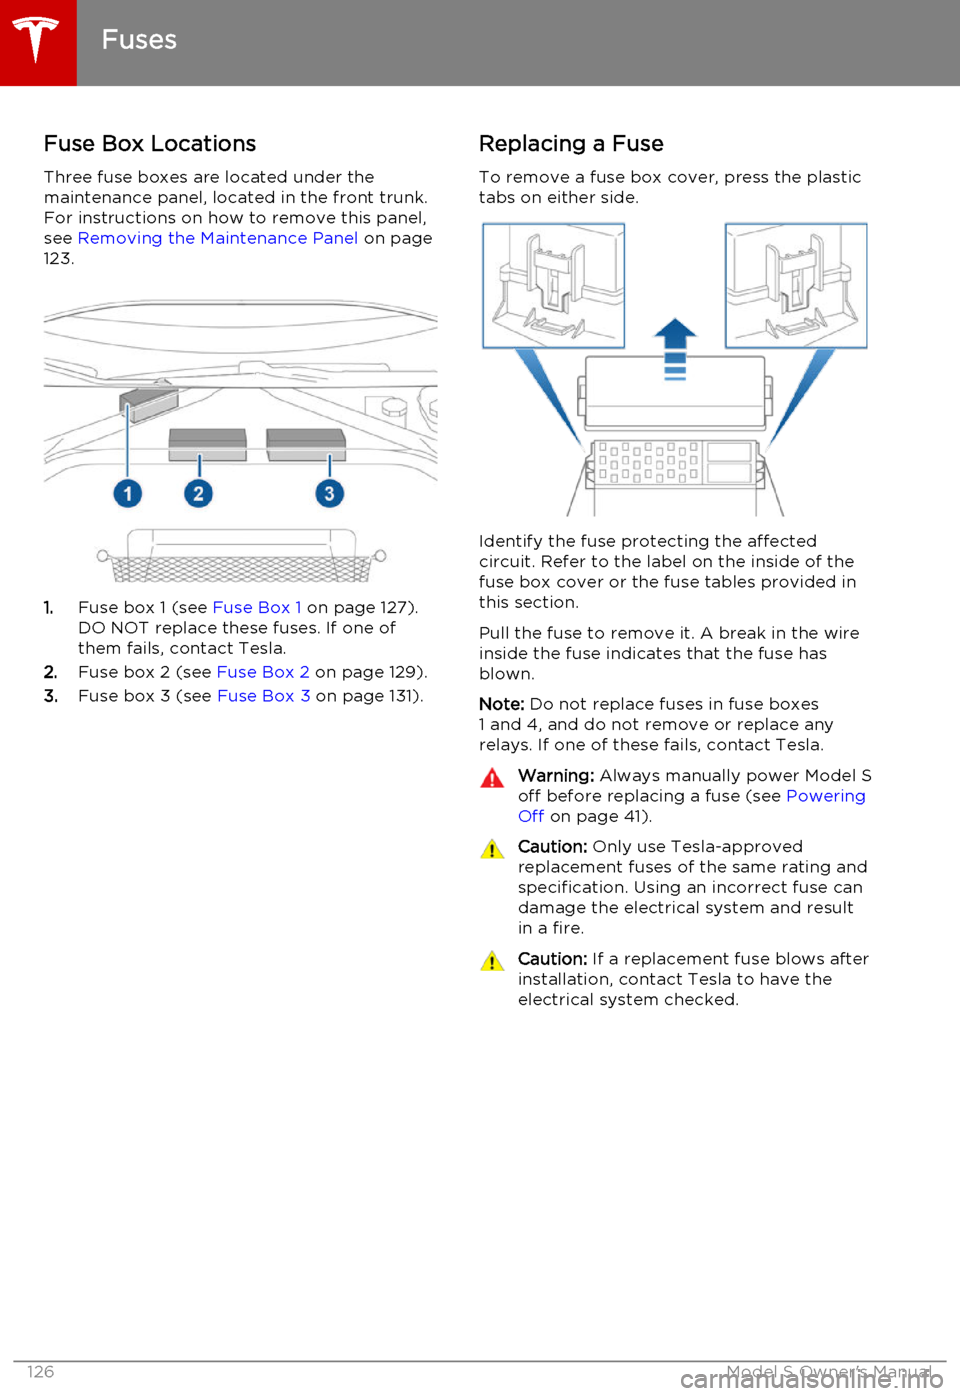
Three fuse boxes are located under the
maintenance panel, located in the front trunk.
For instructions on how to remove this panel,
see Removing the Maintenance Panel on page
123.
1. Fuse box 1 (see Fuse Box 1 on page 127).
DO NOT replace these fuses. If one of them fails, contact Tesla.
2. Fuse box 2 (see Fuse Box 2 on page 129).
3. Fuse box 3 (see Fuse Box 3 on page 131).
Replacing a Fuse
To remove a fuse box cover, press the plastic
tabs on either side.
Identify the fuse protecting the affected
circuit. Refer to the label on the inside of the fuse box cover or the fuse tables provided in
this section.
Pull the fuse to remove it. A break in the wire inside the fuse indicates that the fuse hasblown.
Note: Do not replace fuses in fuse boxes
1 and 4, and do not remove or replace any relays. If one of these fails, contact Tesla.
Warning: Always manually power Model S
off before replacing a fuse (see Powering
Off on page 41).Caution: Only use Tesla-approved
replacement fuses of the same rating and specification. Using an incorrect fuse can
damage the electrical system and result in a fire.Caution: If a replacement fuse blows after
installation, contact Tesla to have the electrical system checked.
Fuses
126Model S Owner's Manual
Page 132 of 164
Jacking Procedure
Follow the steps below to lift Model S. Ensure that any non-Tesla repair facility is aware of
these lifting points.
1. Position Model S centrally between the lift
posts.
2. If your Model S is equipped with Smart Air
Suspension, it automatically self-levels,even when power is off. Use thetouchscreen to set the suspension as
follows:
• Touch Controls > Suspension .
• Press the brake pedal, then touch Very High to maximize the height of
the suspension.
• Touch Jack to disable self-leveling.When Jack mode is active,
Model S displays this indicator
light on the instrument panel,
along with a message telling
you that active suspension is
disabled.
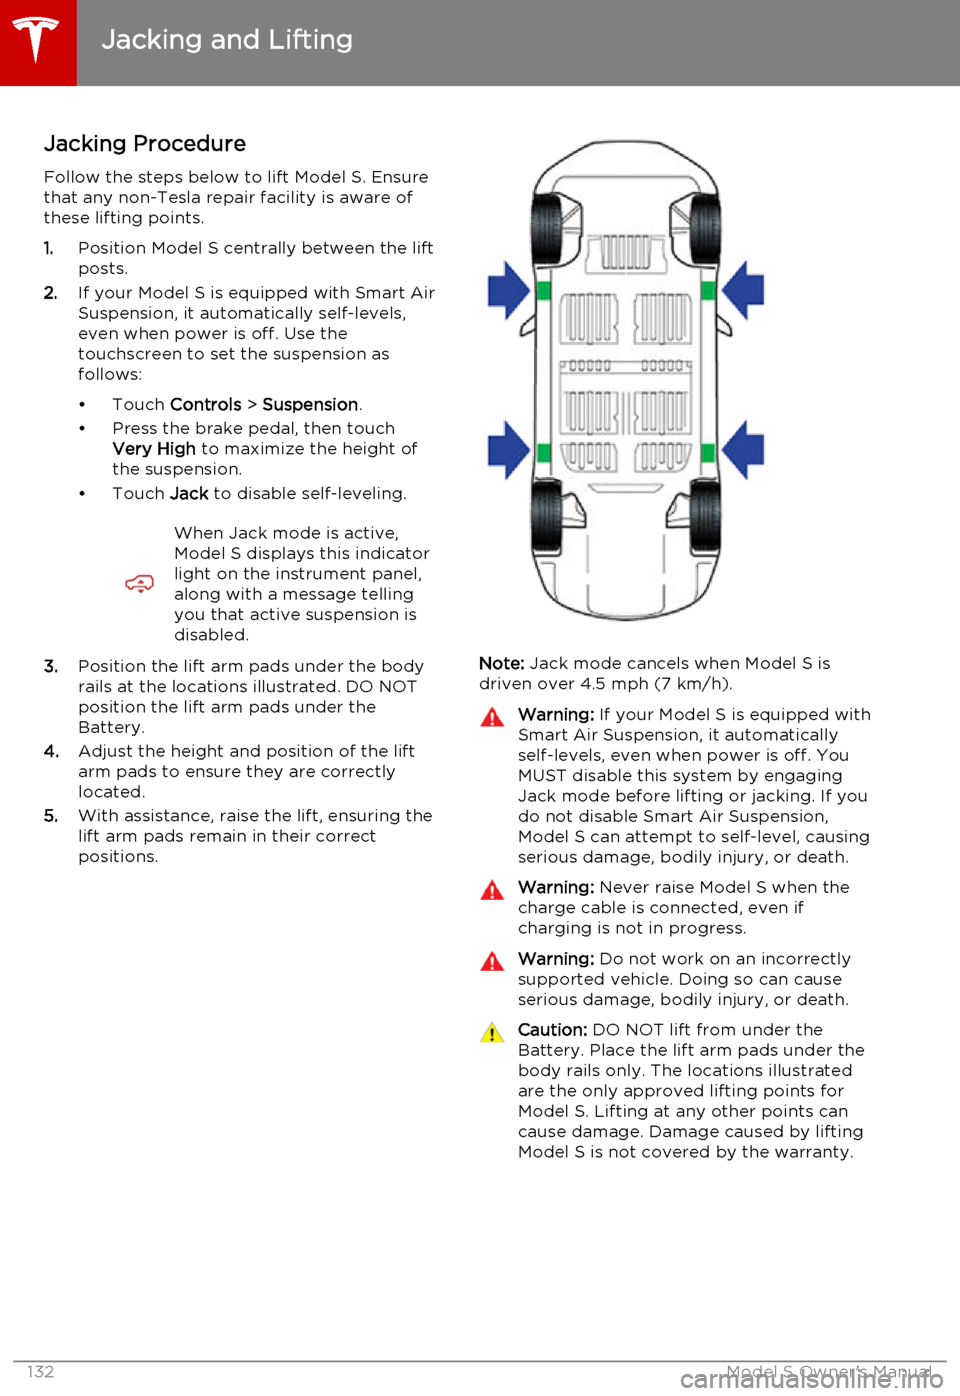
3. Position the lift arm pads under the body
rails at the locations illustrated. DO NOT
position the lift arm pads under the
Battery.
4. Adjust the height and position of the lift
arm pads to ensure they are correctly
located.
5. With assistance, raise the lift, ensuring the
lift arm pads remain in their correct
positions.Note: Jack mode cancels when Model S is
driven over 4.5 mph (7 km/h).
Warning: If your Model S is equipped with
Smart Air Suspension, it automatically
self-levels, even when power is off. You
MUST disable this system by engaging
Jack mode before lifting or jacking. If you do not disable Smart Air Suspension,
Model S can attempt to self-level, causing serious damage, bodily injury, or death.Warning: Never raise Model S when the
charge cable is connected, even if
charging is not in progress.Warning: Do not work on an incorrectly
supported vehicle. Doing so can cause
serious damage, bodily injury, or death.Caution: DO NOT lift from under the
Battery. Place the lift arm pads under the body rails only. The locations illustratedare the only approved lifting points forModel S. Lifting at any other points can
cause damage. Damage caused by lifting Model S is not covered by the warranty.
Jacking and Lifting
132Model S Owner's Manual
Page 133 of 164

Parts, Accessories, and
Modifications
Use only genuine Tesla parts and accessories.Tesla performs rigorous testing on parts to
ensure their suitability, safety, and reliability. Purchase these parts from Tesla, where they
are professionally installed and where you can receive expert advice about modifications toModel S.
Tesla is unable to assess parts manufactured by other distributors and therefore accepts no
responsibility if you use non-Tesla parts on
Model S.Warning: Installing non-approved parts
and accessories, or performing non-
approved modifications, can affect the performance of Model S and the safety of
its occupants. Any damage caused by using or installing non-approved parts, orby performing non-approved
modifications, is not covered by the
warranty.Warning: Tesla does not accept liability
for death, personal injury or damage that
occurs if you use or install non-approved accessories or make non-approvedmodifications.
Body Repairs
If Model S is in a collision, contact Tesla to
ensure that it is repaired with genuine Tesla
parts. Tesla has selected and approved body
shops that meet strict requirements for
training, equipment, quality, and customer
satisfaction.
Some repair shops and insurance companies
might suggest using non-original equipment
or salvaged parts to save money. However,
these parts do not meet Tesla's high
standards for quality, fit and corrosion
resistance. In addition, non-original equipment and salvaged parts (and any damage or
failures they might cause) are not covered by
the warranty.
Parts and Accessories
Maintenance133
Page 135 of 164
Load Capacity LabelingIt is important to understand how much
weight your Model S can safely carry. This
weight is called the vehicle capacity weight
and includes the weight of all occupants,
cargo and any additional equipment added to
your Model S since it was manufactured.
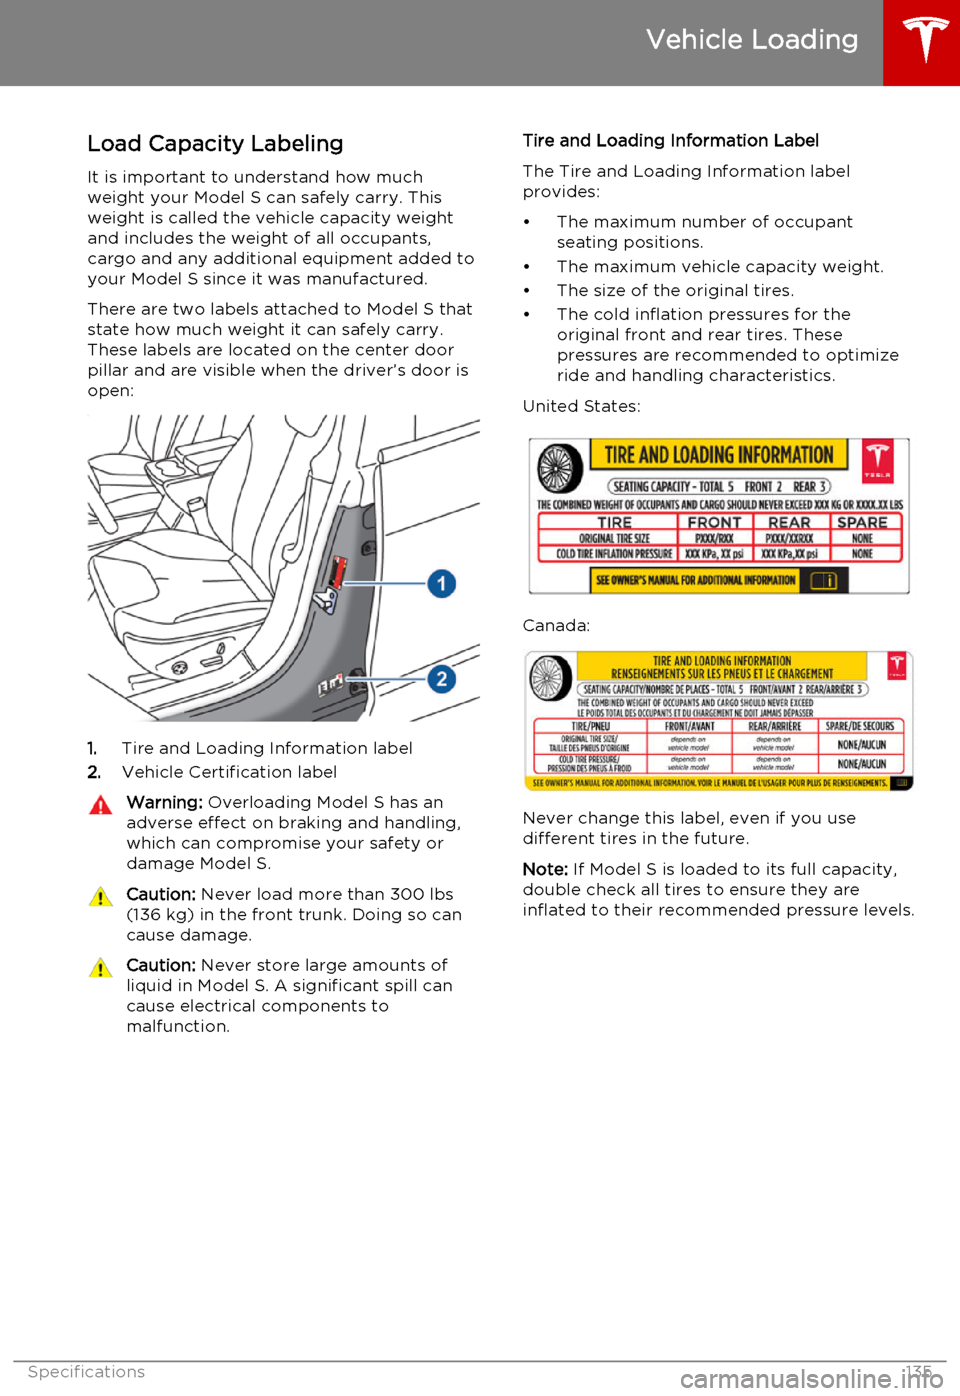
There are two labels attached to Model S that
state how much weight it can safely carry.
These labels are located on the center door
pillar and are visible when the driver’s door is open:
1. Tire and Loading Information label
2. Vehicle Certification label
Warning:
Overloading Model S has an
adverse effect on braking and handling,
which can compromise your safety or
damage Model S.Caution: Never load more than 300 lbs
(136 kg) in the front trunk. Doing so can
cause damage.Caution: Never store large amounts of
liquid in Model S. A significant spill can
cause electrical components to
malfunction.Tire and Loading Information Label
The Tire and Loading Information label provides:
• The maximum number of occupant seating positions.
• The maximum vehicle capacity weight.
• The size of the original tires.
• The cold inflation pressures for the original front and rear tires. These
pressures are recommended to optimize
ride and handling characteristics.
United States:
Canada:
Never change this label, even if you use different tires in the future.
Note: If Model S is loaded to its full capacity,
double check all tires to ensure they are
inflated to their recommended pressure levels.
Vehicle Loading
Specifications135
Page 136 of 164
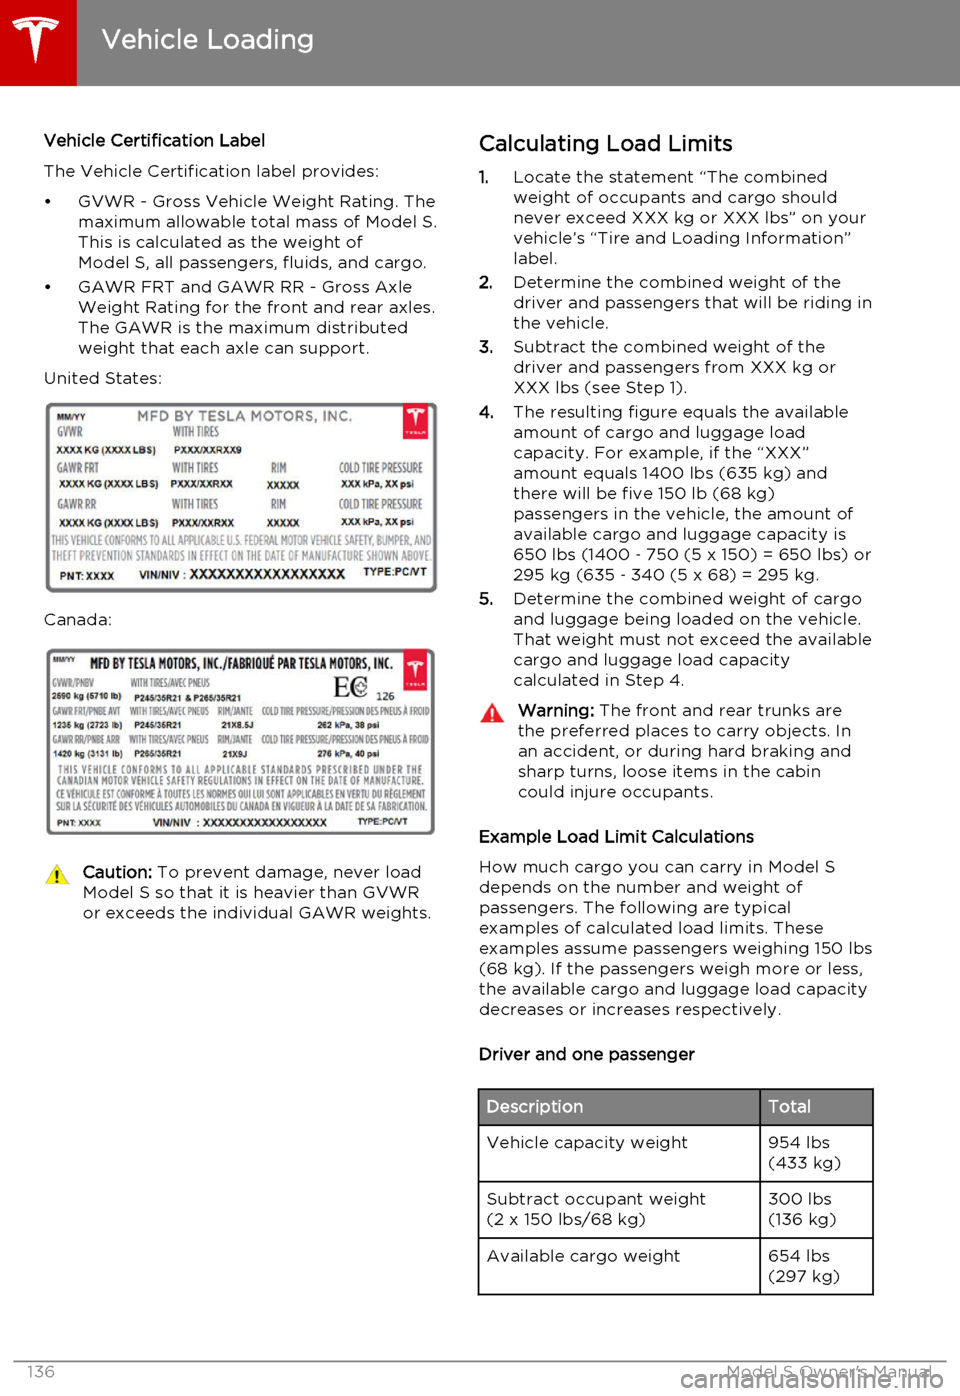
Vehicle Certification Label
The Vehicle Certification label provides:
• GVWR - Gross Vehicle Weight Rating. The maximum allowable total mass of Model S.
This is calculated as the weight of Model S, all passengers, fluids, and cargo.
• GAWR FRT and GAWR RR - Gross Axle Weight Rating for the front and rear axles.
The GAWR is the maximum distributed
weight that each axle can support.
United States:
Canada:
Caution: To prevent damage, never load
Model S so that it is heavier than GVWR
or exceeds the individual GAWR weights.Calculating Load Limits
1. Locate the statement “The combined
weight of occupants and cargo should
never exceed XXX kg or XXX lbs” on your
vehicle’s “Tire and Loading Information”
label.
2. Determine the combined weight of the
driver and passengers that will be riding in
the vehicle.
3. Subtract the combined weight of the
driver and passengers from XXX kg or
XXX lbs (see Step 1).
4. The resulting figure equals the available
amount of cargo and luggage load
capacity. For example, if the “XXX”
amount equals 1400 lbs (635 kg) and
there will be five 150 lb (68 kg)
passengers in the vehicle, the amount of
available cargo and luggage capacity is
650 lbs (1400 ‑ 750 (5 x 150) = 650 lbs) or
295 kg (635 ‑ 340 (5 x 68) = 295 kg.
5. Determine the combined weight of cargo
and luggage being loaded on the vehicle.
That weight must not exceed the available
cargo and luggage load capacity
calculated in Step 4.Warning: The front and rear trunks are
the preferred places to carry objects. In
an accident, or during hard braking and sharp turns, loose items in the cabin
could injure occupants.
Example Load Limit Calculations
How much cargo you can carry in Model S
depends on the number and weight of
passengers. The following are typical
examples of calculated load limits. These
examples assume passengers weighing 150 lbs (68 kg). If the passengers weigh more or less,
the available cargo and luggage load capacity decreases or increases respectively.
Driver and one passenger
DescriptionTotalVehicle capacity weight954 lbs
(433 kg)Subtract occupant weight
(2 x 150 lbs/68 kg)300 lbs
(136 kg)Available cargo weight654 lbs
(297 kg)
Vehicle Loading
136Model S Owner's Manual
Page 137 of 164
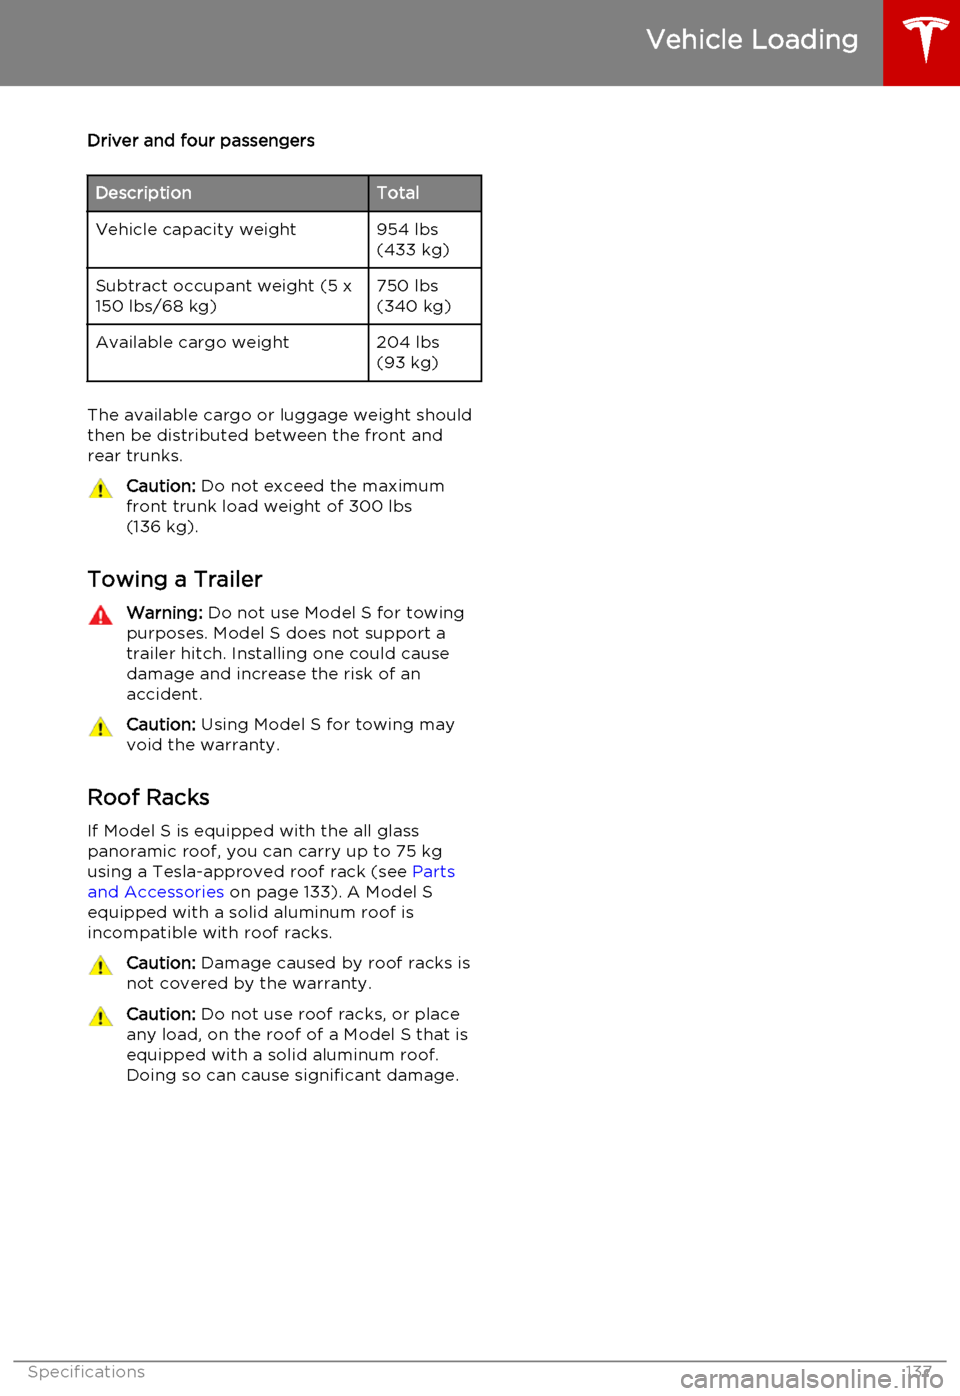
Driver and four passengersDescriptionTotalVehicle capacity weight954 lbs
(433 kg)Subtract occupant weight (5 x
150 lbs/68 kg)750 lbs
(340 kg)Available cargo weight204 lbs
(93 kg)
The available cargo or luggage weight should
then be distributed between the front and
rear trunks.
Caution: Do not exceed the maximum
front trunk load weight of 300 lbs
(136 kg).
Towing a Trailer
Warning: Do not use Model S for towing
purposes. Model S does not support a
trailer hitch. Installing one could cause
damage and increase the risk of an
accident.Caution: Using Model S for towing may
void the warranty.
Roof Racks
If Model S is equipped with the all glass
panoramic roof, you can carry up to 75 kg
using a Tesla-approved roof rack (see Parts
and Accessories on page 133). A Model S
equipped with a solid aluminum roof is incompatible with roof racks.
Caution: Damage caused by roof racks is
not covered by the warranty.Caution: Do not use roof racks, or place
any load, on the roof of a Model S that is equipped with a solid aluminum roof.Doing so can cause significant damage.
Vehicle Loading
Specifications137
Page 147 of 164

Uniform Tire Quality Grading
The following information relates to the tire
grading system developed by the National
Highway Traffic Safety Administration
(NHTSA), which grades tires by tread wear,
traction and temperature performance. Tires
that have deep tread, and winter tires, are
exempt from these marking requirements.
Where applicable, quality grades are found on
the tire’s sidewall between the tread shoulder and maximum section width. For example:
• TREADWEAR 180
• TRACTION AA
• TEMPERATURE A
The quality grades are described next. Note: In addition to the marking requirements,
passenger car tires must conform to Federal Safety Requirements.
Treadwear
The treadwear grade is a comparative rating
based on the wear rate of the tire when tested
under controlled conditions on a specified government test course.
For example, a tire graded 150 wears one and
a half times better on a government test
course than a tire graded 100. The relative
performance of tires depends on the actual
conditions of their use, however, and can depart significantly from the norm due to
variations in driving habits, service practices, road characteristics, and climate.
Traction
The traction grades, from highest to lowest,
are: AA, A, B, and C. These grades represent a
tire’s ability to stop on wet pavement as
measured under controlled conditions on test
surfaces of asphalt and concrete. A tire
marked C might have poor traction performance.Warning: Defective tires are dangerous.
Do not drive if a tire is damaged,
excessively worn, or is inflated to an
incorrect pressure. The safety of the
vehicle and occupants can be adversely
affected. Check tires regularly for wear
and to ensure there are no cuts, bulges or
exposure of the ply/cord structure.Warning: The traction grade assigned to
the tire is based on straight-ahead
braking tests, and doesn’t include:acceleration, cornering, hydroplaning or
peak traction characteristics.
Temperature
The temperature grades are A (the highest), B, and C, representing the tire’s resistance tothe generation of heat and its ability to
dissipate heat when tested under controlled
conditions on a specified indoor laboratory test wheel. Sustained high temperature cancause the tire to degenerate and reduce tirelife, and excessive temperature can lead to
sudden tire failure.
The grade C corresponds to the minimum
level of performance that all passenger car
tires must meet under the Federal Motor Safety Standard No. 109. Grades B and A
represent levels of performance on the
laboratory test wheel that exceed the
minimum requirements.
Warning: A tire’s temperature grade is
established for a tire that is properly
inflated and not overloaded. Excessive
speed, under-inflation, or excessive
loading, either separately or in
combination, can cause heat buildup and
possible tire failure.
Wheels and Tires
Specifications147
Page 150 of 164
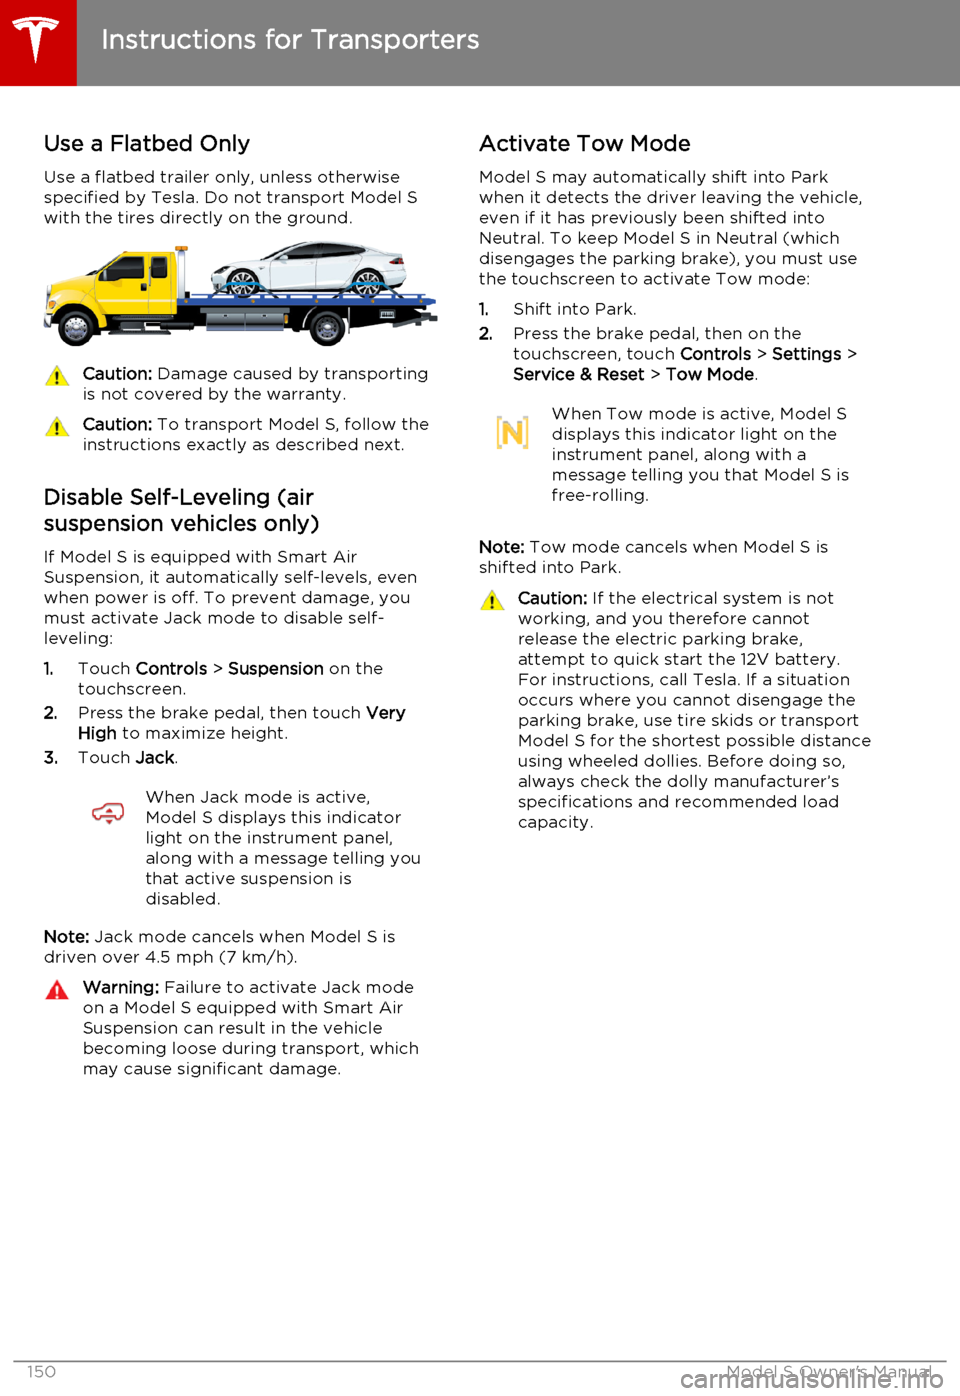
Use a Flatbed Only
Use a flatbed trailer only, unless otherwise
specified by Tesla. Do not transport Model S with the tires directly on the ground.Caution: Damage caused by transporting
is not covered by the warranty.Caution: To transport Model S, follow the
instructions exactly as described next.
Disable Self-Leveling (air
suspension vehicles only)
If Model S is equipped with Smart Air
Suspension, it automatically self-levels, even when power is off. To prevent damage, you
must activate Jack mode to disable self- leveling:
1. Touch Controls > Suspension on the
touchscreen.
2. Press the brake pedal, then touch Very
High to maximize height.
3. Touch Jack.
When Jack mode is active,
Model S displays this indicator
light on the instrument panel,
along with a message telling you
that active suspension is
disabled.
Note: Jack mode cancels when Model S is
driven over 4.5 mph (7 km/h).
Warning: Failure to activate Jack mode
on a Model S equipped with Smart Air
Suspension can result in the vehicle becoming loose during transport, which
may cause significant damage.Activate Tow Mode
Model S may automatically shift into Park
when it detects the driver leaving the vehicle, even if it has previously been shifted into
Neutral. To keep Model S in Neutral (which disengages the parking brake), you must use
the touchscreen to activate Tow mode:
1. Shift into Park.
2. Press the brake pedal, then on the
touchscreen, touch Controls > Settings >
Service & Reset > Tow Mode .When Tow mode is active, Model S
displays this indicator light on the
instrument panel, along with a
message telling you that Model S is
free-rolling.
Note: Tow mode cancels when Model S is
shifted into Park.
Caution: If the electrical system is not
working, and you therefore cannot
release the electric parking brake,
attempt to quick start the 12V battery.
For instructions, call Tesla. If a situation
occurs where you cannot disengage the
parking brake, use tire skids or transport
Model S for the shortest possible distance
using wheeled dollies. Before doing so,
always check the dolly manufacturer’s specifications and recommended load
capacity.
Instructions for Transporters
150Model S Owner's Manual