rear view mirror TESLA MODEL S 2015 Owner's Manual
[x] Cancel search | Manufacturer: TESLA, Model Year: 2015, Model line: MODEL S, Model: TESLA MODEL S 2015Pages: 164, PDF Size: 4.78 MB
Page 1 of 164

Overview........................................................................................ 2Interior Overview........................................................................ 2Exterior Overview....................................................................... 3
Opening and Closing................................................................. 4Doors............................................................................................... 4
Keyless Locking and Unlocking 4Using the Key 4Using Exterior Door Handles 6Using Interior Door Handles 6Interior Locking and Unlocking 6Child-protection Lock 7Drive-away Locking 7Walk-away Locking 7Unlocking When the Key Doesn't Work 7Opening Interior Doors with No Power 8
Windows........................................................................................ 9
Opening and Closing 9Locking Rear Windows 9
Rear Trunk................................................................................... 10
Opening 10Closing 10Adjusting the Opening Height 10Interior Release 11Opening with No Power 11
Front Trunk.................................................................................. 12
Opening 12Closing 12Interior Emergency Release 13Opening with No Power 13
Glove Box..................................................................................... 14
Opening and Closing 14
Sunroof.......................................................................................... 15
Opening and Closing 15
Cup Holders................................................................................. 16
Opening and Closing 16
Seating and Safety Restraints.............................................. 17Front and Rear Seats............................................................... 17
Correct Driving Position 17Adjusting the Driver’s Seat 17Seat Heaters 18Folding Rear Seats 18Raising Rear Seats 19Head Supports 19Seat Covers 19
Seat Belts.................................................................................... 20
Wearing Seat Belts 20Wearing Seat Belts When Pregnant 20Seat Belt Pre-tensioners 21Testing Seat Belts 21Seat Belt Warnings 21
Child Safety Seats.................................................................... 23
Guidelines for Seating Children 23Choosing a Child Safety Seat 24Seating Larger Children 25Installing Child Safety Seats 25Installing Seat Belt Retained Child Seats 25Installing LATCHChild Seats 26Attaching Upper Tether Straps 26Testing a Child Safety Seat 27Warnings - Child Safety Seats 27
Tesla Built-In Rear Facing Child Seats............................. 28
Usage Restrictions 28Opening 28Folding 28Seating a Child 30Warnings - Tesla Child Seats 30
Airbags......................................................................................... 32
Location of Airbags 32How the Airbags Work 33Types of Airbags 33Passenger Front Airbag 34Inflation Effects 35Airbag Warning Indicator 35Airbag Warnings 35
Driving.......................................................................................... 36Driver Profiles............................................................................ 36
Creating a Driver Profile 36Restoring a Driver’s Profile 36Saved Driver Settings 36
Steering Wheel.......................................................................... 37
Adjusting Position 37Adjusting Sensitivity 37Using Left Steering Wheel Buttons 37Using Right Steering Wheel Buttons 38Using Voice Commands 38Heated Steering Wheel 39Horn 39
Mirrors.......................................................................................... 40
Adjusting Exterior Side Mirrors 40Rear View Mirror 40
Starting and Powering Off.....................................................41
Starting Model S 41Powering Off 41
Gears............................................................................................. 42
Shifting Gears 42Leaving Model S in Neutral - Tow Mode 42
Instrument Panel...................................................................... 43
Instrument Panel Overview 43Indicator Lights 44
Lights............................................................................................ 47
Controlling Lights 47Headlight High Beams 49Headlights After Exit 50Cornering Lights 50Turn Signals 50Hazard Warning Flashers 50
Wipers and Washers................................................................ 51
Wipers 51Washers 51
Brakes........................................................................................... 52
Braking Systems 52Brake Wear 52Regenerative Braking 53Parking Brake 53
Traction Control........................................................................54
How It Works 54
Speed Assist............................................................................... 55
How Speed Assist Works 55Controlling Speed Assist 56Limitations and Inaccuracies 56
Lane Departure Warning....................................................... 57
How Lane Departure Warning Works 57Controlling Lane Departure Warning 57Limitations and Inaccuracies 57
Forward Collision Warning................................................... 58
How Forward Collision Warning Works 58Visual and Audible Feedback 58Controlling Forward Collision Warning 58Limitations 58
Traffic-Aware Cruise Control.............................................. 60
Operating Traffic Aware Cruise Control 60Instrument Panel Indicator Lights 62Changing the Set Speed 62Overtake Acceleration 63Canceling and Resuming 64Limitations 64
Park Assist.................................................................................. 66
How Park Assist Works 66Visual and Audio Feedback 66Controlling Audible Feedback 67Limitations and False Warnings 67Other Parking Aids 67
Hill Start Assist.......................................................................... 68
Trip Information........................................................................ 69
Displaying Trip Information 69
Getting Maximum Range...................................................... 70
Driving Tips to Maximize Range 70Energy App 70Saving Energy 70
Rear View Camera.....................................................................71
Camera Location 71
Using the Touchscreen........................................................... 72Touchscreen Overview...........................................................72
The Big Picture 72
Controls........................................................................................74
Controlling Model S Features 74
Settings.........................................................................................77
Customizing Model S 77Erasing Personal Data 79
Climate Controls.......................................................................80
Overview of Climate Controls 80Customizing Climate Control 81Ventilation 82Climate Control Operating Tips 82
Smart Air Suspension............................................................. 83
Manual Height Adjustments 83Location-Based Suspension 83Automatic Lowering 84Jack Mode 84
Media and Audio.......................................................................85
Overview 85AM and FM Radio 85XM Radio 85Internet Radio 85Media Settings 86Favorites 86My Music & Devices 86USB Connections 8712V Power Socket 87
Phone............................................................................................ 88
Bluetooth®Compatibility 88Pairing a Bluetooth Phone 88Importing Contacts 88Unpairing a Bluetooth Phone 88Connecting to a Paired Phone 89Making a Phone Call 89Receiving a Phone Call 89In Call Options 89
Maps and Navigation.............................................................. 90
Overview 90Using Maps 90Starting Navigation 90During Navigation 91Favorite Destinations 92Updated Maps 92
Calendar....................................................................................... 93
Overview 93Calendar and Navigation 94
Security Settings...................................................................... 95
About the Security System 95
HomeLink ®
Universal Transceiver.......................................96
About HomeLink 96Programming HomeLink 96Troubleshooting HomeLink 96
Connecting to Wi-Fi................................................................ 98
Software Updates.................................................................... 99
Loading New Software 99Viewing Release Notes 99
Mobile App............................................................................... 100
Model S Mobile App 100
Charging......................................................................................101Electric Vehicle Components..............................................101
High Voltage Components 101Charging Equipment 102
Battery Information............................................................... 103
About the Battery 103Battery Care 103
Charging Model S................................................................... 104
Opening the Charge Port 104Plugging In 104During Charging 105Stopping Charging 105Charge Port Light 105Changing Charge Settings 106Charging Status 107
Maintenance............................................................................. 108Maintenance Schedule..........................................................108
Service Intervals 108Daily Checks 108Monthly Checks 108Fluid Replacement Intervals 108High Voltage Safety 108
Tire Care and Maintenance................................................. 109
Maintaining Tire Pressures 109Inspecting and Maintaining Tires 110Replacing Tires and Wheels 111Tire Types 111Driving in Low Temperatures 112Using Tire Chains 112Tire Pressure Monitoring 112
Temporary Tire Repair...........................................................114
Tire Repair Kit 114Inflating with Sealant and Air 115Inflating with Air Only 116Replacing the Sealant Canister 117
Cleaning....................................................................................... 118
Cleaning the Exterior 118Cleaning the Interior 119Polishing, Touch Up, and Body Repair 120Using a Car Cover 120Floor Mats 120
Wiper Blades and Washer Jets.......................................... 121
Checking and Replacing Wiper Blades 121Cleaning Washer Jets 121Fluid Reservoirs....................................................................... 123
Removing the Maintenance Panel 123Checking Battery Coolant 123Checking Brake Fluid 124Topping Up Washer Fluid 125
Fuses............................................................................................ 126
Fuse Box Locations 126Replacing a Fuse 126Fuse Box 1 127Fuse Box 2 129Fuse Box 3 131
Jacking and Lifting................................................................. 132
Jacking Procedure 132
Parts and Accessories........................................................... 133
Parts, Accessories, and Modifications 133Body Repairs 133
Specifications........................................................................... 134Identification Labels.............................................................. 134
Vehicle Identification Number 134Emission Control Label 134
Vehicle Loading....................................................................... 135
Load Capacity Labeling 135Calculating Load Limits 136Towing a Trailer 137Roof Racks 137
Dimensions and Weights..................................................... 138
Exterior Dimensions 138Weights 139
Subsystems...............................................................................140
Motor 140Transmission 140Steering 140Brakes 141Suspension 141Battery - 12V 141Battery - High Voltage 142
Wheels and Tires.....................................................................143
Wheel Specifications 143Wheel Alignment Values 143Tire Specifications 144Understanding Tire Markings 145Uniform Tire Quality Grading 147Wheels and Tires Glossary 148
Roadside Assistance............................................................. 149Contacting Roadside Assistance...................................... 149Instructions for Transporters............................................. 150
Use a Flatbed Only 150Disable Self-Leveling (air suspension vehicles only) 150Activate Tow Mode 150Connect the Tow Chain 151Pull Onto the Trailer and Secure the Wheels 152
Consumer Information.......................................................... 153About this Owner Information........................................... 153
Illustrations 153Errors or Inaccuracies 153Location of Components 153Document Applicability 153Copyrights and Trademarks 154
Disclaimers................................................................................ 155
Vehicle Telematics/Data Recorders 155Quality Control 155California Proposition 65 155
Reporting Concerns............................................................... 156
Contacting Tesla 156Reporting Safety Defects - US 156Reporting Safety Defects - Canada 156
Declarations of Conformity................................................. 157
Key and Passive Unlocking System 157Tire Pressure Monitoring System 158Media Control Unit 158HomeLink 159Radio Frequency Information 159
Contents
Page 2 of 164
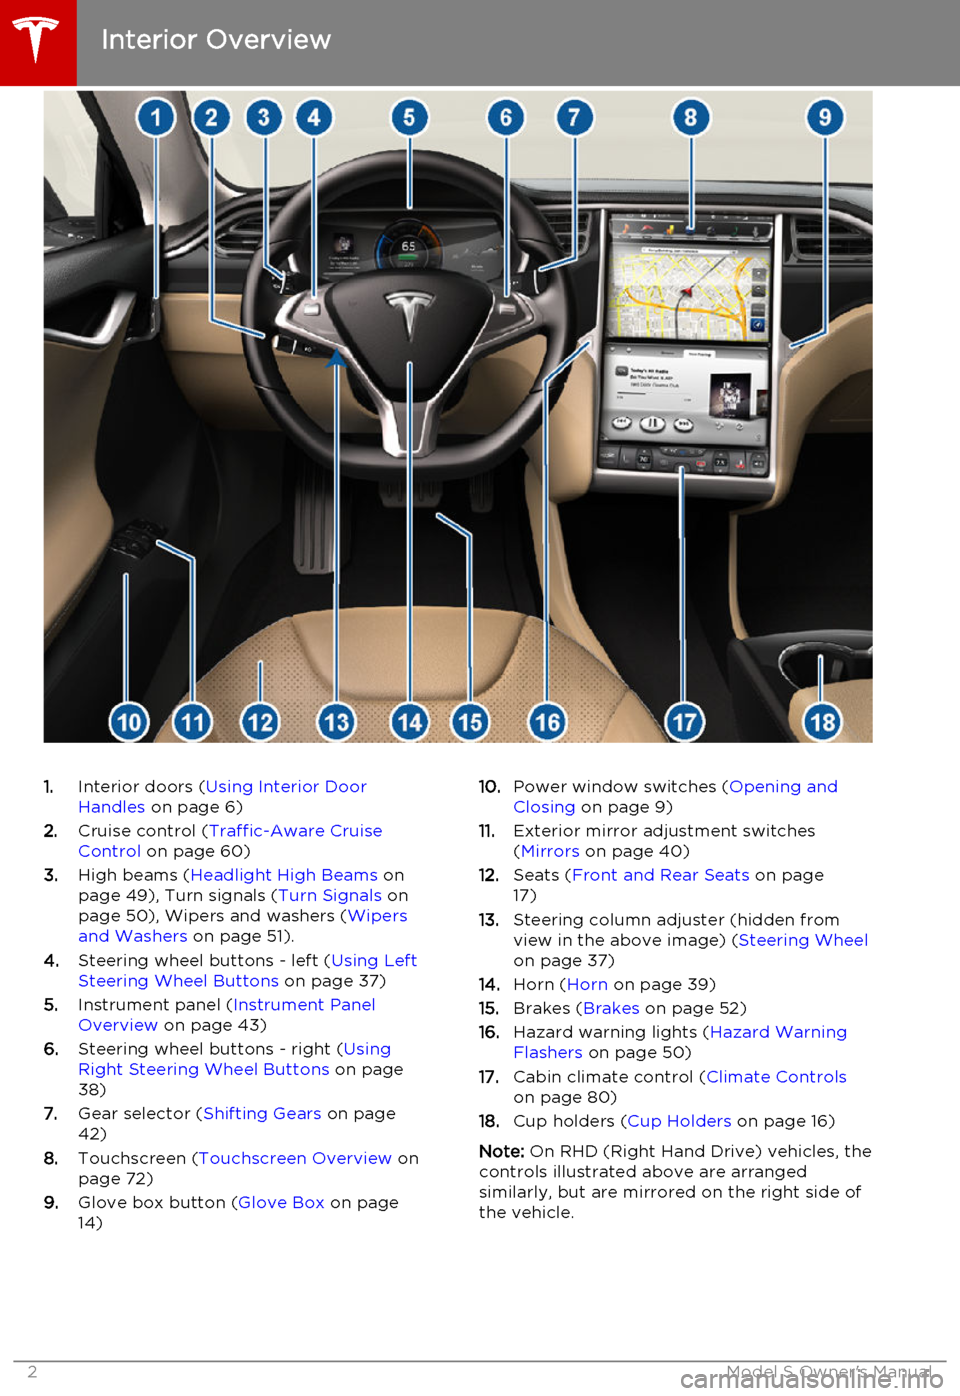
1.Interior doors ( Using Interior Door
Handles on page 6)
2. Cruise control ( Traffic-Aware Cruise
Control on page 60)
3. High beams ( Headlight High Beams on
page 49), Turn signals ( Turn Signals on
page 50), Wipers and washers ( Wipers
and Washers on page 51).
4. Steering wheel buttons - left ( Using Left
Steering Wheel Buttons on page 37)
5. Instrument panel ( Instrument Panel
Overview on page 43)
6. Steering wheel buttons - right ( Using
Right Steering Wheel Buttons on page
38)
7. Gear selector ( Shifting Gears on page
42)
8. Touchscreen ( Touchscreen Overview on
page 72)
9. Glove box button ( Glove Box on page
14)10. Power window switches ( Opening and
Closing on page 9)
11. Exterior mirror adjustment switches
( Mirrors on page 40)
12. Seats ( Front and Rear Seats on page
17)
13. Steering column adjuster (hidden from
view in the above image) ( Steering Wheel
on page 37)
14. Horn ( Horn on page 39)
15. Brakes ( Brakes on page 52)
16. Hazard warning lights ( Hazard Warning
Flashers on page 50)
17. Cabin climate control ( Climate Controls
on page 80)
18. Cup holders ( Cup Holders on page 16)
Note: On RHD (Right Hand Drive) vehicles, the
controls illustrated above are arranged similarly, but are mirrored on the right side of
the vehicle.
Interior Overview
2Model S Owner's Manual
Page 3 of 164
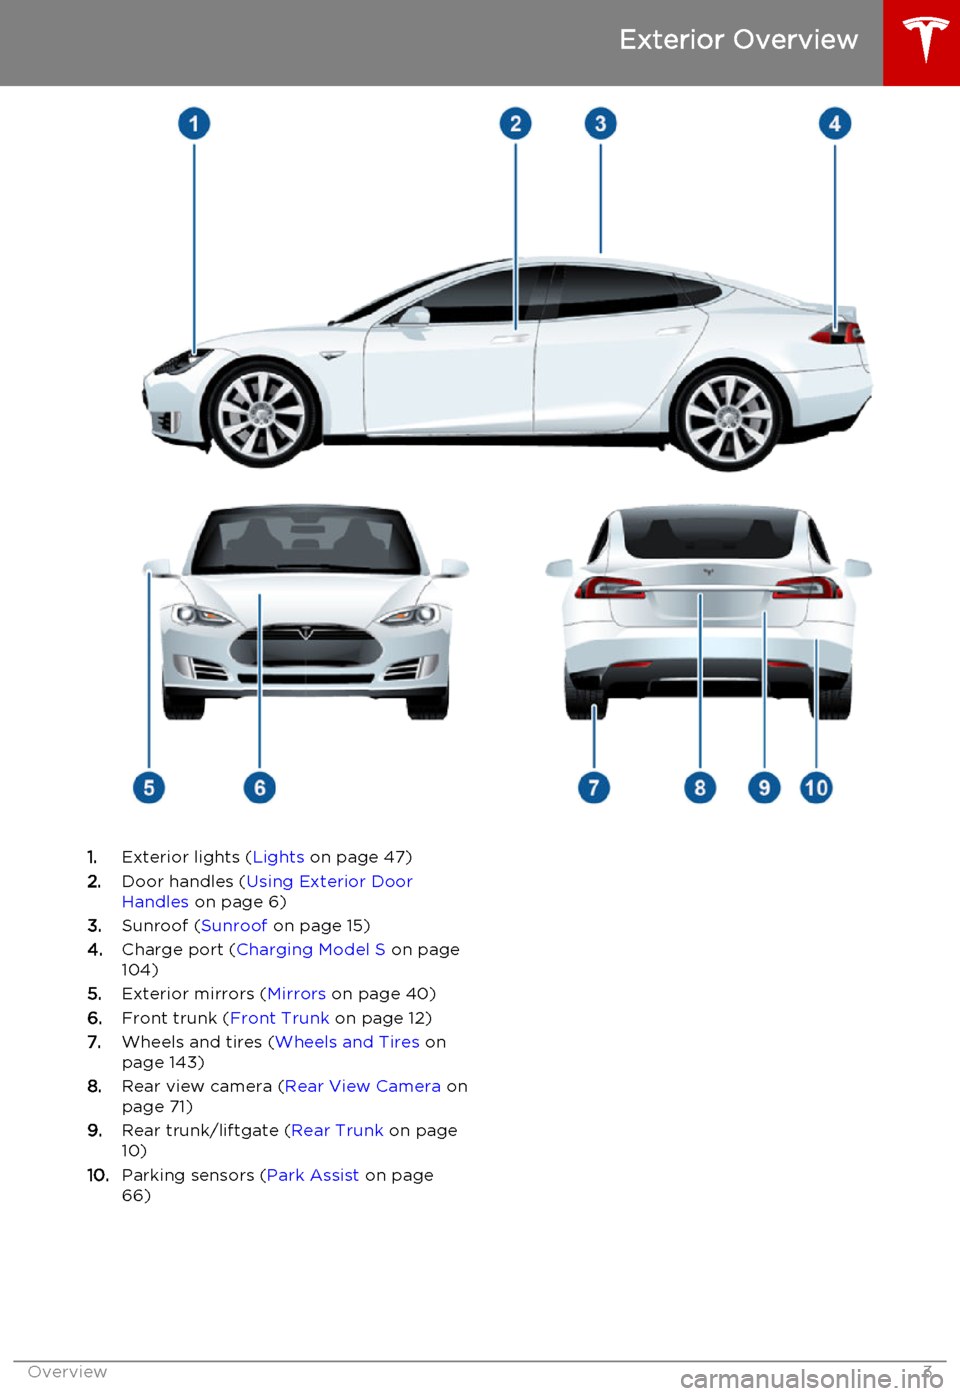
1.Exterior lights ( Lights on page 47)
2. Door handles ( Using Exterior Door
Handles on page 6)
3. Sunroof ( Sunroof on page 15)
4. Charge port ( Charging Model S on page
104)
5. Exterior mirrors ( Mirrors on page 40)
6. Front trunk ( Front Trunk on page 12)
7. Wheels and tires ( Wheels and Tires on
page 143)
8. Rear view camera ( Rear View Camera on
page 71)
9. Rear trunk/liftgate ( Rear Trunk on page
10)
10. Parking sensors ( Park Assist on page
66)
Exterior Overview
Overview3
Page 40 of 164
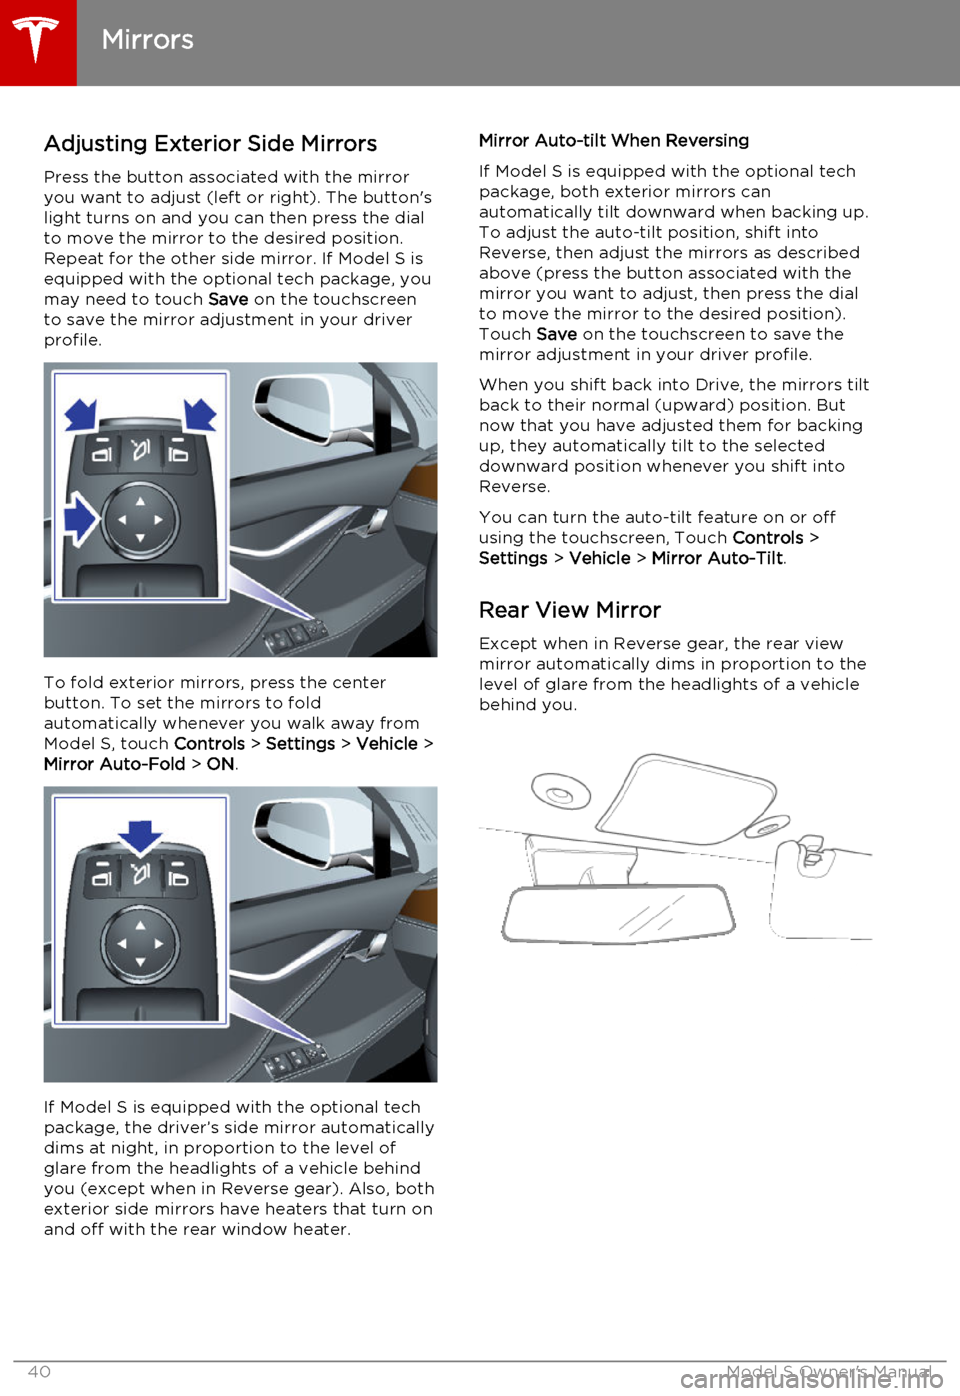
Adjusting Exterior Side MirrorsPress the button associated with the mirror
you want to adjust (left or right). The button's
light turns on and you can then press the dial
to move the mirror to the desired position.
Repeat for the other side mirror. If Model S is
equipped with the optional tech package, you
may need to touch Save on the touchscreen
to save the mirror adjustment in your driver
profile.
To fold exterior mirrors, press the center
button. To set the mirrors to fold
automatically whenever you walk away from Model S, touch Controls > Settings > Vehicle >
Mirror Auto-Fold > ON .
If Model S is equipped with the optional tech
package, the driver’s side mirror automatically
dims at night, in proportion to the level of
glare from the headlights of a vehicle behind
you (except when in Reverse gear). Also, both
exterior side mirrors have heaters that turn on and off with the rear window heater.
Mirror Auto-tilt When Reversing
If Model S is equipped with the optional tech
package, both exterior mirrors can
automatically tilt downward when backing up.
To adjust the auto-tilt position, shift into
Reverse, then adjust the mirrors as described above (press the button associated with themirror you want to adjust, then press the dial
to move the mirror to the desired position). Touch Save on the touchscreen to save the
mirror adjustment in your driver profile.
When you shift back into Drive, the mirrors tilt back to their normal (upward) position. But
now that you have adjusted them for backing
up, they automatically tilt to the selected
downward position whenever you shift into
Reverse.
You can turn the auto-tilt feature on or off using the touchscreen, Touch Controls >
Settings > Vehicle > Mirror Auto-Tilt .
Rear View Mirror
Except when in Reverse gear, the rear view mirror automatically dims in proportion to thelevel of glare from the headlights of a vehiclebehind you.
Mirrors
40Model S Owner's Manual
Page 55 of 164
How Speed Assist Works
If Model S is equipped with Driver Assistance
features, a camera mounted on the windshield behind the interior rear view mirror detectsspeed limit signs. The signs are then analyzed
and compared against GPS data to determine
the speed limit at your current driving
location. For routes where no signs are present, speed limits are determined using
GPS data (if available). Instead of determining the speed limit based on signs and GPS data,you can also manually enter an arbitrary
speed limit.
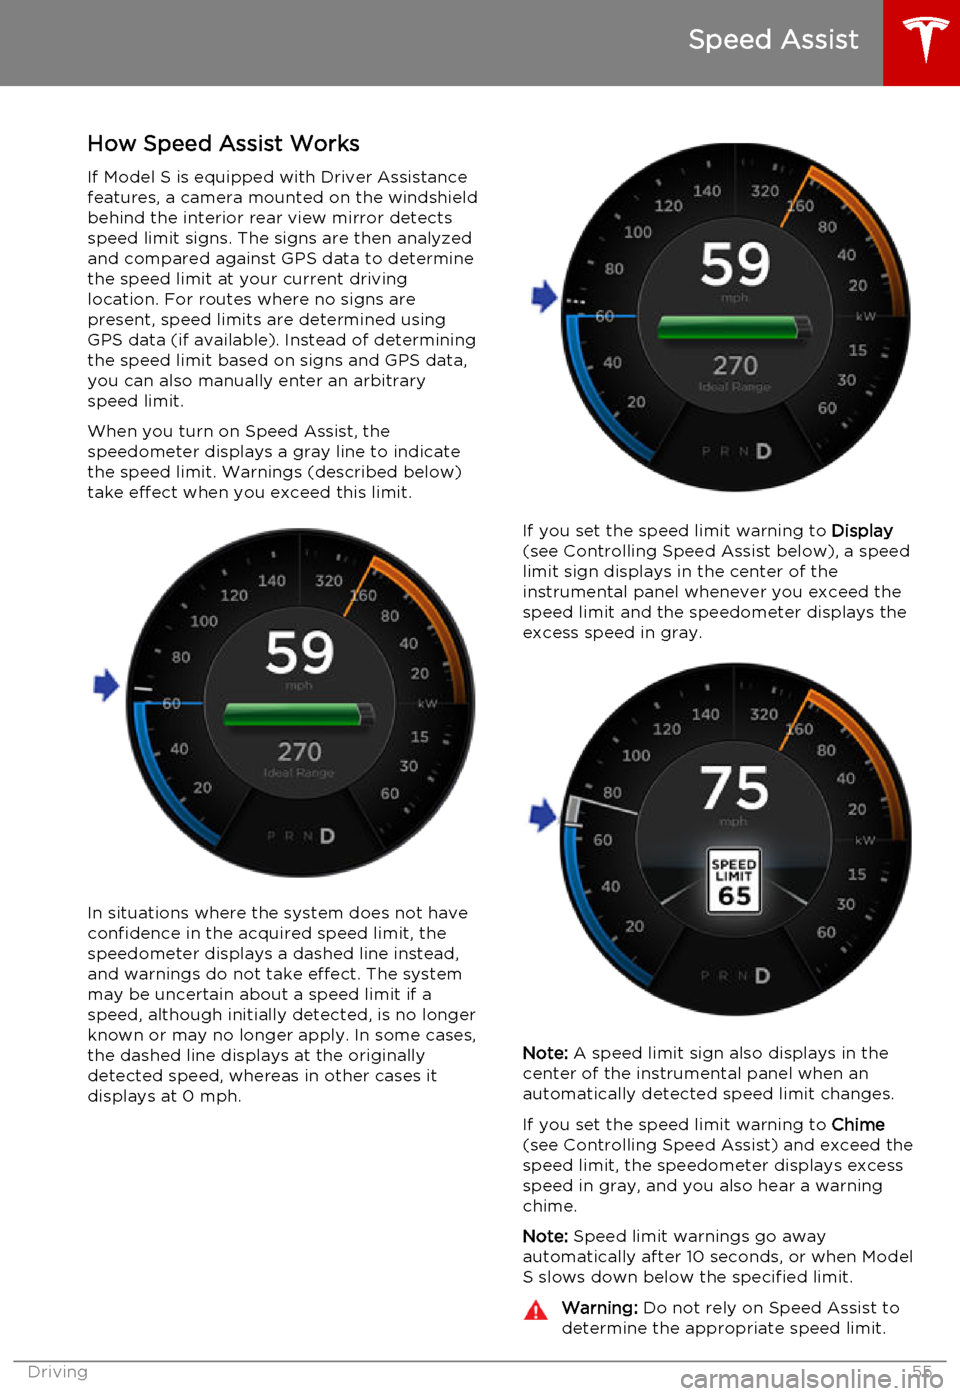
When you turn on Speed Assist, the
speedometer displays a gray line to indicate
the speed limit. Warnings (described below) take effect when you exceed this limit.
In situations where the system does not have
confidence in the acquired speed limit, the speedometer displays a dashed line instead,
and warnings do not take effect. The system
may be uncertain about a speed limit if a
speed, although initially detected, is no longer known or may no longer apply. In some cases,the dashed line displays at the originallydetected speed, whereas in other cases itdisplays at 0 mph.
If you set the speed limit warning to Display
(see Controlling Speed Assist below), a speed
limit sign displays in the center of the
instrumental panel whenever you exceed the speed limit and the speedometer displays the
excess speed in gray.
Note: A speed limit sign also displays in the
center of the instrumental panel when an
automatically detected speed limit changes.
If you set the speed limit warning to Chime
(see Controlling Speed Assist) and exceed the speed limit, the speedometer displays excessspeed in gray, and you also hear a warningchime.
Note: Speed limit warnings go away
automatically after 10 seconds, or when Model
S slows down below the specified limit.
Warning: Do not rely on Speed Assist to
determine the appropriate speed limit.
Speed Assist
Driving55
Page 57 of 164
How Lane Departure Warning
Works
If Model S is equipped with Autopilot, a
camera mounted on the windshield behind the interior rear view mirror monitors the markers
on the lane you are driving in. If a front wheel passes over a lane marking and the associated
turn signal is off, you feel three slight
vibrations in the steering wheel.
Lane Departure Warning operates only when
Model S is traveling over approximately
30 mph (50 km/h).Warning: Lane Departure Warning is for
guidance purposes only. Never depend
on Lane Departure Warning to inform you of unintentionally driving outside of theboundaries of the driving lane. Several
external factors can reduce the
performance of Lane Departure Warning,
causing either no readings or false
readings. Therefore, depending on this
system to stay within the boundaries of the driving lane can result in serious injuryor death. Always keep your eyes on the
road when driving. It is the driver's
responsibility to stay alert, drive safely,
ensure the vehicle stays in the traveling lane, and be in control of the vehicle at all
times.Warning: Lane Departure Warning is
designed to activate when it detects lane markings. It is not designed to detect the
edge of a road. It is the driver's
responsibility to drive attentively and stay
within the boundaries of the driving lane.Caution: If your Model S is equipped with
Lane Departure Warning, you must take
your vehicle to Tesla Service if a
windshield replacement is needed. Failure
to do so can cause Lane Departure
Warning to malfunction.Controlling Lane Departure
Warning
To turn Lane Departure Warning on or off,
touch Controls > Settings > Driver
Assistance > Lane Assist .
Limitations and Inaccuracies Lane Departure Warning can not always
clearly detect lane markings and you may
experience unnecessary or invalid warnings in
these situations:
• Visibility is poor and lane markings are not clearly visible (due to heavy rain, snow,fog, etc.).
• Bright light (oncoming headlights or direct sunlight) is interfering with thecamera's view.
• Model S is being driven very close to a vehicle in front of it which is blocking the
camera's view.
• The windshield area in the camera's field of view is obstructed (fogged over, dirty,
covered by a sticker, etc.).
• Lane markings are excessively worn or have been adjusted due to roadconstruction.
• Lane markings are changing quickly (for example, lanes branching off, crossing
over, or merging).
• The road is narrow or winding.
• Objects or landscape features are casting strong shadows on lane markers.
Lane Departure Warning
Driving57
Page 58 of 164
How Forward Collision Warning
Works
If Model S is equipped with Autopilot, a
camera mounted on the windshield behind the interior rear view mirror and a radar sensor in
the center of the front grill monitor the area in
front of Model S for the presence of a vehicle,
bike or pedestrian. If a collision is considered likely unless you take immediate correctiveaction, Forward Collision Warning is designedto provide visual and audible warnings.
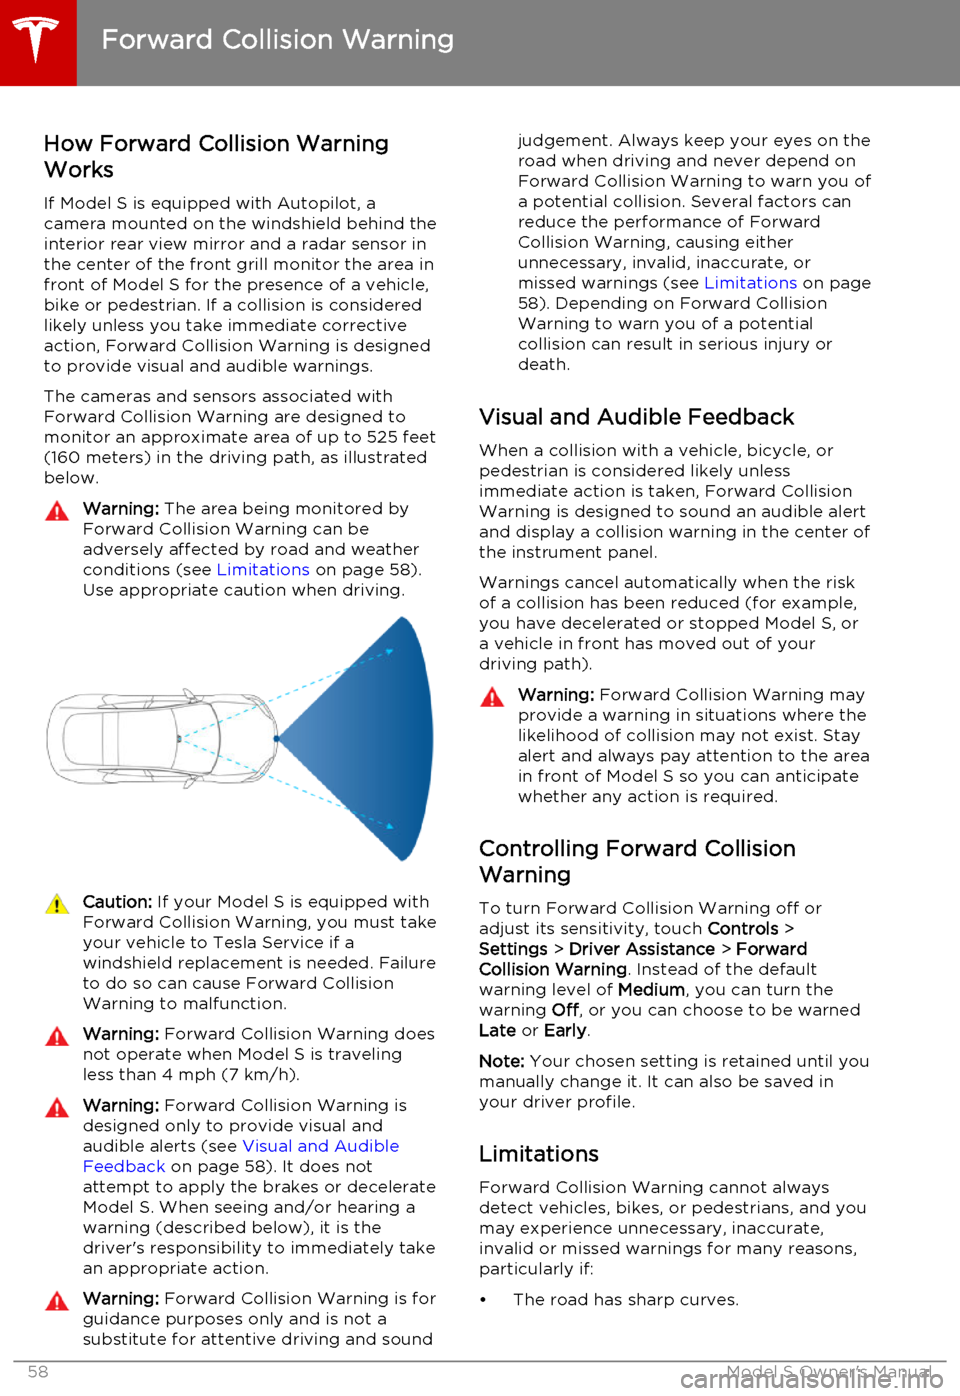
The cameras and sensors associated withForward Collision Warning are designed to
monitor an approximate area of up to 525 feet (160 meters) in the driving path, as illustrated
below.Warning: The area being monitored by
Forward Collision Warning can be adversely affected by road and weatherconditions (see Limitations on page 58).
Use appropriate caution when driving.Caution: If your Model S is equipped with
Forward Collision Warning, you must take
your vehicle to Tesla Service if a
windshield replacement is needed. Failure
to do so can cause Forward Collision
Warning to malfunction.Warning: Forward Collision Warning does
not operate when Model S is traveling less than 4 mph (7 km/h).Warning: Forward Collision Warning is
designed only to provide visual and
audible alerts (see Visual and Audible
Feedback on page 58). It does not
attempt to apply the brakes or decelerate
Model S. When seeing and/or hearing a warning (described below), it is the
driver's responsibility to immediately take an appropriate action.Warning: Forward Collision Warning is for
guidance purposes only and is not a
substitute for attentive driving and soundjudgement. Always keep your eyes on the road when driving and never depend on
Forward Collision Warning to warn you of a potential collision. Several factors canreduce the performance of Forward
Collision Warning, causing either
unnecessary, invalid, inaccurate, or
missed warnings (see Limitations on page
58). Depending on Forward Collision
Warning to warn you of a potential
collision can result in serious injury or
death.
Visual and Audible Feedback
When a collision with a vehicle, bicycle, or
pedestrian is considered likely unless
immediate action is taken, Forward Collision
Warning is designed to sound an audible alert
and display a collision warning in the center of the instrument panel.
Warnings cancel automatically when the risk
of a collision has been reduced (for example,
you have decelerated or stopped Model S, or
a vehicle in front has moved out of your
driving path).
Warning: Forward Collision Warning may
provide a warning in situations where the
likelihood of collision may not exist. Stay
alert and always pay attention to the area
in front of Model S so you can anticipate
whether any action is required.
Controlling Forward Collision
Warning
To turn Forward Collision Warning off or
adjust its sensitivity, touch Controls >
Settings > Driver Assistance > Forward
Collision Warning . Instead of the default
warning level of Medium, you can turn the
warning Off, or you can choose to be warned
Late or Early .
Note: Your chosen setting is retained until you
manually change it. It can also be saved in
your driver profile.
Limitations Forward Collision Warning cannot always
detect vehicles, bikes, or pedestrians, and you may experience unnecessary, inaccurate,
invalid or missed warnings for many reasons, particularly if:
• The road has sharp curves.
Forward Collision Warning
58Model S Owner's Manual
Page 60 of 164
Traffic-Aware Cruise Control uses a camera
mounted on the windshield behind the interior
rear view mirror and a radar sensor in the
center of the front grill to detect whether
there is a vehicle in front of you in the same lane. If the area in front of Model S is clear,Traffic-Aware Cruise Control is designed todrive consistently at a set speed. When a
vehicle is detected, Traffic-Aware Cruise
Control is designed to slow down Model S if needed to maintain a selected time-baseddistance from the vehicle in front, up to the
set speed. Traffic-Aware Cruise Control does
not eliminate the need to watch the road in
front of you and to apply the brakes if needed.
Traffic-Aware Cruise Control makes it easy to maintain a consistent time-based distance
from a vehicle travelling in front of you in the
same lane. Traffic-Aware Cruise Control is
primarily intended for driving on dry, straight roads, such as highways and freeways. It
should not be used on city streets.
Note: Traffic-Aware Cruise Control is available
only if your Model S is equipped with Autopilot hardware and you have purchased
the Tech Package.
Operating Traffic Aware Cruise
Control
1. Touch the end of the cruise control lever.
Unless a vehicle is detected ahead of you, you must be driving at least 18 mph
(30 km/h) to initiate Traffic-Aware Cruise
Control. If a vehicle is detected in front of you, you can initiate Traffic-Aware CruiseControl at any speed, even when
stationary.
The light on the lever turns on. Traffic-
Aware Cruise Control is now in standby
mode and is not actively controlling your speed until you specify a cruising speed,
as described in the next step.
2. Set your cruising speed by accelerating
until you reach a desired cruising speed
then moving the cruise control lever up or
down (or pull briefly toward you), then
releasing.
Once you've initally set a cruising speed, you can adjust the speed to cruise at the
speed limit that is currently being
determined by Speed Assist (see Speed
Assist on page 55). To do so, pull the
cruise control lever toward you and hold momentarily (about half a second). Whenyou release, your cruising speed is set to
the speed that is automatically or manually being determined by Speed
Assist, taking into consideration any offset you may have specified.
Note: When you adjust the cruising speed
based on the speed limit, the set speed
does not change when the speed limit changes. You will need to pull the lever
again. You can also manually adjust your
cruising speed at any time (see Changing
the Set Speed on page 62).
Warning: Do not rely on Speed Assist
to determine an accurate or
appropriate cruising speed. Always
cruise at a safe speed based on traffic and road conditions.
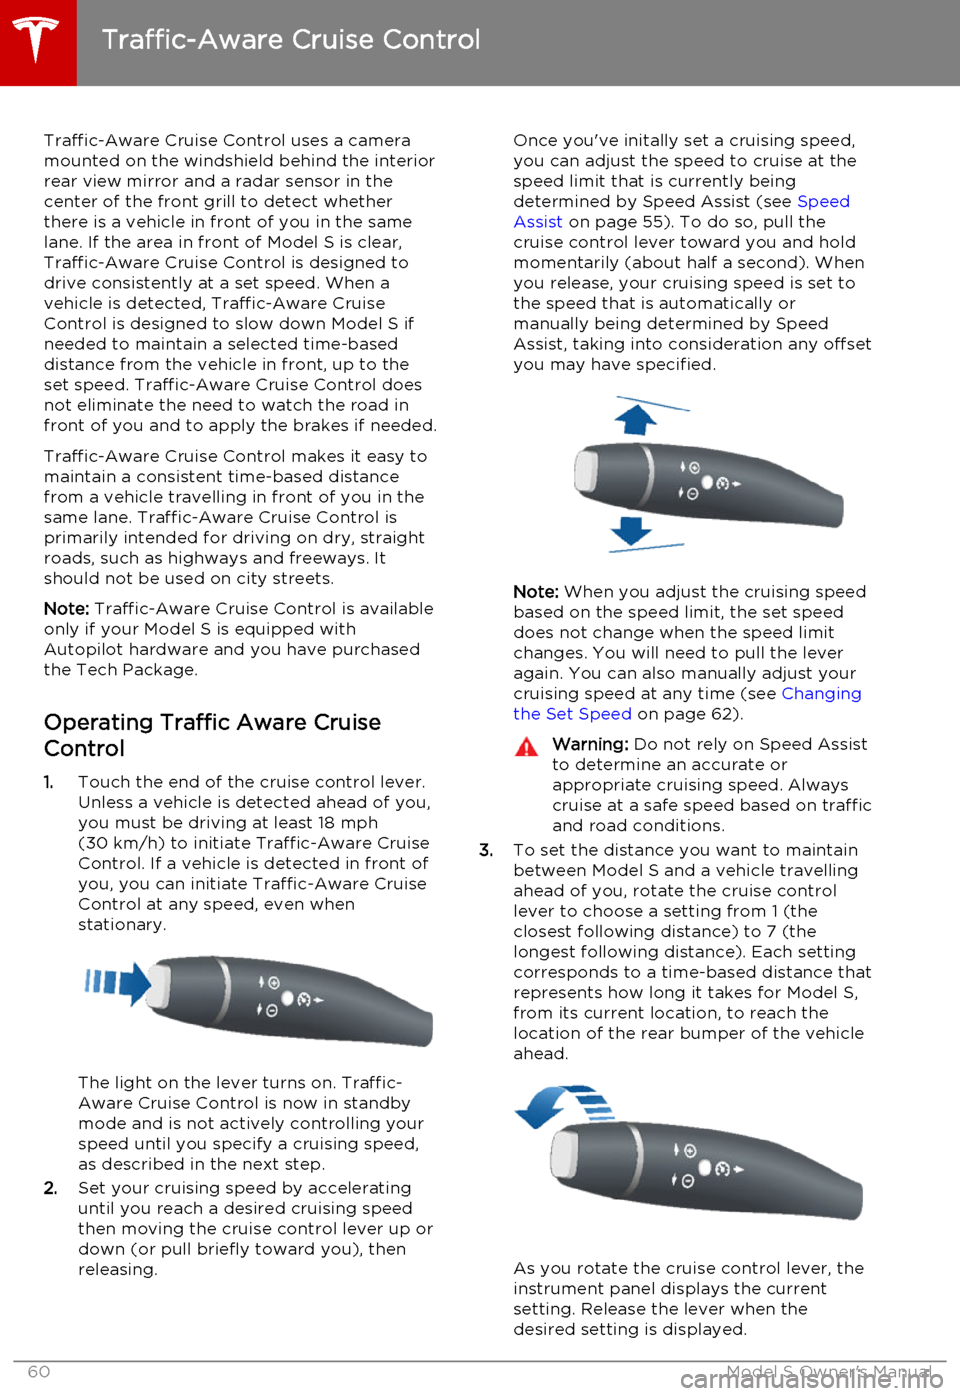
3. To set the distance you want to maintain
between Model S and a vehicle travelling
ahead of you, rotate the cruise control
lever to choose a setting from 1 (the
closest following distance) to 7 (the
longest following distance). Each setting
corresponds to a time-based distance that represents how long it takes for Model S,
from its current location, to reach the
location of the rear bumper of the vehicle ahead.
As you rotate the cruise control lever, the
instrument panel displays the current
setting. Release the lever when the
desired setting is displayed.
Traffic-Aware Cruise Control
60Model S Owner's Manual
Page 66 of 164
How Park Assist Works
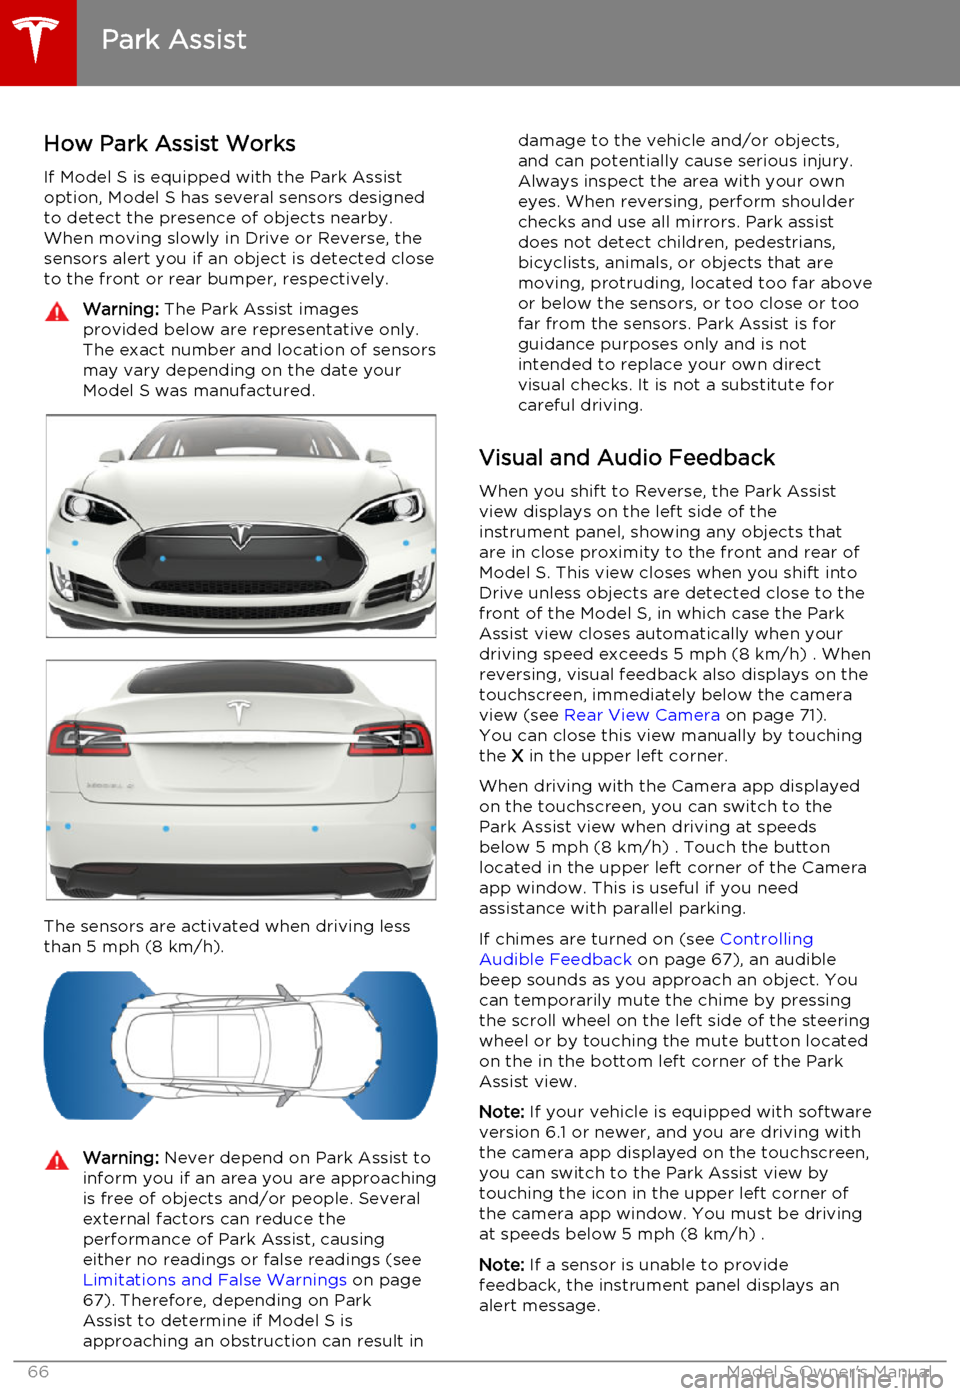
If Model S is equipped with the Park Assist option, Model S has several sensors designedto detect the presence of objects nearby.When moving slowly in Drive or Reverse, the
sensors alert you if an object is detected close to the front or rear bumper, respectively.Warning: The Park Assist images
provided below are representative only.
The exact number and location of sensors
may vary depending on the date your
Model S was manufactured.
The sensors are activated when driving less
than 5 mph (8 km/h).
Warning: Never depend on Park Assist to
inform you if an area you are approaching is free of objects and/or people. Several
external factors can reduce the
performance of Park Assist, causing
either no readings or false readings (see Limitations and False Warnings on page
67). Therefore, depending on Park Assist to determine if Model S is
approaching an obstruction can result indamage to the vehicle and/or objects,
and can potentially cause serious injury.
Always inspect the area with your own
eyes. When reversing, perform shoulder
checks and use all mirrors. Park assist
does not detect children, pedestrians,
bicyclists, animals, or objects that are moving, protruding, located too far above
or below the sensors, or too close or too far from the sensors. Park Assist is for
guidance purposes only and is not
intended to replace your own direct
visual checks. It is not a substitute for careful driving.
Visual and Audio Feedback
When you shift to Reverse, the Park Assistview displays on the left side of the
instrument panel, showing any objects that
are in close proximity to the front and rear of
Model S. This view closes when you shift into
Drive unless objects are detected close to the front of the Model S, in which case the Park
Assist view closes automatically when your
driving speed exceeds 5 mph (8 km/h) . When reversing, visual feedback also displays on the
touchscreen, immediately below the camera
view (see Rear View Camera on page 71).
You can close this view manually by touching
the X in the upper left corner.
When driving with the Camera app displayed
on the touchscreen, you can switch to the Park Assist view when driving at speeds
below 5 mph (8 km/h) . Touch the button
located in the upper left corner of the Camera
app window. This is useful if you need
assistance with parallel parking.
If chimes are turned on (see Controlling
Audible Feedback on page 67), an audible
beep sounds as you approach an object. You
can temporarily mute the chime by pressing
the scroll wheel on the left side of the steering
wheel or by touching the mute button located
on the in the bottom left corner of the Park Assist view.
Note: If your vehicle is equipped with software
version 6.1 or newer, and you are driving with the camera app displayed on the touchscreen,
you can switch to the Park Assist view by
touching the icon in the upper left corner of the camera app window. You must be driving
at speeds below 5 mph (8 km/h) .
Note: If a sensor is unable to provide
feedback, the instrument panel displays an
alert message.
Park Assist
66Model S Owner's Manual
Page 71 of 164
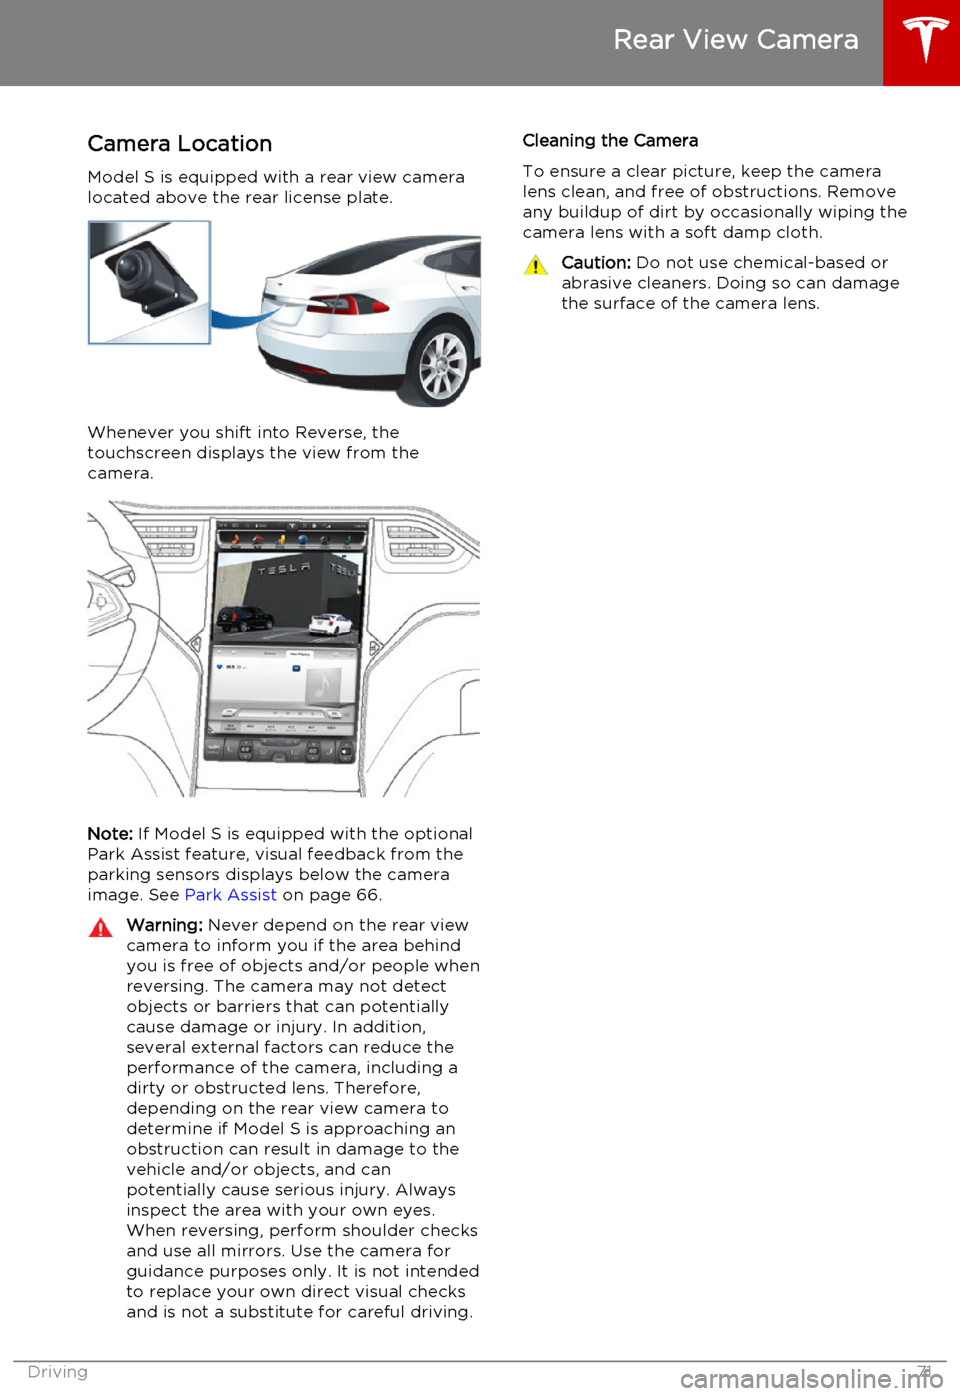
Camera LocationModel S is equipped with a rear view camera
located above the rear license plate.
Whenever you shift into Reverse, the
touchscreen displays the view from the
camera.
Note: If Model S is equipped with the optional
Park Assist feature, visual feedback from the
parking sensors displays below the camera image. See Park Assist on page 66.
Warning:
Never depend on the rear view
camera to inform you if the area behind
you is free of objects and/or people when
reversing. The camera may not detect
objects or barriers that can potentially cause damage or injury. In addition,several external factors can reduce the
performance of the camera, including a dirty or obstructed lens. Therefore,
depending on the rear view camera to determine if Model S is approaching anobstruction can result in damage to the
vehicle and/or objects, and can
potentially cause serious injury. Always
inspect the area with your own eyes.
When reversing, perform shoulder checks
and use all mirrors. Use the camera for
guidance purposes only. It is not intended to replace your own direct visual checks
and is not a substitute for careful driving.Cleaning the Camera
To ensure a clear picture, keep the camera
lens clean, and free of obstructions. Remove any buildup of dirt by occasionally wiping the
camera lens with a soft damp cloth.Caution: Do not use chemical-based or
abrasive cleaners. Doing so can damage
the surface of the camera lens.
Rear View Camera
Driving71