ECO mode TESLA MODEL S 2022 Owner´s Manual
[x] Cancel search | Manufacturer: TESLA, Model Year: 2022, Model line: MODEL S, Model: TESLA MODEL S 2022Pages: 281, PDF Size: 7.63 MB
Page 128 of 281

How Speed Assist Works
Model S displays a speed limit on the instrument panel and you can choose if and
how you are warned when you exceed the speed limit. Also, instead of using the detected speed limit, you can base warnings on an arbitrary speed limit that you enter
manually.
In situations where Model S is unable to
determine a speed limit, or if Speed Assist is
uncertain that an acquired speed limit is
accurate, the
instrument panel may not
display a speed limit sign and warnings do
not take
effect.
NOTE: Speed limit warnings go away after ten
seconds, or when Model S slows down below
the specified limit.
WARNING: Do not rely on Speed Assist to determine the appropriate speed limit or driving speed. Always drive at a safe speed based on traffic and road conditions.
Controlling Speed Assist
To adjust the Speed Limit Warning setting,
touch Controls > Autopilot > Speed Limit Warning, then choose one of these options:
Page 130 of 281
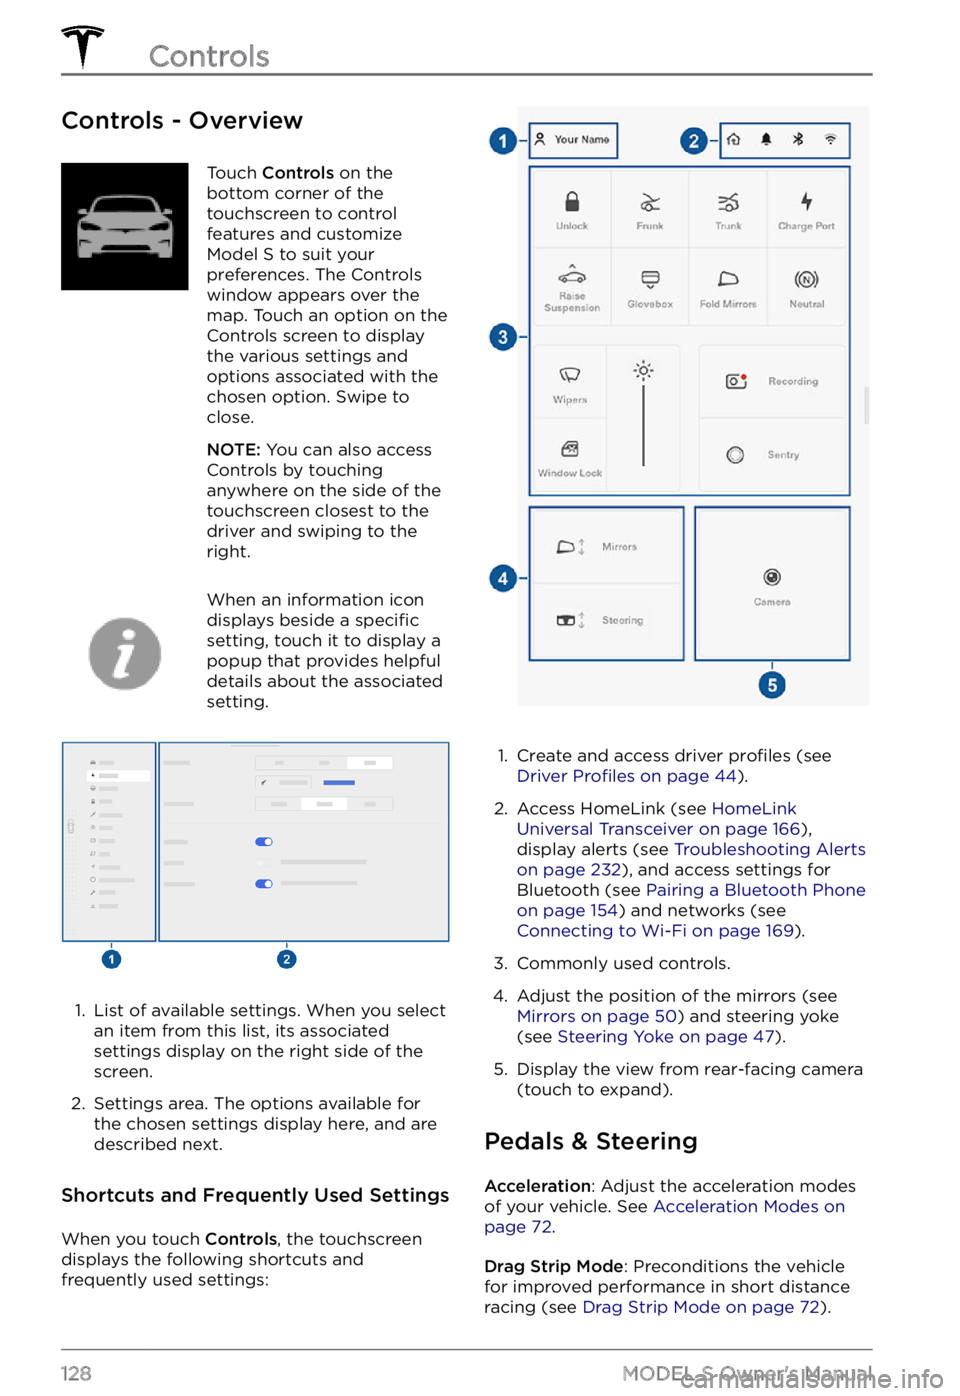
Controls - OverviewTouch Controls on the
bottom corner of the
touchscreen to control
features and customize
Model S to suit your
preferences. The Controls
window appears over the
map. Touch an option on the
Controls screen to display
the various settings and
options associated with the
chosen option. Swipe to
close.
NOTE: You can also access
Controls by touching
anywhere on the side of the
touchscreen closest to the
driver and swiping to the
right.
When an information icon
displays beside a specific
setting, touch it to display a
popup that provides helpful
details about the associated
setting.
1.
List of available settings. When you select
an item from this list, its associated settings display on the right side of the
screen.
2.
Settings area. The options available for
the chosen settings display here, and are
described next.
Shortcuts and Frequently Used Settings
When you touch Controls, the touchscreen
displays the following shortcuts and
frequently used settings:
1.
Create and access driver profiles (see Driver Profiles on page 44).
2.
Access HomeLink (see HomeLink Universal Transceiver on page 166),
display alerts (see Troubleshooting Alerts on page 232), and access settings for
Bluetooth (see Pairing a Bluetooth Phone on page 154) and networks (see Connecting to Wi-Fi on page 169).
3.
Commonly used controls.
4.
Adjust the position of the mirrors (see Mirrors on page 50) and steering yoke
(see Steering Yoke on page 47).
5.
Display the view from rear-facing camera
(touch to expand).
Pedals & Steering
Acceleration: Adjust the acceleration modes
of your vehicle. See Acceleration Modes on page 72.
Drag Strip Mode: Preconditions the vehicle
for improved performance in short distance racing (see
Drag Strip Mode on page 72).
Controls
128MODEL S Owner
Page 147 of 281
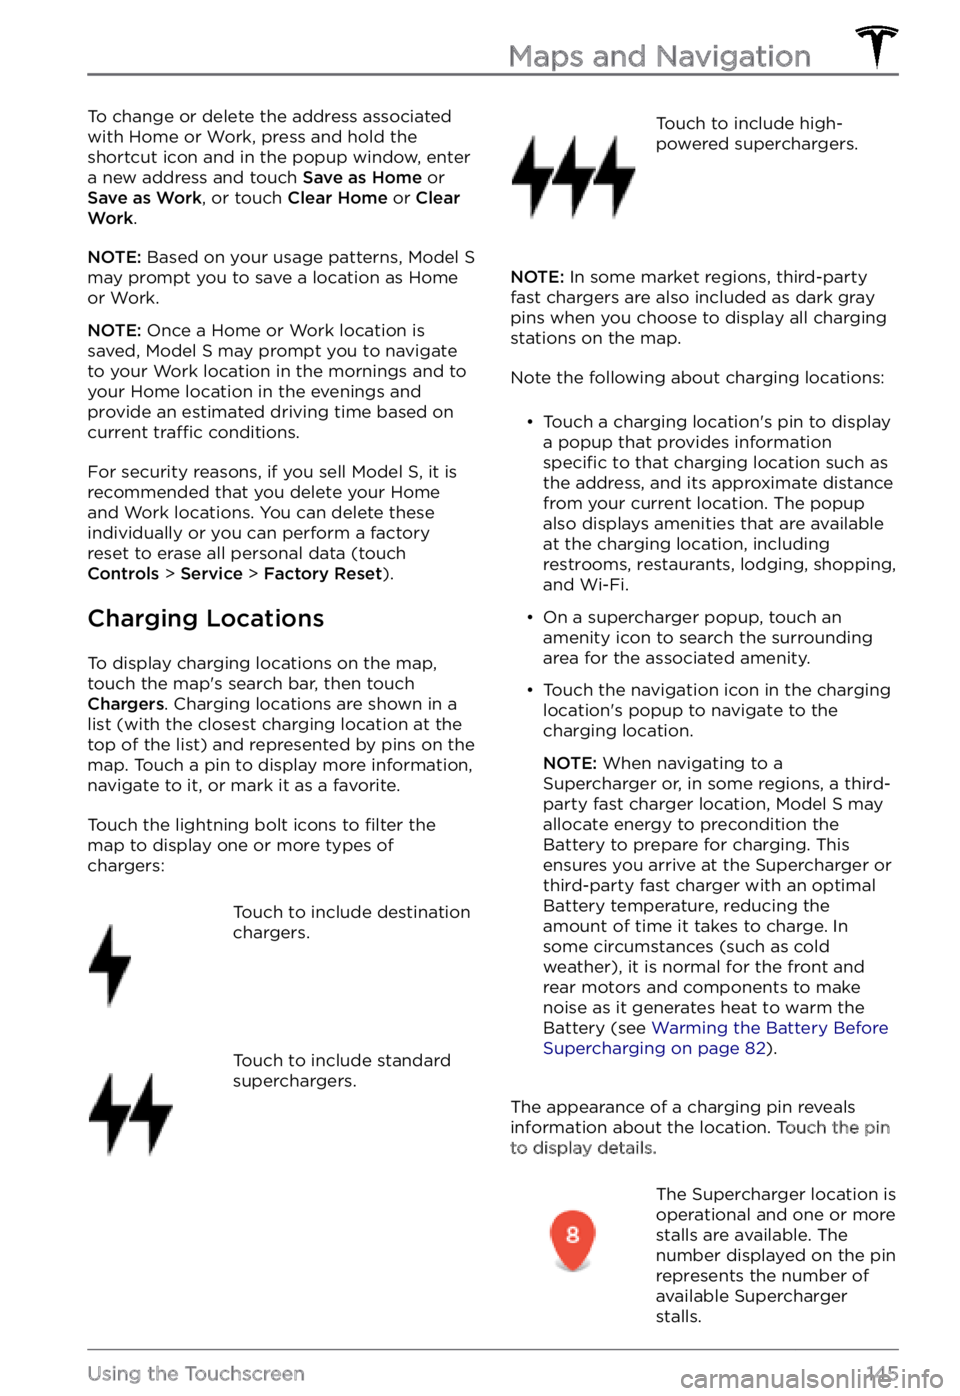
To change or delete the address associated
with Home or Work, press and hold the
shortcut icon and in the popup window, enter
a new address and touch
Save as Home or Save as Work, or touch Clear Home or Clear Work.
NOTE: Based on your usage patterns, Model S may prompt you to save a location as Home
or Work.
NOTE: Once a Home or Work location is
saved, Model S may prompt you to navigate
to your Work location in the mornings and to
your Home location in the evenings and
provide an estimated driving time based on
current
traffic conditions.
For security reasons, if you sell Model S, it is
recommended that you delete your Home
and Work locations. You can delete these individually or you can perform a factory
reset to erase all personal data (touch
Controls > Service > Factory Reset).
Charging Locations
To display charging locations on the map,
touch the map
Page 150 of 281

NOTE: Navigation instructions that you enter
manually, or send to Model S, always override
navigation destinations suggested by Automatic Navigation.
NOTE: Availability of this feature depends on
market region and vehicle configuration.
Map Updates
As updated maps become available, they are
automatically sent to Model S over Wi-Fi. To
ensure you receive them, periodically connect
Model S to a Wi-Fi network (see Connecting to Wi-Fi on page 169). The touchscreen
displays a message informing you when new
maps are installed.
Maps and Navigation
148MODEL S Owner
Page 163 of 281
About the Security System
If Model S does not detect a key nearby and a
locked door or trunk is opened, an alarm
sounds and the headlights and turn signals
flash. To deactivate the alarm, press any
button on the key.
To manually enable or disable the alarm
system, touch Controls > Safety > Security Alarm. When enabled, Model S activates its
alarm one minute after you exit, the doors
lock, and a recognized key is no longer
detected.
A battery-backed siren sounds in situations where a locked door or trunk is opened and
Model S does not detect a key nearby (if
equipped). If you also want this siren to sound
in situations where
Model S detects motion
inside the cabin, or is moved or tilted (for
example, with a tow truck or jack), turn on the
Tilt/Intrusion setting (touch Controls > Safety > Tilt/Intrusion) (if equipped).
NOTE: If you plan to leave something that
moves inside your locked Model S, remember
to turn off Tilt/Intrusion. If this setting is on,
any motion detected inside Model S activates
the intrusion alarm.
NOTE: If Model S is in Sentry Mode (see Sentry Mode on page 162), you must disable
Sentry Mode before you can disable the
Security alarm or the Tilt/Intrusion alarm.
NOTE: The Security Alarm must be on to
enable Tilt/Intrusion.
NOTE: The Intrusion Sensor automatically
disables in situations where the climate
control system is operating when you have
left your vehicle (see
Keep Climate On, Dog Mode, and Camp Mode on page 139). To
override, you can manually turn the Intrusion
Sensor on again after choosing Keep Climate On, Dog, or Camp Mode (touch
Controls > Safety > Tilt/Intrusion).
If your Model S is equipped with the
Enhanced Anti-Theft upgrade, the horn
sounds in situations where a locked door or trunk is opened and
Model S does not detect
a key nearby. If the Tilt/Intrusion setting is on,
the horn also sounds if Model S detects
motion inside the cabin, or if the vehicle is moved or tilted (for example, with a tow truck
or jack). To turn the Tilt/Intrusion detection system on or
off, touch Controls > Safety > Tilt/Intrusion.
PIN to Drive
To increase security, you can prevent Model S from being driven until a 4-digit PIN (Personal Identification Number) is entered. To enable
this setting, touch Controls > Safety > PIN to Drive and follow the on-screen prompts to
create a driving PIN.
NOTE: When enabled, in addition to entering
the 4-digit driving PIN to drive, you must also
use it to enter Valet mode for the
first time
and create the 4-digit valet PIN that you can
use to enter and exit Valet mode. When in
Valet mode,
Model S can be driven without
the need for the valet to enter a driving PIN.
In addition, the
PIN to Drive setting is
disabled whenever Valet mode is active.
If you forget your driving PIN, or to disable PIN to Drive, return to this setting, touch the
link to enter your Tesla login credentials, then
follow the on-screen prompts.
NOTE: In the unlikely event that your
touchscreen is unresponsive, you may be
unable to enter the PIN. In this case,
first try
to restart the touchscreen (see Restarting the Touchscreen on page 52). If the touchscreen
is still unresponsive, you can still bypass PIN
to Drive by turning on Keyless Driving in the
Tesla mobile app.
Glovebox PIN
For additional security, you can protect the contents in your glovebox with a 4-digit PIN. To enable this setting, touch
Controls > Safety > Glovebox PIN and follow the on-
screen prompts. When enabled, you are
prompted to enter the PIN to open the
glovebox. To disable this setting, select the
toggle to disable and then enter the PIN.
If you forget your glovebox PIN, reset it by
entering your Tesla login credentials, then
follow the on-screen prompts.
NOTE: When you open the glovebox with
both Glovebox PIN and Valet mode enabled,
you are prompted for the glovebox PIN and taken out of Valet mode after the glovebox
opens.
Security Settings
161Using the Touchscreen
Page 164 of 281
Sentry Mode
NOTE: Depending on market region, vehicle configuration, options purchased, and software version, your vehicle may not be equipped with Sentry Mode, or the feature may not operate exactly as described.
In Sentry Mode, cameras and sensors remain
powered on and ready to record suspicious
activity whenever
Model S is locked and in
Park.
To turn Sentry Mode on or off, touch Controls > Sentry. Alternatively, you can use voice
commands, the mobile app, or you can touch
Controls > Safety > Sentry Mode. To activate
Sentry Mode using voice commands, say
"
Keep Tesla safe", "Keep my car safe", "Sentry on", or "Enable Sentry" (for details using
voice commands, see Using Voice Commands on page 160).
NOTE: Sentry Mode requires the Battery to be
at least 20% charged. If the Battery falls
below 20%, Sentry Mode turns
off and the
mobile app sends you a notification.
NOTE: Power consumption may increase
when Sentry Mode is active.
NOTE: Software updates cannot be installed
when Sentry Mode is activated.
CAUTION: Do not rely on Sentry Mode to protect Model S from all possible security threats. While it may help deter some threats, no security system can prevent all attacks.
CAUTION: Sentry Mode may not trigger the security alarm in all situations involving damage to the vehicle. The security alarm depends upon multiple factors to be triggered and may not detect all impacts to the vehicle or may not trigger the alarm in all cases.
Standby, Alert, and Alarm States
When in Sentry Mode, Model S may go
through three states depending on its
surroundings
Page 171 of 281
Wi-Fi is available as a data connection
method and is often faster than cellular data
networks. Connecting to Wi-Fi is especially
useful in areas with limited or no cellular
connectivity. To ensure fast, reliable delivery
of software and map updates, Tesla
recommends leaving your vehicle connected to a Wi-Fi network whenever possible (for
example, if parked in your garage overnight).
To connect to a Wi-Fi network:
1.
Touch the cellular icon (usually LTE or 3G)
on the top of the Controls screen. Model S begins to scan and display
detected Wi-Fi networks that are within
range.
NOTE: If a known Wi-Fi network does not
appear in the list, move your vehicle
closer to the access point or consider
using a range extender to reach your
vehicle.
2.
Select the Wi-Fi network you want to use,
enter the password (if necessary), then
touch
Confirm.
3.
Your vehicle connects to the Wi-Fi
network. Whenever the network is within
range,
Model S automatically connects to
it.
You can also connect to a hidden network
that isn
Page 181 of 281
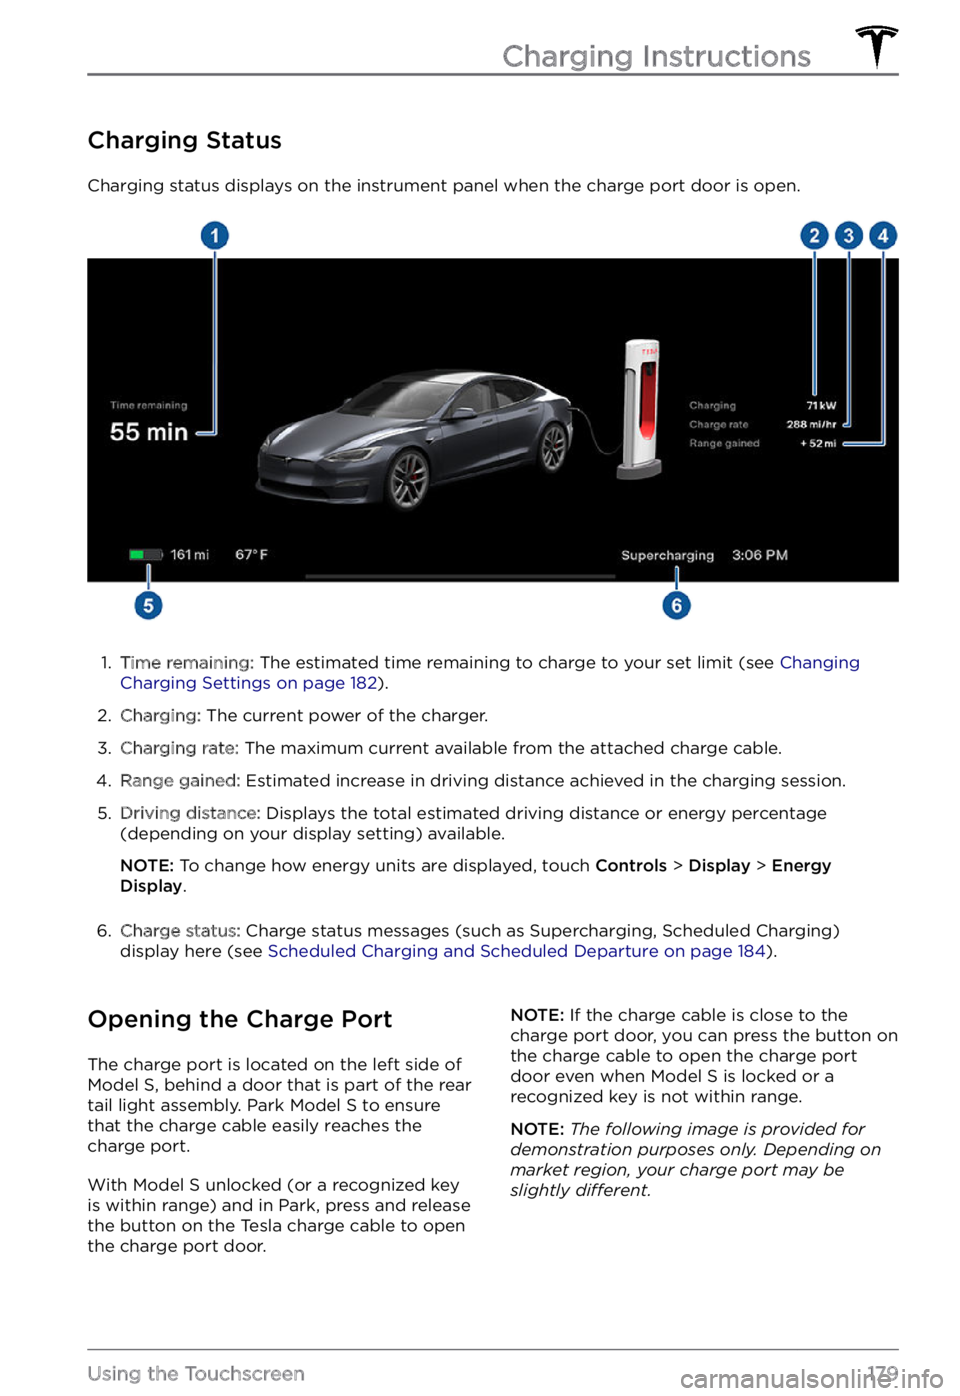
Charging Status
Charging status displays on the instrument panel when the charge port door is open.
1.
Time remaining: The estimated time remaining to charge to your set limit (see Changing Charging Settings on page 182).
2.
Charging: The current power of the charger.
3.
Charging rate: The maximum current available from the attached charge cable.
4.
Range gained: Estimated increase in driving distance achieved in the charging session.
5.
Driving distance: Displays the total estimated driving distance or energy percentage
(depending on your display setting) available.
NOTE: To change how energy units are displayed, touch Controls > Display > Energy Display.
6.
Charge status: Charge status messages (such as Supercharging, Scheduled Charging)
display here (see Scheduled Charging and Scheduled Departure on page 184).
Opening the Charge Port
The charge port is located on the left side of Model S, behind a door that is part of the rear
tail light assembly. Park Model S to ensure
that the charge cable easily reaches the
charge port.
With Model S unlocked (or a recognized key is within range) and in Park, press and release
the button on the Tesla charge cable to open the charge port door.
NOTE: If the charge cable is close to the
charge port door, you can press the button on
the charge cable to open the charge port
door even when Model S is locked or a recognized key is not within range.
NOTE: The following image is provided for demonstration purposes only. Depending on market region, your charge port may be slightly di
Page 184 of 281

2. While holding the public charging handle
in one hand and the adapter in the other
hand, press and hold the button on the
public charging handle and pull both
outwards, removing the handle and adapter at the same time.
NOTE: If the charging station handle
separates from the adapter, leaving the
adapter in
Model S, use the touchscreen
to unlock the charge port (touch the
charging icon on the overhead view of the
vehicle).
3.
Press and hold the charging handle button again to release the adapter from
the charging handle.
NOTE: The charge port automatically closes
within approximately 10 seconds of removing
the connector from the charge port.
CAUTION: Tesla strongly recommends leaving Model S plugged in when not in use. This maintains the Battery at the optimum level of charge.
Manually Releasing Charge
Cable
If the usual methods for releasing a charge
cable from the charge port (using the charge
handle release button, touchscreen, or mobile
app) do not work, carefully follow these steps:
1.
Ensure that Model S is not actively
charging by displaying the charging
screen on the touchscreen. If necessary,
touch
Stop Charging.
2.
Open the rear trunk.
3.
Pull the charge port
Page 188 of 281

Service Intervals
Your vehicle should generally be serviced on
an as-needed basis. However, Tesla
recommends the following maintenance items
and intervals, as applicable to your vehicle, to
ensure continued reliability and
efficiency of
your Model S.