warning TESLA MODEL X 2020 Service Manual
[x] Cancel search | Manufacturer: TESLA, Model Year: 2020, Model line: MODEL X, Model: TESLA MODEL X 2020Pages: 247, PDF Size: 6.48 MB
Page 188 of 247

Note: If Model X is locked, the charge port
light does not light up.
If the charge port light turns red while
charging, a fault is detected. Check the instrument panel or touchscreen for a
message describing the fault. A fault can
occur due to something as common as a power outage. If a power outage occurs,
charging resumes automatically when power
is restored.
Note: When charging, particularly at high
currents, the refrigerant compressor and fan
operate as needed to keep the Battery cool.
Therefore, it is normal to hear sounds during
charging.
Note: Air conditioning performance is
generally not affected by charging. However,
under certain circumstances (for example, you
are charging at high currents during a
particularly warm day), the air coming from
the vents may not be as cool as expected and
a message displays on the instrument panel.
This is normal behavior and ensures that the
Battery stays within an optimum temperature
range while charging to support longevity and
optimum performance.Warning: Never spray liquid at a high
velocity (for example, if using a pressure
washer) towards the charge port while
charging. Failure to follow these
instructions can result in serious injury or
damage to the vehicle, charging
equipment, or property.
Stopping Charging
Stop charging at any time by disconnecting
the charge cable or touching Stop Charging
on the touchscreen.
Note: To prevent unauthorized unplugging of
the charge cable, the charge cable latch remains locked and Model X must be unlockedor able to recognize your key before you can
disconnect the charge cable.
To disconnect the charge cable:
1. Press and hold the button on the
connector handle to release the latch.
Alternatively, unlock the vehicle by
opening a door, using a key fob, or
touching Stop Charging on the
touchscreen. These methods unlock the
charge port as well.
2. Pull the connector from the charge port.
3. Push the charge port door closed.
Note:
If Model X is equipped with a motorized
charge port door, it automatically closes shortly after you remove the charge cable.Caution: Tesla strongly recommends
leaving Model X plugged in when not in use. This maintains the Battery at the
optimum level of charge.
Manually Releasing Charge Cable
If the usual methods for releasing a charge
cable from the charge port (using the charge
handle release button, touchscreen, or mobile
app) do not work, carefully follow these steps:
1. Ensure that Model X is not actively
charging by displaying the charging
screen on the touchscreen. If necessary,
touch Stop Charging .
2. Open the rear trunk.
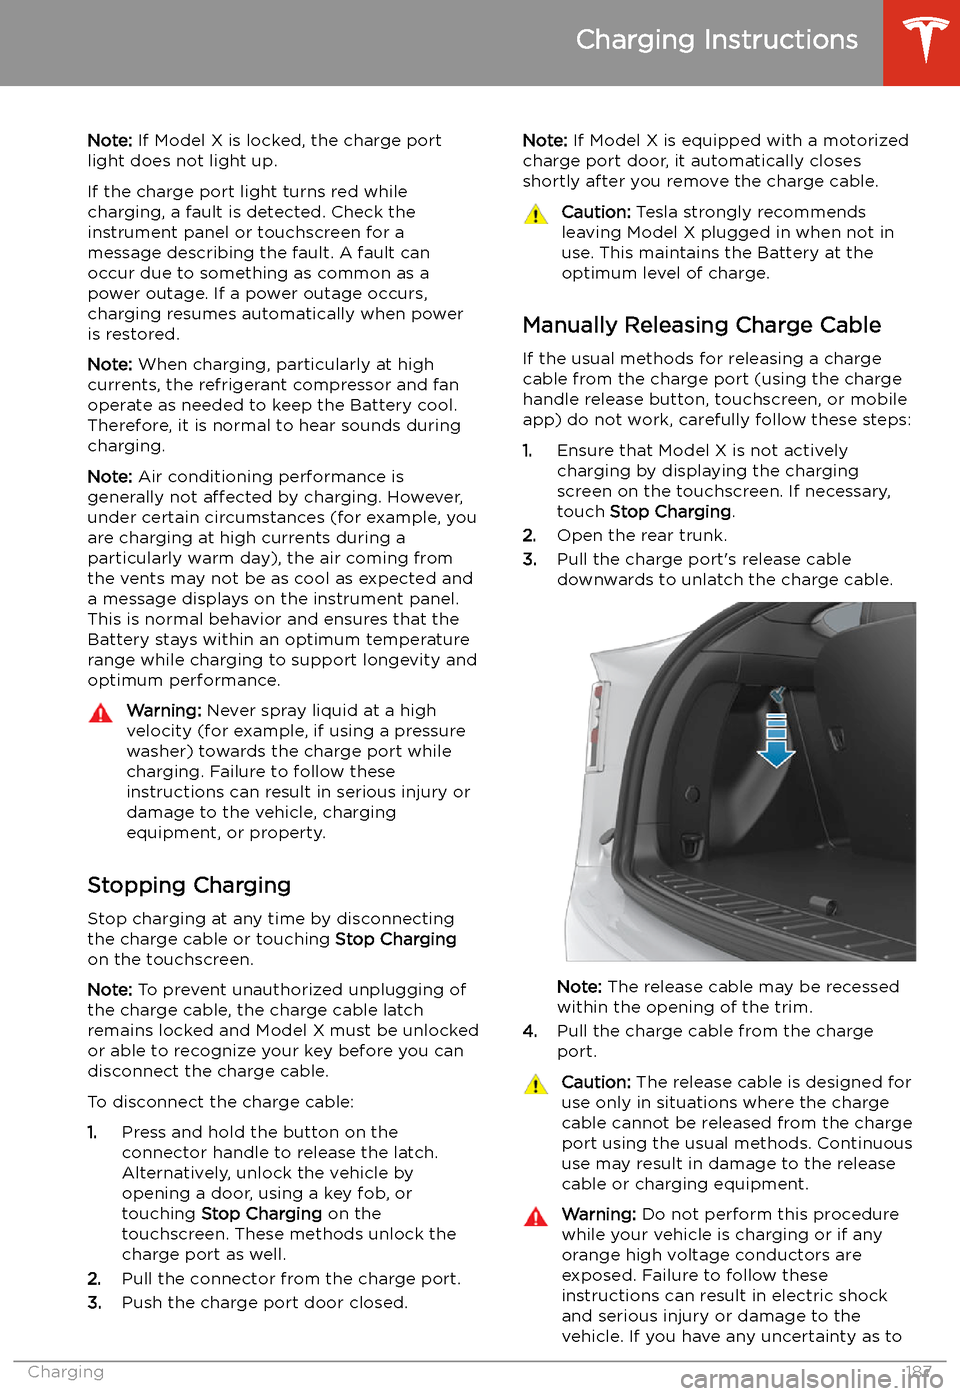
3. Pull the charge port
Page 189 of 247

how to safely perform this procedure,
contact your closest Service Center.Warning: Do not attempt to remove the
charge cable at the same exact time as
you begin to pull the release cable.
Always pull the release cable down and
hold it before you begin to remove the
charge cable from the charge port.
Failure to follow these instructions can
result in electric shock and serious injury.
Charge Port Light
Page 197 of 247

Punctured Tires
A puncture eventually causes the tire to lose pressure, which is why it is important to check
tire pressures frequently. Permanently repair
or replace punctured or damaged tires as
soon as possible.
Your tubeless tires may not leak when
penetrated, provided the object remains in the tire. If, however, you feel a sudden vibration or
ride disturbance while driving, or you suspect a tire is damaged, immediately reduce yourspeed. Drive slowly, while avoiding heavy
braking or sharp steering and, when safe to do so, stop the vehicle. Arrange to have Model X
transported to a Tesla Service Center, or to a nearby tire repair center.
Note: In some cases, you can temporarily
repair small tire punctures (under 1/4” (6
mm)) using an optional tire repair kit available
from Tesla. This allows you to slowly drive
Model X to Tesla or to a nearby tire repair
facility.Warning: Do not drive with a punctured
tire that has not been repaired, even if the puncture has not caused the tire to
de
Page 198 of 247

Warning: Road holding is seriously
impaired if the tires are incorrectly
installed on the wheels.Removing and Installing Lug Nut Covers
If your Model X is equipped with lug nut
covers, you must remove them to access the
lug nuts.
To remove a lug nut cover:
1. Insert the curved part of the lug nut cover
tool (located in the glovebox for some
vehicles) into the hole at the base of the
Tesla "T".
Note: The lug nut cover tool can also be
purchased at an auto parts store or
through online retailers.
2. Maneuver the lug nut cover tool so that it
is fully inserted into the hole in the lug nut
cover.
3. Twist the lug nut cover tool so that the
curved part is touching the middle of the
lug nut cover.
4. Firmly pull the lug nut tool away from the
wheel until the lug nut cover is released.
To install the lug nut cover:
1. Align the lug nut cover into position.
2. Push firmly on the lug nut cover until it
fully snaps into place.
Caution: Make sure the lug nut cover
is fully secure before driving to
prevent it from falling off.
Tire Care and Maintenance
Maintenance197
Page 201 of 247

Driving in Low Temperatures
Tire performance is reduced in low ambient
temperatures, resulting in reduced grip and an
increased susceptibility to damage from
impacts. Performance tires can temporarily
harden when cold, causing you to hear rotational noise for the first few miles
(kilometers) until the tires warm up.
Using Tire Chains
Tesla has tested and approved Maggie Group
Trak Special LT51 tire chains to increase traction in snowy conditions. These chains
should only be installed on rear 19" or 20"
tires. Do not use chains on 22" tires or on front
tires. The approved tire chains can be
purchased from Tesla.
When installing tire chains, follow the instructions and warnings provided by the tire
chain manufacturer. Mount them evenly and as
tight as possible.
When using tire chains:
Page 204 of 247

Warning: Do not allow any water,
cleaners, or fabric to enter a seat belt
mechanism.Warning: Exposure to chemical cleaners
can be hazardous and can irritate eyes
and skin. Read and observe the
instructions provided by the manufacturer
of the chemical cleaner.
Polishing, Touch Up, and Body
Repair
To preserve the cosmetic appearance of the
body, you can occasionally treat the paint
surfaces with an approved polish containing:
Page 206 of 247

Warning: Do not operate the washers
while cleaning Model X. Windshield
washer
Page 210 of 247

Parts and Accessories
Parts, Accessories, and
Modifications
Use only genuine Tesla parts and accessories.
Tesla performs rigorous testing on parts to
ensure their suitability, safety, and reliability.
Purchase these parts from Tesla, where they
are professionally installed and where you can receive expert advice about modifications to
Model X. Accessories are available for
purchase from Tesla stores or online at www.tesla.com .
Note: Some accessories may not be available
in your market region.
Tesla is unable to assess parts manufactured
by other distributors and therefore accepts no responsibility if you use non-Tesla parts onModel X.
Warning: Installing non-approved parts
and accessories, or performing non- approved modifications, can affect the
performance of Model X and the safety of
its occupants. Any damage caused by
using or installing non-approved parts, or by performing non-approved
modifications, is not covered by the
warranty.Warning: Tesla does not accept liability
for death, personal injury or damage that
occurs if you use or install non-approved
accessories or make non-approved
modifications.Body Repairs
If your Model X is in a collision, contact Tesla
or a Tesla-approved Body Shop to ensure that
it is repaired with genuine Tesla parts. Tesla
has selected and approved body shops that meet strict requirements for training,
equipment, quality, and customer satisfaction.
Some repair shops and insurance companies
might suggest using non-original equipment
or salvaged parts to save money. However,
these parts do not meet Tesla
Page 212 of 247

Vehicle Loading
Load Capacity Labeling It is important to understand how much
weight your Model X can safely carry. This
weight is called the vehicle capacity weight
and includes the weight of all occupants, cargo and any additional equipment added toyour Model X since it was manufactured.
One or more labels attached to the center
door pillar indicate how much weight Model X
can safely carry. Labels are visible when the front door is open.
1. Towing label (if equipped)
2. Tire and Loading Information label
3. Vehicle Certification label
Note: Towing capability is available only if
Model X is equipped with the Towing Package.
Warning: Overloading Model X has an
adverse effect on braking and handling,
which can compromise your safety or cause damage.Caution: Never load more than 175 lbs (80
kg) on the rear load
Page 228 of 247

Instructions for Transporters
DO NOT TRANSPORT WITH
WHEELS ON THE GROUND
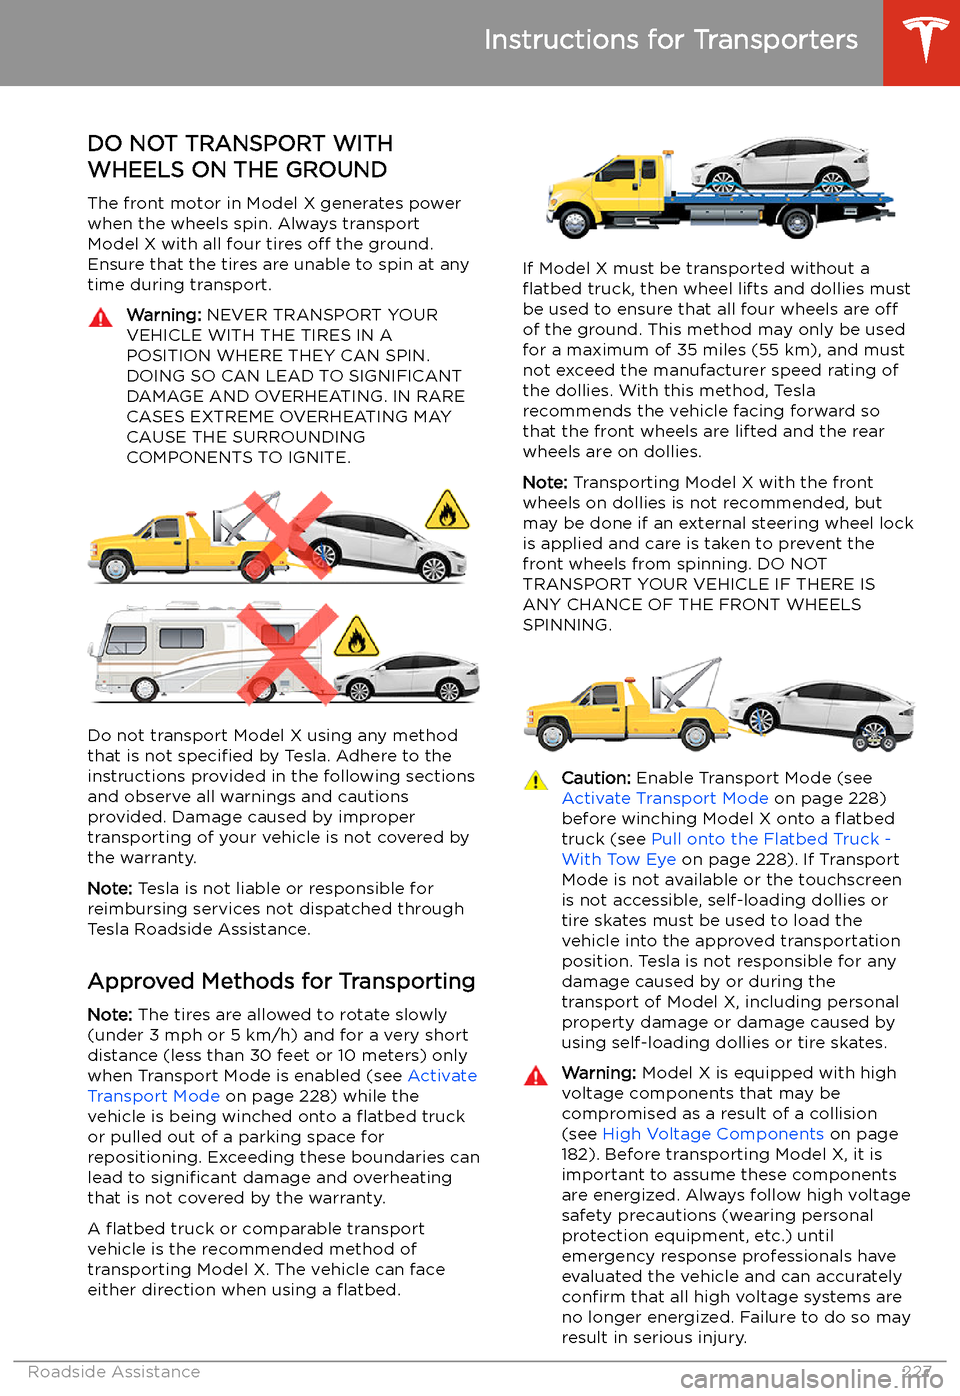
The front motor in Model X generates power
when the wheels spin. Always transport Model X with all four tires off the ground.
Ensure that the tires are unable to spin at any
time during transport.
Warning: NEVER TRANSPORT YOUR
VEHICLE WITH THE TIRES IN A
POSITION WHERE THEY CAN SPIN. DOING SO CAN LEAD TO SIGNIFICANT
DAMAGE AND OVERHEATING. IN RARE CASES EXTREME OVERHEATING MAY
CAUSE THE SURROUNDING
COMPONENTS TO IGNITE.
Do not transport Model X using any method
that is not specified by Tesla. Adhere to the
instructions provided in the following sections
and observe all warnings and cautions provided. Damage caused by impropertransporting of your vehicle is not covered by
the warranty.
Note: Tesla is not liable or responsible for
reimbursing services not dispatched through
Tesla Roadside Assistance.
Approved Methods for Transporting Note: The tires are allowed to rotate slowly
(under 3 mph or 5 km/h) and for a very short
distance (less than 30 feet or 10 meters) only
when Transport Mode is enabled (see Activate
Transport Mode on page 228) while the
vehicle is being winched onto a