ECO mode TESLA MODEL X 2021 Owner´s Manual
[x] Cancel search | Manufacturer: TESLA, Model Year: 2021, Model line: MODEL X, Model: TESLA MODEL X 2021Pages: 212, PDF Size: 5.07 MB
Page 7 of 212
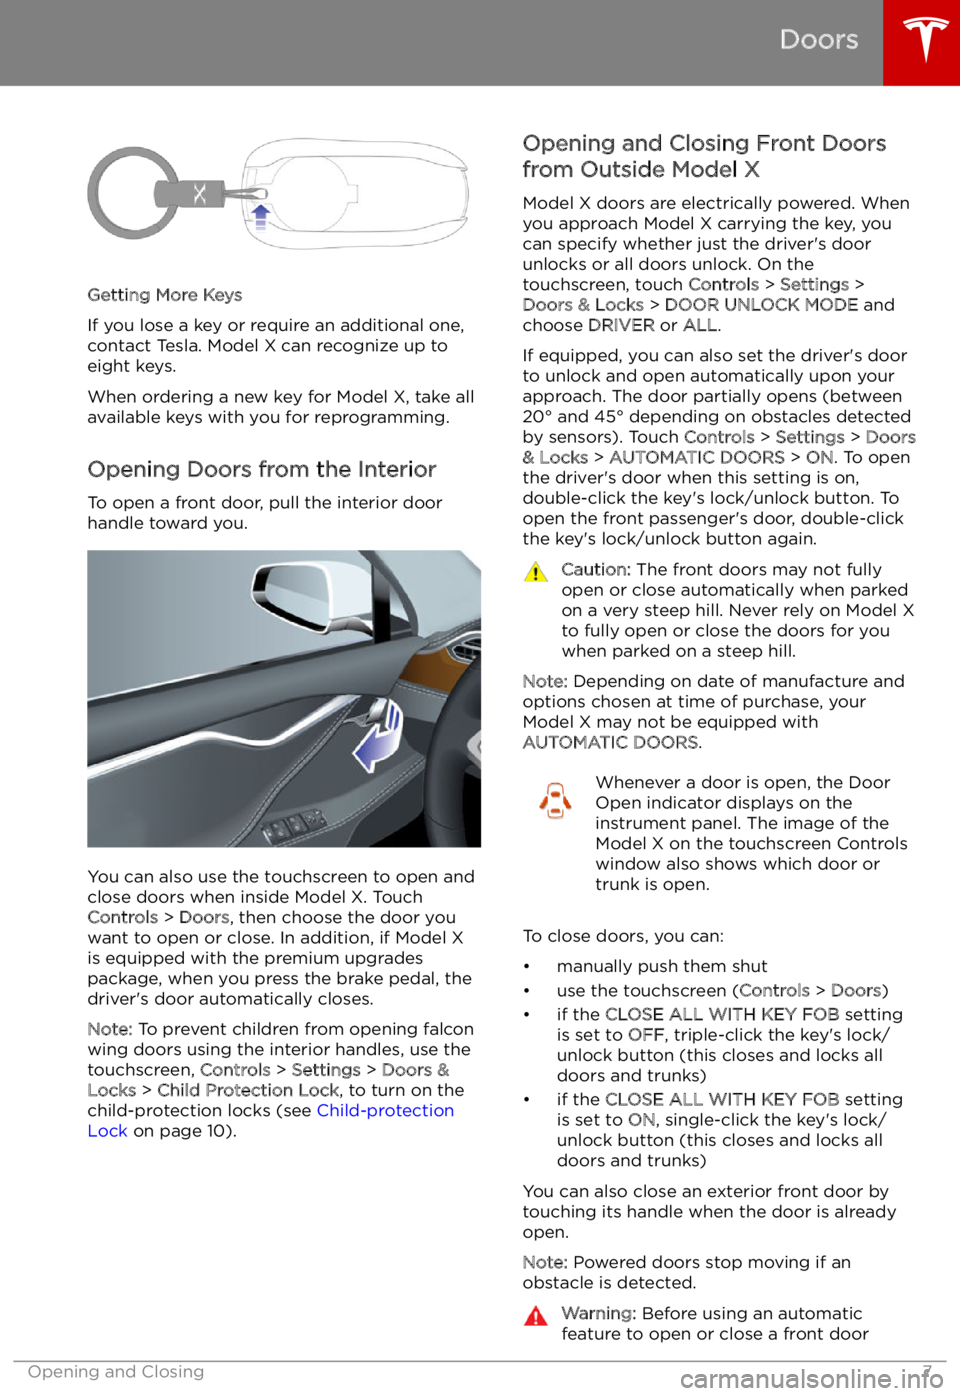
Getting More Keys
If you lose a key or require an additional one,
contact Tesla. Model X can recognize up to
eight keys.
When ordering a new key for Model X, take all
available keys with you for reprogramming.
Opening Doors from the Interior
To open a front door, pull the interior door handle toward you.
You can also use the touchscreen to open and
close doors when inside Model X. TouchControls > Doors , then choose the door you
want to open or close. In addition, if Model X
is equipped with the premium upgrades
package, when you press the brake pedal, the
driver
Page 14 of 212
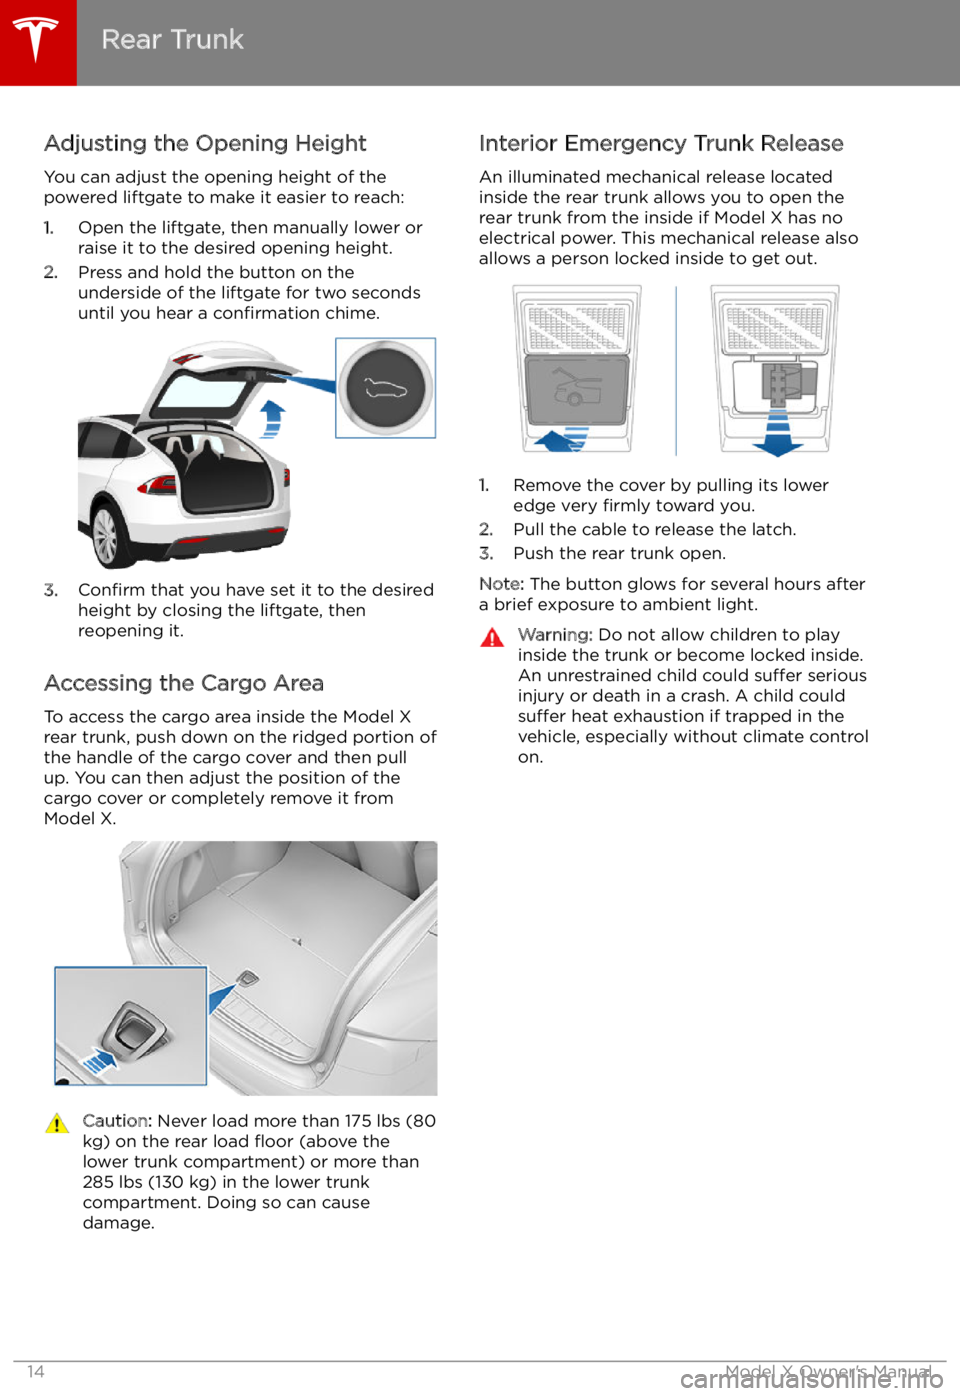
Adjusting the Opening Height
You can adjust the opening height of the
powered liftgate to make it easier to reach:
1. Open the liftgate, then manually lower or
raise it to the desired opening height.
2. Press and hold the button on the
underside of the liftgate for two seconds
until you hear a confirmation chime.
3.Confirm that you have set it to the desired
height by closing the liftgate, then
reopening it.
Accessing the Cargo Area To access the cargo area inside the Model X
rear trunk, push down on the ridged portion of the handle of the cargo cover and then pull
up. You can then adjust the position of the
cargo cover or completely remove it from
Model X.
Caution: Never load more than 175 lbs (80
kg) on the rear load
Page 21 of 212
serious injuries in a collision, as you could
slide under the lap belt or be propelled into the seat belt. Ensure your seat back
is reclined no more than 30 degrees when
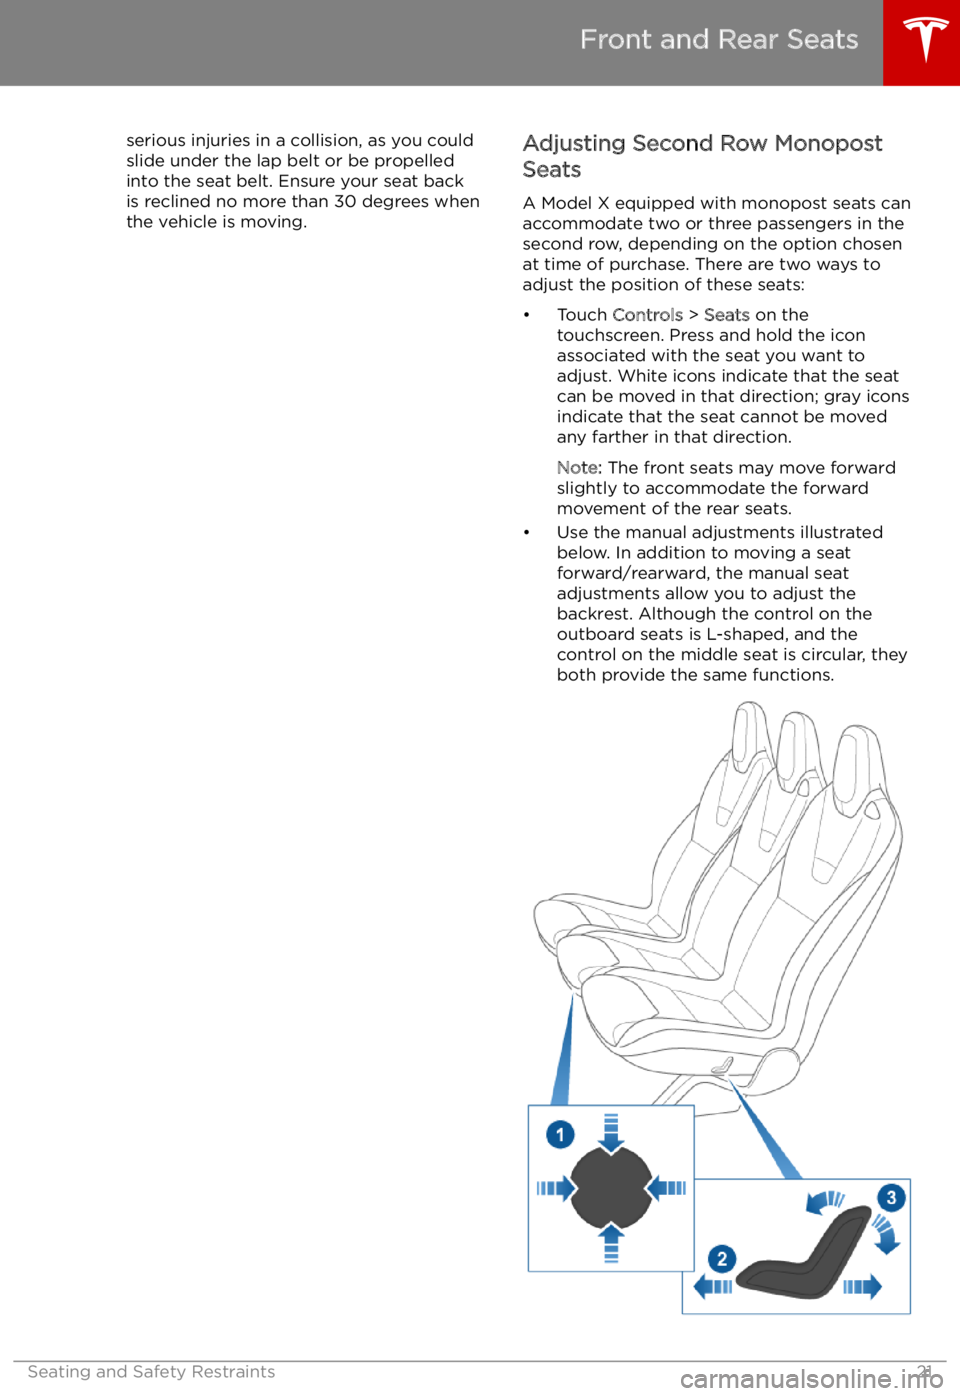
the vehicle is moving.Adjusting Second Row Monopost
Seats
A Model X equipped with monopost seats can
accommodate two or three passengers in the
second row, depending on the option chosen
at time of purchase. There are two ways to
adjust the position of these seats:
Page 22 of 212
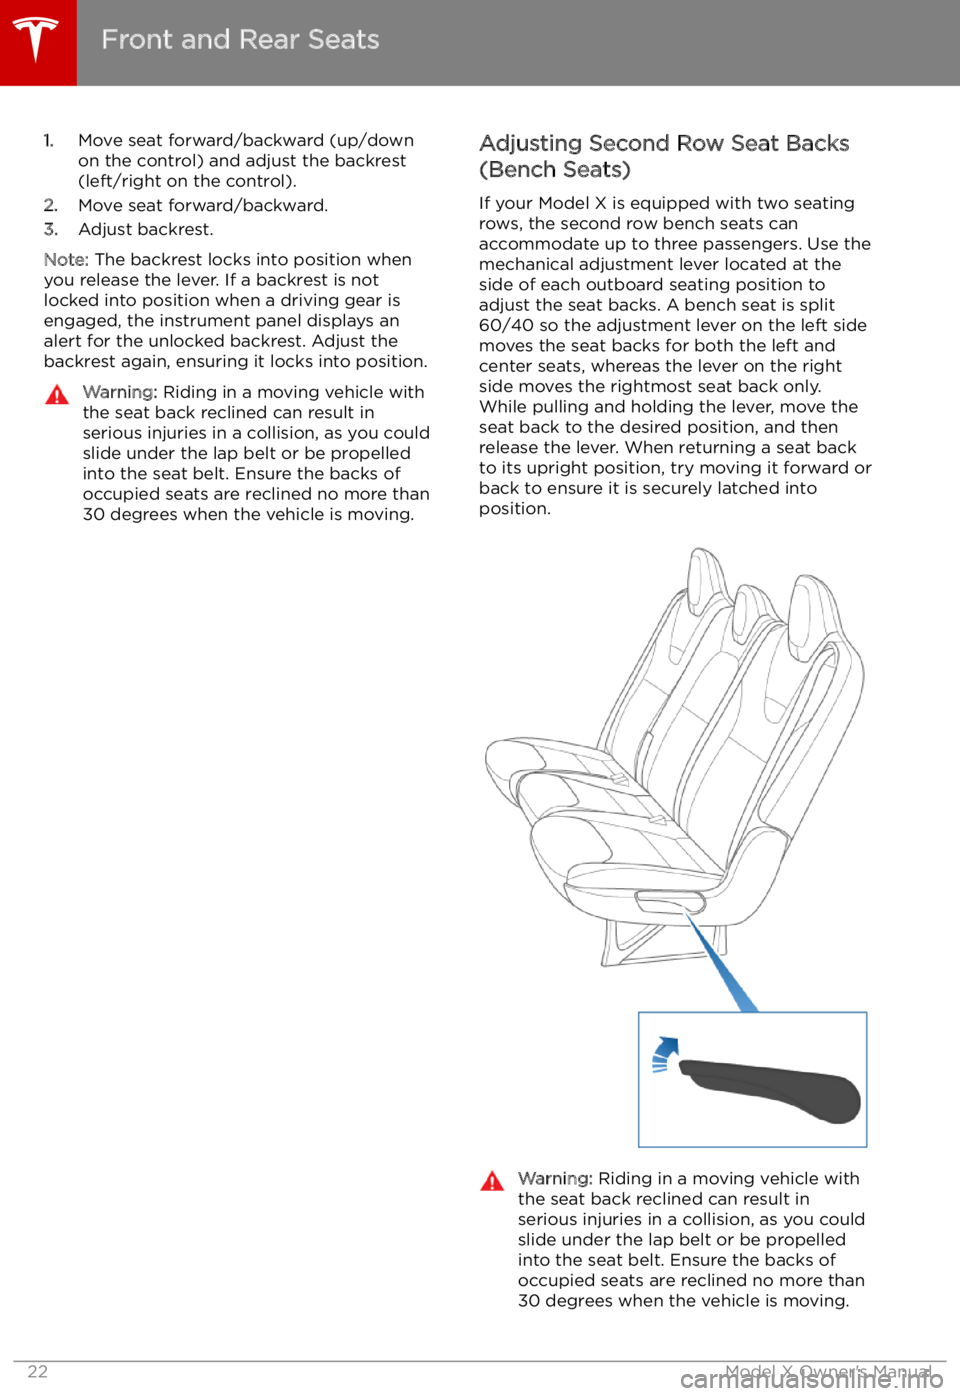
1.Move seat forward/backward (up/down
on the control) and adjust the backrest
(left/right on the control).
2. Move seat forward/backward.
3. Adjust backrest.
Note: The backrest locks into position when
you release the lever. If a backrest is not
locked into position when a driving gear is engaged, the instrument panel displays analert for the unlocked backrest. Adjust the
backrest again, ensuring it locks into position.Warning: Riding in a moving vehicle with
the seat back reclined can result in
serious injuries in a collision, as you could
slide under the lap belt or be propelled into the seat belt. Ensure the backs of
occupied seats are reclined no more than 30 degrees when the vehicle is moving.Adjusting Second Row Seat Backs
(Bench Seats)
If your Model X is equipped with two seating
rows, the second row bench seats can
accommodate up to three passengers. Use the
mechanical adjustment lever located at the side of each outboard seating position toadjust the seat backs. A bench seat is split
60/40 so the adjustment lever on the left side
moves the seat backs for both the left and
center seats, whereas the lever on the right
side moves the rightmost seat back only.
While pulling and holding the lever, move the
seat back to the desired position, and then
release the lever. When returning a seat back
to its upright position, try moving it forward or
back to ensure it is securely latched into
position.Warning: Riding in a moving vehicle with
the seat back reclined can result in
serious injuries in a collision, as you could
slide under the lap belt or be propelled into the seat belt. Ensure the backs of
occupied seats are reclined no more than 30 degrees when the vehicle is moving.
Front and Rear Seats
22Model X Owner
Page 34 of 212
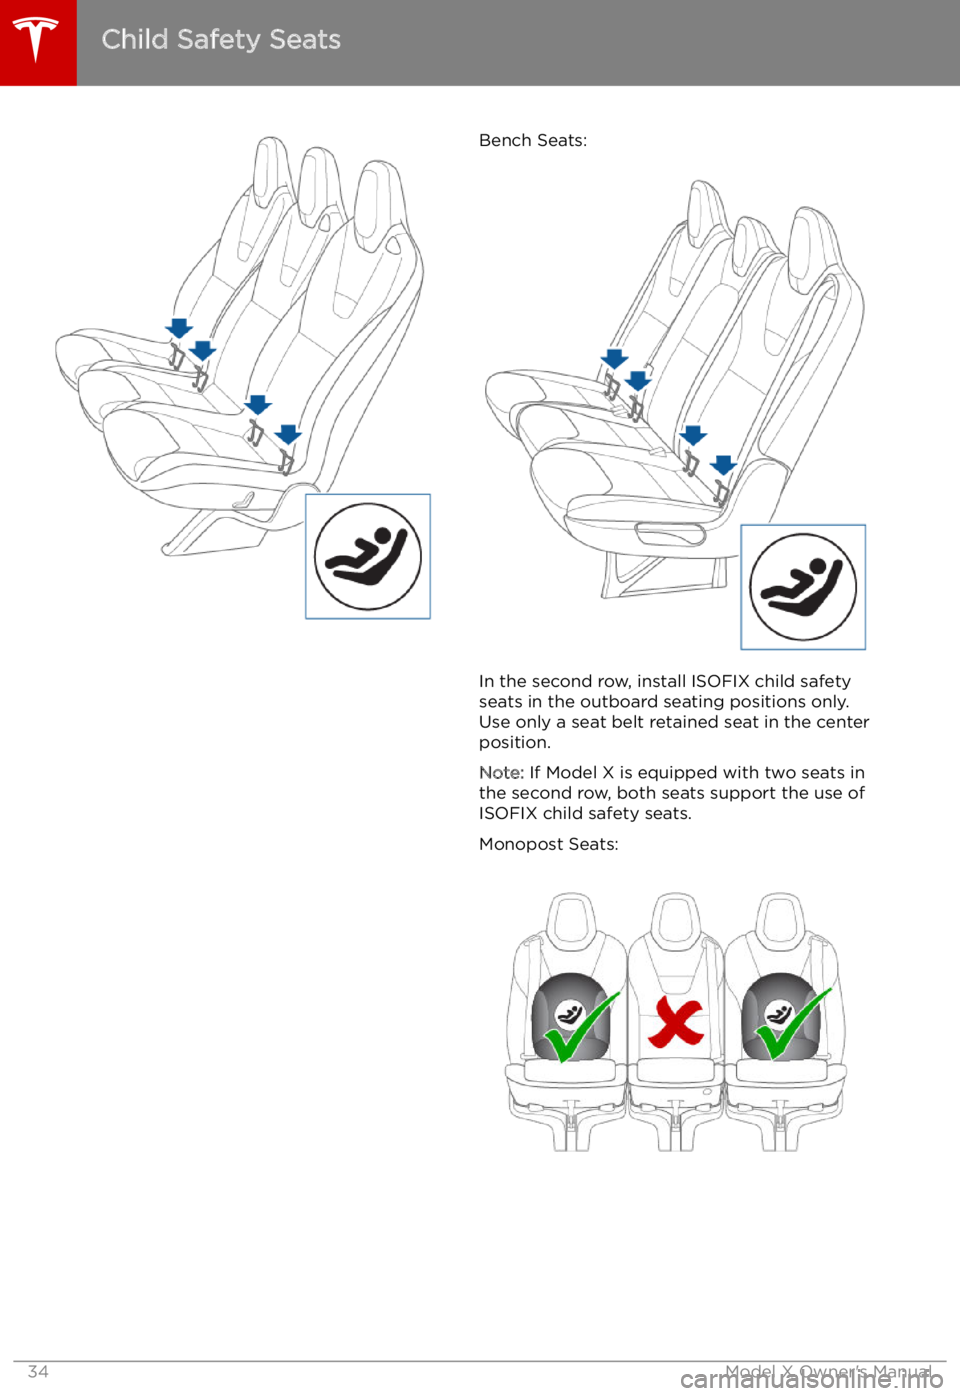
Bench Seats:
In the second row, install ISOFIX child safety
seats in the outboard seating positions only.
Use only a seat belt retained seat in the center
position.
Note: If Model X is equipped with two seats in
the second row, both seats support the use of
ISOFIX child safety seats.
Monopost Seats:
Child Safety Seats
34Model X Owner
Page 38 of 212
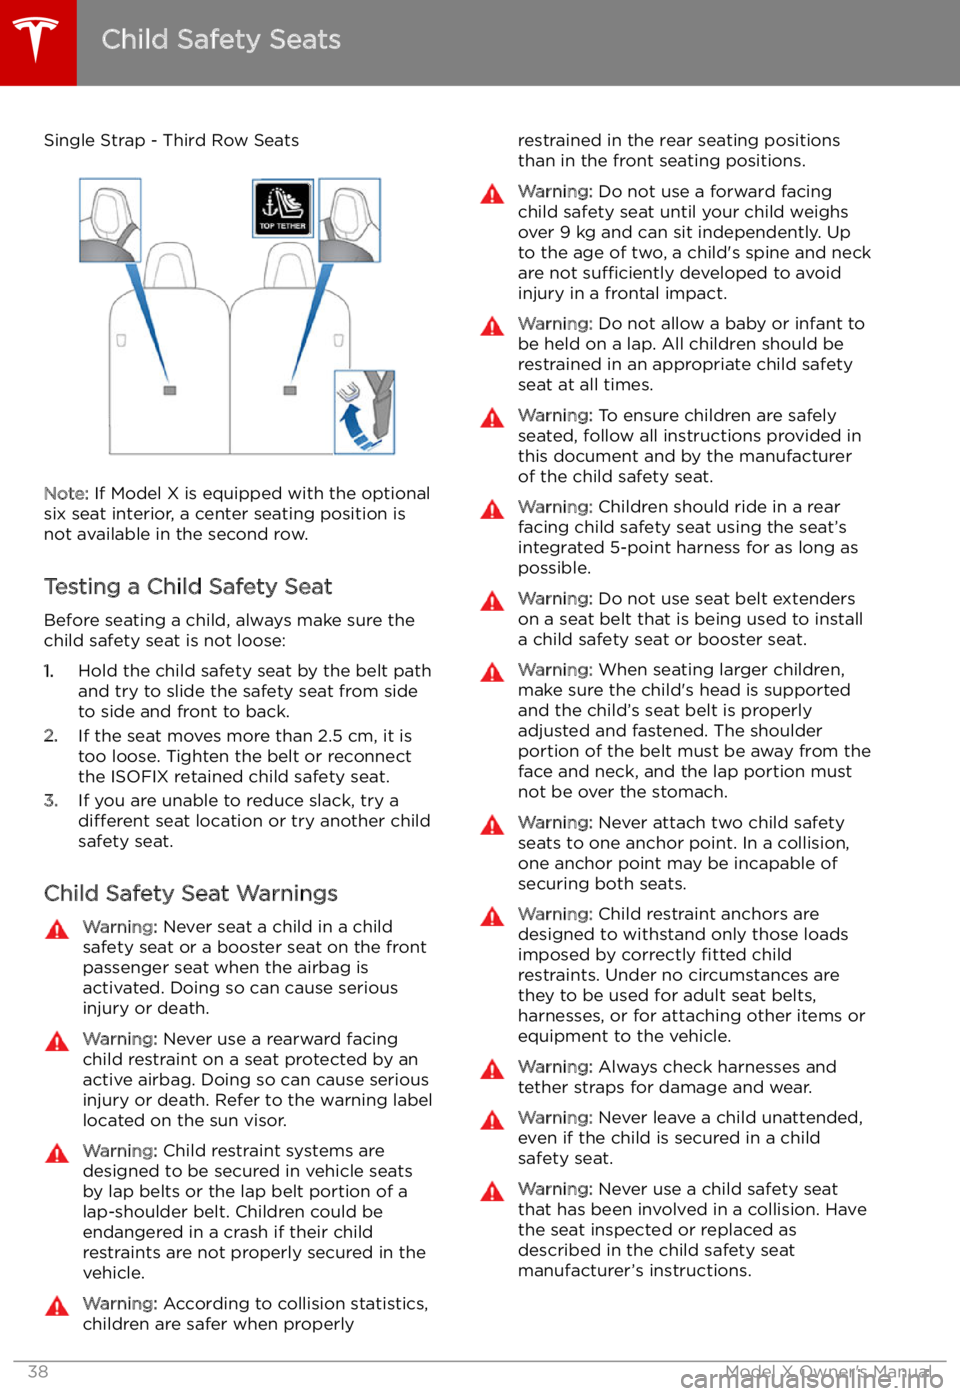
Single Strap - Third Row Seats
Note: If Model X is equipped with the optional
six seat interior, a center seating position is
not available in the second row.
Testing a Child Safety Seat
Before seating a child, always make sure the
child safety seat is not loose:
1. Hold the child safety seat by the belt path
and try to slide the safety seat from side
to side and front to back.
2. If the seat moves more than 2.5 cm, it is
too loose. Tighten the belt or reconnect
the ISOFIX retained child safety seat.
3. If you are unable to reduce slack, try a
different seat location or try another child
safety seat.
Child Safety Seat Warnings
Warning: Never seat a child in a child
safety seat or a booster seat on the front
passenger seat when the airbag is
activated. Doing so can cause serious injury or death.Warning: Never use a rearward facing
child restraint on a seat protected by an
active airbag. Doing so can cause serious
injury or death. Refer to the warning label
located on the sun visor.Warning: Child restraint systems are
designed to be secured in vehicle seats
by lap belts or the lap belt portion of a lap-shoulder belt. Children could be
endangered in a crash if their child restraints are not properly secured in the
vehicle.Warning: According to collision statistics,
children are safer when properlyrestrained in the rear seating positions
than in the front seating positions.Warning: Do not use a forward facing
child safety seat until your child weighs
over 9 kg and can sit independently. Up
to the age of two, a child
Page 60 of 212
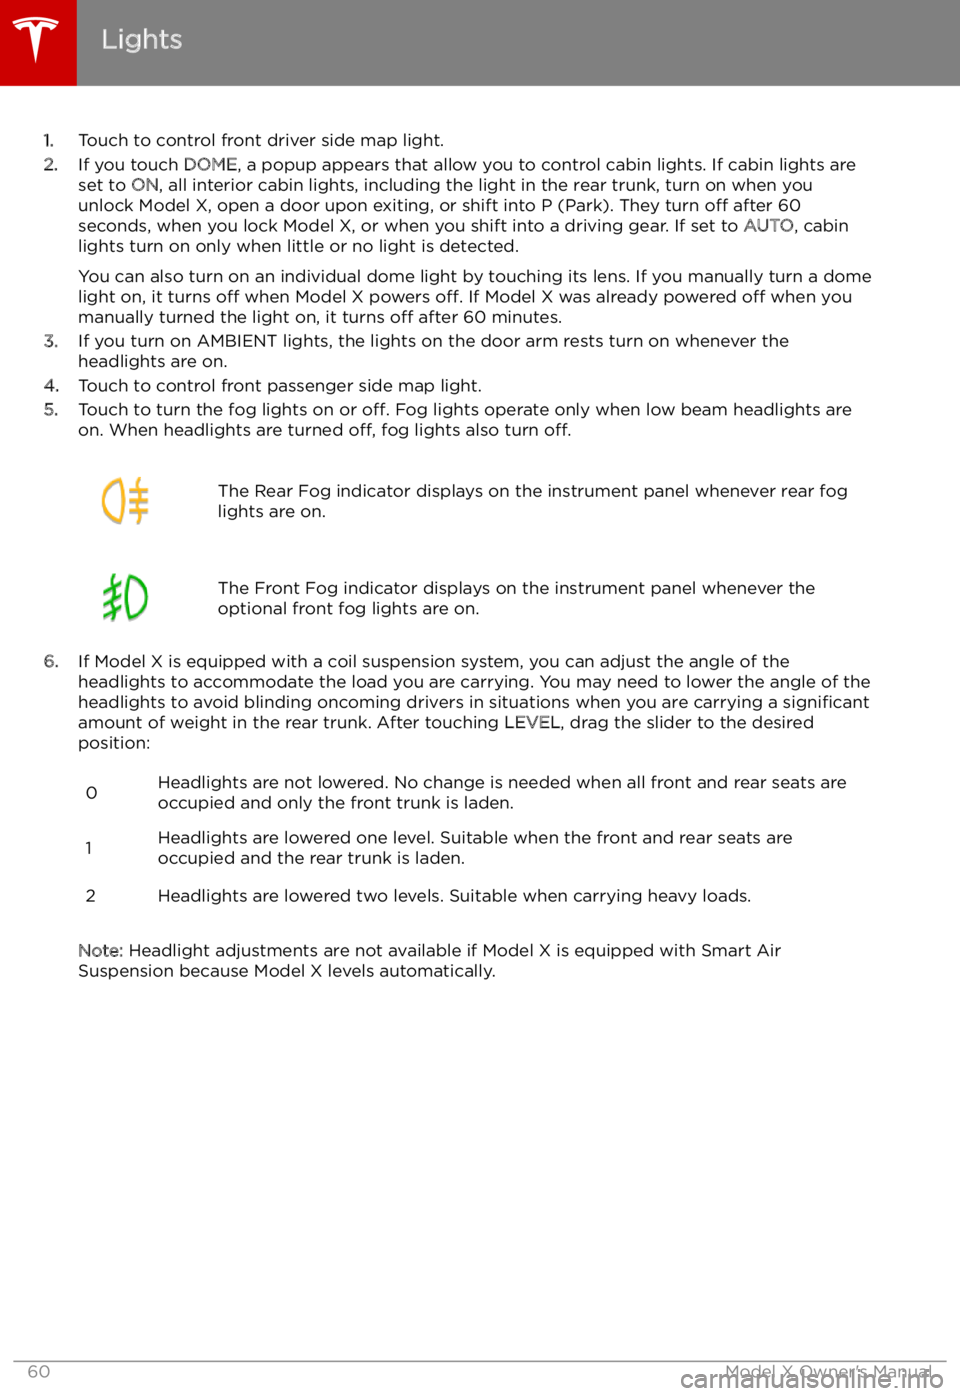
1.Touch to control front driver side map light.
2. If you touch DOME, a popup appears that allow you to control cabin lights. If cabin lights are
set to ON, all interior cabin lights, including the light in the rear trunk, turn on when you
unlock Model X, open a door upon exiting, or shift into P (Park). They turn off after 60
seconds, when you lock Model X, or when you shift into a driving gear. If set to AUTO, cabin
lights turn on only when little or no light is detected.
You can also turn on an individual dome light by touching its lens. If you manually turn a domelight on, it turns off when Model X powers off. If Model X was already powered off when you
manually turned the light on, it turns off after 60 minutes.
3. If you turn on AMBIENT lights, the lights on the door arm rests turn on whenever the
headlights are on.
4. Touch to control front passenger side map light.
5. Touch to turn the fog lights on or off. Fog lights operate only when low beam headlights are
on. When headlights are turned off, fog lights also turn off.
The Rear Fog indicator displays on the instrument panel whenever rear fog
lights are on.The Front Fog indicator displays on the instrument panel whenever the
optional front fog lights are on.
6. If Model X is equipped with a coil suspension system, you can adjust the angle of the
headlights to accommodate the load you are carrying. You may need to lower the angle of theheadlights to avoid blinding oncoming drivers in situations when you are carrying a significant
amount of weight in the rear trunk. After touching LEVEL, drag the slider to the desired
position:
0Headlights are not lowered. No change is needed when all front and rear seats are
occupied and only the front trunk is laden.1Headlights are lowered one level. Suitable when the front and rear seats are occupied and the rear trunk is laden.2Headlights are lowered two levels. Suitable when carrying heavy loads.
Note: Headlight adjustments are not available if Model X is equipped with Smart Air
Suspension because Model X levels automatically.
Lights
60Model X Owner
Page 66 of 212
Warning: In snowy or icy conditions
Model X may experience traction loss
during regenerative braking, particularly
when in the Standard setting and/or not
using winter tires. Tesla recommends
using the Low setting (see To Set the
Regenerative Braking Level on page 66)
in snowy or icy conditions to help maintain vehicle stability.
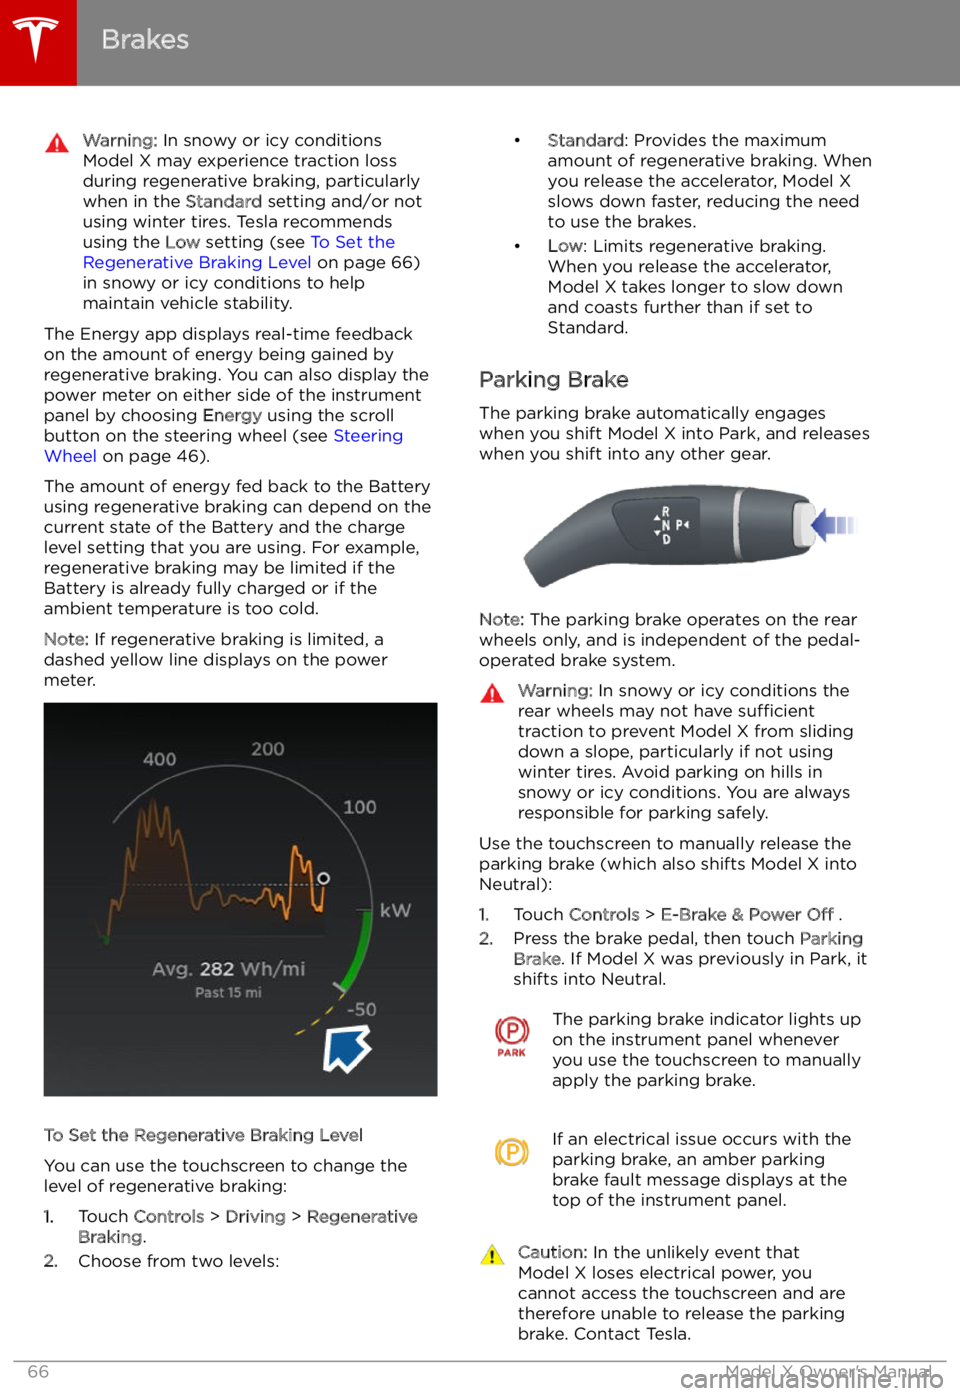
The Energy app displays real-time feedbackon the amount of energy being gained by
regenerative braking. You can also display the
power meter on either side of the instrument
panel by choosing Energy using the scroll
button on the steering wheel (see Steering
Wheel on page 46).
The amount of energy fed back to the Battery using regenerative braking can depend on the
current state of the Battery and the charge
level setting that you are using. For example,
regenerative braking may be limited if the Battery is already fully charged or if the
ambient temperature is too cold.
Note: If regenerative braking is limited, a
dashed yellow line displays on the power
meter.
To Set the Regenerative Braking Level
You can use the touchscreen to change the
level of regenerative braking:
1. Touch Controls > Driving > Regenerative
Braking .
2. Choose from two levels:
Page 79 of 212
Towing Capacity
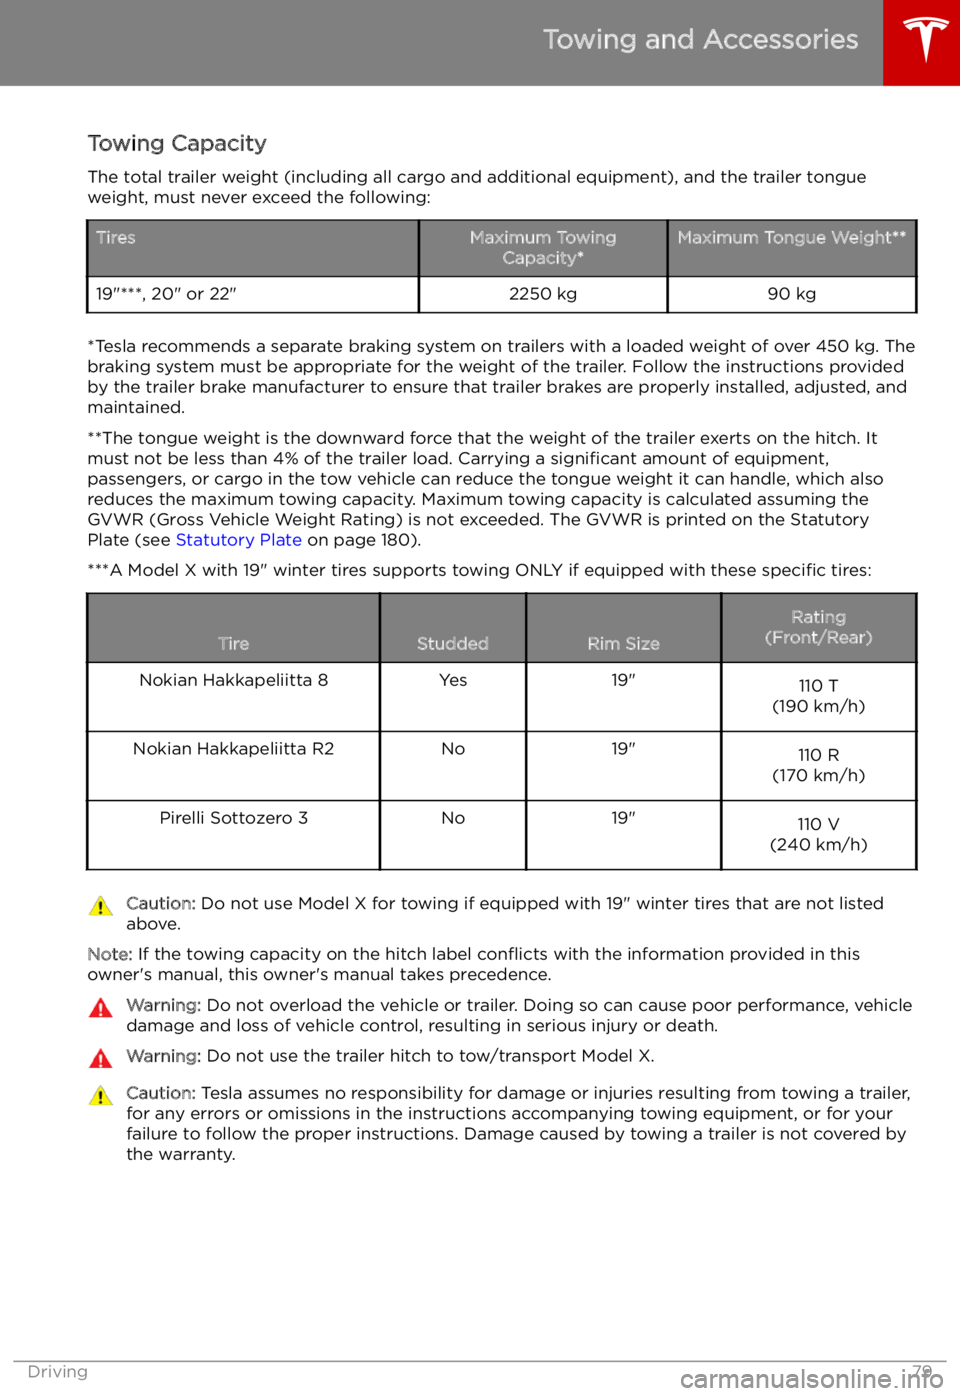
The total trailer weight (including all cargo and additional equipment), and the trailer tongue
weight, must never exceed the following:TiresMaximum Towing Capacity*Maximum Tongue Weight**19"***, 20" or 22"2250 kg90 kg
*Tesla recommends a separate braking system on trailers with a loaded weight of over 450 kg. Thebraking system must be appropriate for the weight of the trailer. Follow the instructions providedby the trailer brake manufacturer to ensure that trailer brakes are properly installed, adjusted, and
maintained.
**The tongue weight is the downward force that the weight of the trailer exerts on the hitch. It must not be less than 4% of the trailer load. Carrying a significant amount of equipment,
passengers, or cargo in the tow vehicle can reduce the tongue weight it can handle, which also
reduces the maximum towing capacity. Maximum towing capacity is calculated assuming the
GVWR (Gross Vehicle Weight Rating) is not exceeded. The GVWR is printed on the Statutory
Plate (see Statutory Plate on page 180).
***A Model X with 19" winter tires supports towing ONLY if equipped with these specific tires:
TireStuddedRim Size
Rating
(Front/Rear)Nokian Hakkapeliitta 8Yes19"110 T
(190 km/h)Nokian Hakkapeliitta R2No19"110 R
(170 km/h)Pirelli Sottozero 3No19"110 V
(240 km/h)Caution: Do not use Model X for towing if equipped with 19" winter tires that are not listed
above.
Note: If the towing capacity on the hitch label con
Page 92 of 212
Note: Your set speed will use your current
driving speed if you move the cruise control lever up or down.
Note: If Speed Assist is unable to determine a
speed limit, your set speed does not change
when you pull the cruise control lever toward
you.Warning: Do not rely on Speed Assist or
Traffic-Aware Cruise Control to determine
an accurate or appropriate cruising
speed. Always cruise at a safe speed
based on road conditions and applicable
speed limits.
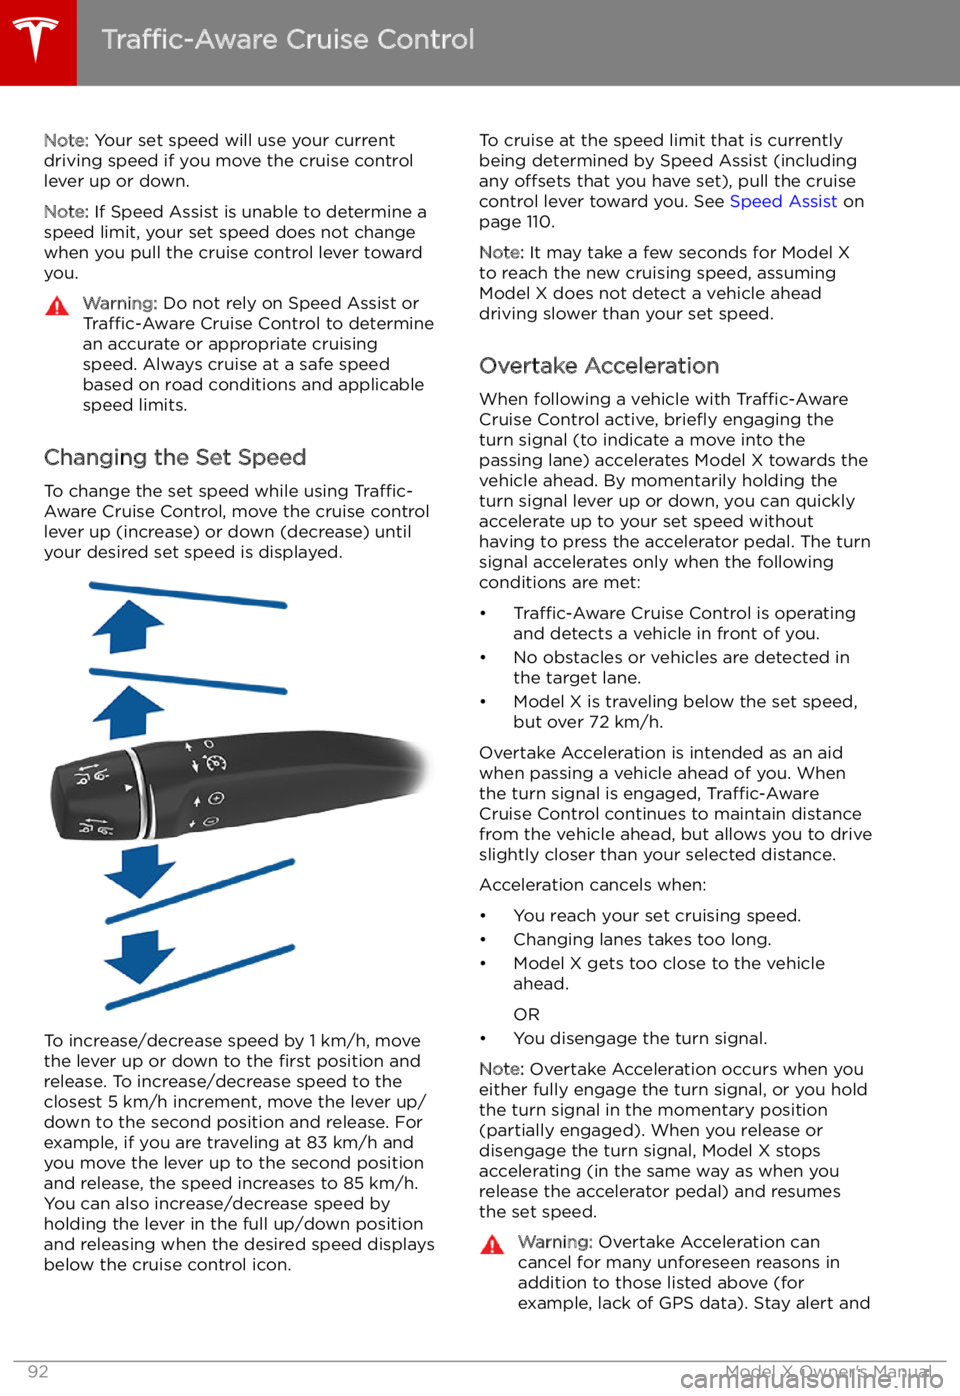
Changing the Set Speed
To change the set speed while using Traffic-
Aware Cruise Control, move the cruise control
lever up (increase) or down (decrease) until
your desired set speed is displayed.
To increase/decrease speed by 1 km/h, move
the lever up or down to the first position and
release. To increase/decrease speed to the closest 5 km/h increment, move the lever up/
down to the second position and release. For
example, if you are traveling at 83 km/h and you move the lever up to the second positionand release, the speed increases to 85 km/h.
You can also increase/decrease speed by
holding the lever in the full up/down position
and releasing when the desired speed displays
below the cruise control icon.
To cruise at the speed limit that is currently
being determined by Speed Assist (including any offsets that you have set), pull the cruise
control lever toward you. See Speed Assist on
page 110.
Note: It may take a few seconds for Model X
to reach the new cruising speed, assuming
Model X does not detect a vehicle ahead
driving slower than your set speed.
Overtake Acceleration
When following a vehicle with Traffic-Aware
Cruise Control active, brie