open TESLA MODEL X 2022 Owner´s Manual
[x] Cancel search | Manufacturer: TESLA, Model Year: 2022, Model line: MODEL X, Model: TESLA MODEL X 2022Pages: 212, PDF Size: 5.07 MB
Page 16 of 212

Note: The interior release button glows
following a brief exposure to ambient light.Warning: People should never climb
inside the front trunk. Never shut the
front trunk when a person is inside.Warning: Care should be taken to ensure
that objects inside the front trunk do not
bump against the release button, causing the trunk to accidentally open.
Front Trunk
16Model X Owner
Page 17 of 212
Glove Box
Opening and Closing
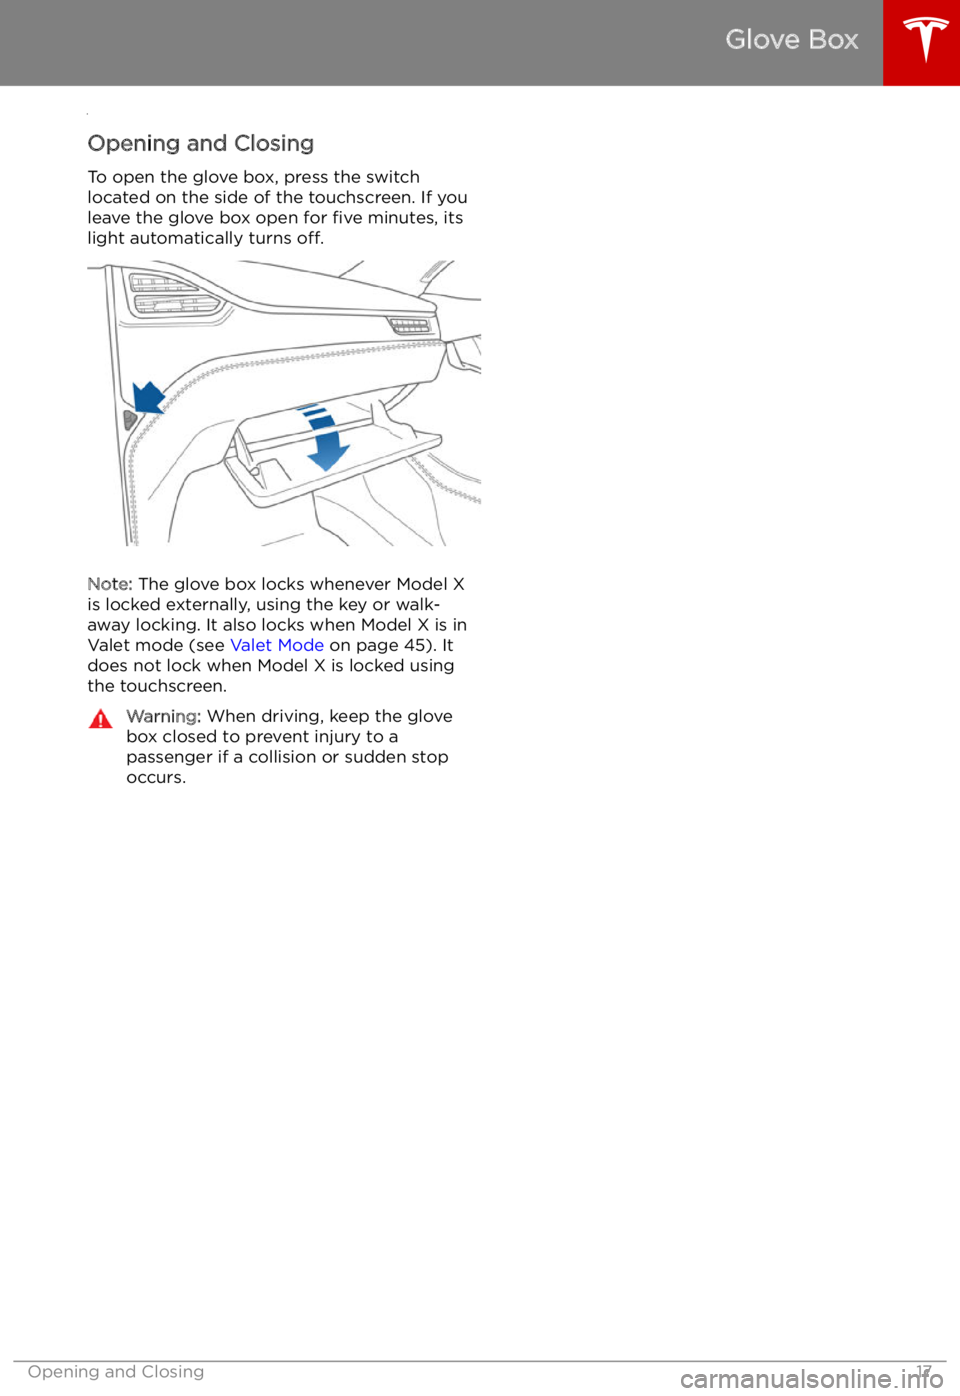
To open the glove box, press the switch located on the side of the touchscreen. If you
leave the glove box open for five minutes, its
light automatically turns off.
Note: The glove box locks whenever Model X
is locked externally, using the key or walk-
away locking. It also locks when Model X is in Valet mode (see Valet Mode on page 45). It
does not lock when Model X is locked using
the touchscreen.
Warning: When driving, keep the glove
box closed to prevent injury to a
passenger if a collision or sudden stop
occurs.
Glove Box
Opening and Closing17
Page 18 of 212
Cup Holders
Opening and Closing
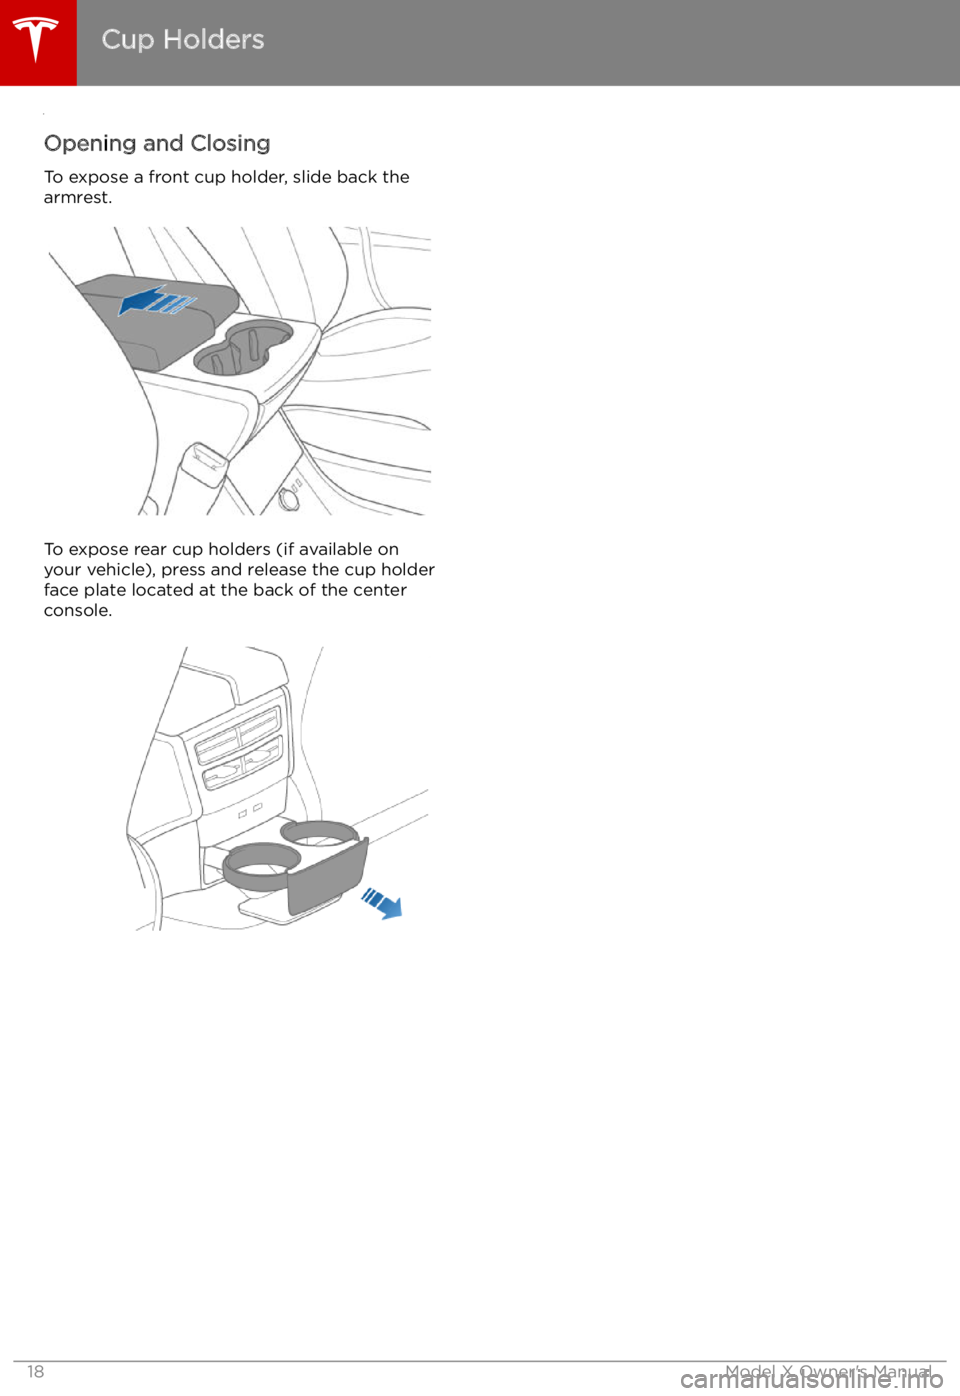
To expose a front cup holder, slide back the
armrest.
To expose rear cup holders (if available on
your vehicle), press and release the cup holder face plate located at the back of the center console.
Cup Holders
18Model X Owner
Page 19 of 212
Sun Visors
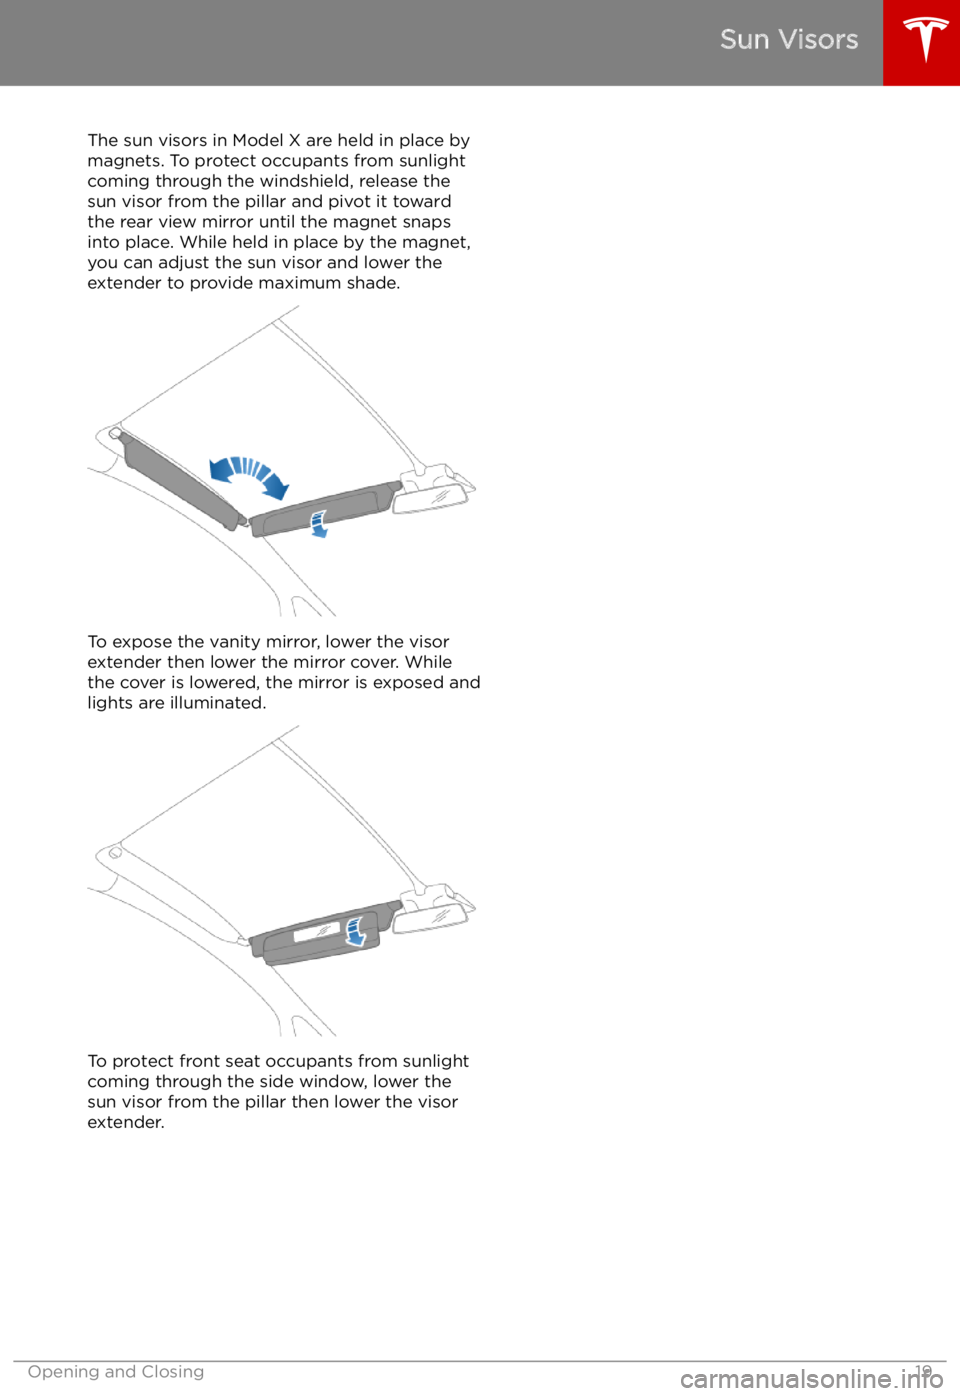
The sun visors in Model X are held in place by
magnets. To protect occupants from sunlight
coming through the windshield, release the sun visor from the pillar and pivot it toward
the rear view mirror until the magnet snaps into place. While held in place by the magnet,
you can adjust the sun visor and lower the extender to provide maximum shade.
To expose the vanity mirror, lower the visorextender then lower the mirror cover. While
the cover is lowered, the mirror is exposed and
lights are illuminated.
To protect front seat occupants from sunlight
coming through the side window, lower the
sun visor from the pillar then lower the visor
extender.
Sun Visors
Opening and Closing19
Page 45 of 212

Linking a Driver Profile to a Key
You can link a driver profile to a specific key to
allow Model X to automatically select the
correct driver profile when the linked key is
detected as you approach the vehicle and
open the driver
Page 50 of 212
Starting and Powering
Off
Starting When you open a door, Model X powers on
the instrument panel and touchscreen and you
can operate all controls.
To drive Model X:
1. PRESS THE BRAKE PEDAL - Model X
powers on and is ready to drive.
2. SELECT A GEAR - Move the gear lever all
the way down for Drive and all the way up
for Reverse. See Shifting Gears on page
52.
Note: If Passive Entry is off and you do not
press the brake pedal to start Model X within
approximately five minutes, a message
displays on the instrument panel and you must
use the key to lock then unlock Model X again before starting the vehicle.
Everything you need to know when driving
Model X displays on the instrument panel.
Key Not Inside
If Model X does not detect a key when you
press the brake, the instrument panel displays
a message telling you that a key is not inside.
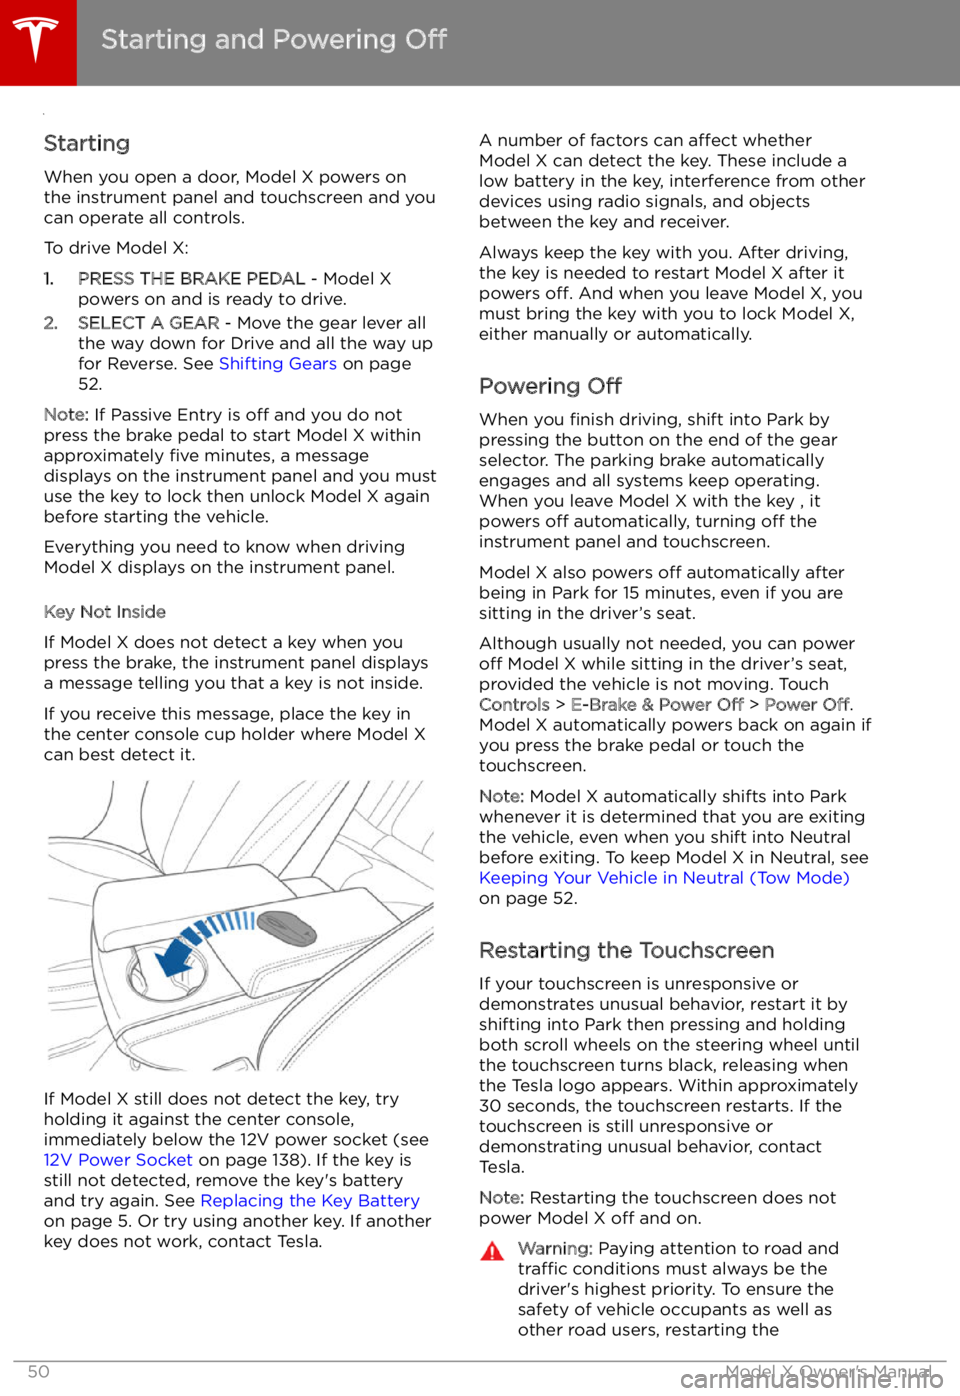
If you receive this message, place the key in
the center console cup holder where Model X can best detect it.
If Model X still does not detect the key, try
holding it against the center console,
immediately below the 12V power socket (see
12V Power Socket on page 138). If the key is
still not detected, remove the key
Page 59 of 212
Lights
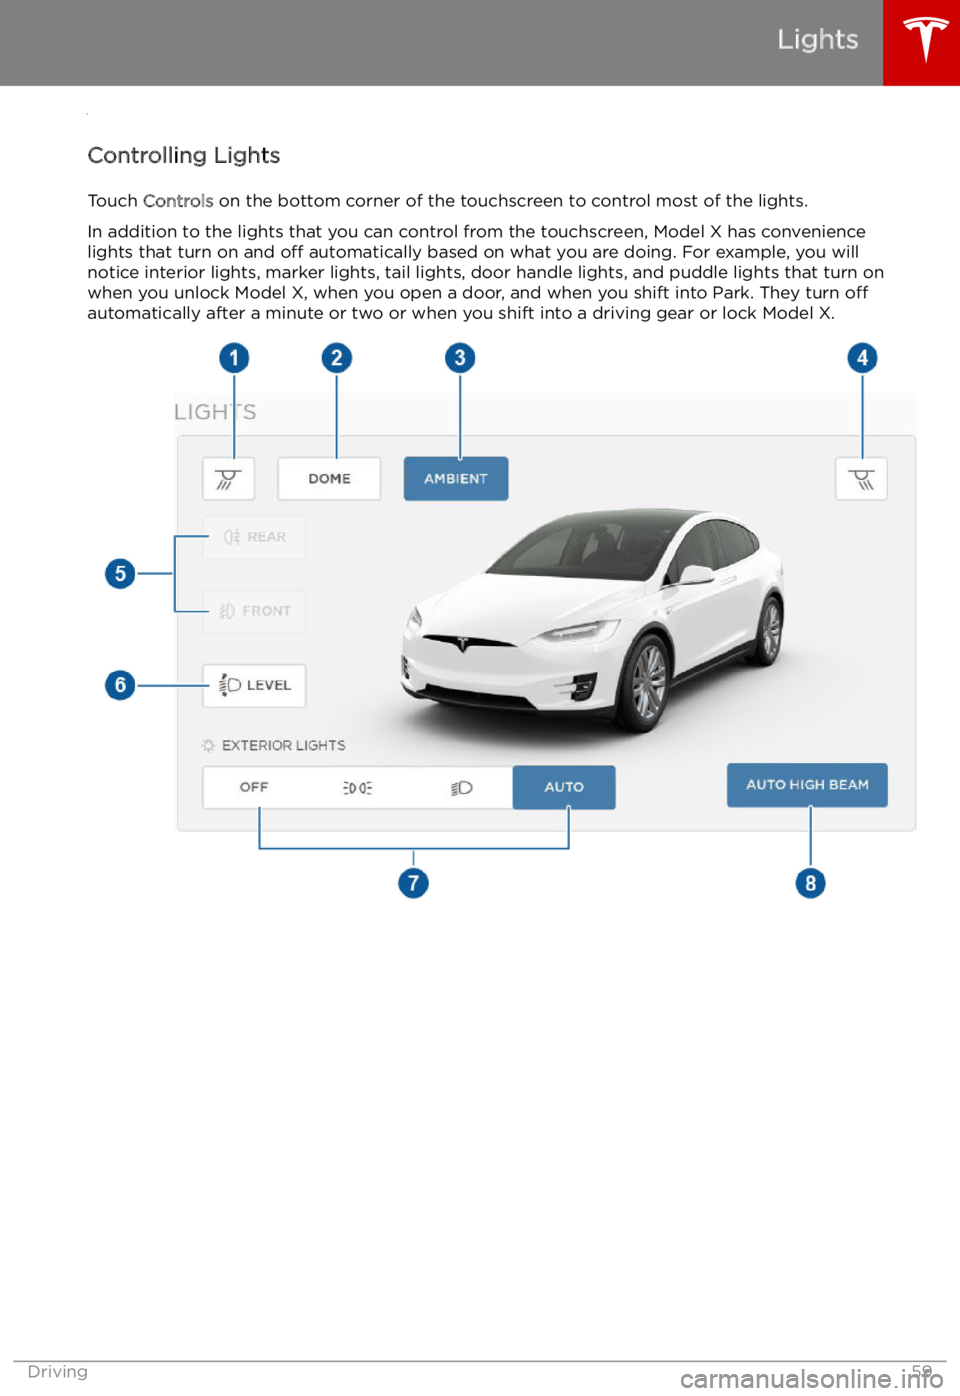
Controlling Lights Touch Controls on the bottom corner of the touchscreen to control most of the lights.
In addition to the lights that you can control from the touchscreen, Model X has convenience
lights that turn on and off automatically based on what you are doing. For example, you will
notice interior lights, marker lights, tail lights, door handle lights, and puddle lights that turn on
when you unlock Model X, when you open a door, and when you shift into Park. They turn off
automatically after a minute or two or when you shift into a driving gear or lock Model X.
Lights
Driving59
Page 60 of 212

1.Touch to control front driver side map light.
2. If you touch DOME, a popup appears that allow you to control cabin lights. If cabin lights are
set to ON, all interior cabin lights, including the light in the rear trunk, turn on when you
unlock Model X, open a door upon exiting, or shift into P (Park). They turn off after 60
seconds, when you lock Model X, or when you shift into a driving gear. If set to AUTO, cabin
lights turn on only when little or no light is detected.
You can also turn on an individual dome light by touching its lens. If you manually turn a domelight on, it turns off when Model X powers off. If Model X was already powered off when you
manually turned the light on, it turns off after 60 minutes.
3. If you turn on AMBIENT lights, the lights on the door arm rests turn on whenever the
headlights are on.
4. Touch to control front passenger side map light.
5. Touch to turn the fog lights on or off. Fog lights operate only when low beam headlights are
on. When headlights are turned off, fog lights also turn off.
The Rear Fog indicator displays on the instrument panel whenever rear fog
lights are on.The Front Fog indicator displays on the instrument panel whenever the
optional front fog lights are on.
6. If Model X is equipped with a coil suspension system, you can adjust the angle of the
headlights to accommodate the load you are carrying. You may need to lower the angle of theheadlights to avoid blinding oncoming drivers in situations when you are carrying a significant
amount of weight in the rear trunk. After touching LEVEL, drag the slider to the desired
position:
0Headlights are not lowered. No change is needed when all front and rear seats are
occupied and only the front trunk is laden.1Headlights are lowered one level. Suitable when the front and rear seats are occupied and the rear trunk is laden.2Headlights are lowered two levels. Suitable when carrying heavy loads.
Note: Headlight adjustments are not available if Model X is equipped with Smart Air
Suspension because Model X levels automatically.
Lights
60Model X Owner
Page 84 of 212
Warning: You must use the Model X trailer
hitch when towing a trailer. Never attempt
to attach a different type of trailer hitch.
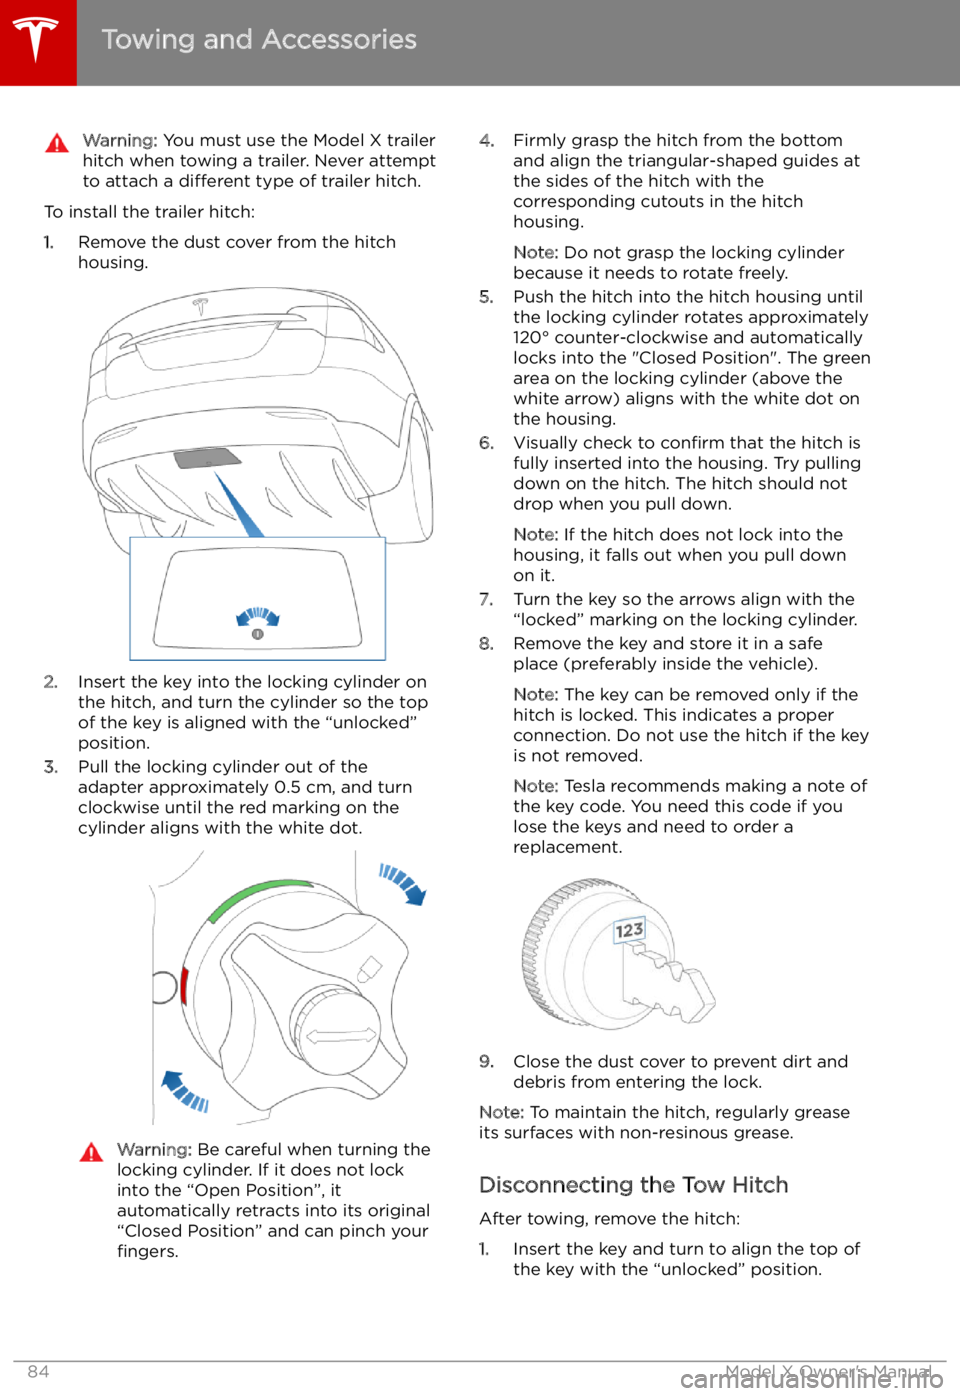
To install the trailer hitch:
1. Remove the dust cover from the hitch
housing.
2. Insert the key into the locking cylinder on
the hitch, and turn the cylinder so the top of the key is aligned with the “unlocked”
position.
3. Pull the locking cylinder out of the
adapter approximately 0.5 cm, and turn
clockwise until the red marking on the
cylinder aligns with the white dot.
Warning: Be careful when turning the
locking cylinder. If it does not lock
into the “Open Position”, it
automatically retracts into its original
“Closed Position” and can pinch your fingers.4. Firmly grasp the hitch from the bottom
and align the triangular-shaped guides at
the sides of the hitch with the
corresponding cutouts in the hitch
housing.
Note: Do not grasp the locking cylinder
because it needs to rotate freely.
5. Push the hitch into the hitch housing until
the locking cylinder rotates approximately
120
Page 85 of 212
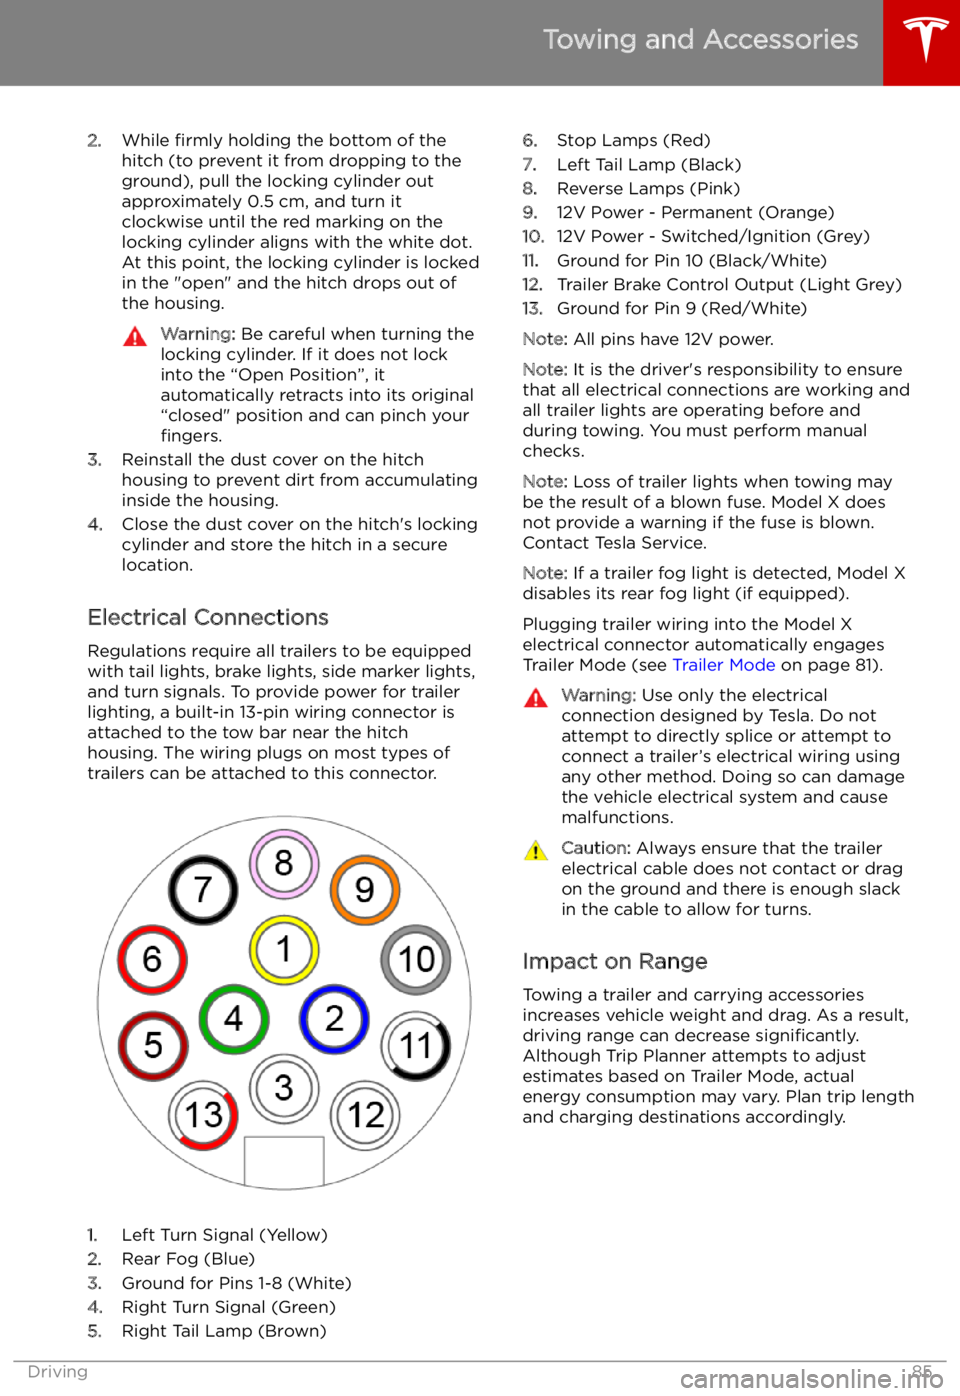
2.While firmly holding the bottom of the
hitch (to prevent it from dropping to the ground), pull the locking cylinder out
approximately 0.5 cm, and turn it clockwise until the red marking on the
locking cylinder aligns with the white dot.
At this point, the locking cylinder is locked
in the "open" and the hitch drops out of
the housing.Warning: Be careful when turning the
locking cylinder. If it does not lock
into the “Open Position”, it
automatically retracts into its original
“closed" position and can pinch your fingers.
3. Reinstall the dust cover on the hitch
housing to prevent dirt from accumulating
inside the housing.
4. Close the dust cover on the hitch