tow TESLA MODEL Y 2023 Owners Manual
[x] Cancel search | Manufacturer: TESLA, Model Year: 2023, Model line: MODEL Y, Model: TESLA MODEL Y 2023Pages: 298, PDF Size: 10.28 MB
Page 3 of 298

Overview................................................................3
Exterior Overview............................................................................3
Interior Overview.............................................................................4
Touchscreen Overview..................................................................5
Opening and Closing.......................................10
Keys.....................................................................................................10
Doors..................................................................................................14
Windows............................................................................................17
Rear Trunk.........................................................................................18
Front Trunk......................................................................................20
Interior Storage and Electronics..............................................23
Seating and Safety Restraints.....................27
Front and Rear Seats...................................................................27
Seat Belts.........................................................................................33
Child Safety Seats.........................................................................36
Airbags..............................................................................................43
Driving..................................................................50
Driver Profiles.................................................................................50
Steering Wheel...............................................................................52
Mirrors...............................................................................................54
Starting and Powering Off.........................................................55
Shifting..............................................................................................56
Lights.................................................................................................58
Car Status..........................................................................................61
Wipers and Washers....................................................................64
Braking and Stopping..................................................................65
Traction Control.............................................................................69
Park Assist.......................................................................................70
Vehicle Hold....................................................................................72
Acceleration Modes......................................................................73
Track Mode......................................................................................74
Trip Information.............................................................................76
Rear Facing Camera(s)...............................................................77
Pedestrian Warning System......................................................78
Towing and Accessories.............................................................79
Cold Weather Best Practices....................................................85
Autopilot..............................................................88
About Autopilot.............................................................................88
Traffic-Aware Cruise Control.....................................................91
Autosteer.........................................................................................96
Navigate on Autopilot................................................................101
Traffic Light and Stop Sign Control.....................................104
Autopark...........................................................................................111
Summon...........................................................................................113
Smart Summon..............................................................................116
Active Safety Features...................................119
Lane Assist......................................................................................119
Collision Avoidance Assist........................................................122
Speed Assist..................................................................................125
Cabin Camera................................................................................126
Using the Touchscreen..................................127
Climate Controls...........................................................................127
Phone, Calendar, and Web Conferencing...........................133
Voice Commands.........................................................................136
Safety & Security Settings.......................................................138
Dashcam.........................................................................................140
Sentry Mode..................................................................................142
USB Drive Requirements for Recording Videos..............144
Smart Garage Connectivity.....................................................145
Connecting to Wi-Fi...................................................................148
Software Updates........................................................................149
Mobile App......................................................................................151
Navigation and Entertainment...................153
Maps and Navigation..................................................................153
Media................................................................................................159
Theater, Arcade, and Toybox...................................................162
Charging and Energy Consumption........165
Electric Vehicle Components..................................................165
High Voltage Battery Information.........................................167
Charging Instructions.................................................................169
Scheduled Charging and Scheduled Departure..............174
Getting Maximum Range..........................................................175
Maintenance......................................................177
Maintenance Service Intervals................................................177
Tire Care and Maintenance......................................................184
Cleaning...........................................................................................191
Windshield Wiper Blades, Jets and Fluid...........................195
Jacking and Lifting......................................................................197
Parts and Accessories................................................................198
Do It Yourself Maintenance....................................................206
Specifications..................................................207
Identification Labels..................................................................207
Vehicle Loading..........................................................................208
Dimensions.....................................................................................210
Subsystems....................................................................................213
Wheels and Tires..........................................................................215
Roadside Assistance.....................................222
Contacting Tesla Roadside Assistance...............................222
Instructions for Transporters..................................................223
Running Out of Range..............................................................226
Jump Starting...............................................................................227
Troubleshooting.............................................229
Troubleshooting Alerts.............................................................229
Contents
Page 5 of 298
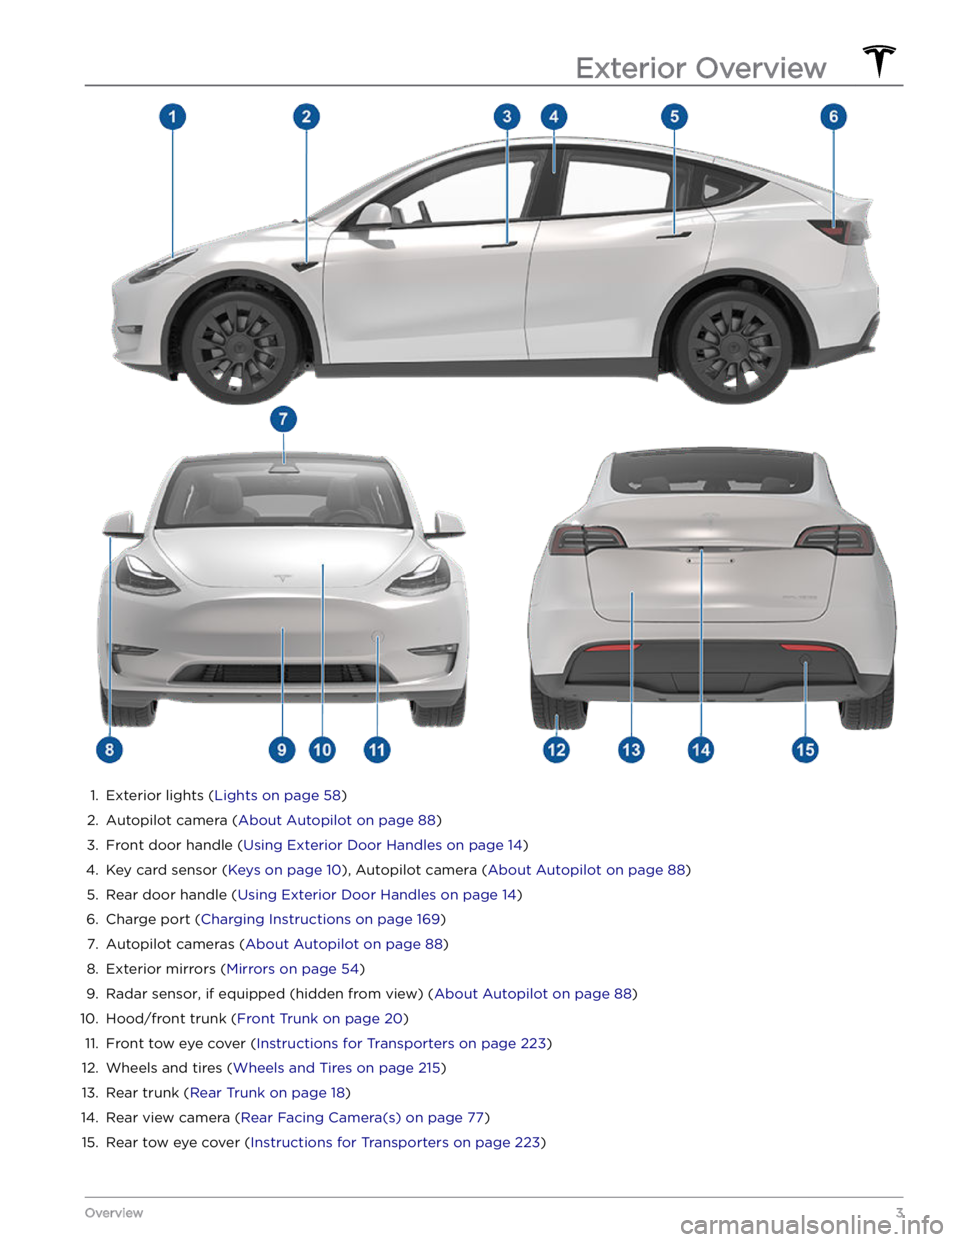
1.
Exterior lights (Lights on page 58)
2.
Autopilot camera (About Autopilot on page 88)
3.
Front door handle (Using Exterior Door Handles on page 14)
4.
Key card sensor (Keys on page 10), Autopilot camera (About Autopilot on page 88)
5.
Rear door handle (Using Exterior Door Handles on page 14)
6.
Charge port (Charging Instructions on page 169)
7.
Autopilot cameras (About Autopilot on page 88)
8.
Exterior mirrors (Mirrors on page 54)
9.
Radar sensor, if equipped (hidden from view) (About Autopilot on page 88)
10.
Hood/front trunk (Front Trunk on page 20)
11.
Front tow eye cover (Instructions for Transporters on page 223)
12.
Wheels and tires (Wheels and Tires on page 215)
13.
Rear trunk (Rear Trunk on page 18)
14.
Rear view camera (Rear Facing Camera(s) on page 77)
15.
Rear tow eye cover (Instructions for Transporters on page 223)
Exterior Overview
3Overview
Page 16 of 298
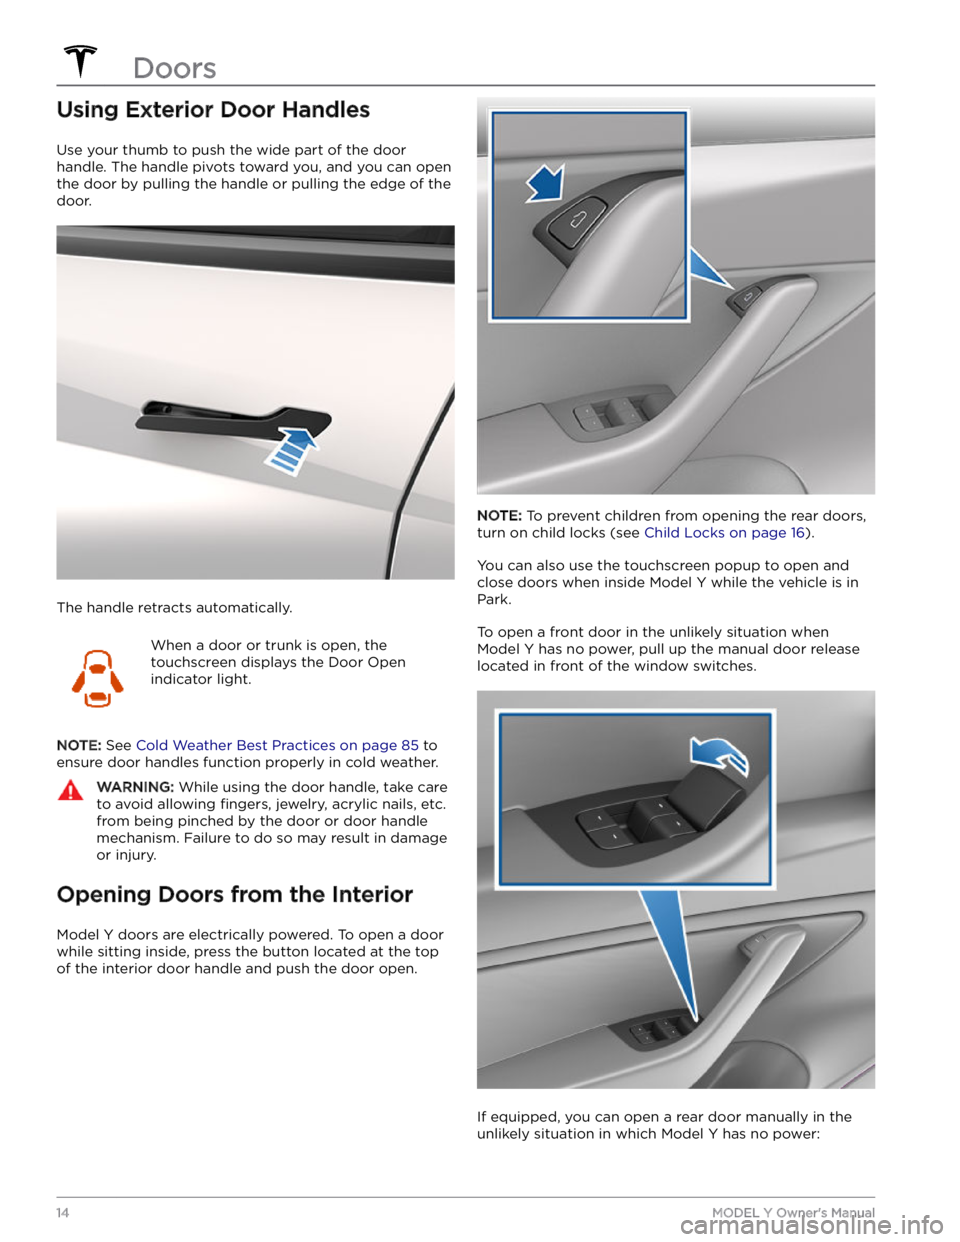
Using Exterior Door Handles
Use your thumb to push the wide part of the door
handle. The handle pivots toward you, and you can open
the door by pulling the handle or pulling the edge of the door.
The handle retracts automatically.
When a door or trunk is open, the
touchscreen displays the Door Open
indicator light.
NOTE: See Cold Weather Best Practices on page 85 to
ensure door handles function properly in cold weather.
WARNING: While using the door handle, take care
to avoid allowing fingers, jewelry, acrylic nails, etc.
from being pinched by the door or door handle
mechanism. Failure to do so may result in damage
or injury.
Opening Doors from the Interior
Model Y doors are electrically powered. To open a door
while sitting inside, press the button located at the top of the interior door handle and push the door open.
NOTE: To prevent children from opening the rear doors,
turn on child locks (see
Child Locks on page 16).
You can also use the touchscreen popup to open and close doors when inside
Model Y while the vehicle is in
Park.
To open a front door in the unlikely situation when
Model Y has no power, pull up the manual door release
located in front of the window switches.
If equipped, you can open a rear door manually in the unlikely situation in which
Model Y has no power:
Doors
14MODEL Y Owner
Page 35 of 298

Wearing Seat Belts
Using seat belts and child safety seats is the most
effective way to protect occupants if a collision occurs.
Therefore, wearing a seat belt is required by law in most jurisdictions.
Both the driver and passenger seats are equipped with three-point inertia reel seat belts. Inertia reel belts are automatically tensioned to allow occupants to move
comfortably during normal driving conditions.
To
securely hold child safety seats, all passenger seating
positions are equipped with an automatic locking
retractor (ALR) feature that, by fully extracting the seat
belt (beyond the length needed for a typical adult
occupant), locks the belt into place until the seat belt is
unbuckled.
The seat belt reel automatically locks to prevent
movement of occupants if
Model Y experiences a force
associated with hard acceleration, braking, cornering, or
an impact in a collision.
Seat Belt Reminders
The seat belt reminder on the touchscreen
alerts you if a seat belt for an occupied driver or passenger seat is unbuckled. If all
occupants are buckled up and the
reminder stays on, re-buckle seat belts to
ensure they are correctly latched. Also
remove any heavy objects (such as a
briefcase) from an unoccupied seat. If the
reminder light continues to stay on,
contact Tesla.
You can temporarily disable a seat belt reminder associated with a rear seating position. This is useful when you are carrying an object in a rear seat that
triggers the seat belt reminder alert. To disable the
reminder, touch the associated seat on the seat belt reminder popup message that displays on the touchscreen when a seat belt reminder is active. When a reminder is disabled, the seat belt reminder icon is replaced by a seat icon, for the current drive only. Touch the seat again to re-enable the reminder.
WARNING: Seat belts must be worn by passengers
in all seating positions. Do not disable a seat belt
reminder when the seating position is occupied by
a passenger.
To Fasten a Belt
1.
Ensure correct positioning of the seat (see Correct
Driving Position on page 27).
2.
Draw the belt out smoothly, ensuring the belt lays flat
across the pelvis, chest and mid-point of your collar
bone, between the neck and shoulder.
3. Insert the latch plate into the buckle and press
together until you hear a click indicating it is locked
in place.4.
Pull the belt to check that it is securely fastened.
5.
Pull the diagonal part of the belt toward the reel to
remove excess slack.
To Adjust the Shoulder Anchor
Height
Model Y is equipped with an adjustable shoulder anchor
for each front seat to ensure that the seat belt is positioned correctly. The seat belt should lay
flat across
the mid-point of your collar bone while in the correct driving position
(see Correct Driving Position on page
27). Adjust the height of the shoulder anchor if the seat
belt is not positioned correctly:
1.
Press and hold the button on the shoulder anchor to release the locking mechanism.
2.
While holding the button, move the shoulder anchor up or down, as necessary, to correctly position the seat belt.
3.
Release the button on the shoulder anchor so that it
locks into position.
4.
Without pressing the button, pull on the seat belt webbing and attempt to move the shoulder anchor
downward to check that it is locked into position.
Seat Belts
33Seating and Safety Restraints
Page 60 of 298
Controlling Lights
Touch Controls > Lights on the touchscreen to access all
light controls, both interior and exterior.
You can also pull the turn signal stalk toward you to
display a popup that provides quick access to exterior lights. For example, you can turn the headlights on or
off
continuously (overriding the default Auto High Beam
setting). The lights popup allows you to adjust all
exterior light settings, including parking lights, fog lights
(if equipped), etc. The setting you choose is retained for
the current drive only.
NOTE: If the touchscreen is already displaying the full
Controls screen for lights, pulling the turn signal stalk does not display the quick access popup.
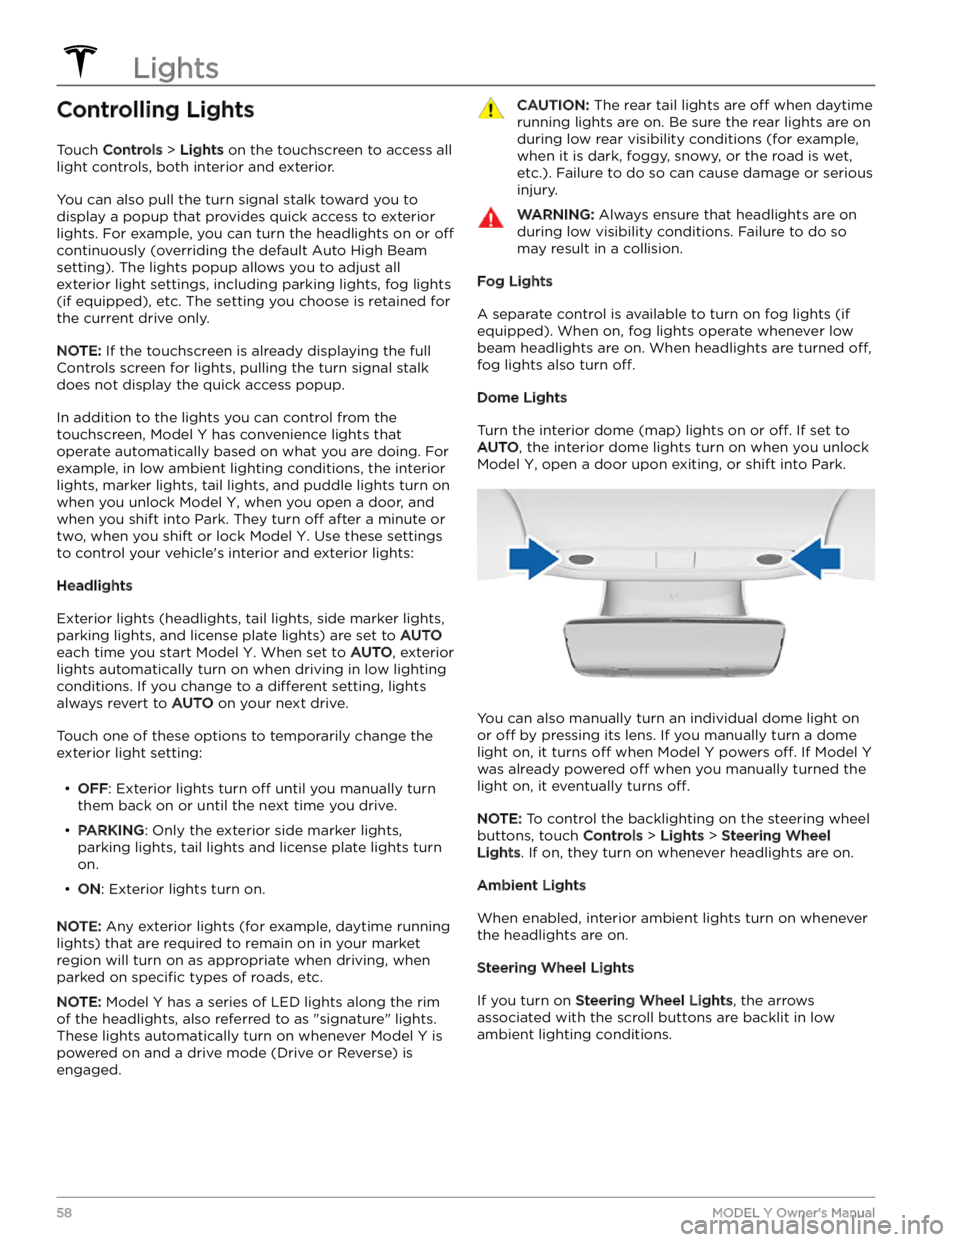
In addition to the lights you can control from the touchscreen,
Model Y has convenience lights that
operate automatically based on what you are doing. For example, in low ambient lighting conditions, the interior lights, marker lights, tail lights, and puddle lights turn on when you unlock
Model Y, when you open a door, and
when you shift into Park. They turn
off after a minute or
two, when you shift or lock
Model Y. Use these settings
to control your vehicle
Page 61 of 298
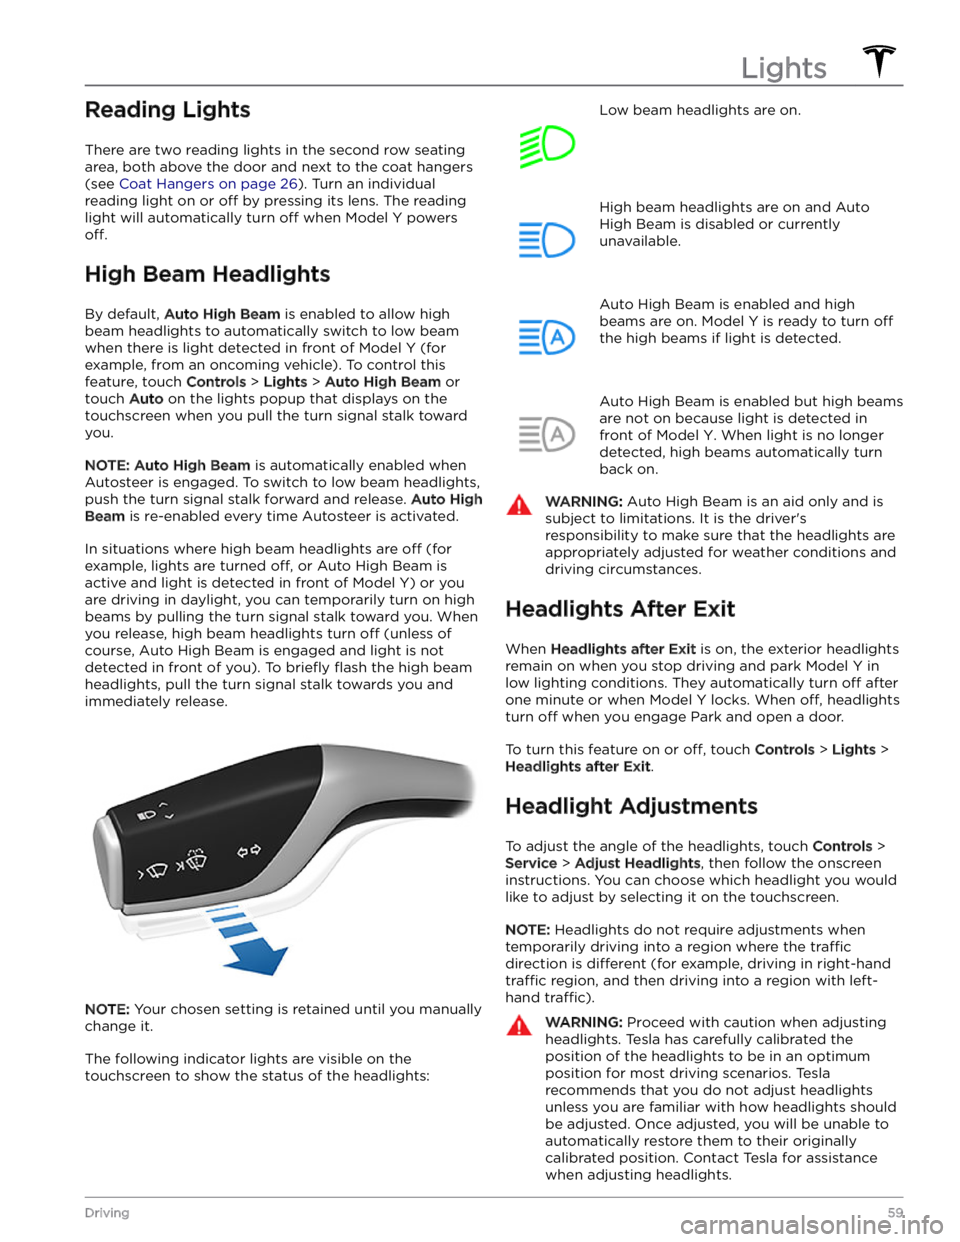
Reading Lights
There are two reading lights in the second row seating
area, both above the door and next to the coat hangers (see
Coat Hangers on page 26). Turn an individual
reading light on or
off by pressing its lens. The reading
light will automatically turn
off when Model Y powers
off.
High Beam Headlights
By default, Auto High Beam is enabled to allow high
beam headlights to automatically switch to low beam
when there is light detected in front of
Model Y (for
example, from an oncoming vehicle). To control this
feature, touch
Controls > Lights > Auto High Beam or
touch
Auto on the lights popup that displays on the
touchscreen when you pull the turn signal stalk toward
you.
NOTE: Auto High Beam is automatically enabled when
Autosteer is engaged. To switch to low beam headlights, push the turn signal stalk forward and release.
Auto High
Beam is re-enabled every time Autosteer is activated.
In situations where high beam headlights are off (for
example, lights are turned
off, or Auto High Beam is
active and light is detected in front of
Model Y) or you
are driving in daylight, you can temporarily turn on high
beams by pulling the turn signal stalk toward you. When
you release, high beam headlights turn
off (unless of
course, Auto High Beam is engaged and light is not detected in front of you). To
briefly flash the high beam
headlights, pull the turn signal stalk towards you and immediately release.
NOTE: Your chosen setting is retained until you manually
change it.
The following indicator lights are visible on the touchscreen to show the status of the headlights:
Low beam headlights are on.High beam headlights are on and Auto
High Beam is disabled or currently
unavailable.Auto High Beam is enabled and high
beams are on.
Model Y is ready to turn off
the high beams if light is detected.
Auto High Beam is enabled but high beams
are not on because light is detected in front of
Model Y. When light is no longer
detected, high beams automatically turn
back on.
WARNING: Auto High Beam is an aid only and is
subject to limitations. It is the driver
Page 64 of 298
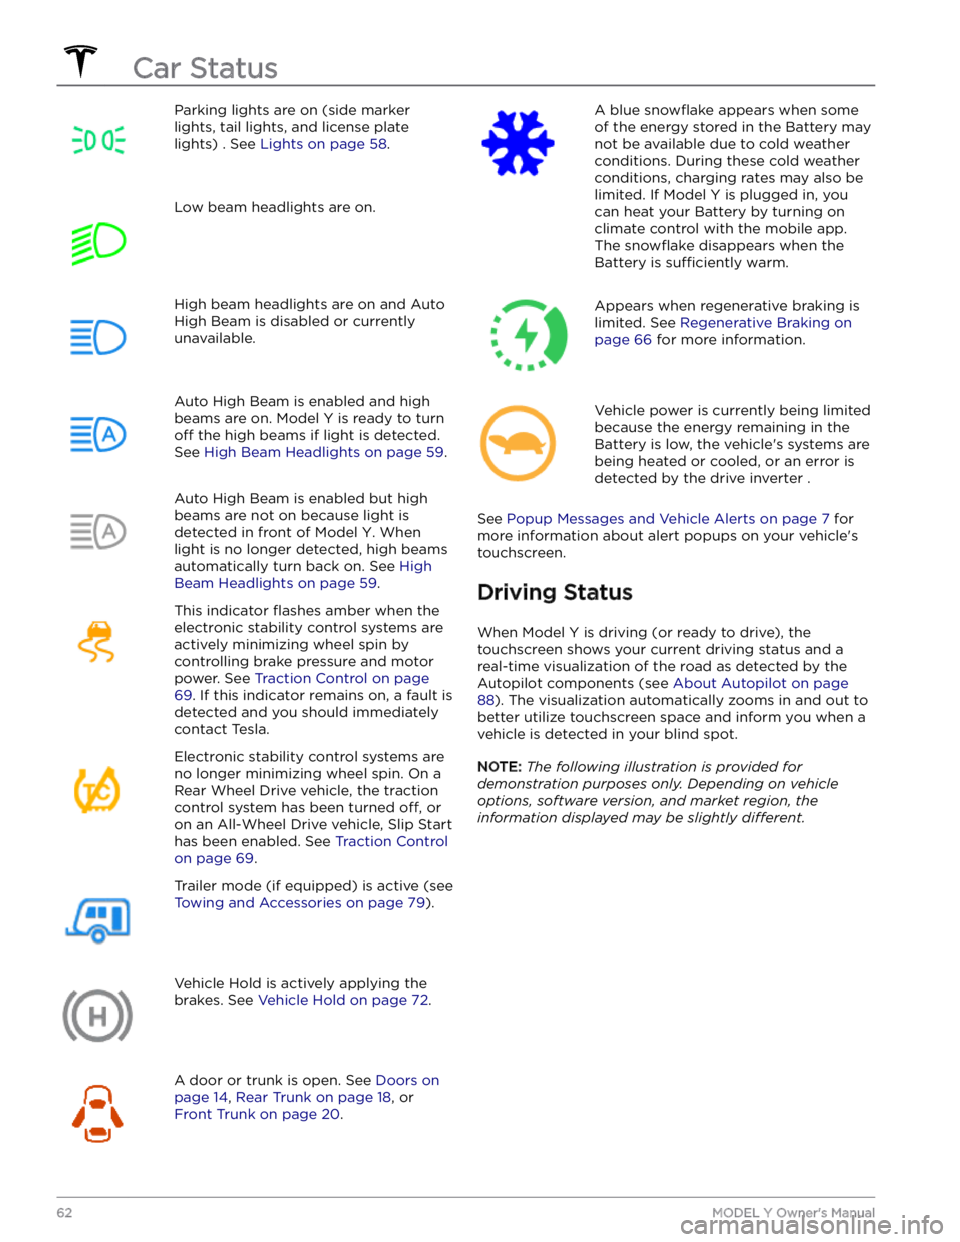
Parking lights are on (side marker
lights, tail lights, and license plate lights) . See
Lights on page 58.
Low beam headlights are on.High beam headlights are on and Auto
High Beam is disabled or currently
unavailable.Auto High Beam is enabled and high
beams are on.
Model Y is ready to turn
off the high beams if light is detected.
See
High Beam Headlights on page 59.
Auto High Beam is enabled but high beams are not on because light is
detected in front of
Model Y. When
light is no longer detected, high beams
automatically turn back on. See
High
Beam Headlights on page 59.
This indicator flashes amber when the
electronic stability control systems are actively minimizing wheel spin by
controlling brake pressure and motor
power. See
Traction Control on page
69. If this indicator remains on, a fault is
detected and you should immediately contact Tesla.
Electronic stability control systems are no longer minimizing wheel spin. On a
Rear Wheel Drive vehicle, the traction
control system has been turned
off, or
on an All-Wheel Drive vehicle, Slip Start has been enabled. See
Traction Control
on page 69.
Trailer mode (if equipped) is active (see
Towing and Accessories on page 79).
Vehicle Hold is actively applying the brakes. See
Vehicle Hold on page 72.
A door or trunk is open. See Doors on
page 14, Rear Trunk on page 18, or
Front Trunk on page 20.
A blue snowflake appears when some
of the energy stored in the Battery may not be available due to cold weather conditions. During these cold weather
conditions, charging rates may also be limited. If
Model Y is plugged in, you
can heat your Battery by turning on climate control with the mobile app. The
snowflake disappears when the
Battery is
sufficiently warm.
Appears when regenerative braking is limited. See
Regenerative Braking on
page 66 for more information.
Vehicle power is currently being limited
because the energy remaining in the
Battery is low, the vehicle
Page 67 of 298

Braking SystemsWARNING: Properly functioning braking systems
are critical to ensure safety. If you experience a
problem with the brake pedal, brake calipers, or
any component of a Model Y braking system,
contact Tesla immediately.
Model Y has an anti-lock braking system (ABS) that
prevents the wheels from locking when you apply
maximum brake pressure. This improves steering control
during heavy braking in most road conditions.
During emergency braking conditions, the ABS
constantly monitors the speed of each wheel and varies
the brake pressure according to the grip available.
The alteration of brake pressure can be felt as a pulsing sensation through the brake pedal. This demonstrates that the ABS is operating and is not a cause for concern. Keep
firm and steady pressure on the brake pedal while
experiencing the pulsing.
The ABS indicator briefly flashes amber on
the
touchscreen when you first start Model
Y. If this indicator lights up at any other
time, an ABS fault has occurred and the ABS is not operating. Contact Tesla. The
braking system remains fully operational
and is not
affected by an ABS failure.
However, braking distances may increase. Drive cautiously and avoid heavy braking.
If the touchscreen displays this red brake
indicator at any time other than
briefly
when you first start Model Y, a brake
system fault is detected, or the level of the
brake
fluid is low. Contact Tesla
immediately. Apply steady pressure and
keep the brakes
firm to bring the vehicle to
a stop when safe to do so.
The touchscreen displays this amber brake
indicator if a brake booster fault is detected. Apply steady pressure and keep the brakes
firm to stop the vehicle when
safety permits. Hydraulic Boost
Compensation will be active (see
Hydraulic
Boost Compensation on page 66).
Emergency Braking
In an emergency, fully press the brake pedal and
maintain
firm pressure, even on low traction surfaces.
The ABS varies the braking pressure to each wheel according to the amount of traction available. This prevents wheels from locking and ensures that you stop as safely as possible.
WARNING: Do not pump the brake pedal. Doing so
interrupts operation of the ABS and can increase
braking distance.
WARNING: Always maintain a safe distance from
the vehicle in front of you and be aware of
hazardous driving conditions. While the ABS can
improve stopping distance, it cannot overcome the
laws of physics. It also does not prevent the
danger of hydroplaning (where a layer of water
prevents direct contact between the tires and the
road).
CAUTION: Automatic Emergency Braking (see
Automatic Emergency Braking on page 123) may
intervene to automatically brake in situations
where a collision is considered imminent.
Automatic Emergency Braking is not designed to
prevent a collision. At best, it can minimize the
impact of a frontal collision by attempting to
reduce your driving speed. Depending on
Automatic Emergency Braking to avoid a collision
can result in serious injury or death.
CAUTION: In emergency situations, if the brakes
are not functioning properly, press and hold the
Park button on the drive stalk to bring the vehicle
to a stop. Do not use this method to stop the
vehicle unless absolutely necessary.
Dynamic Brake Lights (if equipped)
If you are driving over 30 mph (50 km/h) and brake
forcefully
(or if Automatic Emergency Braking engages),
the brake lights
flash quickly to warn other drivers that
Model Y is rapidly slowing down. If Model Y stops
completely, the hazard warning lights
flash. Flashing
continues until you press the accelerator or manually press the hazard lights button to turn them
off (see
Hazard Warning Flashers on page 60).
NOTE: Dynamic brake lights will not flash while Track
Mode is enabled (see
Track Mode on page 74).
NOTE: When towing a trailer (if applicable), the brake
lights on the trailer also operate as described above,
even when the trailer is not equipped with a separate
braking system.
WARNING: When towing a trailer (if applicable),
always increase your following distance. Sudden
braking may result in skidding, jack-knifing, and
loss of control.
Brake Disc Wiping
To ensure brakes remain responsive in cold and wet
weather,
Model Y is equipped with brake disc wiping.
When cold and wet weather is detected, this feature repeatedly applies an imperceptible amount of brake
force to remove water from the surface of the brake discs.
Braking and Stopping
65Driving
Page 81 of 298

The towing package includes a 2" x 2" (5 cm x 5 cm)
hitch receiver that can support an accessory carrier (for bicycles, skis, snowboards, etc.) or tow a trailer.
Installing and Using a Carrier
When using the tow package to carry accessories, the 2"
x 2" (5 cm x 5 cm) square hitch receiver is designed to
support vertical loads of up to
160 lbs (72 kg). Ball
mounts that are compatible with the square receiver
must be purchased separately.
To install and use an accessory carrier, you must first
attach the ball mount to the hitch receiver (see
Attaching and Removing the Ball Mount on page 83).
Then, follow the instructions provided by your accessory
carrier. Observe all regulations and legal requirements in your state or region that apply to carrying accessories.
The Model Y towing package includes the wiring
necessary for using an accessory carrier equipped with
lights (see
Electrical Connections on page 83). The
package also includes Trailer Mode software compatibility (see
Trailer Mode on page 81).
NOTE: Go to http://www.tesla.com to purchase
accessories for your vehicle. Although third-party products are available, Tesla recommends and supports
only Tesla-approved products (see
Parts and
Accessories on page 198). The accessory products
available for your vehicle may vary based on market
region. Before attempting to install a non Tesla-
approved carrier, review the product information to ensure compatibility.
NOTE: When not in use, the ball mount should be
removed and stored in a dry location to prevent dust and corrosion. Keep the dust cover over the hitch housing to prevent dirt and debris from entering (see
Attaching and Removing the Ball Mount on page 83).
NOTE: Tesla assumes no responsibility for damage or
injuries resulting from installing and using an accessory carrier, for any omissions in the instructions
accompanying an accessory carrier, or for your failure to follow the instructions. Damage caused by using an accessory carrier is not covered by the warranty.
Carrying Accessories
The hitch receiver is designed to support vertical loads
up to
160 lbs (72 kg). When carrying bicycles, skis, or
other items on the
Model Y hitch, always check to
ensure that the maximum weight is not exceeded. When calculating weight, remember to include the weight of
the accessory carrier.
For example, assuming the carrier
weighs 40 lbs (18 kg), the weight threshold is sufficient
for carrying two bicycles weighing approximately 60 lbs
(27 kg) each, or four items weighing approximately 30
lbs (14 kg) each.
NOTE: Consult the product details of your accessory
carrier for more information, such as additional weight or load limits. Damage caused by non Tesla-approved
accessories is not covered by the warranty.CAUTION: Exceeding the maximum weight the
Model Y hitch is designed to support (as
previously described) can cause significant
damage.
CAUTION: Do not attempt to install an accessory
carrier on Model Y that is not equipped with the
tow package. Doing so can cause significant
damage.
Trailer Towing
The maximum trailer weight (including all cargo and
additional equipment), and the trailer tongue weight
depend on the number of occupants in your vehicle and the tires being used. The maximum towing capacity and
trailer tongue weight must never exceed the following:
Wheel/Rim Size# of
PassengersMaximum
Towing
CapacityMaximum
Tongue
Weight19", 20"
and 21"up to 33,500 lbs
(1,588 kg)350 lbs (159
kg)19" and
21"4 - 53,500 lbs
(1,588 kg)350 lbs (159
kg)20"4 - 52,300 lbs
(1,043 kg)**230 lbs (104
kg)**19"6 - 7*2000 lbs
(907 kg)**200 lbs (91
kg)**20"6 - 7*Towing not
permitted-21"6 - 7*1200 lbs
(544 kg)**120 lbs (54
kg)**
*Applicable only to vehicles with seven seating
positions.
** You must operate within the speed limitations of your trailer and tires, and only drive at speeds appropriate for
the load you are towing, the weather, road and
traffic
conditions, and your level of towing experience. Always
obey posted speed limits and local regulations regarding
speed.
NOTE: In Canada, towing is limited to 55 mph (89 km/h).
For trailers with a combined loading of more than 1650
lbs (750 kg), Tesla recommends using a separate braking
system with an independent controller (see
Trailer
Brakes on page 81). Carefully follow the instructions
provided by the trailer brake manufacturer to ensure that trailer brakes are properly installed, adjusted, and
maintained.
Towing and Accessories
79Driving
Page 82 of 298

The tongue weight is the downward force that the weight of the trailer exerts on the hitch. This must not exceed 10% of the maximum trailer weight. Carrying a
significant amount of equipment, passengers, or cargo
in the tow vehicle can reduce the towing capacity it can handle, which also reduces the tongue weight. Maximum towing capacity is calculated assuming the
GVWR
(Gross Vehicle Weight Rating) is not exceeded (see
Vehicle Loading on page 208).
NOTE: If the information on the hitch label conflicts with
the information provided in this Owner