steering TOYOTA 4RUNNER 2007 N210 / 4.G Quick Reference Guide
[x] Cancel search | Manufacturer: TOYOTA, Model Year: 2007, Model line: 4RUNNER, Model: TOYOTA 4RUNNER 2007 N210 / 4.GPages: 16, PDF Size: 0.96 MB
Page 3 of 16
1
OVERVIEW
FEATURES/OPERATIONS
SAFETY AND EMERGENCY FEATURES
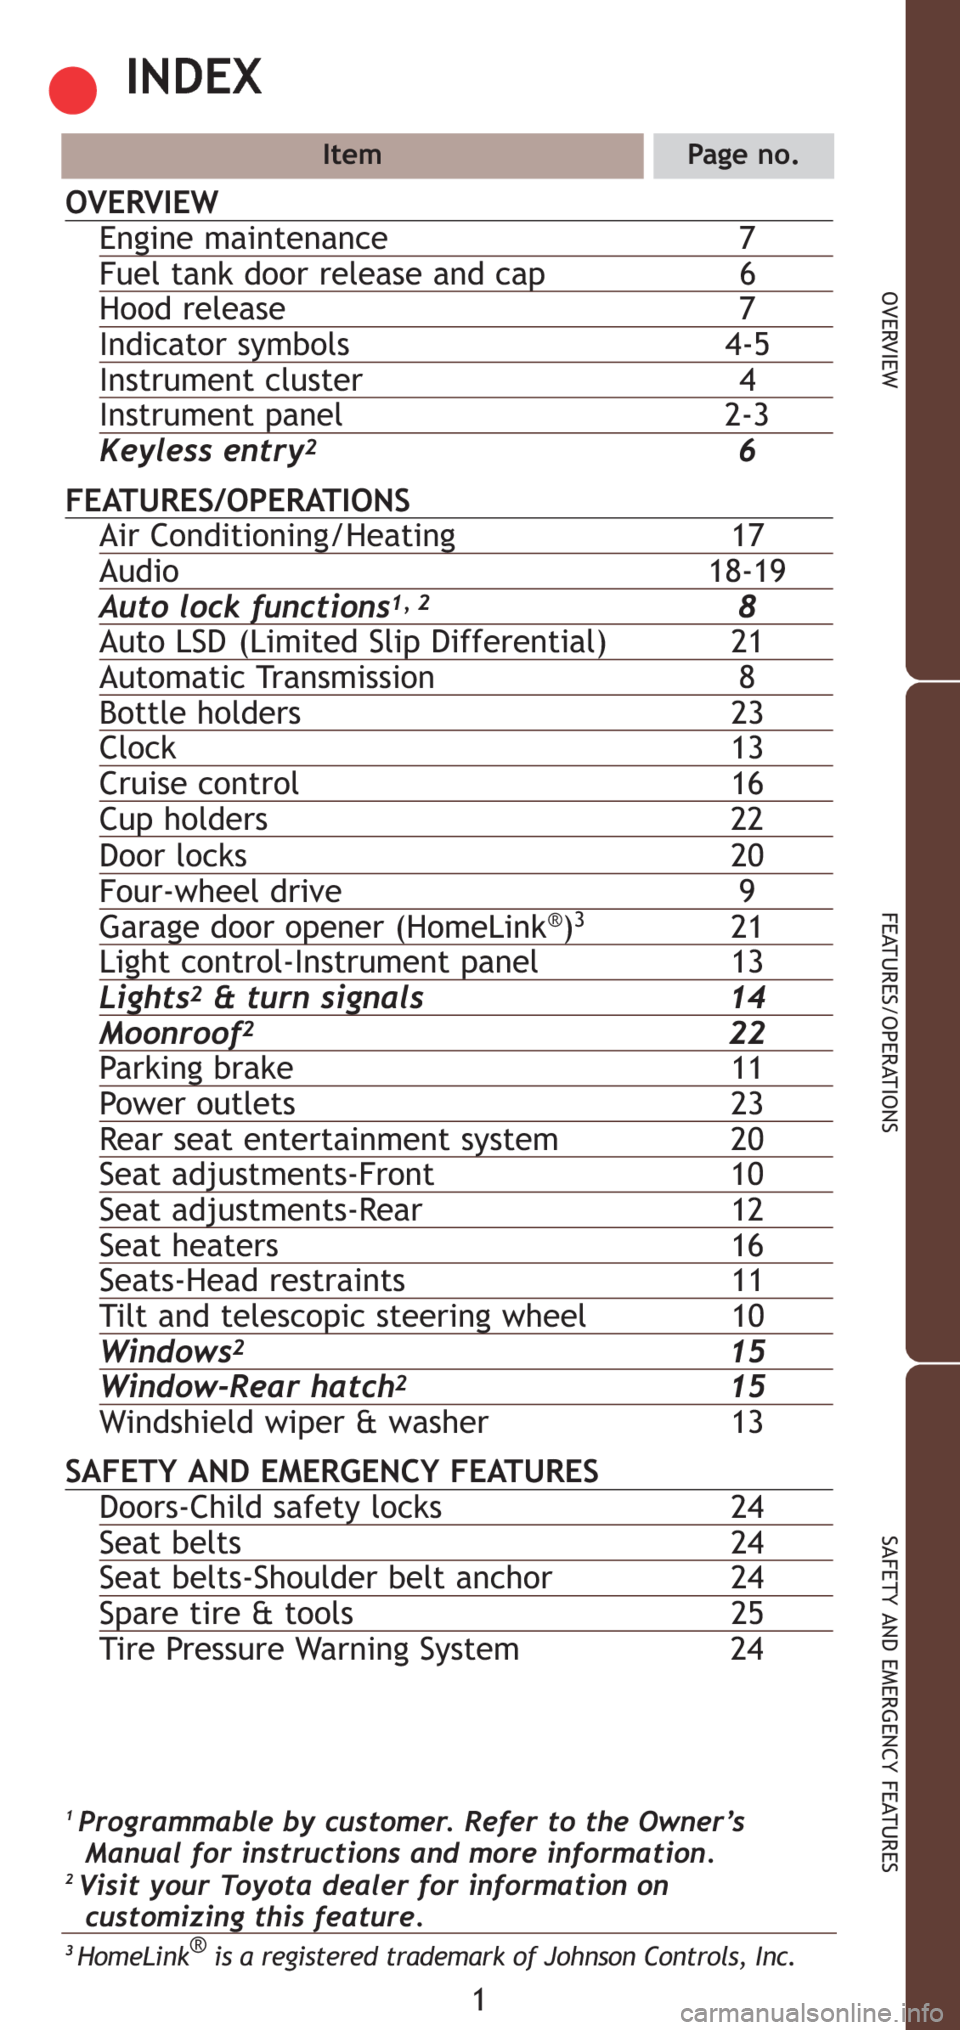
INDEX
ItemPage no.
OVERVIEWEngine maintenance 7Fuel tank door release and cap 6Hood release 7
Indicator symbols 4-5Instrument cluster 4Instrument panel 2-3
Keyless entry26
FEATURES/OPERATIONSAir Conditioning/Heating17Audio18-19Auto lock functions1, 28Auto LSD(Limited Slip Differential)21Automatic Transmission8Bottle holders 23Clock13Cruise control16Cup holders 22
Door locks 20Four-wheel drive9Garage door opener (HomeLink®)321Light control-Instrument panel13Lights2&turn signals14Moonroof222Parking brake11Power outlets 23Rear seat entertainment system 20Seat adjustments-Front10Seat adjustments-Rear12Seat heaters16Seats-Head restraints11Tilt and telescopic steering wheel10Windows215Window-Rear hatch215
Windshield wiper & washer13
SAFETY AND EMERGENCY FEATURESDoors-Child safety locks 24Seat belts 24Seat belts-Shoulder belt anchor 24Spare tire & tools 25
Tire Pressure Wa r n i n g System 24
1Programmable by customer.Refer to the Owner’s
Manual for instructions and more information.
2Visit your Toyota dealer for information on
customizing this feature.
3HomeLink®is a registered trademark of Johnson Controls, Inc.
Page 4 of 16
3
OVERVIEW
FEATURES/OPERATIONS
SAFETY AND EMERGENCY FEATURES
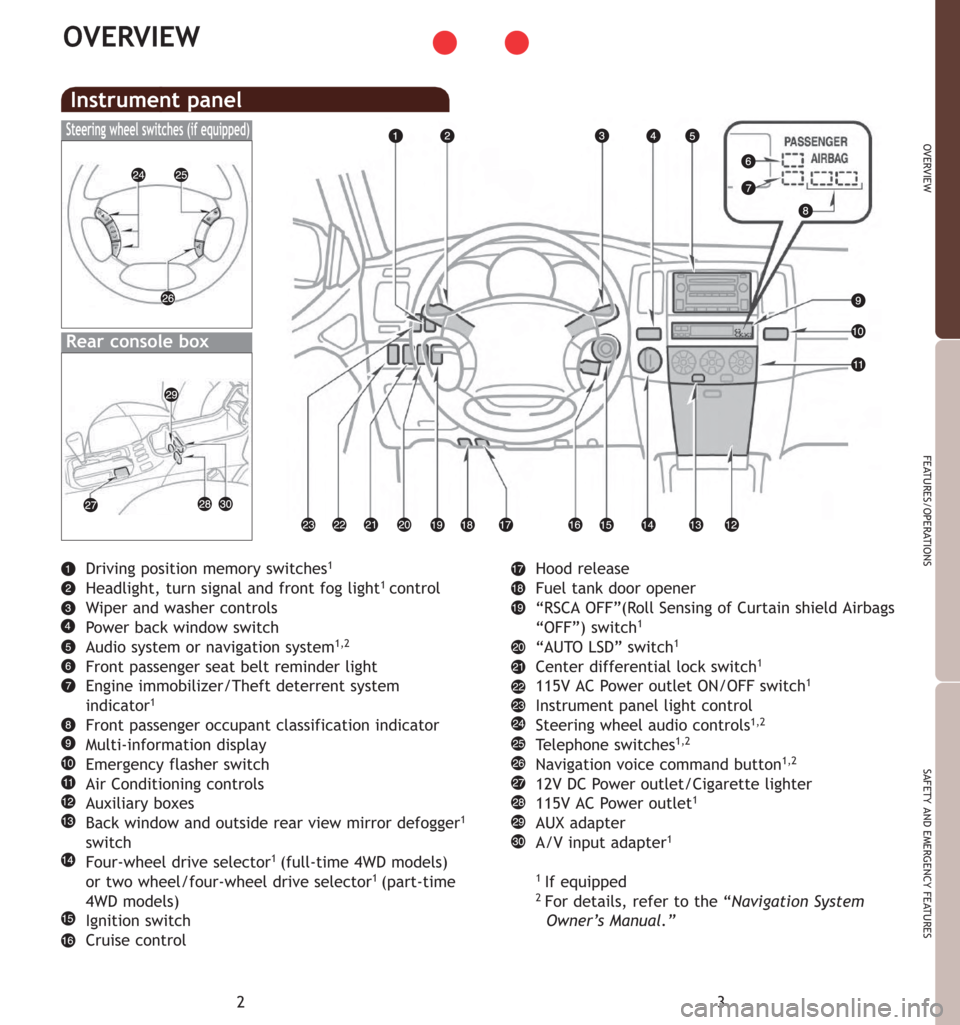
Hood release
Fuel tank door opener
“RSCA OFF”(Roll Sensing of Curtain shield Airbags
“OFF”) switch
1
“AUTO LSD” switch1
Center differential lock switch1
115V AC Power outlet ON/OFF switch1
Instrument panel light control
Steering wheel audio controls1,2
Te l e p h o n e switches1,2
Navigation voice command button1,2
12V DC Power outlet/Cigarette lighter
115V AC Power outlet1
AUX adapter
A/V input adapter1
1
If equipped2For details, refer to the “Navigation System
Owner’s Manual.”
2
OVERVIEW
Driving position memory switches1
Headlight, turn signal and front fog light1control
Wiper and washer controls
Power back window switch
Audio system or navigation system
1,2
Front passenger seat belt reminder light
Engine immobilizer/Theft deterrent system
indicator
1
Front passenger occupant classification indicator
Multi-information display
Emergency flasher switch
Air Conditioning controls
Auxiliary boxes
Back window and outside rear view mirror defogger
1
switch
Four-wheel drive selector1(full-time 4WD models)
or two wheel/four-wheel drive selector1(part-time
4WD models)
Ignition switch
Cruise control
Instrument panel
Steering wheel switches (if equipped)
Rear console box
Page 6 of 16
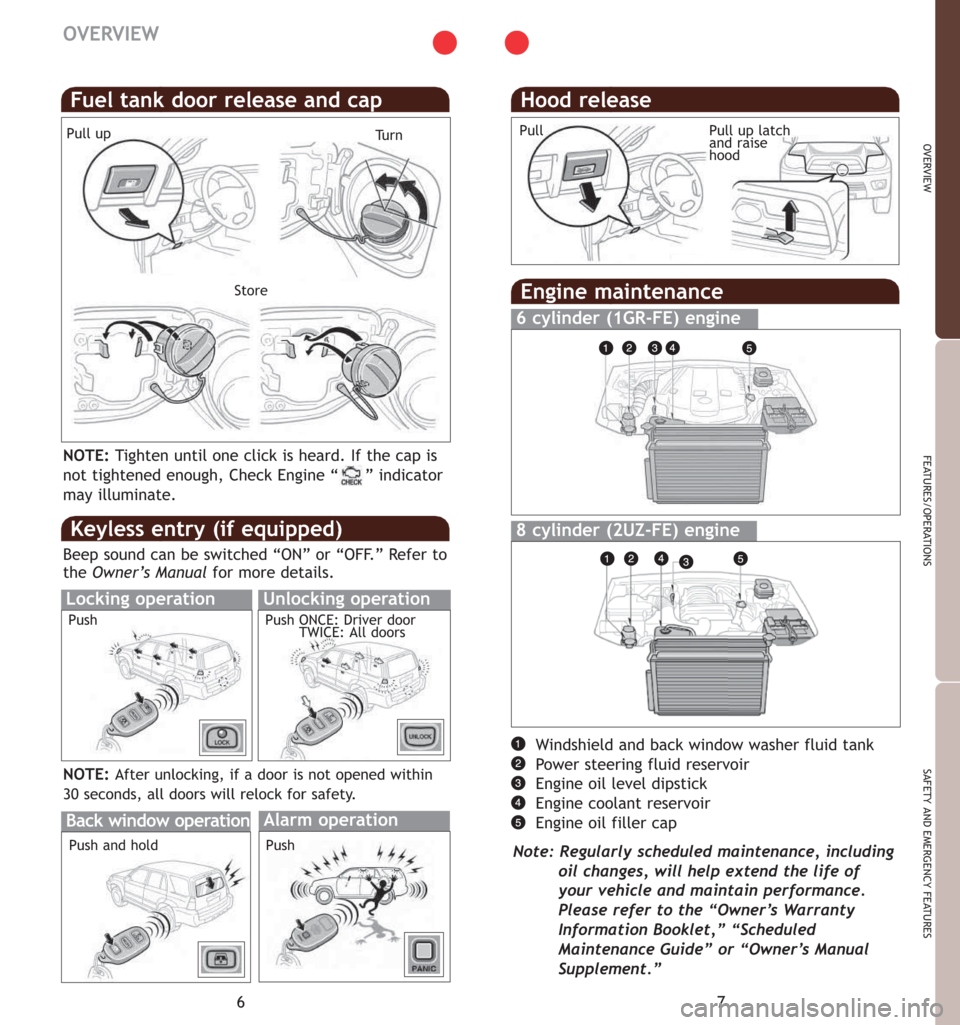
NOTE:Tighten until one click is heard. If the cap is
not tightened enough, Check Engine “ ” indicator
may illuminate.
7
OVERVIEW
FEATURES/OPERATIONS
SAFETY AND EMERGENCY FEATURES
Windshield and back window washer fluid tank
Power steering fluid reservoir
Engine oil level dipstick
Engine coolant reservoir
Engine oil filler cap
Note: Regularly scheduled maintenance, including
oil changes, will help extend the life of
your vehicle and maintain performance.
Please refer to the
“Owner’s Warranty
Information Booklet,” “Scheduled
Maintenance Guide” or “Owner’s Manual
Supplement.”
Engine maintenance
6cylinder (1GR-FE) engine
8 cylinder (2UZ-FE) engine
6
OVERVIEW
Fuel tank door release and capHood release
Pull upTu r n
StorePull Pull up latch
and raise
hood
NOTE:After unlocking, if a door is not opened within
30 seconds, all doors will relock for safety.
Alarm operation
Keyless entry (if equipped)
Locking operationUnlocking operation
Back window operation
Beep sound can be switched “ON” or “OFF.” Refer to
the Owner’s Manualfor more details.
Push
Push Push ONCE: Driver door
TWICE: All doors
Push and hold
Page 8 of 16
11
OVERVIEW
FEATURES/OPERATIONS
SAFETY AND EMERGENCY FEATURES
10
FEATURES/OPERATIONS
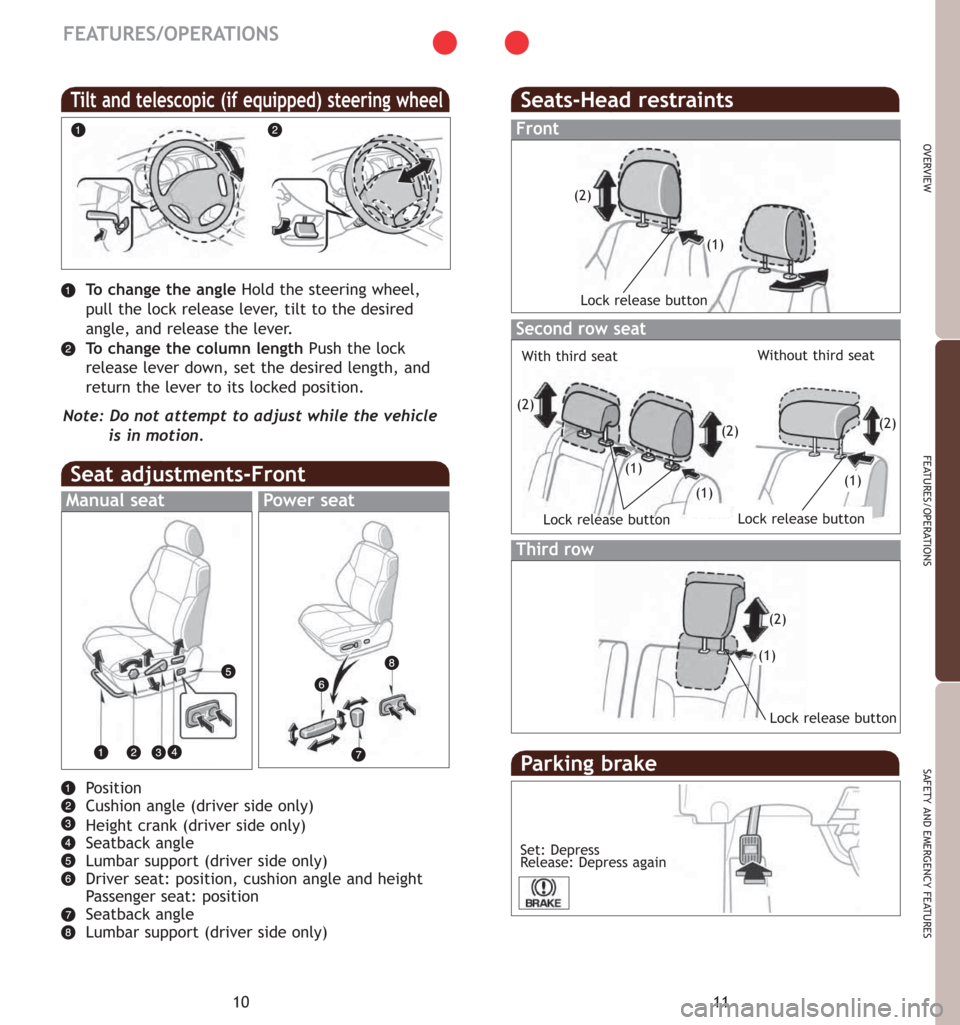
Position
Cushion angle(driver side only)
Height crank (driver side only)
Seatback angle
Lumbar support(driver side only)
Driver seat: position, cushion angle and height
Passenger seat: position
Seatback angle
Lumbar support(driver side only)
Seat adjustments-Front
Manual seatPower seat
Seats-Head restraints
Front
Second row seat
Third row
Lock release button
Lock release button
Lock release button
Lock release button
With third seatWithout third seat
To change the angleHold the steering wheel,
pull the lock release lever, tilt to the desired
angle, and release the lever.
To change the column lengthPush the lock
release lever down, set the desired length, and
return the lever to its locked position.
Note: Do not attempt to adjust while the vehicle
is in
motion.
Tilt and telescopic (if equipped) steering wheel
Parking brake
Set: Depress
Release: Depress again
(2)
(1)
(2)
(1) (2)
(2)
(1)
(2)
(1) (1)
Page 12 of 16
19
OVERVIEW
FEATURES/OPERATIONS
SAFETY AND EMERGENCY FEATURES
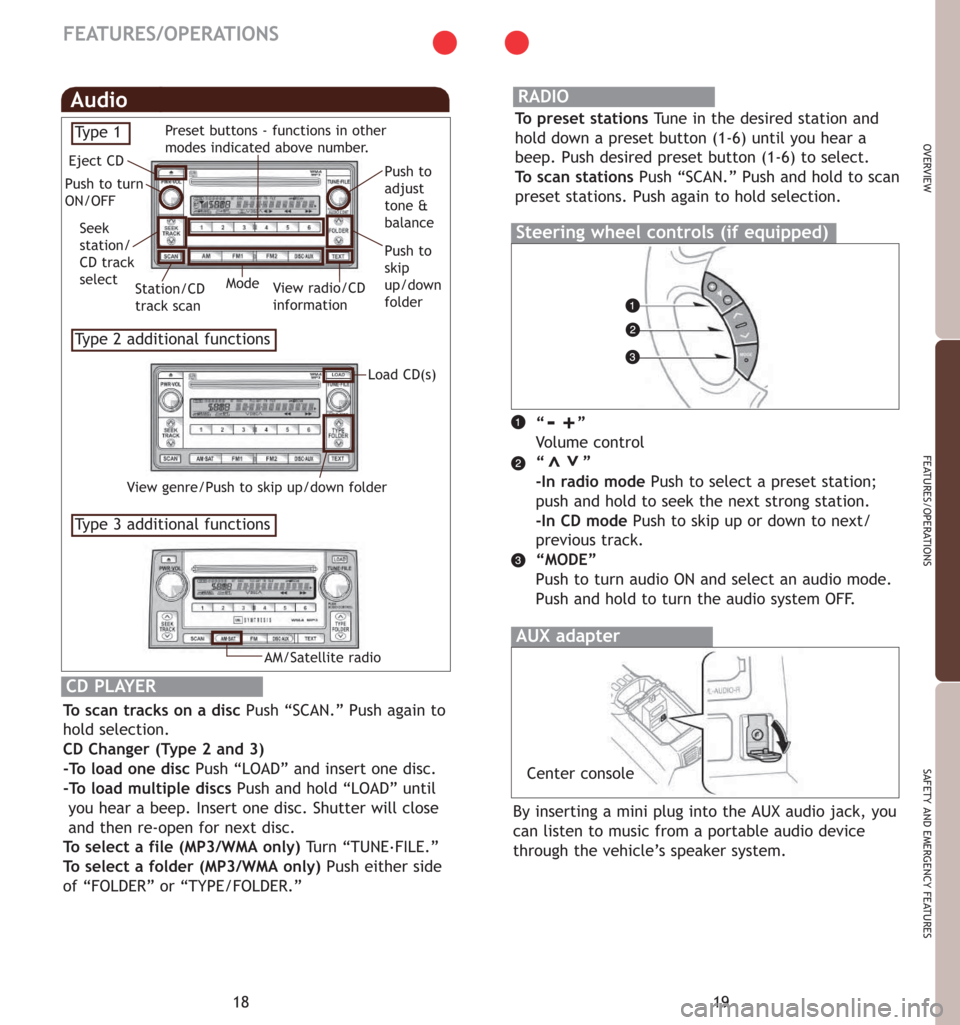
18“”
Vo l u m e control
“”
-In radio modePush to select a preset station;
push and hold to seek the next strong station.
-In CD modePush to skip up or down to next/
previous track.
“MODE”
Push to turn audio ON and select an audio mode.
Push and hold to turn the audio system OFF.
By inserting a mini plug
into the AUX audio jack, you
can listen to music from a portable audio device
through the vehicle’s speaker system.
>>
Steering wheel controls (if equipped)
CD PLAYER
To scan tracks on a disc Push “SCAN.” Push again to
hold selection.
CD Changer (Type 2 and 3)
-To load one disc Push “LOAD” and insert one disc.
-To load multiple discs Push and hold “LOAD” until
you hear a beep. Insert one disc. Shutter will close
and then re-open for next disc.
To select a file (MP3/WMA only) Tu r n “TUNE.
FILE.”
To select a folder (MP3/WMA only) Push either side
of “FOLDER” or “TYPE/FOLDER.”
AUX adapter
FEATURES/OPERATIONS
Audio
Ty p e 2 additional functions
Ty p e 3 additional functions
View radio/CD
information Eject CD
Push to turn
ON/OFFPush to
adjust
tone &
balance
Push to
skip
up/down
folder Seek
station/
CD track
select
Station/CD
track scanMode
Load CD(s) Preset buttons - functions in other
modes indicated above number.
View genre/Push to skip up/down folder
RADIO
To preset stations Tune in the desired station and
hold down a preset button (1-6) until you hear a
beep. Push desired preset button (1-6) to select.
To scan stations Push “SCAN.” Push and hold to scan
preset stations. Push again to hold selection.
-+
Ty p e 1
AM/Satellite radio
Center console