TOYOTA 4RUNNER 2009 N280 / 5.G Owners Manual
Manufacturer: TOYOTA, Model Year: 2009, Model line: 4RUNNER, Model: TOYOTA 4RUNNER 2009 N280 / 5.GPages: 520, PDF Size: 10.74 MB
Page 391 of 520
391
4-3. Do-it-yourself maintenance
4
Maintenance and care
■If the tread wears down below 0.16 in. (4 mm) on snow tires
The effectiveness of snow tires is lost.
■Maximum load of tire
Check that the maximum load of the re
placed tire is greater than 1/2 of
the Gross Axle Weight Ratings (GAWR) of either the front axle or the
rear axle, whichever is greater.
As for the maximum load of the tire, see the load limit at maximum cold
tire inflation pressure mentioned on the sidewall of the tire, and as for the
Gross Axle Weight Ratings (GAWR) , see the Certification Label.
( P. 395, 471, 484).
■Tire types
1 Summer tires
Summer tires are high-speed performance tires best suited to highway
driving under dry conditions. Since summer tires do not have the same
traction performance as snow tire s, summer tires are inadequate for
driving on snow-covered or icy roads. For driving on snow-covered
roads or icy roads, the use of snow tires is recommended. When
installing snow tires, be sure to replace all four tires.
2 All season tires
All season tires are designed to provide better traction in snow and to
be adequate for driving in most winter conditions, as well as for use
year round. All season tires, however, do not have adequate traction
performance compared with snow tires in heavy or loose snow. Also,
all season tires fall short in acceleration and handling performance
compared with summer tires in highway driving.
3Snow tires For driving on snow-covered roads or icy roads, we recommend using
snow tires. If you need snow tires, select tires of the same size, con-
struction and load capacity as the or iginally installed tires. Since your
vehicle has radial tires as original equipment, make sure your snow
tires also have radial construction. Do not install studded tires without
first checking local regulations for possible restriction. Snow tires
should be installed on all wheels. ( P. 213)
Page 392 of 520
392 4-3. Do-it-yourself maintenance
■Routine tire inflation pressure checks
The tire pressure warning system does not replace routine tire inflation
pressure checks. Make sure to check tire inflation pressure as part of
your routine of daily vehicle checks.
■Tire pressure warning system certification
MODEL/FCC IDs:
Transmitter: PAXPMV107J
Receiver: HYQ13BCG
IC (Canada) IDs:
Transmitter: 3729A-PMV107J
Receiver:1551A-13BCG
For vehicles sold in U.S.A.
NOTE:
This device complies with Part 15 of the FCC Rules. Operation is subject
to the following two conditions: (1) This device may not cause harmful
interference, and (2) this device must accept any interference received,
including interference that may cause undesired operation.
FCC WARNING:
Changes or modifications not expre ssly approved by the party responsi-
ble for compliance could void the user’s authority to operate the equip-
ment.
For vehicles sold in Canada
NOTE:
Operation is subject to the following two conditions: (1) this device may
not cause interference, and (2) this de vice must accept any interference,
including interference that may caus e undesired operation of the device.
Page 393 of 520
393
4-3. Do-it-yourself maintenance
4
Maintenance and care
CAUTION
■When inspecting or replacing tires
Observe the following precautions to
prevent accidents. Failure to do so
may cause damage to parts of the drive train, as well as dangerous han-
dling characteristics, which may lead to an accident resulting in death or
serious injury.
●Do not mix tires of different makes, models, tread patterns or tread-
wear.
●Do not use tire sizes other than those recommended by Toyota.
●Do not mix radial, bias-belted, or bias-ply tires.
●Do not mix summer, all season and winter tires.
●Do not use tires that have been used on another vehicle.
●Do not use tires if you do not know how they were used previously.
NOTICE
■Repairing or replacing tires, wheels and tire pressure warning
valves and transmitters
When removing or fitting the wheels, tires or the tire pressure warning
valve and transmitter, contact your Toyota dealer as the tire pressure
warning valve and transmitter may be damaged if not handled correctly.
■To avoid damaging the tire pressure warning valves and transmit-
ters
Do not use liquid sealants on flat tires.
Page 394 of 520
394 4-3. Do-it-yourself maintenance
NOTICE
■Driving on rough roads
Take particular care when driving on roads with loose surfaces or pot-
holes.
These conditions may cause losses in tire inflation pressure, reducing
the cushioning ability of the tires. In addition driving on rough roads may
cause damage to the tires themselves, as well as the vehicle’s wheels
and body.
■If tire inflation pressures become low while driving
Do not continue driving, or your tires and/or wheels may be ruined.
Page 395 of 520
395
4-3. Do-it-yourself maintenance
4
Maintenance and care
Tire inflation pressure
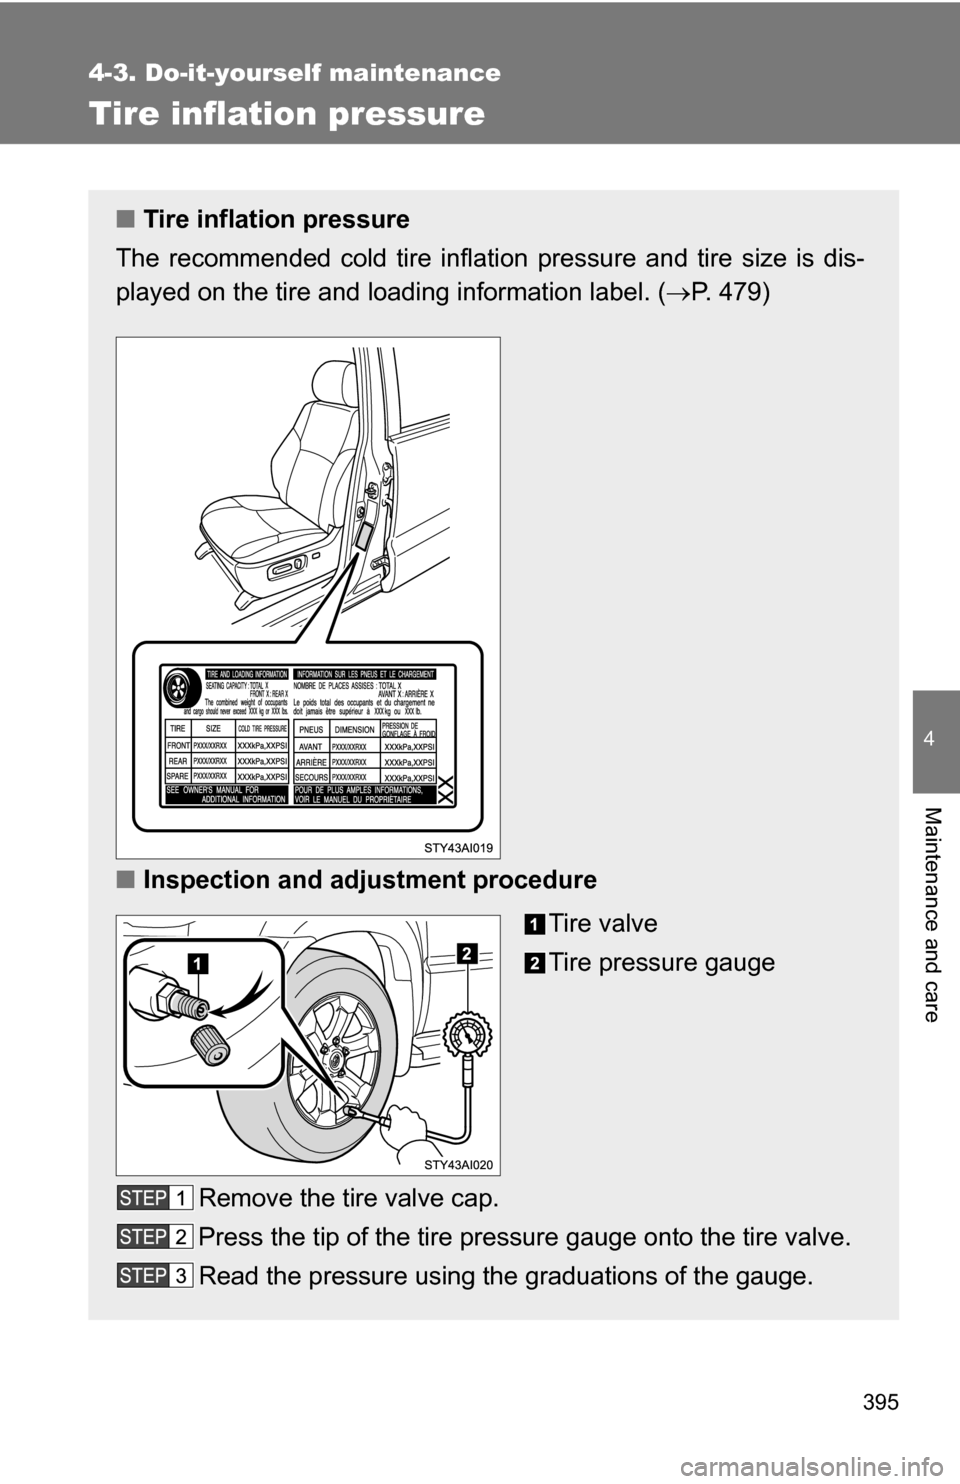
■Tire inflation pressure
The recommended cold tire inflation pressure and tire size is dis-
played on the tire and loadi ng information label. (P. 479)
■ Inspection and adjustment procedure
Tire valve
Tire pressure gauge
Remove the tire valve cap.
Press the tip of the tire pressure gauge onto the tire valve.
Read the pressure using the graduations of the gauge.
Page 396 of 520
396 4-3. Do-it-yourself maintenance
■Tire inflation pressure check interval
You should check tire pressure every two weeks, or at least once a
month.
Do not forget to check the spare.
■Effects of incorrect tire inflation pressure
Driving with incorrect tire inflation pressure ma y result in the following:
●Reduced fuel efficiency
●Reduced driving comfort and tire life
●Reduced safety
●Damage to the drive train
If a tire needs frequent re filling, have it checked by your Toyota dealer.
■Instructions for checking tire inflation pressure
When checking tire inflation pressure, observe the following:
●Check only when the tires are cold.
If your vehicle has been parked for at least 3 hours and has not been
driven for more than 1 mile or 1.5 km, you will get an accurate cold
tire inflation pressure reading.
●Always use a tire pressure gauge.
The appearance of the tire can be mi sleading. In addition, tire infla-
tion pressures that are even just a few pounds off can degrade ride
and handling.
If the tire inflation pressure is not within the recommended
levels, adjust inflate the tire.
If you add too much air, pres s the center of the valve to
lower.
After completing the tire inflation pressure measurement
and adjustment, apply soapy water to the valve and check
for leakage.
Reinstall the tire valve cap.
Page 397 of 520
397
4-3. Do-it-yourself maintenance
4
Maintenance and care
●Do not bleed or reduce tire inflation pressure after driving. It is normal
for the tire inflation pressure to be higher after driving.
●Never exceed the vehicle capacity weight.
Passengers and luggage weight should be placed so that the vehicle
is balanced.
CAUTION
■Proper inflation is critical
to save tire performance
Keep your tires properly inflated.
Otherwise, the following conditions may occur and result in an accident
causing death or serious injury.
●Excessive wear
●Uneven wear
●Poor handling
●Possibility of blowouts resu lting from overheated tires
●Poor sealing of the tire bead
●Wheel deformation and/or tire separation
●A greater possibility of tire damage from road hazards
NOTICE
■When inspecting and adjusting tire inflation pressure
Be sure to reinstall the tire valve caps.
Without the valve caps, dirt or mo isture could get into the valve and
cause air leakage, which could result in an accident. If the caps have
been lost, replace them as soon as possible.
Page 398 of 520
398
4-3. Do-it-yourself maintenance
Wheels
■When replacing wheels
The wheels of your Toyota are equipped with tire pressure warning
valves and transmitters that allow the tire pressure warning system to
provide advanced warning in the event of a loss in tire inflation pressure.
Whenever wheels are replaced, the tire pressure warning valves and
transmitters must be installed. (P. 390)
If a wheel is bent, cracked or heavily corroded, it should be
replaced.
Otherwise, the tire may separate from the wheel or cause loss of
handling control.
■ Wheel selection
When replacing wheels, care should be taken to ensure that
they are equivalent to those removed in load capacity, diameter,
rim width, and offset.
Replacement wheels are available at your Toyota dealer.
Toyota does not recommend using:
●Wheels of different sizes or types
● Used wheels
● Bent wheels that have been straightened
■ Aluminum wheel precautions (if equipped)
●Use only Toyota wheel nuts and wrench designed for use with
your aluminum wheels.
● When rotating, repairing or changing your tires, check that the
wheel nuts are still tight after driving 1000 miles (1600 km).
● Be careful not to damage the aluminum wheels when using
tire chains.
● Use only Toyota genuine balance weights or equivalent and a
plastic or rubber hammer when balancing your wheels.
Page 399 of 520
399
4-3. Do-it-yourself maintenance
4
Maintenance and care
CAUTION
■When replacing wheels
●Do not use wheels that are a different size from those recommended in
the Owner’s Manual, as this may re
sult in loss of handling control.
●Never use an inner tube in a leaking wheel which is designed for a
tubeless tire. Doing so may result in an accident, causing death or seri-
ous injury.
NOTICE
■Replacing tire pressure warning valves and transmitters
●Because tire repair or replacement may affect the tire pressure warn-
ing valves and transmitters, make su re to have tires serviced by your
Toyota dealer or other qualified service shop. In addition, make sure to
purchase your tire pressure warning valves and transmitters at your
Toyota dealer.
●Ensure that only Genuine Toyota wheels are used on your vehicle.
Tire pressure warning valves and transmitters may not work properly
with non-genuine wheels.
Page 400 of 520
400
4-3. Do-it-yourself maintenance
Air conditioning filter
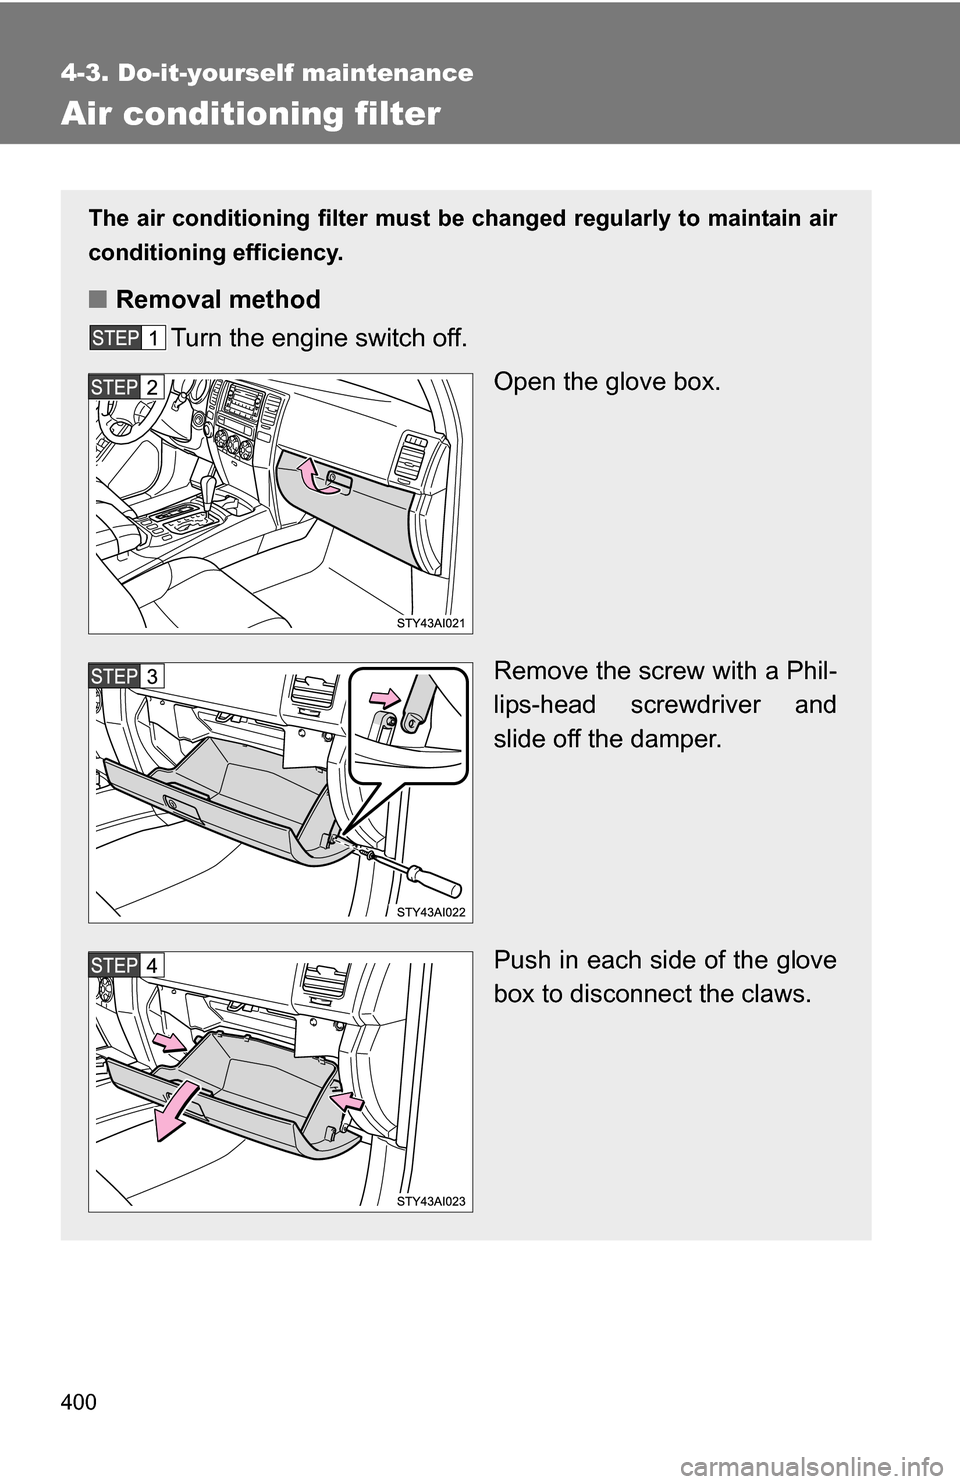
The air conditioning filter must be changed regularly to maintain air
conditioning efficiency.
■ Removal method
Turn the engine switch off.
Open the glove box.
Remove the screw with a Phil-
lips-head screwdriver and
slide off the damper.
Push in each side of the glove
box to disconnect the claws.