steering wheel adjustment TOYOTA 4RUNNER 2009 N280 / 5.G Owners Manual
[x] Cancel search | Manufacturer: TOYOTA, Model Year: 2009, Model line: 4RUNNER, Model: TOYOTA 4RUNNER 2009 N280 / 5.GPages: 520, PDF Size: 10.74 MB
Page 41 of 520
41
1
Before driving
1-3. Adjustable components (seats, mirrors, steering wheel)
Front seats
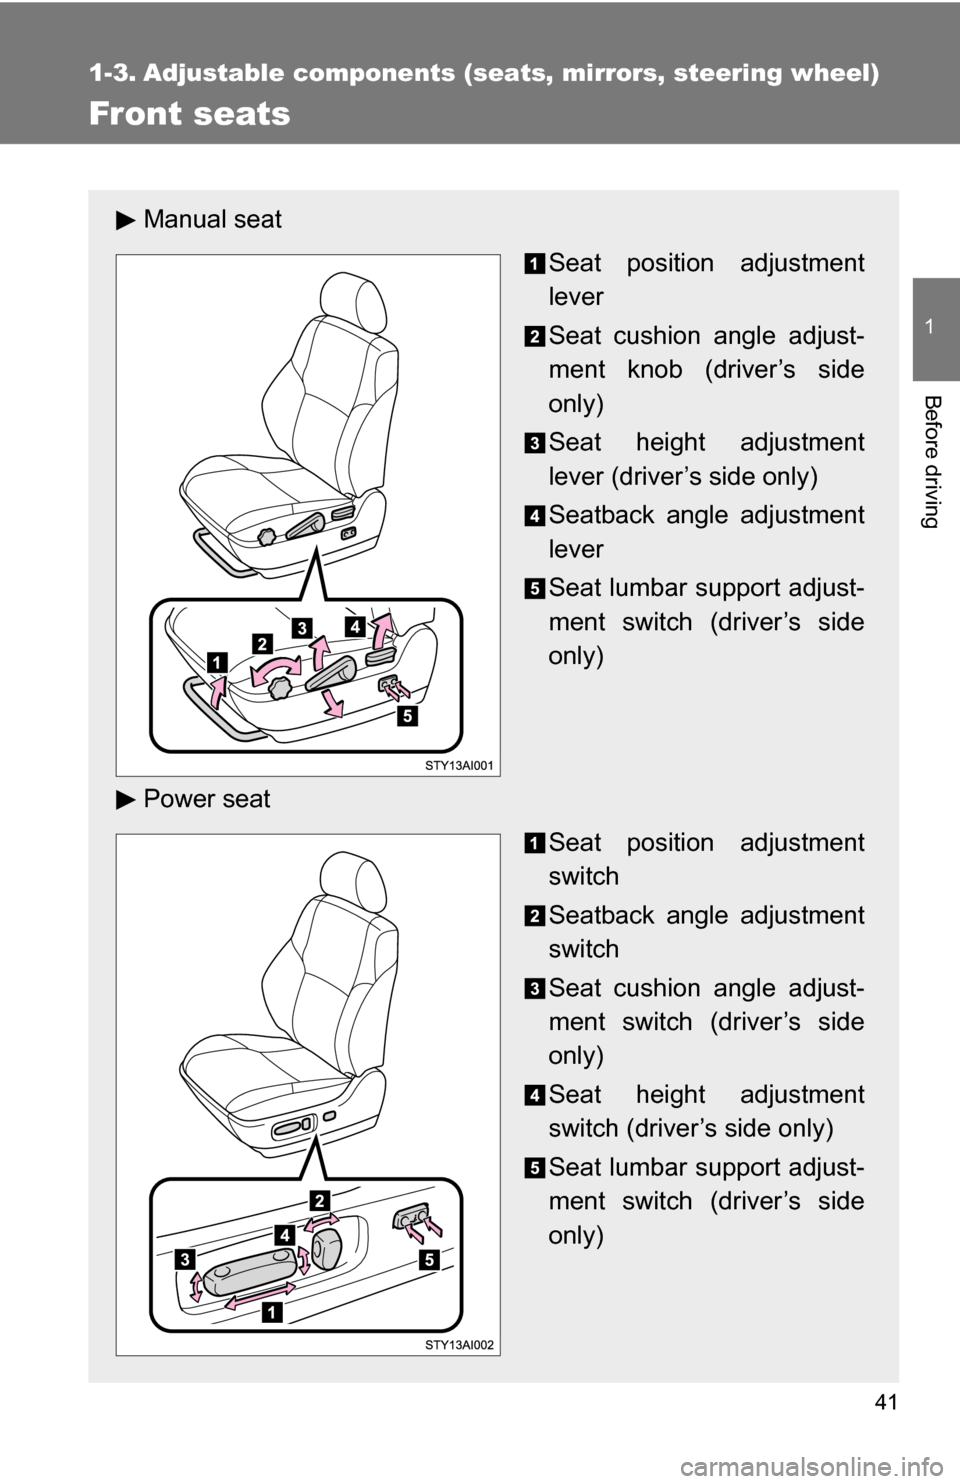
Manual seat
Seat position adjustment
lever
Seat cushion angle adjust-
ment knob (driver’s side
only)
Seat height adjustment
lever (driver’s side only)
Seatback angle adjustment
lever
Seat lumbar support adjust-
ment switch (driver’s side
only)
Power seat Seat position adjustment
switch
Seatback angle adjustment
switch
Seat cushion angle adjust-
ment switch (driver’s side
only)
Seat height adjustment
switch (driver’s side only)
Seat lumbar support adjust-
ment switch (driver’s side
only)
Page 43 of 520
43
1-3. Adjustable components (s
eats, mirrors, steering wheel)
1
Before driving
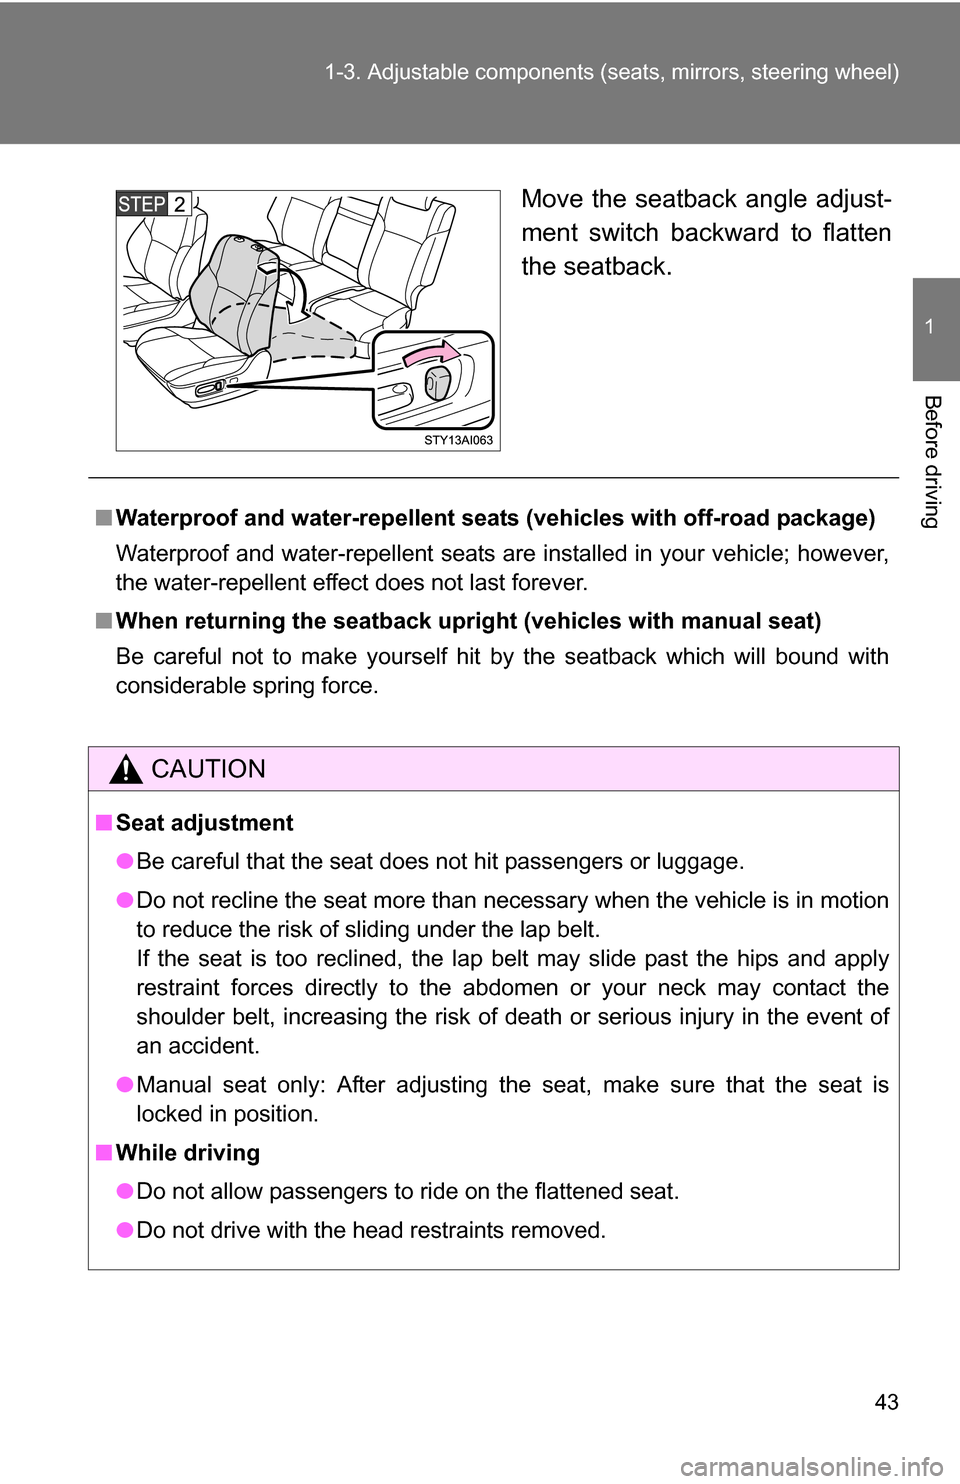
Move the seatback angle adjust-
ment switch backward to flatten
the seatback.
■Waterproof and water-repellent seat s (vehicles with off-road package)
Waterproof and water-repellent seats are installed in your vehicle; however,
the water-repellent effect does not last forever.
■ When returning the seatback uprigh t (vehicles with manual seat)
Be careful not to make yourself hit by the seatback which will bound with
considerable spring force.
CAUTION
■ Seat adjustment
●Be careful that the seat does not hit passengers or luggage.
● Do not recline the seat more than necessary when the vehicle is in motion
to reduce the risk of sliding under the lap belt.
If the seat is too reclined, the lap belt may slide past the hips and apply
restraint forces directly to the abdomen or your neck may contact the
shoulder belt, increasing the risk of death or serious injury in the event of
an accident.
● Manual seat only: After adjusting the seat, make sure that the seat is
locked in position.
■ While driving
●Do not allow passengers to ride on the flattened seat.
● Do not drive with the head restraints removed.
Page 44 of 520
44
1-3. Adjustable components (seats, mirrors, steering wheel)
Rear seats
■Second seats (vehicles without third seats)
The second seats do not have a seat adjustment function.
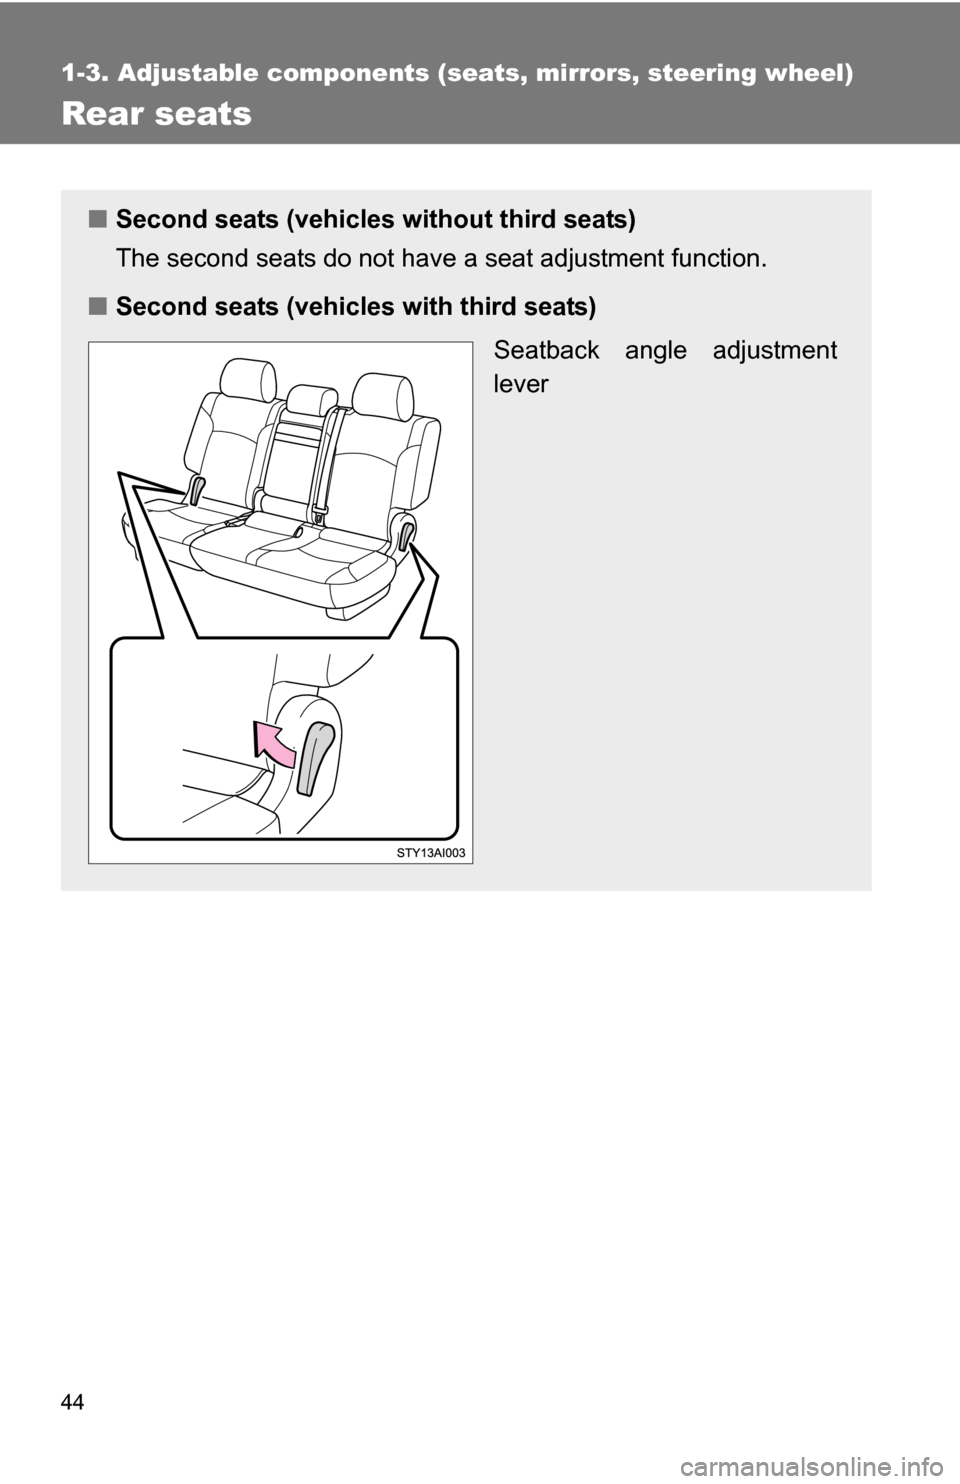
■ Second seats (vehicl es with third seats)
Seatback angle adjustment
lever
Page 45 of 520
45
1-3. Adjustable components (s
eats, mirrors, steering wheel)
1
Before driving
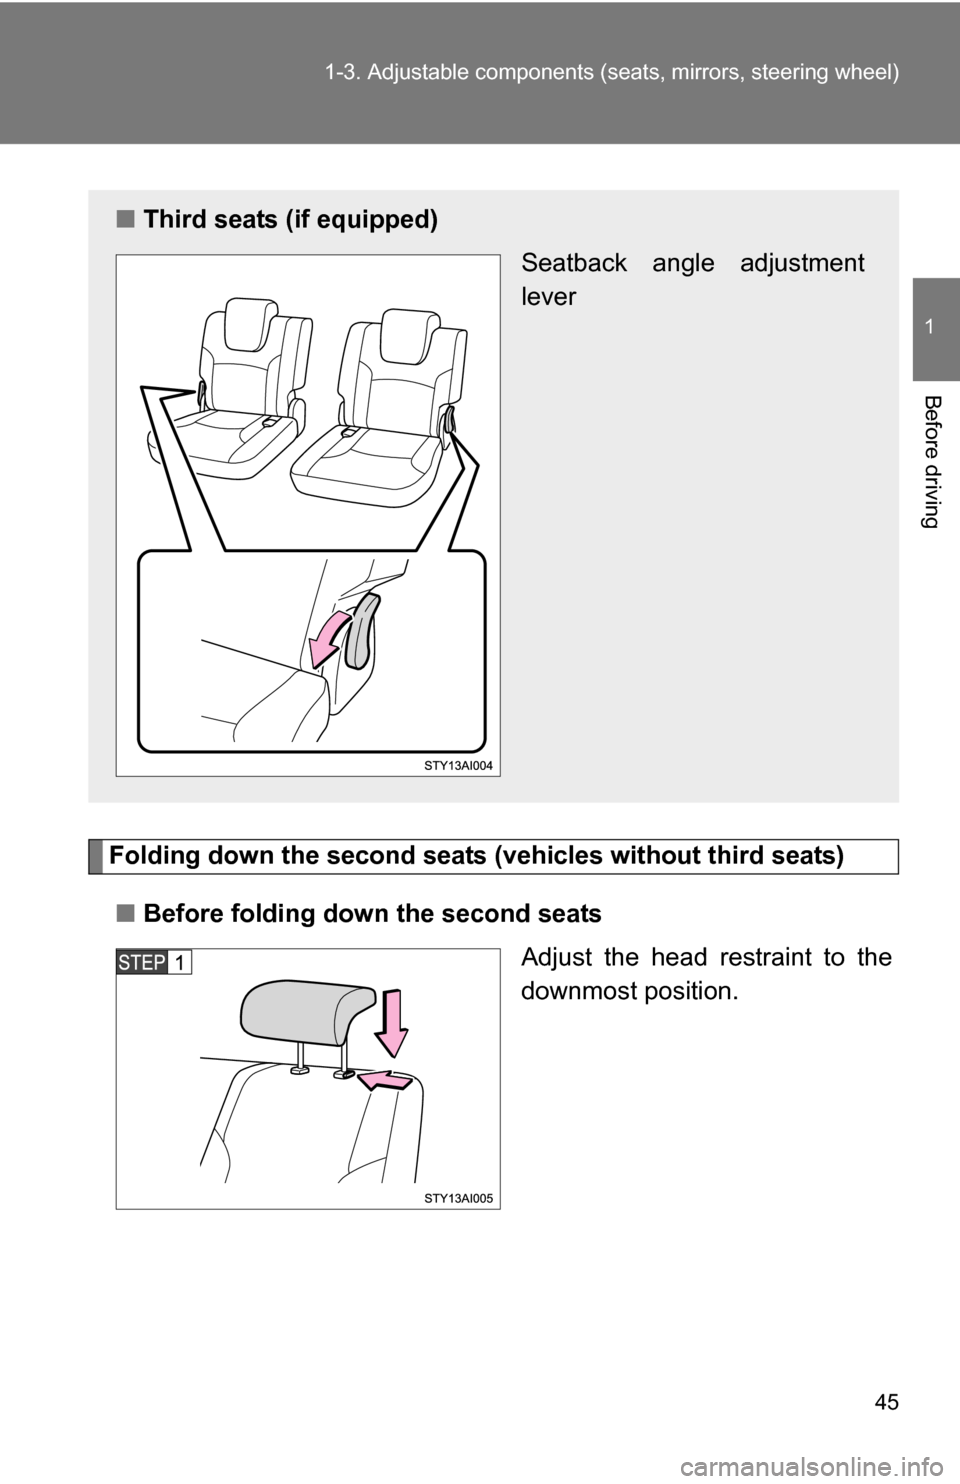
Folding down the second seats (v ehicles without third seats)
■ Before folding down the second seats
Adjust the head restraint to the
downmost position.
■Third seats (if equipped)
Seatback angle adjustment
lever
Page 55 of 520
55
1-3. Adjustable components (s
eats, mirrors, steering wheel)
1
Before driving
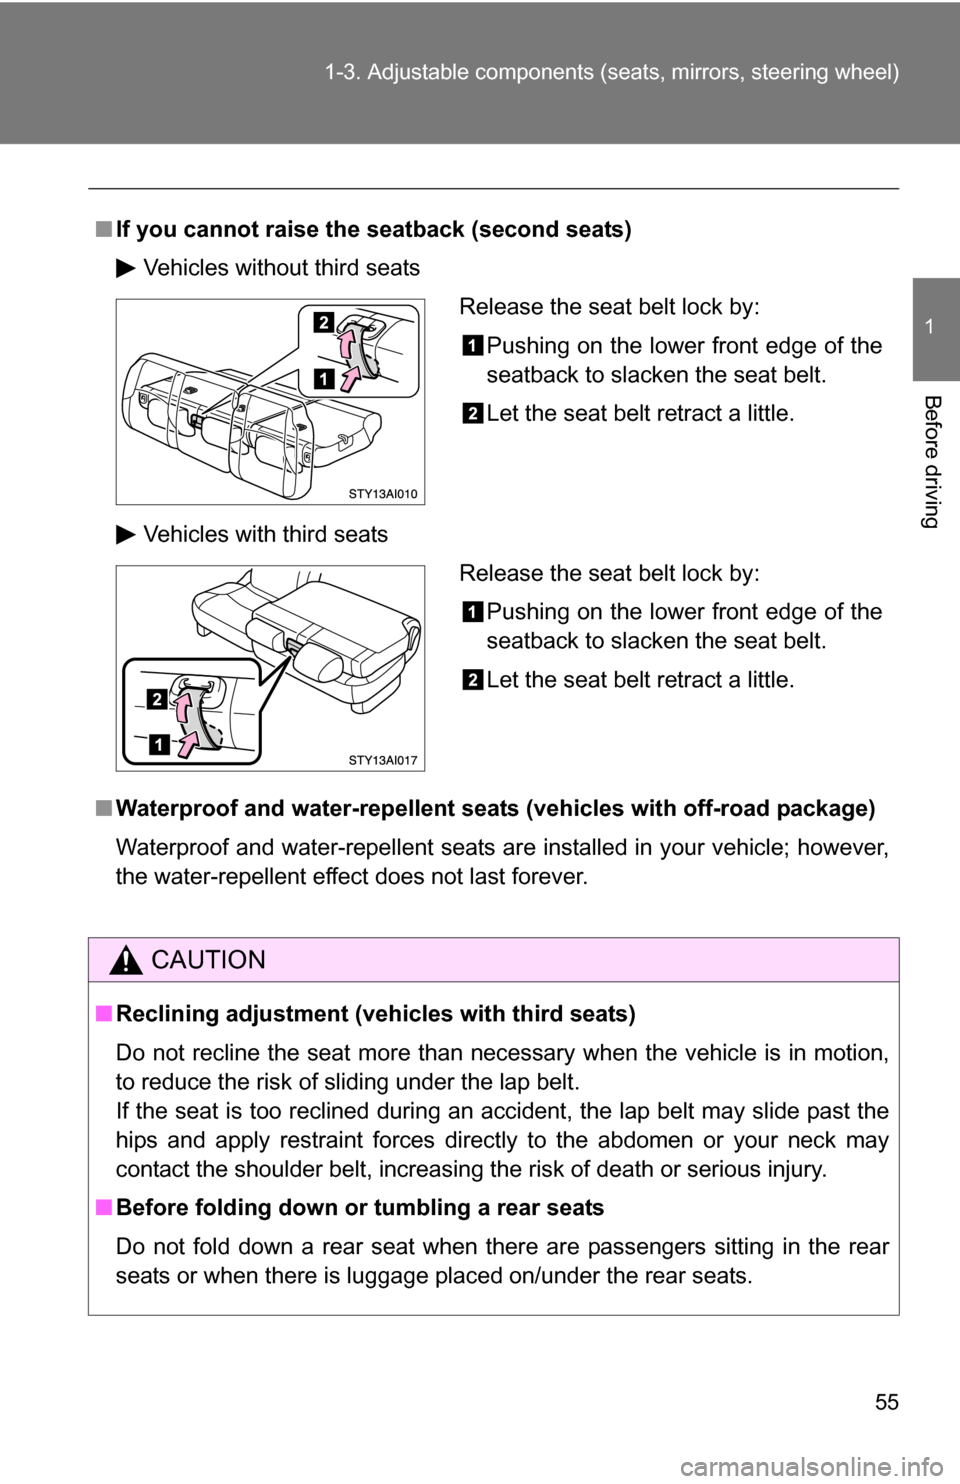
■If you cannot raise th e seatback (second seats)
Vehicles without third seats
Vehicles with third seats
■ Waterproof and water-repellent seat s (vehicles with off-road package)
Waterproof and water-repellent seats are installed in your vehicle; however,
the water-repellent effect does not last forever.
CAUTION
■ Reclining adjustment (vehicles with third seats)
Do not recline the seat more than necessary when the vehicle is in motion,
to reduce the risk of sliding under the lap belt.
If the seat is too reclined during an accident, the lap belt may slide past the
hips and apply restraint forces directly to the abdomen or your neck may
contact the shoulder belt, increasing the risk of death or serious injury.
■ Before folding down or tumbling a rear seats
Do not fold down a rear seat when there are passengers sitting in the rear
seats or when there is luggage placed on/under the rear seats.
Release the seat belt lock by: Pushing on the lower front edge of the
seatback to slacken the seat belt.
Let the seat belt retract a little.
Release the seat belt lock by:Pushing on the lower front edge of the
seatback to slacken the seat belt.
Let the seat belt retract a little.
Page 59 of 520
59
1-3. Adjustable components (s
eats, mirrors, steering wheel)
1
Before driving
■Retained accessory power
Each memorized position can be activated within 30 seconds after the
driver’s door is opened, even if the key is not in the engine switch.
■ If any position memory button is pushed while the adjustments are
being made
The operation will stop. To reactivate the system, push the button (“1” or “2”)
again.
■ If the battery is disconnected
The memorized positions must be reset because the computer’s memory is
erased when the battery is disconnected.
CAUTION
■Seat adjustment caution
Take care during seat adjustment that the seat does not strike the rear pas-
senger or squeeze your body against the steering wheel.
If this happens, you can stop the movement by pressing another seat posi-
tion memory button.
Page 60 of 520
60
1-3. Adjustable components (seats, mirrors, steering wheel)
Head restraints
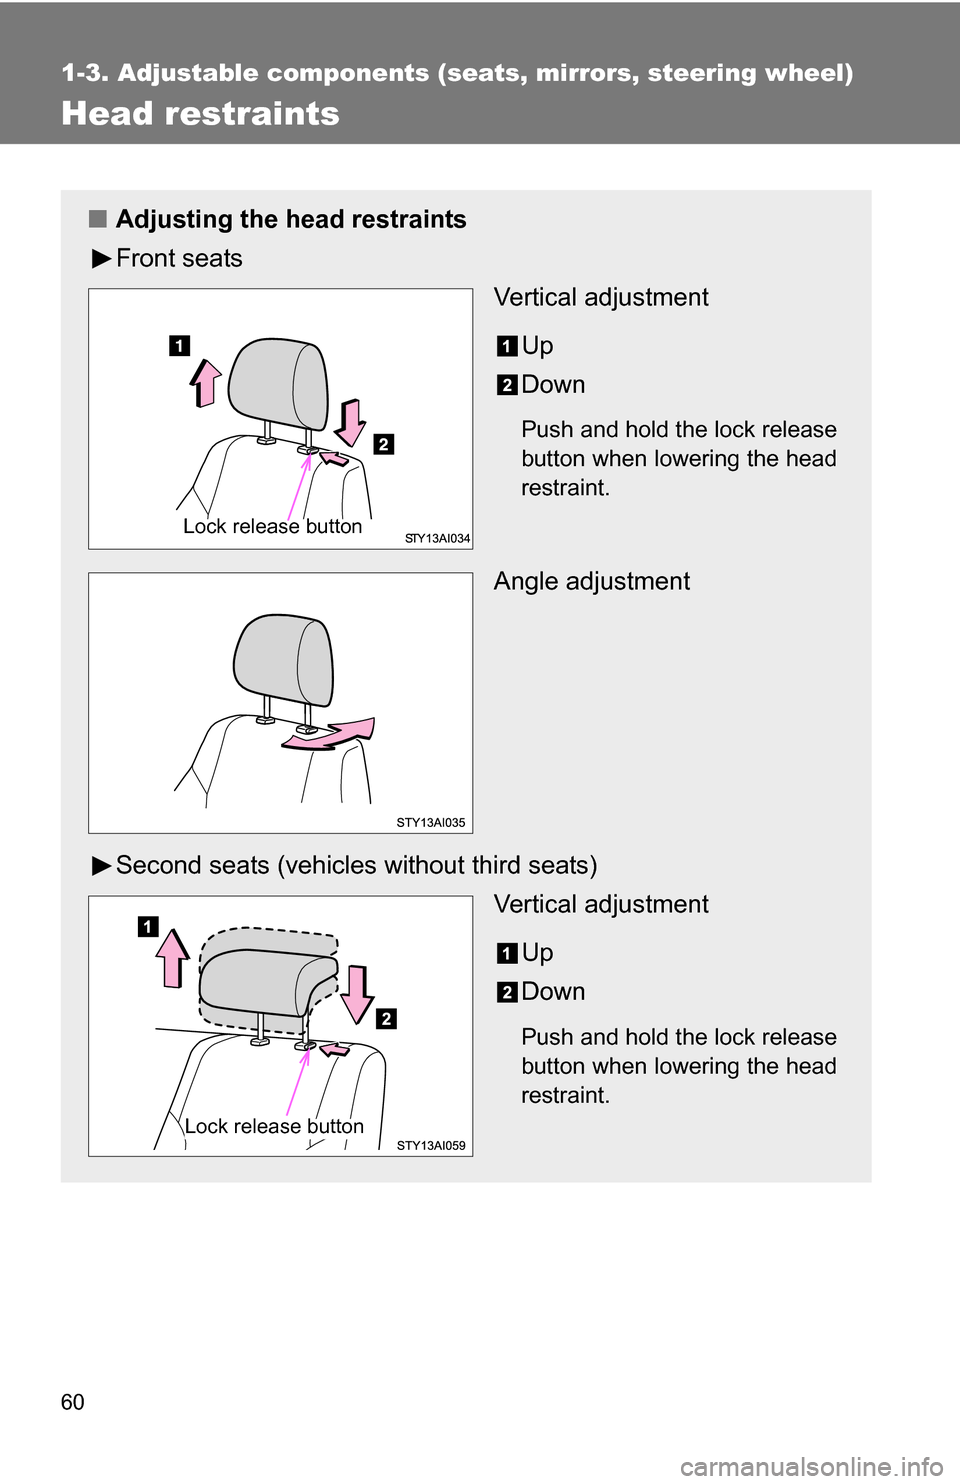
■Adjusting the head restraints
Front seats
Vertical adjustment
Up
Down
Push and hold the lock release
button when lowering the head
restraint.
Angle adjustment
Second seats (vehicles without third seats) Vertical adjustment
Up
Down
Push and hold the lock release
button when lowering the head
restraint.
Lock release button
Lock release button
Page 61 of 520
61
1-3. Adjustable components (s
eats, mirrors, steering wheel)
1
Before driving
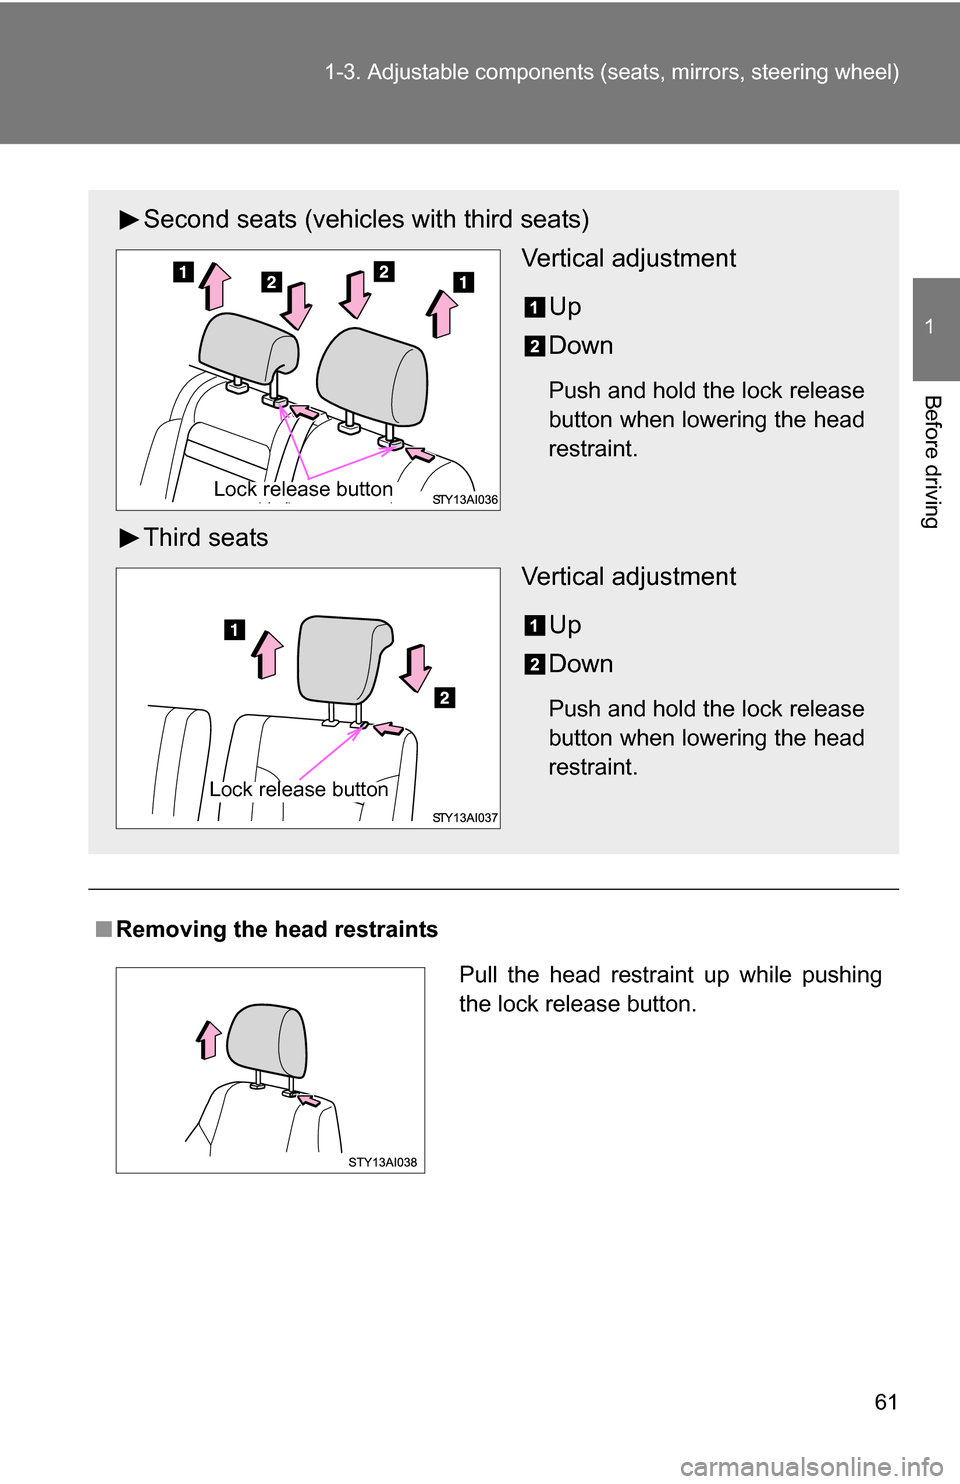
■Removing the head restraints
Second seats (vehicles with third seats)
Vertical adjustment
Up
Down
Push and hold the lock release
button when lowering the head
restraint.
Third seats Vertical adjustment
Up
Down
Push and hold the lock release
button when lowering the head
restraint.
Lock release button
Lock release button
Pull the head restraint up while pushing
the lock release button.
Page 443 of 520

5
When trouble arises
443
5-2. Steps to take in an emergency
CAUTION
■If the tire pressure warning light comes on
Be sure to observe the following precautions. Failure to do so could
cause loss of vehicle control and result in death or serious injury.
●Stop your vehicle in a safe place as
soon as possible. Adjust the tire
inflation pressure immediately.
●If the tire pressure warning light comes on even after tire inflation pres-
sure adjustment, it is pr obable that you have a flat tire. Check the tires.
If the tire is flat, change to the spare tire and have the flat tire repaired
by the nearest Toyota dealer.
●Avoid abrupt maneuvering and braking. If the vehicle tires deteriorate,
you could lose control of the steering wheel or the brakes.
■If a blowout or sudden air leakage should occur
The tire pressure warning syste m may not activate immediately.
■Maintenance of the tire
Each tire, including the spare (if provided), should be checked monthly
when cold and inflated to the inflation pressure recommended by the
vehicle manufacturer on the vehicle placard or tire inflation pressure
label (tire and load information label). (If your vehicle has tires of a differ-
ent size than the size indicated on the vehicle placard or tire inflation
pressure label [tire and load information label], you should determine the
proper tire inflation pr essure for those tires.)
As an added safety feature, your vehicle has been equipped with a tire
pressure monitoring system (TPMS-ti re pressure warning system) that
illuminates a low tire pressure telltal e (tire pressure warning light) when
one or more of your tires is significantly under-inflated. Accordingly,
when the low tire pressure telltale (tire pre ssure warning light) illumi-
nates, you should stop and check your tires as soon as possible, and
inflate them to the proper pressure. Driving on a significantly under-
inflated tire causes the tire to overheat and can lead to tire failure.
Under-inflation also reduces fuel effi ciency and tire tread life, and may
affect the vehicle’s handling and stopping ability.
Page 512 of 520

512 Alphabetical index
Service reminder indicators .............................. 151
Shift lever Automatic transmission ......... 143
If the shift lever cannot be shifted from P...................... 457
Shift lock system ..................... 457
Shopping bag hooks ............... 340
Side airbags................................95
Side doors ..................................33
Side marker lights Replacing light bulbs ............. 418
Switch.................................... 158
Wattage ................................. 480
Side mirror Adjusting and folding ...............73
Spare tire
Inflation pressure................... 479
Replacing .............................. 445
Storage location .................... 445
Spark plug ................................ 475
Specifications........................... 470
Speedometer ............................ 148
SRS airbags Curtain shield airbags .............95
Front airbags ...........................95
Precautions ........................... 102
Side airbags ............................95
Steering wheel
Adjustment ..............................69
Audio switches ...................... 271
Stop lights
Replacing light bulbs ............. 423
Wattage ................................. 480
Storage feature......................... 309
Storage precautions ................208
Stuck If the vehicle becomes
stuck ................................... 466
Sun visors................................. 323
Switch Active traction control switch .................................. 182 AUTO LSD switch ................. 175
Cruise control switch ............. 166
Downhill Assist control
switch.................................. 186
Emergency flasher switch ..... 426
Engine switch ........................ 140
Fog light switch ..................... 162
Four-wheel drive control
switch.................................. 177
Hazard light switch ................ 426
Ignition switch ....................... 140
Light switch ........................... 158
Power back window switch ..... 79
Power door lock switch ........... 33
Power window switch .............. 76
Rear differential lock switch.................................. 184
Rear window wiper and washer switch ..................... 165
Turn signal lights ................... 145
Window lock switch ................. 77
Wiper and washer ......... 163, 165
Tachometer .............................. 148
Tail lights Replacing light bulbs ............. 423
Switch ................................... 158
Wattage................................. 480
Theft deterrent system Alarm....................................... 90
Engine immobilizer system ..... 88
Theft prevention labels............ 92
Theft prevention labels ............. 92
Tire inflation pressure ............. 479
Tire information Glossary ................................ 489
Size ....................................... 486
Tire identification number...... 485
Uniform tire quality grading ... 487
Tires
Chains ................................... 214
Checking ............................... 389
Identification number............. 485
T